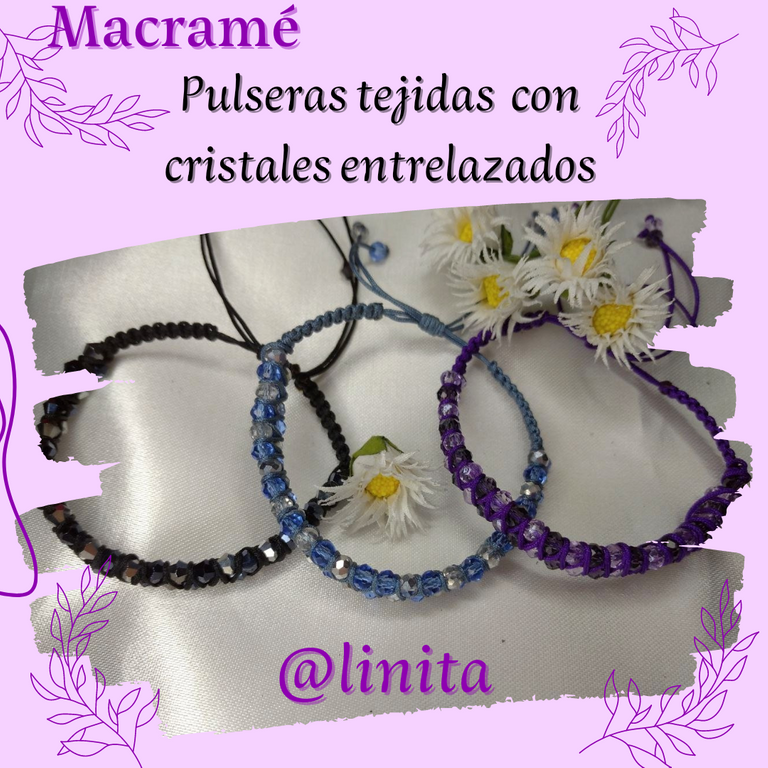
[ENG-ESP] Woven bracelet with intertwined crystals
WELCOME TO MY BLOG
Hellooooo, hellooooo! Friends of Jewelry. Very excited to share with you this week a new bracelet made with the macrame technique. A few days ago I left shopping and I stocked up on some materials to make different pieces. The truth is that I was amazed at the number of things you can get, from stones and threads to the smallest thing you can imagine. This day I realized that I am a neophyte in the matter. I know absolutely nothing about the names of the materials and tools that exist or the utility you can give them. So I will have to do an intensive course to learn all the names and know how to differentiate between huge amounts of stones, threads and other inputs that we can use at the time of making a piece.
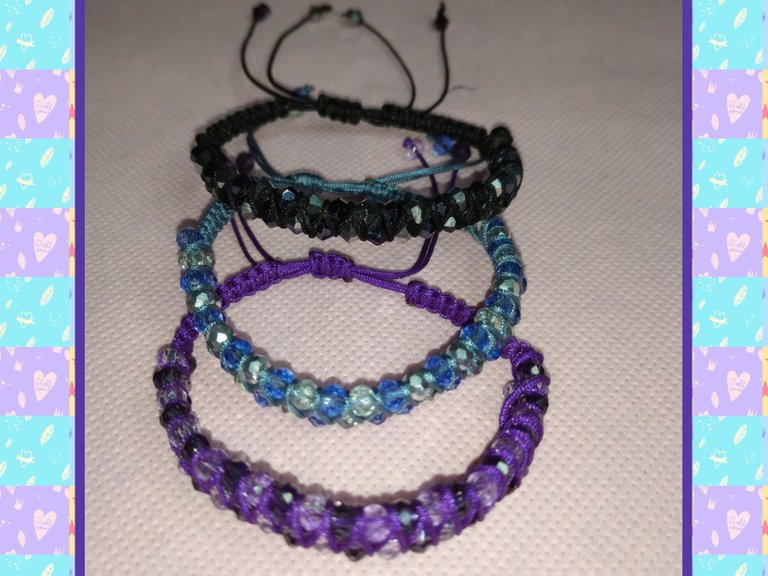
But as what I will present to you today if I know the name of the technique and the materials, I tell you that it is very exciting when you want to do something and you have what you need at hand. These bracelets are very, very cute and I liked making them so much that I made about three. And also very simple and they are done very quickly, of course it was a bit difficult for me because my vision is poor and seeing the hole to insert the thread was cumbersome, but if you don't have that problem, you'll see how quickly you will do it . Without further ado, let's get started.
BIENVENIDOS A MI BLOG
¡Holaaaaa, holaaaa! Amig@s de Jewelry. Muy emocionada de compartir con ustedes esta semana una nueva pulsera realizada con la técnica de macramé. Hace unos días salí de compras y me abastecí de algunos materiales para hacer diferentes piezas. La verdad, es que quedé maravillada de la cantidad de cosas que puedes conseguir, desde piedras e hilos hasta lo más mínimo que te puedas imaginar. Este día me di cuenta que soy neófita en la materia. No sé absolutamente nada sobre los nombres de los materiales y herramientas que existen ni la utilidad que puedes darles. Así que me tocará hacer un curso intensivo para aprenderme todos los nombres y saber diferenciar entre tatas cantidades de piedras, hilos y otros insumos que podemos utilizar en el momento de realizar una pieza.
Pero como lo que les presentaré hoy si sé el nombre de la técnica y los materiales, les cuento que es muy emocionante cuando quieres hacer algo y tienes a mano lo que necesitas. Estas pulseras son muy, muy lindas y me gustó tanto hacerlas que hice unas tres. Y además muy sencillas y se hacen bien rápido, claro a mi me costó un poco porque mi visión es al deficiente y ver el hueco para introducir el hilo se me hizo engorroso, pero si no tienes ese problema, ya verás lo rápido que lo harás. Sin más, comencemos.
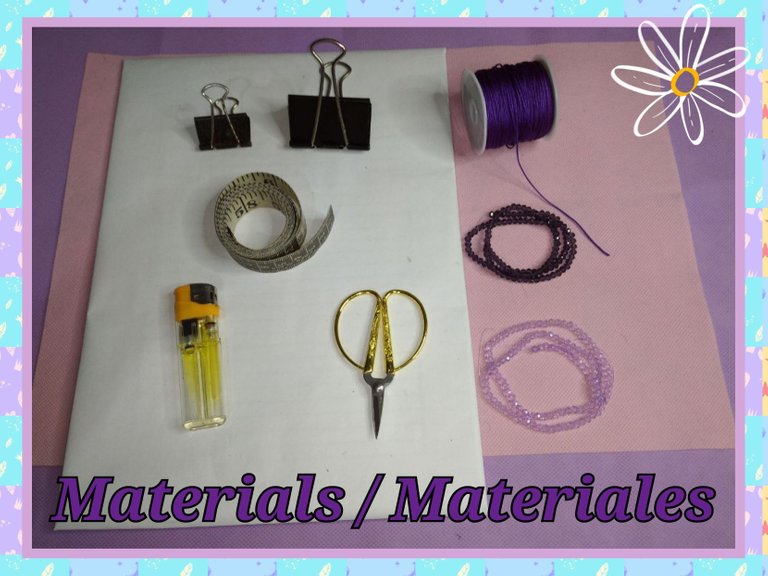
MATERIALS
- Purple Chinese thread 0.10 mm
- Purple and lilac crystals
- Measuring tape
- Scissors
- Lighter
- Table and hooks
MATERIALES
- Hilo chino morado 0,10 mm
- Cristales morado y lila
- Cinta métrica
- Tijera
- Encendedor
- Tabla y ganchos
STEP BY STEP // PASO A PASO
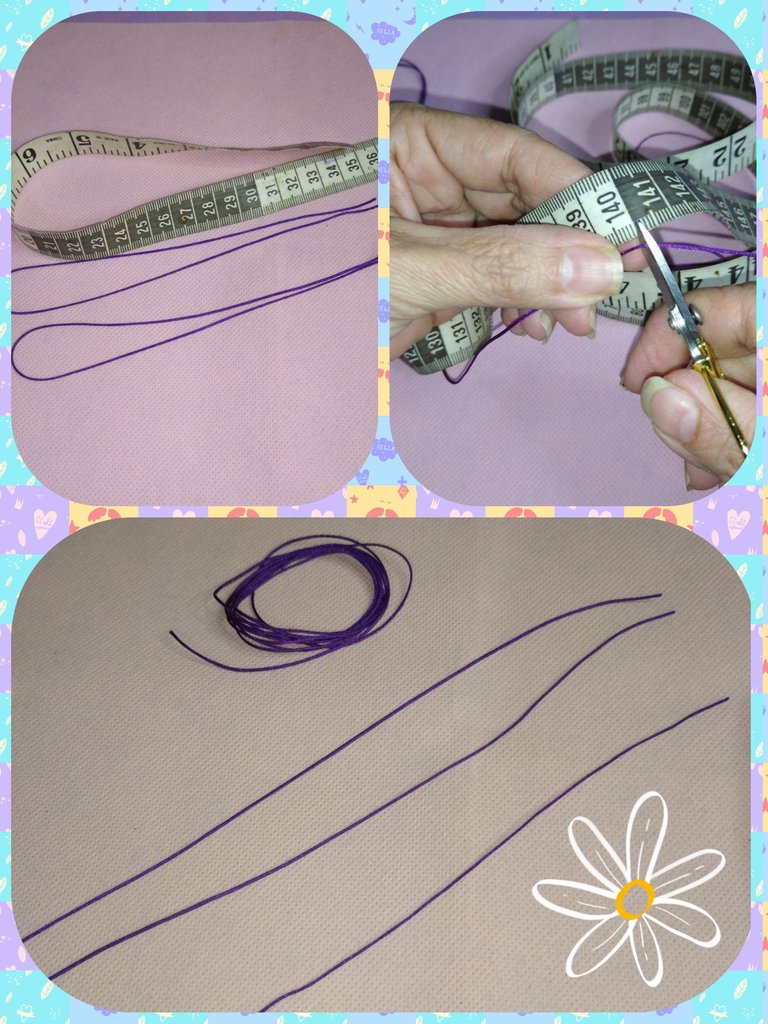
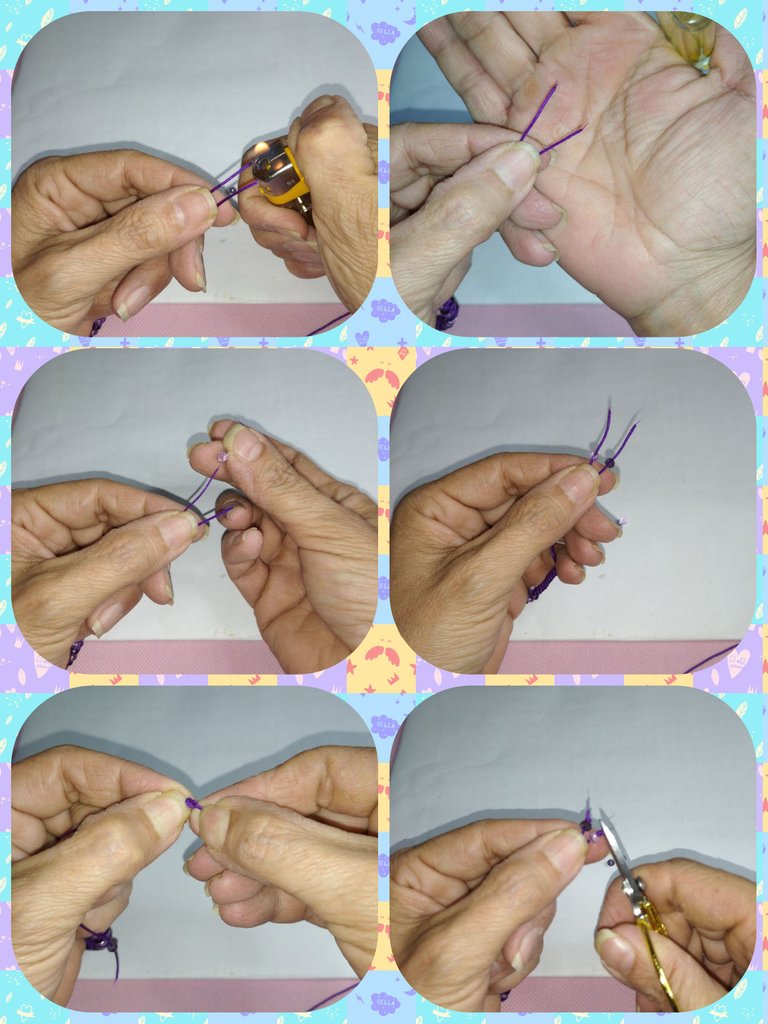
STEP #1
We start by cutting 2 strands of thread of 35 cm or 40 cm if you want to work looser. A strand of 140 cm and one of 20 cm.
PASO #1
Comenzamos cortando 2 hebras de hilo de 35 cm 0 40 cm si quieres trabajar mas holgado. Una hebra de 140 cm y una de 20 cm.
STEP #2
We take the two 35 cm strands and join so that the ends remain together and with the tape measure we measure cms. We take the table and fasten with the hook to the extent of 7 cms and then stretch and place the other hook at the end so that it is pressed.
PASO #2
Tomamos las dos hebras de 35 cm y unimos que queden las puntas juntas y con la cinta métrica medimos cms. Llevamos a la tabla y sujetamos con el gancho a la medida de los 7 cms. y luego estiramos y en el extremo colocamos el otro gancho de manera que quede prensado.
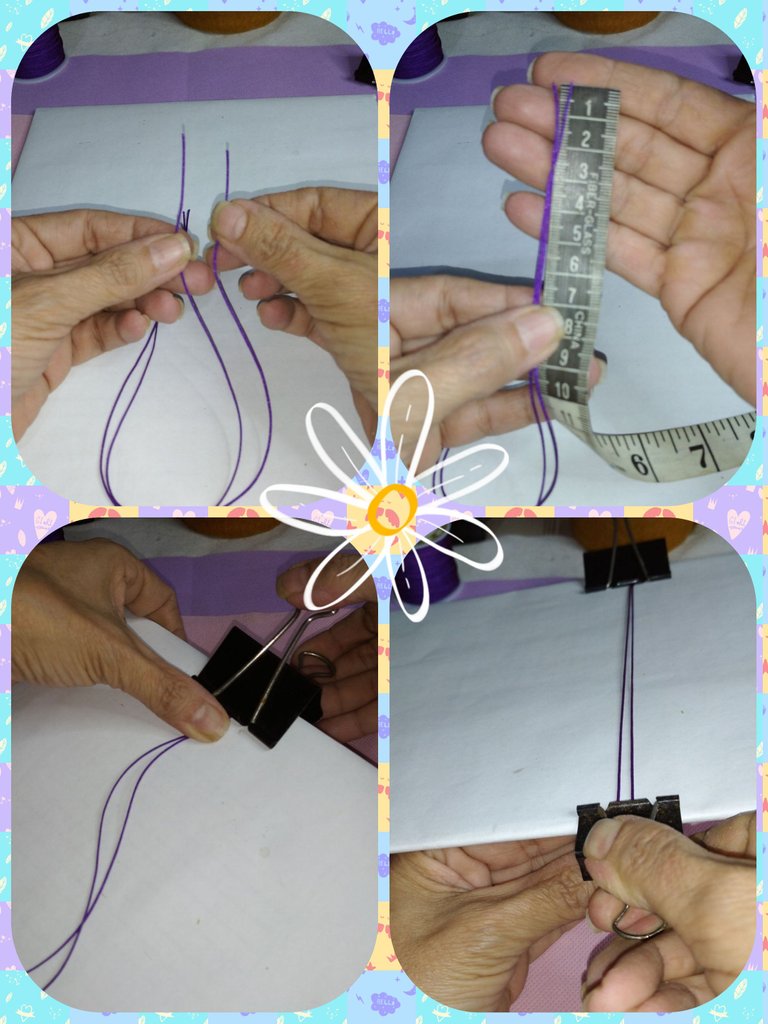
STEP #3
We take the 140 cm strand and join it in half. Then we place on the table below the threads that we already have fixed and we make a basic knot so that each thread is half or equal in size. We adjust and glue at the beginning of the hook or of the pressed threads.
PASO #3
Tomamos la hebra de 140 cms y unimos a la mitad. Luego colocamos en la tabla por debajo de las hebras que ya tenemos fijadas y realizamos un nudo básico de manera que quede a la mitad o de igual tamaño cada hebra. Ajustamos y pegamos al principio del gancho o de los hilos prensados.
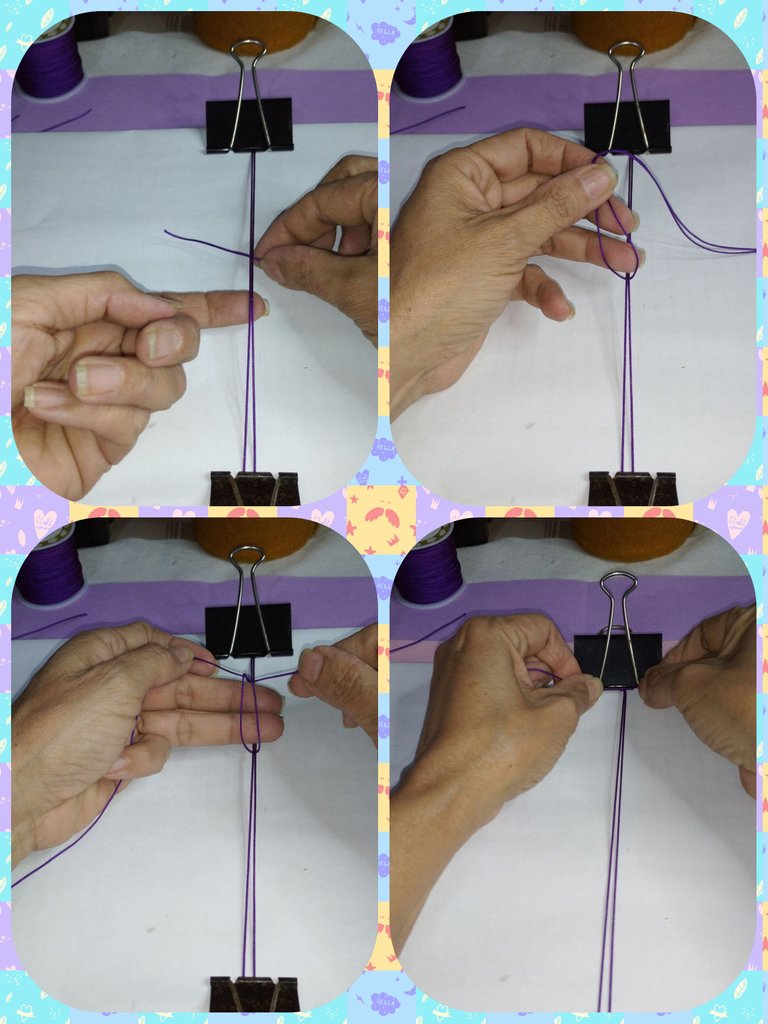
STEP #4
At this moment we will begin the macramé fabric and we will do it with the flat knot. This knot is very easy and quick to learn and with it you can do many things.
We begin by making a four with the strand on the left side. Then we place the strand on the right side over the thread that intertwines the 4 and we will pass it under the union of the threads fixed to the table and the one formed by the 4. We pull both strands and form the first knot.
PASO #4
En este momento comenzaremos el tejido macramé y lo haremos con el nudo plano. Este nudo es muy fácil y rápido de aprender y con él puedes realizar muchas cosas.
Comenzamos realizando un cuatro con la hebra del lado izquierdo. Luego colocamos la hebra del lado derecho sobre el hilo que entrelaza el 4 y lo pasaremos por debajo de la unión de los hilos fijos a la tabla y el formado por el cuatro. Halamos ambas hebras y formamos el primer nudo.

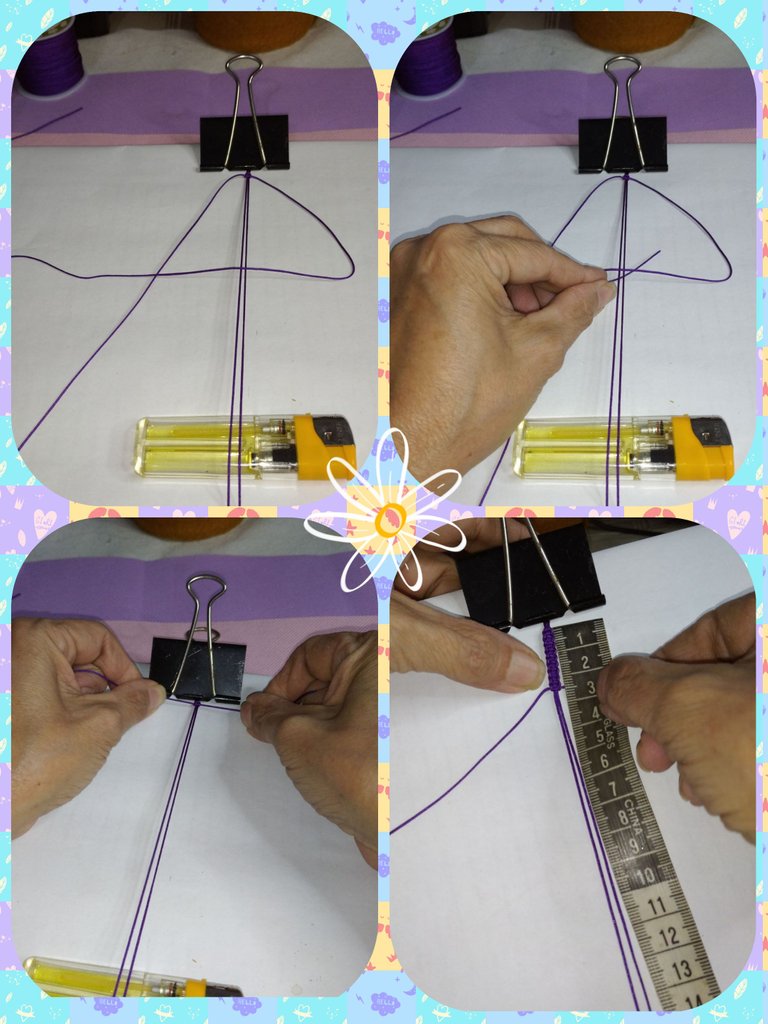
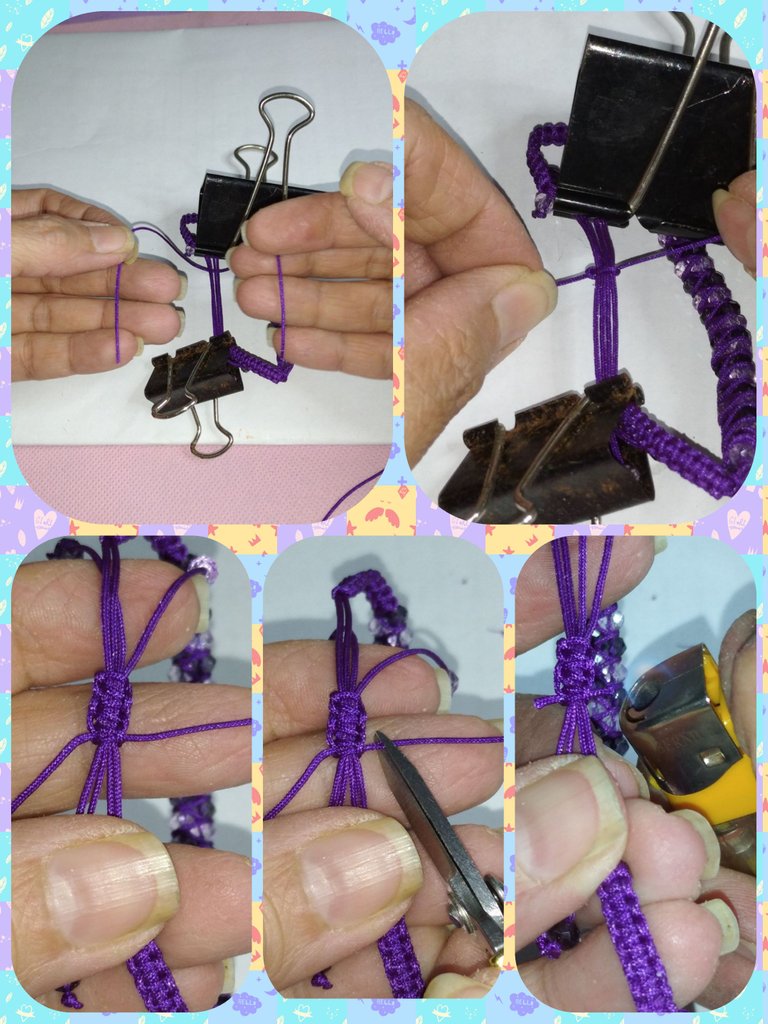
STEP #5
We do the same procedure on the right side, but forming a P, we pass the thread over the one linked by the P and then under the joints. We pull and form the second flat macrame knot. Thus we will successively perform, first the null on the left side, then the right side. Until completing a measurement of 2.5 cm of fabric.
TIP: So that you don't forget which side to tie the knot on, you can make a small knot at the bottom of the thread to serve as a guide.
PASO #5
Hacemos el mismo procedimiento del lado derecho, pero formando una P, pasamos el hilo por encima del enlazado por la P y luego por debajo de las uniones. Halamos y formamos el segundo nudo plano macramé. Así realizaremos sucesivamente, primero el nulo del lado izquierdo, luego el lado derecho. Hasta completar una medida de 2,5 cm de tejido.
TIP: Para que no se te olvide de qué lado corresponde hacer el nudo puedes realizar un pequeño nudo en la parte inferior del hilo para que te sirva como guía.
STEP #6
Now we are going to loosen the central threads and we will introduce 26 crystals into each thread that we will intersperse between the two tones that we have. That is, 13 purple crystals and 13 lilac crystals. We will do this in each of the center strands.
PASO #6
Ahora vamos a soltar los hilos centrales e introduciremos en cada hilo 26 cristales que iremos intercalando entre los dos tonos que tenemos. Es decir, 13 cristales morados y 13 cristales lila. Esto lo haremos en cada una de las hebras del centro.
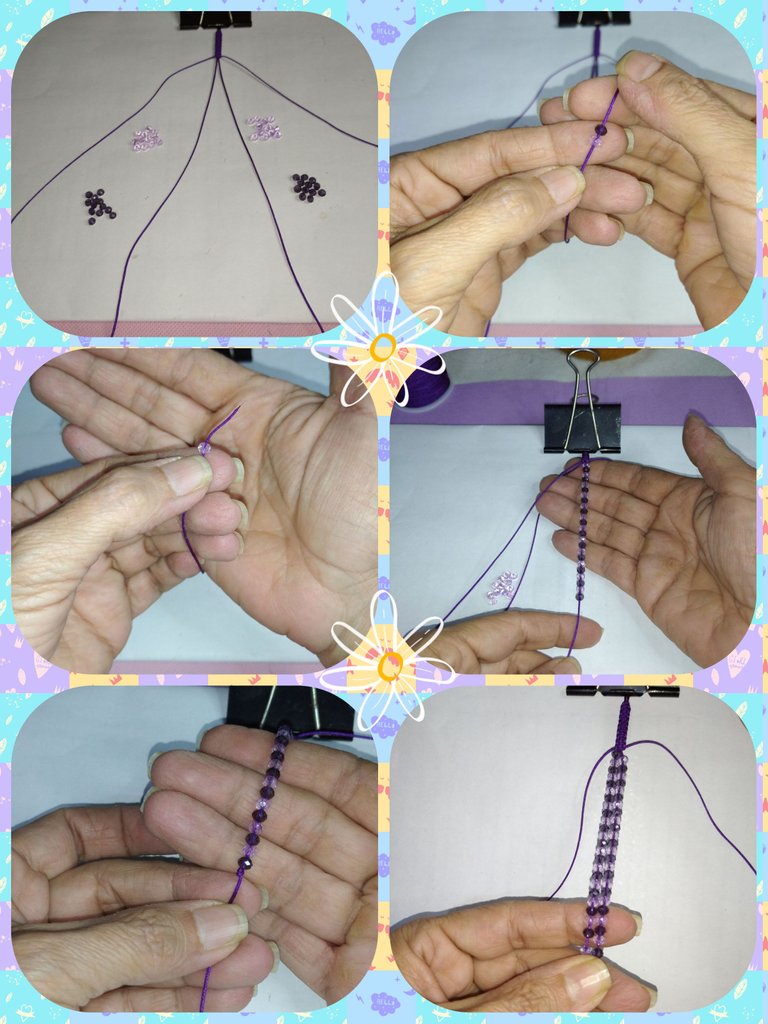
STEP #7
Once we have introduced the crystals we will tie a knot at the end of each strand to prevent them from rolling or coming out.
PASO #7
Una vez que hemos introducido los cristales haremos un nudo al final de cada hebra para evitar que se rueden o salgan.
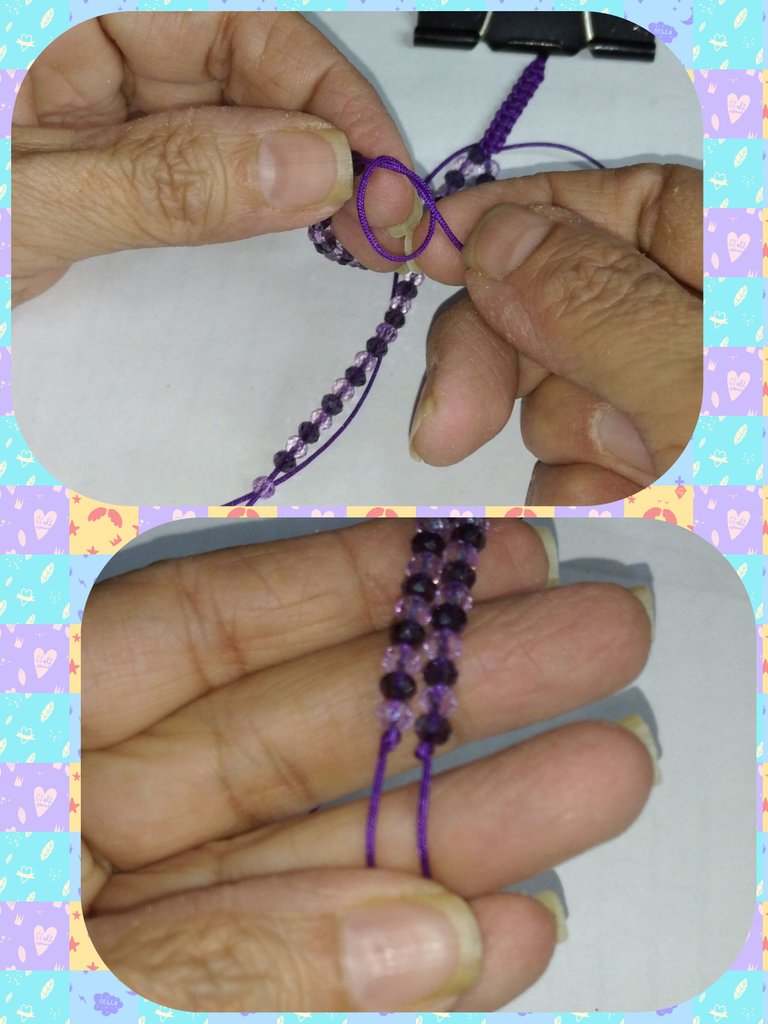
STEP #8
Now we intertwine the threads at the ends through the crystals. We begin by taking the strand on the right side. We pass it under the fabric and then we pass it over intertwining the first crystal, then we pass under it again through the next crystal and so on. We will intertwine the thread between glass and glass, without skipping any.
Once we reach the end of the fabric, we tie with the excess thread of the fabric.
PASO #8
Ahora entrelazamos los hilos de los extremos por los cristales. Comenzamos tomando la hebra del lado derecho. Lo pasamos por debajo del tejido y luego lo pasamos por encima entrelazando el primer cristal, luego pasamos por debajo nuevamente por el cristal siguiente y así sucesivamente. El hilo lo iremos entrelazando entre cristal y cristal, sin saltarnos ninguno.
Una vez que llegamos al final del tejido, amarramos con el hilo sobrante del tejido.
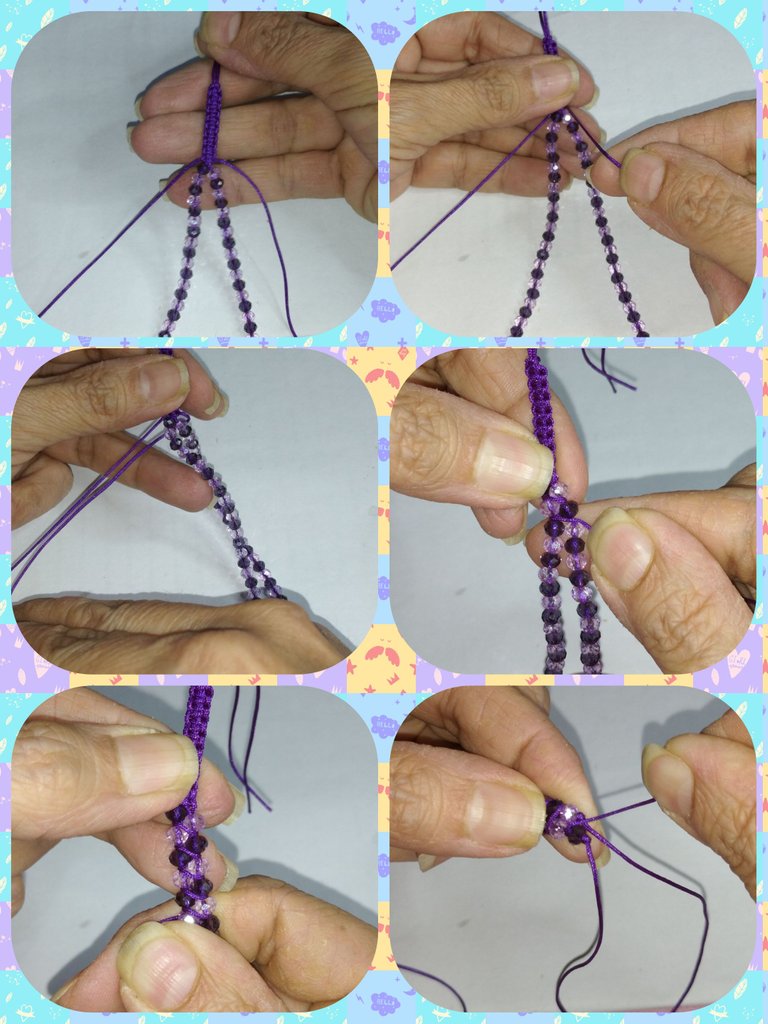
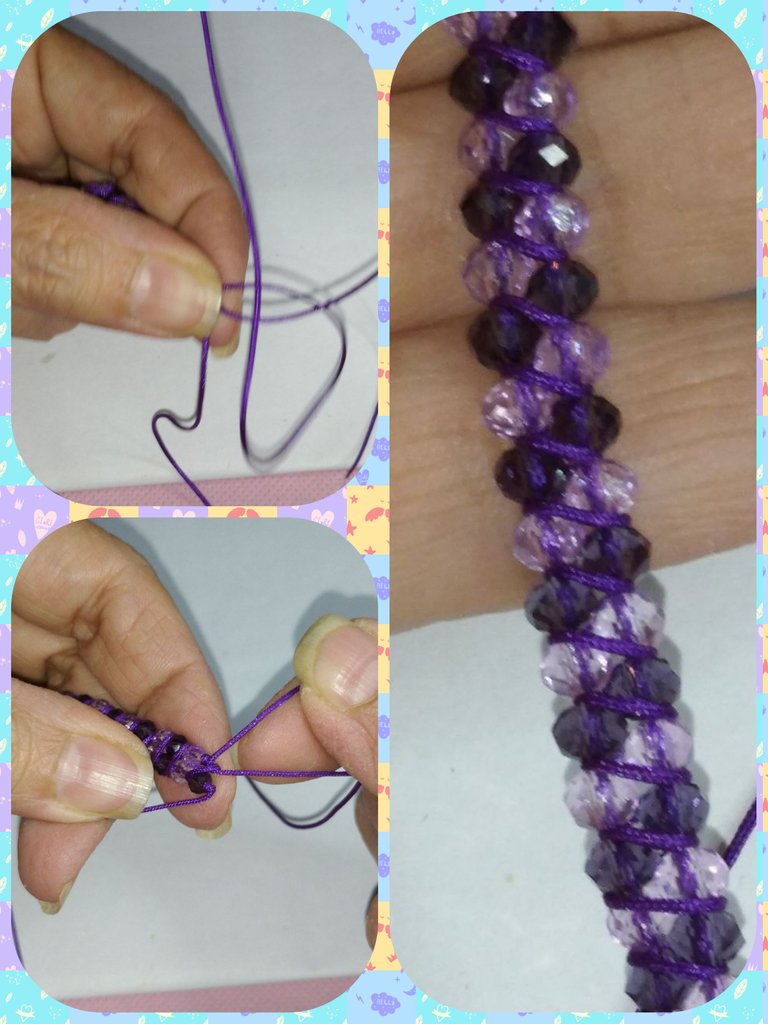
STEP #9
We do the same with the thread on the left side. We go under the fabric and start intertwining through the first crystal, then we go under and through the next crystal until we reach the end.
PASO #9
Hacemos lo mismo con el hilo del lado izquierdo. Pasamos por debajo del tejido y comenzamos entrelazando por el primer cristal, luego pasamos por debajo y por el cristal siguiente hasta llegar al final.
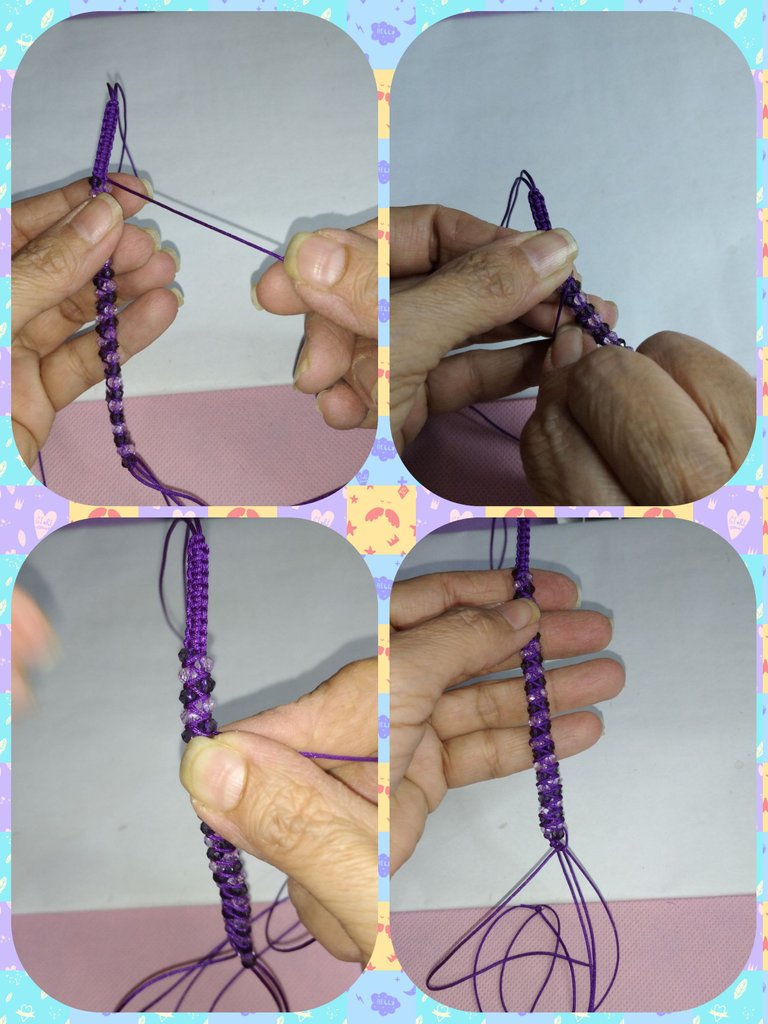
STEP #10
When we have already intertwined the threads and obtained a very firm weave, we weave again with flat knots in the same way as at the beginning. The measurement is 2.5 cm of flat knots. Then we cut the excess threads and seal with the lighter.
PASO #10
Cuando ya hemos entrelazado los hilos y obtenido un tejido bien firme, realizamos nuevamente el tejido con nudos planos de la misma forma que al principio. La medida es de 2,5 cm de nudos planos. Luego cortamos el sobrante de hilos, solo los dos de los extremos, dejando los dos hilos centrales, y sellamos con el encendedor.
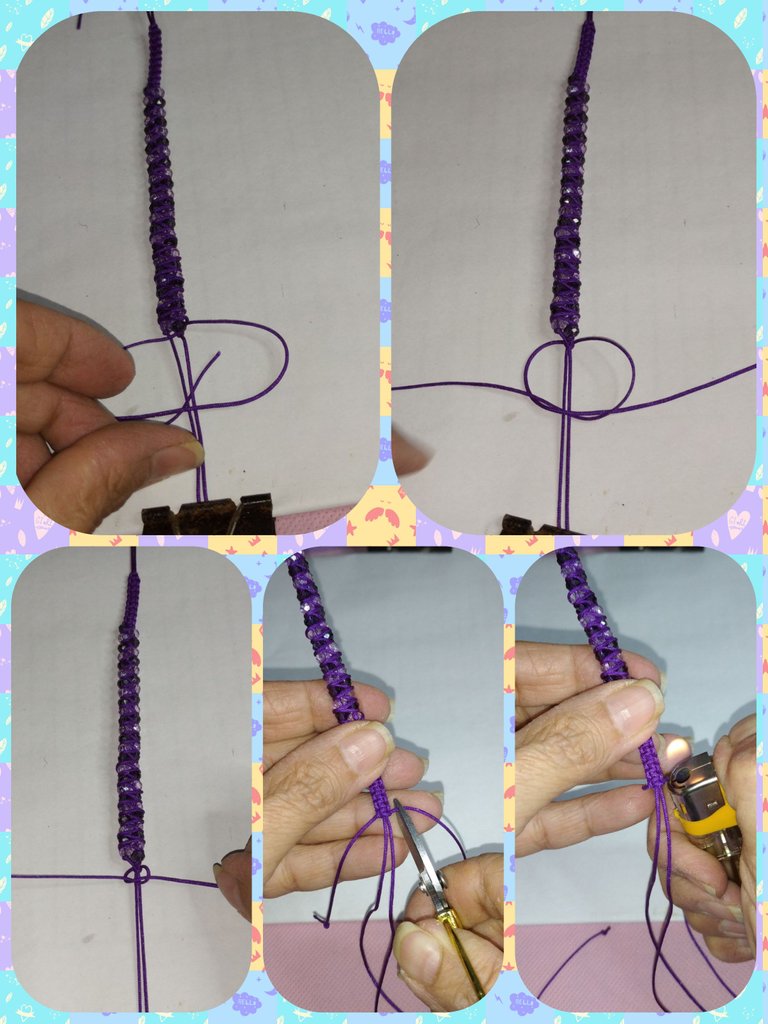
STEP #11
With the lighter we burn the tip of the threads and we make it thinner to introduce two crystals in each thread, one purple and one lilac. We make a knot and cut the rest. In the same way we perform at the next end.
PASO #11
Con el encendedor quemamos la punta de los hilos y lo ponemos mas delgados para introducir dos cristales en cada hilos, uno morado y uno lila. Hacemos un nudo y cortamos el resto. De la misma manera realizamos en el extremo siguiente.
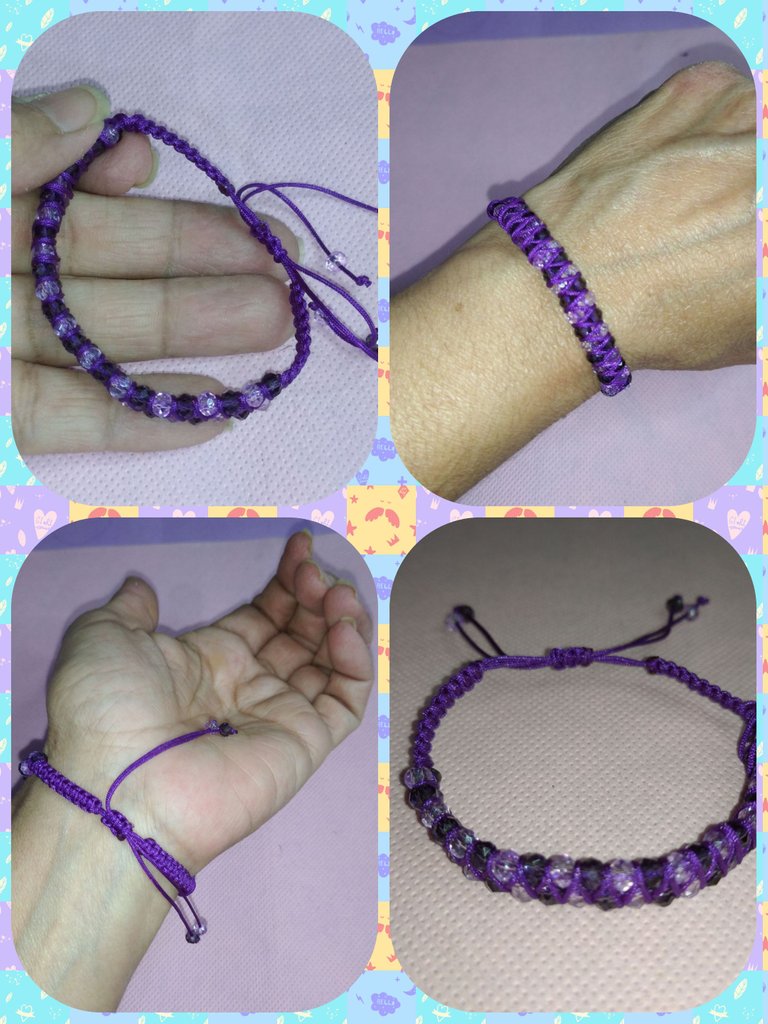
STEP #12
And to finish, we join both ends and fasten them with the hooks and with the 20 cm thread we make a weaving with a flat knot that will serve as a secure and at the same time sliding to adjust the bracelet to the wrist.
PASO #12
Y para terminar, unimos ambos extremos y los sujetamos con los ganchos y con la hebra de 20 com realizamos un tejido con nudo plano que nos servirá de seguro y a la vez deslizante para ajustar la pulsera a la muñeca.
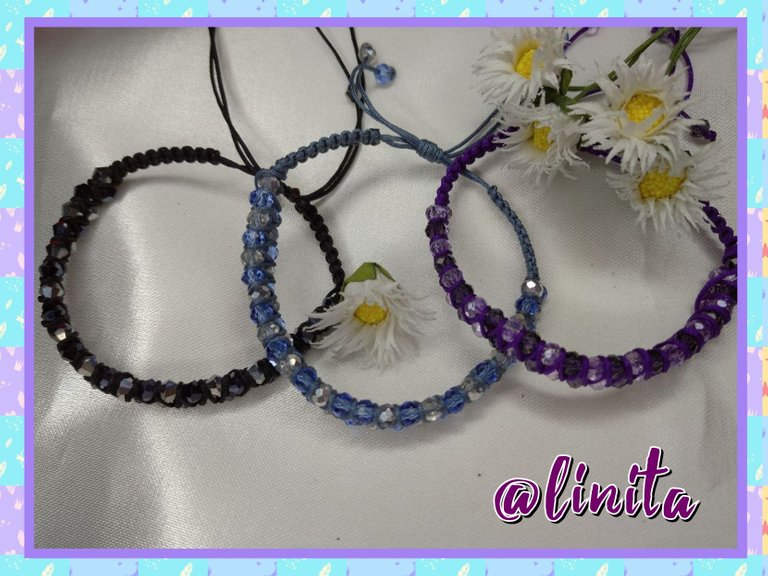
FINISHED PROJECT
This is the final result and we can do it with any type of stones or beads. With the crystals we get a very pretty and shiny bracelet that we can use on different occasions where we want to attract attention. So here I leave this step by step for you to enjoy. See you next time.
PROYECTO FINALIZADO
Este es el resultado final y podemos realizarlo con cualquier tipo de piedras o cuentas. Con los cristales conseguimos una pulsera muy linda y brillantes que podemos usarlas en diferentes ocasiones donde queramos llamar la atención. Así que aquí te dejo este paso a paso para que lo disfrutes. Nos vemos en la próxima.
Me encanto el entrelazado que usaste, las tres combinaciones de colores de mis preferidas. Un trabajo muy prolijo, delicado y llamativo. Gracias por compartir. Mil éxitos amiga @linita ✨
Queda muy lindo la verdad, al principio dudé porque sentía que iba quedando muy apretado, pero resulta que es eso lo que la hace ver linda, que queda bien firme. Me alegro que haya gustado. Saludos 😁😁
Hola 🙋 feliz noche.
Me encanta la técnica del macramé. Se logran resultados preciosos como este entrelazado que nos muestras hoy. Las tres pulseras están preciosas.
Es verdad que los cristales hacen de la prenda una verdadera joya. Gracias por compartir tu creación 👏
Están bellísimas, son sencillas de hacer y además me encantan los colores 👍
Si, y puedes utilizar cualquier otra piedra,bla que más te guste y combinarla cómo quieras. Gracias por comentar 😁
Nos encantan estas pulseras que.nos regalas hoy amiga @linita son pulseras con estilo y el paso a paso está genial sin duda lo explicas muy bien y cualquiera puede intentar realizarlas, un gran trabajo 👏 😉
Muchas gracias, siempre intentado ser lo más precisa para poder llegar a muchas personas que como yo queremos aprender.
Están preciosas me encanta la parte central esta muy bello el tejido y los colores de cada pulsera están preciosos, los cristales le dan un toque genial.