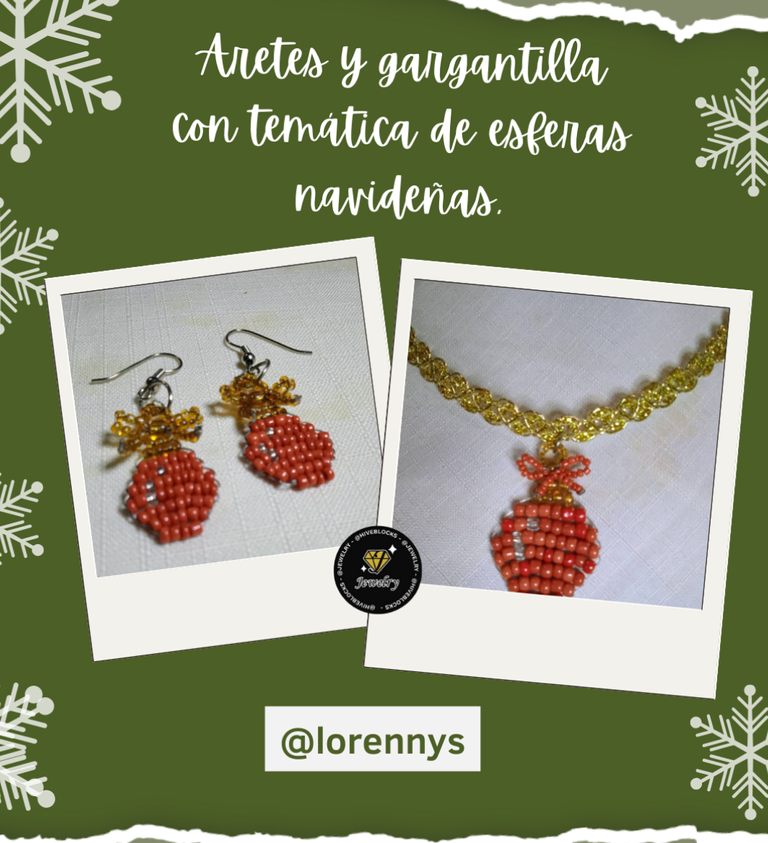
Aretes y Gargantilla Con Temática Esferas Navideñas [Esp/Eng]
Hola hola amigos amantes de las joyas, espero como siempre que todos esten sanos y felices, yo muy contenta por supuesto de poder estar compartiendo con ustedes uno de mis proyectos una vez más.
A pesar de que sentimos la navidad como la época más bonita del año, no por eso dejamos de estresarnos pues la corredera para tener todo en orden con el fin de poder disfrutar el festivo ambiente navideño en familia, creo que a todos nos llena de entusiasmo, por eso buscar los estrenos, preparar todo para cena, comprar los regalos para el niño Jesús, nos pone casi para el manicomio, pero bien vale la pena el sacrificio para luego ver los maravillosos resultados 🤣🤣.
Y hablando de regalos les comento que la mayoría de los años yo misma realizó los detalles para mi familia porqué me gusta personalizar mis regalos. Este año he querido darle a cada uno algo en recuerdo de estas fechas que gracias a Dios siempre nos reunimos para compartir.
Escogí entre los diseños navideños la temática de las esperas con que adornamos el arbolito pues me parece ideal para crear unos aretes, un dije para cadena, un llavero, en fin si tenemos la idea la imaginación es la que cuenta; así que de esta manera hice unos bonitos aretes y un dije para una hermosa gargantilla navideña.
Para que vean el paso a paso de como los hice los invito a leerme en su elaboración quedándose aquí hasta el final .
Hello hello friends jewelry lovers, I hope as always that everyone is healthy and happy, I am very happy of course to be able to share with you one of my projects once again.
Even though we feel Christmas as the most beautiful time of the year, that doesn't stop us from stressing because the runner to have everything in order in order to enjoy the festive Christmas atmosphere with family, I think it fills us all with enthusiasm, that's why looking for the premieres, preparing everything for dinner, buying gifts for the baby Jesus, puts us almost to the madhouse, but well worth the sacrifice to then see the wonderful results 🤣🤣.
And speaking of gifts, I tell you that most of the years I make the details for my family myself because I like to personalize my gifts. This year I wanted to give everyone something to remember these dates that thank God we always get together to share.
I chose among the Christmas designs the theme of the waits with which we decorate the tree because it seems ideal to create earrings, a pendant for a chain, a keychain, in short if we have the idea the imagination is what counts; so in this way I made some nice earrings and a pendant for a beautiful Christmas choker.
To see the step by step of how I made them I invite you to read me in its elaboration staying here until the end.
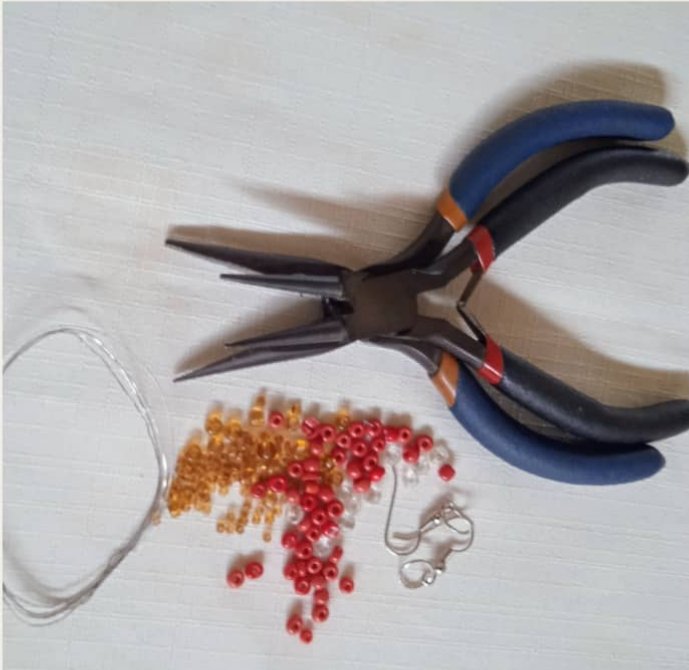
Materiales Usados En Su Elaboración
✓ Mostacillones rojos.
✓ Mostacillones dorados.
✓ Mostacillones Transparentes.
✓ Mostacillas doradas.
✓ Mostacillas rojas.
✓ Mostacillas transparentes.
✓ Tres argollas.
✓ Dos anzuelos para Aretes.
✓ Alambre calibre 28".
✓ Alambre calibre 26".
✓Cuarenta centímetros de punta dorada.
✓Pinzas
Materials used in its elaboration.
✓ Red mustacillones.
✓ Golden mustacillones.
✓ Transparent Mussels.
✓ Golden beads.
✓ Red beads.
✓ Transparent beads.
✓ Three rings.
✓ Two earring hooks.
✓ 28" gauge wire.
✓ 26" gauge wire.
✓Forty centimeters of gold tip.
✓ Clamps.
Use estos sencillos pasos para realizar mi Hermoso Proyecto
Paso Uno:
Voy a comenzar este tutorial describiendo la elaboración de la pieza con la que elaboraré mi manualidad.
Tomando un alambre de cuarenta centímetros calibre 28" inserto diez mostacillones rojos, los coloco en la mitad del mismo, luego una de las puntas la paso por seis de los mostacillones dejando cuatro sin trabajar, halo las dos puntas y ajusto, continúo insertando por la punta de la derecha ocho mostacillones rojos que cruzo con la punta del alambre de la izquierda de nuevo halo las puntas y ajusto.
**Use these simple steps to complete my Beautiful Project
Step One:
I am going to start this tutorial by describing the making of the piece I will be making my craft with.
Taking a forty centimeter 28" wire I insert ten red beads, I place them in the middle of the wire, then one of the ends I pass through six of the beads leaving four unworked, I pull the two ends and tighten, I continue inserting through the right end eight red beads that I cross with the end of the wire on the left side, again I pull the ends and tighten.
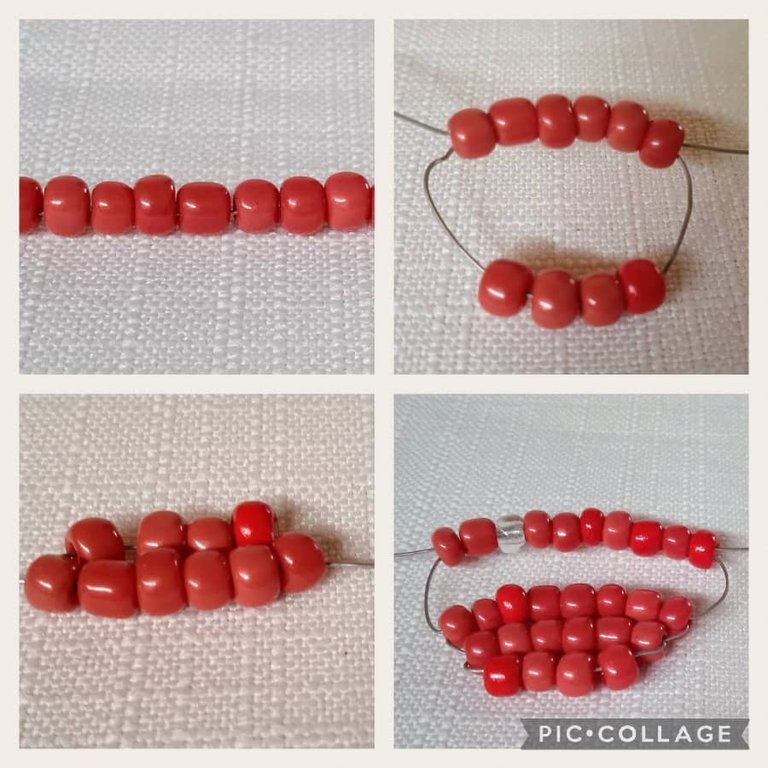
Paso Dos:
En este paso continúo de la manera siguiente,
Por la punta del lado derecho inserto siete mostacillones rojos, un mostacillón transparente, dos mostacillones rojos para lograr diez mostacillones que cruzo con el alambre del lado izquierdo; ahora hago otra vuelta de la misma forma, en esta siguiente vuelta inserto por la punta del lado derecho cinco mostacillones rojos, un mostacillón transparente, dos mostacillones rojos, los cruzo con la punta del alambre del lado izquierdo, halo las dos puntas y sigo ajustando, ahora inserto de nuevo seis mostacillones rojos por el alambre de la derecha que cruzo con el alambre de la izquierda, halo las dos puntas y voy ajustando y moldeando con las manos.
Step Two:
In this step I continue as follows,
Through the tip of the right side I insert seven red beads, one transparent bead, two red beads to obtain ten beads that I cross with the wire of the left side; now I make another turn in the same way, in this next turn I insert by the tip of the right side five red small red mostacillones, a transparent mostacillones, two red mostacillones, I cross them with the tip of the wire of the left side, I pull the two tips and I continue adjusting, now I insert again six red mostacillones by the wire of the right side that I cross with the wire of the left side, I pull the two tips and I go adjusting and molding with my hands.
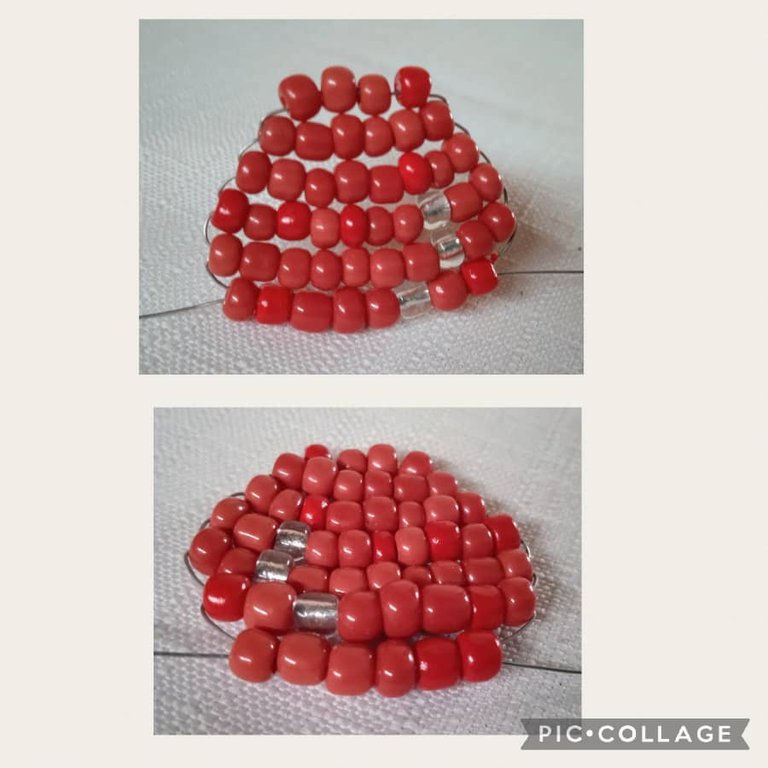
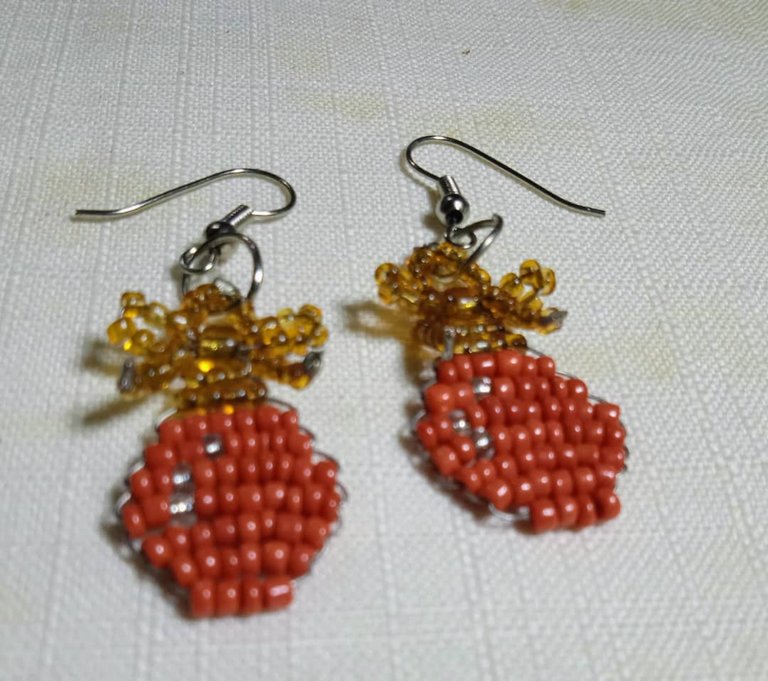
Paso Tres:
Aquí continúo su elaboración pero uso mostacillones dorados para simular el agarre que tienen las borlas para colgar, inserto cuatro mostacillones dorados por la punta del lado derecho y los cruzo con el alambre del lado izquierdo halo y ajusto, ahora inserto tres mostacillones dorados, los cruzo ajusto bien y para rematar la borla inserto un último mostacillón dorado por la punta del lado derecho que ajusto con la punta del lado izquierdo y esto lo hago dos veces para que quede firme.
Step Three:
Here I continue its elaboration but I use golden beads to simulate the grip that have the tassels to hang, I insert four golden beads by the tip of the right side and cross them with the wire of the left side I pull and adjust, now I insert three golden beads, cross them I adjust well and to finish off the tassel I insert a last golden bead by the tip of the right side that I adjust with the tip of the left side and this I do it twice so that it is firm.
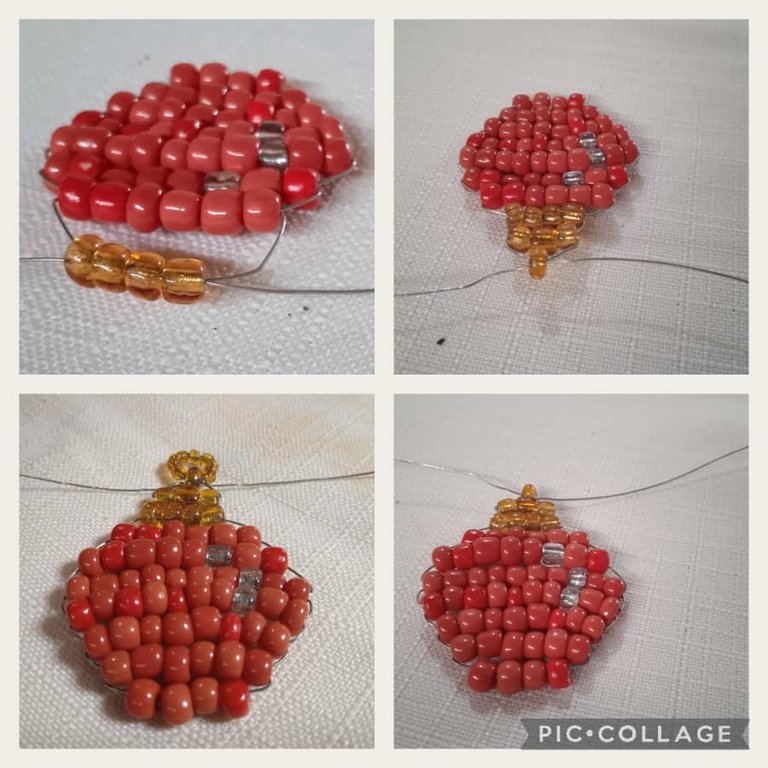
Paso Cuatro:
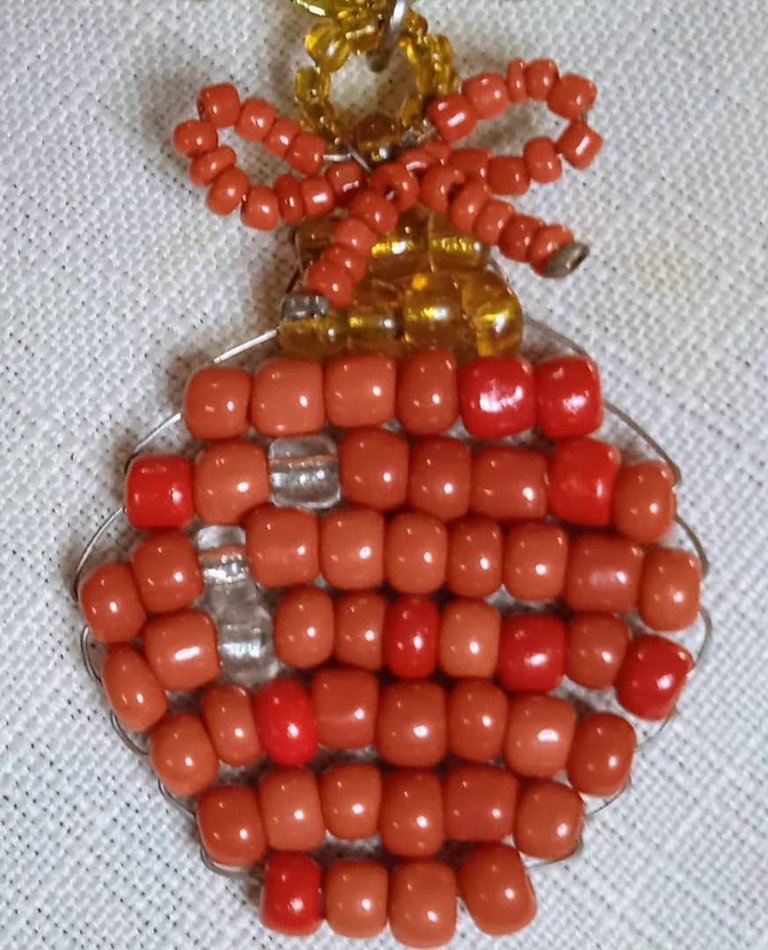
Aquí realizó un pequeño arito para colgar la borla, insertando en la punta del lado izquierdo diez mostacillas doradas, las cruzo con el alambre del lado derecho y saco las puntas del alambre cruzandolos por el mostacillón dorado de arriba, ahora para que mi borla quede muy preciosa y navideña voy a decorarla con un lacito rojo, en una punta del alambre coloco diez mostacillas rojas las paso por el mostacillón dorado de la punta, y halo para formar la mitad del 🎀 en la otra punta del alambre hago lo mismo, halo bien las dos puntas y ajusto, ahora en cada punta coloco cinco mostacillas rojas, uso un escalachin de presión para asegurar y así queda.
Step Four:
Here I make a small hoop to hang the tassel, inserting in the tip of the left side ten golden beads, I cross them with the wire on the right side and pull out the ends of the wire crossing them through the golden bead above, now to make my tassel very precious and Christmasy I will decorate it with a red bow, on one end of the wire I place ten red beads, I pass them through the golden bead on the end, and pull to form half of the 🎀 on the other end of the wire I do the same, pull the two ends well and adjust, now on each end I place five red beads, I use a pressure scalachin to secure and that's how it is
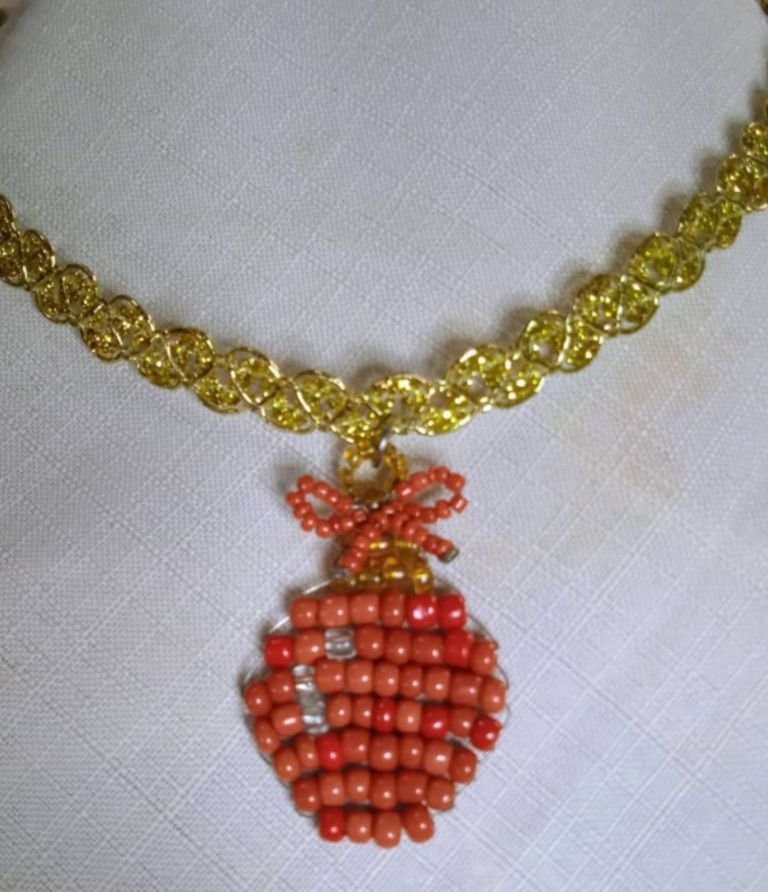
Paso Cinco:
Una vez que tengo realizada mi esfera voy a elaborar con ella una hermosa gargantilla, escogí el color dorado por ser uno de los colores aleatorio a la navidad use una argolla y coloque el dije en una puntilla dorada y este es el maravilloso resultado.
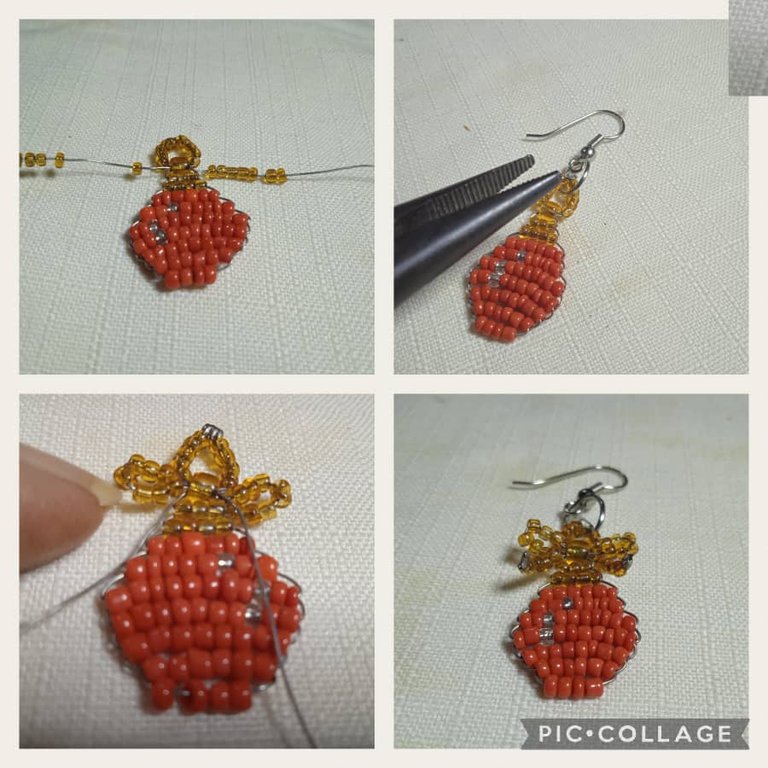
Luego haciendo un igual procedimiento realizó un par de Aretes, para hacerlos uso Mostacillas rojas y doradas porque son más livianas, les coloco un anzuelo para aretes y así logro mi par.
Espero que mi proyecto les haya gustado y sirva de inspiración para otros y se animen a realizarlo.
Step Five:
Once I have made my sphere I am going to elaborate with it a beautiful choker, I chose the golden color for being one of the random colors to Christmas I use a ring and place the pendant in a golden lace and this is the wonderful result.
Then doing the same procedure I made a pair of earrings, to make them I use red and gold beads because they are lighter, I put an earring hook and this is how I got my pair.
I hope you liked my project and serve as inspiration for others and encourage them to make it.
it.
Todas las imágenes son de mi propiedad, capturadas con mi Tecno Spark 10 pro.📸.
Editores utilizados GridArt y piccollage
Banner inicial y final editado con Canva versión libre.
🔁Deeptraductor fue utilizado para esta publicación.📶
Éxitos y bendiciones para todos 🙏🏻 que sigan sanos y felices, Hasta la próxima.
¡Tengan una feliz tarde!
¡Gracias por detenerte a leer!
All images are my property, captured with my Tecno Spark 10 pro.📸.
Editors used GridArt and piccollage.
Initial and final banner edited with Canva free version.
🔁Deeptranslator was used for this publication.📶.
Success and blessings to all 🙏🏻 stay healthy and happy, Until next time.
Have a happy afternoon!
Thanks for stopping by to read!
De veras que la navidad es inspiración, eso te quedó hermoso lorennys, ojalá me toque a mi ese regalito de verdad me encantaría,🥰
Muy hermosa querida amiga, súper llamativa, felicidades por tu idea. Saludos
Gracias amiga por ser consecuente me alegra te haya gustado.
Te aplaudo por la paciencia para insertar esos canutillos y a la vez darla la forma deseada al unirlos.
Están bien lindas amiga
Gracias amiga me alegra mucho que te hayan gustado ☺️
Congratulations @lorennys! You have completed the following achievement on the Hive blockchain And have been rewarded with New badge(s)
Your next target is to reach 7000 upvotes.
You can view your badges on your board and compare yourself to others in the Ranking
If you no longer want to receive notifications, reply to this comment with the word
STOP@lorennys Hermosos aretes y con la gargantilla, un espectacular dúo para navidad, gracias por compartir, saludos 🤗