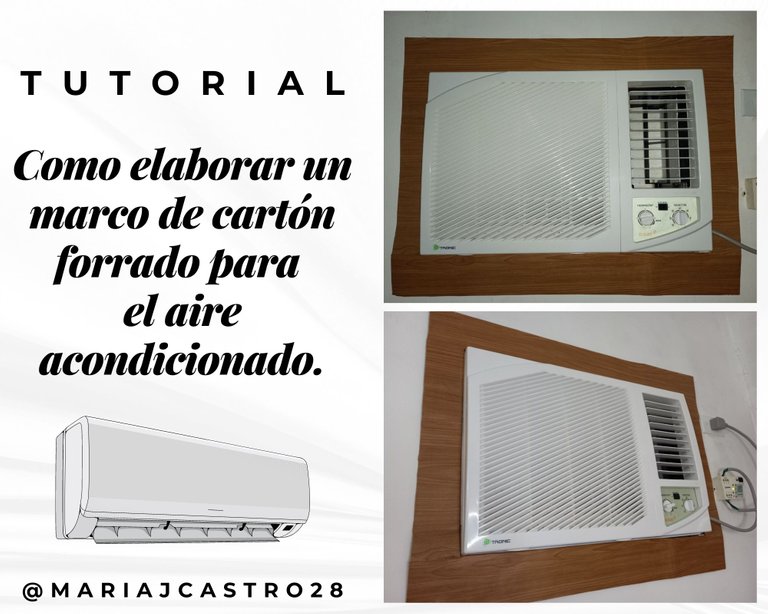
Como elaborar un marco de cartón forrado para el aire acondicionado ➠ Tutorial paso a paso ✂ | How to make a covered cardboard frame for the air conditioner ➠ Step by step tutorial ✂
✨ ¡Saludos Comunidad Creativa! | ¡Greetings Creative Community! ✨
¡Feliz Domingo! Espero que estén teniendo un excelente fin de semana, hoy quisiera compartir con ustedes un pequeño proyecto que hice en casa a fin de ambientar mi sala para navidad, se trata de un marco para aire acondicionado que hice con cartón, la idea surgió con el fin de cubrir los lados del aire acondicionado para que no se notaran esos espacios sobrantes que tuve que rellenar con anime para que pudiera quedar justo y pensando en una solución para corregir esto es que se me ocurra hacerle un marco que a su vez es decorativo, a continuación les muestro le procedimiento y los materiales necesarios, sin más, ¡manos a la obra!
¡Happy Sunday! I hope you are having an excellent weekend, today I would like to share with you a small project that I did at home in order to decorate my living room for Christmas, it is a frame for air conditioning that I made with cardboard, the idea arose in order to to cover the sides of the air conditioner so that those extra spaces that I had to fill with anime so that it could be just right would not be noticed and thinking of a solution to correct this is that it occurred to me to make a frame that in turn is decorative, to Then I show you the procedure and the necessary materials, without further ado, ¡let's get to work!

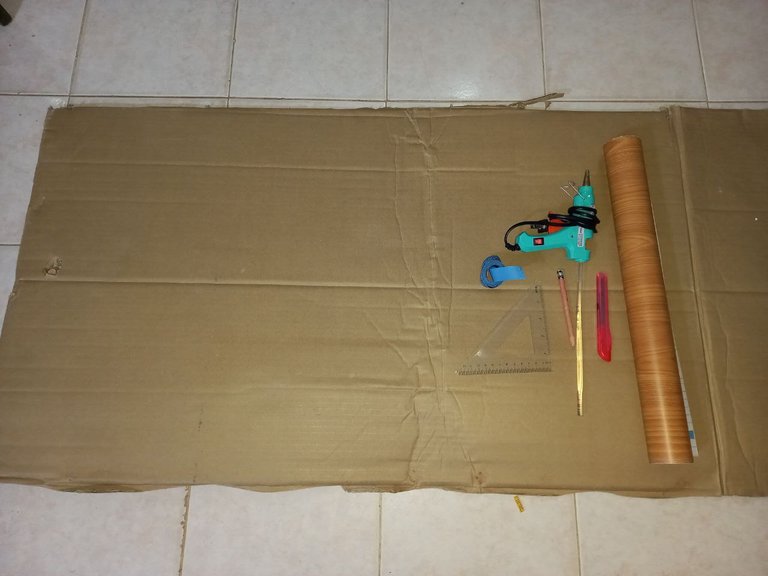
✂ Grapadora.
✂ Papel contact con estampado de madera.
✂ Cinta adhesiva transparente.
✂ Silicón caliente.
✂ Cinta métrica.
✂ Regla.
✂ Tijera.
✂ Lápiz.
✂ Cutter.
✂ Stapler.
✂ Contact paper with wood print.
✂ Transparent adhesive tape.
✂ Hot silicone.
✂ Tape measure.
✂ Rule.
✂ Scissors.
✂ Pencil.
✂ Cutter.

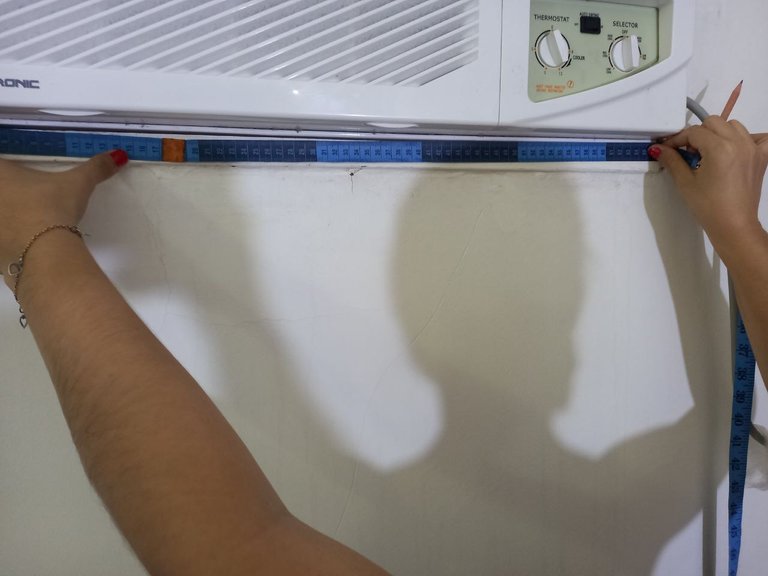
✂ PASO 1. Lo primero es tomar las medidas del aire acondicionado con la cinta métrica, debemos medir tanto el largo como el ancho y a partir de esas medidas establecer de cuanto queremos que sea el marco.
✂ STEP 1. The first thing is to take the measurements of the air conditioning with the tape measure, we must measure both the length and the width and from those measurements establish how big we want the frame to be.


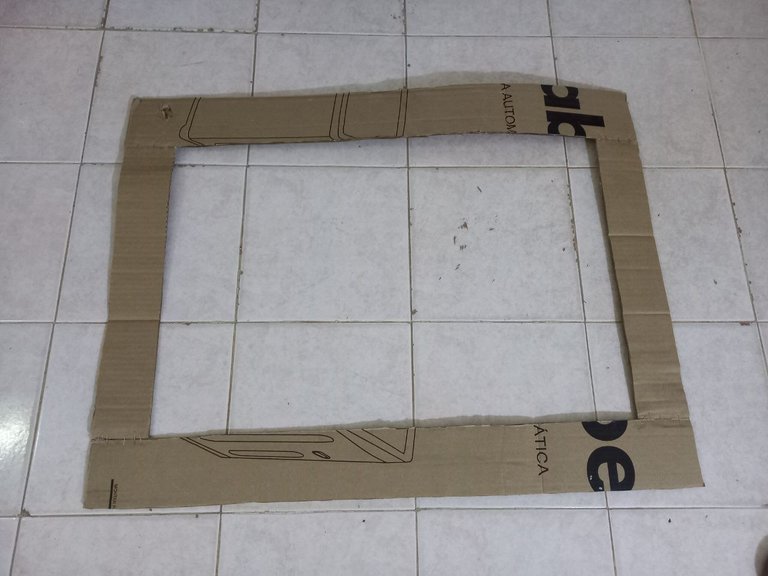
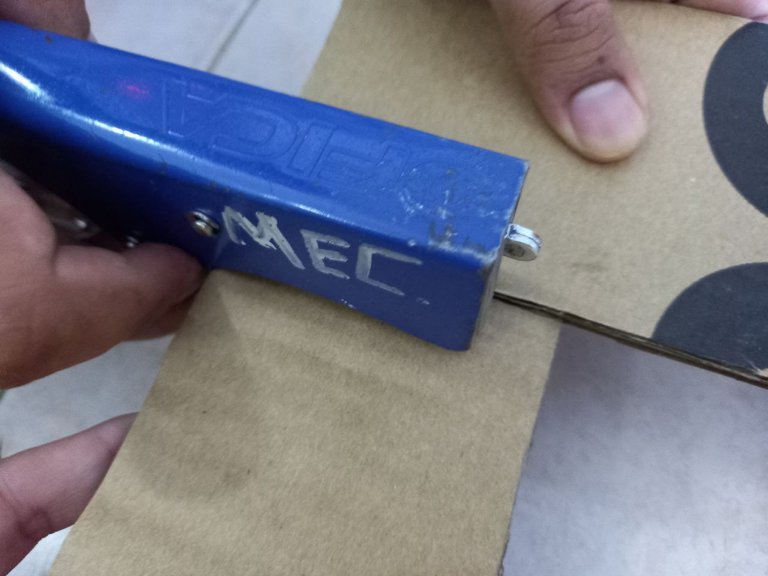
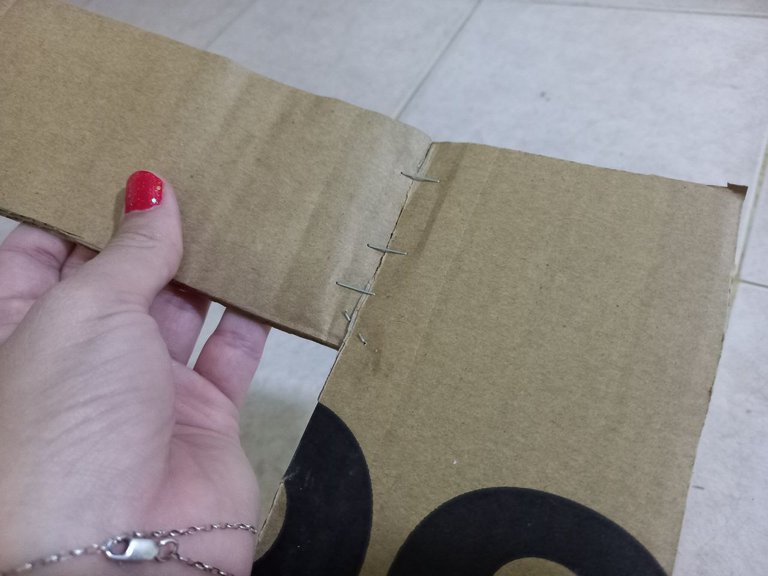
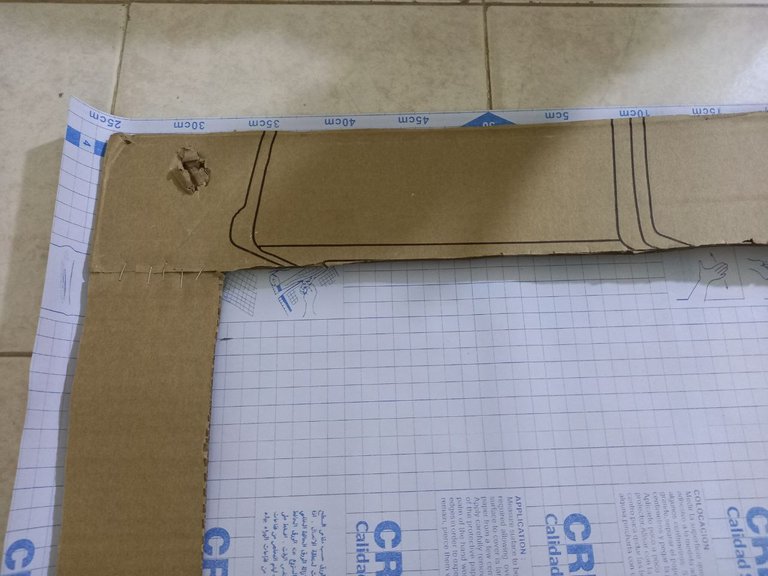
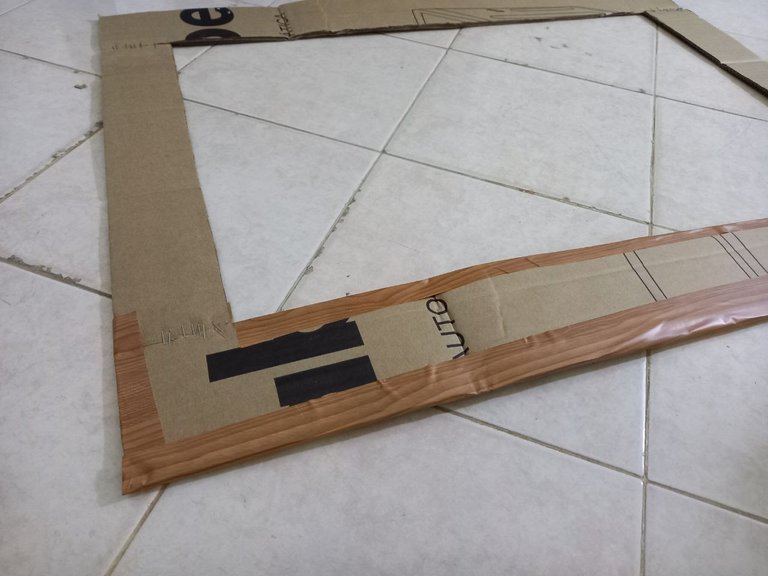
✂ PASO 2. Con las medidas haremos 4 piezas de cartón con el ancho que mejor nos parezca, en mi caso quiero que el marco tengo 5 cm de ancho de cada lado, luego vamos a unir las piezas con grapas formando el marco, una vez listo verificamos que quede bien en el aire acondicionado, de no ser así corregimos de ser necesario y si le quedó bien podemos continuar.
✂ STEP 2. With the measurements we will make 4 pieces of cardboard with the width that best suits us, in my case I want the frame to be 5 cm wide on each side, then we are going to join the pieces with staples forming the Marco, once ready we verify that it fits well in the air conditioning, if not, we correct it if necessary and if it fits well we can continue.


✂ PASO 3. Cortamos 2 piezas de papel contact con la medida de los lados mas largos del marco, es decir, superior e inferior pero con unos 6 cm extra de ancho para poder doblar y pegar en la parte trasera, antes de cortar debemos tomar en cuenta el sentido que queremos que tenga el estampado para que todos los lados sean iguales.
✂ STEP 3. Cut 2 pieces of contact paper with the measurement of the longest sides of the frame, that is, top and bottom but with about 6 cm extra width to be able to fold and glue on the back, before Before cutting, we must take into account the meaning that we want the pattern to have so that all the sides are the same.

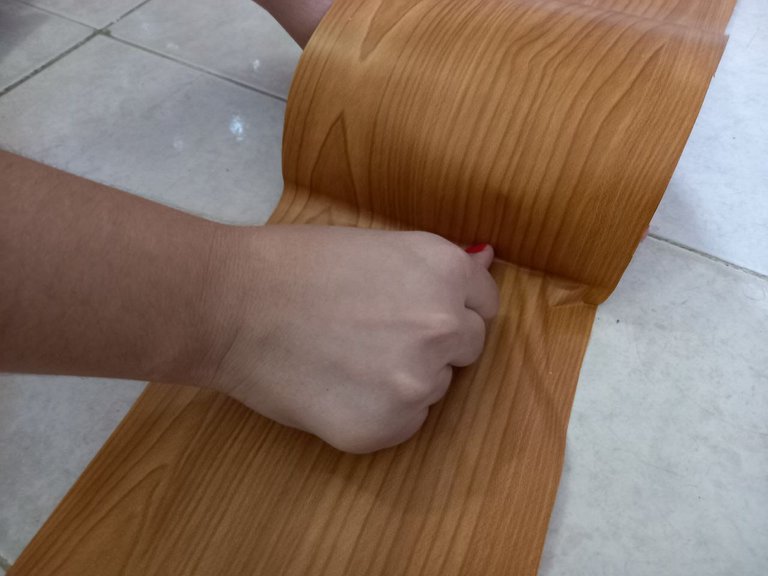
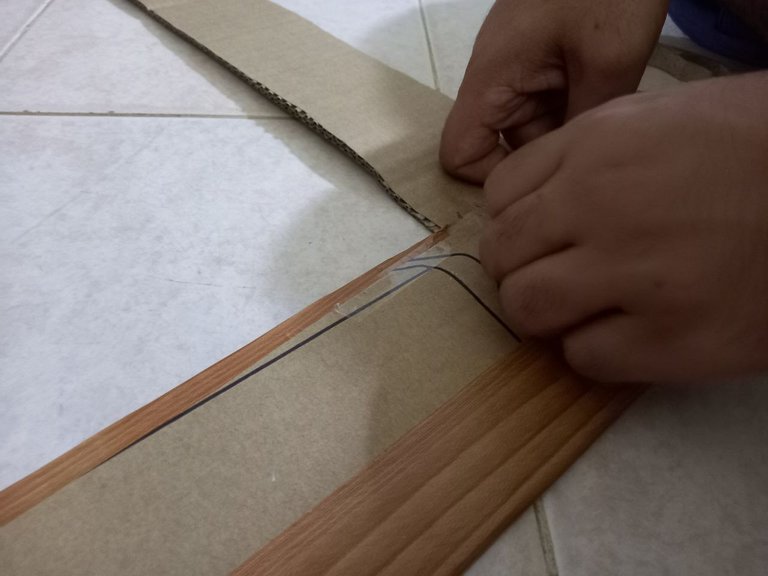
✂ PASO 4. Comenzamos a forrar el marco, pegamos el papel contact por la parte de arriba y vamos retirando poco a poco la otra cara del papel al mismo tiempo que vamos pasando la mano con ciudado para asegurarnos de que el papel quede liso y no le queden burbujas de aire, una vez que terminemos con la parte frontal le damos la vuelta al marco y tomamos los sobrantes de papel contact de los lados y doblamos y pegamos en la parte trasera del marco, luego le colocamos cinta adhesiva transparente para fijar mejor.
✂ STEP 4. We begin to cover the frame, glue the contact paper on the top and gradually remove the other side of the paper while carefully passing our hand to make sure that the paper it is smooth and there are no air bubbles left, once we finish with the front part we turn the frame over and take the contact paper leftovers from the sides and fold and glue on the back of the frame, then we put adhesive tape on it transparent to fix it better.

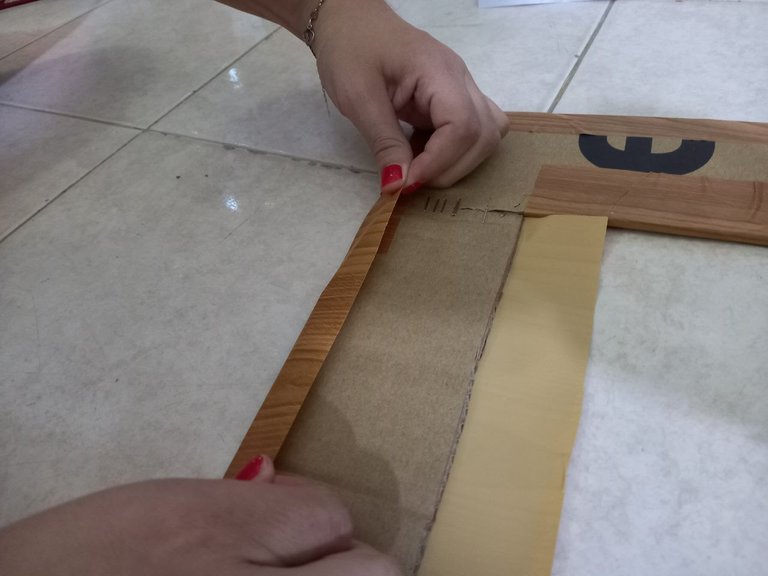
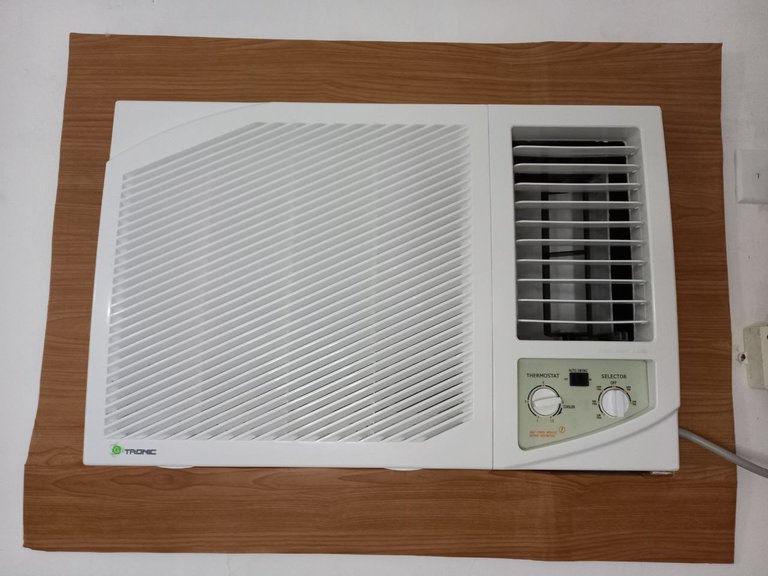
✂ PASO 5. Recortamos ahora 2 piezas de papel contact con las medidas de los lados faltantes del marco pero dejando también unos centímetros extra de ancho, pegamos el papel para forrar lo que falta del marco repitiendo el proceso anterior hasta tener el marco completamente forrado, luego solo resta pegarlo en la pared para decorar el aire acondicionado quedando como si fuera un marco de madera.
✂ STEP 5. Now we cut out 2 pieces of contact paper with the measurements of the missing sides of the frame but also leaving a few extra centimeters wide, we glue the paper to cover what is missing from the frame, repeating the previous process until we have the fully lined frame, then all that remains is to stick it on the wall to decorate the air conditioning, leaving it as if it were a wooden frame.

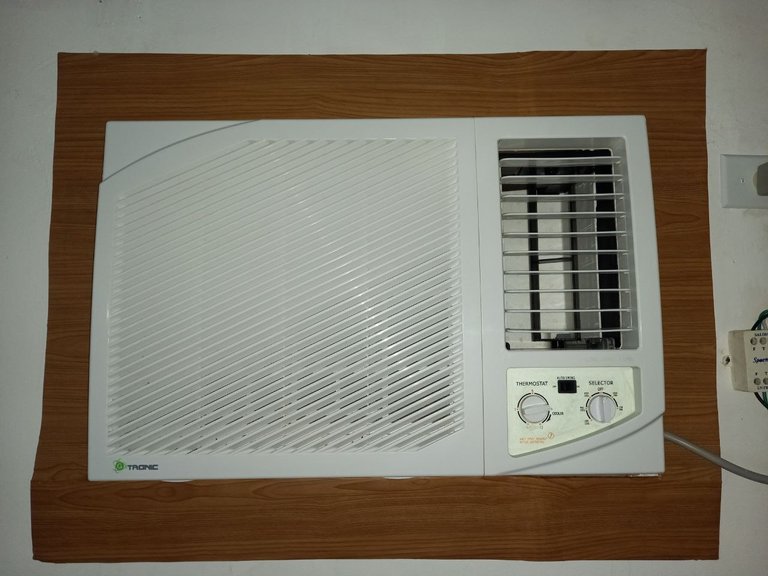
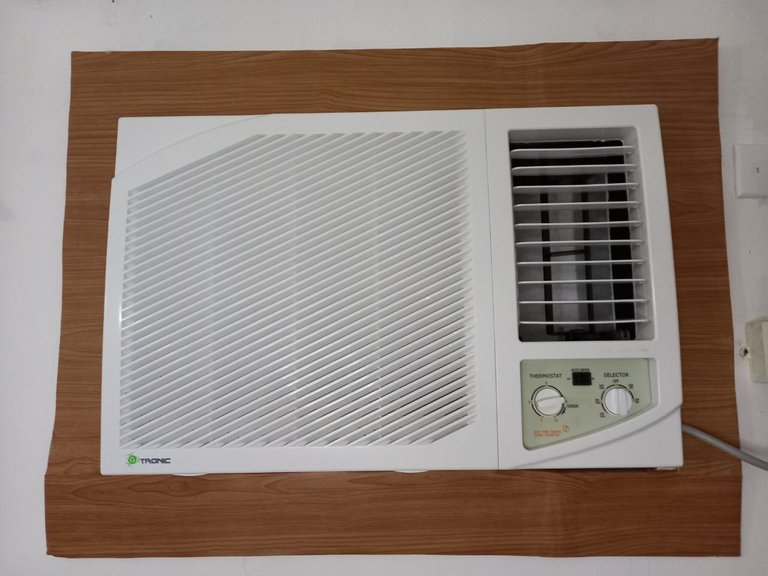
¡Y listo! De esta forma es como he elaborado un lindo marco de cartón forrado para el aire acondicionado de mi sala, el resultado es muy bueno y el aspecto del estampado del papel contact es muy similar a madera real, fue la mejor forma que encontré de cubrir y en cierta forma decorar los alrededores del aire acondicionado y quedó bastante bien, espero que les haya gustado esta idea y les sirva para ponerla en práctica en sus hogares, gracias por leer mi post nos vemos pronto con un nuevo tutorial.
And ready! This is how I have made a nice covered cardboard frame for the air conditioning in my living room, the result is very good and the appearance of the contact paper print is very similar to real wood, it was the best way I found to cover and somehow decorate the surroundings of the air conditioning and it turned out quite well, I hope you liked this idea and it helps you put it into practice in your homes, thanks for reading my post see you soon with a new tutorial.


Todas las fotografías son de mi propiedad.
Fotografías capturadas con mi Samsung Galaxy A12
Separador de texto elaborado en Canva.
Nos vemos en mi próxima publicación.
¡Tengan un feliz día!
All photographs are my property.
Photos captured with my Samsung Galaxy A12
Text separator made in Canva.
See you in my next post.
¡Have a happy day!
This post has been manually curated by @steemflow from Indiaunited community. Join us on our Discord Server.
Do you know that you can earn a passive income by delegating to @indiaunited. We share more than 100 % of the curation rewards with the delegators in the form of IUC tokens. HP delegators and IUC token holders also get upto 20% additional vote weight.
Here are some handy links for delegations: 100HP, 250HP, 500HP, 1000HP.
Please contribute to the community by upvoting this comment and posts made by @indiaunited.
Thank you for the support 😍
Omg quedó bellísimo, parece de madera. Me encantó. Eso está espectacular, sigo insistiendo esto es arte. Buen trabajo!!
Gracias amiga 😘 parece madera de verdad y le da un mejor aspecto al aire acondicionado y a la sala, gracias por tu apoyo y comentario, un abrazo 🤗
Congratulations @mariajcastro28! You have completed the following achievement on the Hive blockchain And have been rewarded with New badge(s)
You can view your badges on your board and compare yourself to others in the Ranking
If you no longer want to receive notifications, reply to this comment with the word
STOPCheck out our last posts:
Te quedó muy bien el marco para el aire acondicionado; el color del papel contac está genial, le da un gran aspecto a la sala.
Holaaa, de verdad que si queda bastante bien, ese estampado de madera le da un toque muy bonito y parece madera de verdad, la sala se ve mucho mejor, gracias por pasar, saludos!
Amiga que buena idea para dar ese toque decorativo y elegante a tu aire acondicionado..
Me parece perfecto✨😍
Gracias amiga, así es, lo mejor es que puedes tapar los lados que siempre quedan espacios vacios o simplemente para hacerlo lucir mas bonito 😍 Que bueno que te gustó ♥️
Thank you for sharing this post in the DIYHUB Community!
Your content got selected by our fellow curator semarekha & you just received a little thank you upvote from us for your great work! Your post will be featured in one of our recurring compilations which are aiming to offer you a stage to widen your audience within the DIY scene of Hive. Stay creative & HIVE ON!
Please vote for our hive witness <3
Thank you! 😍😍😍
Te quedo genial mi Mary, como siempre super práctica y creativa. Me gustó mucho el diseño del papel, siento que le da un toque muy bonito ✨
Gracias mi Vane bella ♥️ Yo siempre ando buscando como decorar todo jaja esta vez fue el aire acondicionado y no podia dejar de compartirlo, me alegra que te gustara la idea, besos! ♥️
this is pretty helpful when it comes to maintenance with ours since it's been a long time since it was placed, kinda worried there'd be holes in it and not be able to keep the coolness in, thank you for sharing your work about this! 😄

https://d.buzz
!ALIVE
@mariajcastro28! You Are Alive so I just staked 0.1 $ALIVE to your account on behalf of @ilovewintergem. (3/10)
The tip has been paid for by the We Are Alive Tribe through the earnings on @alive.chat, feel free to swing by our daily chat any time you want.

Hello, thank you very much for supporting my publication, I appreciate it very much ★
👍🙏
That was precisely one of the reasons why I did this, but after covering those spaces they looked a bit ugly and with a frame that part would be eliminated and it would be given a more beautiful and pleasant view, I'm glad you liked it, I hope May this idea help you
Es una magnífica idea amiga!! Justo una amiga mando a poner un marcó así para su aire, le hubiera salido mucho más económico hacerlo de está manera. Pero bueno, es una excelente idea amiga y si parece un marco de madera. Excelente post amiga,
Gracias por compartir.❤️
Hola amiga linda, pues te cuento que así queda bastante bien, mas económico y nada que envidiarle a la madera real, tenia este tutorial guardado y recién ahora es que lo subo, a lo mejor le habria servido esta idea a tu amiga 😉 me alegra mucho saber que te gustó amiga gracias por pasar, un abrazo! ♥️
Amigaaaa donde habías estado toda mi vida y por que no se me ocurrió hacer algo tan lindo para tapar lo feo que se ve ese espacio del aire jajajaja Dioss, le enviaré este post a mi mama jajaja gracias por compartir!!
Amigaaa jajaja bueno, me alegra saber que te gustó la idea y espero que te pueda ser útil, verás lo lindo que queda y lo mucho decora ese espacio, se ve hasta elegante como si fuera madera de verdad, gracias por pasar amiga linda, te mando un abrazo!💖💖
https://twitter.com/1285595942998224897/status/1612480529135292419
https://twitter.com/918317311/status/1612618089568288771
https://twitter.com/1422413915275812864/status/1613214442946236418
The rewards earned on this comment will go directly to the people( @sugarelys, @helloisalbani, @mariajcastro28 ) sharing the post on Twitter as long as they are registered with @poshtoken. Sign up at https://hiveposh.com.
Amiga eso esta muy lindo, además no parece que fuera cartón, tiene un toque hasta elegante 🙀. Esta super buena la idea, aunque no pueda apliarla en este frío de la ciudad pero si mis padres en Anaco. Quedo genial. Siempre fan de tus creaciones, un abrazo mi Mary 🤗
Hola amiga, muchas gracias por pasar y comentar, me alegra mucho que te gustara la idea y espero te pueda servir en cualquier momento, gracias por el apoyo amiga, un beso grande! 😍
Amiga, te quedó increíble. Está muy buena la idea. No parece cartón.
Gracias amiga, es una opción económica y linda para decorar ese espacio que muchas veces necesita un pequeño arreglo 😍