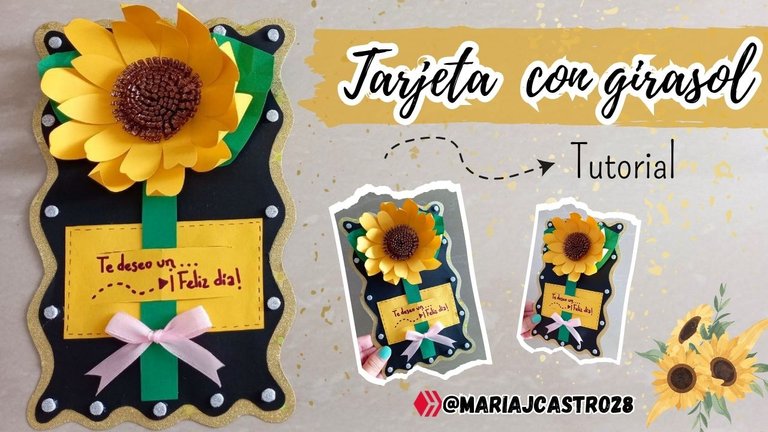
Tarjeta con girasol 🌻 •• Tutorial | Card with sunflower 🌻 •• Tutorial

¡Feliz día amigos creativos de Hive Diy! Espero que estén teniendo una bonita semana. Navegando en las redes sociales he visto desde hace días que se está promocionando la venta de flores amarillas para obsequiar este 21 de marzo, es decir hoy, así que investigué un poco y al parecer es una tradición y se debe a que esta fecha marca el inicio de la primavera y para no quedarme atrás con esta moda quise hacer mi propia flor amarilla para este día y pensando un poco se me ocurrió hacer una tarjeta con un girasol, un detalle lindo para obsequiar y hoy les enseñaré el procedimiento para su elaboración, espero que les guste, ahora sin más, ¡vamos a crear!
Happy day creative friends from Hive Diy! I hope you are having a nice week. Browsing social networks I have seen for days that the sale of yellow flowers is being promoted to give as a gift this March 21, that is, today, so I did a little research and apparently it is a tradition and it is because this date marks the beginning of spring and in order not to be left behind with this fashion I wanted to make my own yellow flower for this day and thinking a little it occurred to me to make a card with a sunflower, a nice detail to give as a gift and today I will show you the procedure for making it, I hope you like it, now without further ado, let's create!

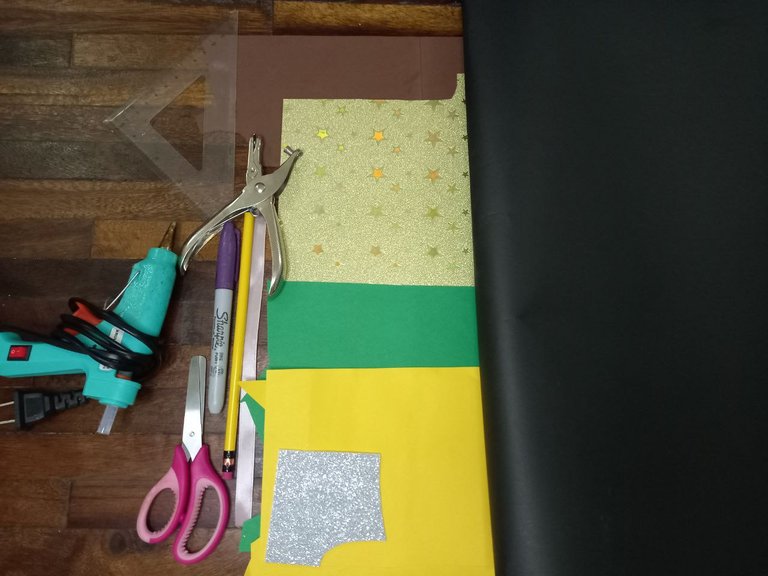
• Cartulina metalizada dorada.
• Foami marrón sin escarcha.
• Foami escarchado plateado.
• Cinta de raso rosada.
• Marcador punta fina.
• Lapicero tinta negra.
• Regla.
• Lápiz.
• Tijera.
• Silicón.
• Gold metallic cardboard.
• Frost-free brown foam.
• Silver frosted foam.
• Pink satin ribbon.
• Fine tip marker.
• Black ink pen.
• Ruler.
• Pencil.
• Scissors.
• Silicone.

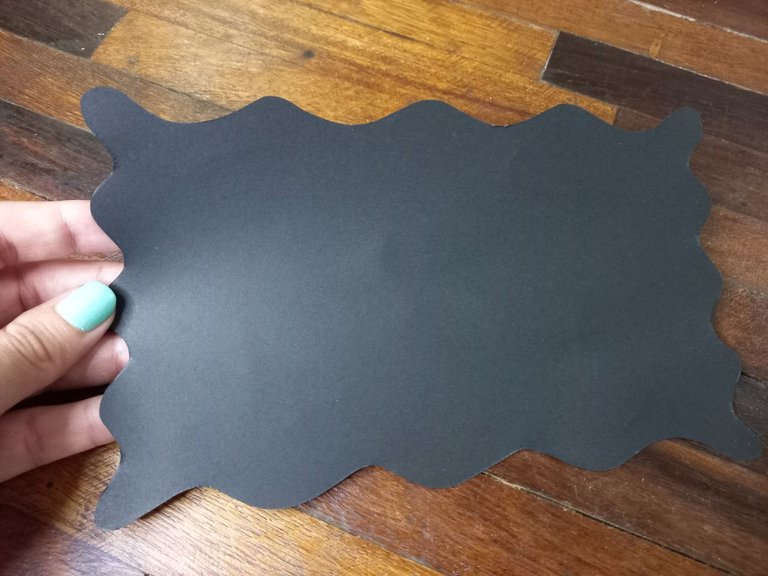
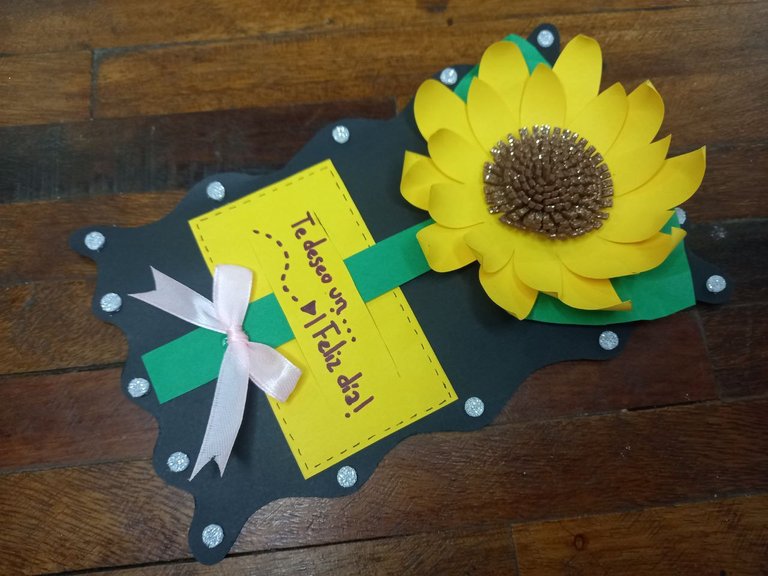
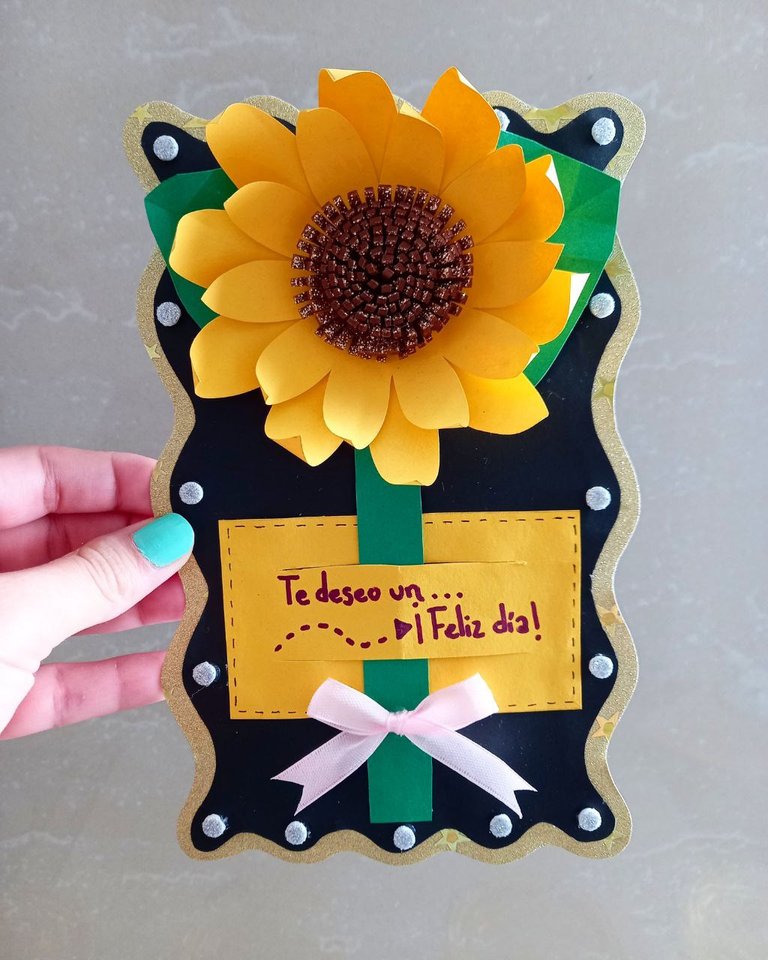
🌻 PASO 1. Lo primero que hice fue recortar una pieza de cartulina negra con la forma y tamaño que quería para mi tarjeta, en mi caso le hice los bordes ondulados para que tuviera una forma linda y diferente.
🌻 STEP 1. The first thing I did was cut out a piece of black cardboard with the shape and size I wanted for my card, in my case I made the edges wavy so that it had a cute and different shape.

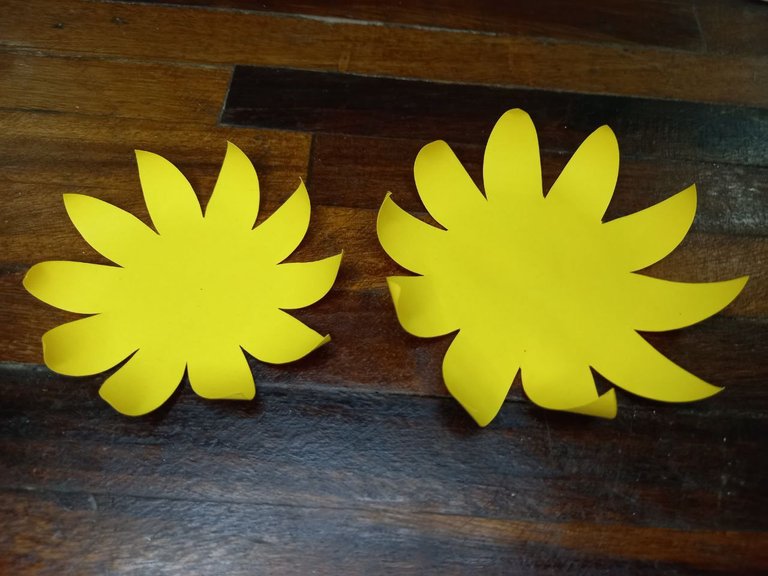
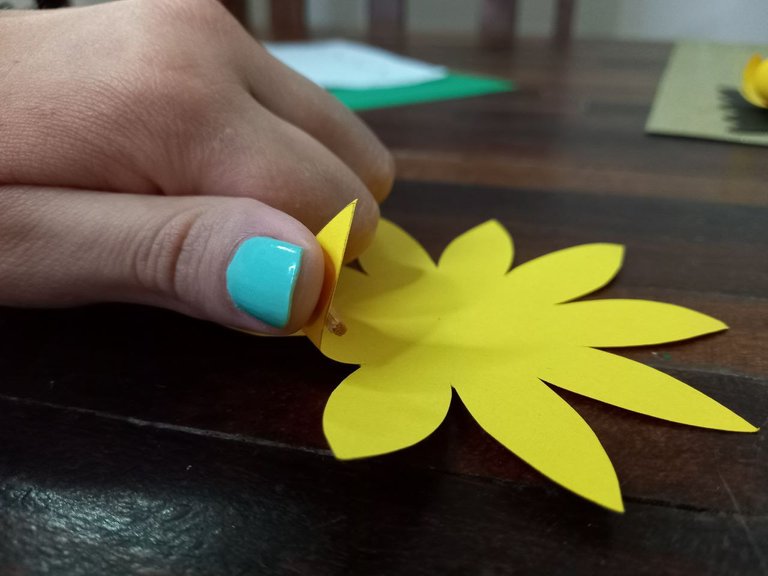
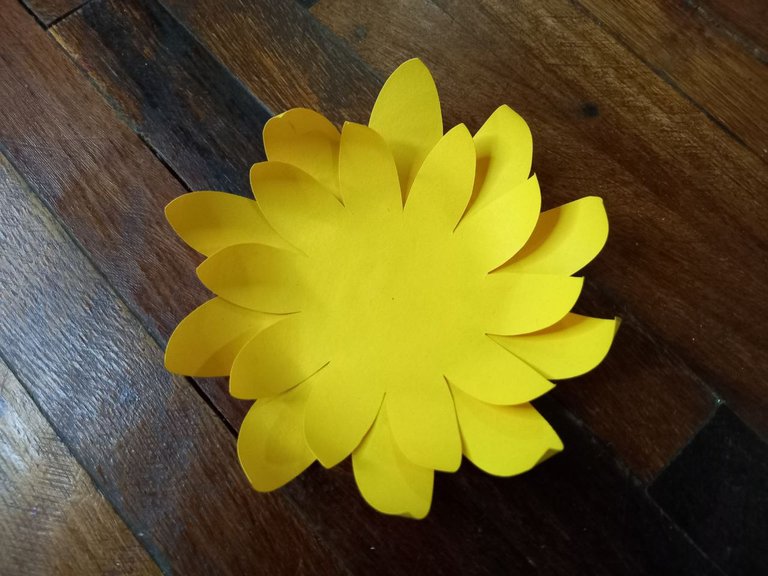
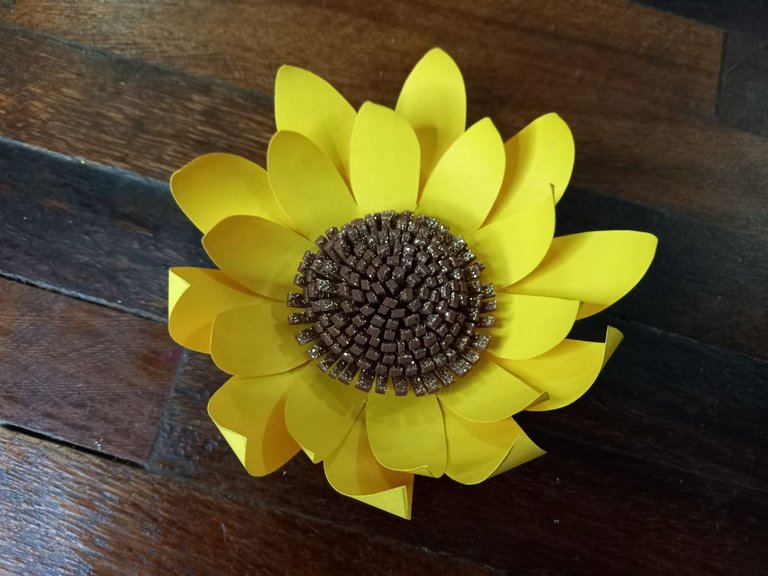
🌻 PASO 2. Lo siguiente fue elaborar la forma de una flor con varios pétalos en cartulina amarilla, e hice 2, una grande y una pequeña, luego recorté ambas. Con ayuda de un palito de altura levanté los pétalos uno por uno, luego de esto pegué la flor pequeña sobre la grande justo en el centro dejando que los pétalos de una quedaran en dirección contraria a los pétalos de la otra para así no dejar espacios vacíos.
🌻 STEP 2. The next thing was to make the shape of a flower with several petals in yellow cardboard, and I made 2, one large and one small, then I cut out both. With the help of a tall stick I lifted the petals one by one, after this I glued the small flower on the large one right in the center, leaving the petals of one to be in the opposite direction to the petals of the other so as not to leave empty spaces. .

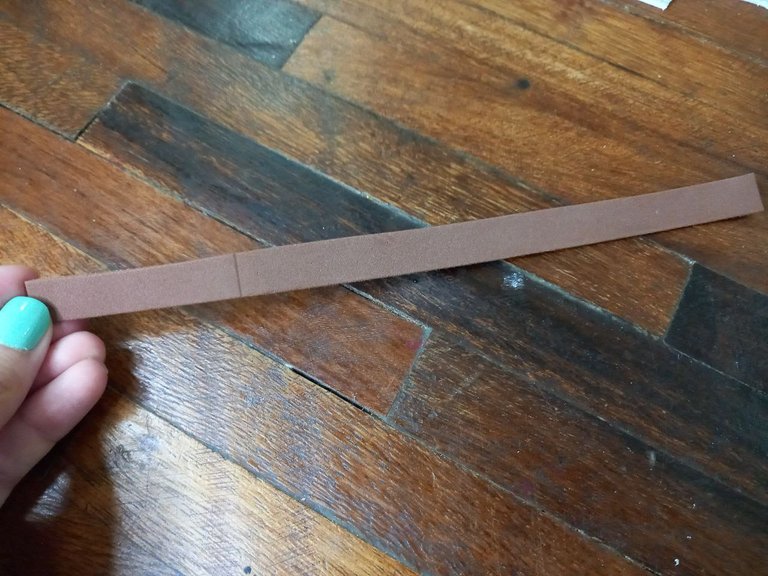
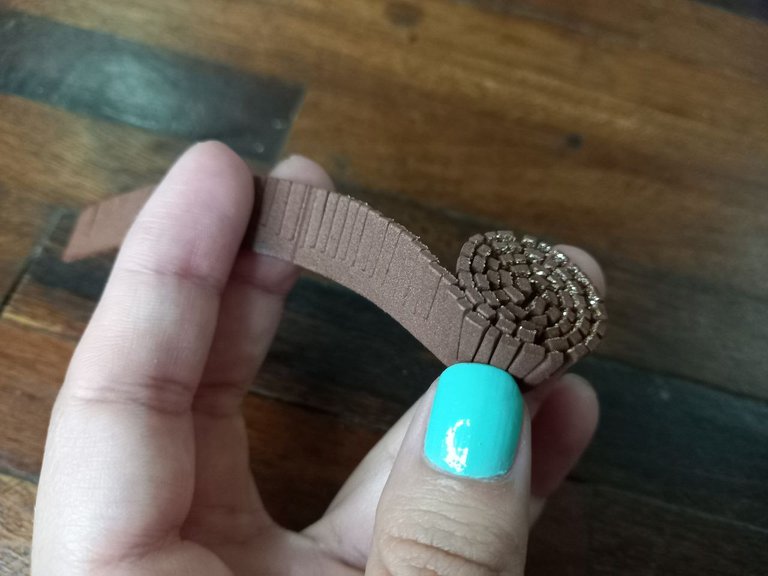
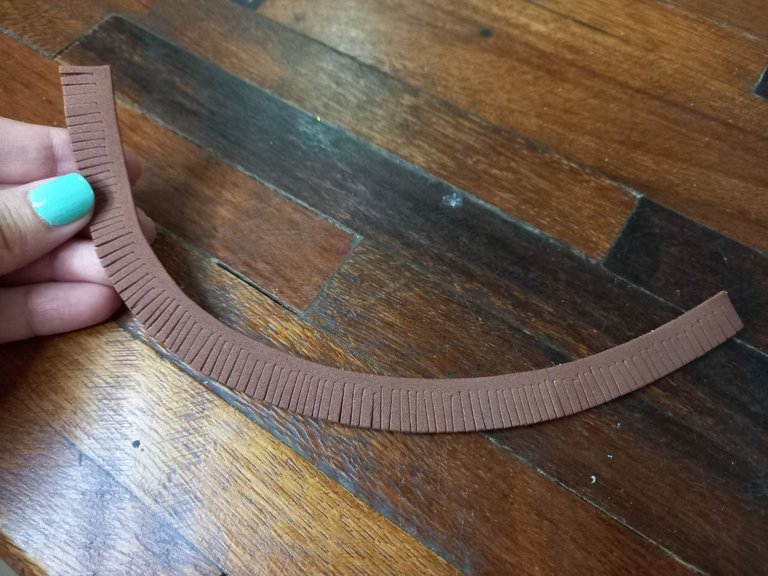
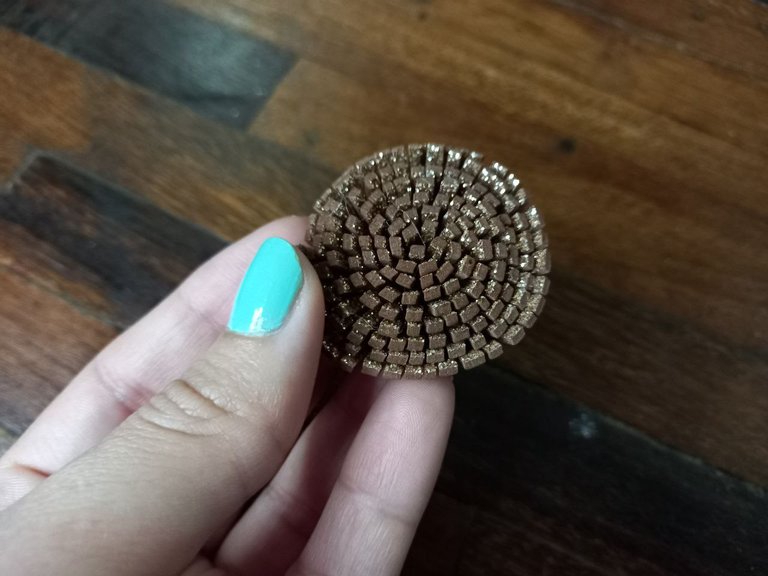
🌻 PASO 3. Recorté una tira larga delgada de foami marrón y le hice cortes finos verticales a lo largo, luego comencé a enrollar uno de sus extremos hasta llegar al final y fijé aplicando silicón para que mantuviera su forma, luego esta pieza la pegué en el centro de la flor de cartulina y con los dedos la extendí un poco para darle mejor forma.
🌻 STEP 3. I cut out a long thin strip of brown foam and made fine vertical cuts along it, then I began to roll one of its ends until I reached the end and fixed it by applying silicone so that it kept its shape, then this I glued the piece in the center of the cardboard flower and spread it out a little with my fingers to give it a better shape.
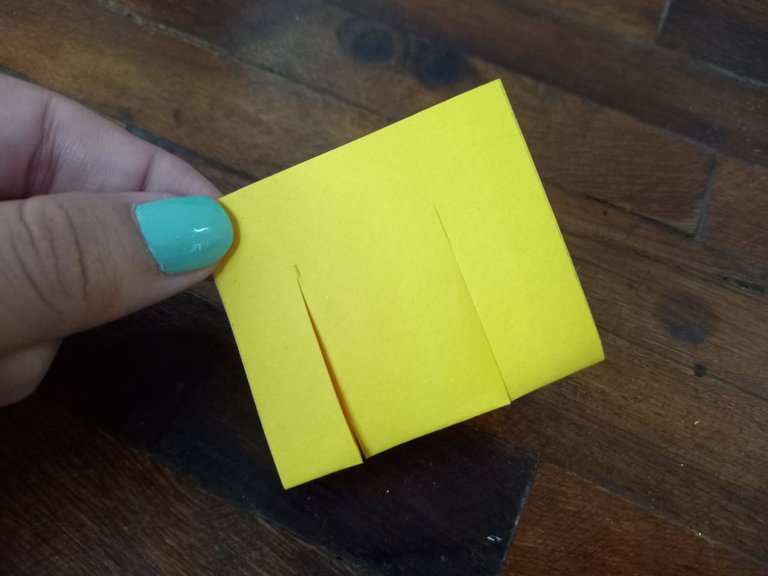
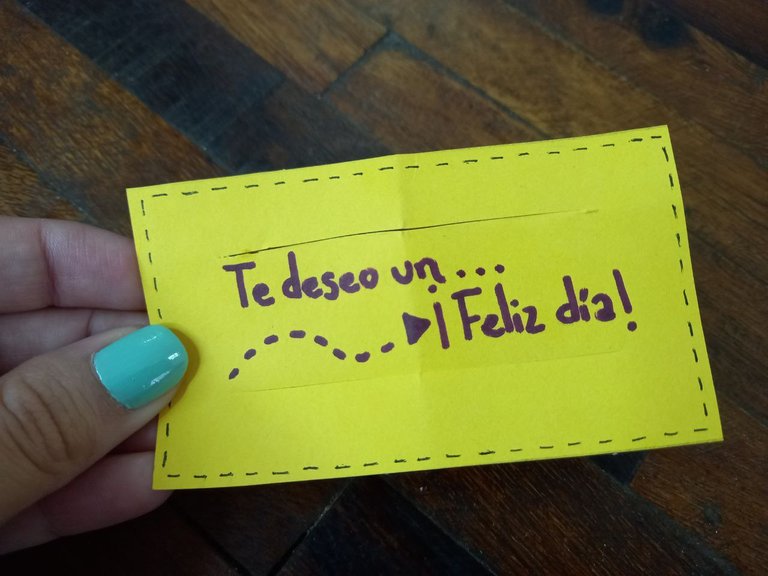
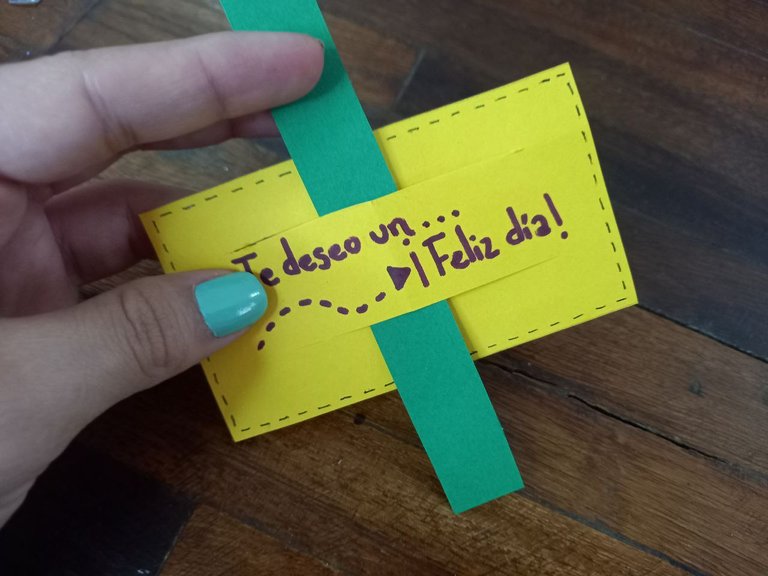
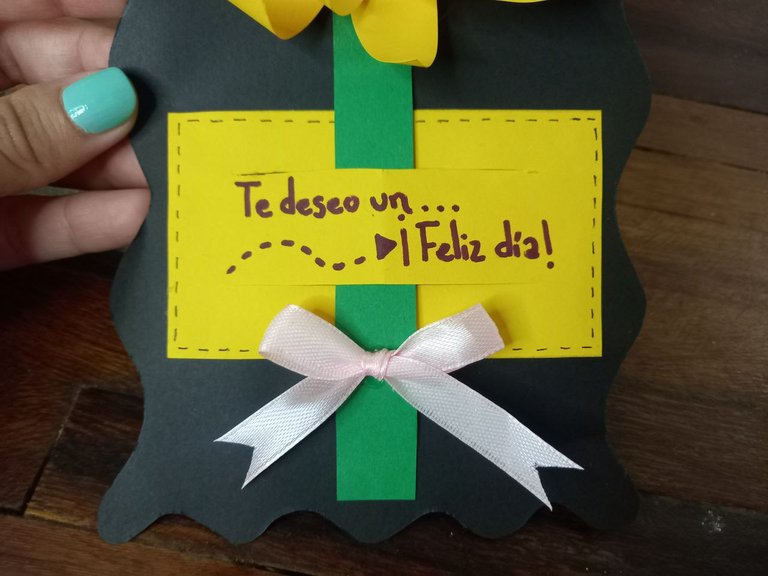
🌻 PASO 4. Recorté una pieza rectangular de cartulina amarilla procurando que de ancho fuera más pequeña que la pieza de cartulina negra que recorté al principio, la doblé a la mitad de manera vertical y le hice 2 cortes a lo largo obteniendo así 2 espacios en el centro de la cartulina, luego con un lapicero de tinta negra le hice algunas marcas en todo el borde para decorar, por último en el centro escribí una corta frase con marcador.
🌻 STEP 4. I cut out a rectangular piece of yellow cardboard, making sure that it was smaller in width than the piece of black cardboard that I cut out at the beginning, I folded it in half vertically and made 2 cuts lengthwise, obtaining So 2 spaces in the center of the cardboard, then with a black ink pen I made some marks around the edge to decorate, finally in the center I wrote a short phrase with a marker.
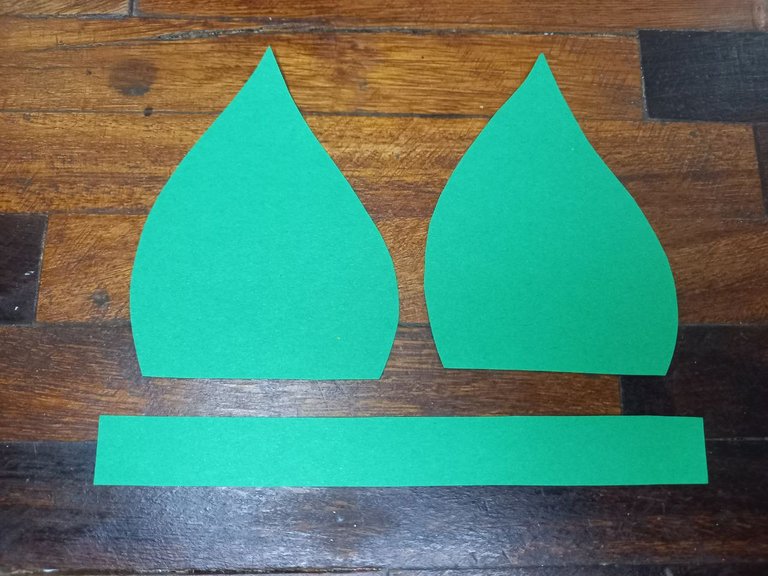
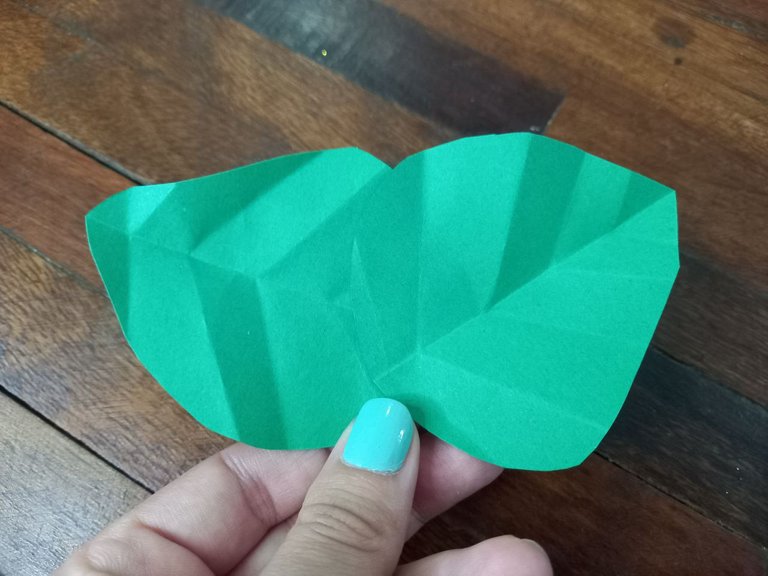
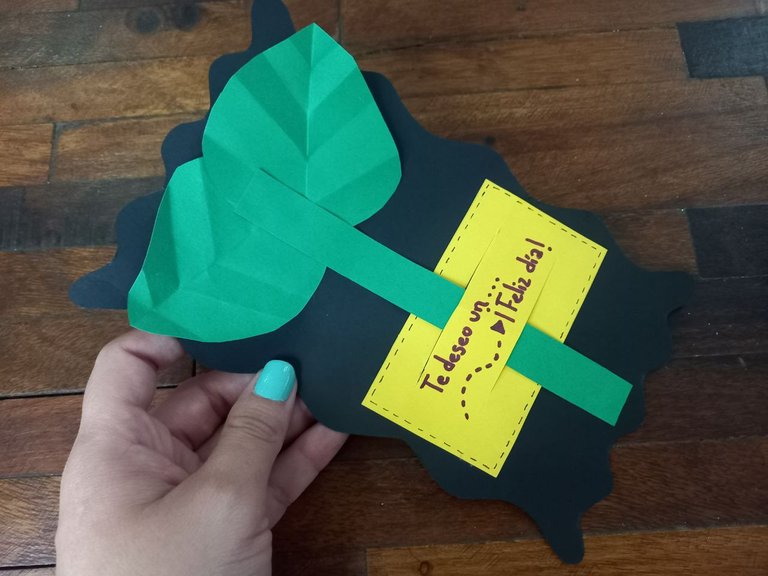
🌻 PASO 5. En cartulina verde hice 2 hojas y el tallo del girasol, a las hojas les hice algunos dobleces para darle mejor forma, luego uní ambas hojas con silicón mientras que el tallo lo pasé por los espacios libres de la cartulina amarilla con la frase y luego pegué la pieza completa en el centro de la cartulina negra.
🌻 STEP 5. In green cardboard I made 2 leaves and the stem of the sunflower, I made some folds to the leaves to give them a better shape, then I joined both leaves with silicone while I passed the stem through the free spaces of the yellow cardboard with the phrase and then I glued the complete piece in the center of the black cardboard.

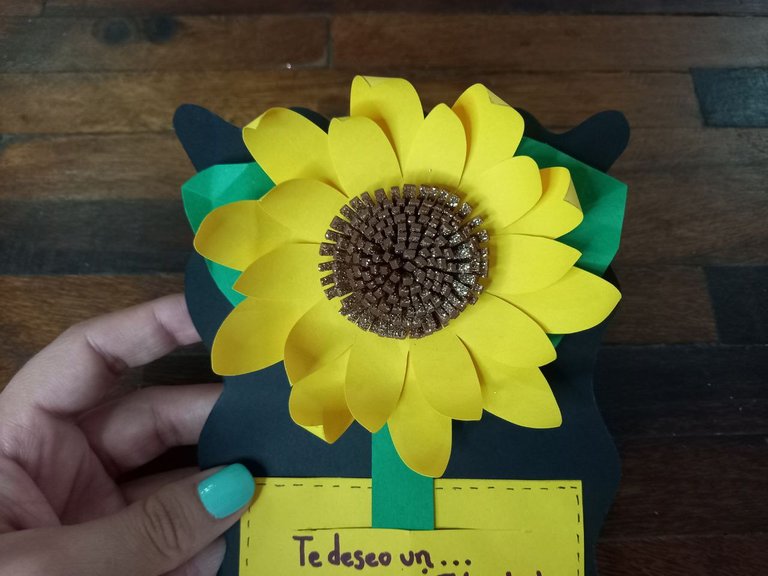
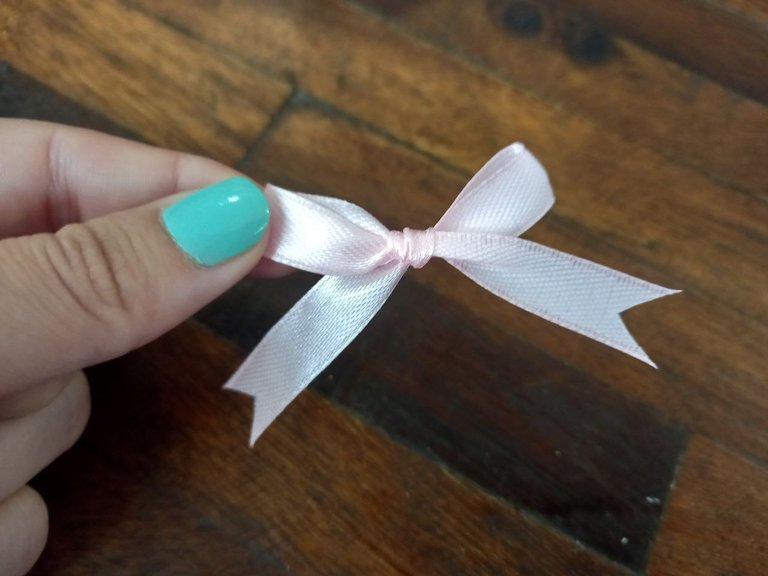
🌻 PASO 6. Pegué el girasol sobre las hojas, justo en el centro, elaboré un pequeño lazo de cinta de raso rosada y lo pegué en la parte inferior de la tarjetita amarilla.
🌻 STEP 6. I glued the sunflower on the leaves, right in the center, I made a small pink satin ribbon bow and glued it to the bottom of the yellow card.
🌻 PASO 7. Recorté varios circulitos pequeños de foami escarchado plateado y los pegué en las partes onduladas de los bordes de la cartulina negra.
🌻 STEP 7. I cut out several small circles of silver frosted foam and glued them to the wavy parts of the edges of the black cardboard.
🌻 PASO 8. Por ultimo pegué la cartulina negra sobre cartulina metalizada dorada y recorté el exceso dejando un borde delgado de esta como fondo de la tarjeta.
🌻 STEP 8. Finally I glued the black cardboard on gold metallic cardboard and trimmed the excess leaving a thin edge of this as the background of the card.

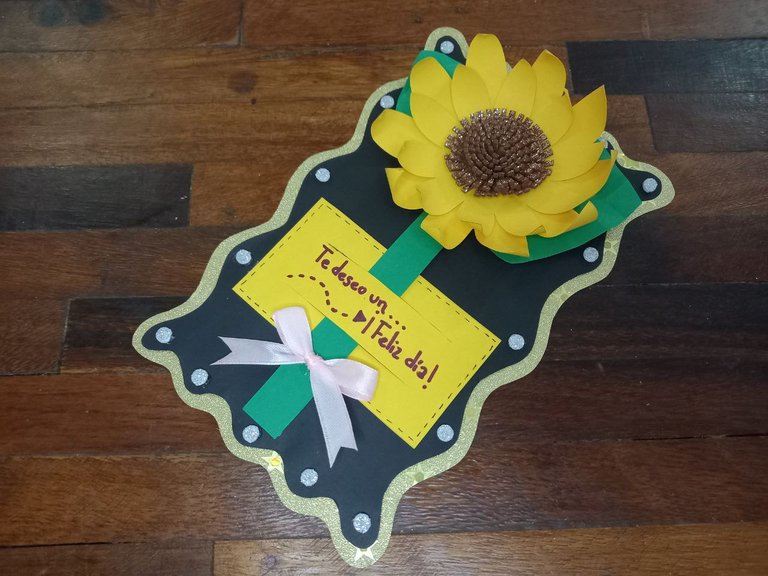
¡Y listo! De esta manera tan sencilla fue como elaboré una linda tarjeta con girasol para obsequiar, el detalle perfecto para este 21 de marzo, ¿Qué les pareció a ustedes? Espero que esta idea les haya gustado tanto como a mí, gracias por su visita, nos vemos pronto con una nueva y creativa idea.
And ready! In this simple way I made a beautiful card with a sunflower to give as a gift, the perfect detail for this March 21st. What did you think? I hope you liked this idea as much as I did, thank you for visiting, see you soon with a new and creative idea.


Todas las fotografías son de mi propiedad.
Fotografías capturadas con mi Samsung Galaxy A12
Separador de texto elaborado en Canva.
Nos vemos en mi próxima publicación.
¡Tengan un feliz día!
All photographs are my property.
Photos captured with my Samsung Galaxy A12
Text separator made in Canva.
See you in my next post.
¡Have a happy day!
feliz día amiga te quedo hermosa

Gracias amiga, me alegra que te gustara 😍 Feliz día para ti también 💛
Que belleza, te quedó demasiado hermosa Mary. No sabía porque entregaban flores hoy 21 de Marzo así que gracias por la información ❤️
Hola mi Vane, muchas gracias ami, que gusto leer tu comentario 💛 Bueno ami, ahora lo sabes, espero que hayas recibido tus flores amarillas hoy y si no te comparto de la mía 🥰
Feliz día amiga @mariajcastro28 está tarjeta es tan hermosa, el diseño te quedó increíble, los girasoles son unas de las flores exóticas que decoran con un efecto llamativo. Te felicito está preciosa la tarjeta.
Hola amiga, muchas gracias por tu lindo comentario de apoyo, es gratificante para mi poder leer este tipo de comentarios, me alegra inmenso que te gustara mi creación de hoy. Gracias por la visita, te envío un fuerte abrazo 🤗
Está preciosa!
Gracias amiga 🥰
Que bonita. Me encantó.
No sabía acerca de la fecha mencionada, la primavera es la temporada preferida de muchos y estás flores amarillas derrochan energía y encanto. Perfectas para la temporada.
Saludos
Hola amiga, yo tampoco sabía mucho al respecto pero en redes sociales uno se entera de todo 🤣 no me quise quedar por fuera e hice mi propia flor amarilla. Em girasol fue la mejor opción, es hermoso y la mejor representación de la primavera por su color y belleza tan radiante. Me alegra mucho saber que te gustó, gracias por la visita. Un abrazo! 🥰
Te quedo muy hermosa amiga
Hola amiga muchas gracias 🤗
A ti por compartir tan maravilloso contenido feliz día
Muy bella Mary🥰, feliz día!!!
Gracias ami linda, feliz día para ti también 🌻
Te quedó preciosísima, Mary! Feliz día para ti 🌻🌻❤️❤️❤️
Gracias mi Albi 🥰 Feliz día para ti también 🌻✨
Bello detalle hoy 21 de Marzo. Gracias por compartir este contenido. Me encantó! 🤗
Gracias amiga, de verdad que lo es, perfecto para regalar a esa persona especial, me alegra que te gustara 🥰
Bellísimo amiga 💕 amo tus manualidades 🤩 gracias por compartirlo 🙏
Gracias amiga, me alegra inmenso que te haya gustado, un abrazo! 🥰
Amiii te quedo preciosisima, yo feliz con una tarjeta así 🥹
Gracias ami linda 🥰 es hermosa para un detalle 😊
Que linda tarjetita. Combina perfectamente con la temática de las flores amarillas
Hola muchas gracias, así es amiga, y los girasoles son las flores amarillas más hermosas 😍
¡¡¡Buen trabajo!!! Gracias por publicar tu excelente contenido en Hive Diy, qué hermosas tarjetas, el efecto final que le diste al girasol hace que destaque mucho esta tarjeta, te quedo asombroso.
Tu comunidad artesana ahora es testigo

Hola muchas gracias, de verdad aprecio mucho el comentario, gracias por su apoyo y valoración siempre 🥰
https://twitter.com/hivediy47901/status/1771402150025040114