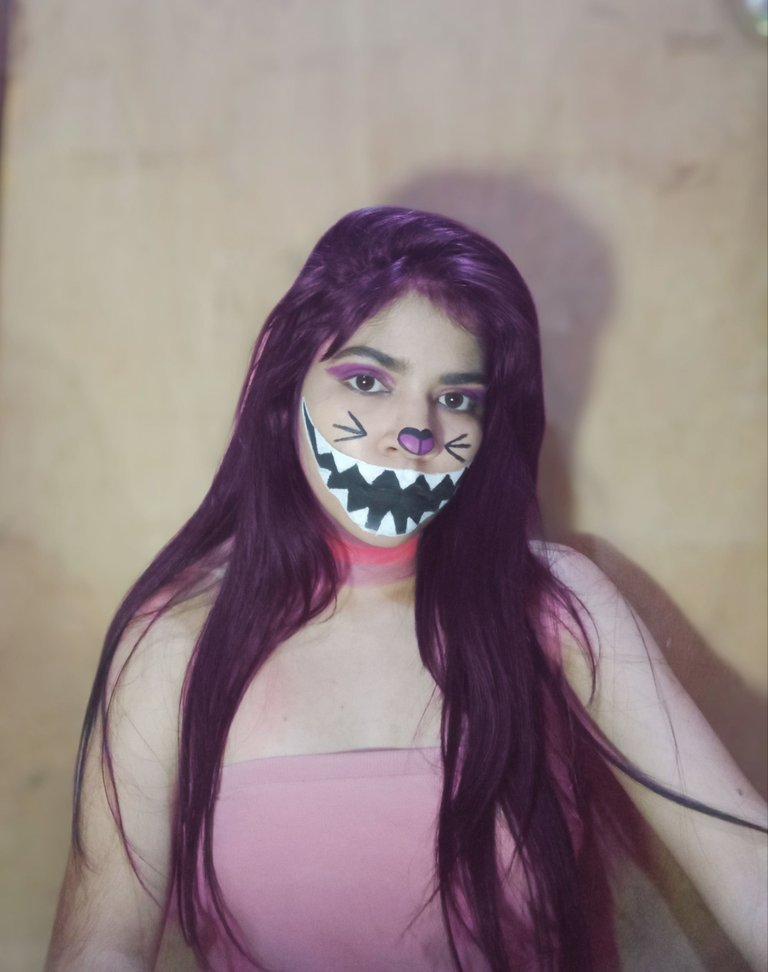
[ ESP - ENG ] Initiative: Inspired Makeup look by Cheshire Cat from Alice in Wonderland.
¡Hola hola amores de Hive! Estos últimos días he estado ausente porque estaba compartiendo con la familia de mi novio así que decidí desconectarme y disfrutar de estos días sin crear ningún tipo de contenido y también aproveché la oportunidad para descansar mi mente y venir con mejor contenido.
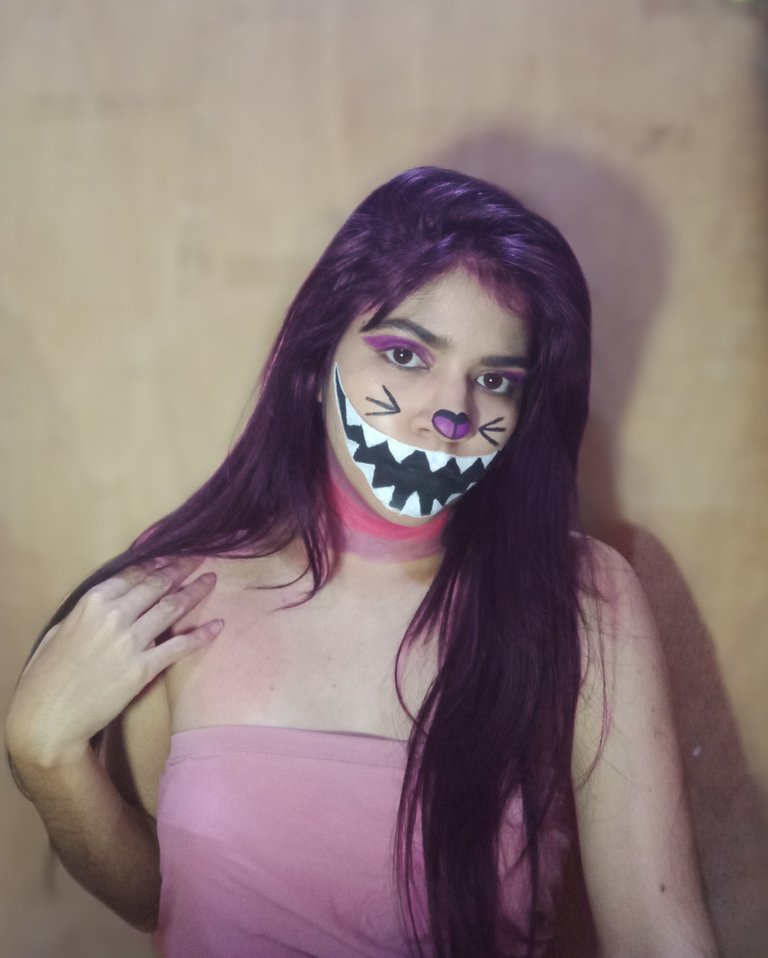
Cómo saben @mintdreams ha realizado otra iniciativa y he venido a unirme, se trata de un maquillaje inspirado en una película, yo me decidí por Alicia en el país de las maravillas, específicamente el gato de cheshire pero la versión animada dónde es rosa y morado.
Hello hello loves of Hive! These last few days I have been absent because I was sharing with my boyfriend's family so I decided to disconnect and enjoy these days without creating any content and I also took the opportunity to rest my mind and come with better content.
As you know @mintdreams has made another initiative and I have come to join, it is a makeup inspired by a movie, I decided for Alice in Wonderland, specifically the cheshire cat but the animated version where it is pink and purple.
Materiales / Materials:
- Tónico facial / Facial tonic.
- Jabón facial neutro / Neutral facial soap.
- Primer / Primer.
- Crema hidratante / Moisturizing cream.
- Protector solar / Sunscreen.
- Pigmento fucsia / Fuchsia pigment.
- Pintura negra / Black paint.
- Pintura blanca / White paint.
- Pigmento morado / Purple pigment.
- Base / Foundation.
- Beauty blender / Beauty blender.
- Polvo suelto / Loose powder.
- Iluminador / highlighter.
- Pinceles / Brushes
Procedimiento / Procedure:
ESPAÑOL
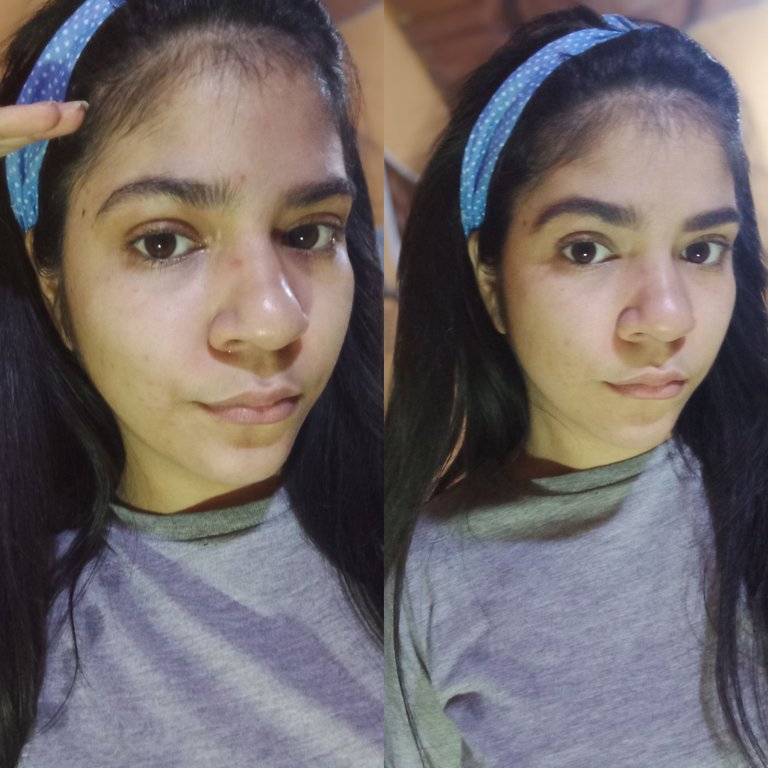
Primer paso:
Para preparar mi rostro para el maquillaje comencé limpiandolo con tónico facial, luego lave mi rostro con jabón facial neutro, luego aplique primer, crema hidratante y protector solar.
Segundo paso:
Acá comencé con mis cejas, así que las peine hacia arriba y luego las delinee con un pincel delgado y pomada, poco a poco fui rellenandolas para luego difuminarla con un cepillo, luego de esto aplique corrector por los bordes para limpiarlas y tener un aspecto más perfecto.
ENGLISH
First step:
To prepare my face for makeup I started by cleansing it with facial toner, then washed my face with neutral facial soap, then applied primer, moisturizer and sunscreen.
Second step:
Here I started with my eyebrows, so I combed them upwards and then outlined them with a thin brush and pomade, little by little I filled them in and then blurred it with a brush, after this I applied concealer around the edges to clean them and have a more perfect look.
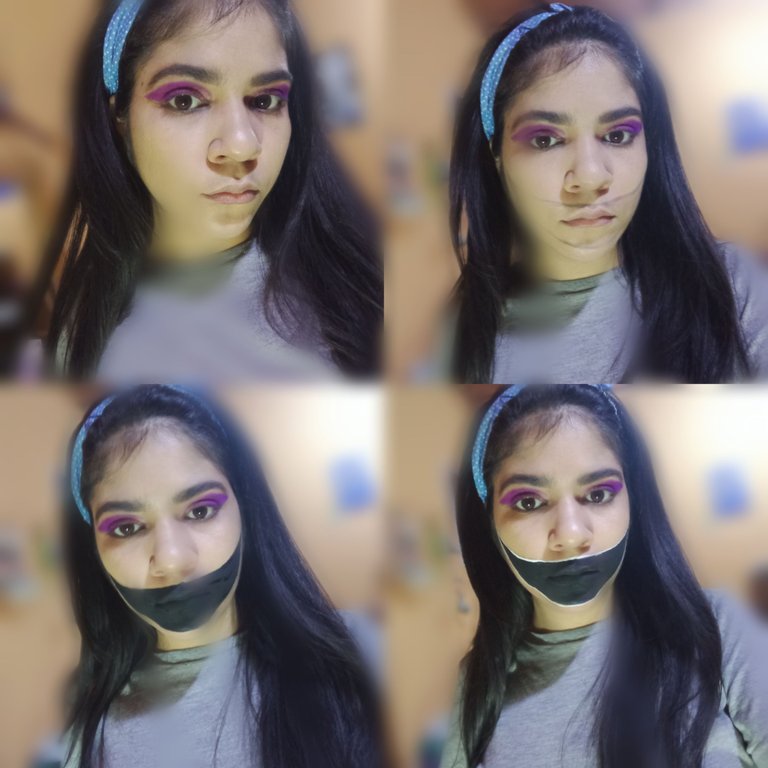
Tercer paso:
Agregue corrector en mis párpados y lo difumine, luego de esto coloque dos cintas adhesivas al final cada ojo, tome el pigmento morado y un pincel y comencé a aplicar en mi ojo, desde la parte final hasta el principio de mi ojo, logrando una forma más afilada gracias a las cintas.
Luego de retirar las cintas tome sombra negra y la aplique debajo de mis ojos, también tome iluminador y lo agregue en mis lagrimales y al principio de mis ojos para así resaltar un poco más el color morado.
Tome mi base y aplique pequeños puntos en mi rostro, lo difumine con mi Beauty blender y lo sellé con polvo suelto.
Cuarto paso:
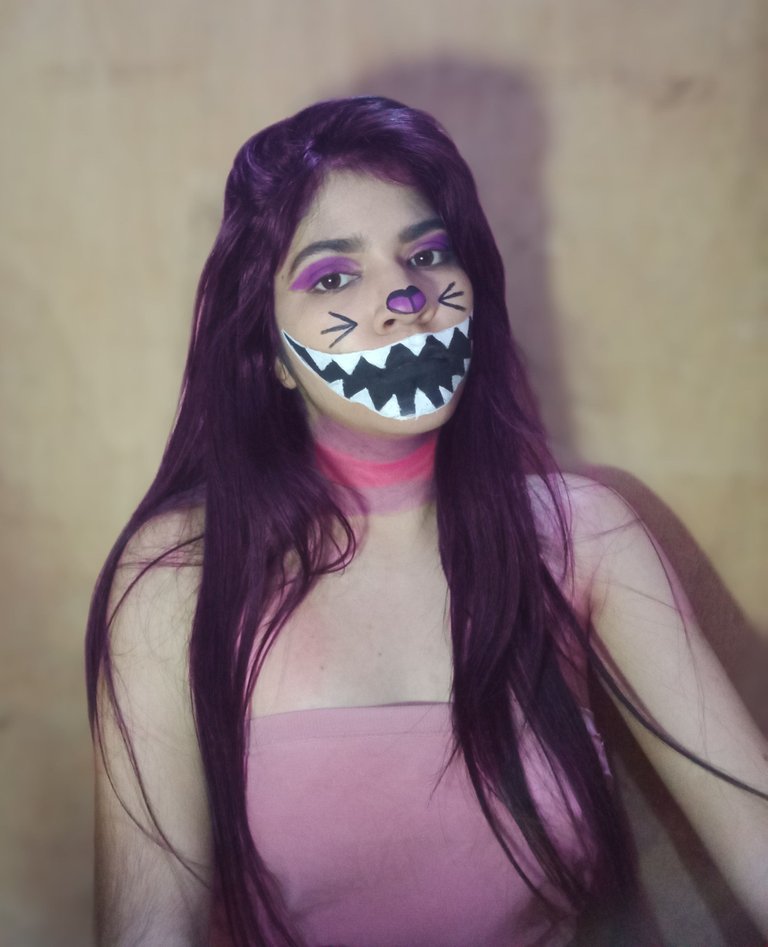
Acá comencé con la sonrisa del gato cheshire, así que para guiarme mejor hice el patrón de la sonrisa con un pincel delgado y sombra negra, luego de esto delinee los bordes con pintura negra.
Luego de dibujar los bordes rellene la sonrisa con pintura negra, luego de rellenar toda la forma tome un pincel delgado y delinee los bordes con pintura blanca para resaltar el negro.
Third step:
I added concealer on my eyelids and blurred it, after that I placed two adhesive tapes at the end each eye, took the purple pigment and a brush and started applying on my eye, from the end to the beginning of my eye, achieving a sharper shape thanks to the tapes.
After removing the ribbons I took black shadow and applied it under my eyes, I also took highlighter and added it on my tear troughs and at the beginning of my eyes to highlight the purple color a little more.
I took my foundation and applied small dots on my face, blended it with my Beauty blender and sealed it with loose powder.
Fourth step:
Here I started with the cheshire cat smile, so to better guide me I made the smile pattern with a thin brush and black shadow, after that I outlined the edges with black paint.
After drawing the edges I filled the smile with black paint, after filling the whole shape I took a thin brush and outlined the edges with white paint to highlight the black.
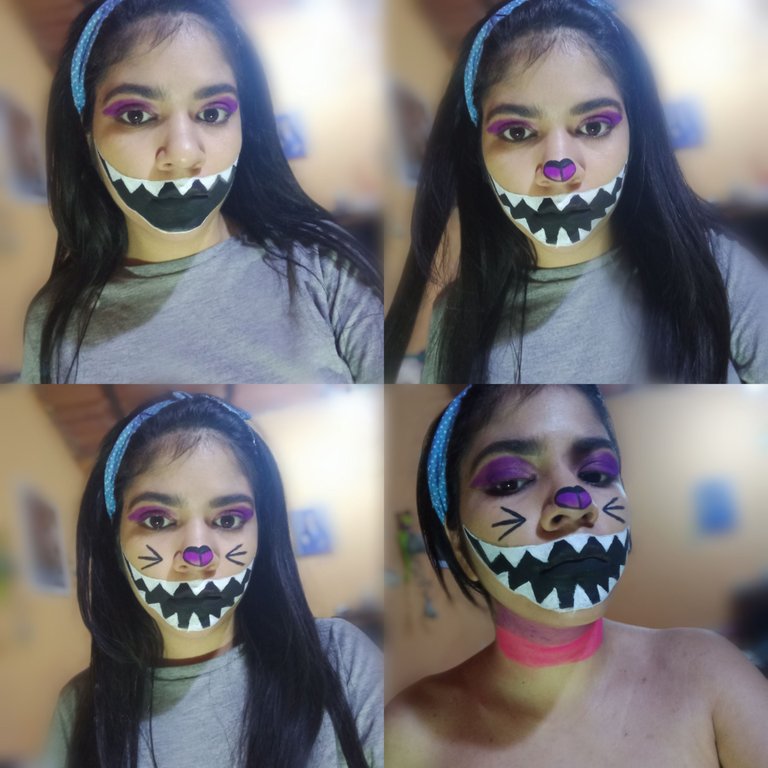
Quinto paso:
Ya con la pintura negra seca, tome un pincel muy delgado junto a la pintura blanca y comencé a dibujar pequeños triángulos invertidos para simular unos dientes afilados primero comencé con los de la parte superior, los cuales fui dibujando y rellenando con el color blanco.
Luego los de la parte inferior y también los rellene.
Sexto paso:
Al terminar la sonrisa comencé con los demás detalles, el siguiente fue la nariz del gato, así que dibuje un círculo en la punta de mi nariz y poco a poco fui haciendo pequeñas curvas para lograr una forma de nariz de gato, hice una división en el medio de esta misma y las divisiones las pinte con pigmento morado.
Luego de esto tome un pincel delgado e hice tres bigotes de cada lado de mi nariz.
Al terminar mi cara tome un poco de cinta adhesiva y cree tres divisiones en mi cuello, dónde colocaría los siguientes colores: Morado, rosado y morado, esto para llevar más la temática del gato y los colores que tiene en su cuerpo.
¡Y listo! Maquillaje terminado
Fifth step:
Already with the black paint dry, I took a very thin brush along with the white paint and began to draw small inverted triangles to simulate sharp teeth first I started with those of the upper part, which I was drawing and filling with the white color.
Then I drew the bottom ones and filled them in as well.
Sixth step:
When I finished the smile I started with the other details, the next one was the cat's nose, so I drew a circle on the tip of my nose and little by little I made small curves to achieve a cat nose shape, I made a division in the middle of it and the divisions I painted with purple pigment.
After this I took a thin brush and made three whiskers on each side of my nose.
When I finished my face I took some masking tape and created three divisions on my neck, where I would place the following colors: purple, pink and purple, this to bring more the cat's theme and the colors it has on its body.
And that's it! Finished makeup
El resultado / The result:
¡Muchas gracias por leer mi post! Estoy encantada de participar en esta iniciativa, aunque dure un poco haciendo el maquillaje no me resultó tan difícil, así que también me encantó el resultado ¿Que les parece? ¡Nos leemos pronto! XOXO.
Thank you so much for reading my post! I'm delighted to participate in this initiative, although it took me a while to do the makeup, it wasn't that difficult, so I also loved the result. See you soon! XOXO.
Text translated with: DeepL.
All photos of the procedure and results belong to me.
I love the step by step. Face painting is so fun with makeup or face paint. It is amazing how you can transform. I like your step by step and the teeth also.
Thank you very much! It's always fun to experiment with makeup, I'm glad you liked it.🥺
Ah, don't have a sad face emoji! I enjoyed the makeup you did!
This makeup around the mouth makes you somewhat similar to Mileena from Mortal Kombat. Without the cat's whiskers, you would certainly look very similar to Mileena.
I had to google it and I loved it! Although her teeth are a bit scarier, but I'll make a note for a future makeup 🤔