Como hacer una hermosa base a crochet para un frasco. //How to make a beautiful crochet base for a jar.
HOLAA¡¡ Amigos de HIVE espero hayan pasado un maravilloso día.
HELLO¡¡ HIVE friends I hope you had a wonderful day.
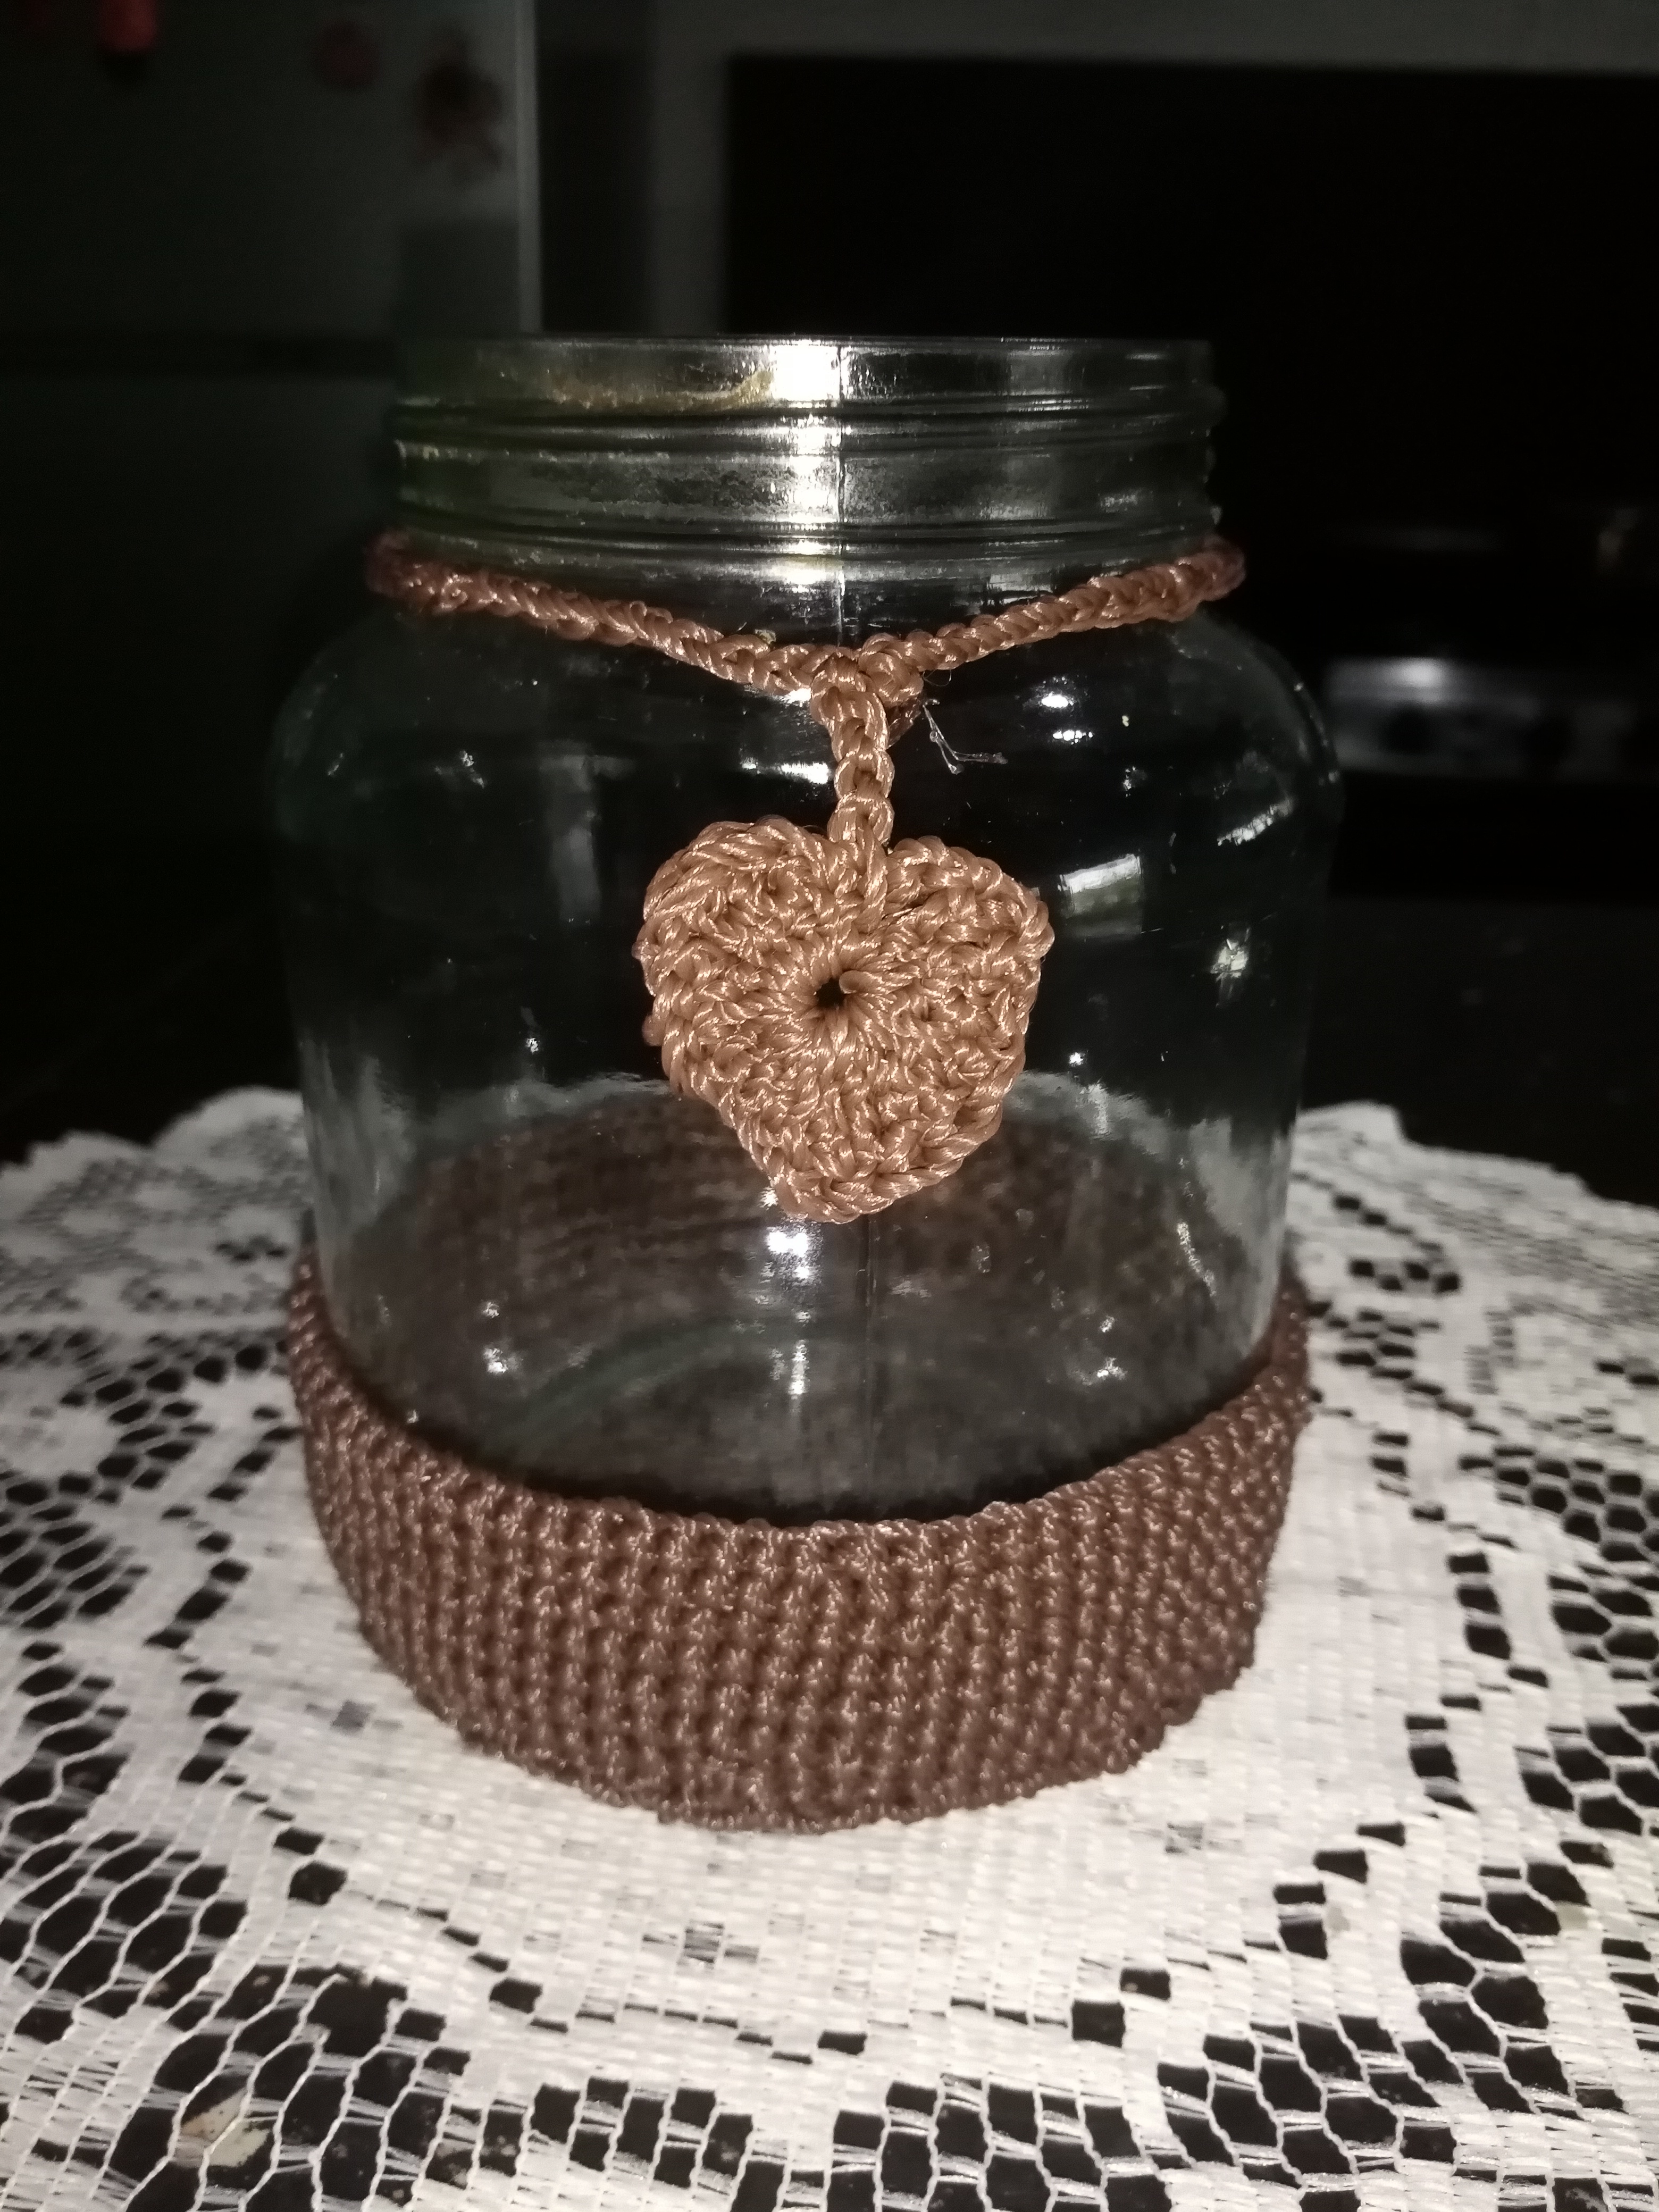
Hoy quisiera compartirles mi más reciente creación la cual se me ocurrió elaborar cuando me hallaba limpiando los gabinetes de mi cocina y encontré varios frascos de vidrio vacíos y debido a que, no todos estaban en mal estado decidí conservarlos pero quise darles un nuevo uso y aspecto algo diferente primero había pensado en pintarlos con acuarela elaborando diseños divertidos y coloridos qué combinarán con nuestra cocina luego pensé en hacerle figuras en foami o papel mache pero como era demasiado trabajo y requería muchos materiales decido irme por algo simple pero bonito.
Today I would like to share with you my most recent creation which I came up with when I was cleaning my kitchen cabinets and I found several empty glass jars and since not all of them were in poor condition I decided to keep them but I wanted to give them a new use and a different look, first I thought of painting them with watercolors making fun and colorful designs that would match our kitchen then I thought of making figures out of foami or paper mache but as it was too much work and required a lot of materials I decided to go for something simple but beautiful.
Y elaborar una bonita base decorativa a crochet qué no sólo le daría un nuevo aspecto al frasco sino que también lo protegiera de golpes y proporcionará mayor seguridad al principio fue algo difícil elaborarla debido a que era la primera vez que hacía una pieza de estas y pensé que quedaría muy simple por lo que con el mismo hilo qué hice la base elegí hacerle un pequeño adorno para la tapa para que no quedará tan simple espero les guste el resultado tanto como a mi.
And making a beautiful decorative crochet base that would not only give the bottle a new look but would also protect it from blows and provide greater security at first, it was somewhat difficult to make because it was the first time I had made a piece of these and I thought It would be very simple, so with the same thread that I made the base, I chose to make a small ornament for the lid so that it won't be so simple. I hope you like the result as much as I do.
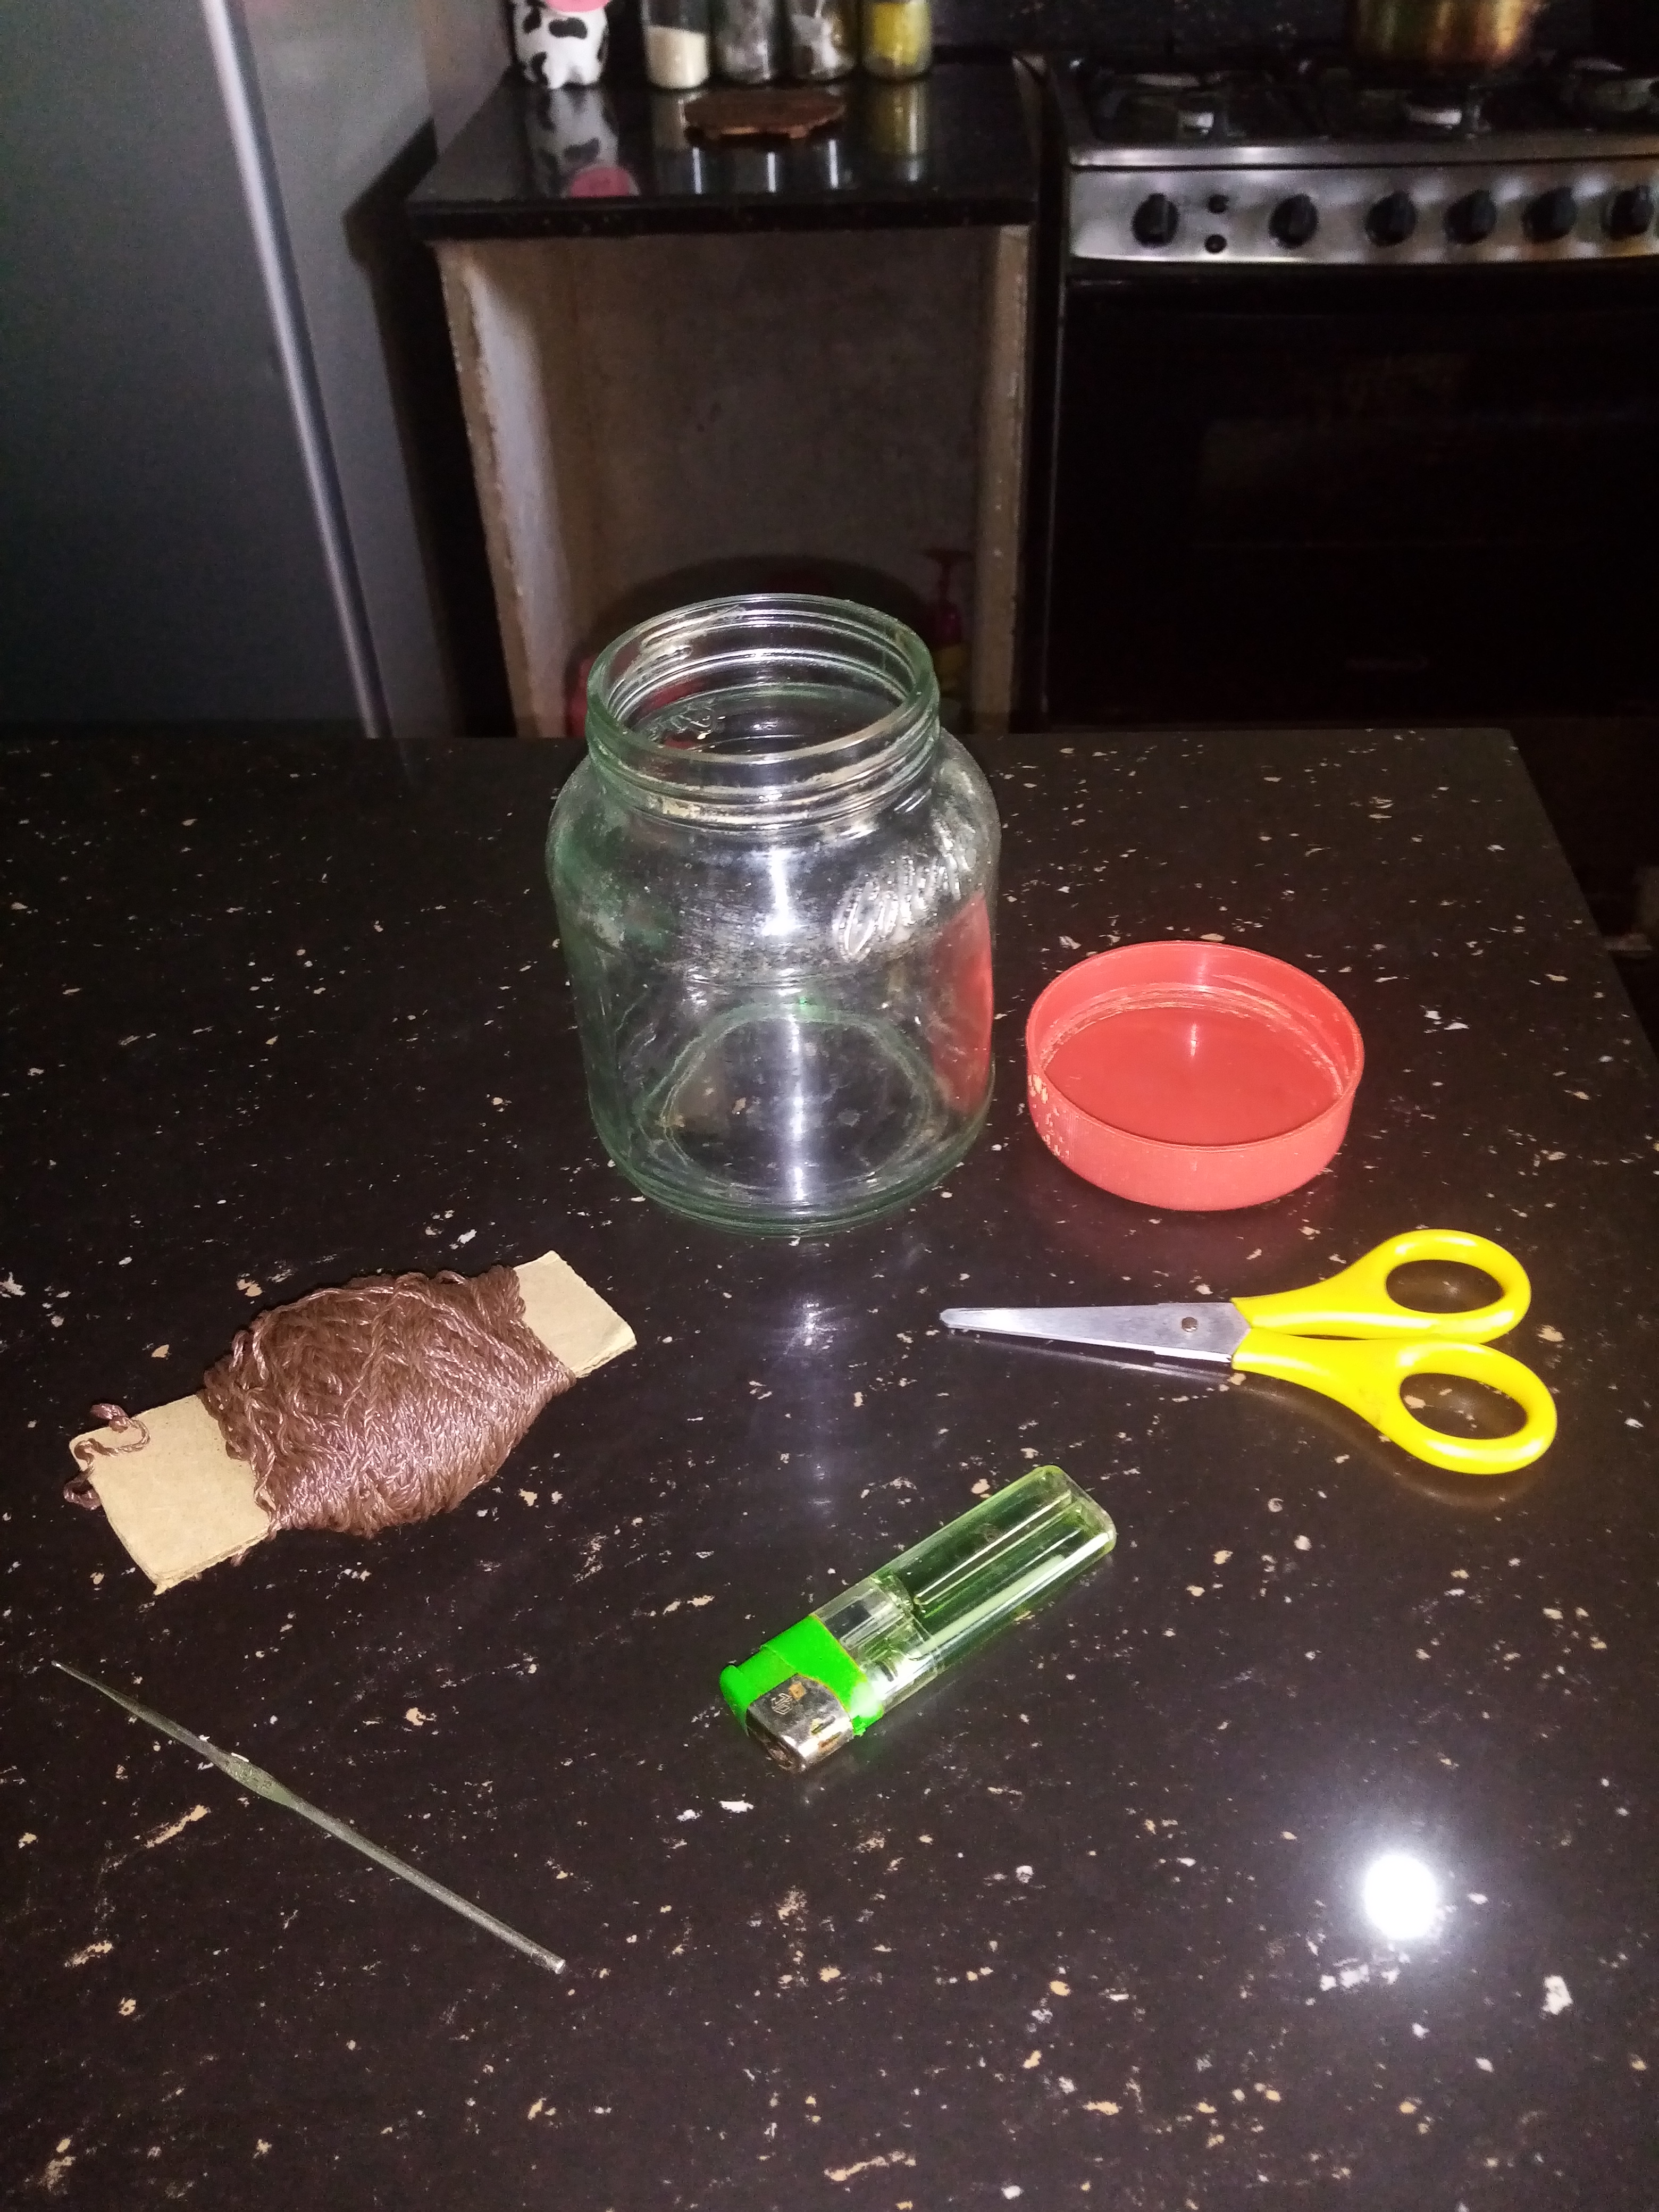
A continuación les mostrare los materiales que emplee y los pasos a seguir para su elaboración.
Next I will show you the materials that I used and the steps to follow for its elaboration.
Materiales.
- Hilo marrón
- Tijeras
- Aguja de tejer N°5
- Un frasco de vidrio.
- Un yesquero
Materials.
- brown thread
- Scissors
- Knitting needle No. 5
- A glass jar.
- A tinderbox
Elaboración.
Elaboration.
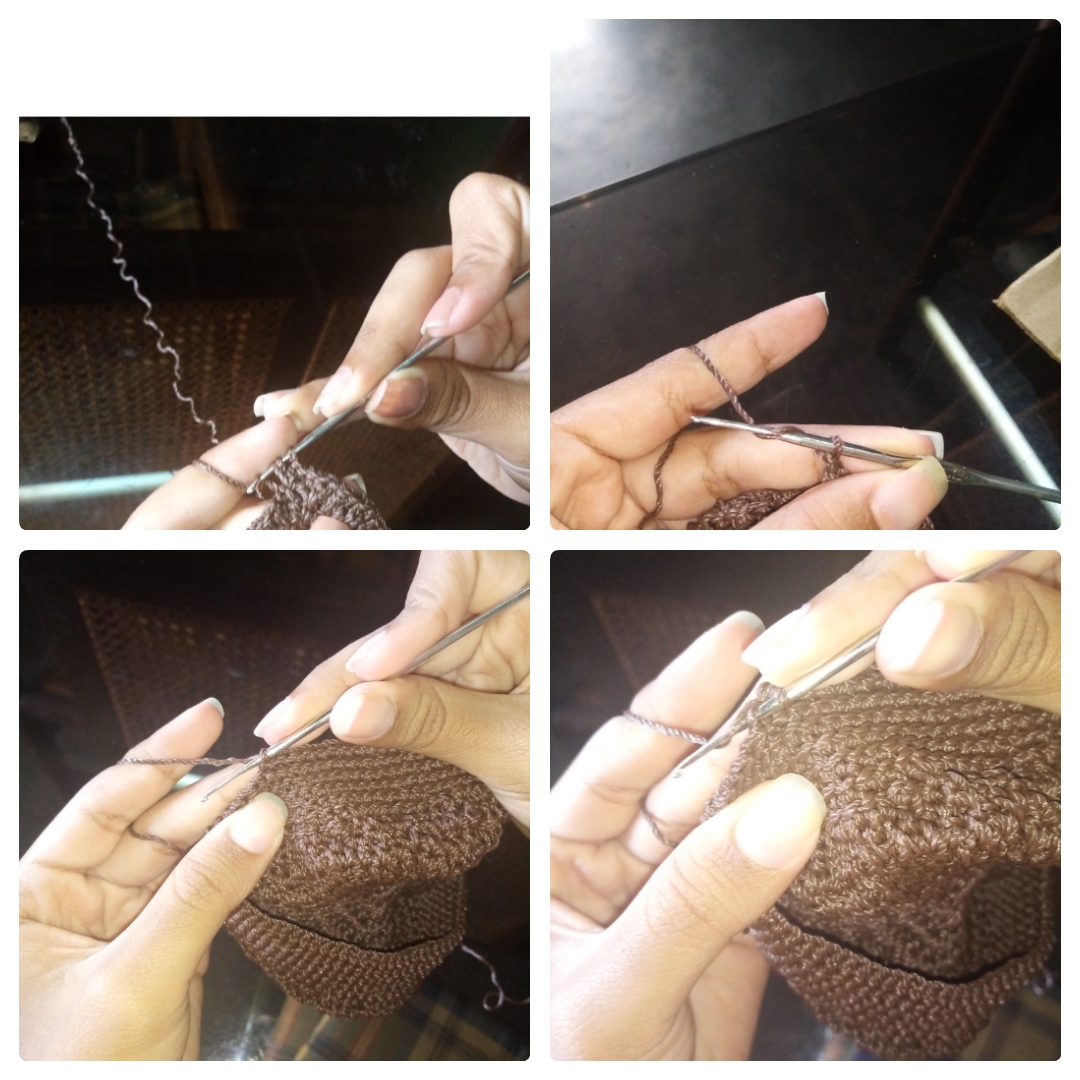
Paso 1
Tome el hilo procedí a elaborar un nudo deslizado para después hacer 6 puntos bajos.
Take the thread and proceed to make a slip knot and then make 6 low points.
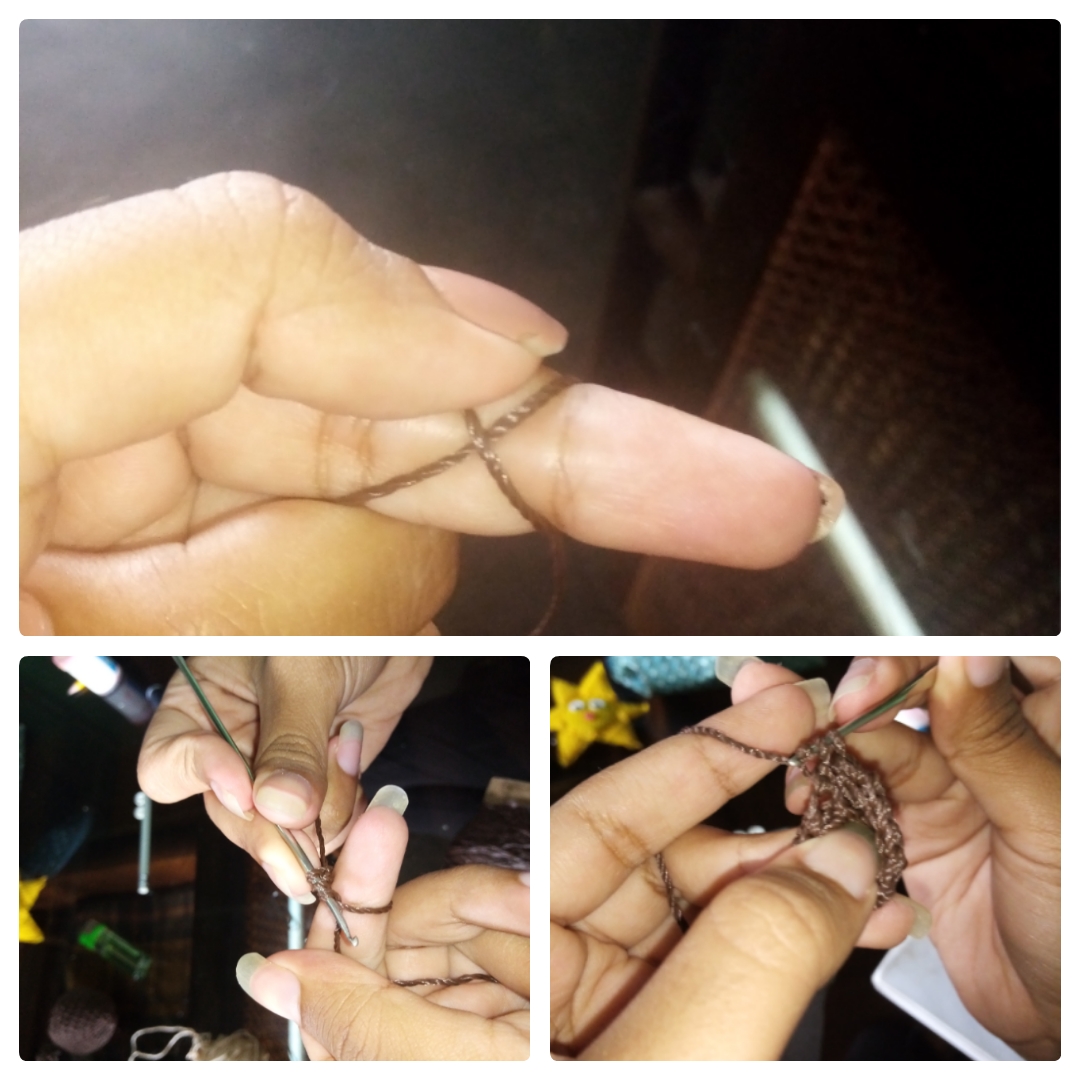

Después procedí a hacer en cada punto un aumento es decir dos puntos bajos por cada punto así obtuve un total de 12 y al repetí en la segunda vuelta lo mismo o obtuve 24 puntos.
Then I proceeded to make an increase in each point, that is, two low points for each point, so I obtained a total of 12 and I repeated the same in the second round or I obtained 24 points.
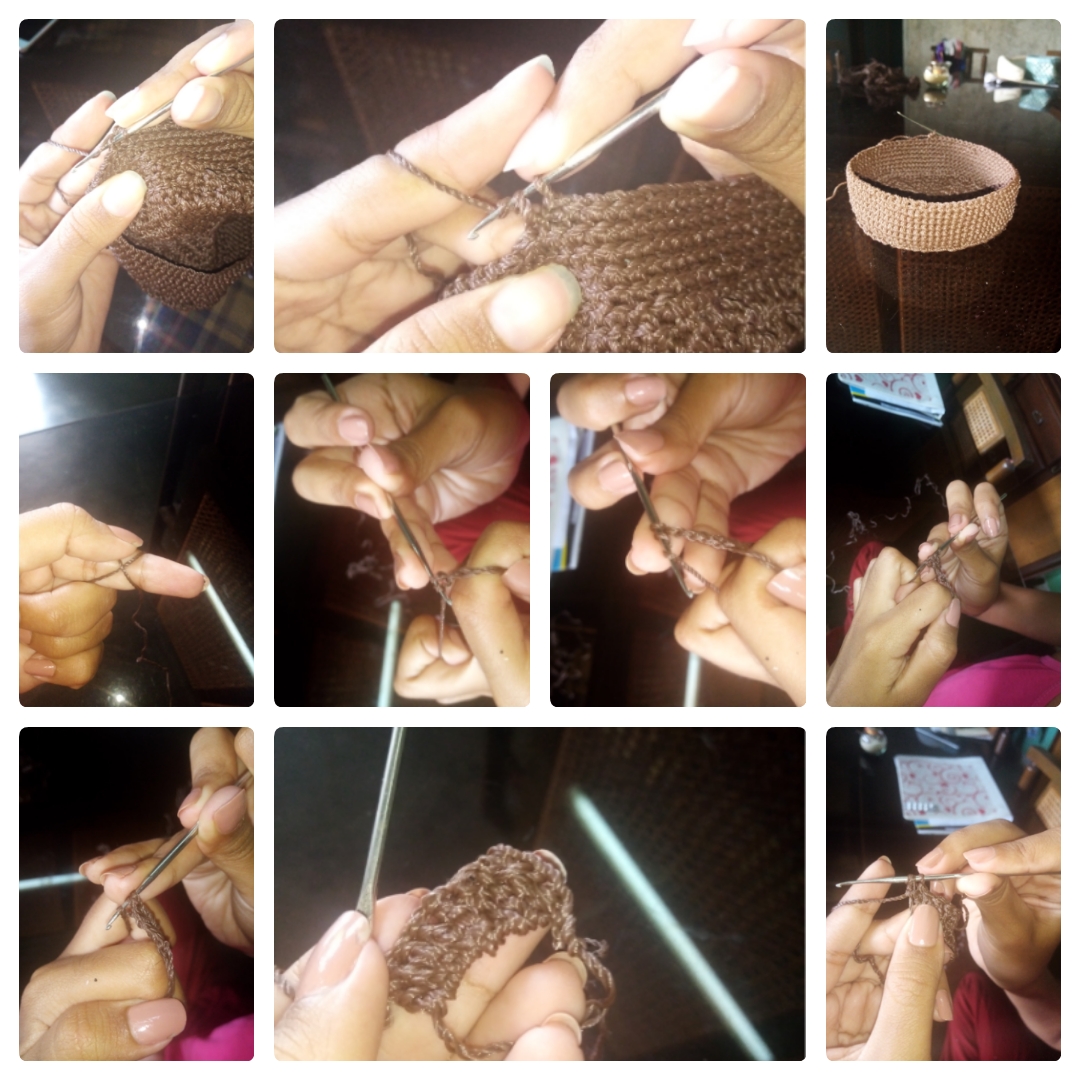
Paso 2
Luego en la tercera vuelta marque con un marcador el punto de inicio de hice puntos bajos en cada punto y luego hice 1 pinto de aumento y uno bajo.
Then on the third round I marked the starting point with a marker, I made single crochets in each stitch and then I made 1 pint increase and 1 low.
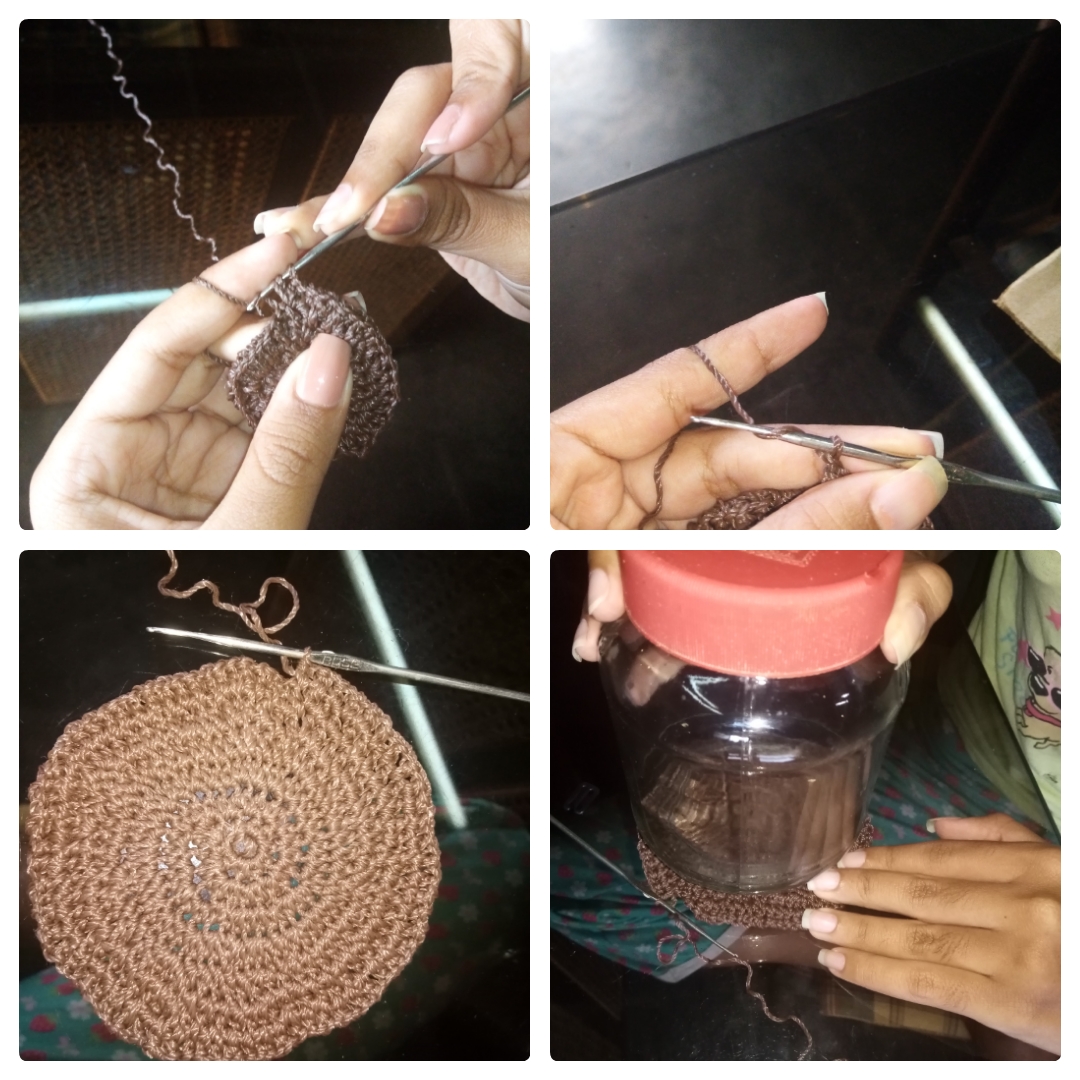
Para después en la siguiente vuelta hacer puntos bajos hasta que obtuvo el tamaño deseado al medirlo con el frasco. Cuando quedo listo la base con el tamaño justo procedo a hacer puntos altos en cada pinto.
Then, on the next round, make single crochets until you obtained the desired size when measured with the jar. When the base is ready with the right size, I proceed to make double crochets in each pint.
Paso 3
Repetí el proceso hasta obtener un grosor de 3 cm de alto y cerré con un pinto delizado para cortar el exceso de hilo.
I repeated the process until I obtained a thickness of 3 cm high and closed with a slipped pinto to cut the excess thread.
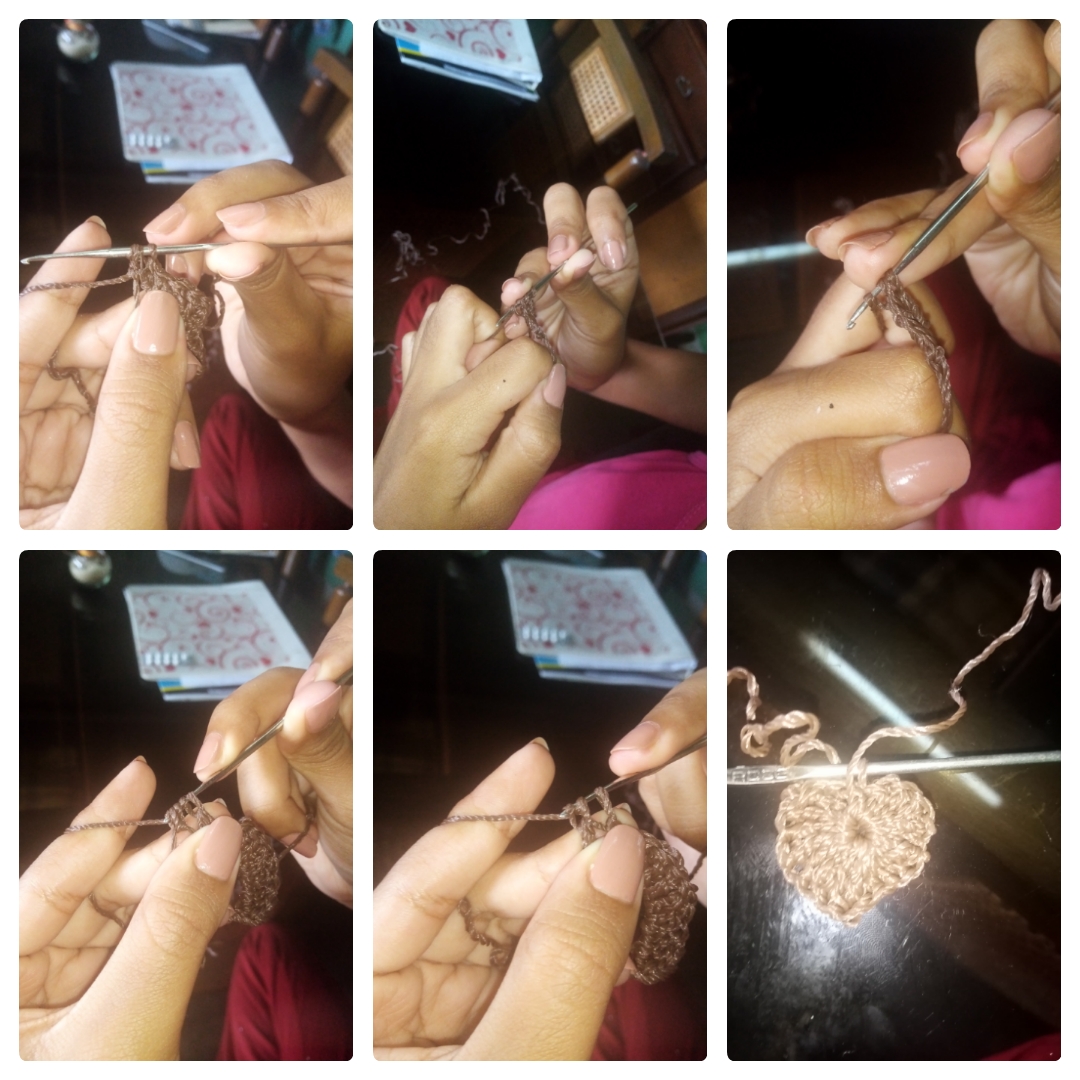
Ya hecho esto hice la decoración de arriba un corazón haciendo un nudo delizado y el mismo una cadeneta de 7 para hacer una doble vareta dentro del anillo repetí el proceso 6 veces más y luego hice 3 varetas simples y una doble de nuevo para repetir el proceso pero esta vez invertido cerré con un punto deslizado y tire del hilo.
Once this was done, I made the decoration above a heart making a slip knot and the same chain of 7 to make a double crochet inside the ring. I repeated the process 6 more times and then I made 3 single crochet and one double crochet again to repeat the process but this time inverted I closed with a slip stitch and pull the thread.
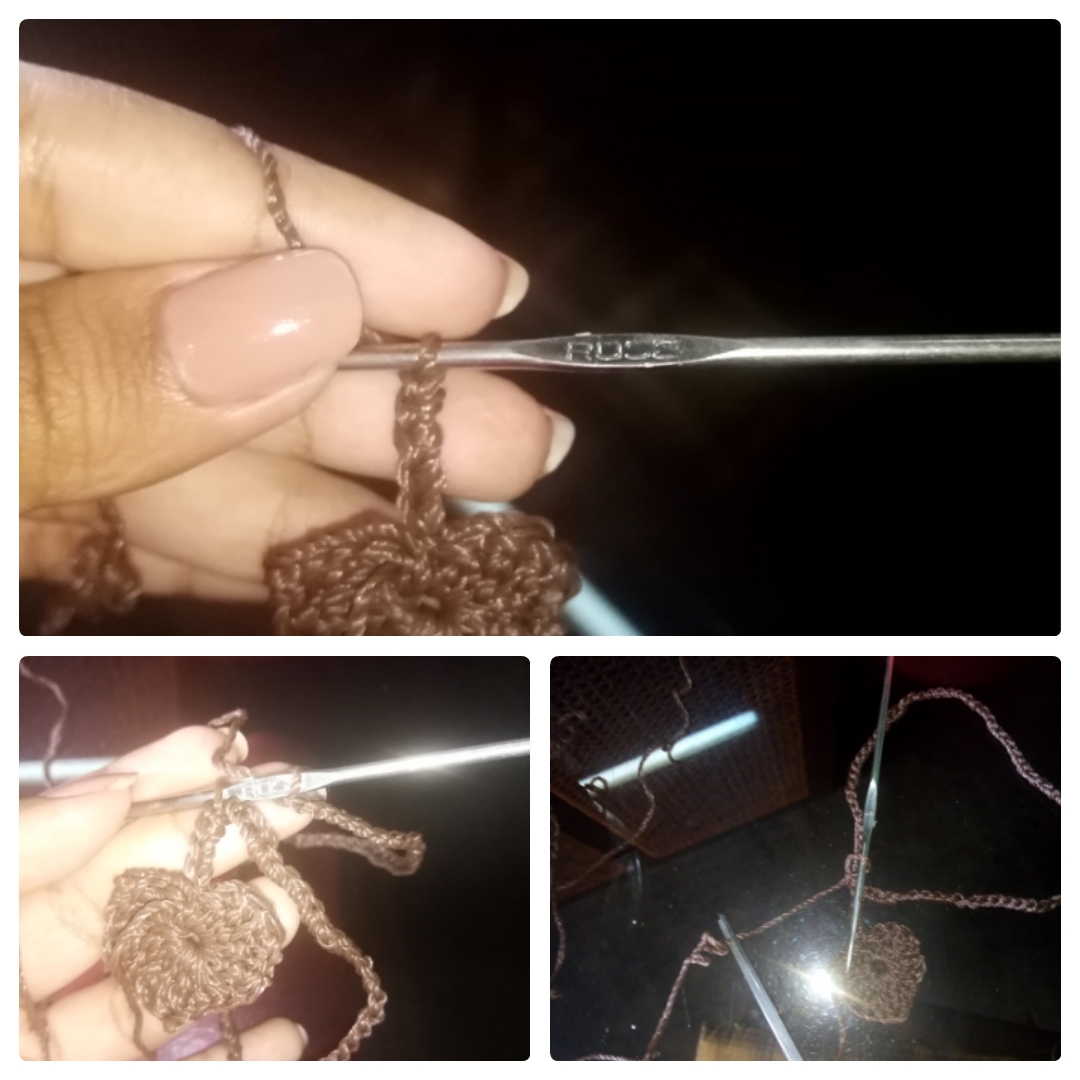
Paso 4
Finalmente ya al cerrar el corazón todo lo que pide me dispuse a tener una cadeneta qué le diera la vuelta al frasco y uní ambos extremos con un pinto deslizado contando los 4 primeros puntos antes de llegar al corazón.
Finally, when closing the heart all that it asks for, I got ready to have a chain that would turn the bottle around and I joined both ends with a slip stitch counting the first 4 stitches before reaching the heart.
Y LISTOOO Tenemos una hermosa base a crochet para frascos qué no sólo es muy bonita u fácil de hacer sino que protegera tus envases de rayones y golpes también se manchas el grosor puedes adaptarlo a ti gusto así como los colores se pueden combinar hasta tres o las colores para variar el diseño el único límite es tu imaginación espero les haya gustado este sencillo pero bonito trabajo manual.
AND READY We have a beautiful crochet base for jars that is not only very beautiful and easy to make, but it will protect your containers from scratches and blows, the thickness also stains, you can adapt it to your liking, as well as the colors can be combined up to three or the colors to vary the design, the only limit is your imagination, I hope you liked this simple but beautiful manual work.
MUCHAS GRACIAS por visitar mi blog hasta la próxima publicación.
THANK YOU SO MUCH for visiting my blog until the next post.
Congratulations!
Your post has been manually curated and reblogged.
You can follow our curation trail on Hive.Vote
If you want to support us and the authors we vote for you can upvote this comment or delegate some Hive Power to our account. Thanks!
Propose a worthy post by mentioning us in the post or in a comment.
We reblog curated posts, follow us if you wish to see them in your feed.