Un saludo, estimados habitantes de esta bella comunidad #NeedleWorkMonday
Esta es la segunda vez que emprendo la labor de tejer un vestido a crochet para una bebé. La primera vez que lo hice quedó demasiado pequeño, era una talla para recién nacido, por lo que la bebé sólo lo uso en su tercera semana después del nacimiento.
Por eso, esta vez quise buscar un modelo bonito y en talla grande, al menos entre 6 y 9 meses. Así, no demoré mucho en conseguir en Youtube un modelo que me gustó, muy bien explicado y, además, en una talla ideal para mi proyecto. El canal se llama Mi rincon del tejido.
Para entonces, faltaban unas tres semanas para el nacimiento de la niña.
Para no replicar el proceso que me sirvió de guía en Internet, les voy a compartir los videos correspondientes a la parte 1 y parte 2 del tutorial para tejer el vestido. En cambio, me voy a concentrar en señalar las modificaciones que hice sobre la marcha para darle a mi tejido un toque particular. Así que, espero que me acompañes en esta experiencia.
Empecé a tejer en mis pequeños ratos libres, cuando en la oficina no tenía trabajo sacaba el ovillo y la aguja de crochet y avanzaba poco a poco.
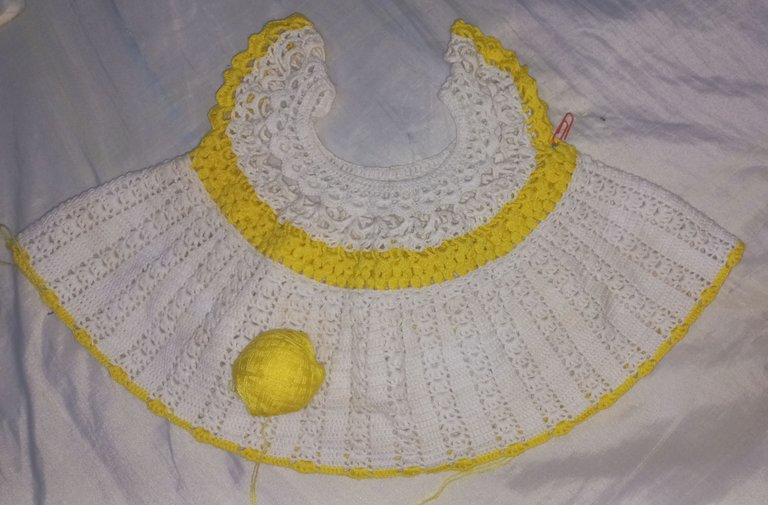
Para empezar, el tutorial indica la realización de un número determinado de cadenas. Como yo quería un vestido un poco más grande decidí tejer mayor cantidad de cadenas (unas 20 más) para iniciar en el área del cuello. Gracias a ello, la amplitud del cuello resultó suficiente para el tamaño de la cabeza de una bebé de más de seis meses, según estimo.
De allí en adelante, empecé a replicar los pasos explicados en el tutorial. De manera que, cuando llegué a los pasos del punto Piña decidí cambiar la lana blanca por lana de color amarillo. De esa manera buscaba la combinación de mi proyecto. Además, sentía que como quería una talla un poco más grande, lo ideal sería duplicar la vuelta de los puntos Piña. Así lo hice, en lugar de una vuelta tejí dos con ese bonito punto a crochet.
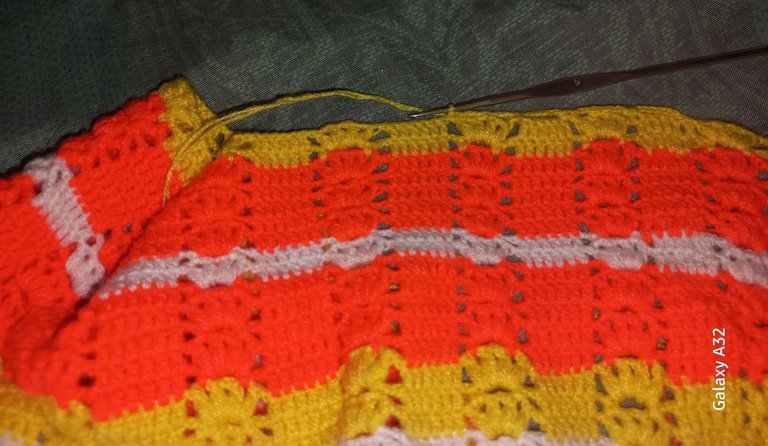
Luego, al empezar a tejer el faldón volví a cambiar el color de la lana a blanco. Seguí los pasos de manera exacta durante las primeras vueltas (unas ocho) hasta que noté que la falda me quedaría demasiado ancha y ya se me agotaba la disponibilidad de lana para hacerla lo suficientemente larga.
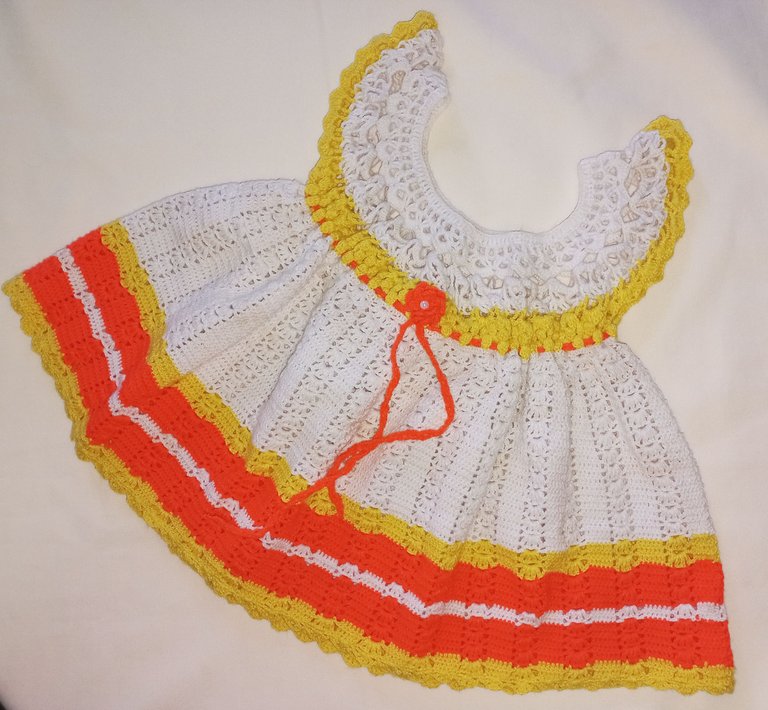
De manera que, mi suegra me facilitó un poco de lana de color naranja, pues no logramos conseguir color blanco ni color amarillo. De esa manera, me las ingenié para tratar de combinar la mitad del faldón inferior con los tres colores.
Al finalizar, decidí tejer una última vuelta en pequeños abanicos para darle un acabado más personalizado a mi pequeño vestido.
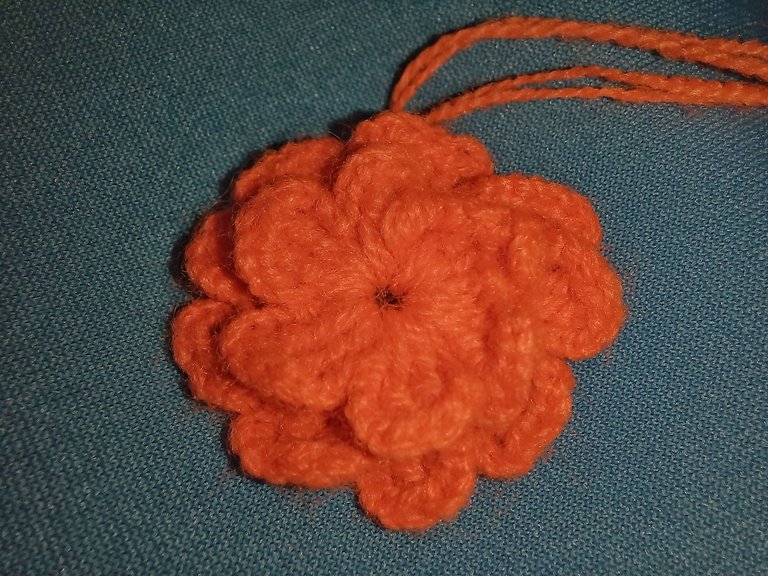
Ya prácticamente había culminado mi proyecto, pero sentía que le faltaba algo. Y era esa pequeña florecilla que quería colocar sobre la parte superior del faldón, en la combinación de color. Así que, mi suegra me orientó cómo hacerla. El resultado me encantó. Aquí les dejo el tutorial
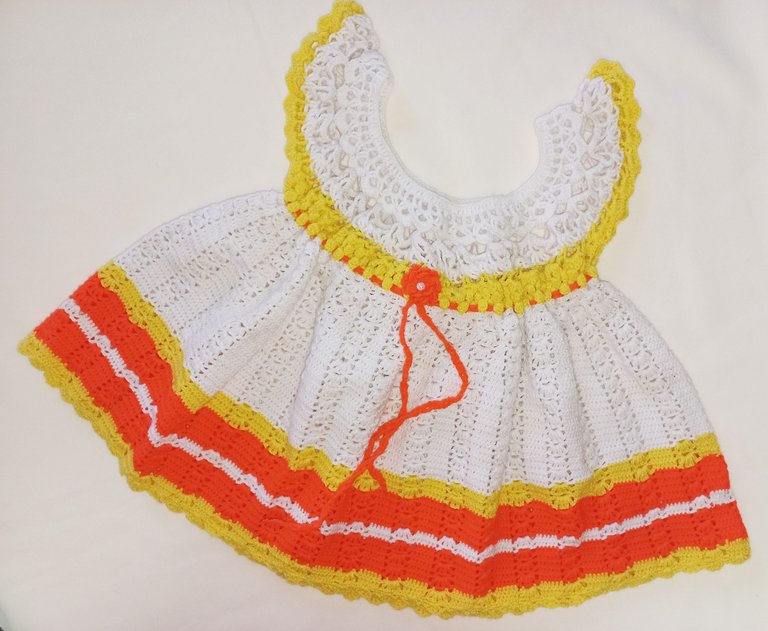
Por otro lado, pese a que ya había terminado el vestido, sentía que era muy ancho, en comparación con el largo de la falda. Así que se me ocurrió una idea. Tejí una cuerda, intercalando puntos altos hasta lograr el largo deseado. Ese cordón tejido lo inserté a través de los espacios entre puntos altos tejidos antes de iniciar el faldón. Eso me pareció espectacular, pues funcionó como eso que llaman "pasa cinta". Dejé los extremos largos para poder ajustar el ancho del vestido al tamaño deseado y poder hacer una pequeña corbata si así se desea.
Al final el resultado me gustó mucho. Así pude obsequiarselo a la pequeña bebé. Para entonces, ya ella cumplía dos meses de edad. Lo bueno fue que lo hice lo suficientemente grande. Vale destacar que empecé a tejer unas semanas antes de su nacimiento.
Por último, les dejo los videos que me sirvieron de guía en este proyecto.
Espero que les guste mi post sobre el trabajo realizado. Gracias de antemano por su lectura y apoyo. Quedo pendiente a sus sugerencias. Un abrazo cordial.
English
Greetings, dear inhabitants of this beautiful community #NeedleWorkMonday.
This is the second time I have undertaken the task of crocheting a dress for a baby. The first time I made it it came out too small, it was a newborn size, so the baby only wore it in her third week after birth.
So this time I wanted to look for a nice model in a large size, at least between 6 and 9 months. So, it didn't take me long to find on Youtube a model that I liked, very well explained and, moreover, in an ideal size for my project. The channel is called [Mi rincon del tejido] (https://youtube.com/@MiRincondelTejido).
By that time, it was about three weeks before the birth of the baby girl.
In order not to replicate the process that I used as a guide on the Internet, I am going to share with you the videos corresponding to part 1 and part 2 of the tutorial to knit the dress. Instead, I'm going to concentrate on pointing out the modifications I made on the fly to give my knitting a particular touch. So, I hope you will join me in this experience.
I started knitting in my spare time, when I had no work to do at the office, I took out the ball of yarn and the crochet needle and advanced little by little.
To begin with, the tutorial shows how to make x chains. Since I wanted a slightly larger dress I decided to knit a total of chains to start in the neck area. Because of this, the neck width turned out to be sufficient for the head size of a baby over six months old, I estimate.
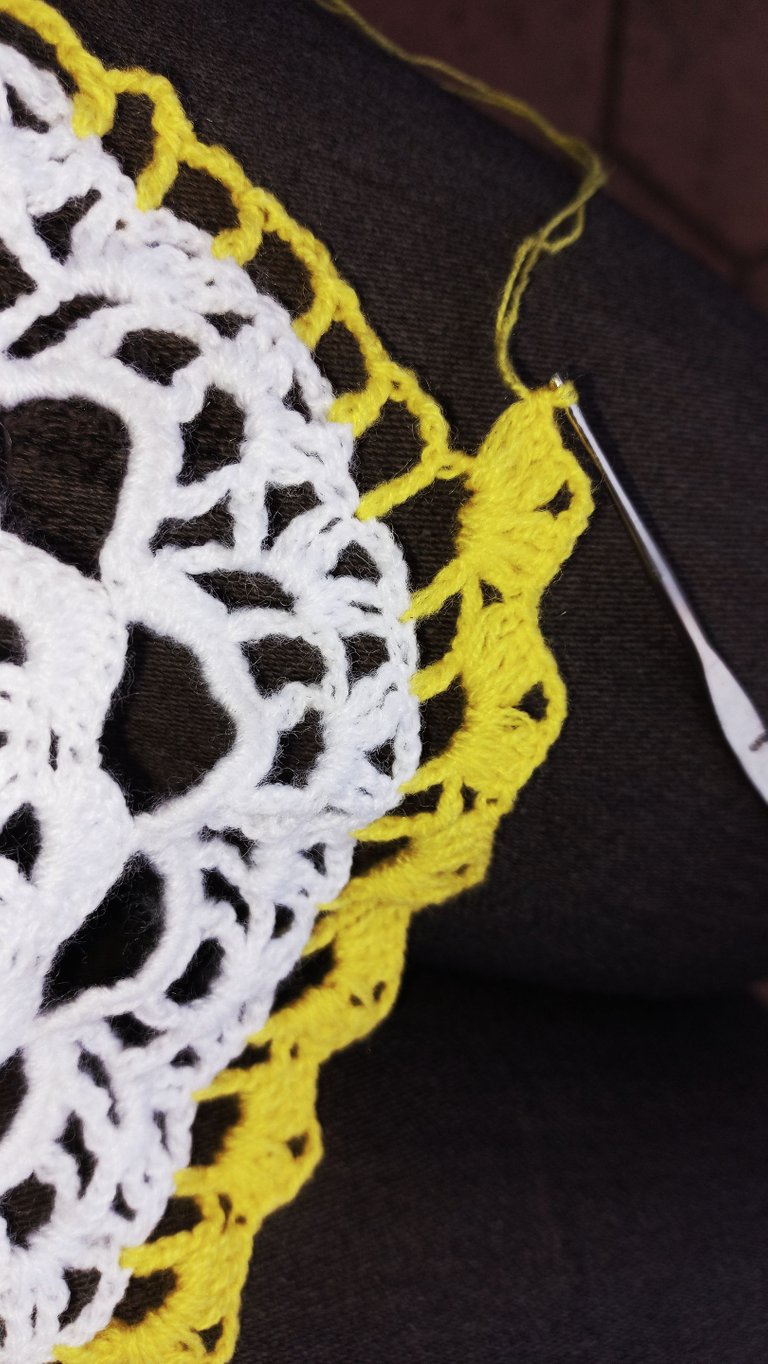
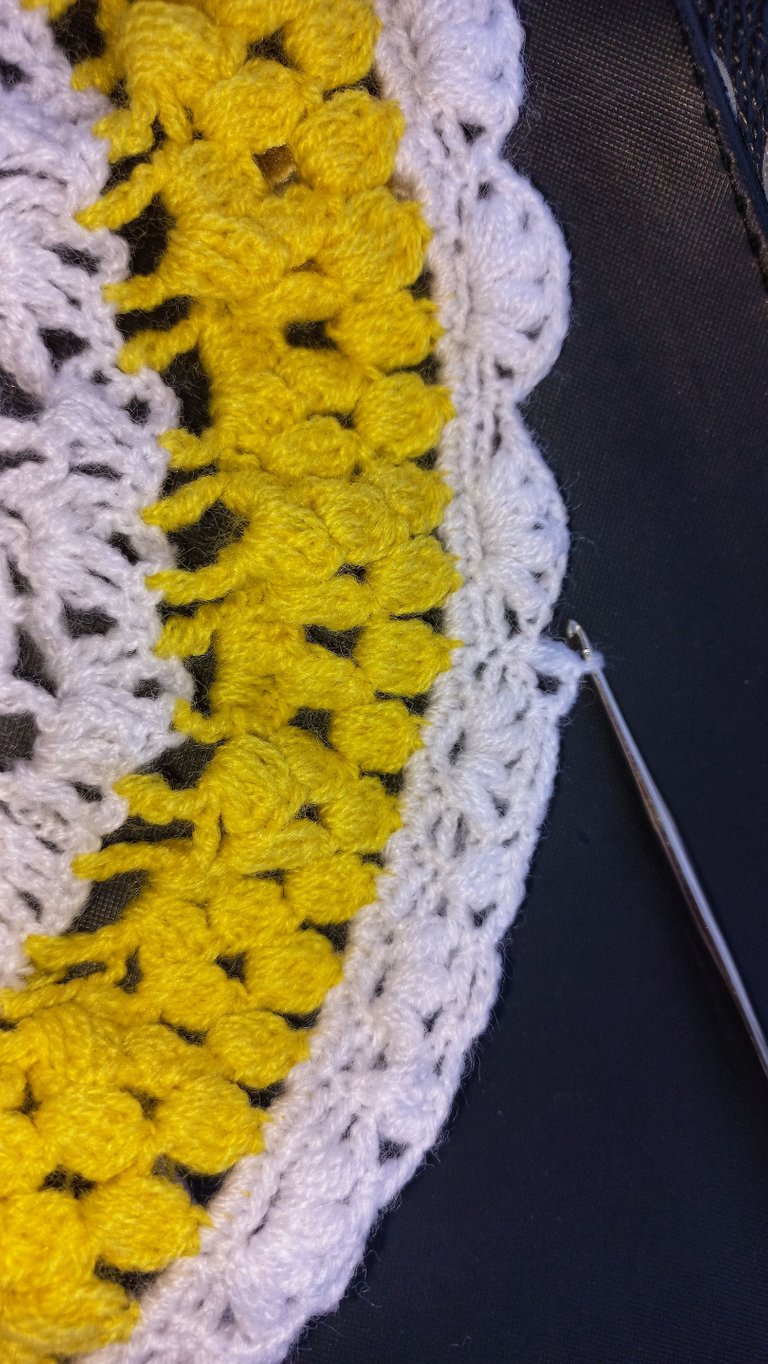
From then on, I started replicating the steps explained in the tutorial. So, when I got to the steps of the Pineapple stitch I decided to change the white yarn for yellow yarn. That way I was looking for the combination of my project. Also, I felt that since I wanted a slightly larger size, the ideal would be to double the round of the Pineapple stitches. So I did it, instead of one row I knitted two with this beautiful crochet stitch.
Then, when I started knitting the skirt I changed the color of the yarn back to white. I followed the steps exactly for the first few rounds (about eight) until I realized that the skirt would be too wide and I was running out of yarn to make it long enough.
So, my mother-in-law provided me with some orange wool, since we couldn't get white or yellow. So, I managed to try to combine half of the bottom skirt with the three colors.
At the end, I decided to knit a last round in small fans to give a more personalized finish to my little dress.
I had almost finished my project, but I felt that something was missing. And it was that little flower that I wanted to place on the top of the skirt, in the color combination. So, my mother-in-law guided me on how to do it. I loved the result. Here is the tutorial
On the other hand, even though I had already finished the dress, I felt it was too wide, compared to the length of the skirt. So I came up with an idea. I knitted a cord, interspersing high stitches until I achieved the desired length. That woven cord I inserted through the spaces between the knitted high stitches before starting the skirt. I thought this was spectacular, as it worked like a "ribbon pass-through". I left the ends long so that I could adjust the width of the dress to the desired size and make a small tie if desired.
In the end I really liked the result. I was able to give it to the little baby as a gift. By then, she was already two months old. The good thing was that I made it big enough. It is worth noting that I started knitting a few weeks before her birth.
Finally, here are the videos that guided me in this project.
I hope you like my post about the work I did. Thank you in advance for your reading and support. I look forward to your suggestions. Best regards.
Texto original en español // Original text in Spanish
Traducido al inglés con Deepl // Translated to English with Deepl
Fotografías: fuente propia // Photography: source own
Edición de fotografías: Snapseed y GridArt // Photo editing: Snapseed and GridArt
Te quedó precioso. Me encantan los colores que elegiste.
Que bueno que pudiste hacer con precisión los aumentos correspondientes para cambiar la talla. Esto requiere de experiencia, al menos así me parece.
Éxitos.
Gracias por tu apreciación. Siii, realmente. Yo no tengo mucha experiencia en el tejido, mi suegra me ayuda a aclarar dudas cada vez que las tengo, se lo agradezco
Tejer vestidos es realmente lindo y poder jugar con los colores y las puntadas lo es muchos más. Has hecho un gran trabajo ya que el vestido te quedó muy bonito. Gracias por compartir. Saludos y bendiciones.
!discovery 37
This post was shared and voted inside the discord by the curators team of discovery-it
Join our Community and follow our Curation Trail
Discovery-it is also a Witness, vote for us here
Delegate to us for passive income. Check our 80% fee-back Program
Thanks, @discovery-it team
Te quedó precioso. Me encantan los colores que elegiste.
Que bueno que pudiste hacer con precisión los aumentos correspondientes para cambiar la talla. Esto requiere de experiencia, al menos así me parece.
Éxitos.
Gracias por tu apreciación. Siii, realmente. Yo no tengo mucha experiencia en el tejido, mi suegra me ayuda a aclarar dudas cada vez que las tengo, se lo agradezco
Congratulations, your post has been upvoted by @dsc-r2cornell, which is the curating account for @R2cornell's Discord Community.
Tejer vestidos es realmente lindo y poder jugar con los colores y las puntadas lo es muchos más. Has hecho un gran trabajo ya que el vestido te quedó muy bonito. Gracias por compartir. Saludos y bendiciones.
Wow Maria que genial te quedó, haz avanzado mucho y te felicito 🤗