[ESP - ENG] Maquillaje full color con cortes múltiples🌈💎 | Por: @marilegny.
¡Hola hola, queridos amigos de Makeup Power! Deseo que tengan una maravillosa semana, llena de éxitos y bendiciones💞 Yo estoy súper emocionada de compartirles el motivo de mi desvelo de anoche jaja y es este hermoso maquillaje multicortes, que realicé para recrear la técnica aprendida en una master class que vi el día de ayer y la verdad es que terminé muy cansada, pero muy contenta con el resultado final así que sin más, comencemos con el paso a paso🌈💎
Hello hello, dear friends of Makeup Power! I wish you have a wonderful week, full of successes and blessings💞 I'm super excited to share with you the reason of my sleeplessness last night haha and it is this beautiful multi-slice makeup, which I did to recreate the technique learned in a master class that I saw yesterday and the truth is that I ended up very tired, but very happy with the final result so, let's start with the step by step🌈💎
💎💖 Paso a paso | Step by Step 💖💎
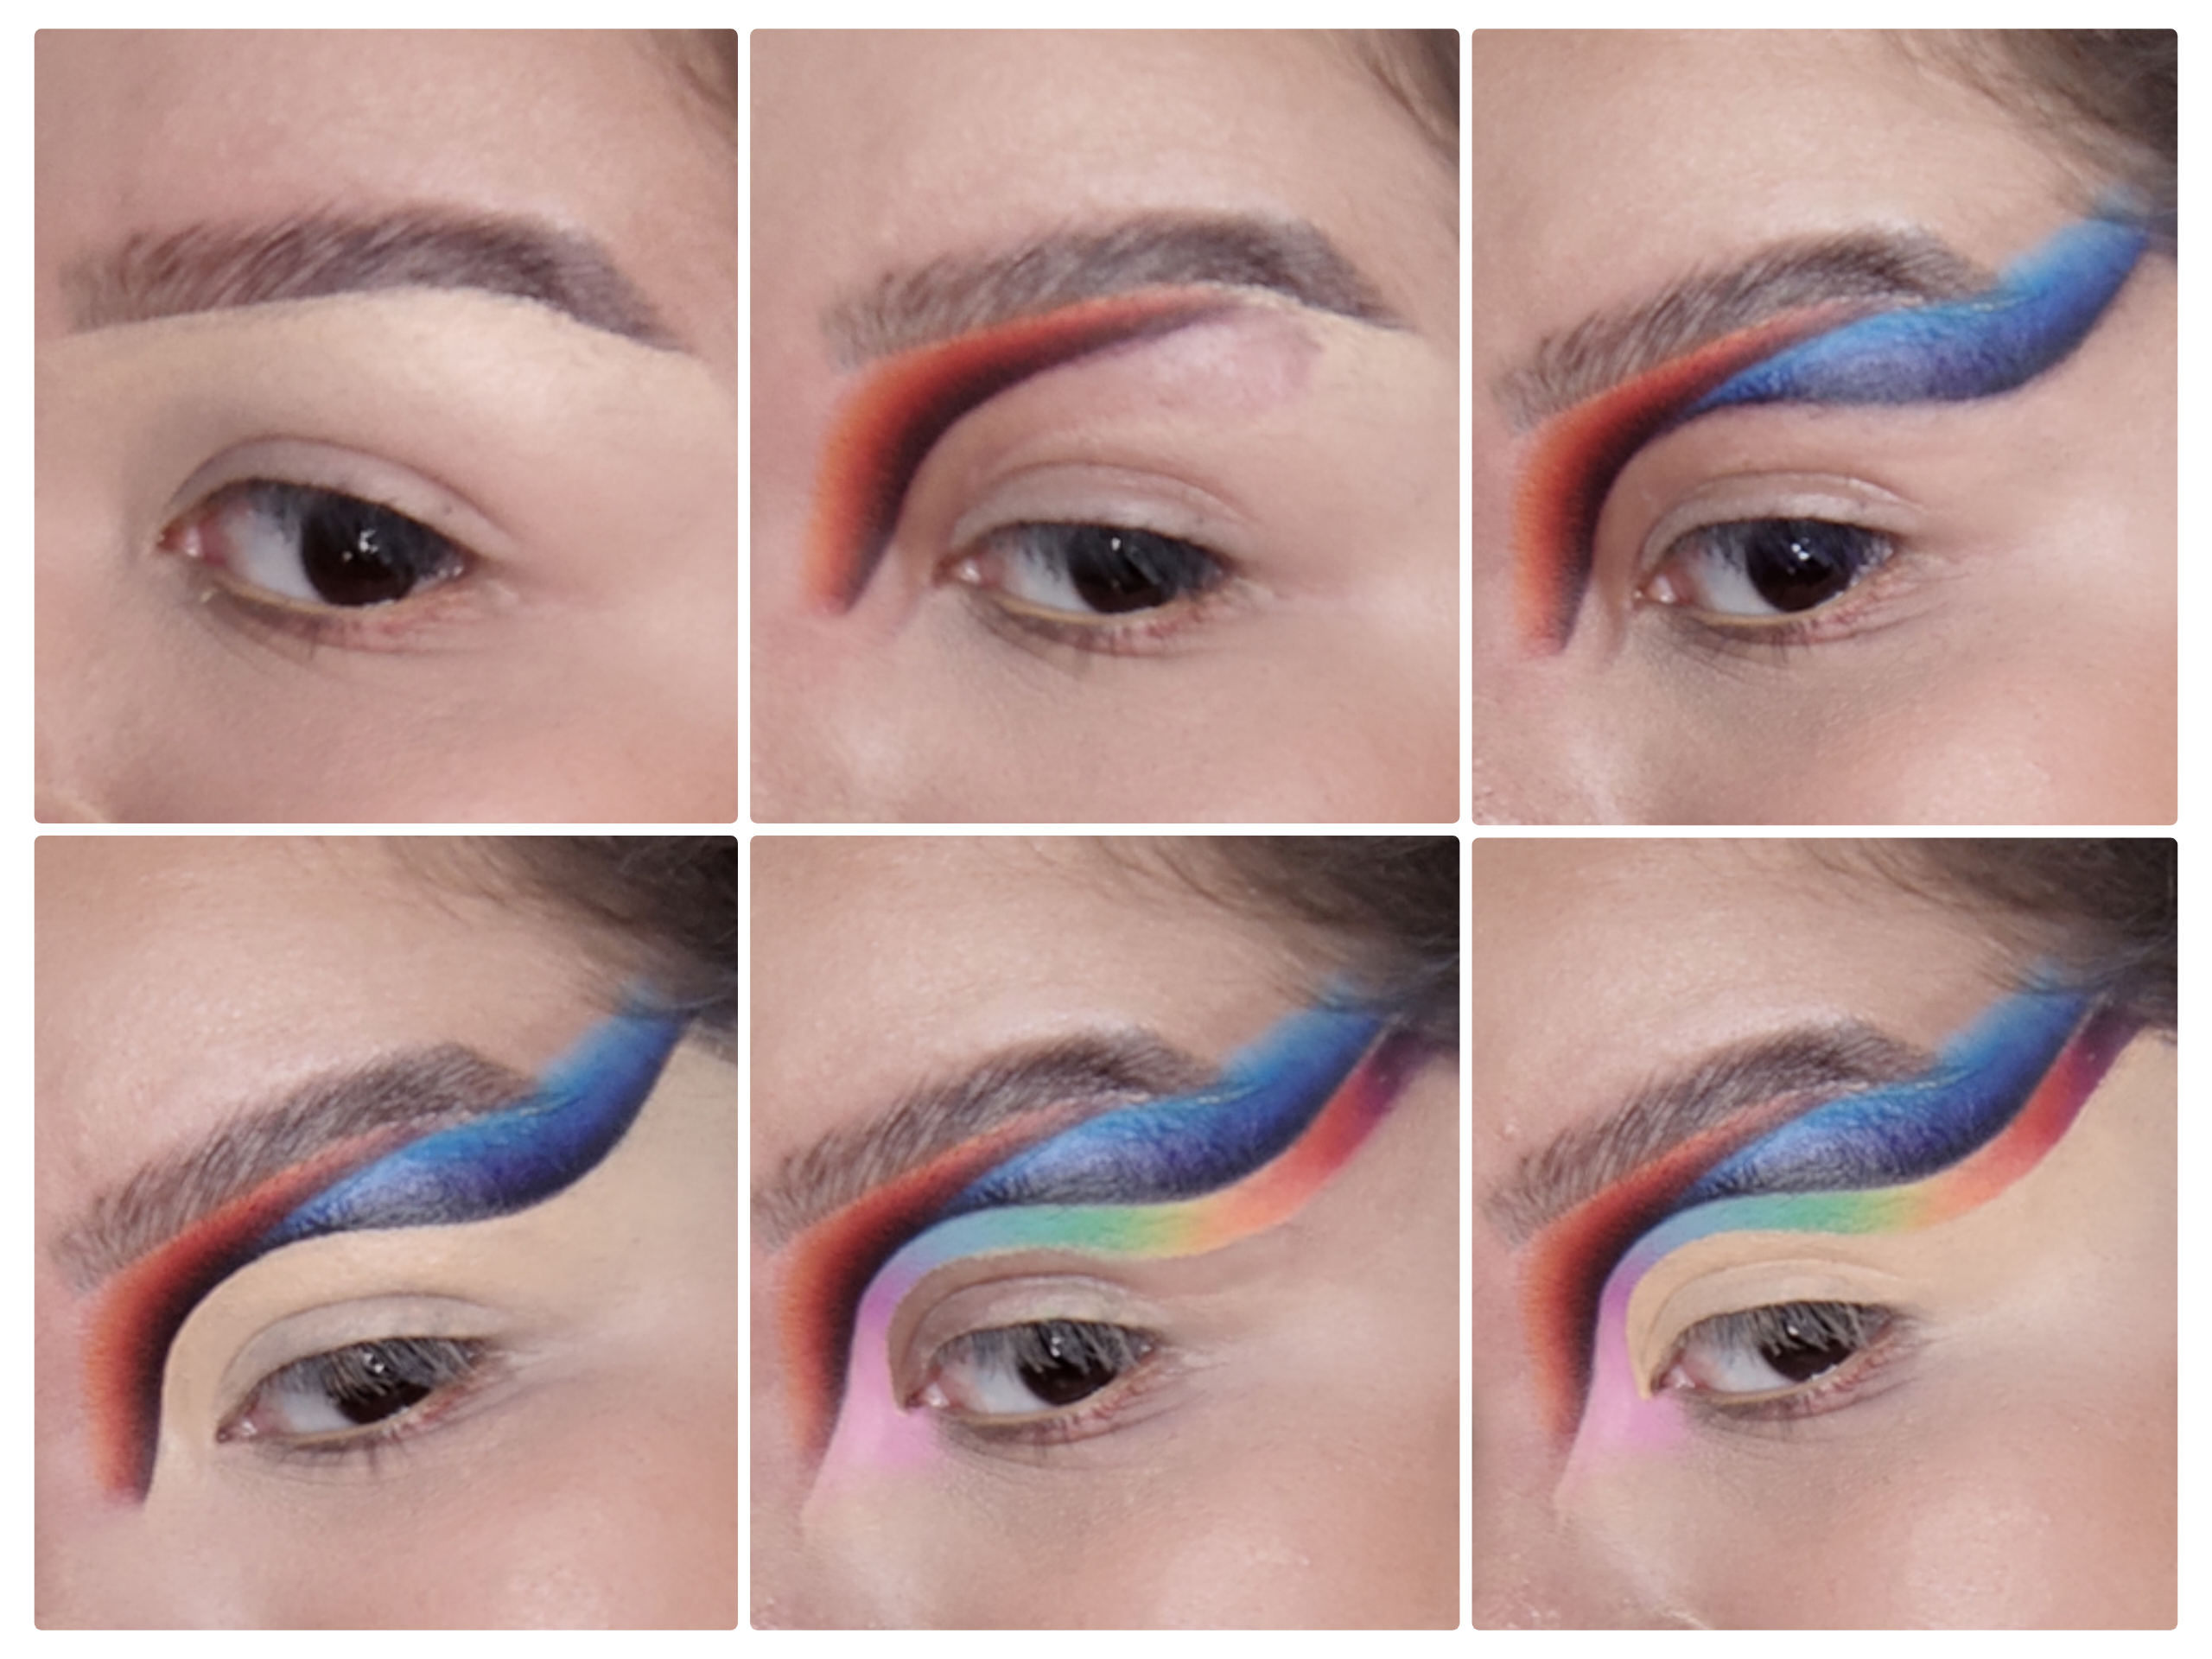
Empezaremos este look realizando cejas orgánicas Ya que tendremos un poco más de espacio en el párpado para realizar los cortes y además la definimos con corrector un poco más arriba de lo habitual, para añadir algo de espacio extra. Difuminamos muy bien el excedente hacia el párpado, para utilizar como prebase de sombra y lograr la saturación deseada en cada color.
Iniciamos nuestro primer corte, definiendo el área con una sombra negra y luego difuminando hacia arriba con sombra roja y naranja. Luego realizamos el segundo corte con una crema azul, para difuminar desde su parte inferior hacia la superior con sombra negra, morada y azul. Limpiamos nuevamente para realizar un corte de cuenca con corrector y en esta oportunidad sellaremos realizando un sombreado arcoiris iniciando con una sombra rosada, luego morada, azul, verde, amarilla, naranja, roja y negro, para realizar un corte de cuenca con corrector:
We will start this look by making organic eyebrows Since we will have a little more space on the eyelid to make the cuts and we also define it with concealer a little higher than usual, to add some extra space. We blend the excess very well towards the eyelid, to use as a shadow primer and achieve the desired saturation in each color.
We start our first cut, defining the area with a black shadow and then blending upwards with a red and orange shadow. Then we make the second cut with a blue cream, to blur from its lower part to the upper part with black, purple and blue shadow. We clean again to make a basin cut with concealer and this time we will seal by making a rainbow shading starting with a pink shadow, then purple, blue, green, yellow, orange, red and black, to make a crease cut with concealer:
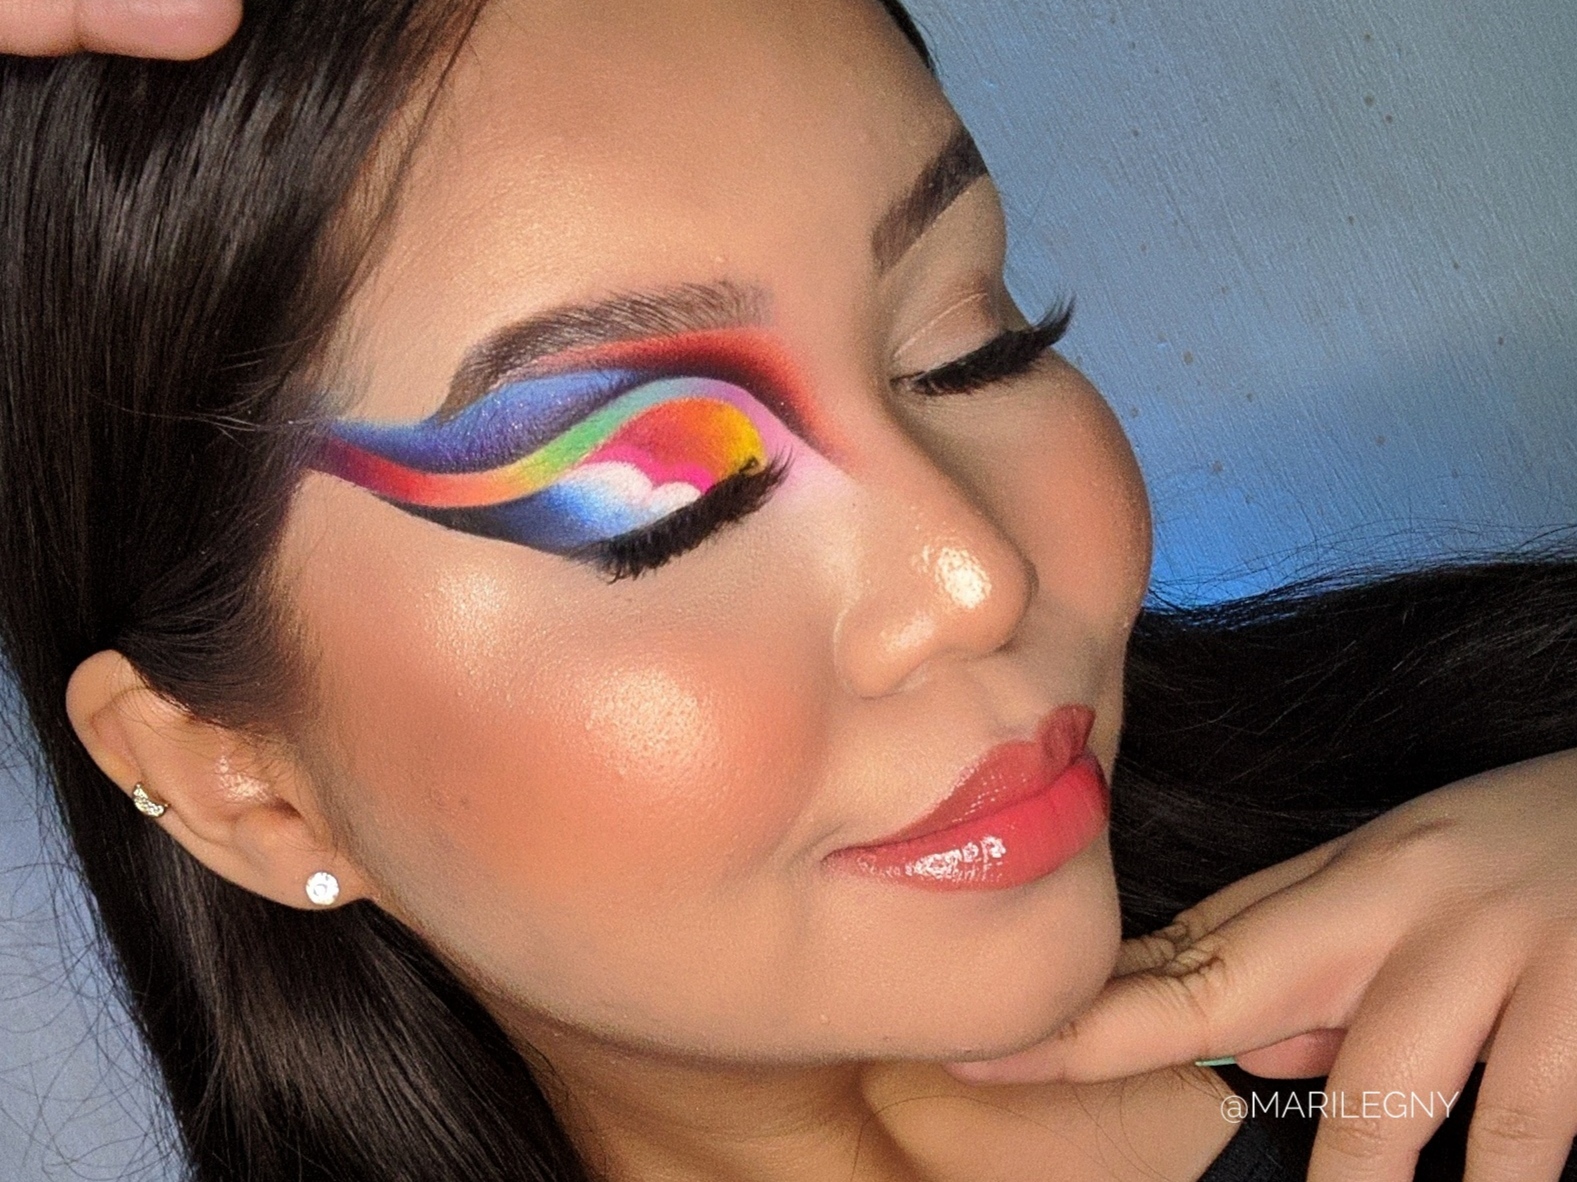
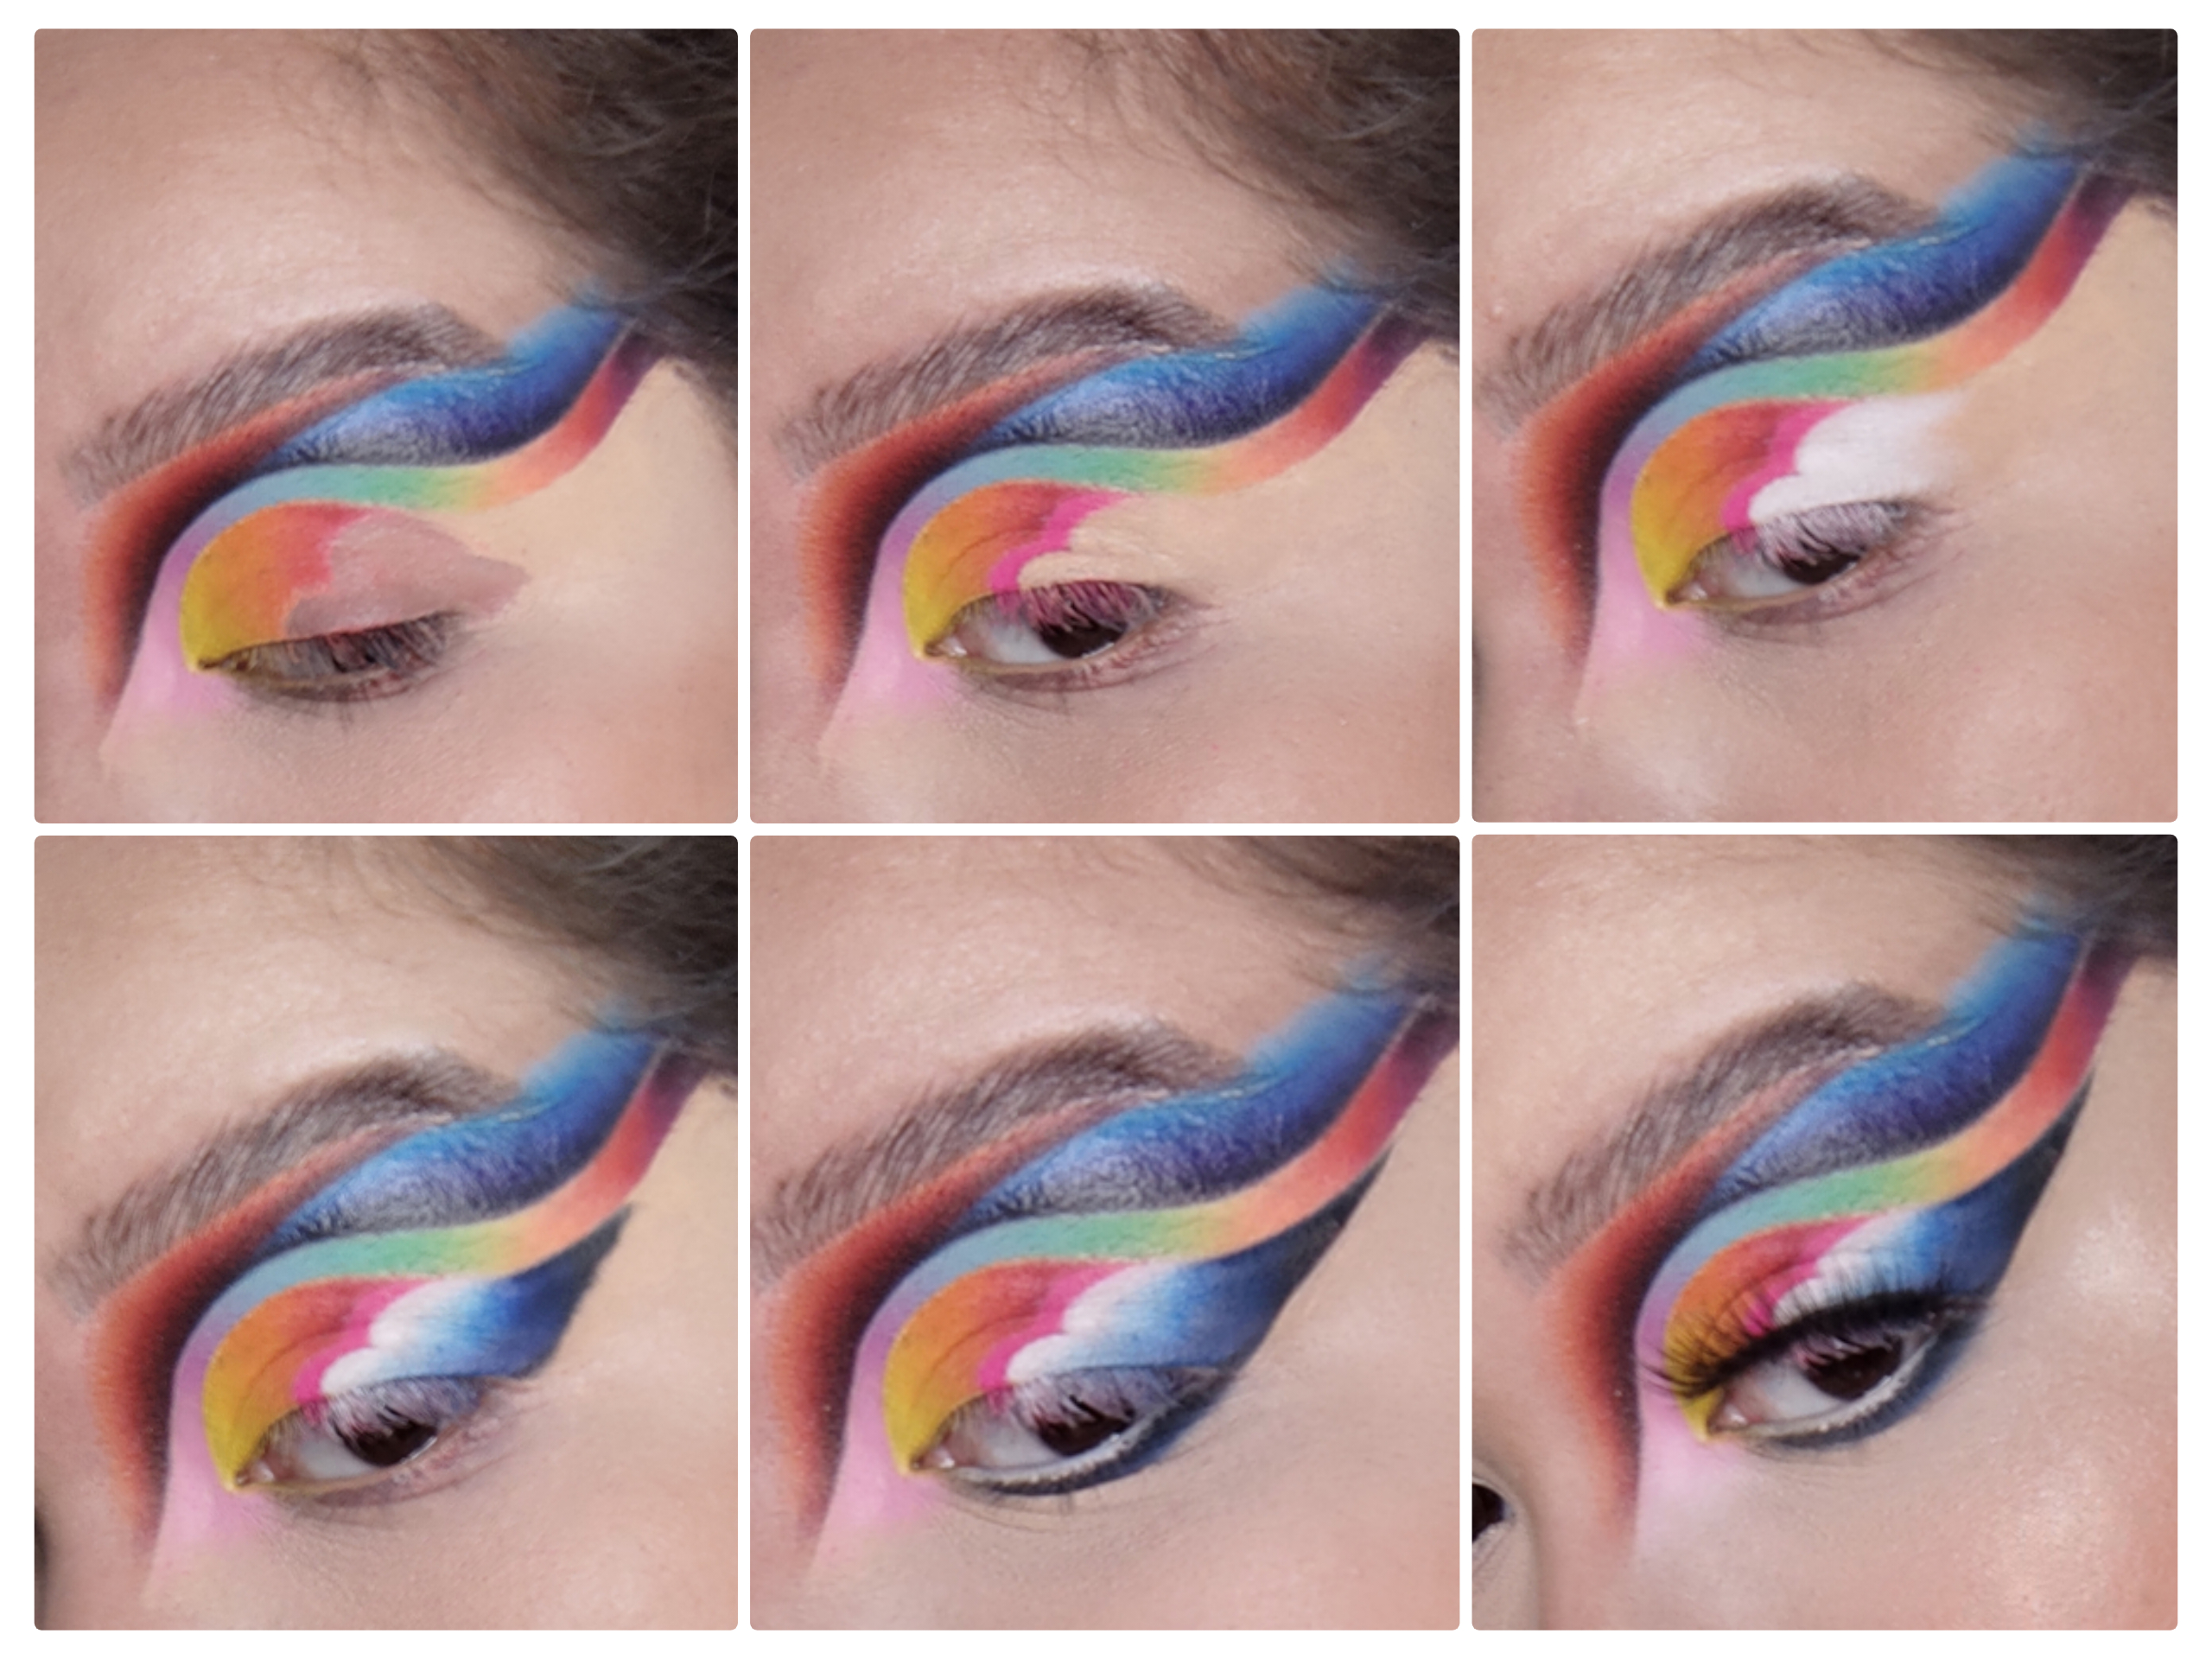
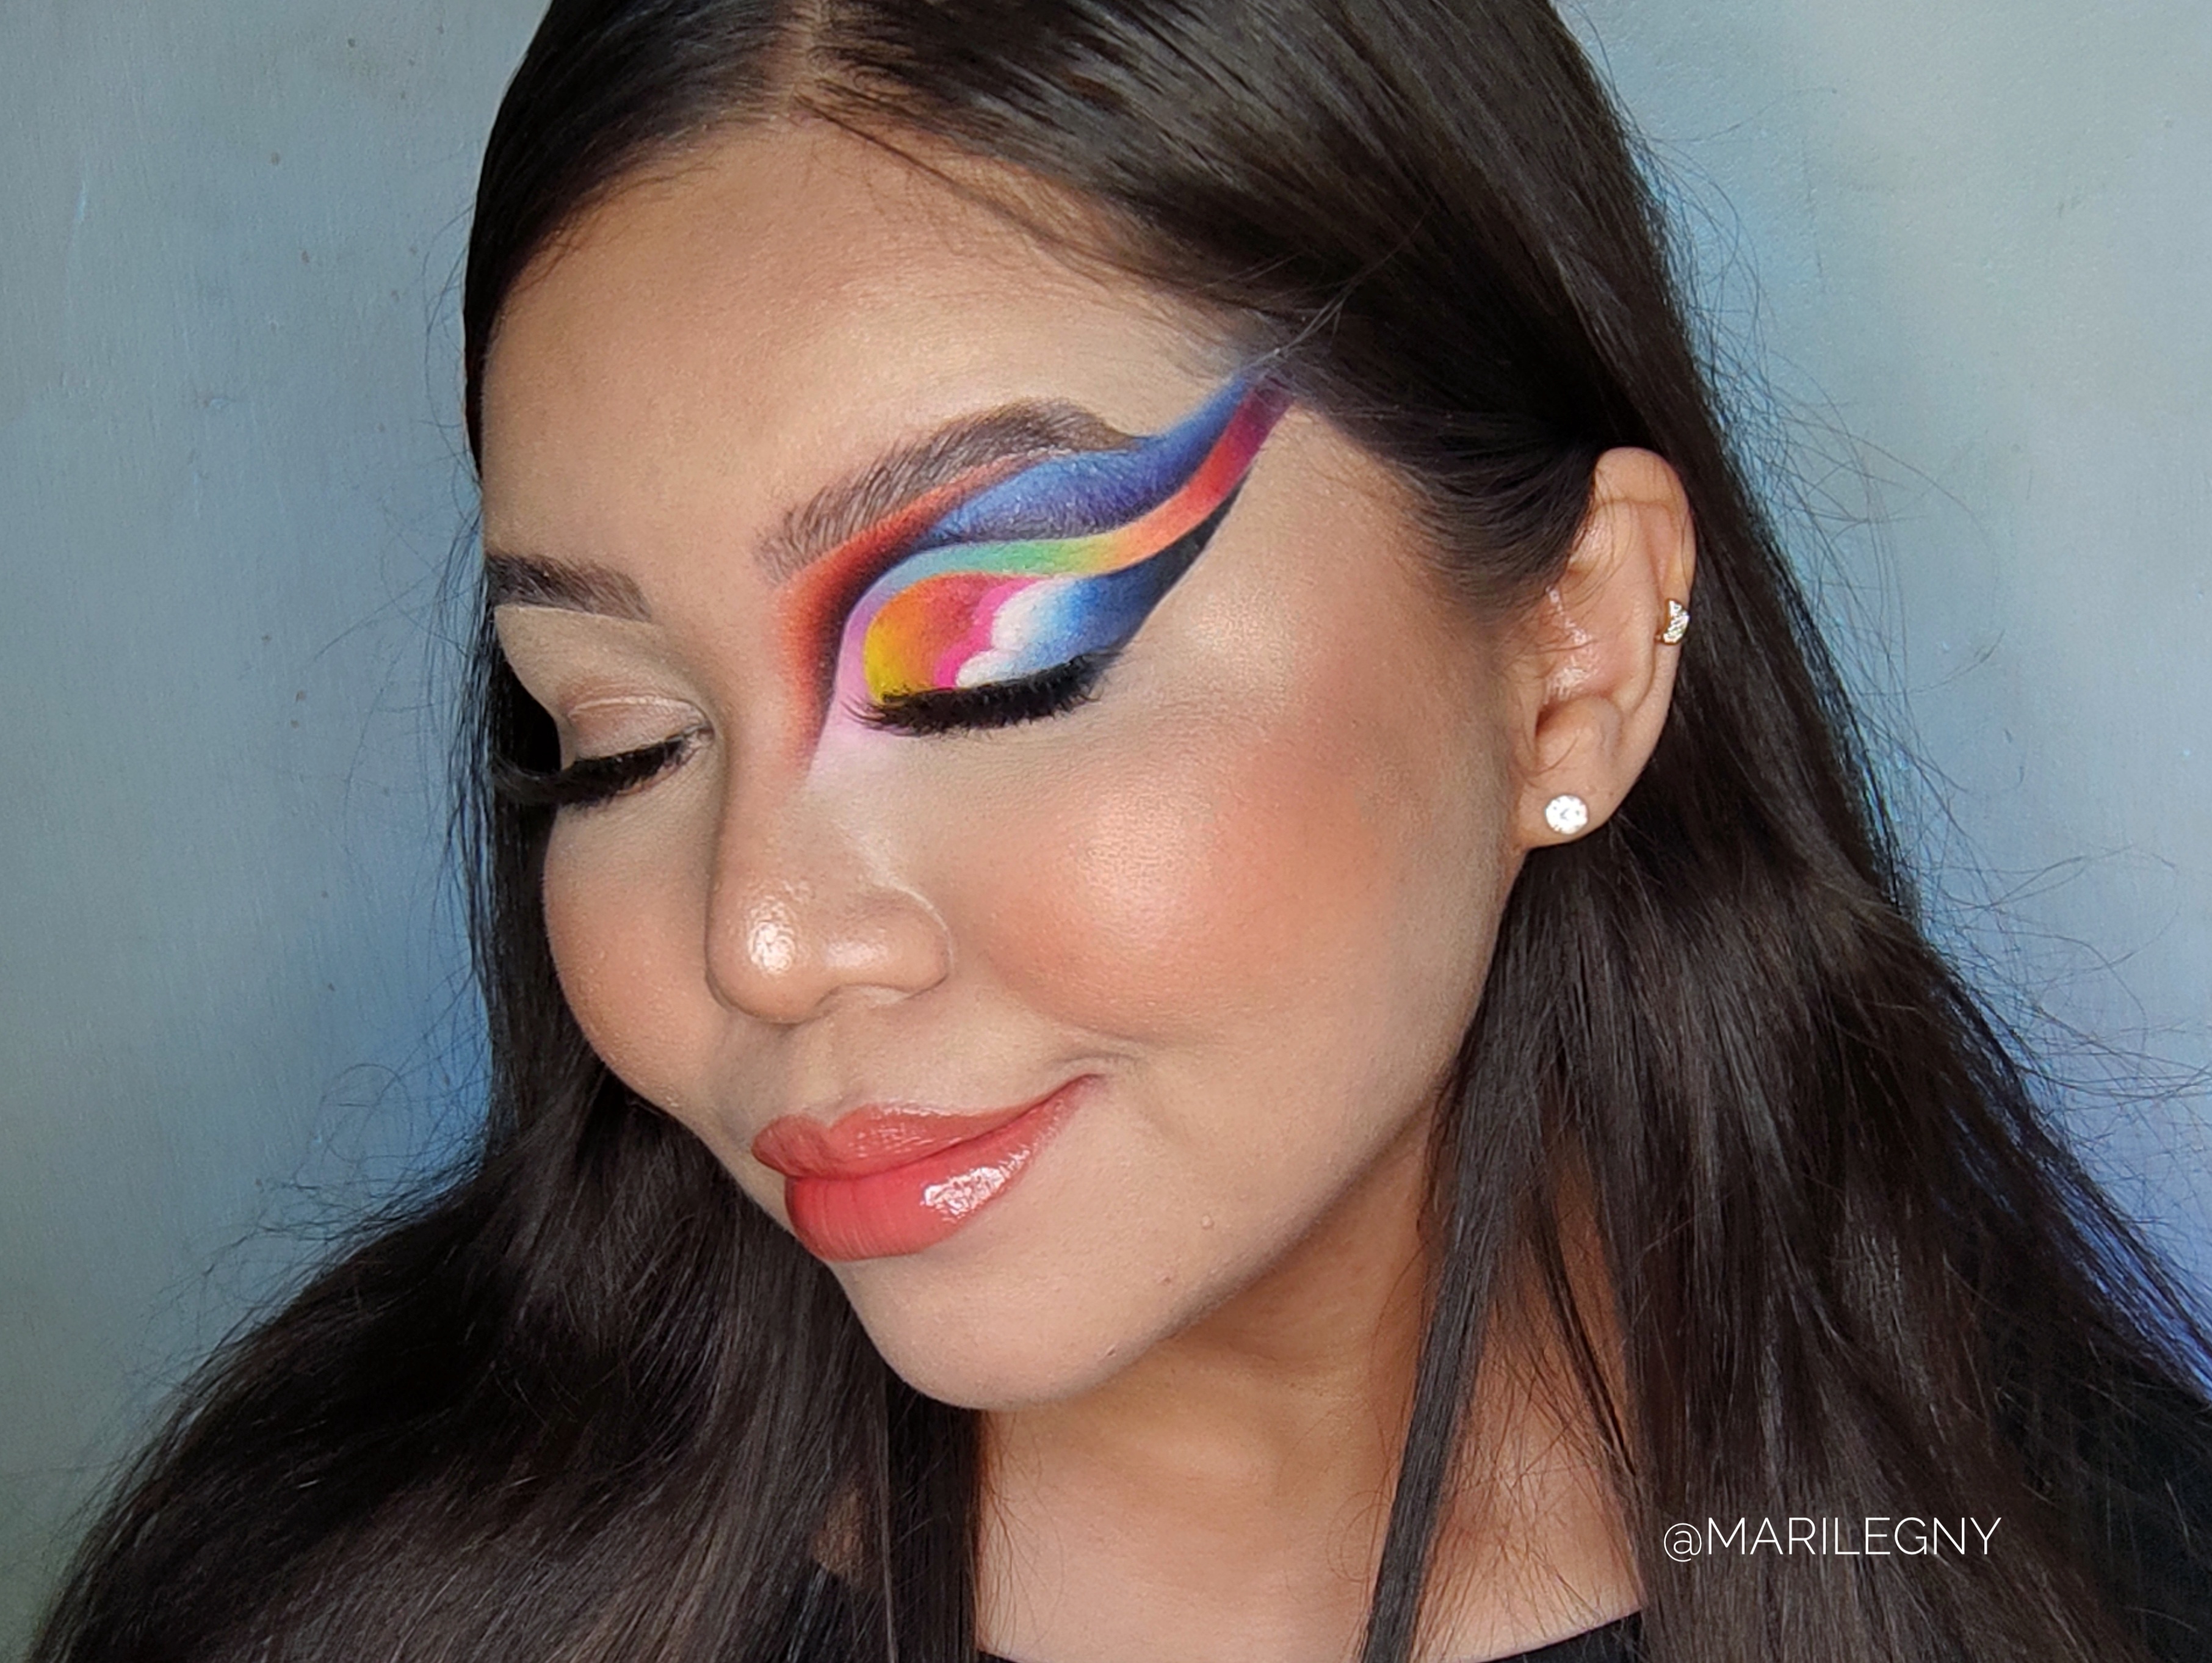
Empezamos a aplicar sombra amarilla y naranja al inicio del párpado, para luego realizar un corte en forma de nube, rellenar con corrector, sellar con sombra fucsia y realizar otro corte que sellaremos con sombra blanca, azul medio, azul marino y negro, en forma de delineado gráfico. Finalizamos los ojos agregando sombra negra y azul en el párpado inferior, lápiz blanco en la línea de agua, máscara de pestañas y pestañas postizas:
We're starting to to apply yellow and orange shadow at the beginning of the eyelid, to then make a cut in the shape of a cloud, fill in with concealer, seal with fuchsia shadow and make another cut that we will seal with white, medium blue, navy blue and black shadow, in the shape of graphic outline. We finish the eyes by adding black and blue shadow on the lower eyelid, white pencil on the water line, mascara and false eyelashes:
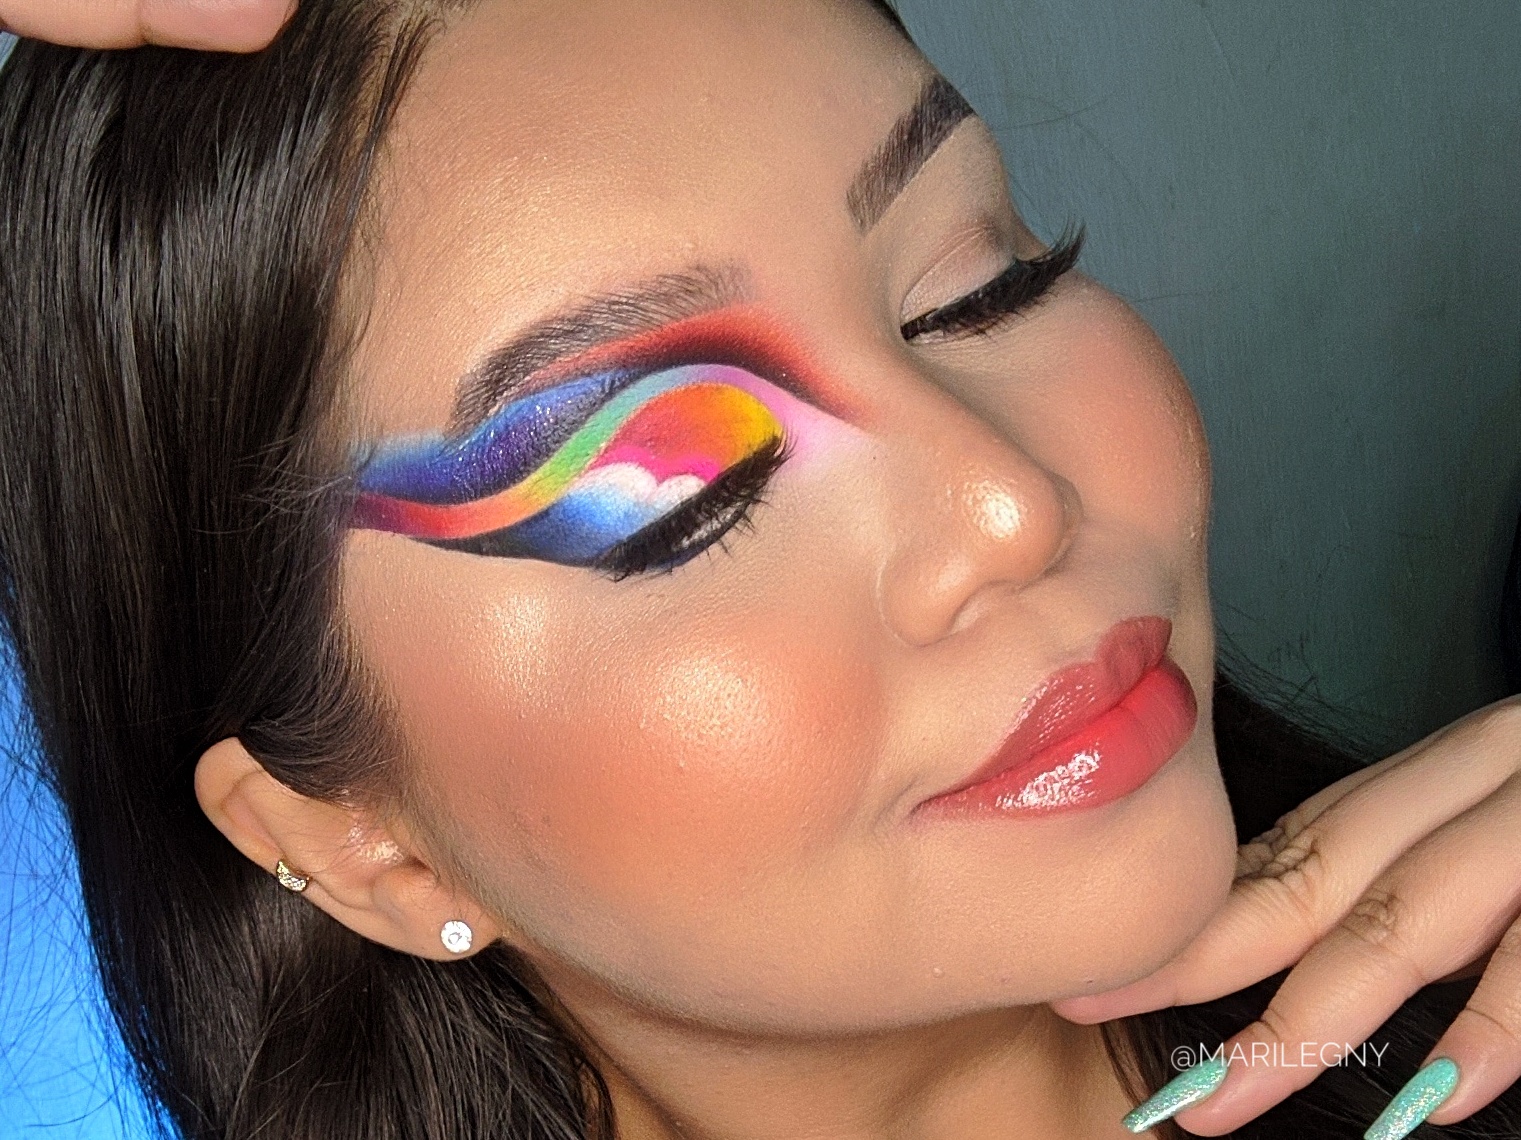
Luego realizamos nuestra piel como de costumbre, aplicando base y corrector, sellando con polvos sueltos y aplicando bronceador, rubor durazno y mucho iluminador. Finalizamos el look delineando los labios con lápiz nude y rellenando con tinta para labios melon, y dando un toque de brillo con lip gloss en el centro.
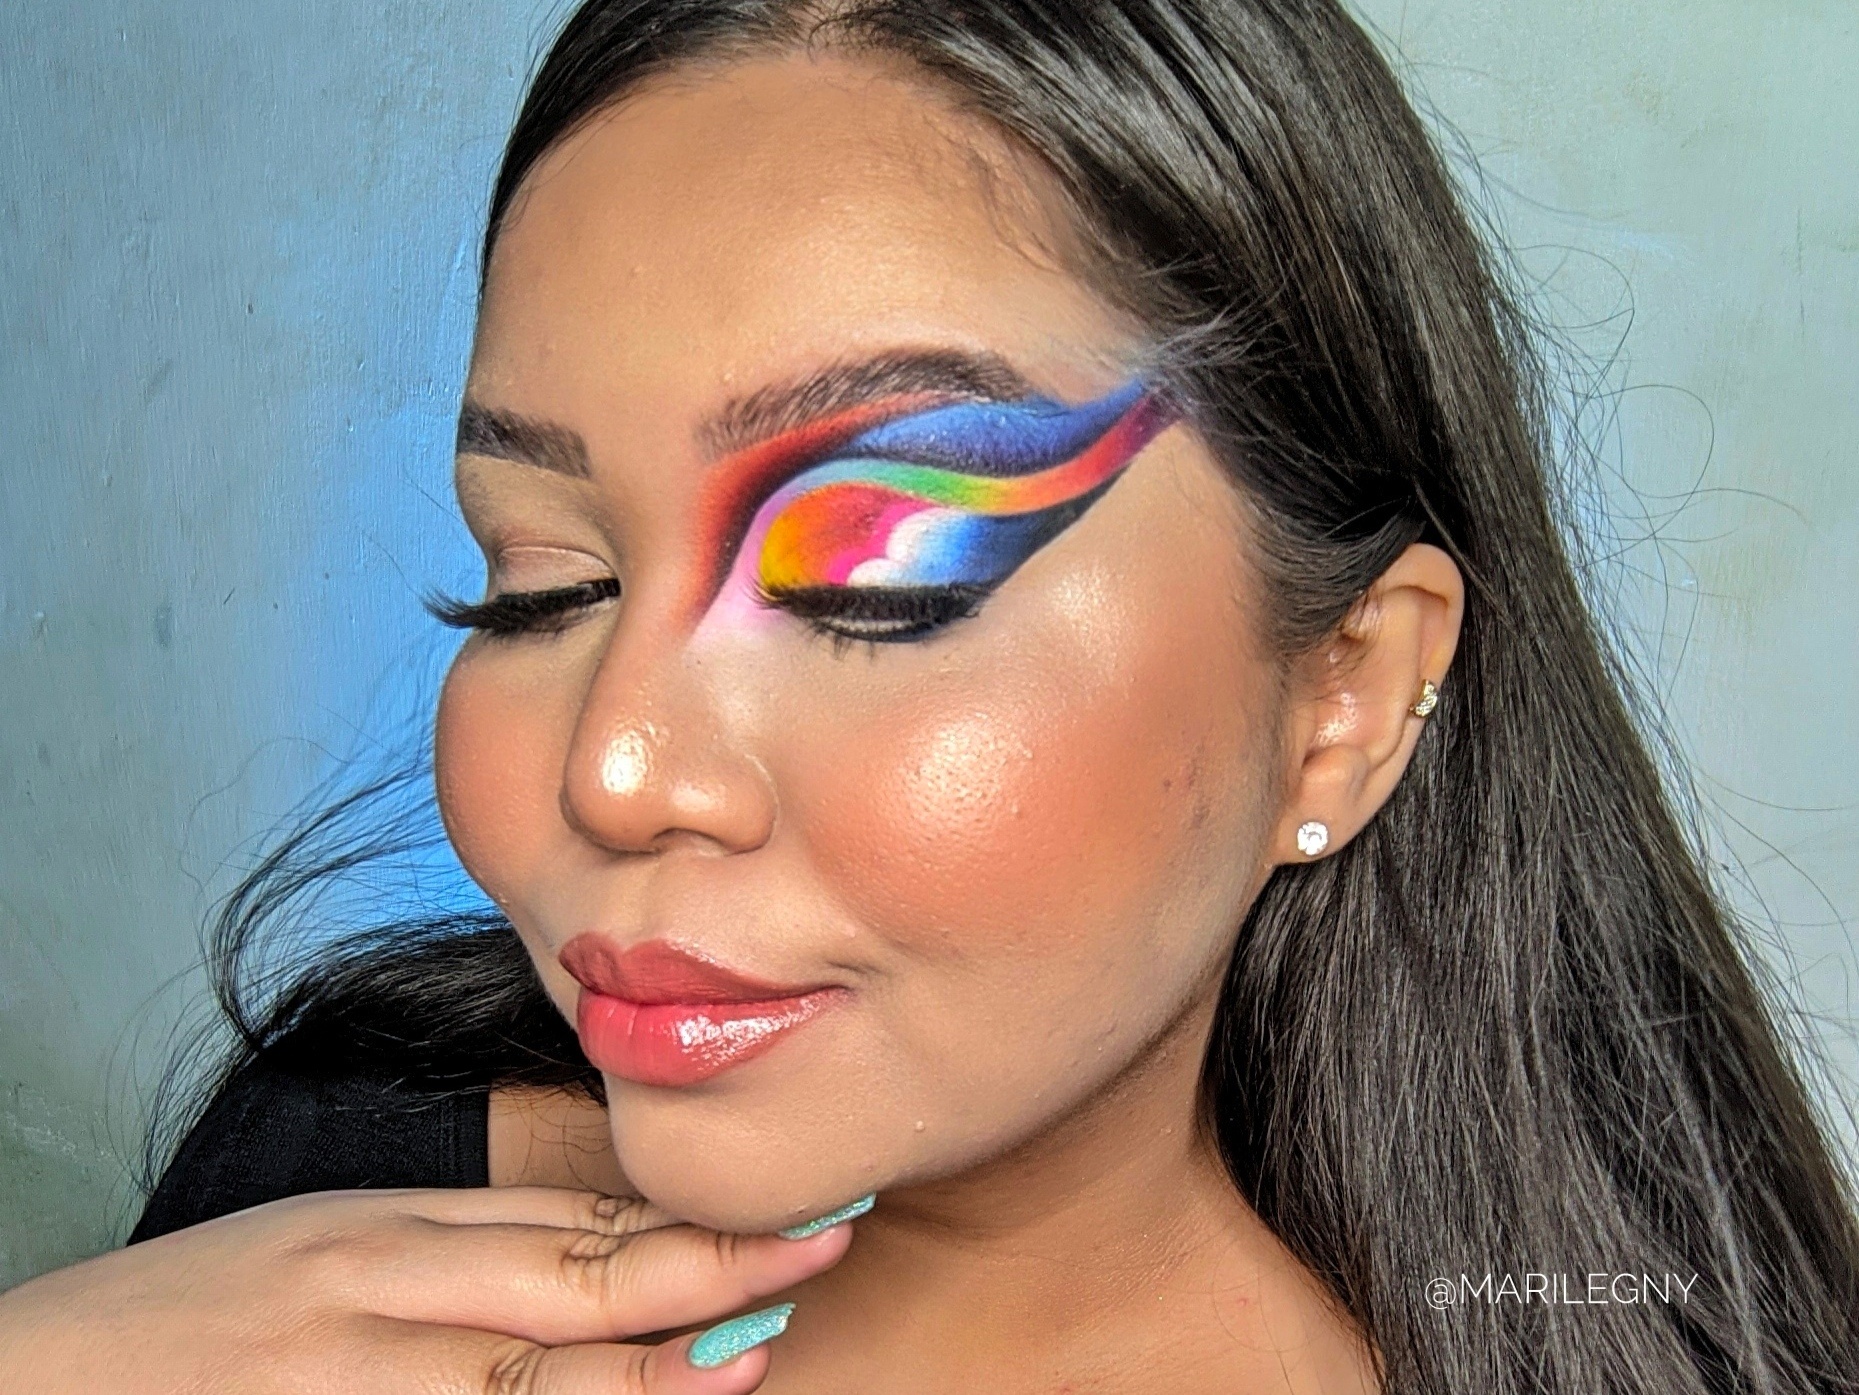
Después de estos últimos pasos, nuestro look está finalizado y estamos listas para posar y tomar unas hermosas fotos🌈💎:
We we're doing our skin as usual, applying foundation and concealer, setting with loose powder, and applying bronzer, peach blush, and lots of highlighter. We finish the look by outlining the lips with nude pencil and filling in with melon lip tint, and giving a touch of shine with lip gloss in the center.
After these last steps, our look is finished and we are ready to pose and take some beautiful photos🌈💎 :
Espero les haya gustado mucho este tutorial pero sobre todo, que hayan aprendido algo nuevo o diferente💖 Yo como siempre, estoy muy contenta de compartirles este contenido que tanto disfruto realizar 😁 Nos vemos en el próximo 💞
I hope you enjoyed this tutorial but most of, I hope you learned something new or different💖 I'm, as always, really happy about sharing this content that enjoy to create 😁 See you in the next one💖
Está súper espectacular 😍
Gracias hermosa 😍🌈
Espectacupluuuuuus✨
Jajaja gracias amiga 💖
Te quedó espectacular Ami 🙀♥️♥️♥️
Gracias ami linda 💖
Te pasas con esos diseños 😍
Ay🙈 gracias muñeca 💖
Hermoso trabajo 😍
Gracias bella 💖💖
❣️
Espectacular definitivamente esto es lo tuyo.😊💙
No podía dejar de comentar este maquillaje. Es hermoso, limpio, perfecto...yo necesito aprender esto. Jajaja. Estoy fascinada con lo que haces.
Excelente.
Qué maquillaje más hermoso Mary, amé la combinación de colores, bendiciones 💖
Guao impresionante 🌈
Excelente!!!! 👏👏👏 Me fascinó 💜❤️🥺