Greetings beautiful
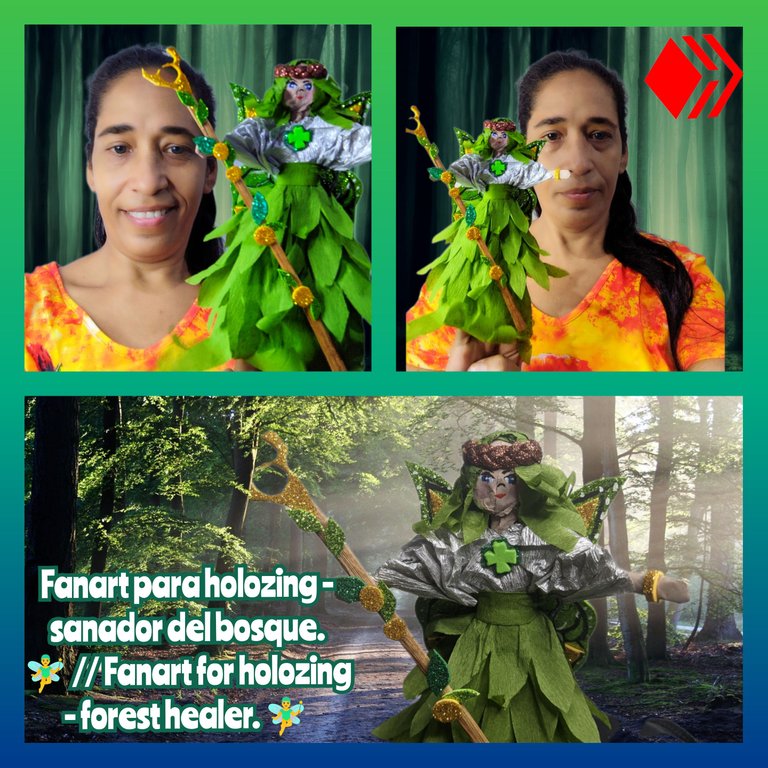
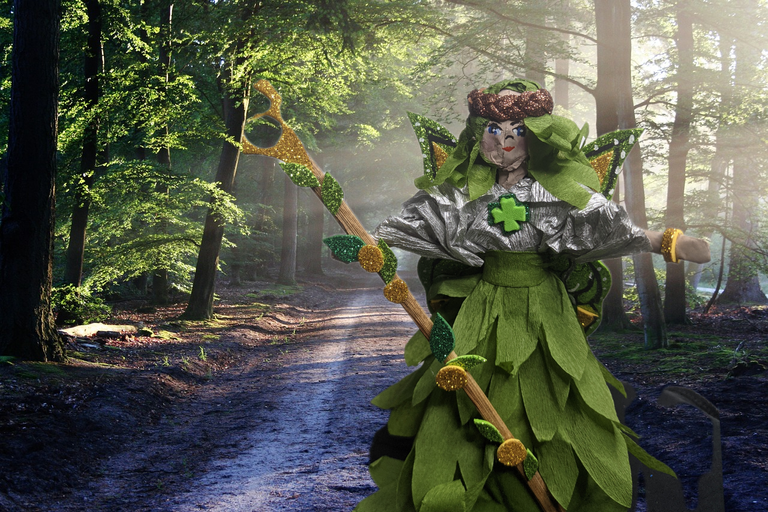
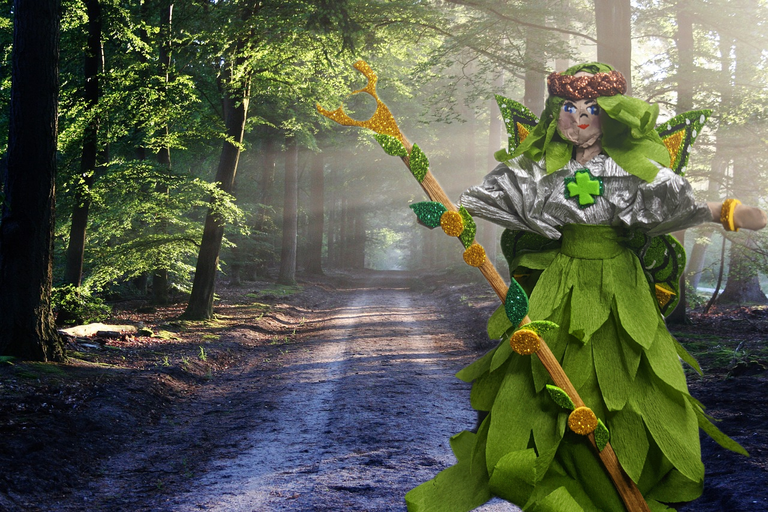
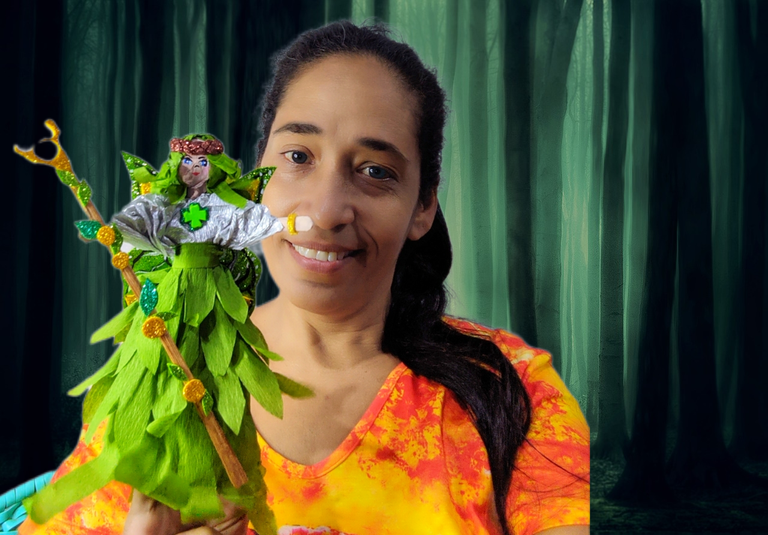
#holozing community, greetings to each and every one of the little bees that visit my blog and support my personal brand within the # hive ecosystem, we continue working with the fanart of this game that already promises to be amazing, today I bring you a more elaborate work in art, I wanted to work with recycled materials to create a beautiful forest healer.
I have a special fascination for mystical creatures and fairies and all this kind of magical creatures so I decided to create a figure, and I must tell you that although I was not so sure how the final result would be, when I finished, I loved the work, I think I managed to recreate a feminine version of the forest healer.
🧚♂️ MATERIALS 🧚♂️
🧚♂️ Cardboard.
🧚♂️ Frosted green Foami.
🧚♂️ Light green foami.
🧚♂️ Gold foami.
🧚♂️ Brown foami.
🧚♂️ Liquid silicone.
🧚♂️ Light green crepe paper.
🧚♂️ Dark green crepe paper.
🧚♂️ Silver crepe paper.
🧚♂️ Scissors
🧚♂️ Pencil.
🧚♂️ Recycled sheets of paper.
🧚♂️ Paints: white, black, red, leather and blue.
🧚♂️ CREATIVE PROCESS 🧚♂️
🧚♂️ Step 1 🧚♂️
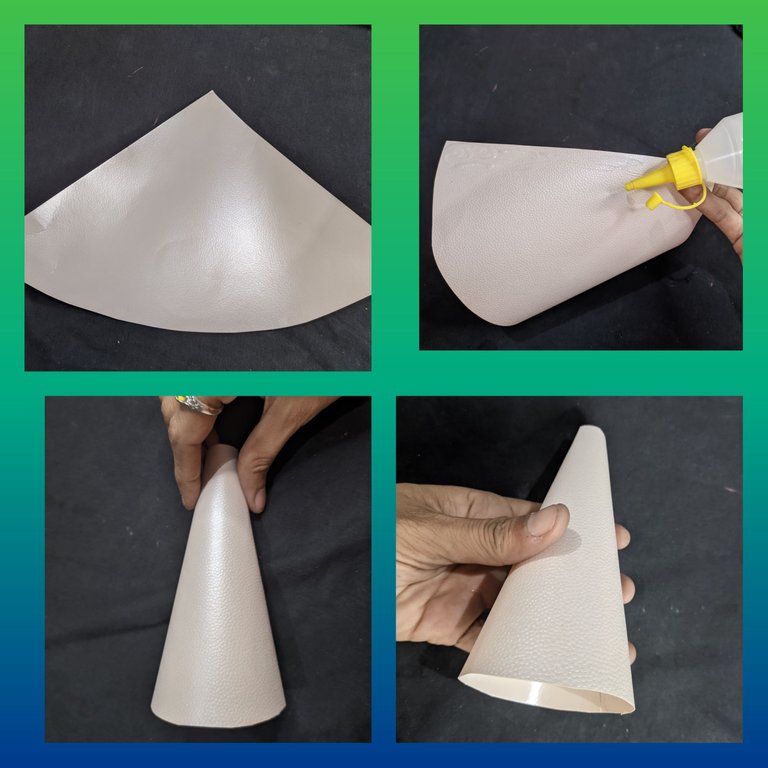
I took the cardboard and drew a kind of triangle, which I then cut out, applied liquid silicone and glued it so that it forms a cone and let it dry.
🧚♂️ Step 2 🧚♂️
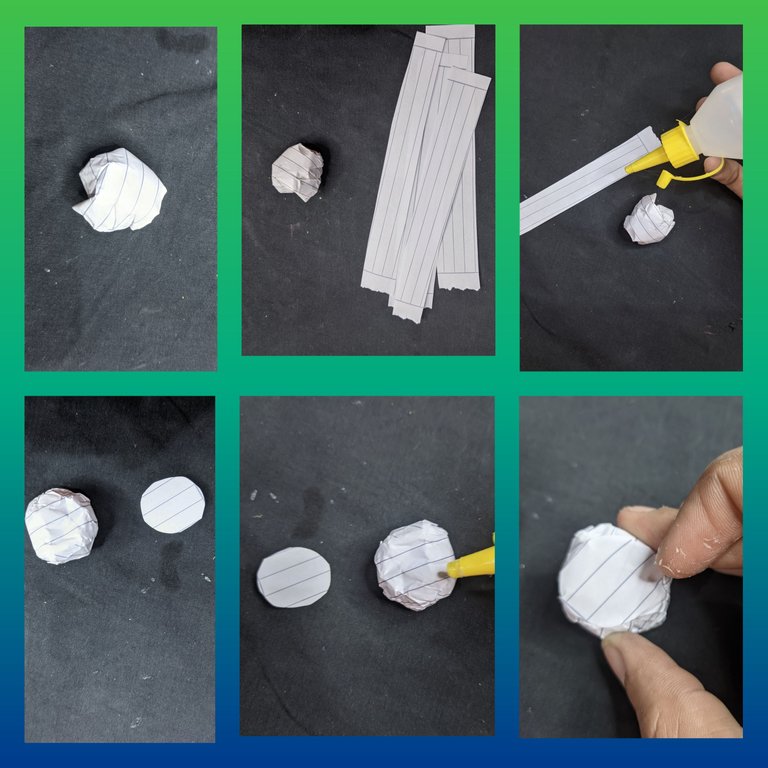
I took the sheets of paper and wrapped them up, until I formed a little ball, which will become the head of my healer.
🧚♂️ Step 3 🧚♂️
Now take two sheets of paper and roll them up to form two tubes, and glue with silicone to seal.
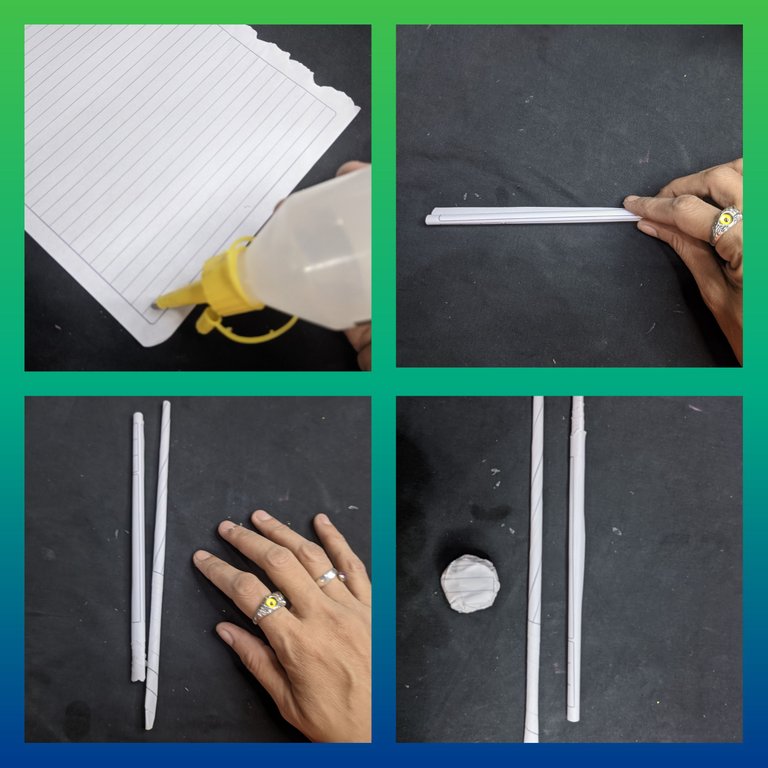
🧚♂️ Step 4 🧚♂️
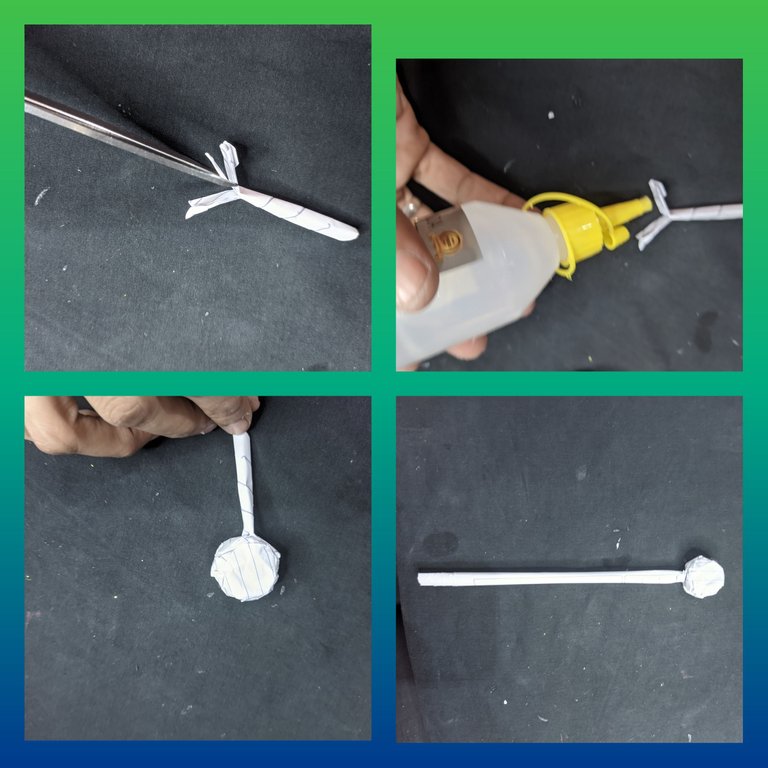
Take one of the tubes and open it in two with the scissors and with the liquid silicone we glue the head on.
🧚♂️ Step 5 🧚♂️
Then we took another small tube, and joined it with the liquid silicone to form the arms, then I cut out several strips of paper which we glued in the center to form the torso of my healer.
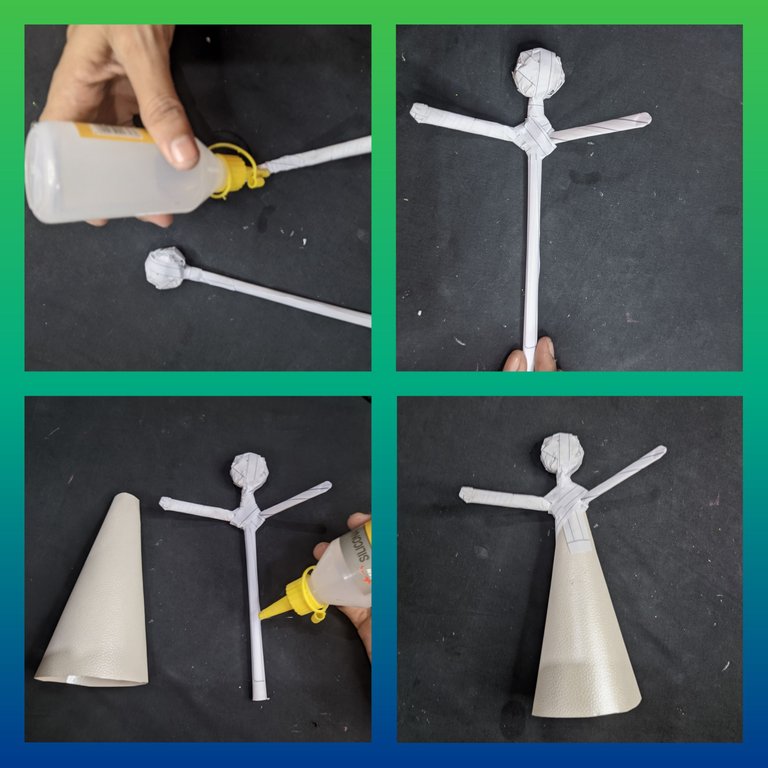
When it was dry, we applied liquid silicone and glued it inside the cone that we had previously made.
🧚♂️ Step 6 🧚♂️
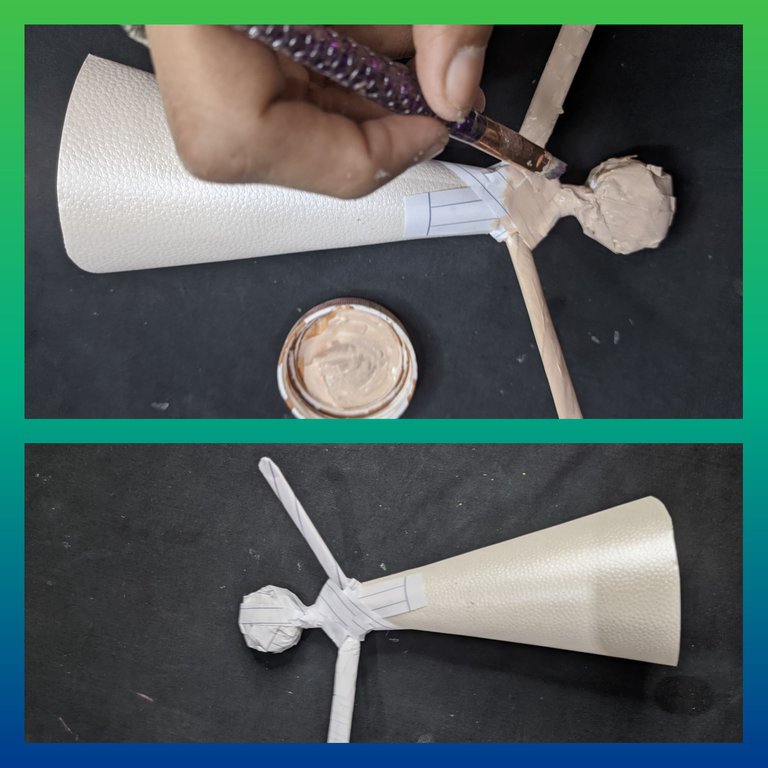
Once the pieces are joined and dry, we proceed to paint everything that will be skin colored, in this case the arms and the face, and let dry.
🧚♂️ Step 7 🧚♂️
Now I cut a strip of about 15 cm long by about 8 cm wide to which we cut out the center, then we introduce the head and helping us with the liquid silicone we glue well, until we form the top of the suit.
🧚♂️ Step 8 🧚♂️
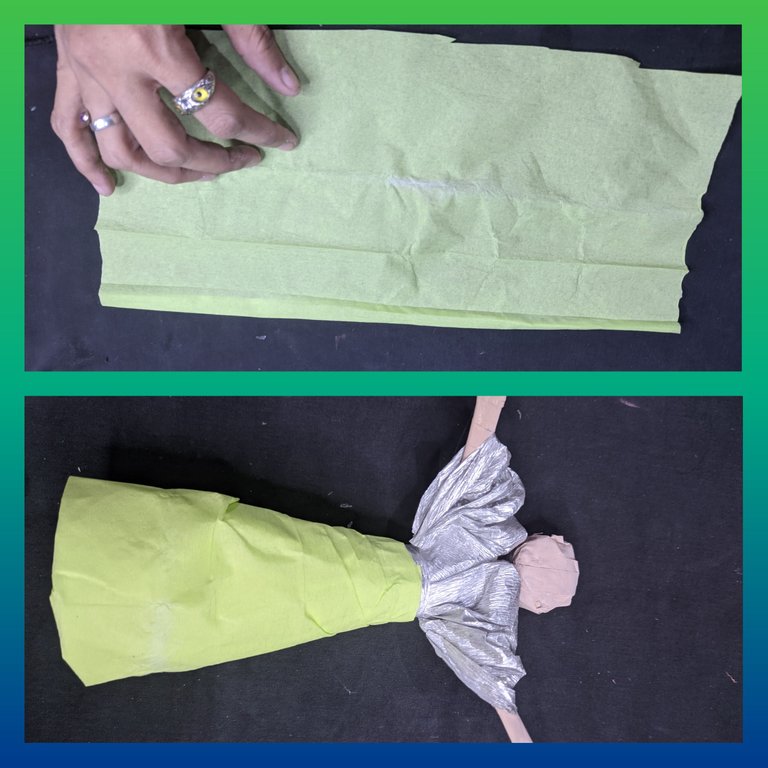
Then we line the bottom with the light green crepe paper and the liquid silicone.
🧚♂️ Step 9 🧚♂️
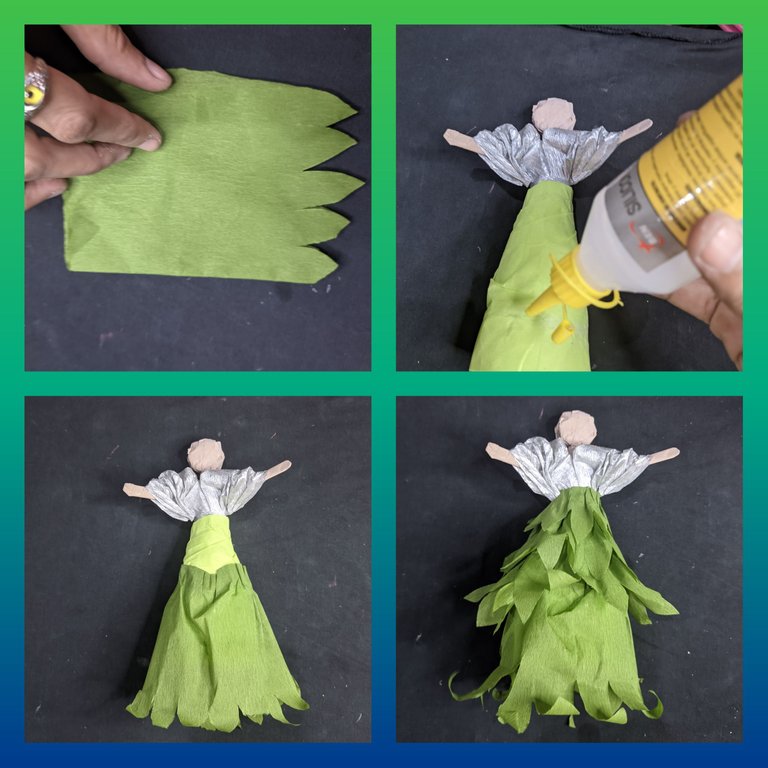
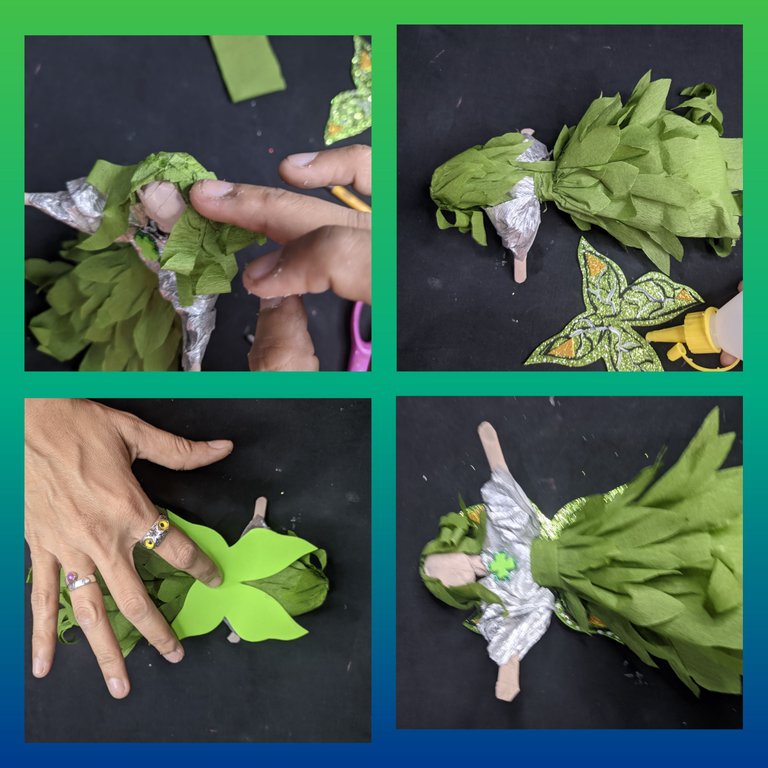
Take the dark green crepe paper and cut out some peaks, and start lining the skirt of the healer's suit, I placed one layer after another until I covered everything, creating a leafy suit effect.
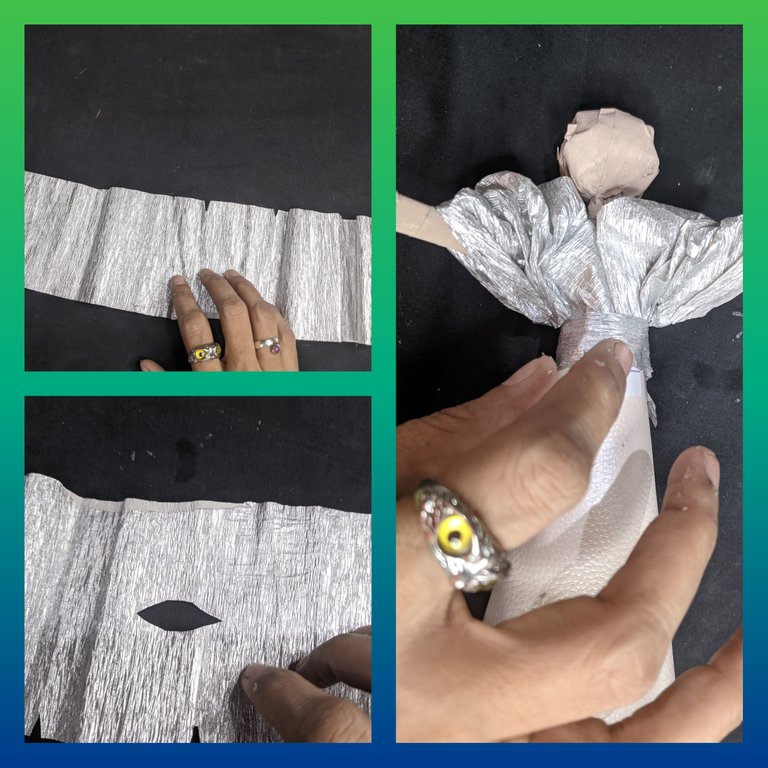
🧚♂️ Step 10 🧚♂️
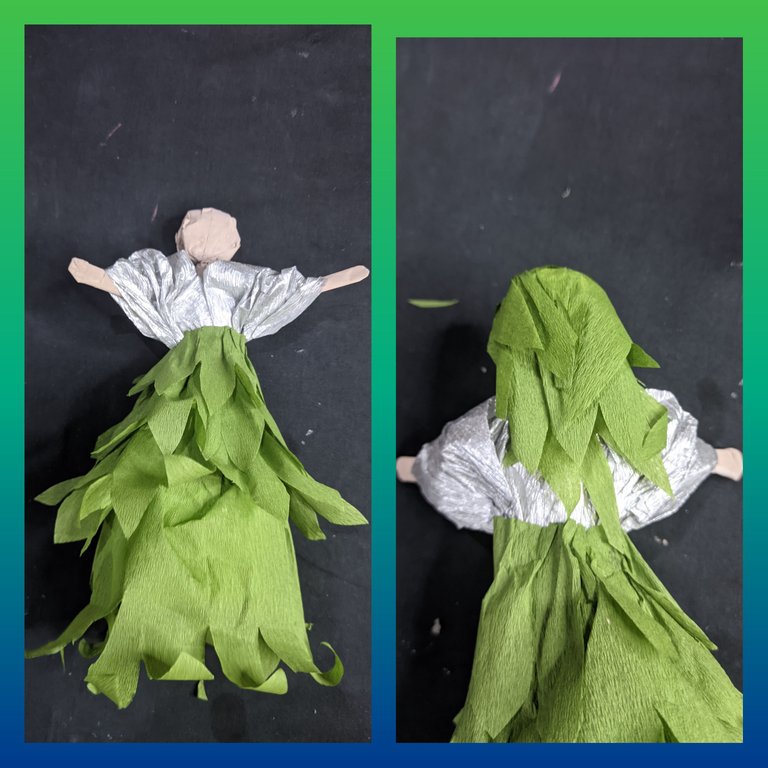
With the scissors we curl the crepe paper, and then we do the same but in a smaller size, to line the head and form the hair.
🧚♂️ Step 11 🧚♂️
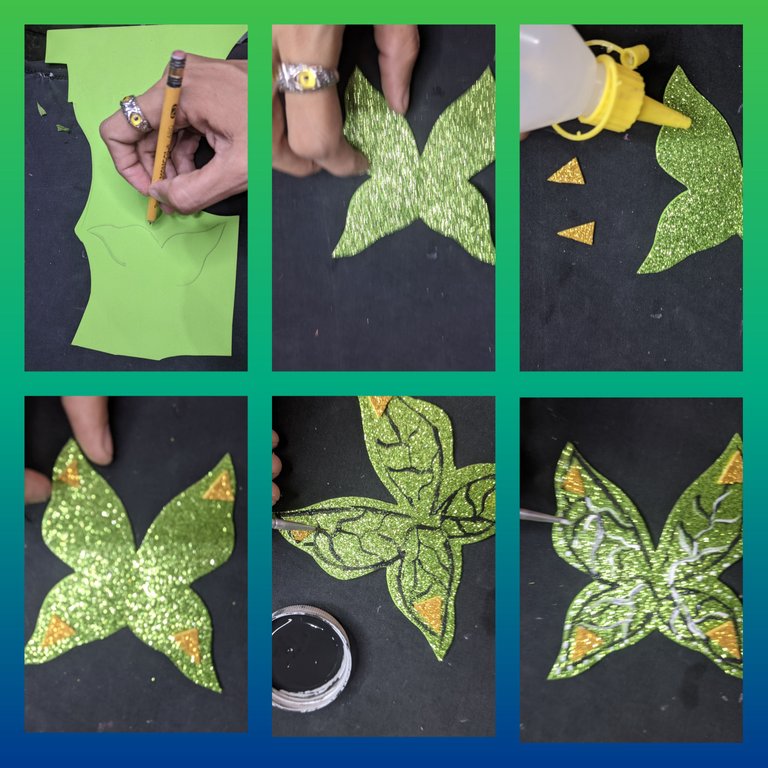
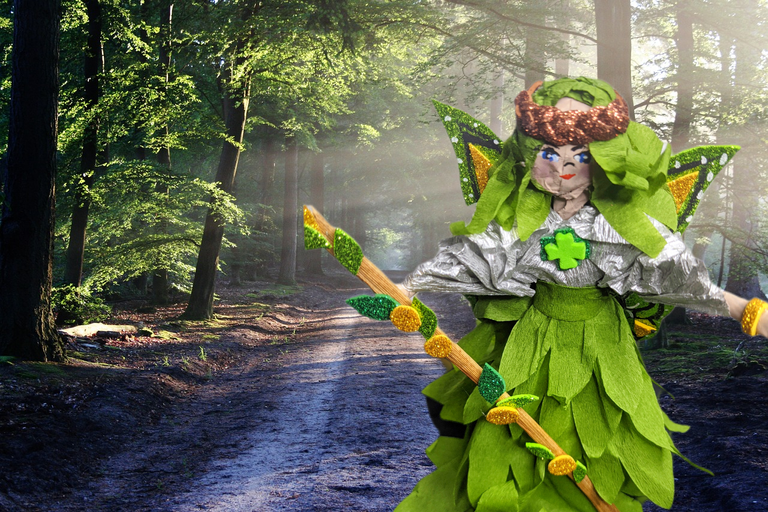
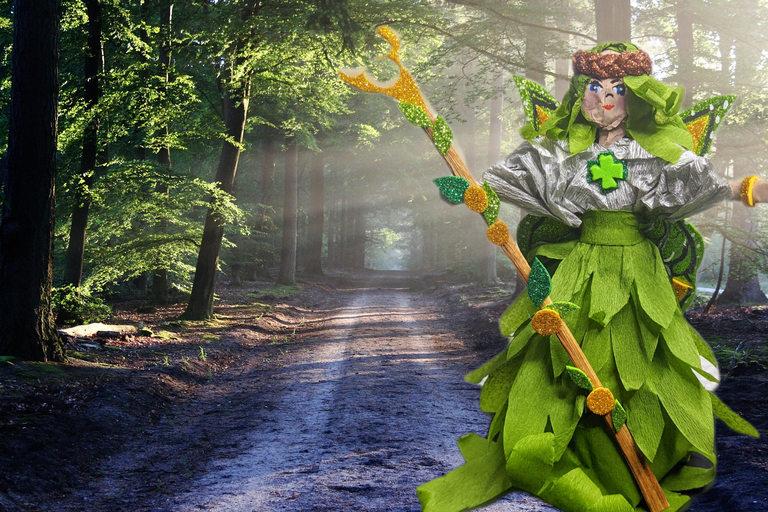
On the frosted green foami I drew the wings of the butterfly and cut them out, then with black paint and white paint I drew the details of the wings, I also cut out pieces of gold colored foami and glued them to give it shine.
🧚♂️ Step 12 🧚♂️
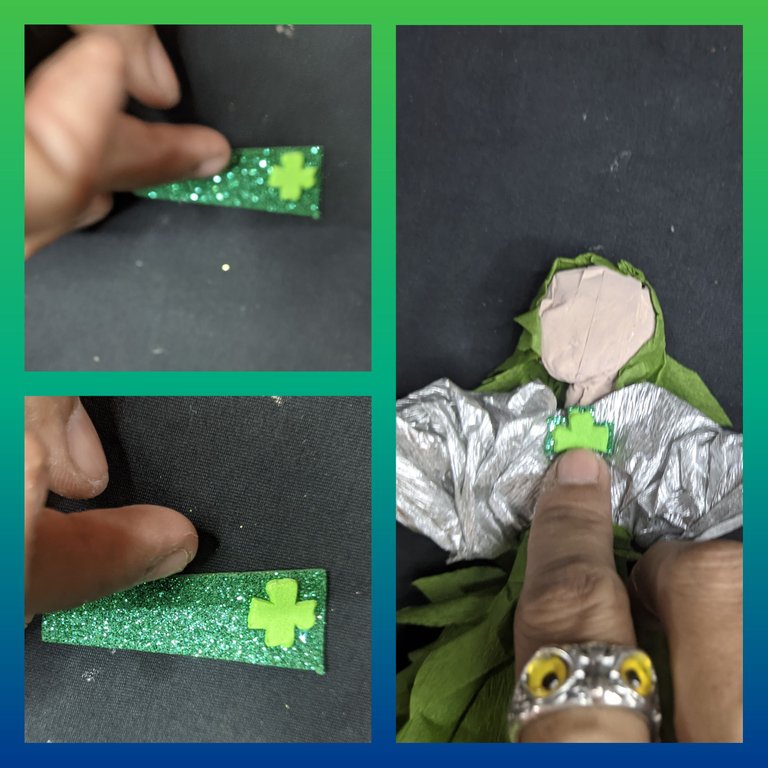
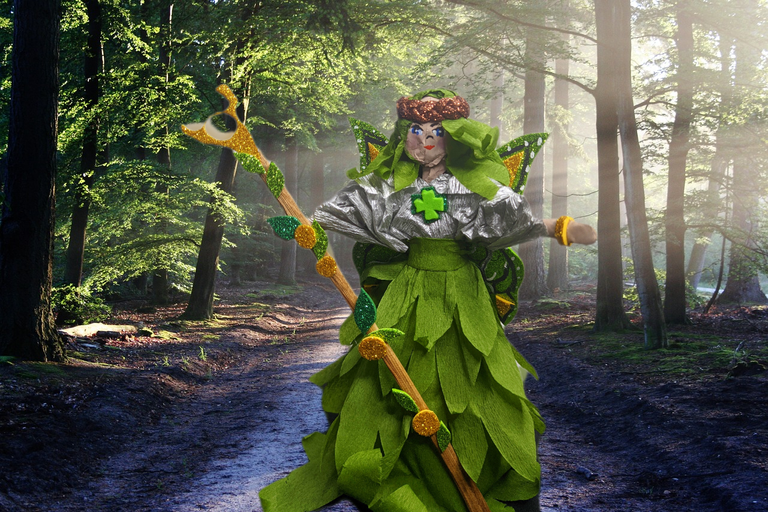
On the light green foami I drew and cut out a four-leaf clover, and glued it on top of the dark green foami, cut out and glued on the chest.
🧚♂️ Step 13 🧚♂️
I fixed the hair a bit, and then with the liquid silicone we glued the wings to the healer.
🧚♂️ Step 14 🧚♂️
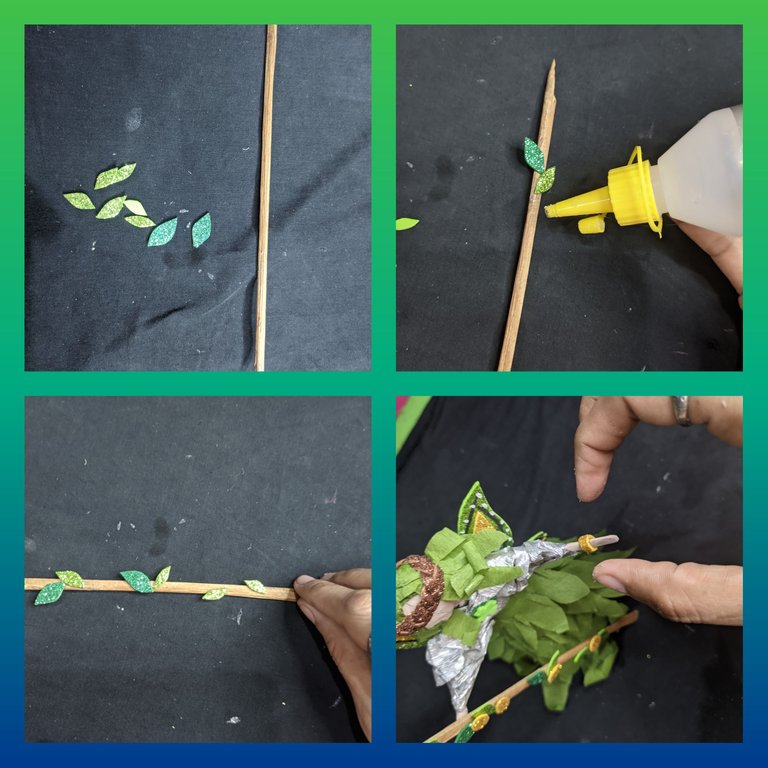
I took a twig from the garden and decorated it with some leaves that I cut out of the foami, I intersperse them between light green and dark green, but we also put some golden circles and a flame at the tip, and ready we have a nice center for our forest healer, so what better that his scepter is made from materials that come from nature.
🧚♂️ Step 15 🧚♂️
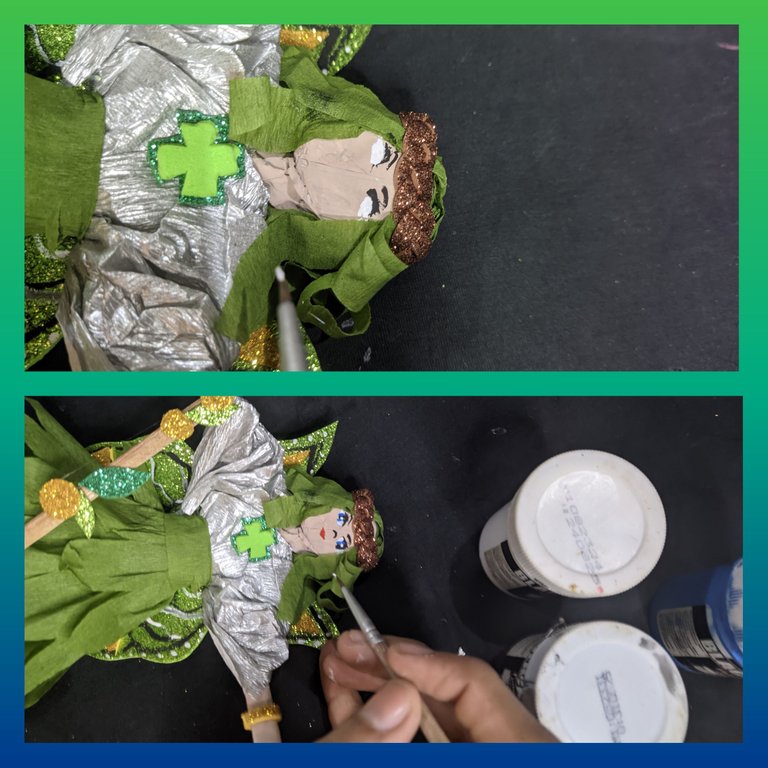
Finally with the paints I drew the eyes and mouth, and with a bit of blush I highlighted her cheeks, and it was beautiful.
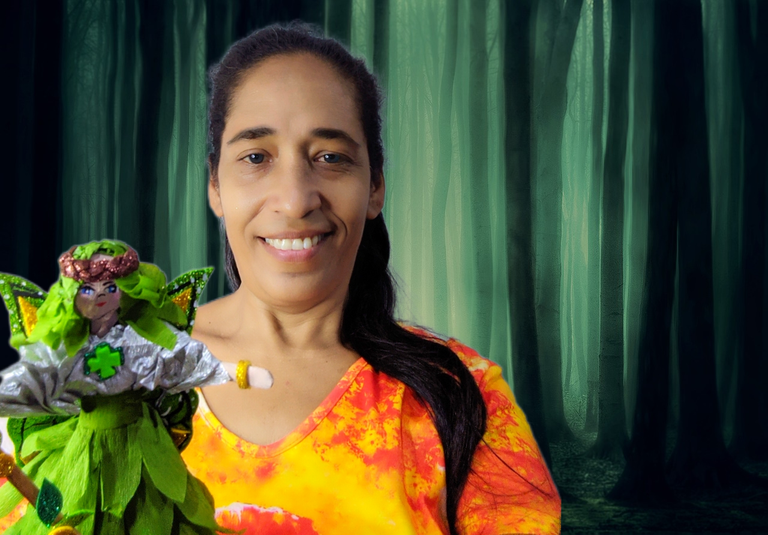
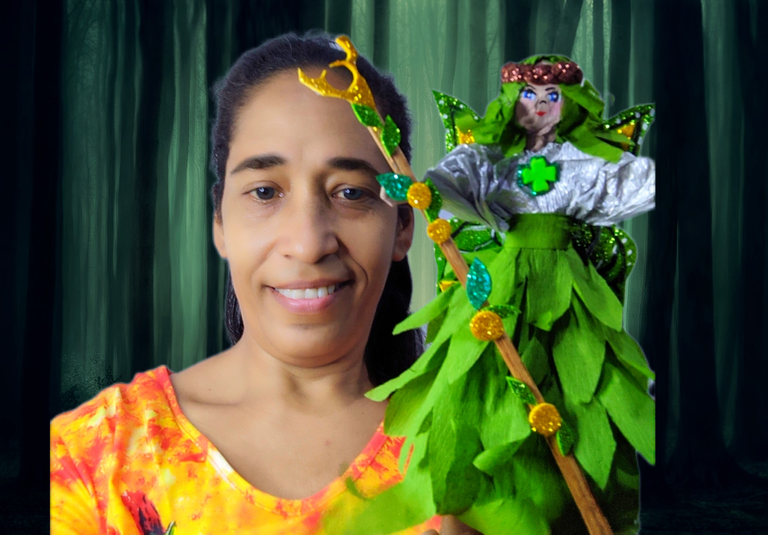
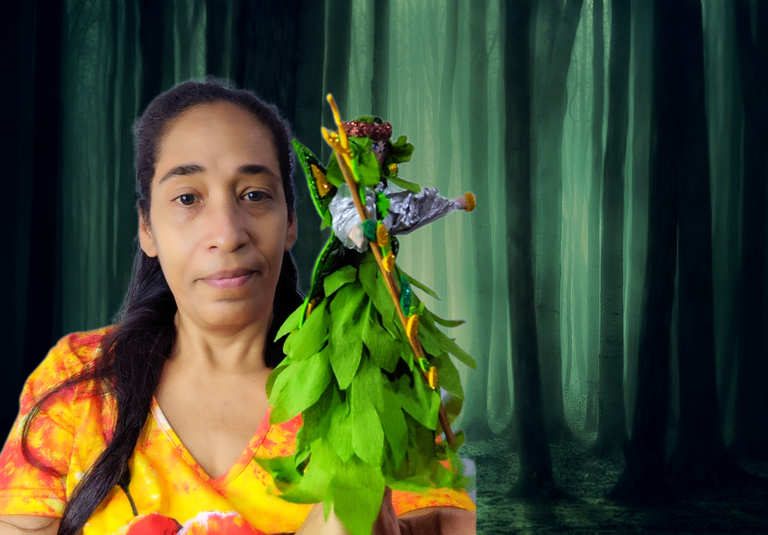
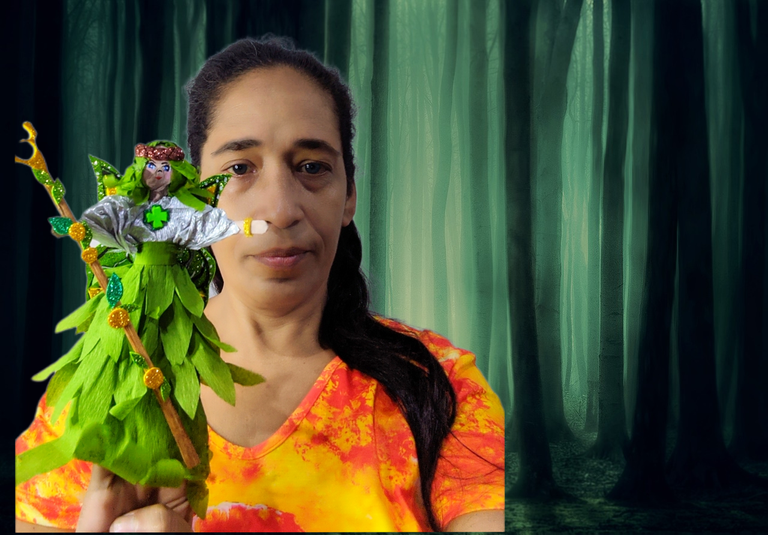
🧚♂️ Final pictures 🧚♂️
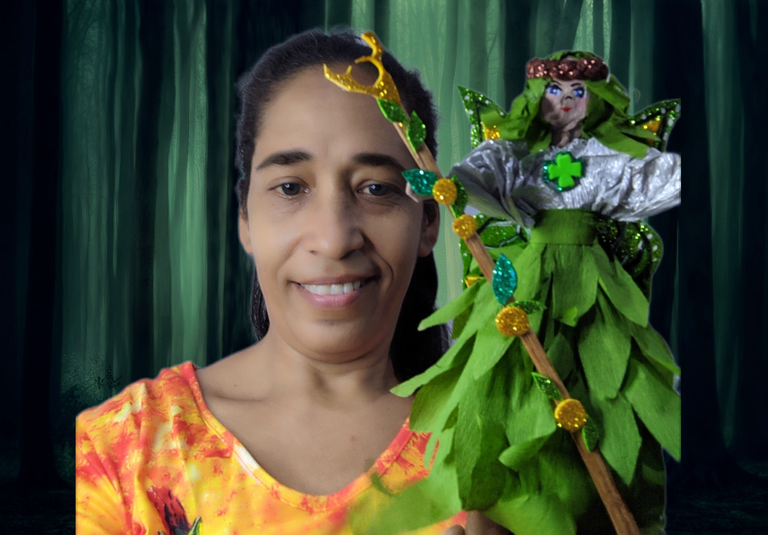

I hope you liked this fanart, soon I will bring you a new makeup, I'm resting because of allergies, but soon I will be back to bring you new characters, for now, I share with you this creation of this forest healer female version, that I made, I enjoyed it completely, even though it was really a long work and it took almost 4 hours, but without any doubt I would do it again because I liked to make this character, so soon I will make the others, for now I say goodbye hoping you liked the work, greetings to all.

🧚♂️ CREDITS 🧚♂️
All pictures were taken with my Xiaomi redmi 9T phone and are my property, use polish and Deepl translator.
Source
Source green forest


Saludos hermosa comunidad de
#holozing, saludos a todas y cada una de las abejitas que visitan mi blog y apoyan mi marca personal dentro del ecosistema # hive, seguimos trabajando con el fanart de este juego que ya promete ser increíble, hoy les traigo un trabajo más elaborado en materia de arte, quise trabajar con materiales de reciclaje para crear un hermoso sanador del bosque.
Yo tengo especial fascinación por criaturas místicas y hadas y todo este tipo de criaturas mágicas por lo que decidí crear una figura, y debo decirles que aunque no estaba tan segura de cómo sería el resultado final, cuando termine, ame el trabajo, pienso que logré recrear una versión femenina del sanador del bosque.
🧚♂️ MATERIALES 🧚♂️
🧚♂️ Cartulina.
🧚♂️ Foami verde escarchado.
🧚♂️ Foami verde claro.
🧚♂️ Foami dorado.
🧚♂️ Foami marrón.
🧚♂️ Silicón líquido.
🧚♂️ Papel crepé verde claro.
🧚♂️ Papel crepé verde oscuro.
🧚♂️ Papel crepé plateado.
🧚♂️ Tijera
🧚♂️ Lápiz.
🧚♂️ hojas de papel recicladas.
🧚♂️ Pinturas: blanca, negra, roja, piel y azul.
🧚♂️ PROCESO CREATIVO 🧚♂️
🧚♂️ Paso 1 🧚♂️
Tome la cartulina y dibujé una especie de triángulo, el cuál luego recorté, le aplique silicón líquido y pegamos de manera que se forme un cono y dejamos secar.
🧚♂️ Paso 2 🧚♂️
Tome las hojas de papel y las envolví, hasta formar una pequeña bolita, que vendrá a ser la cabeza de mi sanador.
🧚♂️ Paso 3 🧚♂️
Ahora tome dos hojas de papel y las enrollamos hasta formar dos tubos, y pegamos con silicón para sellar.
🧚♂️ Paso 4 🧚♂️
Tome uno de los tubitos y abrimos en dos con la tijera y con el silicón líquido pegamos de la cabeza.
🧚♂️ Paso 5 🧚♂️
Luego agarramos otro tubito, y unimos con el silicón líquido formado los brazos, luego recorté varias tiras de papel las cuales pegamos en el centro hasta formar el torso de mi sanador.
Cuando ya se secó, le aplicamos silicón líquido y pegamos dentro del cono que elaboramos previamente.
🧚♂️ Paso 6 🧚♂️
Una vez unidas las piezas y ya bien seco, procedemos a pintar todo lo que será de color piel, en este caso los brazos y la cara, y dejo secar.
🧚♂️ Paso 7 🧚♂️
Ahora recorté una tira de unos 15 cm de largo por unos 8 cm de ancho a la que le recortamos el centro, luego introducimos la cabeza y ayudándonos con el silicón líquido pegamos bien, hasta formar la parte de arriba del traje.
🧚♂️ Paso 8 🧚♂️
Luego forramos la parte de abajo con el papel crepé verde claro y el silicón líquido.
🧚♂️ Paso 9 🧚♂️
Tome el papel crepé verde oscuro y recortamos unos picos, y comenzamos a forrar la falda del traje del sanador, le fui colocando una capa tras otra hasta lograr cubrir todo, creando de esta manera un efecto de un traje de hojas.
🧚♂️ Paso 10 🧚♂️
Con la tijera rizamos el papel crepé, y después hacemos lo mismo pero en un tamaño más pequeño, para forrar la cabeza y formar el cabello.
🧚♂️ Paso 11 🧚♂️
En el foami verde escarchado dibuje las alas de la mariposa y recortamos, después con la pintura negra y la pintura blanca dibujé los detalles de las alas, también recorté trocitos de foami de color dorado y pegamos para darle brillo.
🧚♂️ Paso 12 🧚♂️
En el foami verde claro dibujé y recorté un trébol de cuatro hojas, y lo pegué encima del foami verde oscuro, recorté y pegué en el pecho.
🧚♂️ Paso 13 🧚♂️
Arreglé un poco el cabello, y luego con el silicón líquido pegamos las alas al sanador.
🧚♂️ Paso 14 🧚♂️
Tomé una ramita del jardín y la decoramos con algunas hojitas que recorte del foami, las intercale entre verde claro y verde oscuro, pero también le colocamos unos círculos dorados y una llama en la punta, y listo tenemos un lindo centro para nuestro sanador del bosque, por eso que mejor que su cetro sea de materiales que provienen de la naturaleza.
🧚♂️ Paso 15 🧚♂️
Finalmente con las pinturas dibujé los ojos y la boca, y con un poco de rubor resalté sus mejillas, y listo quedó hermoso.
🧚♂️ Fotografías finales 🧚♂️
Espero que este fanart les haya gustado, pronto les traigo un nuevo maquillaje, solo que estoy descansando por las alergias, pero ya pronto estaré de vuelta para traerles nuevos personajes, por ahora, les comparto esta creación de este sanador del bosque versión femenina, que he realizado, me lo disfruté por completo, muy a pesar de ser realmente un trabajo extenso y que tuvo una duración de casi 4 horas, pero sin duda alguna lo volvería hacer porque me gusto hacer este personaje, así que pronto realizaré los otros, por ahora me despido esperando que les haya gustado el trabajo, saludos a todos.
🧚♂️ CRÉDITOS 🧚♂️
Todas las fotografías fueron tomadas con mi teléfono Xiaomi redmi 9T y son de mi propiedad, utilice el programa polish y el traductor Deepl.
Fuente
Fuente bosque verde
https://twitter.com/Mayelin2021/status/1760788153978212451?t=GEKEL0rlfAsZzRdDkLMdPg&s=19
Te quedó precioso, buen trabajo!
Muchísimas gracias amiga
Te quedó espectacular, como siempre. Que te mejores
Gracias linda
Multitalentos eres, que genialidad 😍 te quedo divina y que arduo labor hay detras de esta hermosa figura, me encanto, eres muy habilidosa ❤️
Muchísimas gracias amiga tu siempre tan consecuente la verdad, hago de todo un poco desde que tengo uso de razón, y le doy gracias a Dios por llenarme de tantas habilidades, hay muchas cosas que hago que nunca he publicado, por ejemplo yo sé de albañilería, de diseño de modas, de tantos temas, es que siempre me a gustado estudiar, por eso tengo tres títulos universitarios, y una cantidad de cursos que ya perdí la cuenta, hay que prepararse en todo, jajajaja, si lo se suena algo maniático, pero de veras cuando no estoy estudiando ando mal, jajajaja saludos amiga y besos a buhito
¡Felicitaciones!
Estás participando para optar a la mención especial que se efectuará el domingo 25 de febrero del 2024 a las 8:00 pm (hora de Venezuela), gracias a la cual el autor del artículo seleccionado recibirá la cantidad de 1 HIVE transferida a su cuenta.
¡También has recibido 1 ENTROKEN! El token del PROYECTO ENTROPÍA impulsado por la plataforma Steem-Engine.
1. Invierte en el PROYECTO ENTROPÍA y recibe ganancias semanalmente. Entra aquí para más información.
2. Contáctanos en Discord: https://discord.gg/hkCjFeb
3. Suscríbete a nuestra COMUNIDAD y apoya al trail de @Entropia y así podrás ganar recompensas de curación de forma automática. Entra aquí para más información sobre nuestro trail.
4. Visita nuestro canal de Youtube.
Atentamente
El equipo de curación del PROYECTO ENTROPÍA
Gracias
¡Dios bendiga tus manos @mayifiestas !
Un saludo especial para tí.
Muchísimas gracias amigo, Feliz de verlo apoyando mi contenido
Un gran abrazo May, @mayifiestas