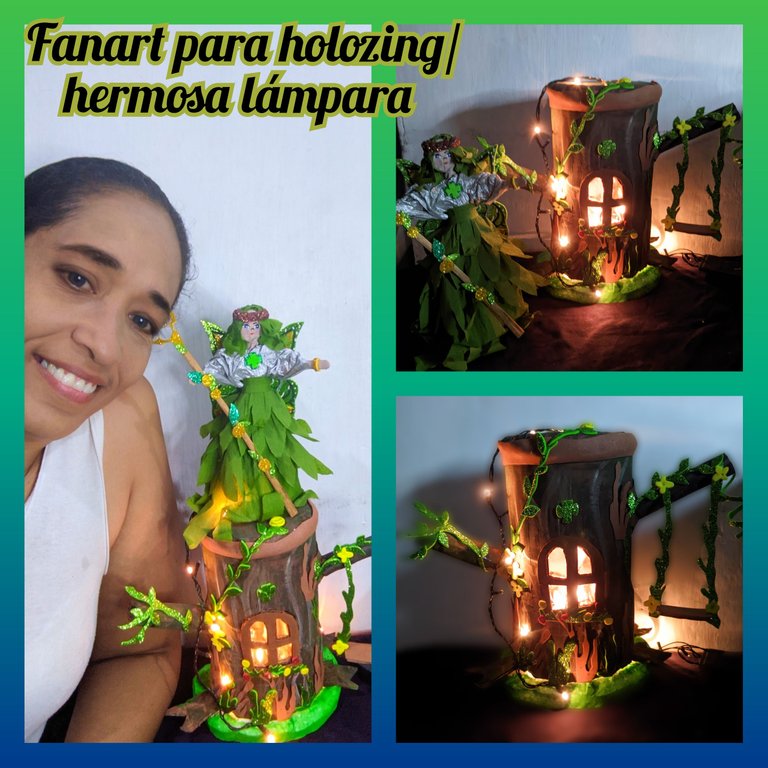
Happy day to all of you especially to the beautiful and hard working bees that every day fill this amazing community with art, today I brought you a very nice Fanart, which I hope you like it, as I always say, I like to create practical things, that have utility, so I got down to work and made this beautiful lamp, but not just any lamp. It is a tree, in which the healer of the forest can recharge his energy, where his battle wounds can be healed, and in which only the healer has access, because it is magic.
The materials are very simple and easy to get, most of them we have in our homes, so there is no excuse to make it, it's just a matter of letting our imagination flow, but let's not say more, let's start our work today.
☘️ MATERIALS ☘️
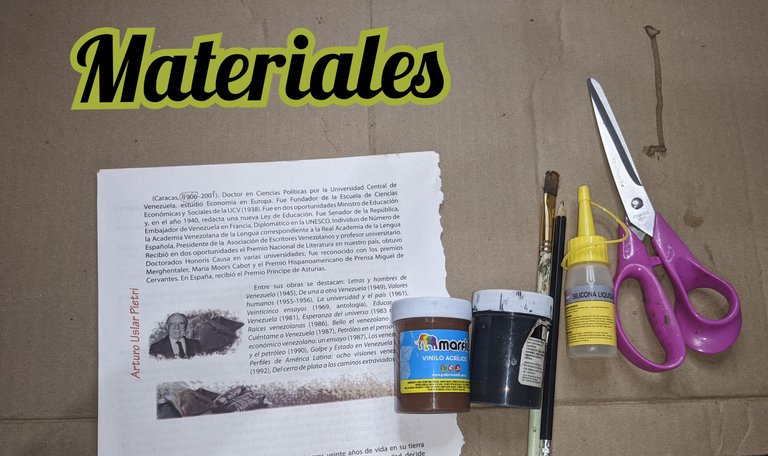
☘️ Cardboard box.
☘️ Apple green frosted foami.
☘️ Brown foami.
☘️ Yellow and red foami scraps.
☘️ Anime or styrofoam.
☘️ Cold paints: green, white and brown.
☘️ Christmas installation (lights).
☘️ Scissors.
☘️ Anime cutter.
☘️ Brush.
☘️ Pencil.
☘️ Recycling sheets.
☘️ Disposable plastic cup.
☘️ CREATIVE PROCESS ☘️
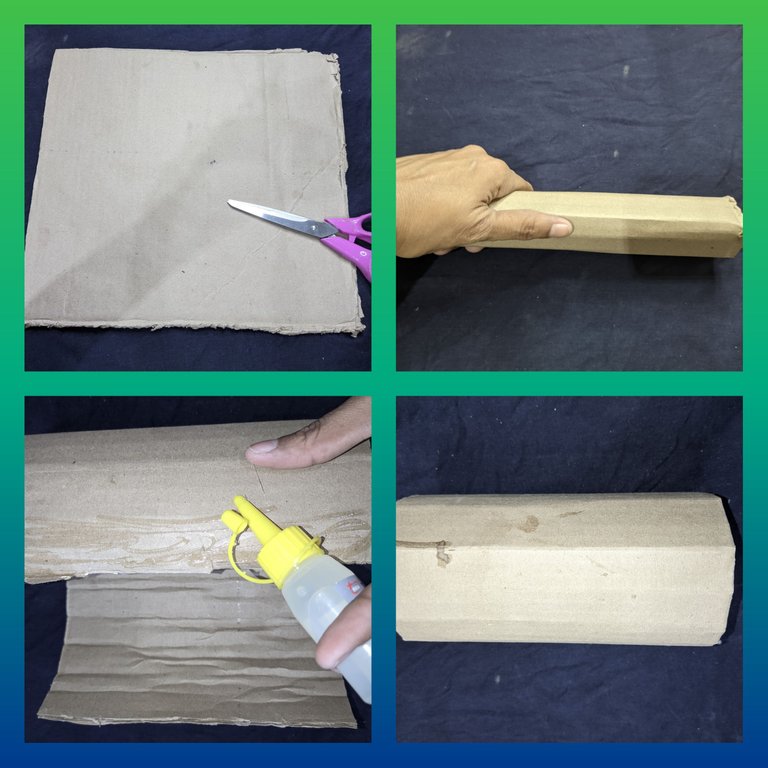
☘️ We take a square of cardboard, the height and width will depend on your taste, in this case I didn't want to make it so big, when I marked it, cut it and roll it up, then with the liquid silicone we glue both ends, until we form a cylinder and let it dry well.
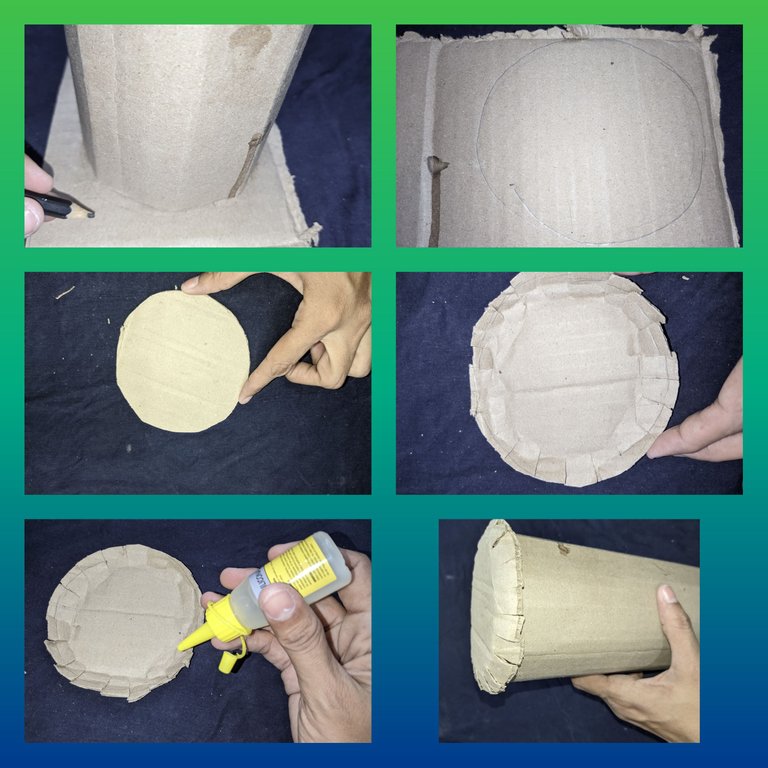
☘️ When the cylinder is dry I use it to mark on the cardboard the lid, after marking, we cut it out and apply liquid silicone and proceed to glue on one of the ends of the cylinder.
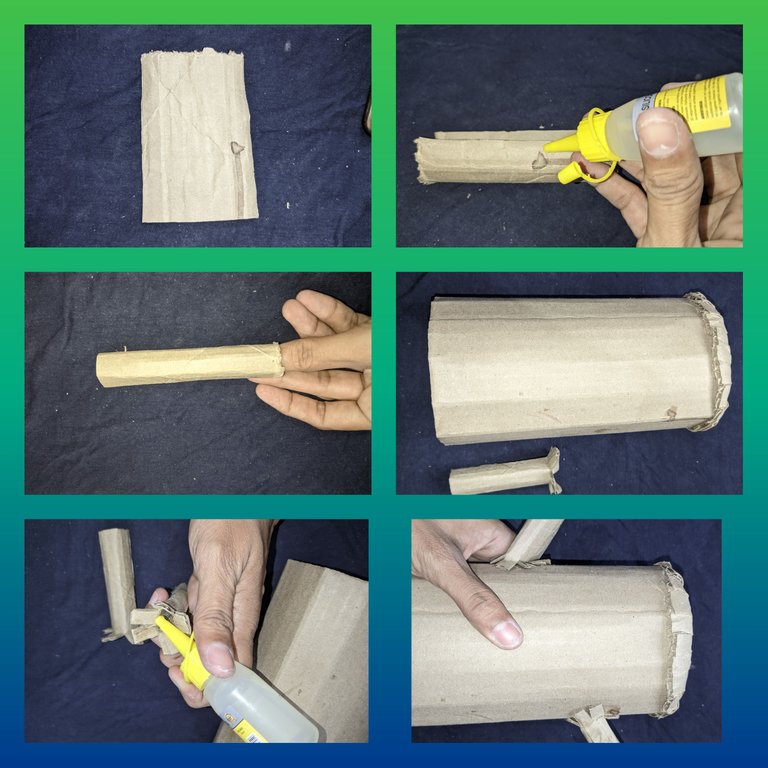
☘️ Then I took two small pieces of cardboard and repeated the procedure, only these should be very small, as they will be the branches of the tree, we glued and let dry well, when it dried well I proceeded to glue it to the trunk, in different parts, and so we formed the thick branches.
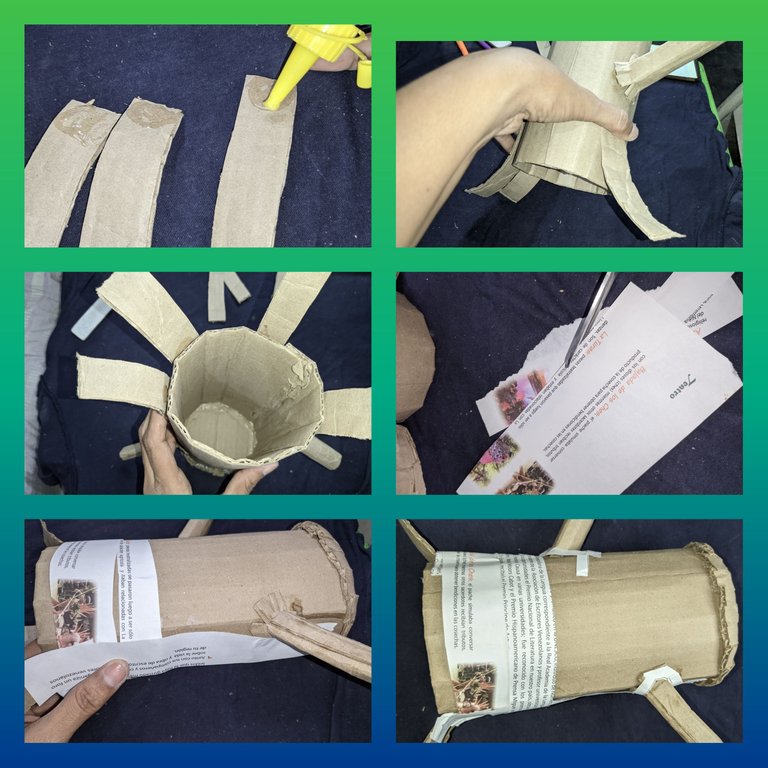
☘️ I then cut out three strips of cardboard which we glued together with liquid silicone, then I took the sheets of paper and chopped up some strips which we glued onto our piece, to help us fix the branches and other pieces.
☘️ Once dry, I proceeded to paint it with brown paint and let it dry, while I cut out some shapes from the brown and green foami that I then glued on the edge of the tree, with the white paint I drew some lines that will form the cracks of the tree.

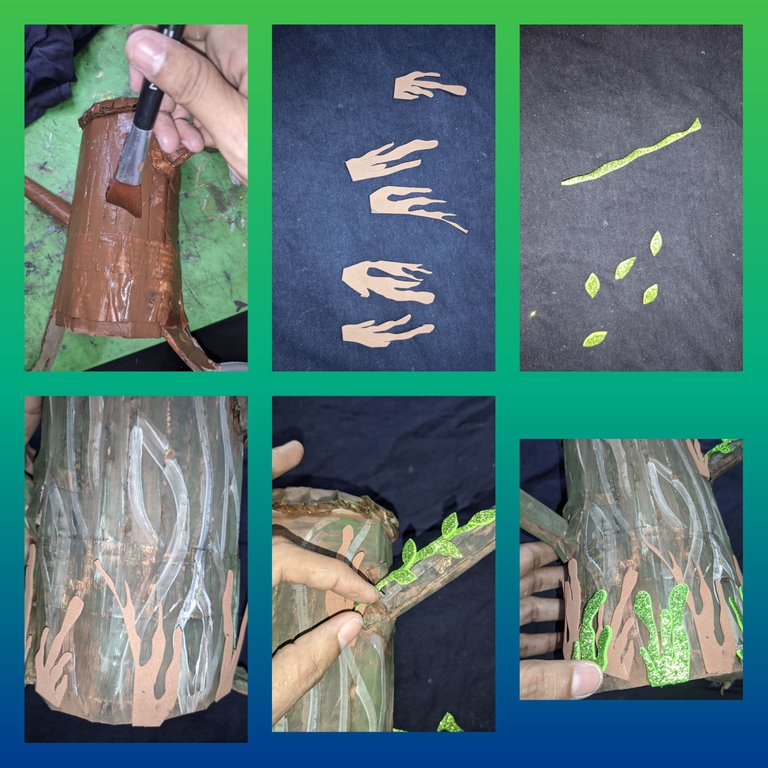
☘️ Now I cut out a square of cardboard and lined it with brown foami, then I cut out branches and leaves from the frosted green foami, and glued them together to form a nice swing, and I also glued branches and leaves in different parts of the tree, and on the brown foami I cut out a strip, which I glued with liquid silicone to the edge of the lid that we paid for.
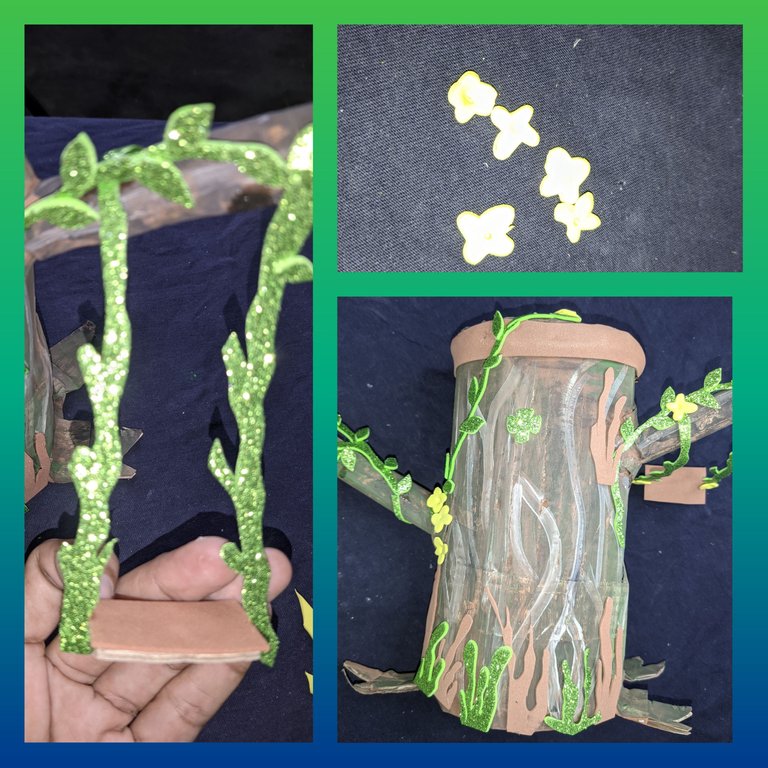
☘️ From the foami scraps I cut out some leaves and glued some little flowers on different parts of them.
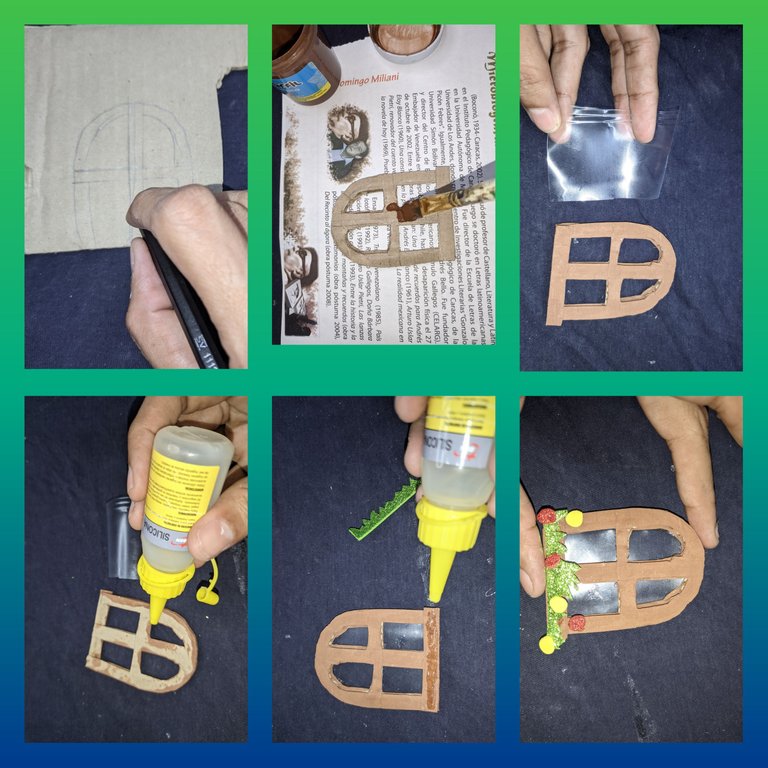
☘️ On another piece of cardboard I drew and cut out a window with the help of the scissors and painted it, to give it a touch of realism I cut out the disposable glass and glued it to the window to make it look like glass, I added some flowers and grasses.
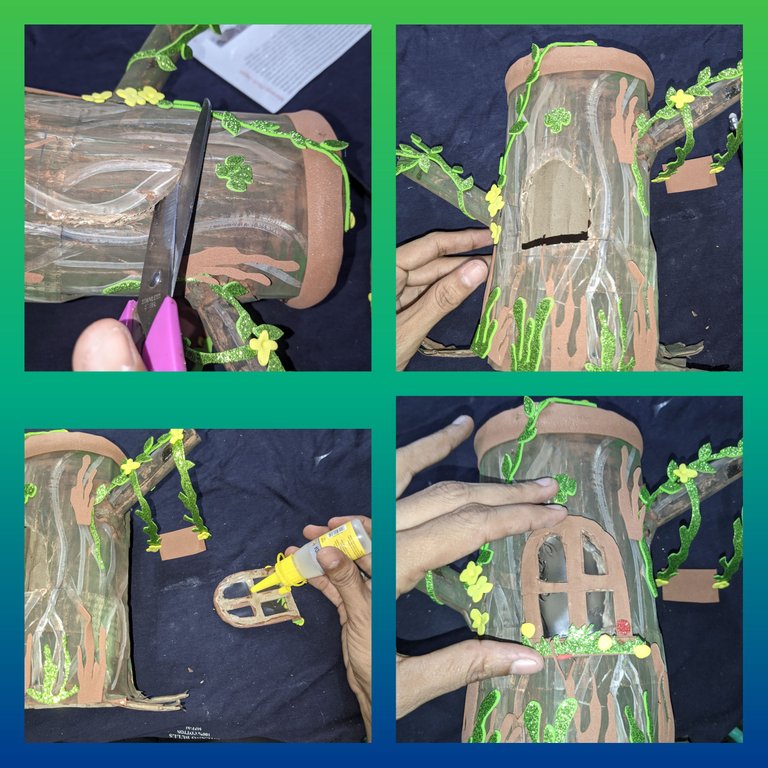
☘️ As I had forgotten to cut out the hole, I cut it out with the scissors and glued the window we made with the liquid silicone, and let it dry well.
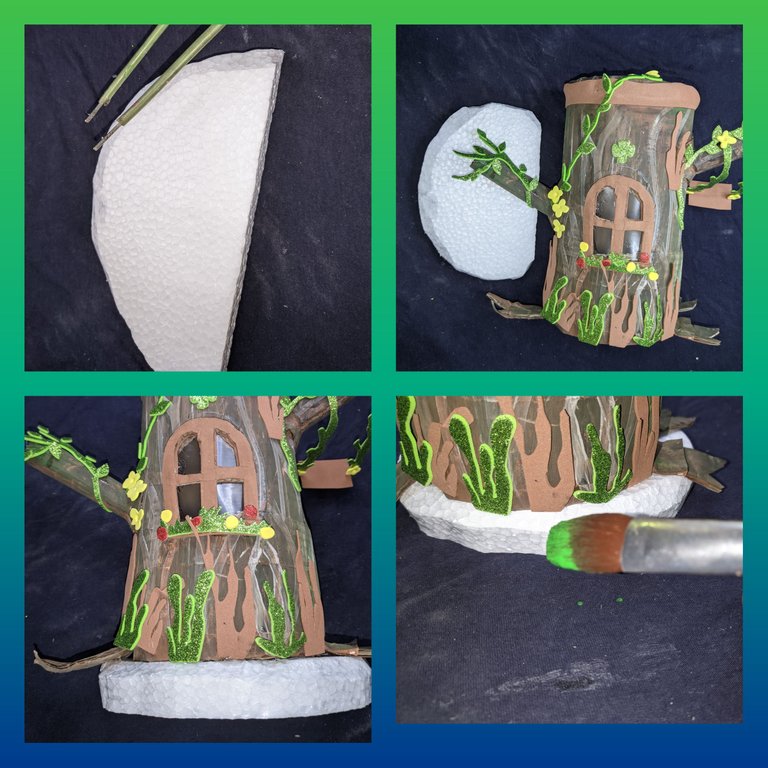
☘️ With the anime cutter I cut out the base of our lamp, which we painted apple green and let it dry well and it is almost ready.
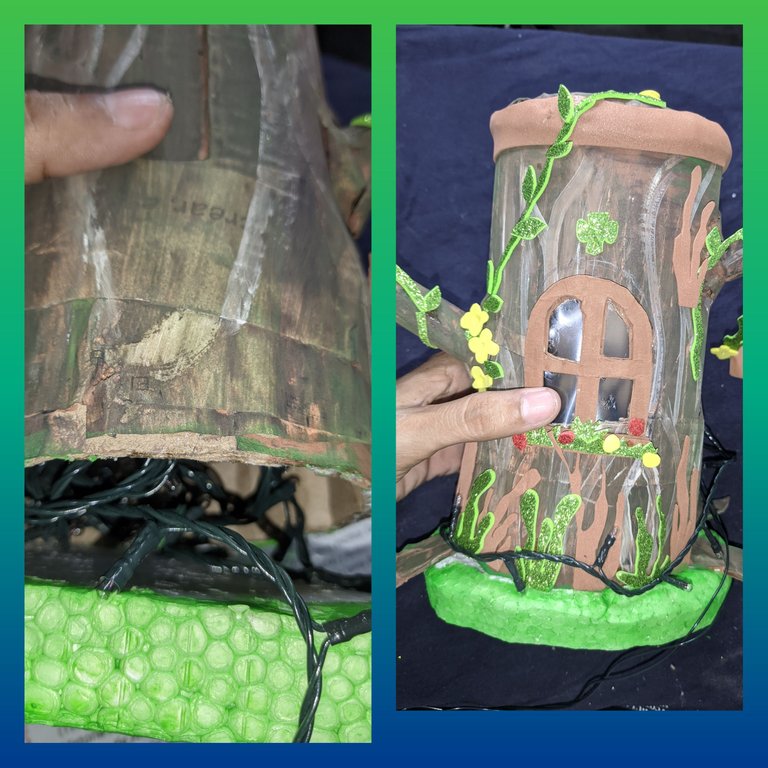
☘️ I took the Christmas lights and put them inside the tree and with the scissors I made a small hole at the top where I took out the tip of the light, which I placed in different parts of the tree, once placed in place, applied liquid silicone and glued the tree to the base and ready we have a beautiful night light that will look beautiful in our room.
☘️ FINAL PHOTOGRAPHS ☘️

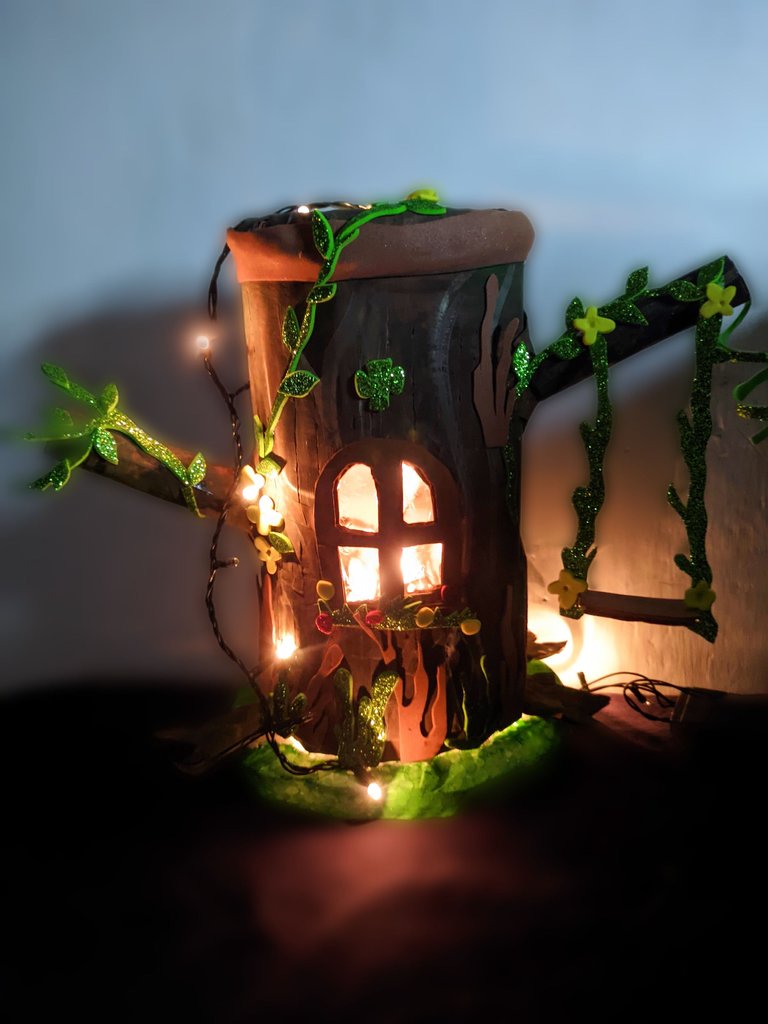
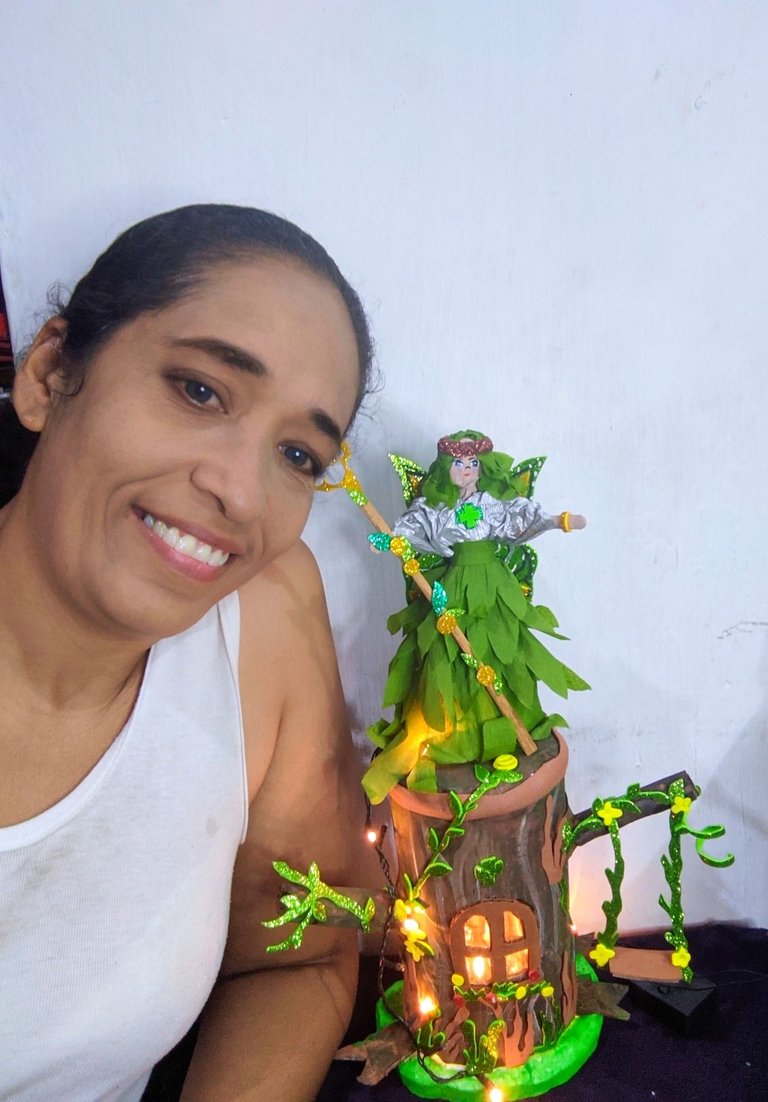
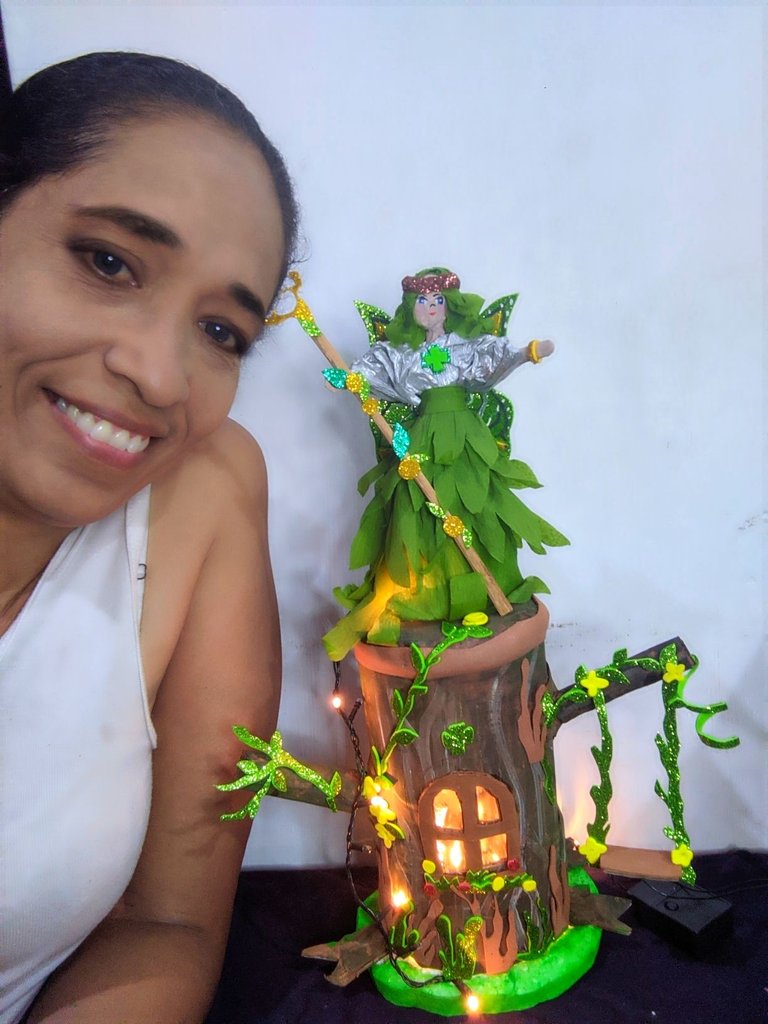
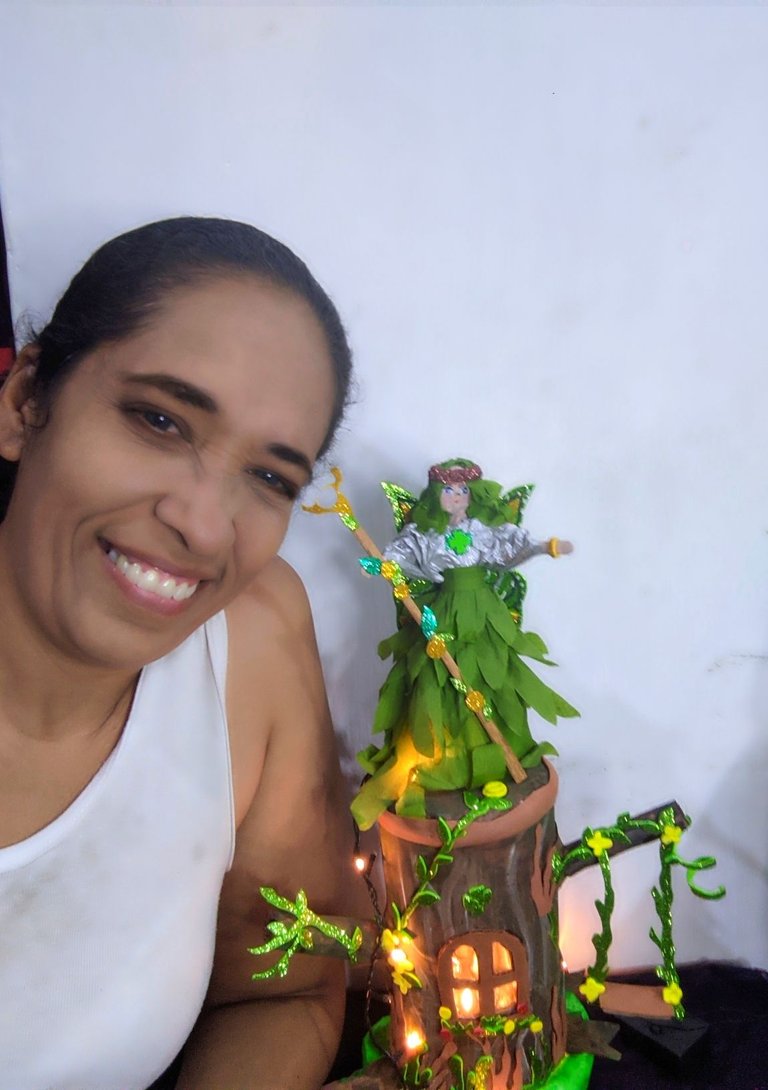
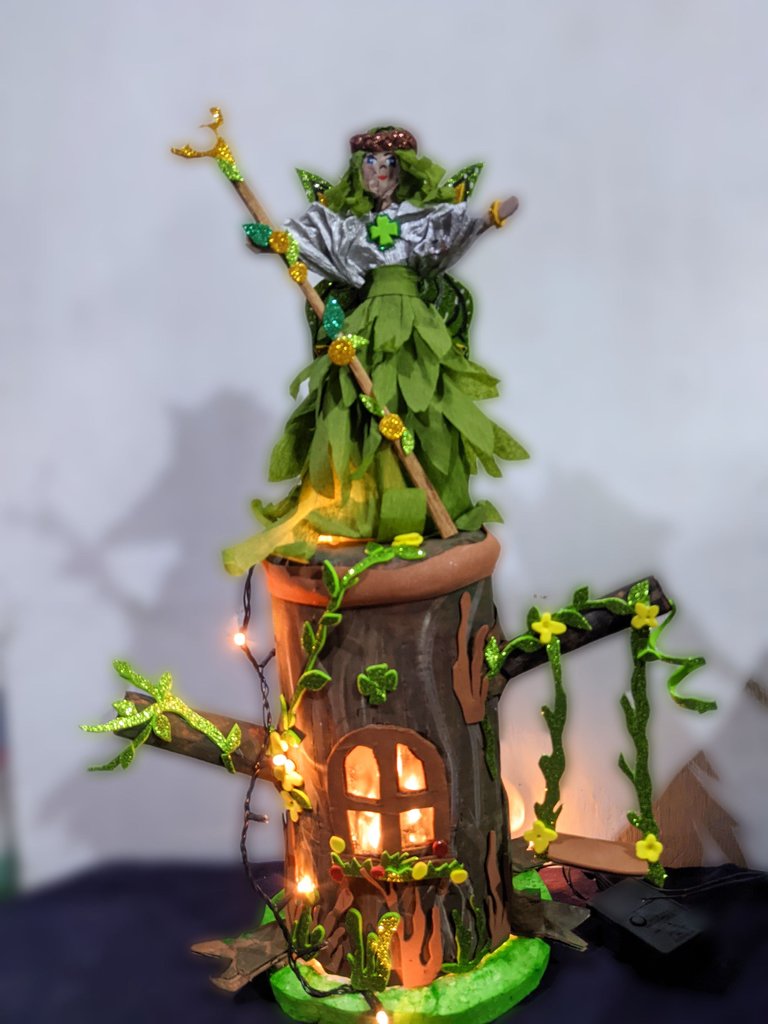

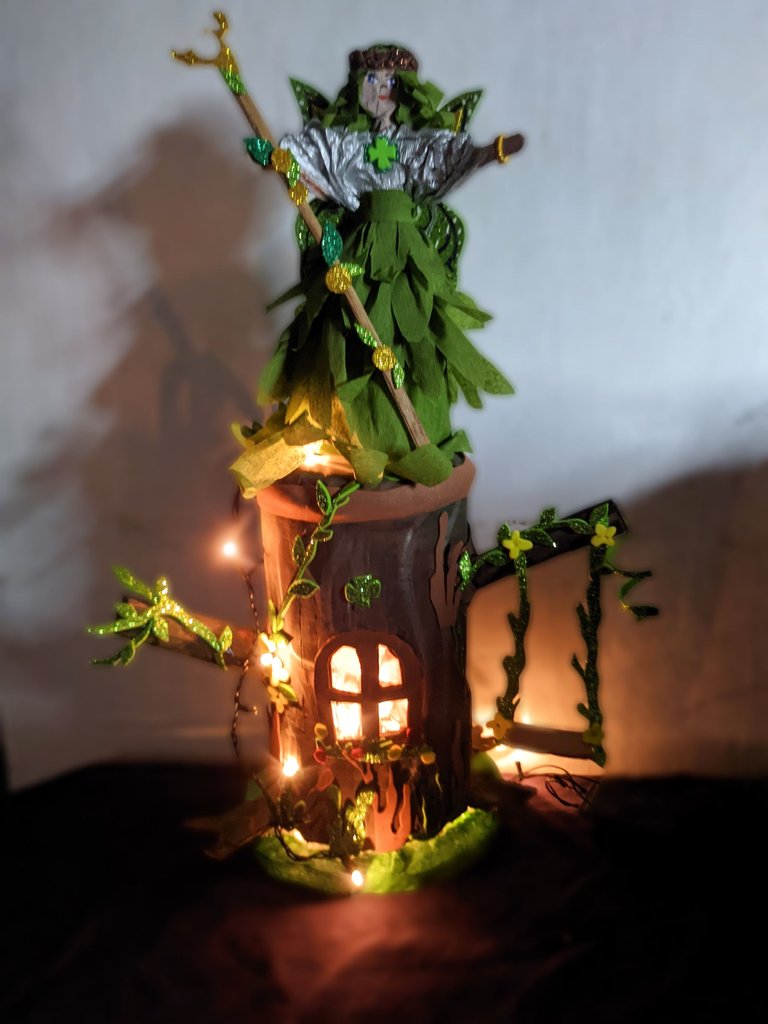
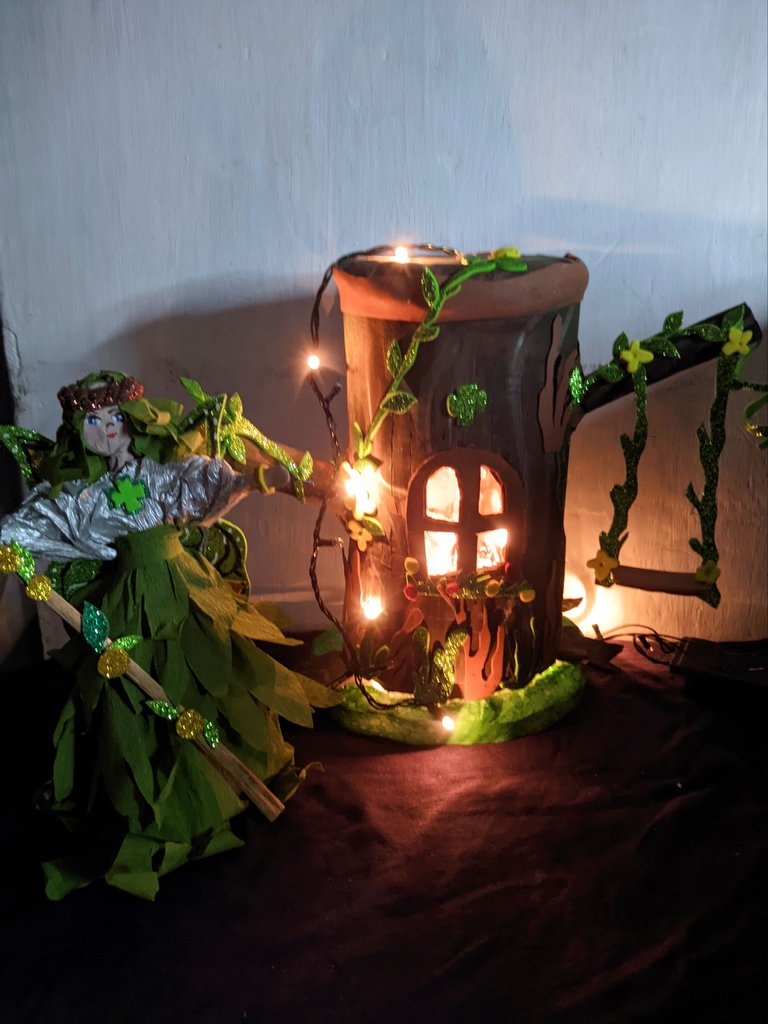
Tell me what this was not beautiful, I loved the final result, and to complement put the forest healer that I made some time ago as a decoration, and tell me what does not look fantastic, I was really in love with this work, I never tire of saying I love this community because it helps us to express all that creativity stored at the same time that our ideas serve to help the creators of this game with one or another idea that we can contribute.

☘️ CREDITS ☘️
All photos were taken with my Xiaomi redmi 9T phone and are my property using polish and Deepl translator.

Feliz día para todos especialmente a esa hermosa la y laboriosas abejitas que día a día llenan de arte a esta increíble comunidad, el día de hoy les traje un Fanart bien bonito, el cuál espero les guste, como siempre digo, a mí me gusta crear cosas prácticas, que tengan utilidad, por eso me puse manos a las obra y realice esta hermosa lámpara, pero no cualquier lámpara. Se trata de un árbol, en el cual el sanador del bosque puede recargar su energía, dónde sus heridas de batallas pueden ser sanadas, y en el cual solo el sanador tiene acceso, ya que es mágico.
Los materiales son bien sencillos y fáciles de conseguir, la mayoría los tenemos en nuestros hogares, así que no hay excusa para realizarlo, solo es cuestión de dejar fluir nuestra imaginación, pero no se diga más demos inició a nuestro trabajo de hoy.
☘️ MATERIALES ☘️
☘️ Cartón de caja.
☘️ Foami escarchado verde manzana.
☘️ Foami marrón.
☘️ Retazos de foami amarillo, y rojo.
☘️ Anime o icopor.
☘️ Pinturas al frío: verde, blanca y marrón.
☘️ Instalación de navidad (luces).
☘️ Tijera.
☘️ Cortador de anime.
☘️ Pincel.
☘️ Lápiz.
☘️ Hojas de reciclaje.
☘️ Vaso plástico desechable.
☘️ PROCESO CREATIVO ☘️
☘️ Tomamos un cuadrado de cartón, el alto y ancho dependerá de tus gustos, en este caso no lo quise hacer tan grande, cuando ya yo marcamos, recortamos y enrollamos, luego con el silicón líquido pegamos ambos extremos, hasta formar un cilindro y dejamos que seque bien.
☘️ Cuando el cilindro está seco lo utilizo para marcar en el cartón la tapa, después de marcar, la recortamos y le aplicamos silicón líquido y procedemos a pegar en uno de los extremos del cilindro.
☘️ Luego tomé dos pedacitos de cartón y repetí el procedimiento, solo que estos deben ser bien pequeño, ya que será las ramas del árbol, pegamos y dejamos secar bien, cuando ya secó bien procedí a pegarlo del tronco, en diferentes partes, y así formamos las ramas gruesas.
☘️ Después recorté tres tiras de cartón las cuales pegamos con silicón líquido, luego tomé las hojas de papel y picamos algunas tiras las cuales pegamos en nuestra pieza, para ayudarnos a fijar las ramos y demás piezas.
☘️ Una vez seco, procedí a pintarlo con la pintura marrón y dejamos secar, mientras recorté del foami marrón y del verde unas formas que luego pegamos en el borde del árbol, con la pintura blanca dibuje algunas betas que formarán las grietas del árbol.
☘️ Ahora recorté un cuadrado de cartón y lo forre con foami de color marrón, seguido de eso recorte del foami verde escarchado una ramas y hojitas, y pegamos hasta formar un lindo columpio, y también pegamos ramas y hojas en diferentes partes del árbol, y en el foami marrón recorté una tira, la cual con ayuda del silicón líquido pegamos en el borde de la tapa que pagamos.
☘️ De los retazos de foami recorte algunas hojas unas florecitas las cuales pegamos en diferentes partes.
☘️ En otro pedacito de cartón dibujé y recorté con ayuda de la tijera una ventana y pintamos, para darle un toque de realismo recorté el vaso desechable y pegamos en la ventana para que parezca un vidrio, le agregué algunas florecitas y gramas.
☘️ Cómo había olvidado recortar el agujero lo hice con la tijera y allí pegamos con el silicón líquido la ventana que hicimos, y dejamos secar bien.
☘️ Con el cortador de anime recorté la base de nuestra lámpara,la cual pintamos de color verde manzana y dejamos secar bien y ya casi está lista.
☘️ Tome las luces de navidad y la introduje dentro del árbol y con la tijera hice un pequeño agujero en la parte superior por dónde saqué la punta de la luz, la cual coloque en diferentes partes del árbol, una vez colocadas en su sitio,aplicó silicón líquido y pegamos el árbol a la base y listo tenemos una hermosa lámpara de noche que lucirá hermosa en nuestra habitación.
☘️ FOTOGRAFÍAS FINALES ☘️
Dígame qué esto no quedó hermoso, a mí me encantó el resultado final, y para complementar coloque al sanador del bosque que elabore hace algún tiempo a modo de decoración, y díganme qué no se ve fantástico, quedé realmente enamorada de este trabajo, no me canso de decirlo me encanta esta comunidad porque nos ayuda a expresar toda esa creatividad guardada al mismo tiempo que nuestras ideas sirven de ayuda a los creadores de este juego con una que otra idea que podamos aportar.
☘️ CRÉDITOS ☘️
Todas las fotografías fueron tomadas con mi teléfono Xiaomi redmi 9T y son de mi propiedad utilizando el programa polish y el traductor Deepl.
https://twitter.com/Mayelin2021/status/1785066234234462209?t=VJw4bJRJrz7QTMpBoWolYA&s=19
Te quedó genial mayi, excelente, eres toda una artista. Tremenda lampara... Saludos
Muchas gracias amiga, anímate hacer arte es divertido y relajante, saludos
Wow Mayita, it is really impressive what you have done and all the effort this takes and has been demonstrated in your publication. Congratulations on your awesomeness and dedication 🙏
Muchas gracias mi amigo, son muchísimas las cosas que podemos realizar cuando hay la disposición, gracias por visitar mi blog y apoyar, saludos
¡Felicidades! Esta publicación obtuvo upvote y fue compartido por @la-colmena, un proyecto de Curación Manual para la comunidad hispana de Hive que cuenta con el respaldo de @curie.
Si te gusta el trabajo que hacemos, te invitamos a darle tu voto a este comentario y a votar como testigo por La Colmena.
Si quieres saber más sobre nuestro proyecto, te invitamos a acompañarnos en nuestro servidor de Discord.
Muchas gracias por el apoyo bendiciones
Es una hermoso trabajo, éxitos.
Muchas gracias mi niña, saludos
Que bonito trabajo, felicidades!!
Muchas gracias ☘️
Congratulations @mayifiestas! You have completed the following achievement on the Hive blockchain And have been rewarded with New badge(s)
Your next target is to reach 1300 posts.
Your next target is to reach 39000 upvotes.
You can view your badges on your board and compare yourself to others in the Ranking
If you no longer want to receive notifications, reply to this comment with the word
STOPCheck out our last posts:
Gracias
¡Eso es genial @mayifiestas! ¡Estamos emocionados de ver tus logros en Hive! ¡Sigue adelante y logra este nuevo objetivo!
¡Te quedó demasiado hermosa! Cómo decoración queda preciosa ✨
Gracias por apreciar el trabajo amiga, llevo un poco de trabajo, pero cuando se hace con cariño todo queda bien, saludos
Te ha quedado espectacular 😍 me encanta 😉
Gracias amiga
Thank you for your witness vote!
Have a !BEER on me!
To Opt-Out of my witness beer program just comment STOP below
Linda lámpara.
Muchas gracias amiga es bien fácil de elaborar y muy práctica. Saludos