Greetings to everyone especially to those
#holozing Fanart fans, today I'm back to show you how I was able to recreate this beautiful character, the water healer, which I wanted to do for a long time but I had not been able to do it, so today we decided to do it and I show it here by
#hive.
To start I will give you the list of materials, which I used, and of course the step by step of the whole creative process, here I leave you absolutely everything so you can do it, I worked with simple materials, many of them I had from previous works, others I bought, but they are easy to get, I hope you like it.
🐳 Materials 🐳
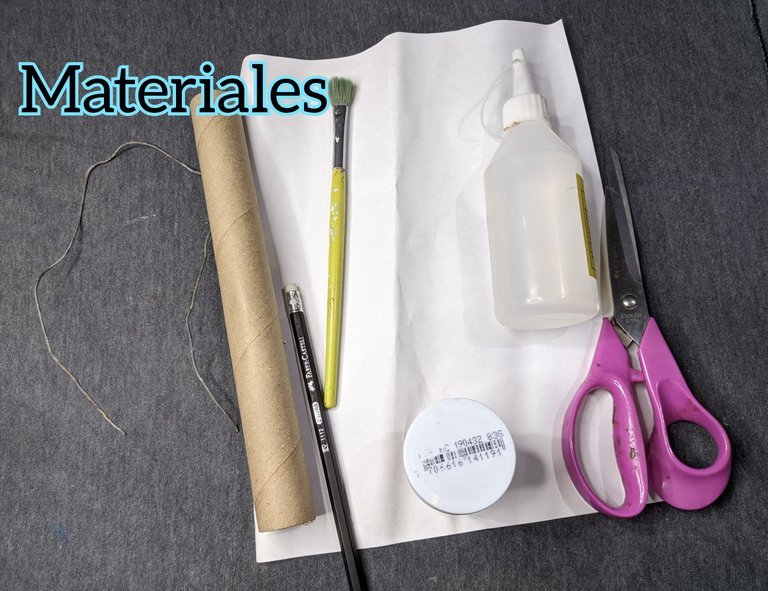
🐳 Sheets of paper.
🐳 Liquid silicone.
🐳 Dark blue frosted foami.
🐳 Light blue frosted foami.
🐳 White foami.
🐳 skin-coloured, blue, white and black paint.
🐳 Brush.
🐳 Costume jewellery accessories.
🐳 Scissors.
🐳 Height stick.
🐳 Creative process 🐳
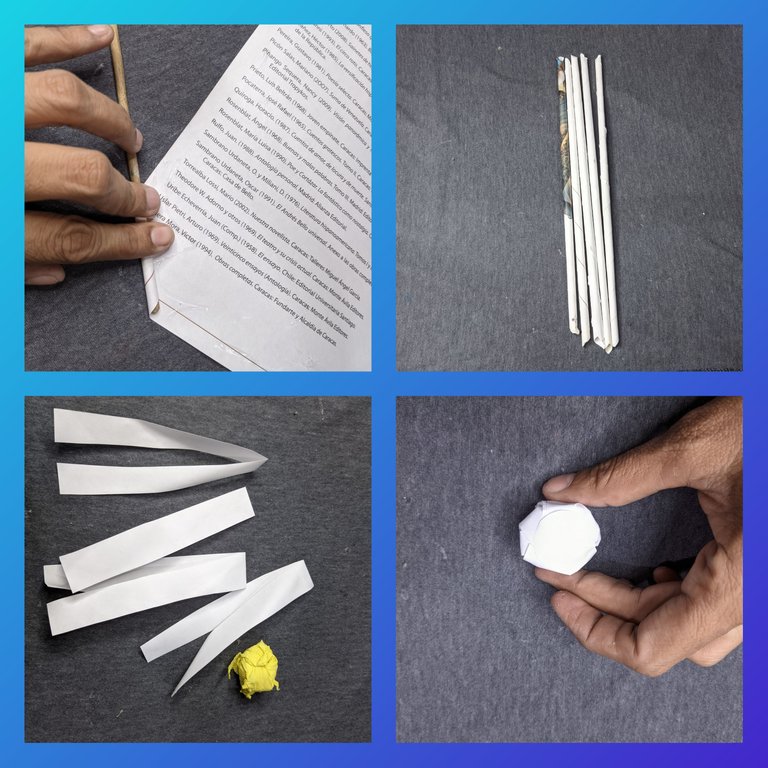
🐳 First I took the sheets of paper and with the help of the height stick I rolled and formed these little tubes, in total I took about 5, and glued the ends with a little liquid silicone.
Then I took several pieces of paper and rolled them up to form a little ball which will be our face, then I cut out several strips with which I gave shape to the little ball I made out of paper.
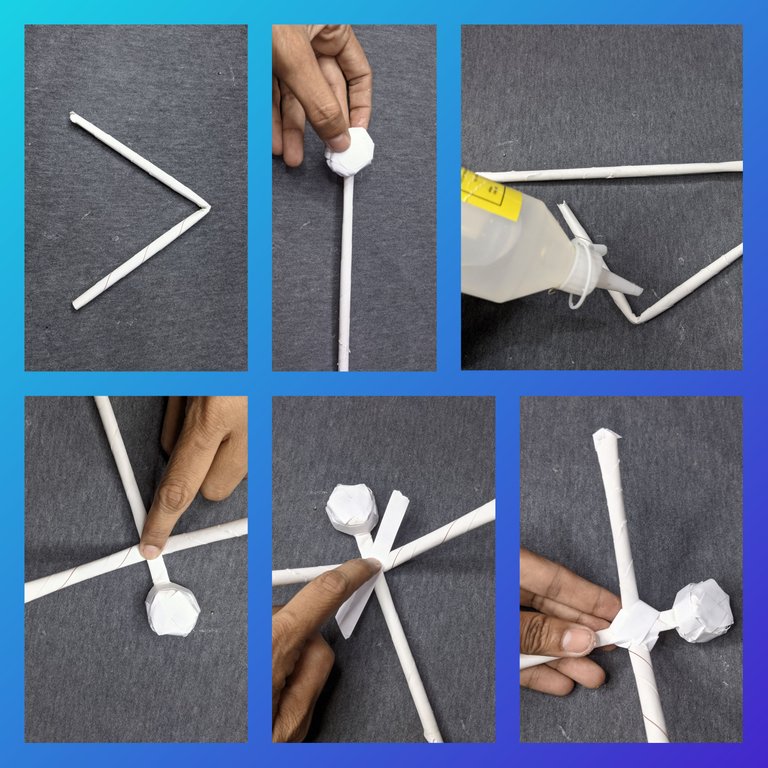
🐳 Then I took one of the tubes and folded it in two, then I took another tube and glued it with the liquid silicone of the head or ball we made earlier, followed by gluing it in the centre of the strip that we folded in half and let it dry, then with the tabs we glued the strips with liquid silicone crossing them through the tube, in this way we formed the torso of our healer.
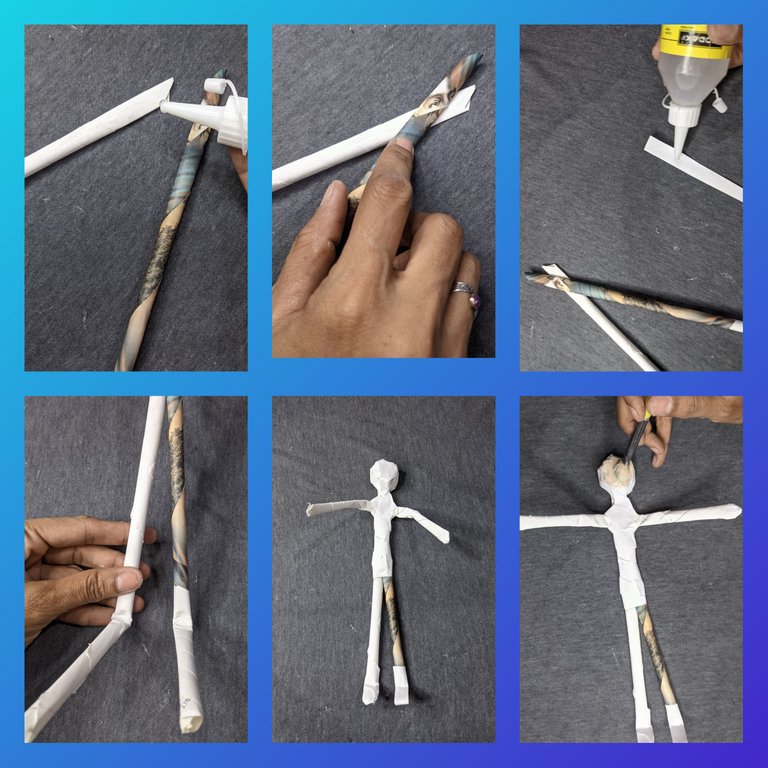
🐳 Take two small tubes and glue them to the body and bend them at the ends to form the feet.
🐳 With the skin-coloured paint and the thick brush, paint the face and arms and let them dry well.
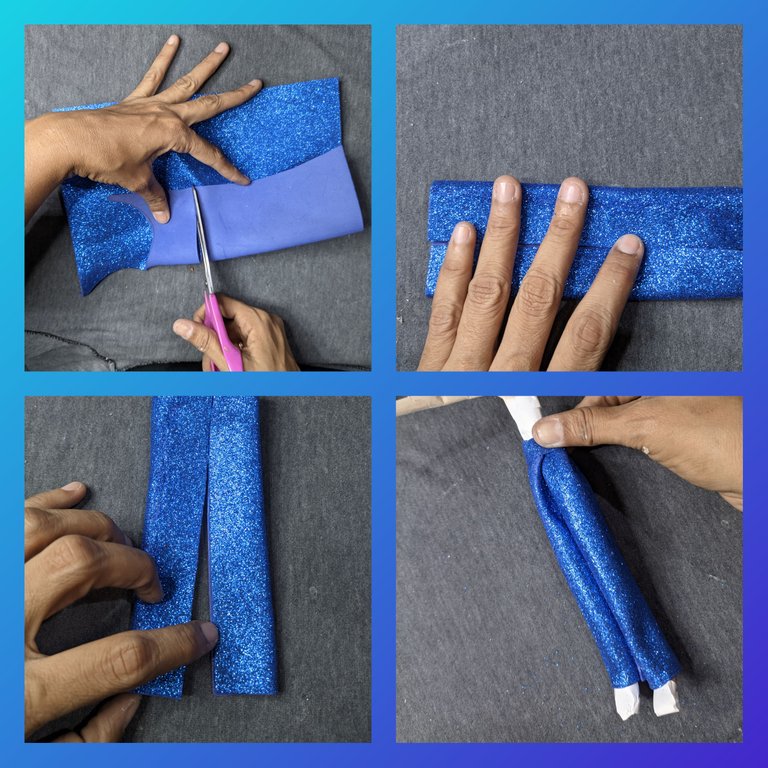
🐳 Take the dark blue frosted foami and on it I drew and cut out the trousers and glued it with the liquid silicone of the doll.
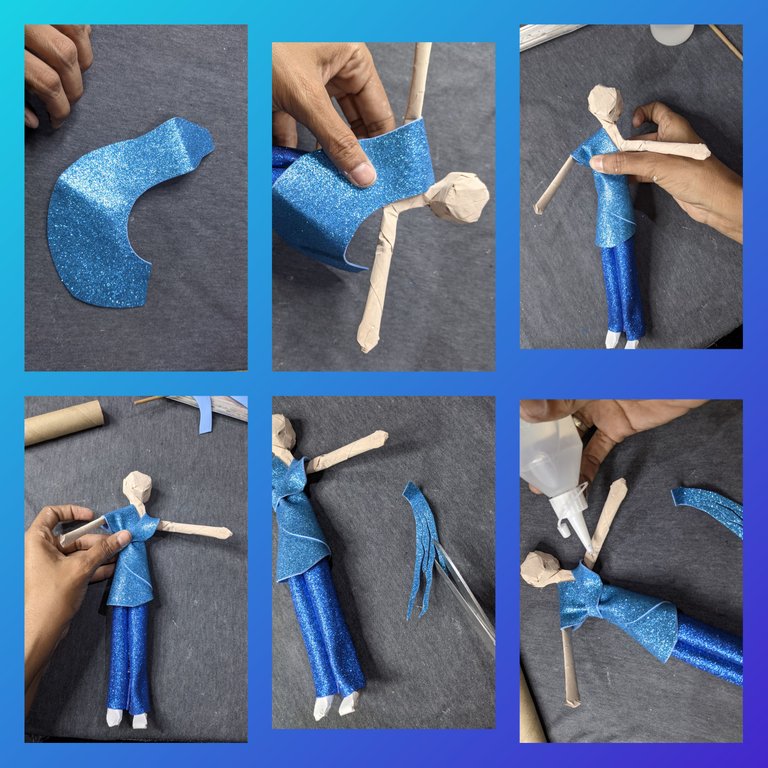
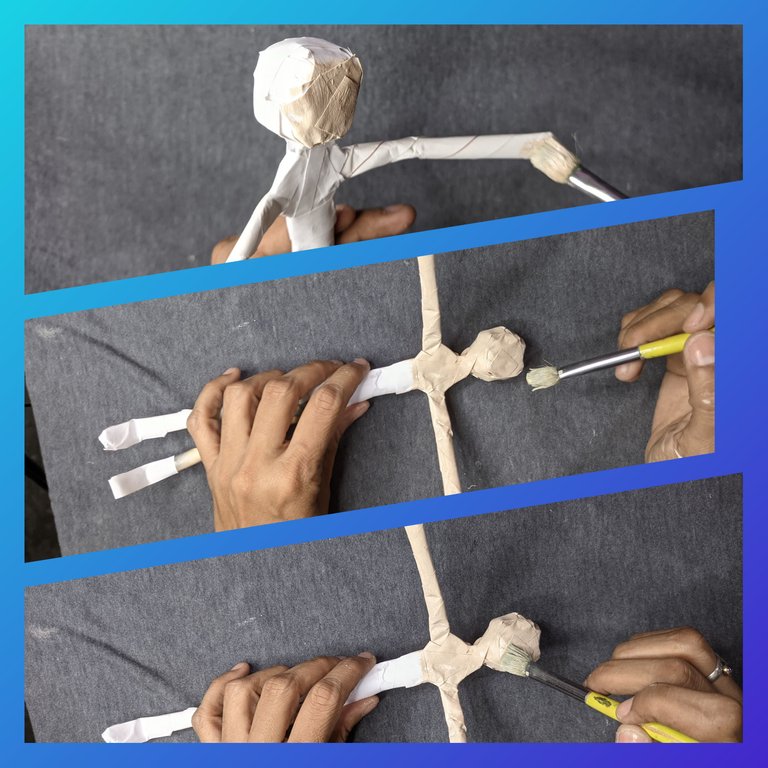
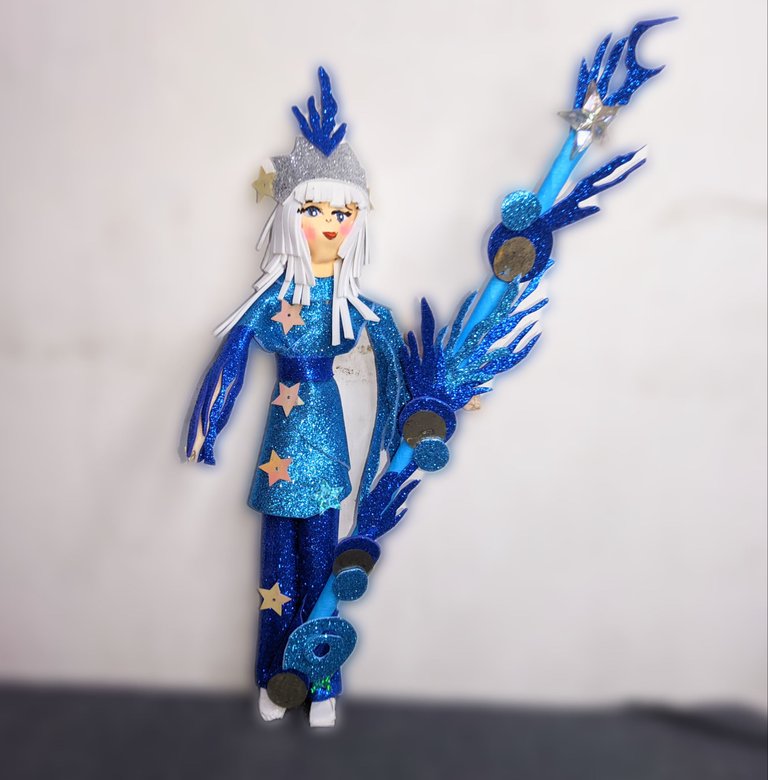
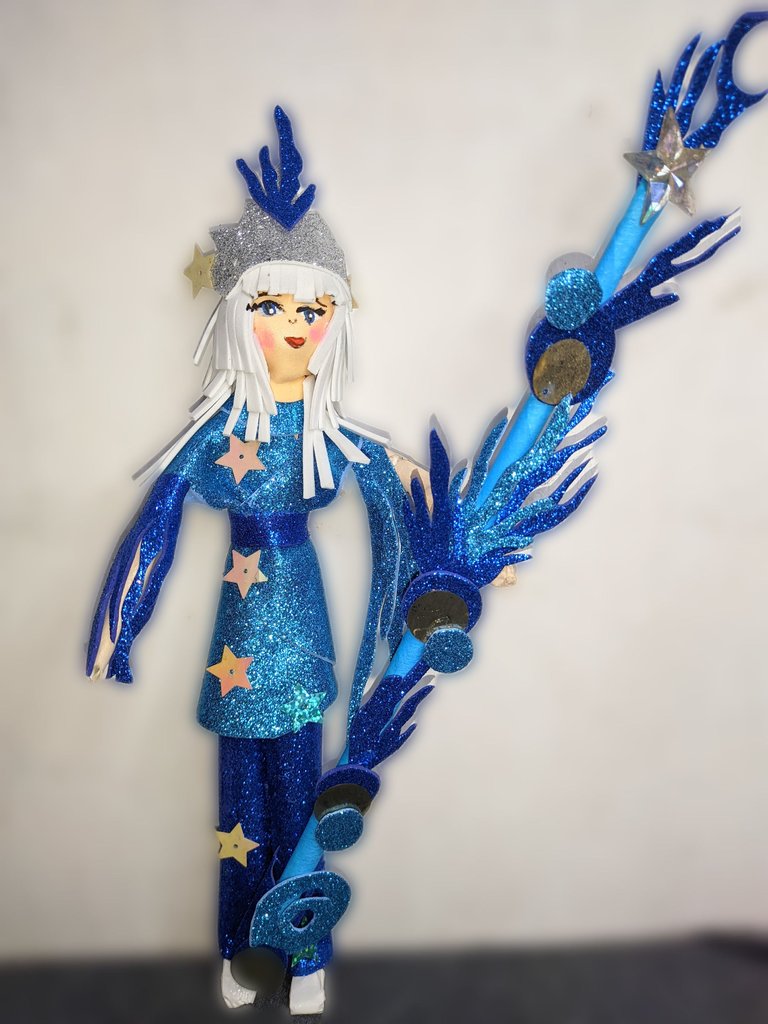
🐳 The next thing I did was cut out a slightly different figure and glued it onto the doll to form the top of the water healer's suit, I wanted to make it so that his suit looked like ocean waves and I put some elaborate details in light blue frosted foami.
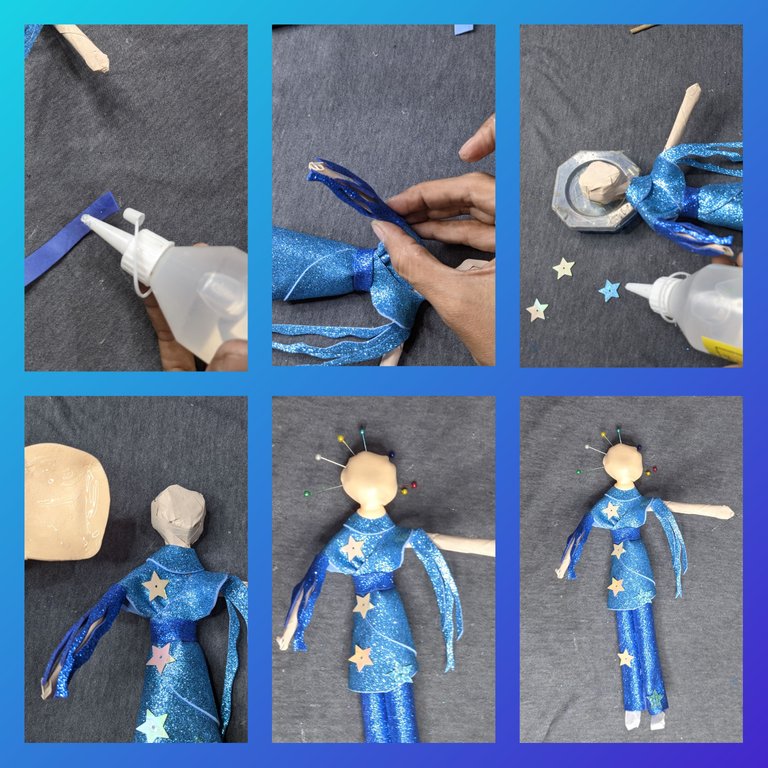
🐳 In the other sleeve we glue some dark blue seaweed, then take a piece of skin coloured foami to which we apply a little heat and we glue the face, that is to say we cover the ball and let it dry, I fixed it with some pins, and then we glue with the liquid silicone some applications of stars, in the suit.
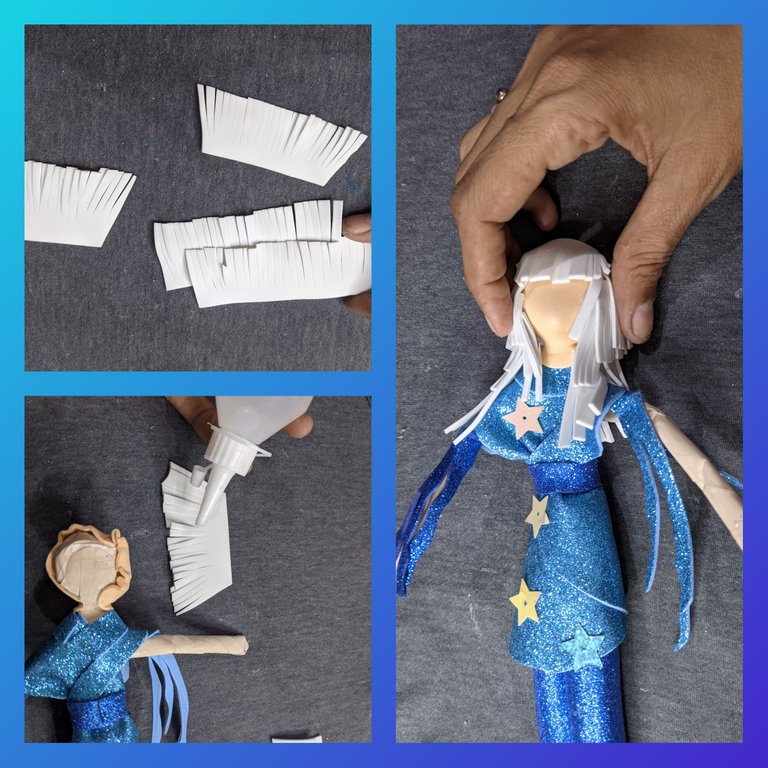
🐳 I cut several strips of the white foami, and I made many strips so that it looks like hair, when I have them I remove the pins and apply liquid silicone and proceed to glue the hair.
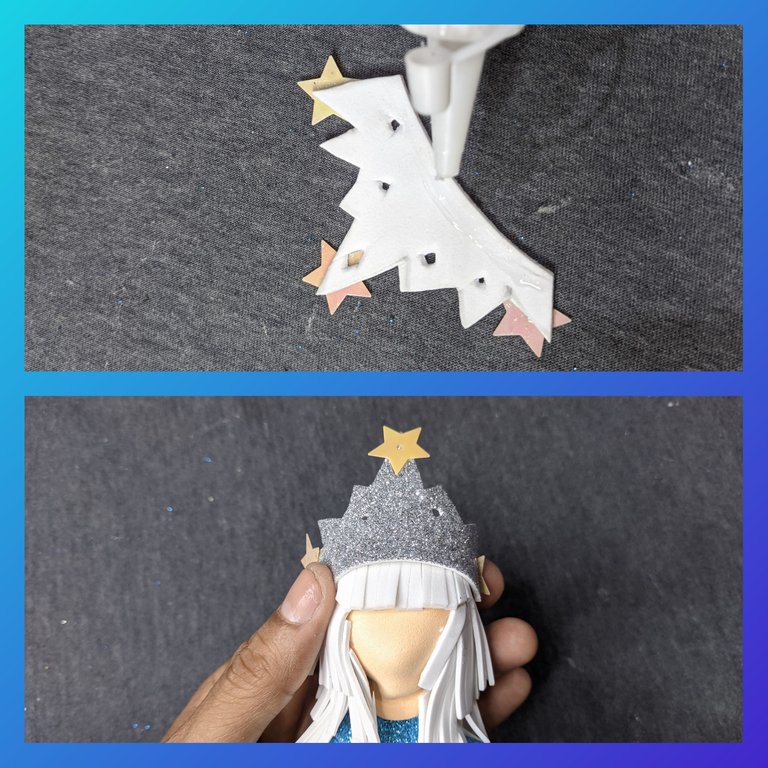
🐳 Then I cut out a beautiful wreath to which I glued star appliqués.
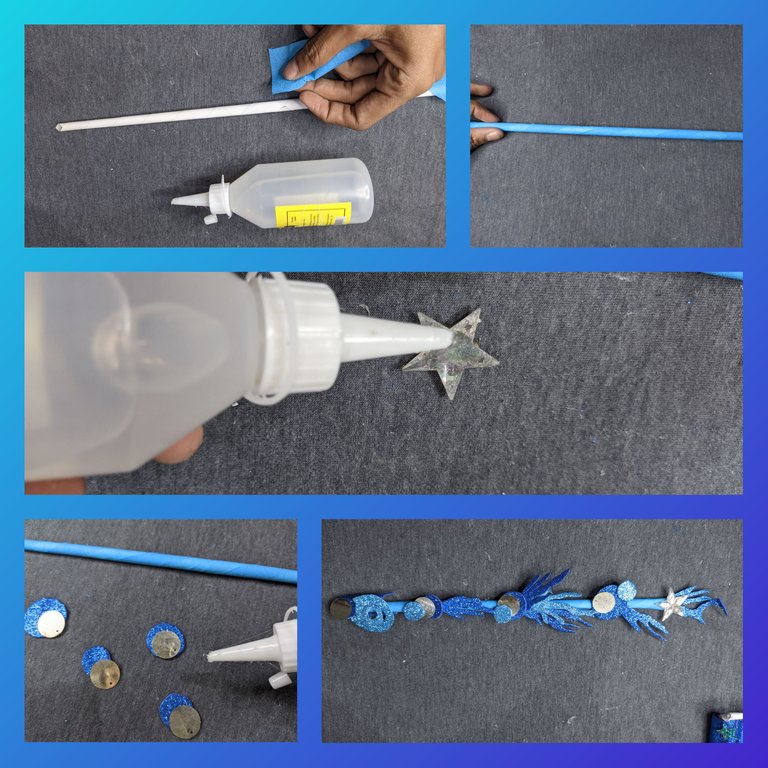
🐳 now we are going to form the sceptre or staff of the healer, for this we take one of the little tubes and we cover it in blue, then we glue the different applications that I made, for example I cut out seaweed, also some circles that simulate water bubbles and we glue everything and it looks beautiful.
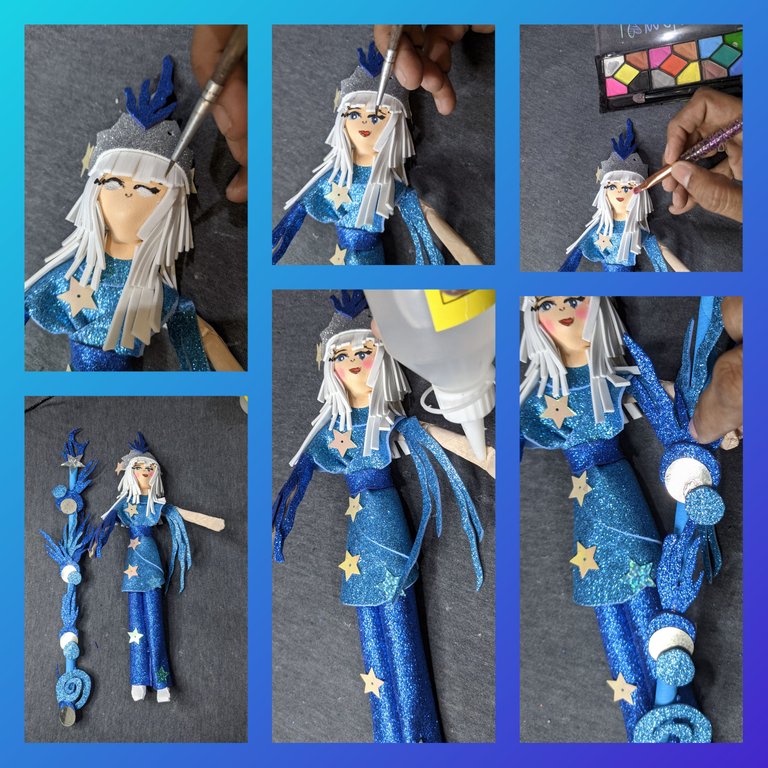
🐳 To finish I drew the face, and finally I applied liquid silicone and glued the scepter to it.
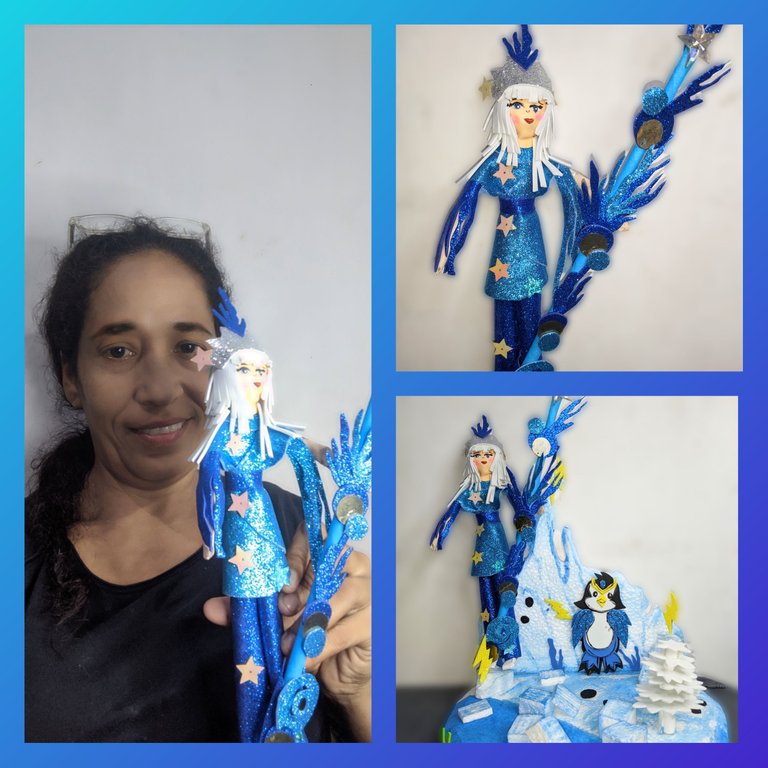
🐳 FINAL PHOTOGRAPHS 🐳
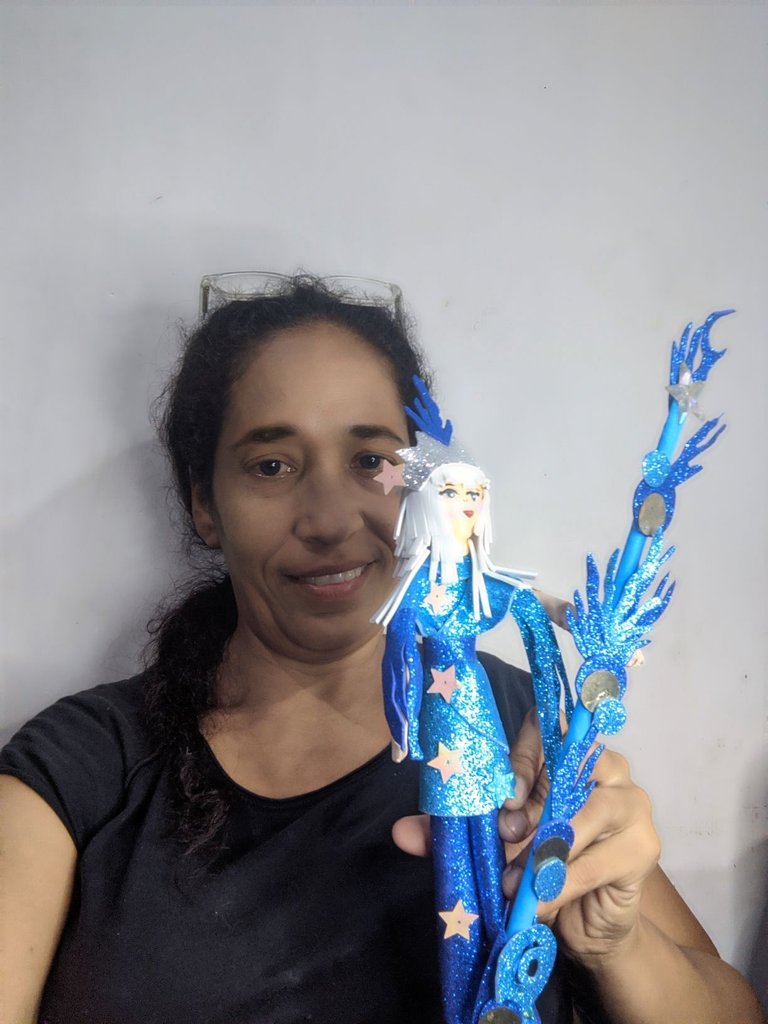
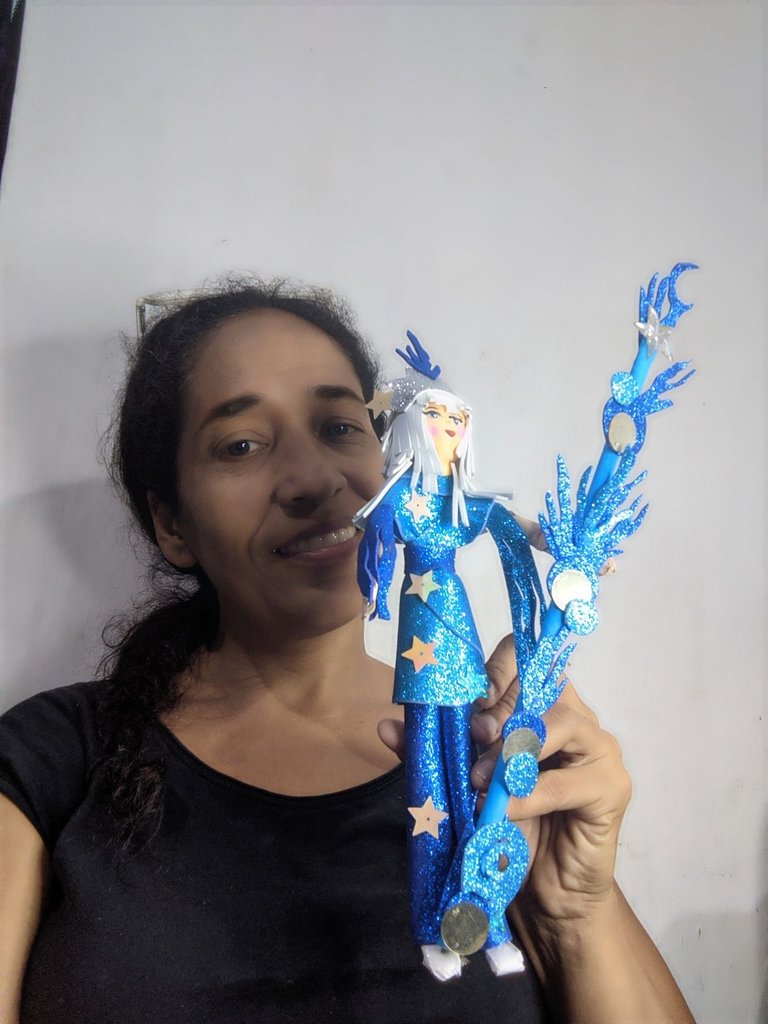
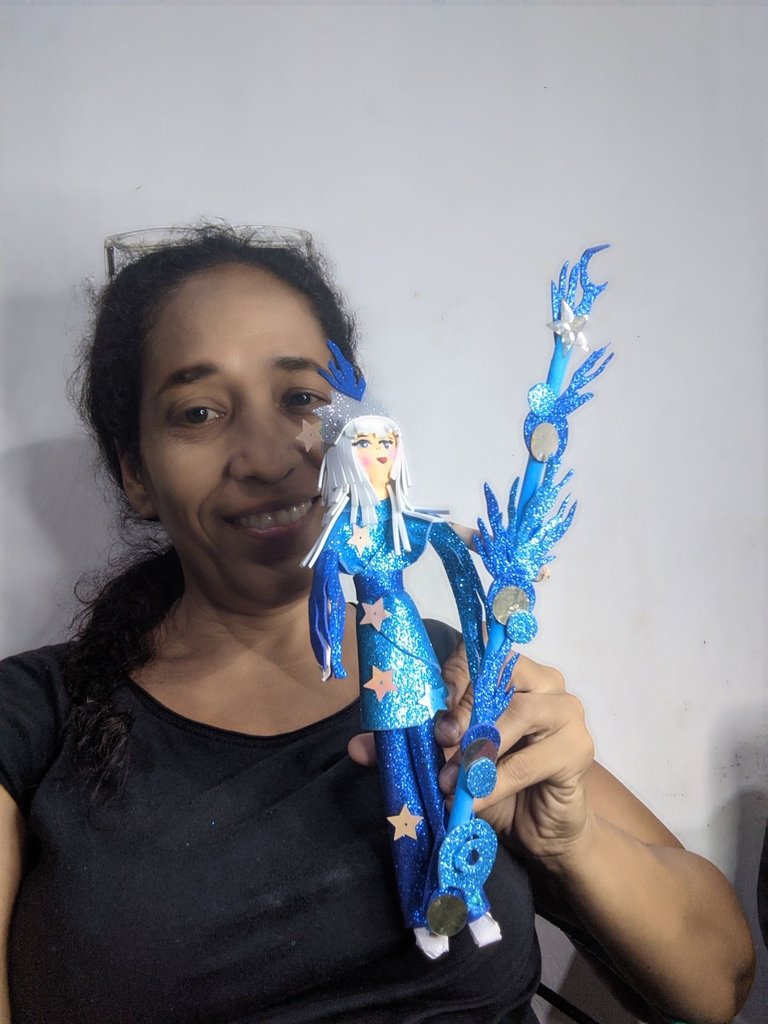
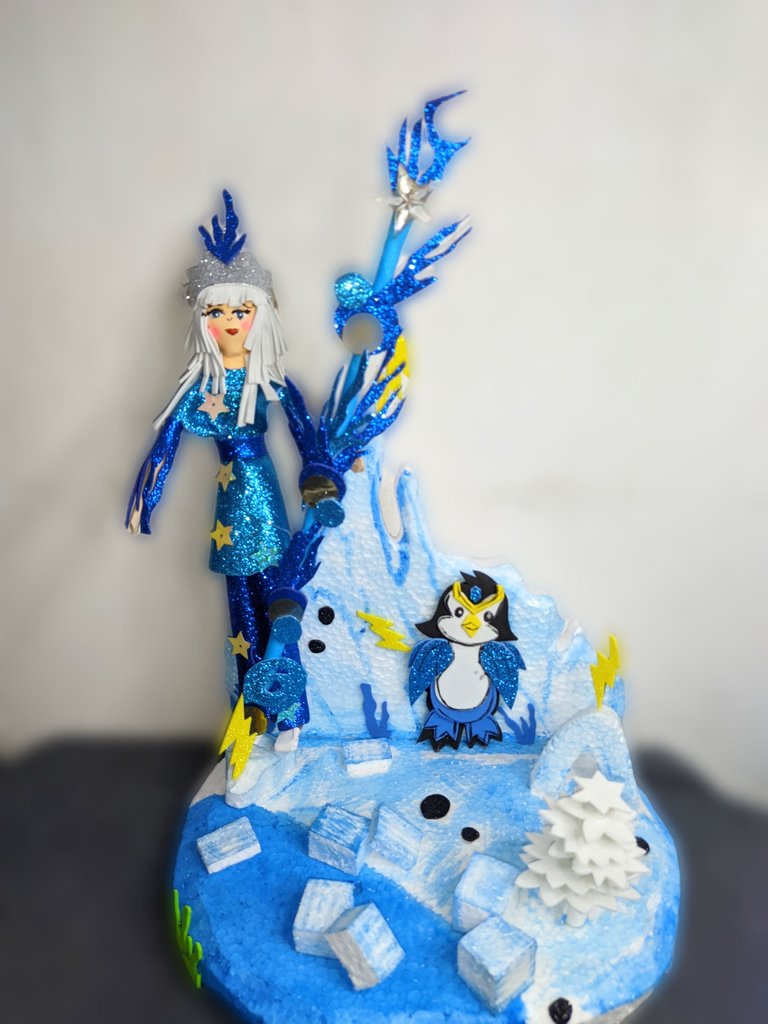
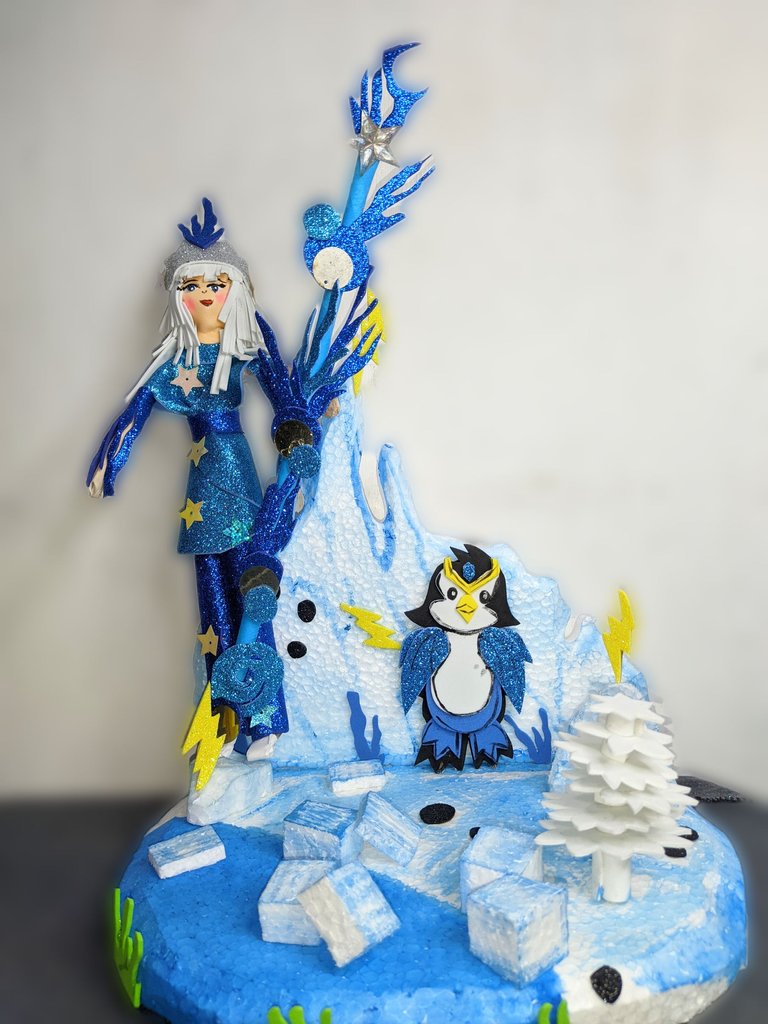
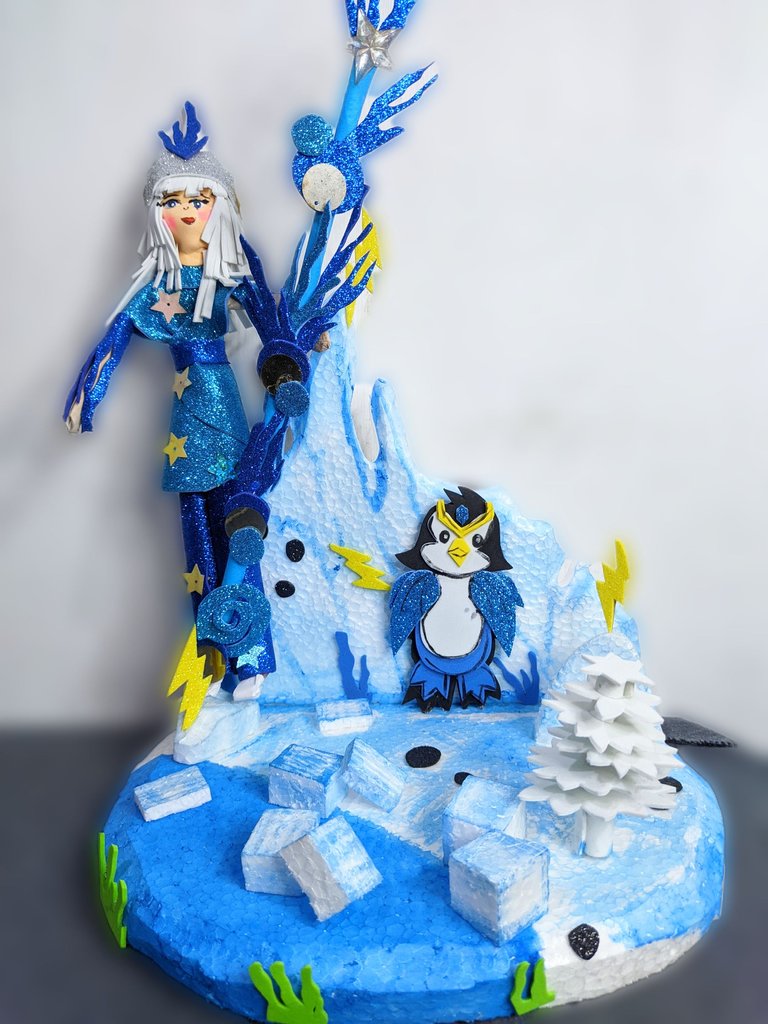
Tell me what you think, I loved how it looked, so I took advantage that I had previously made a stage for zingu and I put it there to take some pictures, and look how beautiful it looks, I am more than satisfied with the work done, for now I say goodbye but not before reminding you that soon I will bring you a much more beautiful and incredible stage than the ones I have brought previously.
🐳 CREDITS 🐳
All pictures were taken with my Xiaomi redmi 9T phone and are my own property, for the editing of this post I used polish and Deepl translator.

Saludos a todos especialmente a esos fanáticos de Fanart de
#holozing, hoy regreso para mostrarles como fue que pude recrear a este hermoso personaje, el sanador del agua, el cuál quería realizar desde hace mucho tiempo pero la verdad no había podido hacerlo, así que hoy nos decidimos a realizarlo y te lo muestro por acá por
#hive.
Para comenzar te daré la lista de materiales, que utilicé, y por supuesto el paso a paso de todo el proceso creativo, acá te dejo absolutamente todo para que te animes y lo hagas, yo trabajé con materiales sencillos, muchos de ellos los tenía de trabajos previos, otros los compré, pero son de fácil conseguí, espero que les guste.
🐳 Materiales 🐳
🐳 Hojas de papel.
🐳 Silicón líquido.
🐳 Foami escarchado azul oscuro.
🐳 Foami escarchado azul claro.
🐳 Foami blanco.
🐳 pintura color piel, azul, blanca y negra.
🐳 Pincel.
🐳 Accesorios de bisutería.
🐳 Tijera.
🐳 Palillo de altura.
🐳 Proceso creativo 🐳
🐳 Primero tomé las hojas de papel y con ayuda del palillo de altura enrollamos y formamos estos tubitos,en total yo saqué unos 5, y pego en las puntas con un poco de silicón líquido.
Luego tomé varios pedacitos de papel y enrolle hasta formar una pequeña bolita la cual será nuestro rostro, luego recorté varias tiras con las que fui dándole forma a la pequeña bolita que hice de papel.
🐳 Luego tomé uno de los tubitos y los doblamos en dos, después tomé otro de los tubitos y lo pegamos con el silicón líquido de la cabeza o bolita que hicimos anteriormente, seguido de eso pegamos en el centro de la tira que doblamos a la mitad y dejamos secar, luego con las pestañas tiras pegamos con el silicón líquido cruzandolas a través del tubito, de esta manera formamos el torso de nuestro sanador.
🐳 Tome dos tubitos y los pegamos al cuerpo y en las puntas doblamos, hasta formar los pies.
🐳 Con la pintura de color piel y el pincel grueso, pintamos el rostro y brazos y dejo secar bien.
🐳 Tome el foami escarchado azul oscuro y en el dibujé y recorté el pantalón y lo pegamos con el silicón líquido del muñeco.
🐳 Lo siguiente que hice fue recortar una figura un tanto diferente y lo pegamos en el muñeco para formar la parte de arriba del traje del sanador de agua, quise hacerlo de manera que su traje parezca olas del mar y le coloco algunos detalles elaborados en foami escarchado azul claro.
🐳 En la otra manga pegamos unas algas de color azul oscuro, luego tome un trozo de foami color piel a la que le aplique un poco de calor y pegamos del rostro, es decir forramos la bolita y dejamos secar, yo lo fijé colocándole unos alfileres, y luego pegamos con el silicón líquido unas aplicaciones de estrellas, en el traje.
🐳 Recorté varias tiras del foami de color blanco, y le hice muchas tiras de manera que parezca el cabello, al tenerlas retiró los alfileres y aplico silicón líquido y procedo a pegar el cabello.
🐳 Luego recorté una hermosa corona a la cual le pegue aplicaciones de estrellas.
🐳 vamos ahora a formar el cetro o báculo del sanador, para ello tome uno de los tubitos y forramos en azul, luego pegamos las diferentes aplicaciones que hice, por ejemplo recorte algas, también unos círculos que simulan burbujas de agua y pegamos todo y queda hermoso.
🐳 Para terminar le dibujé el rostro, y finalmente le aplicó silicón líquido y pegamos el cetro.
🐳 FOTOGRAFÍAS FINALES 🐳
Díganme qué les pareció, a mí me encantó como quedó, así que aproveche que anteriormente había hecho un escenario para zingu y lo coloque allí para tomarle algunas fotografías, y mira que se ve hermoso, estoy más que satisfecha con el trabajo realizado, por ahora me despido no sin antes recordarles que pronto les traeré un escenario mucho más hermoso e increíble que los que he traído anteriormente.
🐳 CRÉDITOS 🐳
Todas las fotografías fueron tomadas con mi teléfono Xiaomi redmi 9T y son de mi propiedad, para la edición de este post utilice el programa polish y el traductor Deepl.
https://twitter.com/Mayelin2021/status/1776723238422188170?t=LuIZ5MV1g4L7zmJ0FFiA7A&s=19
Está muñequita está increíble que bonito
Muchísimas gracias mi linda, que bueno que te gustó, todo lo que hago, es con amor y eso se refleja en el resultado, mil gracias
Hola buenas tardes, como me gusta ese acabado le diste al personaje. Mientras te leía en el paso a paso que desarrollaste, me vino a la mente ese programa que se llamaba Artatac, si no me equivoco 🤣. Que chulada de muñeca. Saludos 👋🏻
Jajajaja si bueno un poco de arte casero, gracias por el apoyo agradecida de todo corazón 💖🥀💖
Que ingeniosa idea para realizar el personaje y todo el escenario que le hiciste, muy bonito. Excelente 🤩
Muchas gracias, cuando se quiere se puede y yo disfruto mucho realizando estás figuras, saludos y gracias por visitar mi blog 💖
Gracias
Hola amiga me gusto tu creación 😊
Que bueno amigo, muchas gracias por el apoyo
🤗🤗😊😘
¡Felicidades! Esta publicación obtuvo upvote y fue compartido por @la-colmena, un proyecto de Curación Manual para la comunidad hispana de Hive que cuenta con el respaldo de @curie.
Si te gusta el trabajo que hacemos, te invitamos a darle tu voto a este comentario y a votar como testigo por La Colmena.
Si quieres saber más sobre nuestro proyecto, te invitamos a acompañarnos en nuestro servidor de Discord.
Agradezco su apoyo, saludos
Hermoso trabajo Mayi, la sanadora parece una muñeca, los colores combinan muy bien, el cetro me encantó.
Saludos!
Muchas gracias amiga, si a mí también me gustó mucho el cetro, gracias por visitar mi blog
Amiga te quedó preciosa ☺️
Muchas gracias, disfrute todo el proceso, y sobretodo el resultado final 💖🥀💖
Un trabajo artístico bastante laborioso, quedó muy bien junto al escenario. Saludos ☺️
Muchas gracias por tu visita, fue muy elaborado y llevo mucho tiempo, pero a mí me encantó, sirvió un poco para bajar el stress, saludos 💖💖💖
Te quedó muy linda! Se ve súper bien al lado del pingüino, muy bonito también! ❤️
Gracias, si Zingu el pingüino me encanta es uno de los personajes más tiernos, gracias por visitar mi blog y apoyar 💖
Cuánta creatividad estimada @mayifiestas!! Hiciste una excelente recreación del personaje. No solo haces arte con tu voz, también con tus manos 🥰
Gracias por tus lindas palabras, me llenan de alegría saber que te gustó, agradezco mucho tu apoyo y tú visita a mi blog 💖🤗💖
Exelente, manualidades que cultivan la paciencia, muchas bendiciones
Mil gracias mi apreciado amigo. 🤗
A very nice job, my friend. Those works you do always surprise us. Thanks for sharing.
Un trabajo muy lindo amiga. Esos trabajos que haces siempre nos sorprenden. Gracias por compartir.
!PIZZA 🍕
Gracias a ti por el apoyo amiga, un abrazo 💖💖
$PIZZA slices delivered:
@chacald.dcymt(1/5) tipped @mayifiestas