DIY: SET EMPERATRIZ✂️


Hola, hola gente bonita de hive💗 paso por aquí una vez más para mostrarles es tutorial de este ser fabuloso, ideal para estas épocas festivas. Está preciosidad se la hice a mi prima que es fanática del verde, y desde que vió este ser lo visualizó en este tono, el cual fue un verdadero acierto.
Hello, hello beautiful people of hive💗 I'm stopping by here once again to show you the tutorial of this fabulous being, ideal for these festive times. I made this beauty for my cousin who is a fan of green, and since she saw this being she visualized it in this tone, which was a true success.
Necesitaremos tela Acanalada, 1.5 metros aproximadamente. Este set es talla única, se adapta a la M / S. Tijeras, cinta métrica y máquina de coser.
We will need Ribbed fabric, approximately 1.5 meters. This one is one size fits all, fits M/S. Scissors, tape measure and sewing machine.
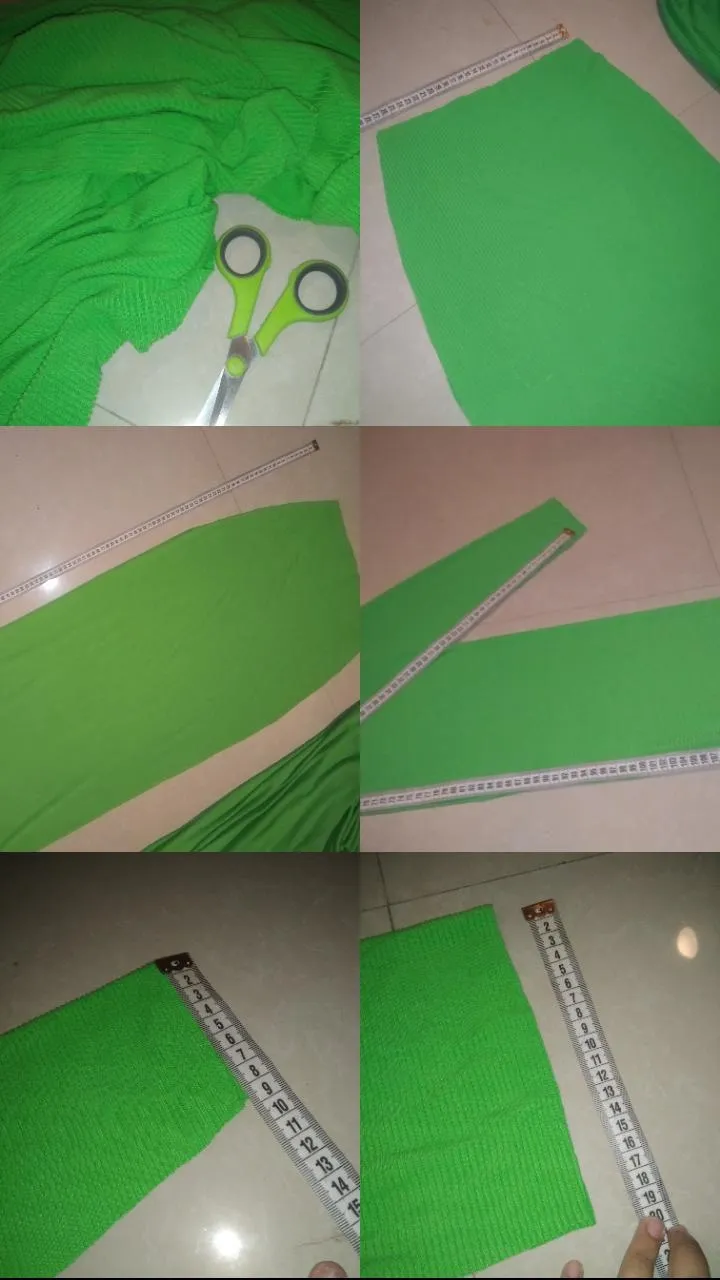
Es súper sencillo de realizar, el primero paso es cortar, para esto la tela debe estar muy bien extendida y con medidas o patrones sacar las piezas, primero la falda, yo utilicé 1.2cm de largo.
It is super easy to make, the first step is to cut, for this the fabric must be very well spread and with measurements or patterns take out the pieces, first the skirt, I used 1.2cm long.
Y para el top solo hay que cortar una tira larga (del ancho de la tela) y reducirle la punta a partir de los últimos 40cm.
And for the top you just have to cut a long strip (the width of the fabric) and reduce the tip from the last 40cm.
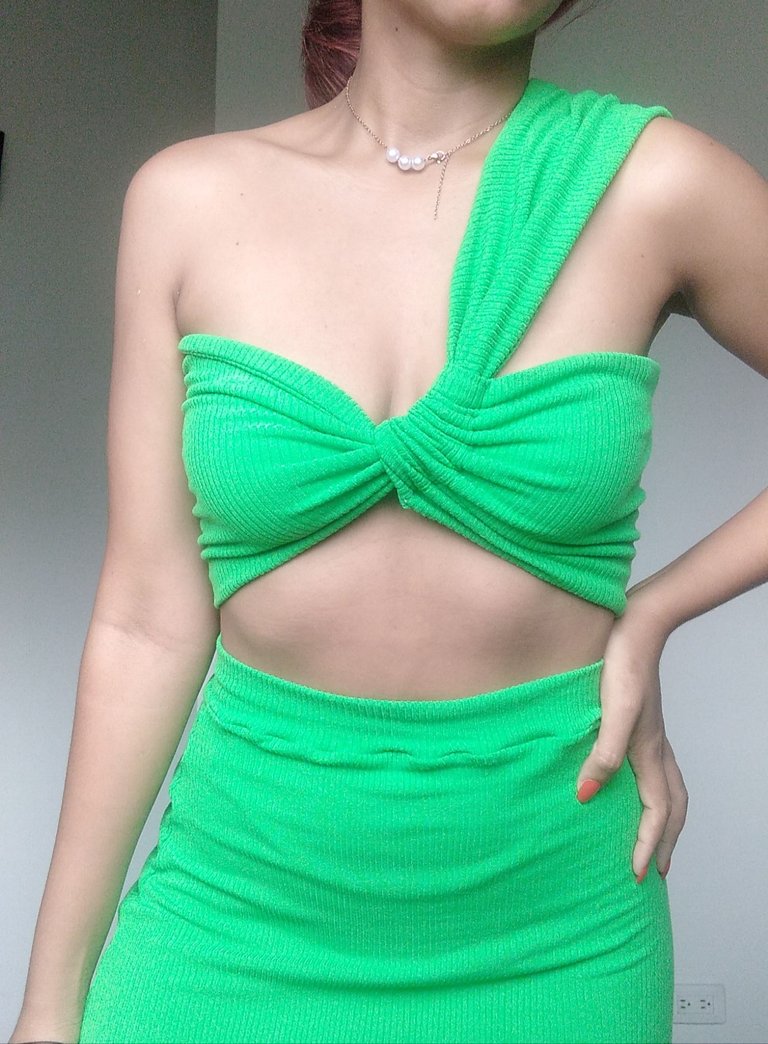
Ahora vamos a coser, la falta es súper sencilla, coser por los lados dejando una abertura pronunciada, y pega la pretina.
Now we are going to sew, the missing part is super simple, sew along the sides leaving a pronounced opening, and glue the waistband.
Por otra lado el top es un poco más complicado, debemos marcar el centro para ubicar el sitio de el tiro, después vamos a coser con recta todo el borde, dejando ese espacio de la tira libre, volteamos, introducimos la punta más delgada por ahí y cosemos otra vez por el al revés.
On the other hand, the top is a little more complicated, we must mark the center to locate the place of the shot, then we are going to sew the entire edge straight, leaving that space of the strip free, We turn it over, insert the thinnest tip there and sew again on the reverse side.
Cuando la tira ya esté pegada, solo debemos doblar la punta que queda libre, introduciendo el otra extremo del top y coser con recta.
When the strip is already glued, we only have to fold the free end, introducing the other end of the top and sew straight.
Y así queda nuestro ser EMPERATRIZ
And so remains our being EMPRESS
Espero les haya gustado este tutorial, como siempre les envío la mejor vibra, nos vemos pronto con más costuras,✨💞
I hope you liked this tutorial, as always I send you the best vibes, see you soon with more sewing,✨💞

Este color es hermoso y le luce muy bien.. Me encanta el diseño.. Un trabajo excelente amiga.. ! 🤗
Gracias amiga❤️ Saludos!
This dress is giving dinner, elegant, chic.…. This is so beautiful, I'm sure your cousin will like it. you did a nice job.
Congratulations @medicenbecky! You received a personal badge!
You can view your badges on your board and compare yourself to others in the Ranking