Let Us Celebrate Women with our DIY CONTEST/Elaboración de zarcillos con material de Totuma. (Spn-Eng)
Versión en Español.
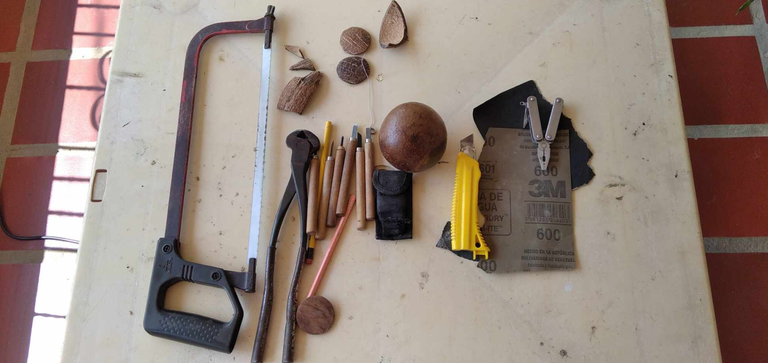
El material hecho es a base del fruto de tapara, en el hipervínculo azul dejo información para las personas que todavía no saben sobre este árbol tengan información de esta noble planta, de la cual he utilizado como material principal. Lo que necesité para hacer este trabajo fueron los siguientes materiales.
-1 totuma.
-1 papel de lija 120.
-1 Equipo te tallado pequeño.
-1 segueta.
-1 alicate de construcción.
-1 Lápiz y creyón de color claro.
Los pasos para la elaboración fueron los siguientes:
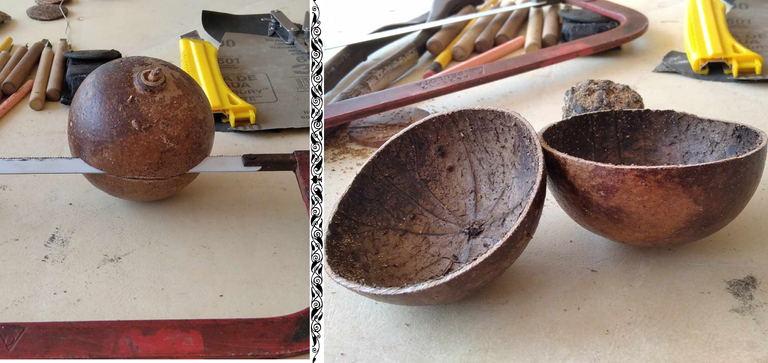
Paso 1: Cortar el fruto.
En este pasó me valí con la ayuda de una seguita, medí a pulso buscar la mitad de la totuma para hacer un corte vertical, dividiendo así el fruto en dos, en este tipo de corte trato de mantener rectitud ya que trato de aprovechar gran parte del material, la cascara de la totuma es resistente pero a la vez un material muy noble que con una equivocación puede quedar inutilizable para mi propósito.
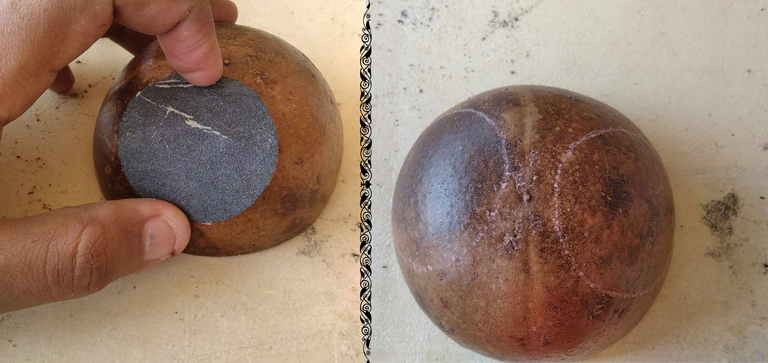
Paso 2: Marcar el patrón.
Con un creyón y un molde hecho con un pedazo de lija procedí a marcar dos círculos, cada una alejada del otro ya, se necesita dejar espacio para poder extraer los patrones de manera cómoda, en lo personal he aprendido a marcar con la ayuda de la ayuda de la misma segueta, para de eso forma cuando moldee el patrón pueda darme cuenta hasta donde puedo cortar.

Paso 3: Moldear el patrón.
Con la ayuda de un alicate de construcción, también puede ser de tipo piqueta, se cortan desde el exterior al interior, en forma diagonal, de esa forma en caso de formarse una grieta no toque dañe el interior del molde.

Paso 4: Perfilado y simetría.
Con la ayuda de una lija perfilé los bordes, la meta es darle simetría a la pieza, logrado esto pasé a la siguiente fase.
Paso 5: Marcar el patrón.
Aquí con la ayuda de un lápiz y a pulso realicé una figurita que es la que tallaré, en la imagen dejo en evidencia, el marcado a lápiz, el marcado con la pieza y la realización del patrón de la misma, aproveché para marcar el orificio de entrada donde irían los aretes.

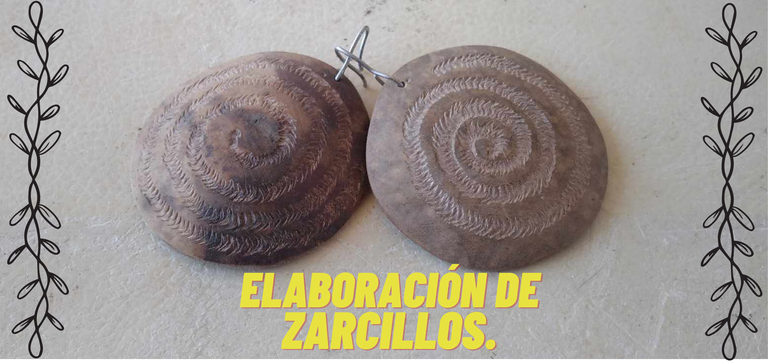
Paso 6: Pulido y armado.
Como el título bien lo dice, en este pasó lo dediqué a suavizar la pieza con una lija de tal manera que detallara el color natural de la concha, detallara la figura, además abrí el orificio para poner los aretes.

Resultado.
Hasta aquí ha llegado el post, agradezco el que te hayas tomado un tiempo para leer esta publicación, estoy presto a la interacción para sugerencia u otro tipo de comentarios, su opinión cuenta ya que contribuye en mi crecimiento dentro de la comunidad, hasta una próxima ocasión.
English Version.
Hello Diyhub community I hope you are well, today I am motivated to present a tendril design, made in commemoration for the month of women, the spiral shape that I have given has a symbolism within the Wayuu indigenous culture, this figure represents the struggle between good and evil, the spiral in the Wayuu culture represents the traditional dance called "yonna" in which a woman dances with a man in circles until she knocks him down, it represents the dominance of women in this culture as it is characterized by being matriarchal.
The material made is based on the tapara fruit, in the blue hyperlink I leave information for people who still do not know about this tree have information of this noble plant, which I have used as the main material. What I needed to make this work were the following materials.
- 1 totuma.
- 1 sandpaper 120.
- 1 small carving kit.
- 1 hacksaw.
- 1 construction pliers.
- 1 pencil and light-colored crayon.
The steps for the elaboration were the following:Step 1: Cut the fruit.
In this step I used the help of a segue, I measured by hand to find half of the totuma to make a vertical cut, thus dividing the fruit in two, in this type of cut I try to maintain straightness as I try to take advantage of much of the material, the shell of the totuma is resistant but at the same time a very noble material that with a mistake can be unusable for my purpose.
Step 2: Mark the pattern.
With a crayon and a mold made with a piece of sandpaper I proceeded to mark two circles, each one away from the other already, it is necessary to leave space to be able to extract the patterns in a comfortable way, personally I have learned to mark with the help of the help of the same segueta, so that way when I mold the pattern I can realize how far I can cut.
Step 3: Mold the pattern.
With the help of a construction pliers, also can be of type pickaxe, cut from the outside to the inside, diagonally, that way in case of forming a crack does not touch damage the inside of the mold.
Step 4: Profiling and symmetry.
With the help of sandpaper I outlined the edges, the goal is to give symmetry to the piece, achieved this I went to the next phase.Step 5: Marking the pattern.
Here with the help of a pencil and by hand I made a small figure that is what I will carve, in the image I leave in evidence, the pencil marking, the marking with the piece and the realization of the pattern of the same, I took the opportunity to mark the entrance hole where the earrings would go.
Step 6: Polishing and assembly.
As the title says, in this step I dedicated it to smooth the piece with sandpaper in such a way that it would detail the natural color of the shell, detail the figure, and open the hole to put the earrings.
Result.
This is the end of the post, I appreciate that you have taken the time to read this publication, I am open to interaction for suggestions or other comments, your opinion counts as it contributes to my growth within the community, until next time.
Me encanta que hayas usado la tapara como material para los zarcillos, quedaron muy bonitos. Éxitos 🤗
Gracias Irene, si es un material muy noble.
Hola Miguel, están geniales estos aretes hechos de cascara de tapara, se que no es fácil de manejar y como dices el menor error puede agrietar la cascara, solía usar este material cuando estaba en casa!
Te deseo mucho éxito! ✨️
Hola @yetsimar, muchas gracias por tu apreciación, ese material es muy noble y a la vez tan resistente, espero pronto subir otras artesanías del mismo material.
Ohhh que genial quedó y con un proceso bastante laborioso. 🤗
Hola @yaslenysofia , muchas gracias, me alegro que te haya gustado.
https://reddit.com/r/blogs/comments/1brqi2m/tendrías_tutorial/
The rewards earned on this comment will go directly to the people( @irenenavarroart ) sharing the post on Reddit as long as they are registered with @poshtoken. Sign up at https://hiveposh.com.
the tendrils look like they have such rich history. Really beautiful
Thank you for entering the contest. Good luck
Thanks for the support 😀
Que buen registro profe , bien explicado y al punto . Muy interesante su significado , su figura es la trayectoria que cumple la pareja en el baile
Así mismo, sumado a los surcos en diagonal que es como caminan los wayuu monte adentro para que los espíritus ni las almas los sigan.
Simplemente hermosos 😍
Hola @laranitacrochet, muchas gracias por tu apreciación, lo hice con la mayor de las ganas.