Mi participación en el concurso : Regreso a clases con Angry Birds | My entry in the contest : Back to school with Angry Birds
Hola buenas tardes tengan todos los amigos presentes de la comunidad #Hivediy , espero que todos se encuentren bien , disfruten de esta fin de semana próximo , me encantaría con este post formar parte del nuevo concurso regreso a clases de parte de nuestra querida amiga @equipodelta y todo su maravilloso equipo , me encanto este tema , soy docente y espero en este regreso a clases ver muchos niños motivados a continuar con sus estudios , tengo un bebé varón y por tal motivo decidí hacer mi cartuchera en una comiquita que ambos hemos visto y disfrutamos , Andry Birds , el diseño que les presentaré es sumamente sencillo , estoy seguro que nuestros pequeños lo amaran , también le hago la invitación a mis amigas para que formen parte de este concurso y nos muestren su gran talento con las manualidades @zarethg , @rameuris @egarysv , participen ,no se lo pierdan amigas
Hello good afternoon to all friends present in the community #Hivediy , I hope everyone is well , enjoy this coming weekend , I would love with this post to be part of the new contest back to school from our dear friend @equipodelta and all his wonderful team , I love this topic , I am a teacher and I hope this back to school to see many children motivated to continue their studies , I have a baby boy and for that reason I decided to make my pencil case in a cartoon that we both have seen and enjoy, Andry Birds, the design that I will present is very simple, I'm sure our little ones will love it, I also invite my friends to be part of this contest and show us their great talent with crafts @zarethg, @rameuris @egarysv , participate, do not miss it friends.

Materiales para realizar una cartuchera de foamis :
-Foamis
-Tijera
-Silicon
-Lapiz
-Papel
Materials to make a foamis pencil case:
-Foamis
-Scissors
-Silicon
-Pencil
-Paper

A continuación les presentaré los pasos que realice :
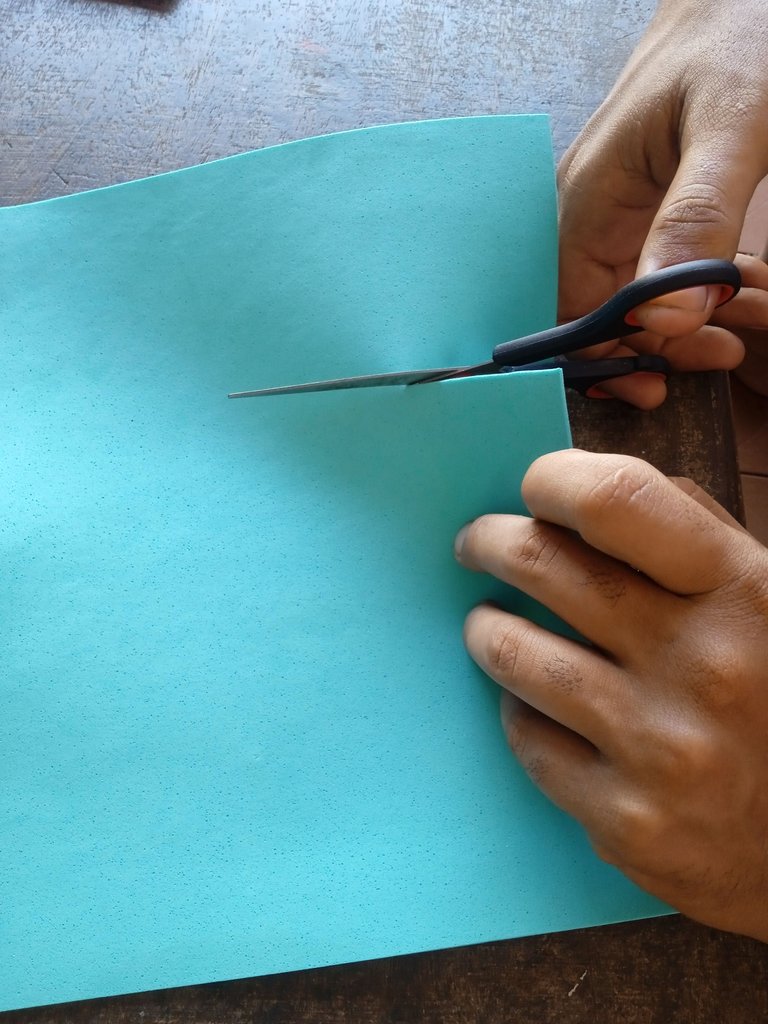
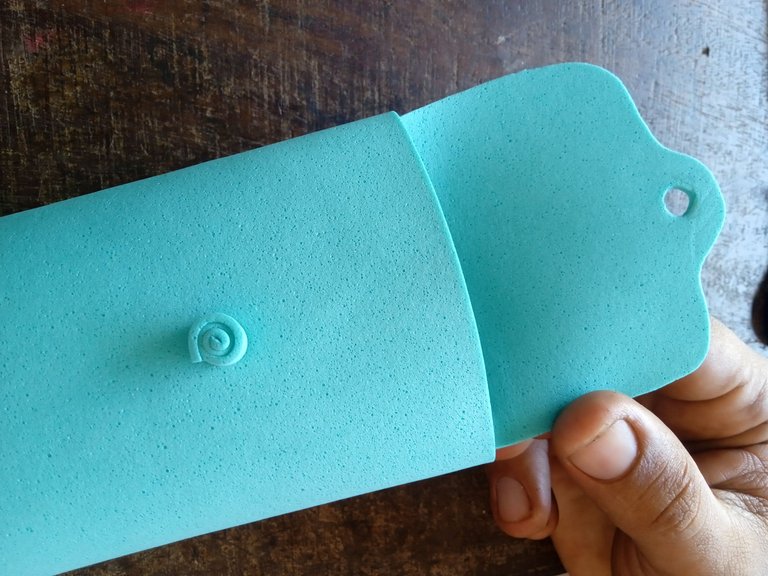
Primer paso : comenzaremos con adaptar el foamis al tamaño deseado , tome mi foamis y le recorte 7 centímetros uno más pequeño para que la cartuchera no me quedará tan grande , si ustedes gustan pueden dejarlo un poco más grandecito todo dependerá de la comodidad , como está solo será para lápices
Next I will present the steps I did:
First step: we will begin with adapting the foamis to the desired size, take my foamis and cut 7 centimeters smaller one so that the pencil case will not be so big, if you like you can leave it a little bigger everything will depend on the comfort, as it will only be for pencils.
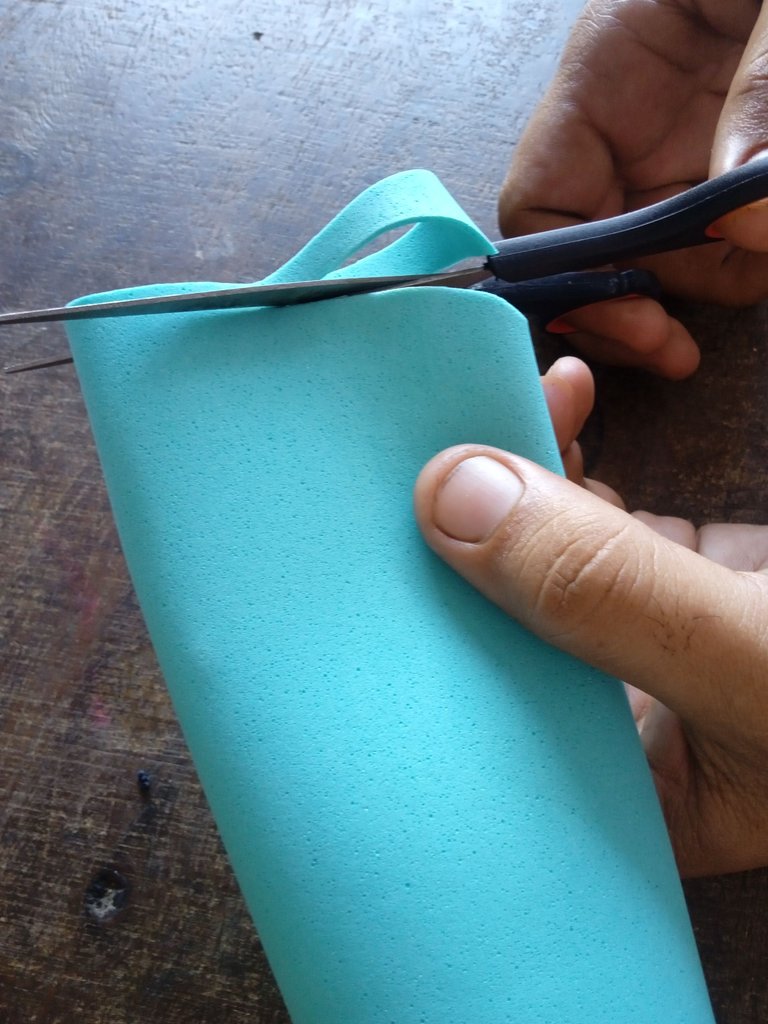
Segundo paso : en este paso vamos a realizar una figura similar a un cilindro , por tal motivo tomaremos ambos bordes del foamis que recortamos , añadiremos Silicon a uno de ellos , inmediatamente antes que seque pegamos borde con borde como lo están observando , esto tiene que ser rápido porque estamos utilizando Silicon caliente ,es proceso de rapidez
Second step: in this step we are going to make a figure similar to a cylinder, for this reason we will take both edges of the foamis that we cut, we will add Silicon to one of them, immediately before it dries we glue edge to edge as you are observing, this has to be fast because we are using hot Silicon, it is a fast process.

Tercer paso : con la ayuda de nuestra tijera una vez que tengamos el cilindro listo , vamos a recortar el borde del foamis tipo redondo , esto solo va dirigido para la parte de abajo , la de arriba debe quedar recta tal y como está
Third step: with the help of our scissors once we have the cylinder ready, we will cut the edge of the foamis round type, this is only directed to the bottom, the top should be straight as it is.
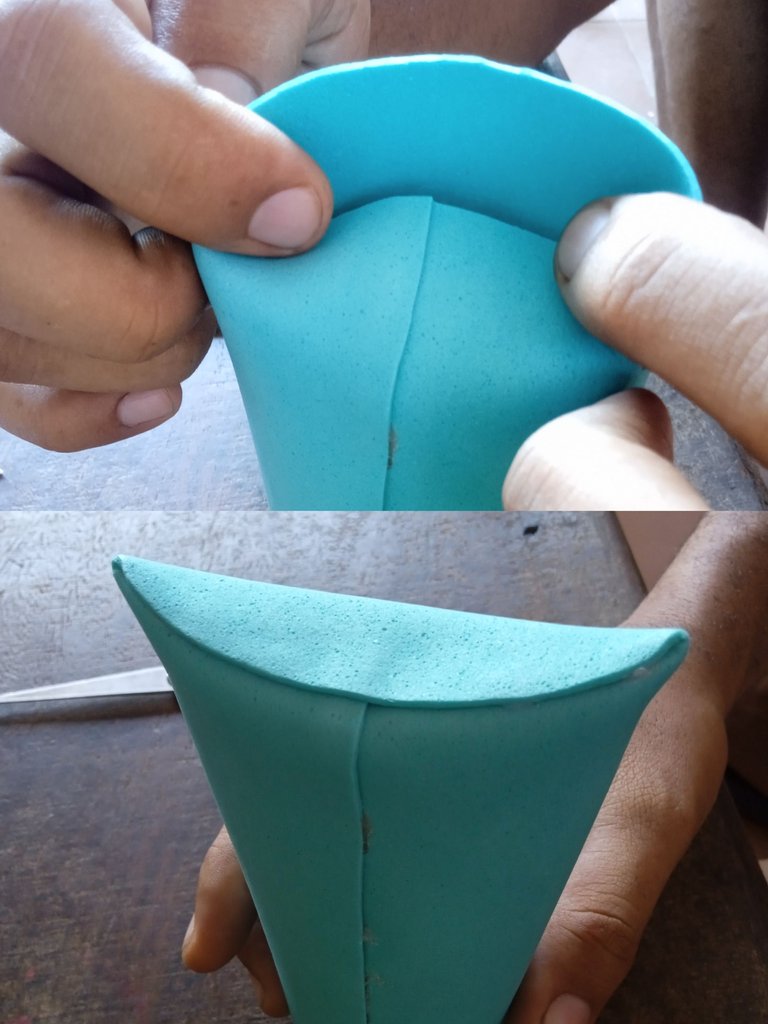
Cuarto paso : para formar la base de abajo y que está quede redonda vamos a tomar uno de los lados de nuestra cartuchera , la hundimos hacia el centro como lo están observando , sosteniendo con cuidado con uno de nuestros dedos , luego agregamos Silicon por todo el borde y pegamos la parte de arriba que está sin doblar a la parte de abajo , de esta manera estaremos realizando la base de nuestra cartuchera tipo redonda
Fourth step: to form the bottom base and make it round, we are going to take one of the sides of our pencil case, we sink it towards the center as you are observing it, holding it carefully with one of our fingers, then we add Silicon all around the edge and glue the top part that is not folded to the bottom part, in this way we will be making the base of our round type pencil case.
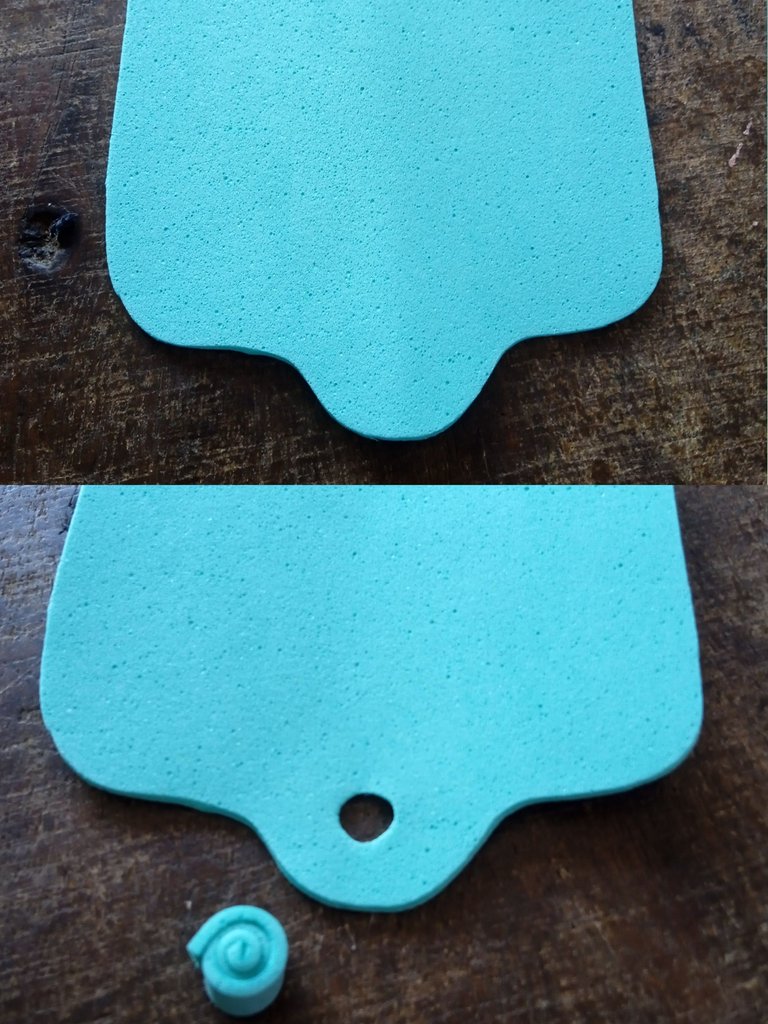
Quinto paso : en nuestro quinto paso haremos la pieza con la que abriremos y cerraremos nuestra cartuchera , recortaremos primeramente un cuadro ,luego tomaremos el centro de él y lo vamos a moldear dejando lo circular en el centro , luego abriremos un pequeño agujero y realizaremos un botón de foamis donde irá sujeto nuestro cierre
Fifth step: in our fifth step we will make the piece with which we will open and close our pencil case, first we will cut a square, then we will take the center of it and we will mold it leaving the circular in the center, then we will open a small hole and we will make a foamis button where our zipper will be attached.
Sexto paso : en este paso vamos a pegar en la parte de arriba la pieza con la que abriremos y cerraremos muestra cartuchera , el botón de foamis lo pegaremos en la parte de abajo , tomando en cuenta que debe quedar en todo el centro para abrir y cerrar nuestra cartuchera , este lo pegaremos en el centro como les mencioné
Sixth step: in this step we will glue on the top the piece with which we will open and close the pencil case, the foam button will be glued on the bottom, taking into account that it must be in the center to open and close our pencil case, we will glue it in the center as I mentioned before.
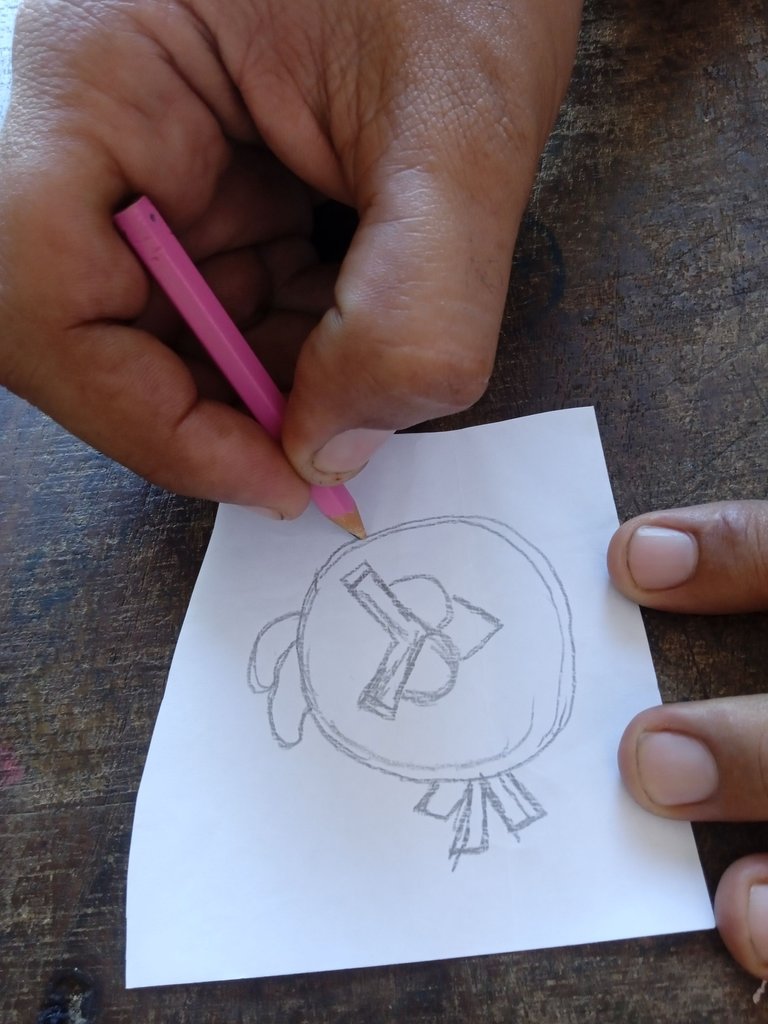
Séptimo paso : a continuación vamos a realizar a partir de este paso nuestro amistoso andry Bird , primero tomaremos un papel y lo dibujaremos , para que sea nuestro patrón y recortaremos para ir formando pieza por pieza y queden bien hechas
Seventh step: next we are going to make from this step our friendly andry bird, first we will take a paper and draw it, to be our pattern and we will cut it out to form piece by piece to be well done
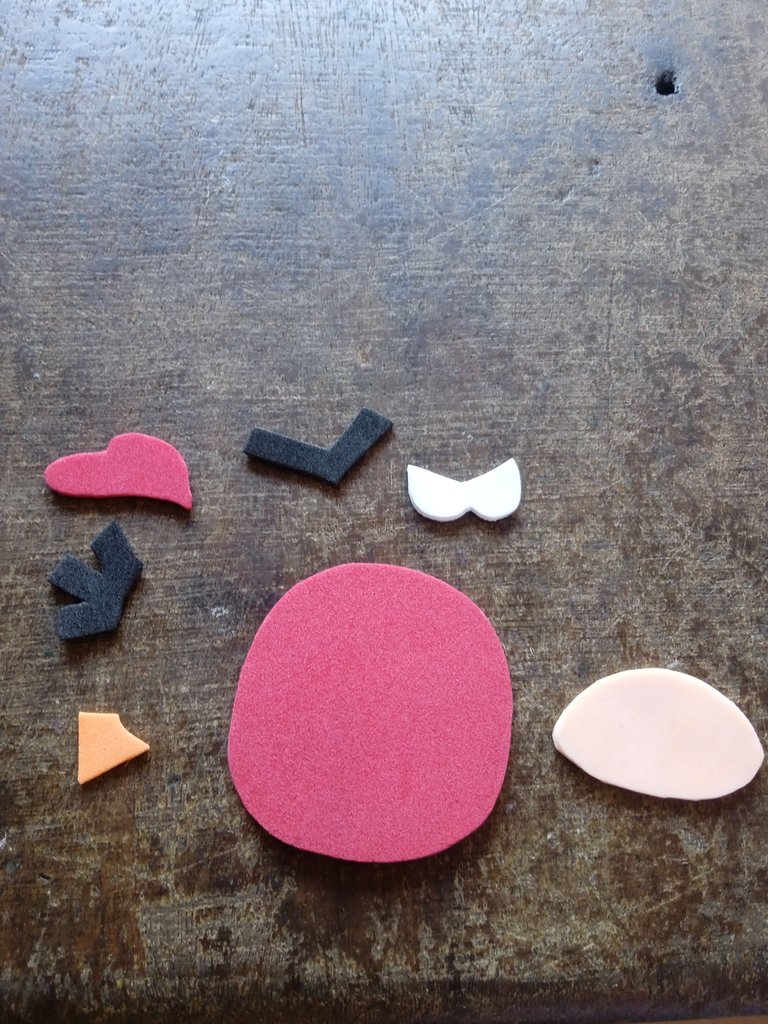
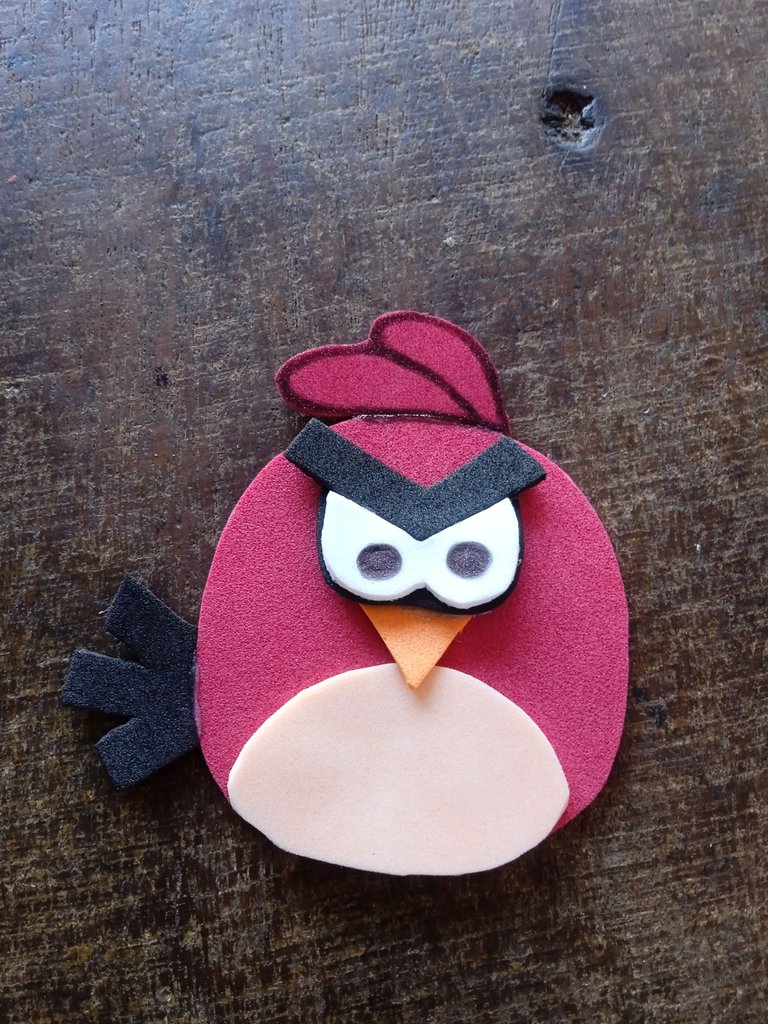
Octavo paso : comenzaremos con nuestro patrón a recortar todas las piezas para formar nuestro angry bird , esto va a incluir , cuerpo , cejas , cresta, cola, ojos ,picos y todo para formar nuestro lindo angry amigos
Eighth step: we will start with our pattern to cut all the pieces to form our angry bird, this will include, body, eyebrows, crest, tail, eyes, beaks and everything to form our cute angry friends.
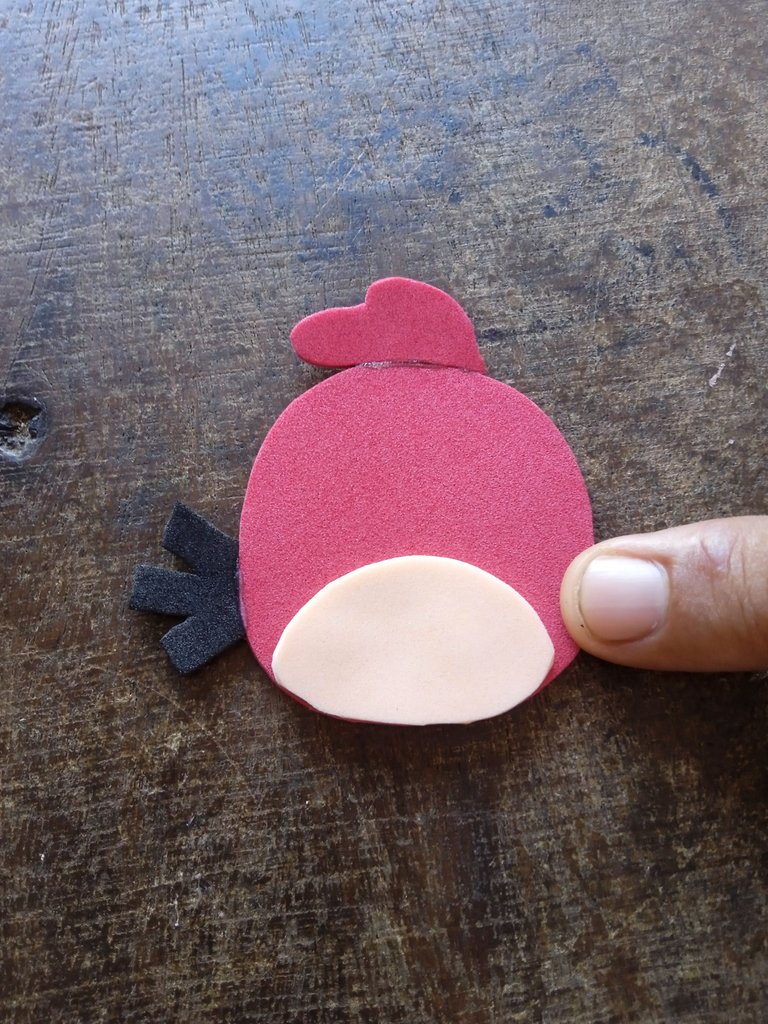
Noveno paso : en este paso vamos a comenzar pegando primeramente su barriga de otro tono , su cresta roja color de su cuerpo y plumaje y su colita negra , de esta manera comenzamos a construir a nuestro angry
Ninth step: in this step we will start by first gluing his belly in a different color, his red crest color of his body and plumage and his little black tail, in this way we start to build our angry bird.
Decimo paso : este paso finalizaremos de realizar nuestro angry , primero tomaremos sus cejas y sus ojos y lo pegaremos en todo el centro ,la forma en que los realice es para que parezca que está furioso o molesto , bajo sus ojos pegue su enorme pico , por último con lápiz negro resalte el centro de sus ojos y su cresta roja , finalizando nuestro amigo
Tenth step: in this step we will finish making our angry , first we will take his eyebrows and his eyes and we will glue them in the whole center , the way we make them is to make it look like he is angry or annoyed , under his eyes glue his huge beak , finally with black pencil highlight the center of his eyes and his red crest , finishing our friend.
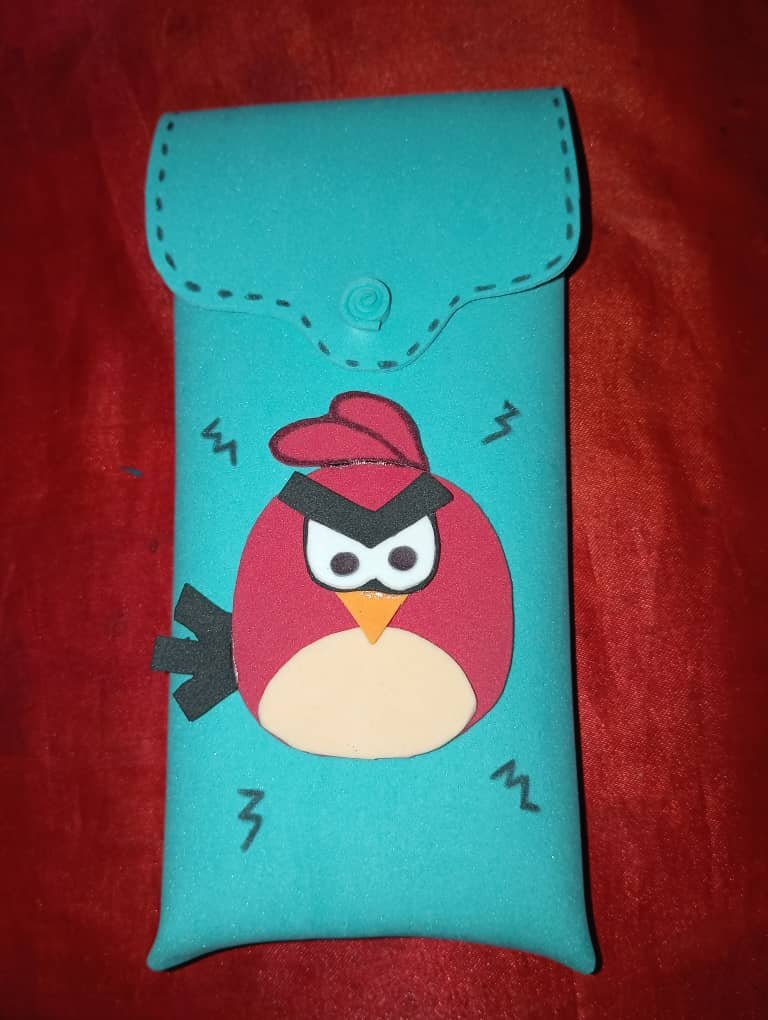
Paso final : en este paso vamos a tomar nuestro angry que es la temática de esta cartuchera , lo pegaremos en todo el centro , alrededor de él pinte con el mismo lápiz negro unos rayos para que simbolicen más su rabia , y por la parte de arriba del broche unas rayas negras que parezca que está cocido , para darle unos detalles más bonito y llamativos
Final step: in this step we are going to take our angry that is the theme of this pencil case, we will paste it around the center, around him paint with the same black pencil some rays to symbolize more his rage, and on the top of the brooch some black stripes to look like he is cooked, to give it a more beautiful and striking details.

Resultado : este es el resultado final de mi hermosa cartuchera con temática de angry , realizada con mucho amor para mi hijo , especialmente para su regreso al prescolar , las fotos las tomé con mi redmi 9A , todo el texto escrito parte de mi creación traducida con el traductor deepl , feliz tarde
Result : this is the final result of my beautiful angry themed pencil case , made with love for my son , especially for his return to preschool , the photos I took with my redmi 9A , all the written text part of my creation translated with the translator deepl , happy afternoon
Quedó muy tierna esta idea! Es excelente para los chicos en su regreso a clases.
Está muy tierno el botón 😁
Excelente te idea,muchas gracias por compartir.
Gracias amiga saludos
Has sido votado por
PROYECTO ENLACE
'Conectando Ideas y Comunidades'
PROYECTO ENLACE es un proyecto de curación de habla hispana enfocado en recompensar contenido de calidad y apoyar autores en su proceso de crecimiento en HIVE.
Creemos y apostamos por el futuro de esta gran plataforma, y estamos muy emocionados de poder hacerla crecer junto a esta comunidad. Así que te invitamos a publicar en nuestra COMUNIDAD y estar atento a todas las actividades que tenemos preparadas y que estaremos publicando en breve.
¿QUIERES AUTOMATIZAR TUS GANANCIAS DE CURACIÓN? SE PARTE DEL PROYECTO ENLACE APOYANDO A NUESTRO TRAIL EN HIVE.VOTE INGRESA AQUÍ PARA CONOCER LOS DETALLES.
¿QUIERES INVERTIR ENLACE? DESCUBRE COMO HACERLO Y GENERAR INGRESOS DE FORMA SEMANAL MEDIANTE TU DELEGACIÓN DE HP AQUÍ TE EXPLICAMOS COMO.
Te invitamos a participar en nuestro servidor de Discord: https://discord.gg/3S9y7BbWfS
Atentamente
EQUIPO ENLACE 2023
Hola esta muy linda la cartuchera, hace un tiempo también solía ver esa caricatura con mi hijo, es muy graciosa. Saludos 😊
Me pareció un lindo motivo para los más pequeños de la casa
Saludos amigo @moisesrojas me encantó tu proyecto los colores,la temática es una combinación perfecta. Éxitos para el concurso 🙂
Que bueno que le gustó amiga lorennys gracias saludos
@moisesrojas
https://inleo.io/threads/view/hive-130560/re-leothreads-3ccioeugp
https://twitter.com/hivediy47901/status/1712979516887375873
Quedó demasiado hermosa la cartuchera. Te felicito y gracias por compartir esa obra tan bonita y útil
Saludos 🌺🌷💐🌻
Muchas gracias saludos
Congratulations @moisesrojas! You have completed the following achievement on the Hive blockchain And have been rewarded with New badge(s)
Your next target is to reach 10000 upvotes.
You can view your badges on your board and compare yourself to others in the Ranking
If you no longer want to receive notifications, reply to this comment with the word
STOPCheck out our last posts:
Uy los Angry Birds, cuantos recuerdos con ese juego y como se volvio un boom en su momento, me encanto ver tu trabajo recordando a estos lindos y enojados pajaritos jeje
Te quedo muy linda, gracias por el tutorial ❤️
Gracias que bueno que le gustó saludos
Hola Moises. Me encanta ese pajarito. jajaj! Muy bueno ponerlo como guardián de lápices y colores, es como dijeran: No te metas con mis colores, jajajaj! Gracias por tu participación, hemos validado tu entrada.
Hola gracias por apreciar mi trabajo me siento motivado saludos