Repairing of an expiring leather car seat.
Hello, great people of #hive-motors, How are you doing this new week? I hope the start of the week is going smoothly. This is an amazing week for me.
Everyone is preparing for Christmas, and for sure, this Christmas will really make sense to all of us here.
Today I want to share with you guys what I did in my workshop. This is all about the sewing of a car seat.

This is a Lexus back seat; the other is my regular customer. Last year, I worked on his two fronts since the back was not bad, and he was supposed to do it since last year, but I had much work at hand, but this year, I don't have any work at all because things are really hard here in my country.
He will travel with the car to his village, which is why he wants to make the seat look neat and new, like the front.
I used only today to get the work done because I had no other work. Like this, I need help because it is not easy to feed the family.
I will love to share with you guys some steps I follow to get the work done.
Here is the seat before

Here is the seat after

The work really looks beautiful; I really love it, and the owner was so happy about the finished work.
To get the work done, I first loosen the seat in my shop and then cut a sample of the leather for the market to get something similar in color.
Here is the leather I am using for this project.

After getting the leather, I take the vertical and horizontal measurements of each pattern on the old seat and then pen it down.

I then draw out the new measurements on the new leather.

I then cut it out.

Since I have been working with similar seats before, I have all the patterns for this seat; therefore, to make it simple and fast for me, I simply place the pattern on the cut material and trace out the new pattern.

I then gum the pattern into a form to make it think.
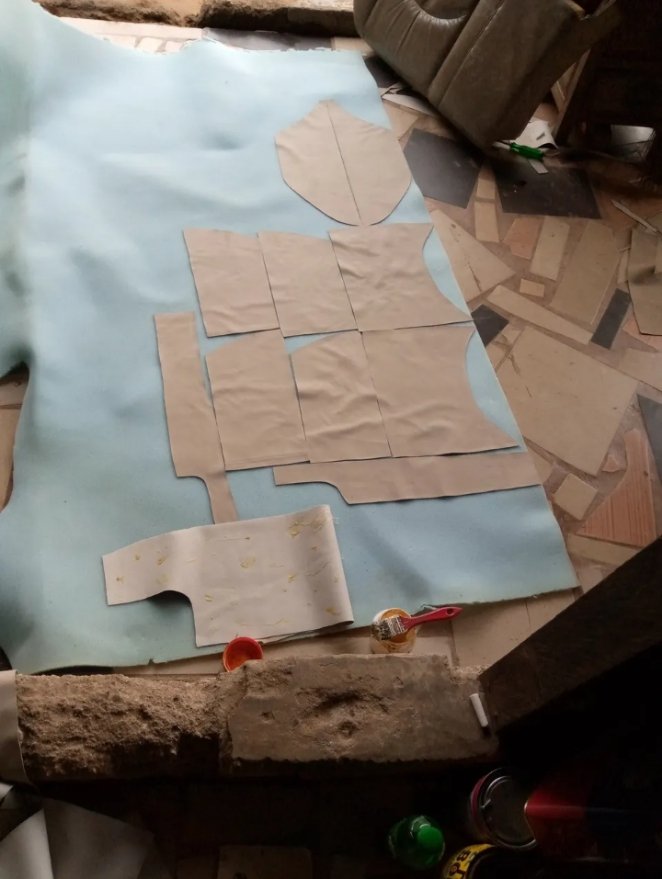
I don't love using foam because it is not as strong as the roof material, but there is no roof material. The seller complains that it is too costly, and I have no other option than to manage the foam.
I then cut the pattern out.

I then use a sewing machine to join those patterns together as if they were in the old seat. After carefully joining them, my new seat cover is ready.


I then clip the new seat cover to the old seat.

I finally pulled it back, and here is the outcome of it.
Finally, tighten it back to the car.

This was stressful because it was something I was supposed to work on in two days, but I used one day to complete it.
Congratulations to me!
Thanks to everyone for your support and your time. Remain bless. Amen
Wow this is so beautiful, I love the color of it, although it was so stressful but you finally made it, keep it up and thanks for sharing
Thanks dear friend
Hello brother, good job, they were left from the factory. Greetings
Thanks so much for stopping by.
Congratulations @mosupholstery! You have completed the following achievement on the Hive blockchain And have been rewarded with New badge(s)
Your next target is to reach 1500 upvotes.
You can view your badges on your board and compare yourself to others in the Ranking
If you no longer want to receive notifications, reply to this comment with the word
STOPI'm not a fan of the beige color but it should match the rest of the car interior, thanks for sharing.
Thanks for stopping by, I really appreciate. What is your color?
Hey brother, those seats turned out very well, they were elegant, greetings.