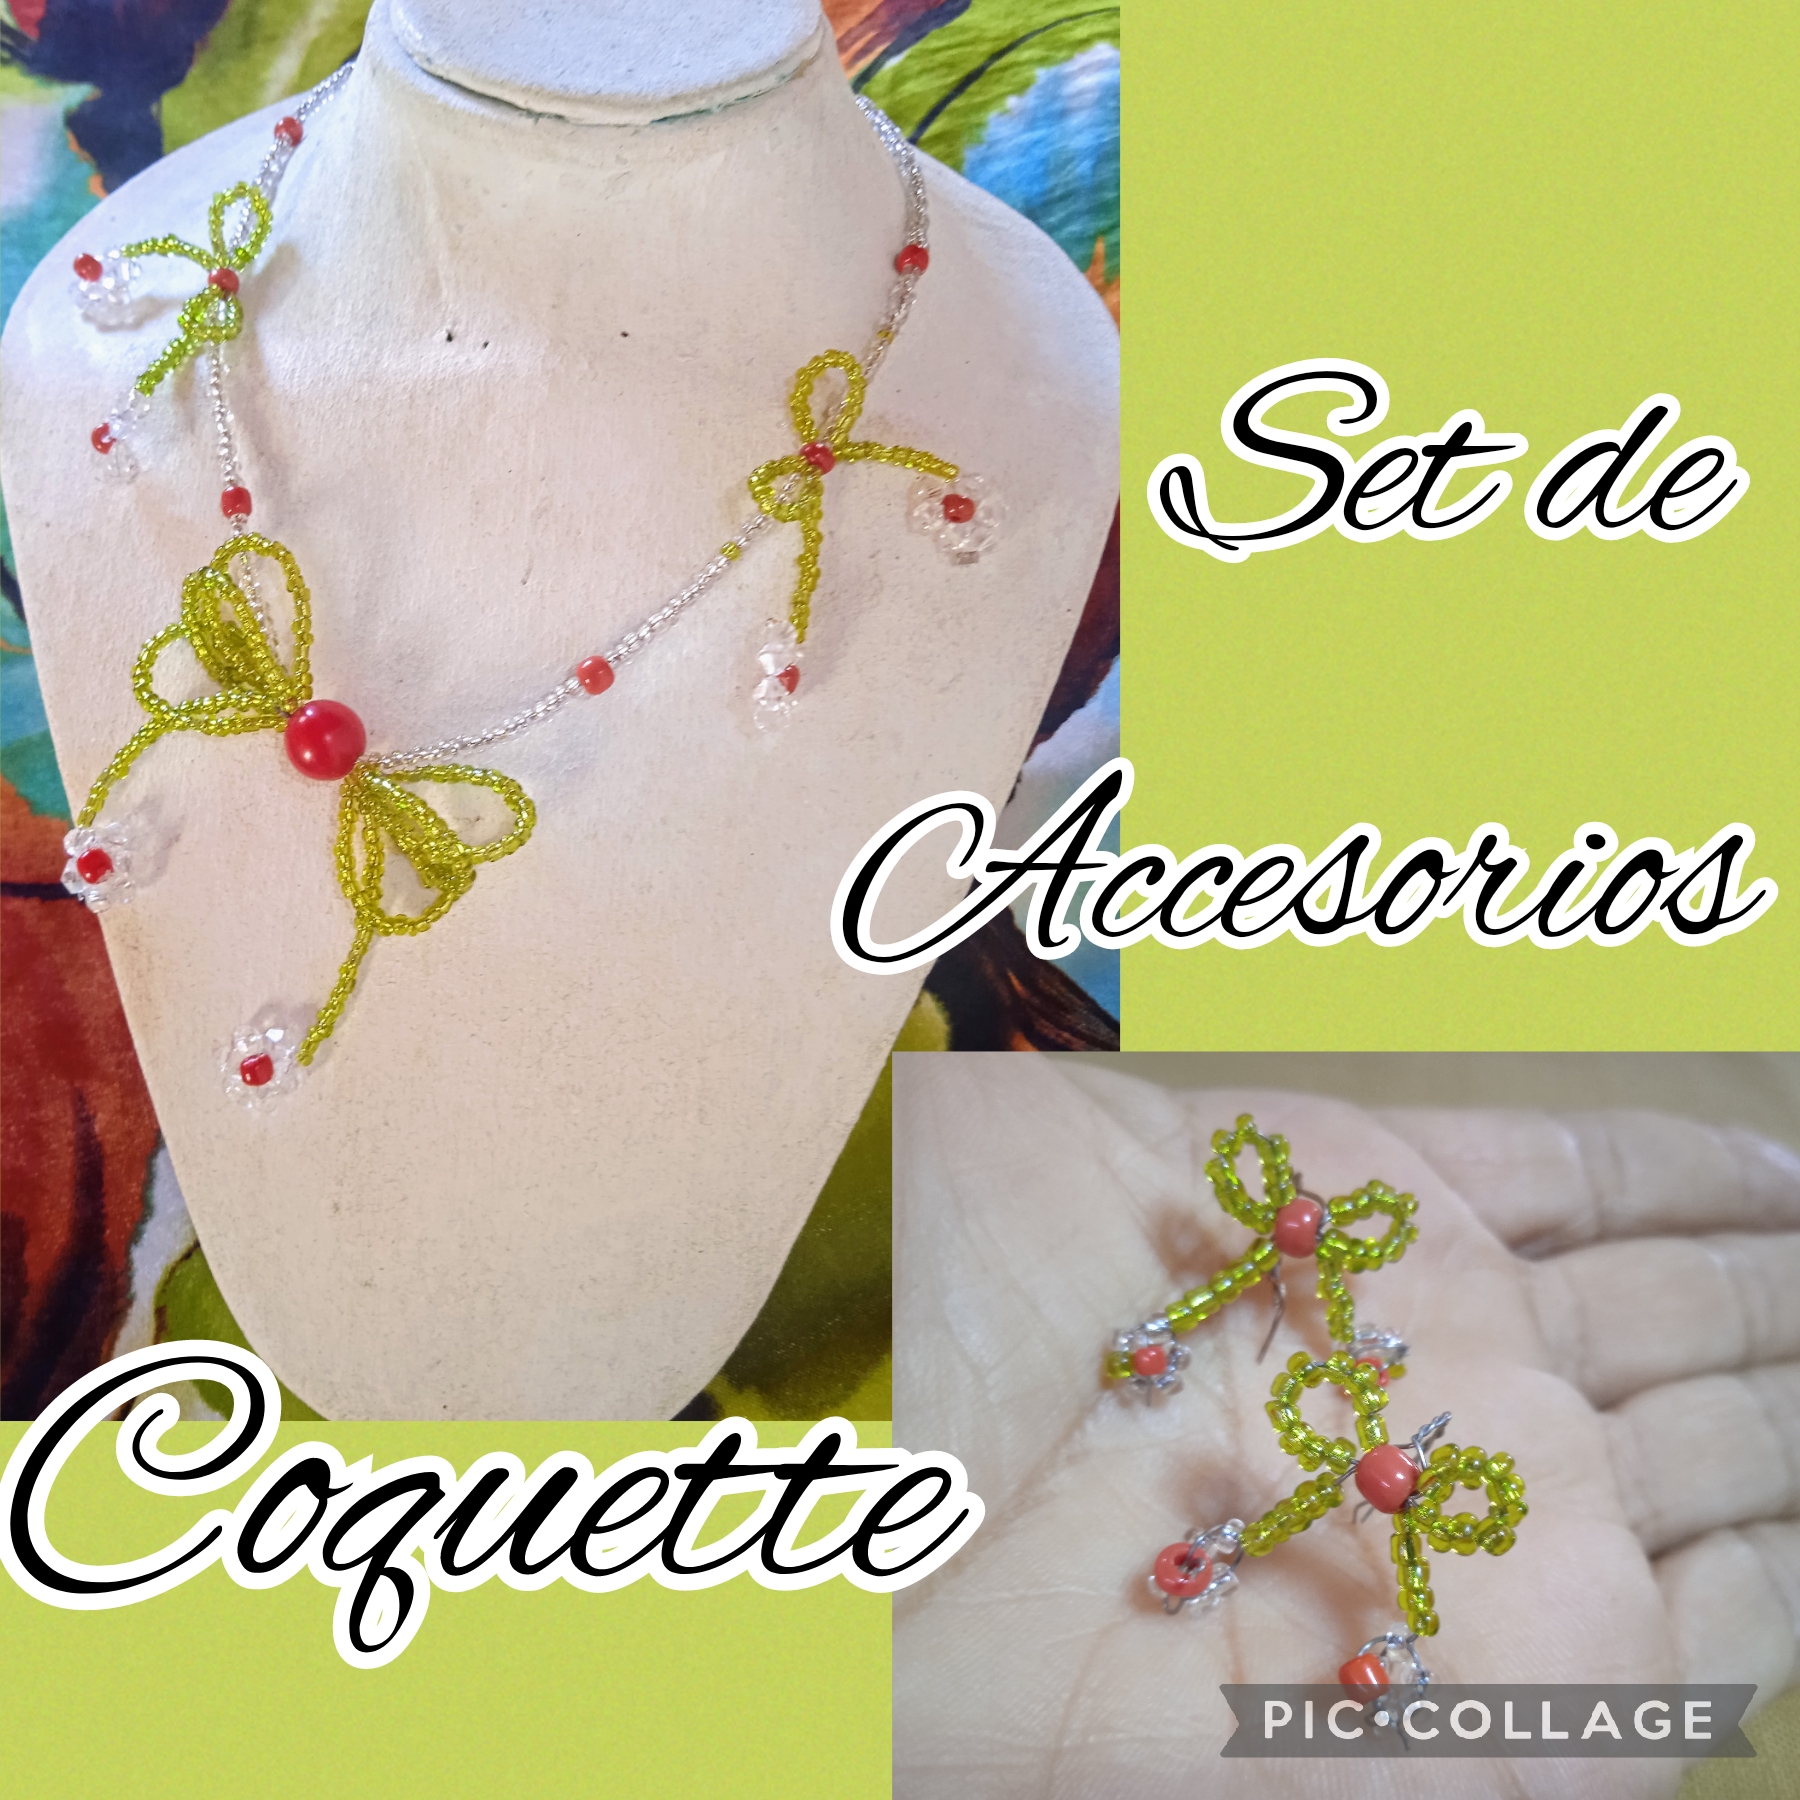
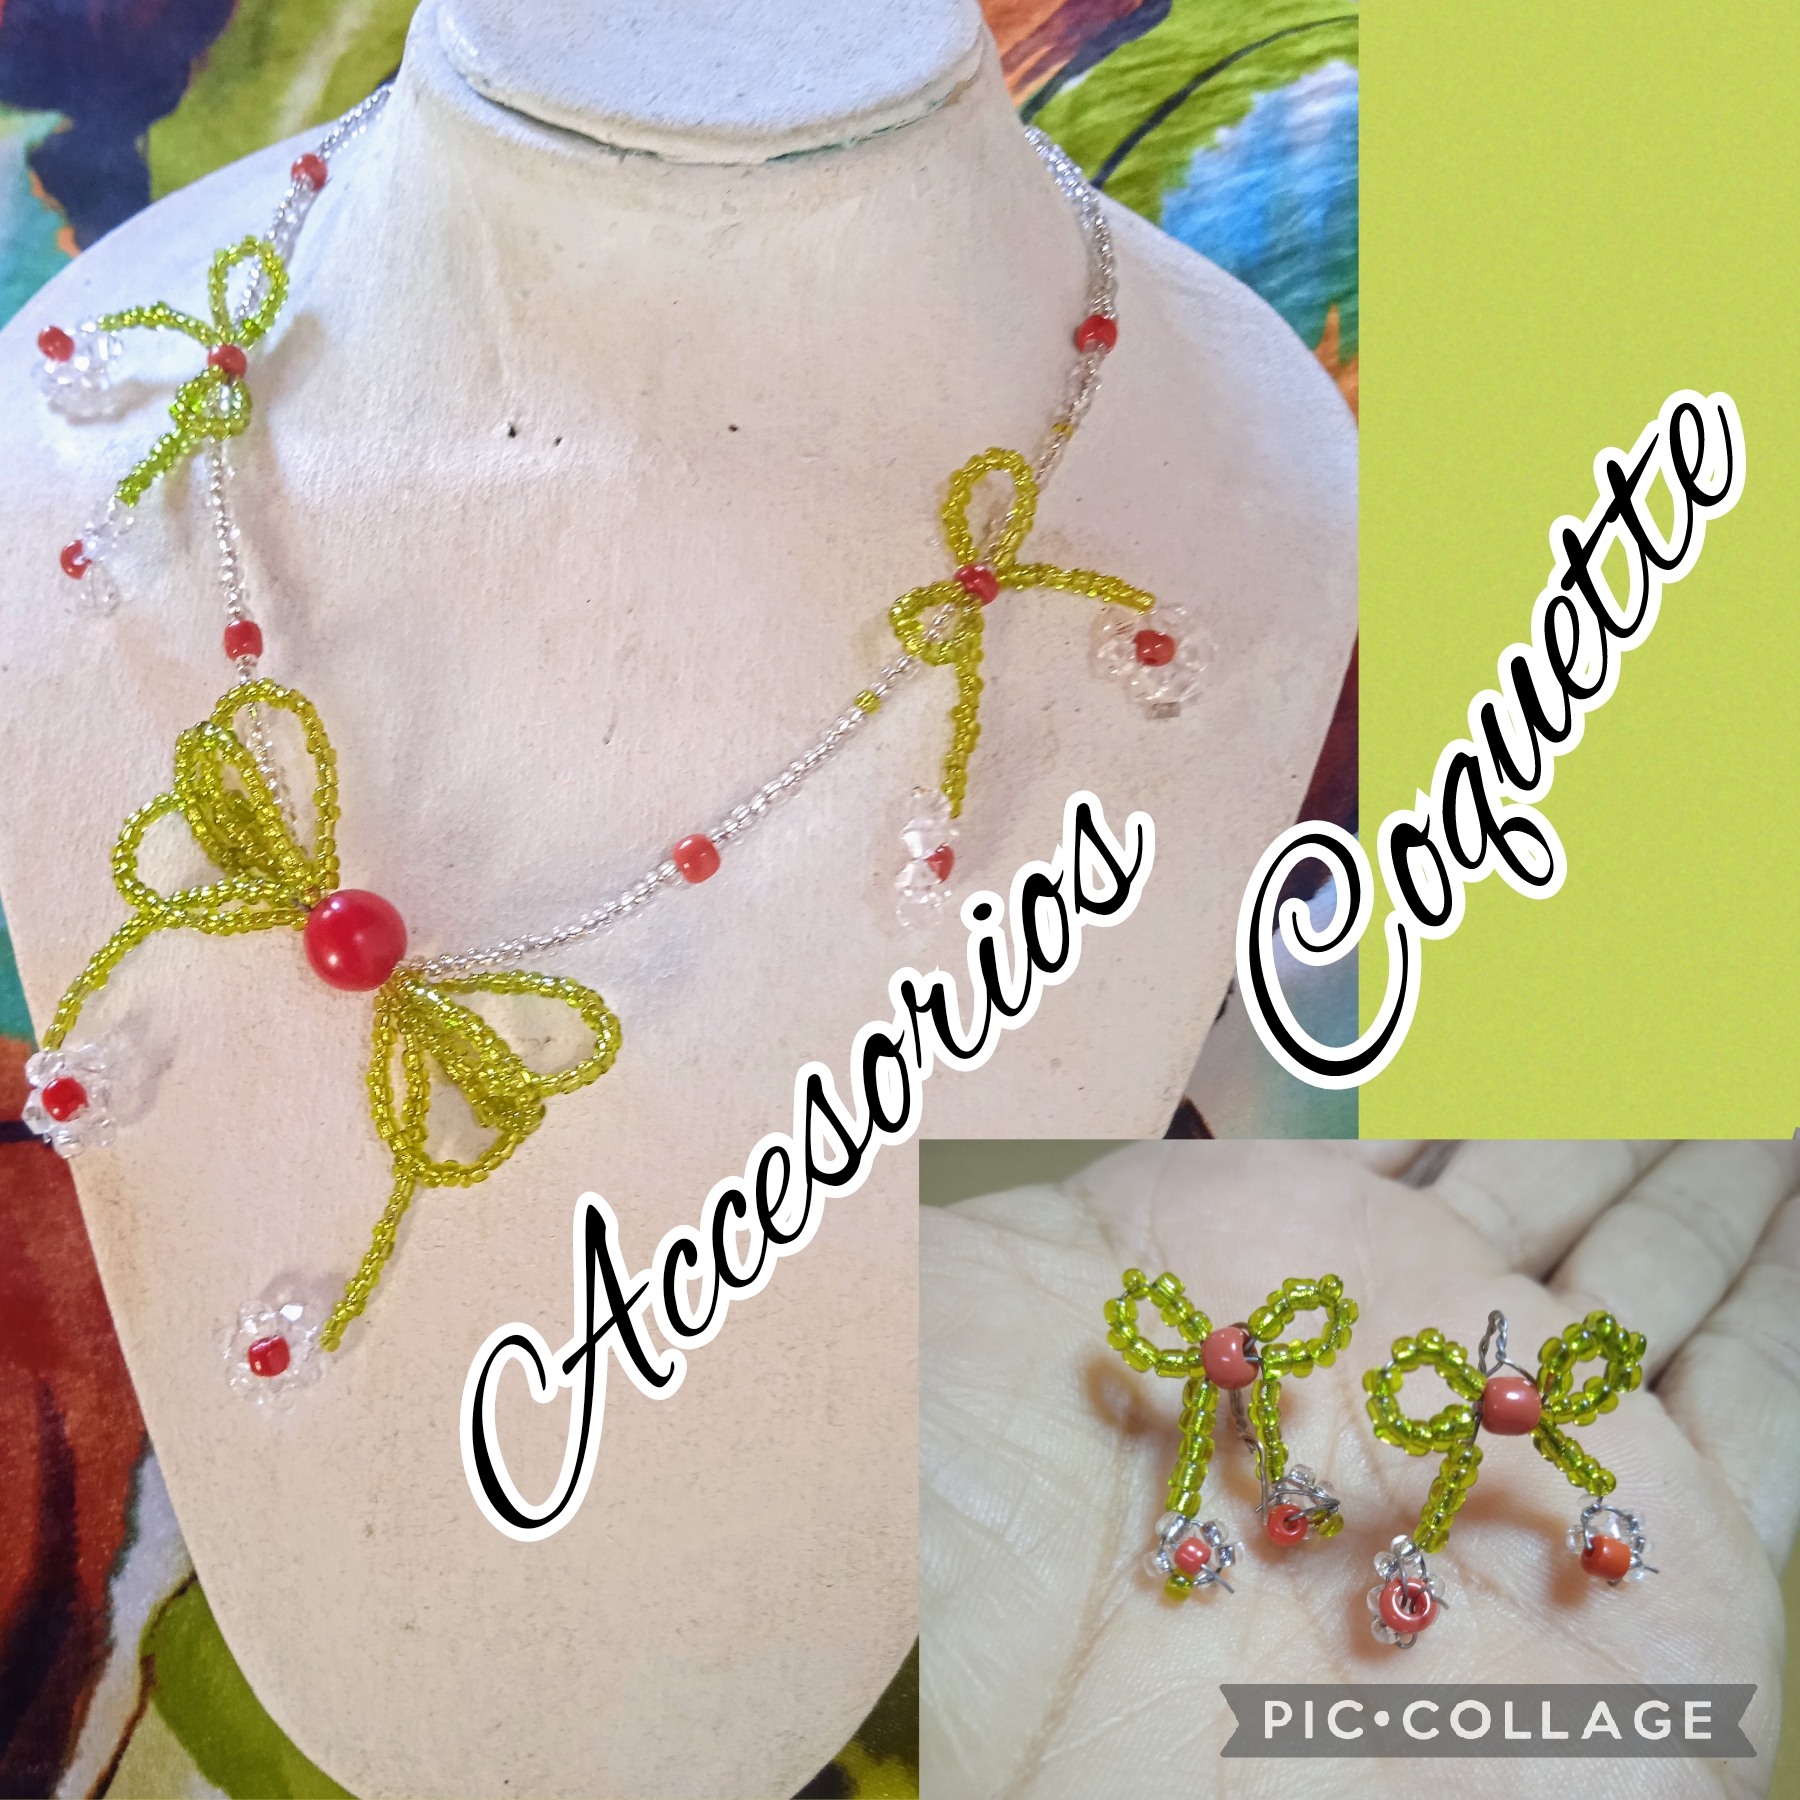
Romantic And Youthful Coquette Style Accessories Set..// [Esp-Eng]
Saluditos Artistas Creadores de las Manualidades y la Joyería, mis deseos como siempre porque todos se encuentran en armonía familiar, con muy buena salud y las mejores bendiciones del Dios todo poderoso.
Por acá como siempre Yo, en mi estado habitual corriendo; es que estos primeros meses del año son de mucha actividad aqui en la comunidad y es que la cultura, el folklore, la artesanía, las manualidades en general ocupan casi un setenta por ciento de la vida activa en la misma, es por eso que siempre hago reseñas de las efemérides pues la mayoria de las veces nos toca comentar o agasajar sobre los profesionales comuneros que hacen aquí vida diaria.
Es por eso que tenemos toda la semana preparando un bonito escenario para conmemorar y hacer una mención muy especial a todas las mujeres que celebran mañana 8 de marzo El Día Internacional de la Mujer, esos maravillosos seres que se han ganado el respeto y la admiracion, por su desarrollo y participación en la sociedad para ser reconocida en el mundo como Mujer Trabajadora y luchadora por sus derechos e igualdad y así evitar la discriminación que se ha sostenido en relación con los varones.
Y como somos mujeres luchadoras, trabajadoras, valientes para afrontar y salir adelante de los problemas, asi también tenemos una gran capacidad para mostrar nuestra feminidad y coquetería. Para felicitar a nuestra compañera y asistente social en este Día elaboré un Set de Accesorios siguiendo la Moda Coquette: Gargantilla con sus Aretes en mostacillas y cola de tigre o tranza; sigan leyendo y vean el paso a paso de como los hice:
Greetings Artists Creators of Crafts and Jewelry, my wishes as always because everyone is in family harmony, with very good health and the best blessings from the almighty God.
Here as always Me, in my usual running state; It is that these first months of the year are very active here in the community and that culture, folklore, crafts, crafts in general occupy almost seventy percent of the active life in it, that is why we always I make reviews of the anniversaries because most of the time we have to comment or entertain the community professionals who carry out daily life here.
That is why we have been preparing a beautiful stage all week to commemorate and make a very special mention of all the women who celebrate International Women's Day tomorrow, March 8, those wonderful beings who have earned respect and admiration, for her development and participation in society to be recognized in the world as a Working Woman and fighter for her rights and equality and thus avoid the discrimination that has been sustained in relation to men.
And since we are feisty, hard-working women who are brave enough to face and overcome problems, we also have a great capacity to show our femininity and coquetry. To congratulate our colleague and social worker on this Day, I created a Set of Accessories following the Coquette Fashion: Choker with its Earrings in beads and tiger tail or braid; Keep reading and see the step by step of how I made them:
MATERIALES USADOS EN SU ELABORACIÓN:
✓Mostacillas transparentes.
✓ Mostacillas verdes.
✓ Mostacillones rojos.
✓ Cristales transparentes.
✓ Una chaquira número seis roja.
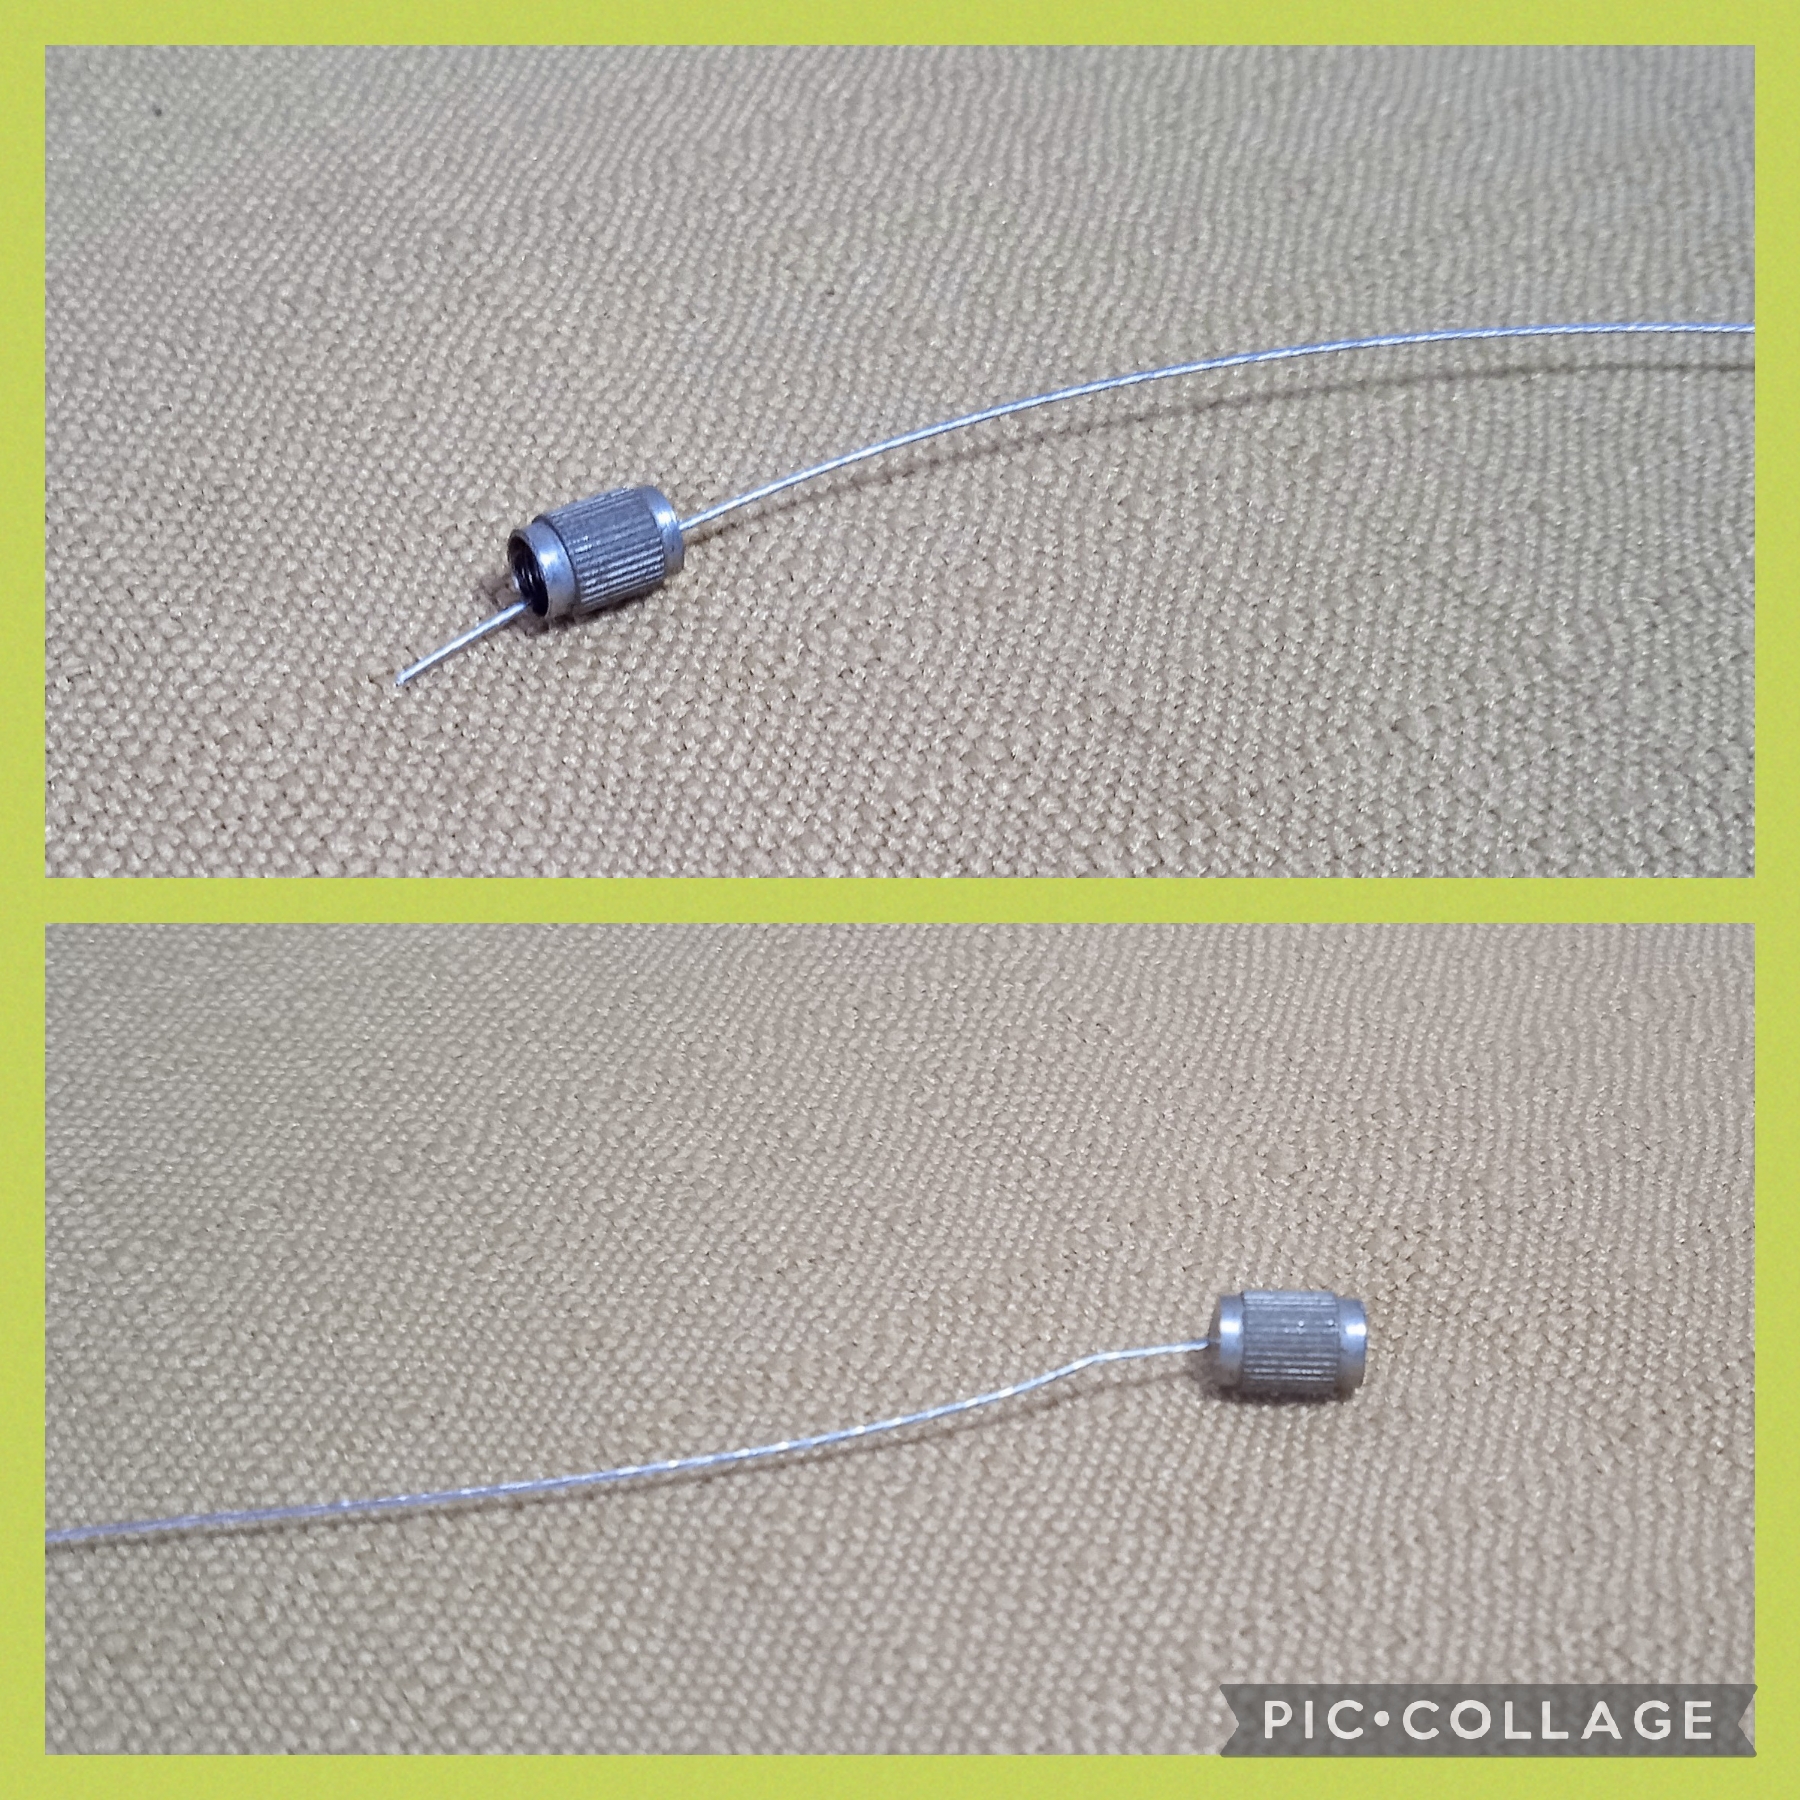
✓ Tranca tipo tornillo.
✓ Naylon.
✓ Alambre calibre 26 ".
✓ Cola de tigre.
✓ Tijeras.
✓ Pinza plana.
✓ Pinza punta redonda.
✓ Regla.
MATERIALS USED IN ITS PREPARATION:
✓Transparent beads.
✓ Green beads.
✓ Red mustacillons.
✓ Transparent crystals.
✓ A red number six bead.
✓ Screw type lock.
✓ Nylon.
✓ 26" gauge wire.
✓ Tiger tail.
✓ Scissors.
✓ Flat clamp.
✓ Round tip tweezers.
✓ Rule.
CON ESTOS SENCILLOS Y POCOS PASOS ELABORÉ MI MANUALIDAD:
PRIMER PASO:
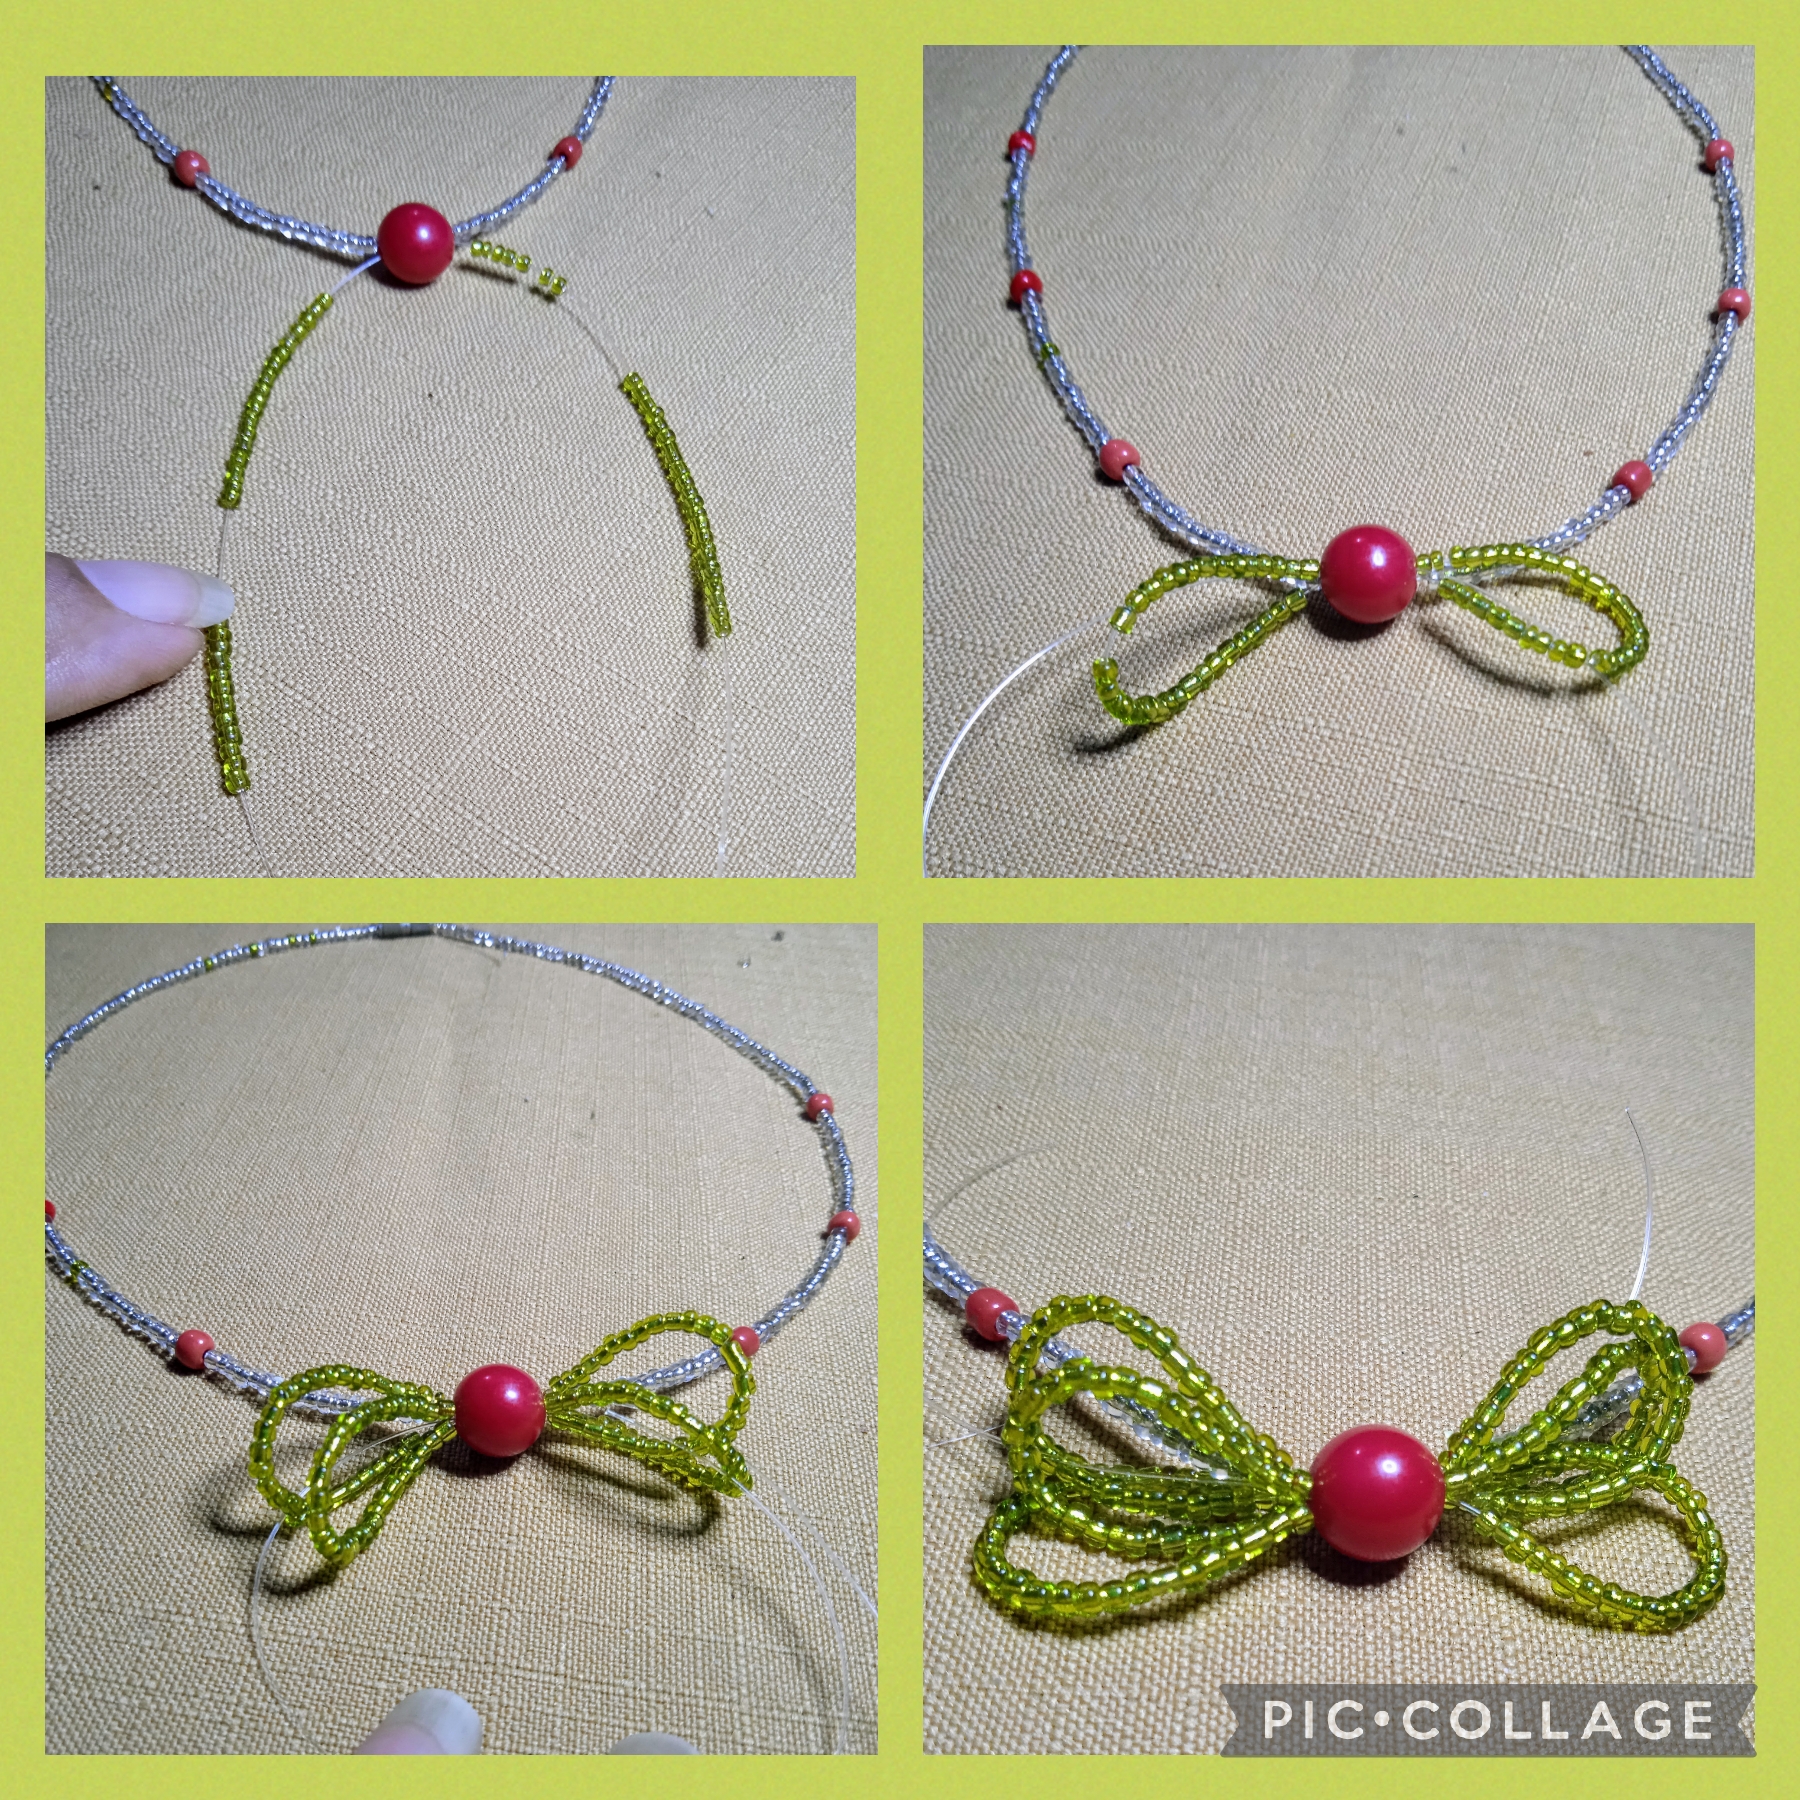
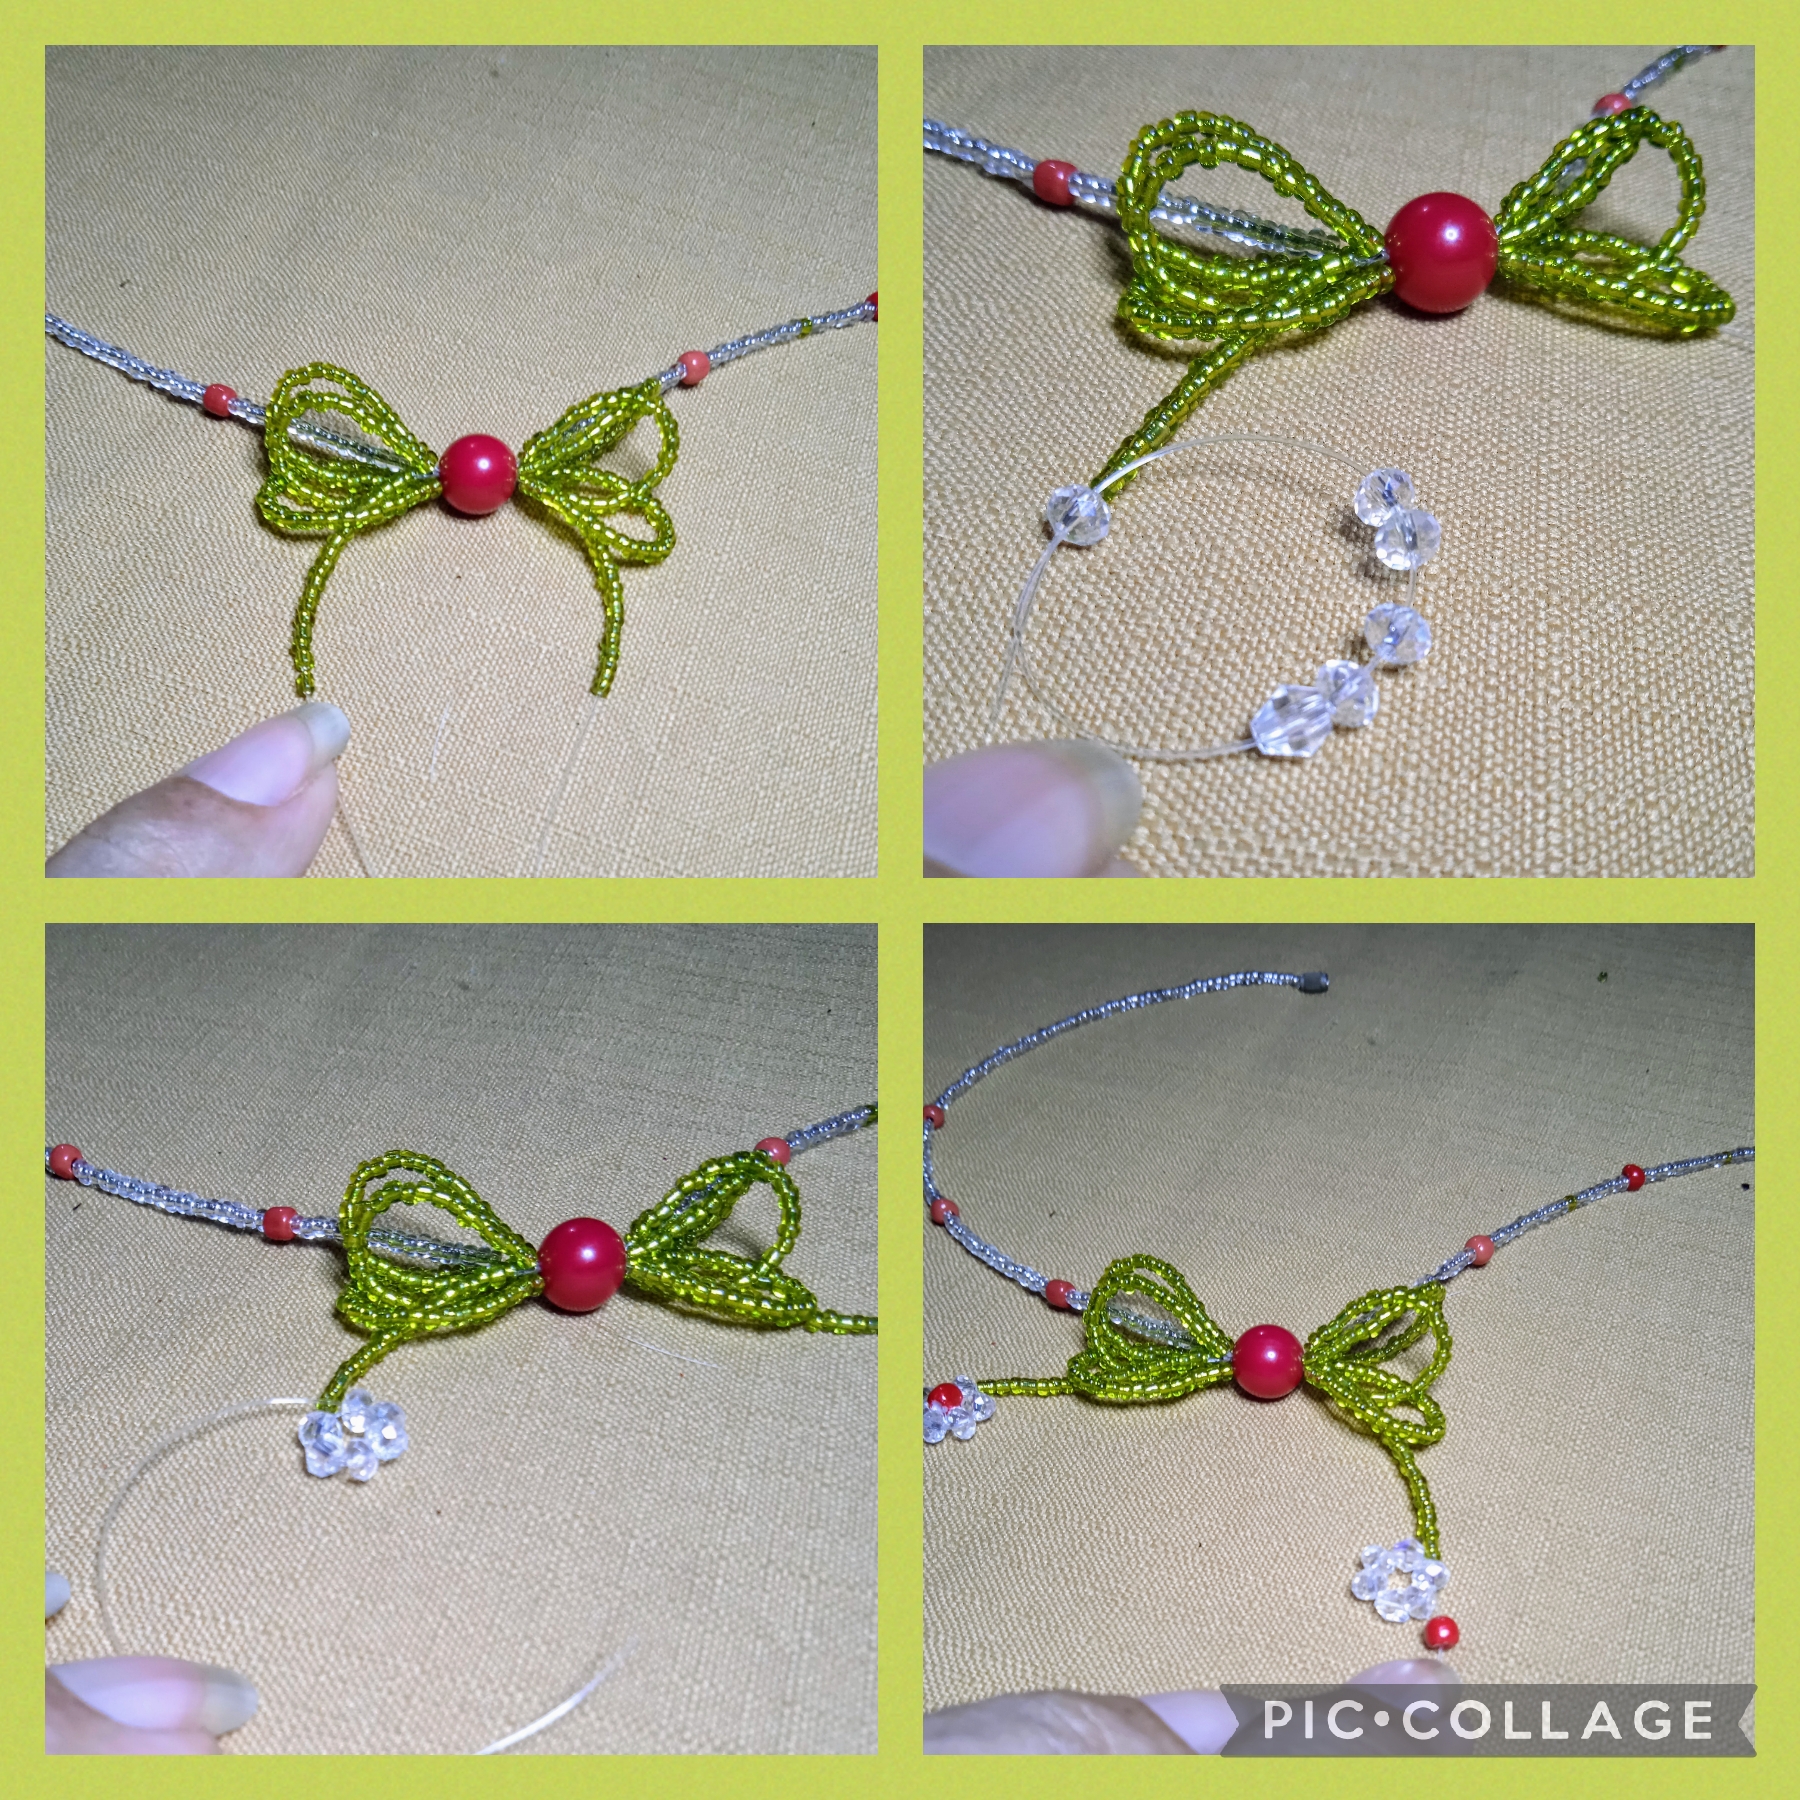
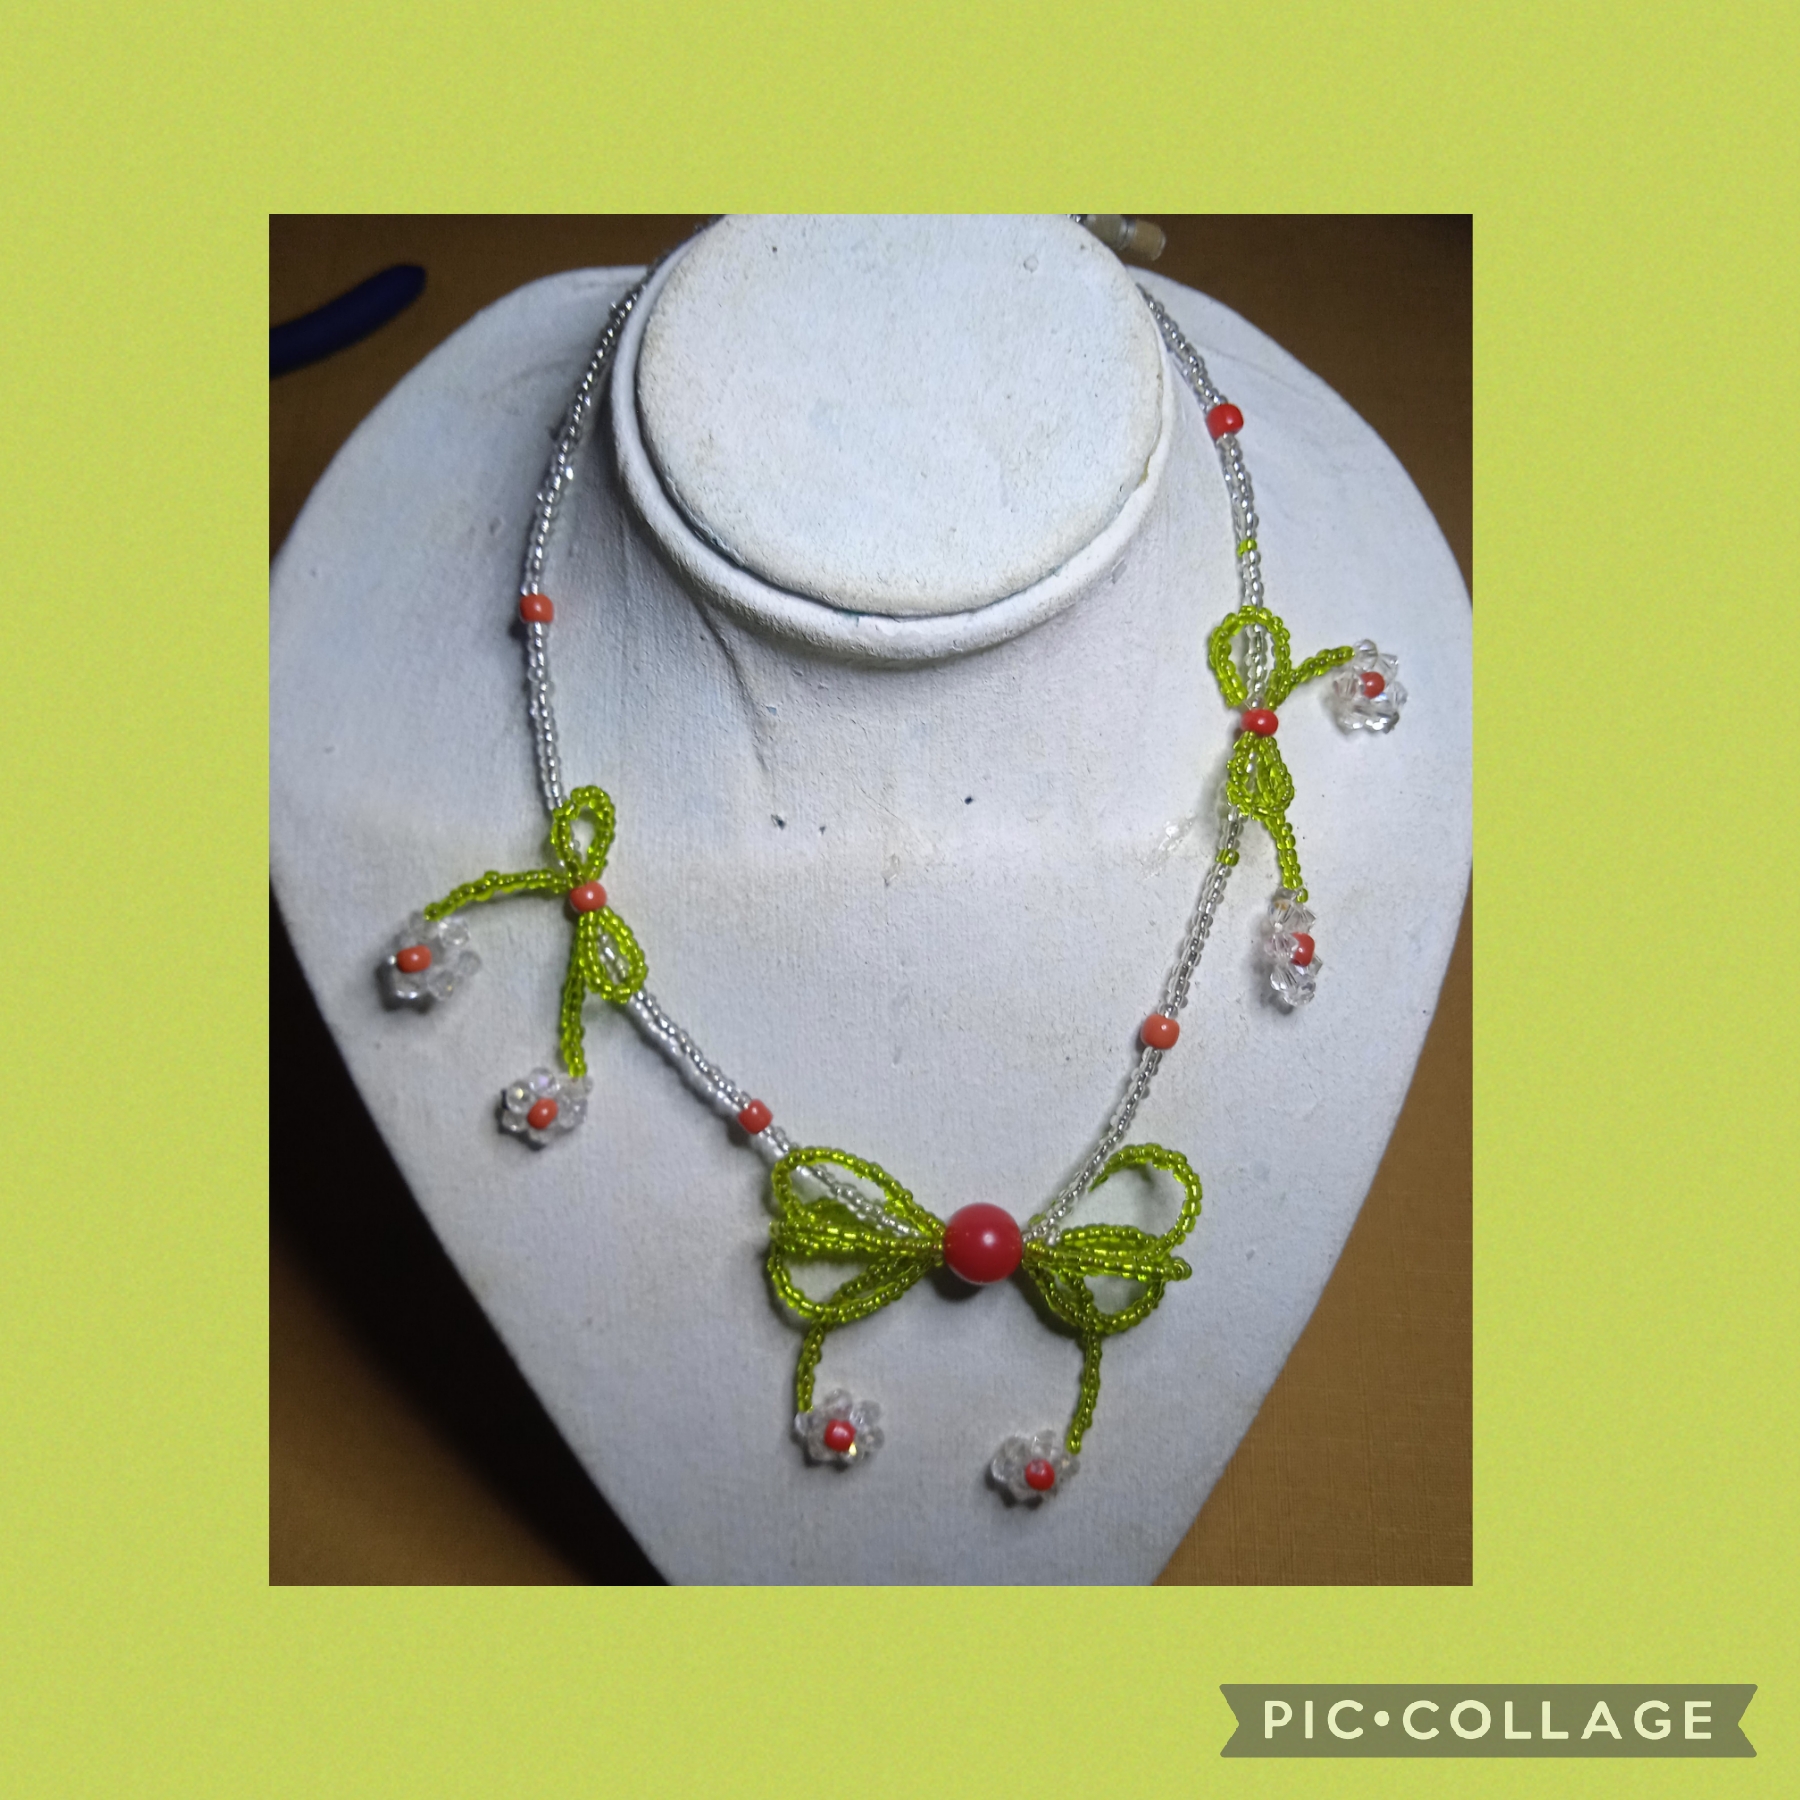
Voy a comenzar este proyecto elaborando primero la gargantilla, para ello voy a ocupar cuarenta y cinco centímetros de la tranza o cola de tigre que confirme su medida con la regla, tomo la tranca tipo tornillo que está conformada por dos partes y coloco una de las partes en un extremo, ahora sigo insertando cuarenta mostacillas transparentes y luego un mostacillón rojo, después veinte mostacillas transparentes y un mostacillón rojo, sigo con dos pasos más iguales o sea veinte mostacillas y un mostacillón, ahora coloco la chaquira roja número seis, después hago el mismo procedimiento veinte mostacillas transparentes y un mostacillón rojo por tres veces como muestra la imagen, sigo con las cuarentas chaquiras transparentes coloco la otra mitad de la tranca y así queda.
WITH THESE SIMPLE AND FEW STEPS I CREATE MY CRAFTS:
FIRST STEP:
I am going to start this project by first making the choker, for this I am going to use forty-five centimeters of the braid or tiger tail that confirms its measurement with the ruler, I take the screw type braid that is made up of two parts and I place one of the parts at one end, now I continue inserting forty transparent beads and then one red bead, then twenty transparent beads and one red bead, I continue with two more equal steps that is twenty beads and one bead, now I place the red bead number six, then I do the same procedure, twenty transparent beads and one red bead three times as shown in the image, I continue with the forty transparent beads, place the other half of the bar and this is how it looks.

SEGUNDO PASO:
Voy a continuar realizando en la chaquira roja del centro un lazo triple corto con las tijeras un trozo de naylon de cincuenta centímetros y lo paso de lado a lado por la chaquira ahora inserto en cada lado treinta mostacillas verdes, paso la punta de un lado por el orificio de la chaquira y saco por el otro lado, halo y hago lo mismo con el otro lado que tambien cruzo quedando un lazo simple 🎀 de nuevo inserto treinta mostacillas verdes en cada punta del naylon y las cruzo y realizo un lazo 🎀 doble, y hago lo mismo otra vez para formar el lazo triple.
Halo fuerte las puntas para fijar bien el 🎀 ahora en cada punta del naylon inserto veinte mostacillas verdes y seis cristales transparentes, paso la punta del naylon por el último cristal y formo una florecita lo halo hasta la ultima mostacilla verde ahora inserto un mostacillón rojo y lo coloco en el centro paso el naylon por los cristales ajustando bien con un nudo simple y así queda. Hago el mismo procedimiento del otro lado terminando el 🎀
✓SECOND STEP:
I am going to continue making a short triple bow on the red bead in the center with a fifty-centimeter piece of nylon and I pass it from side to side along the bead. Now I insert thirty green beads on each side, passing the tip on one side through the hole of the bead and take it out on the other side, pull it and do the same with the other side that I also cross, leaving a simple loop 🎀 again I insert thirty green beads in each end of the nylon and cross them and make a double loop 🎀, and do the same again to form the triple loop.
I pull the tips tightly to fix the 🎀 well now in each tip of the nylon I insert twenty green beads and six transparent crystals, I pass the tip of the nylon through the last crystal and form a little flower I pull it until the last green bead now I insert a red bead and I place it in the center, pass the nylon through the crystals, adjusting well with a simple knot and that's how it looks. I do the same procedure on the other side finishing the 🎀
TERCER PASO:
Aquí voy a realizar un 🎀 sencillo a cada lado del lazo del centro entre el segundo y tercer Chaquiron rojo, corto un naylon de veinte centímetros y lo inserto en el segundo Chaquiron rojo pasándolo de lado a lado, en cada punta coloco diez Mostacillas verdes y las cruzo por el mostacillón rojo, halo las puntas y formo lazo 🎀 simple inserto en cada naylon de las puntas diez mostacillas verdes y seis cristales transparentes para formar la punta del lazo como la del lazo triple, hago un lazo igual del otro lado como en las imágenes y así va quedando.
THIRD STEP:
Here I am going to make a simple 🎀 on each side of the center bow between the second and third red Chaquiron, I cut a twenty centimeter nylon and insert it into the second red Chaquiron passing it from side to side, on each end I place ten green Mostacillas and I cross them through the red bead, pull the ends and form a bow 🎀 I simply insert into each nylon of the tips ten green beads and six transparent crystals to form the tip of the bow like the triple bow, I make an equal bow on the other side as in the images and that's how it looks.
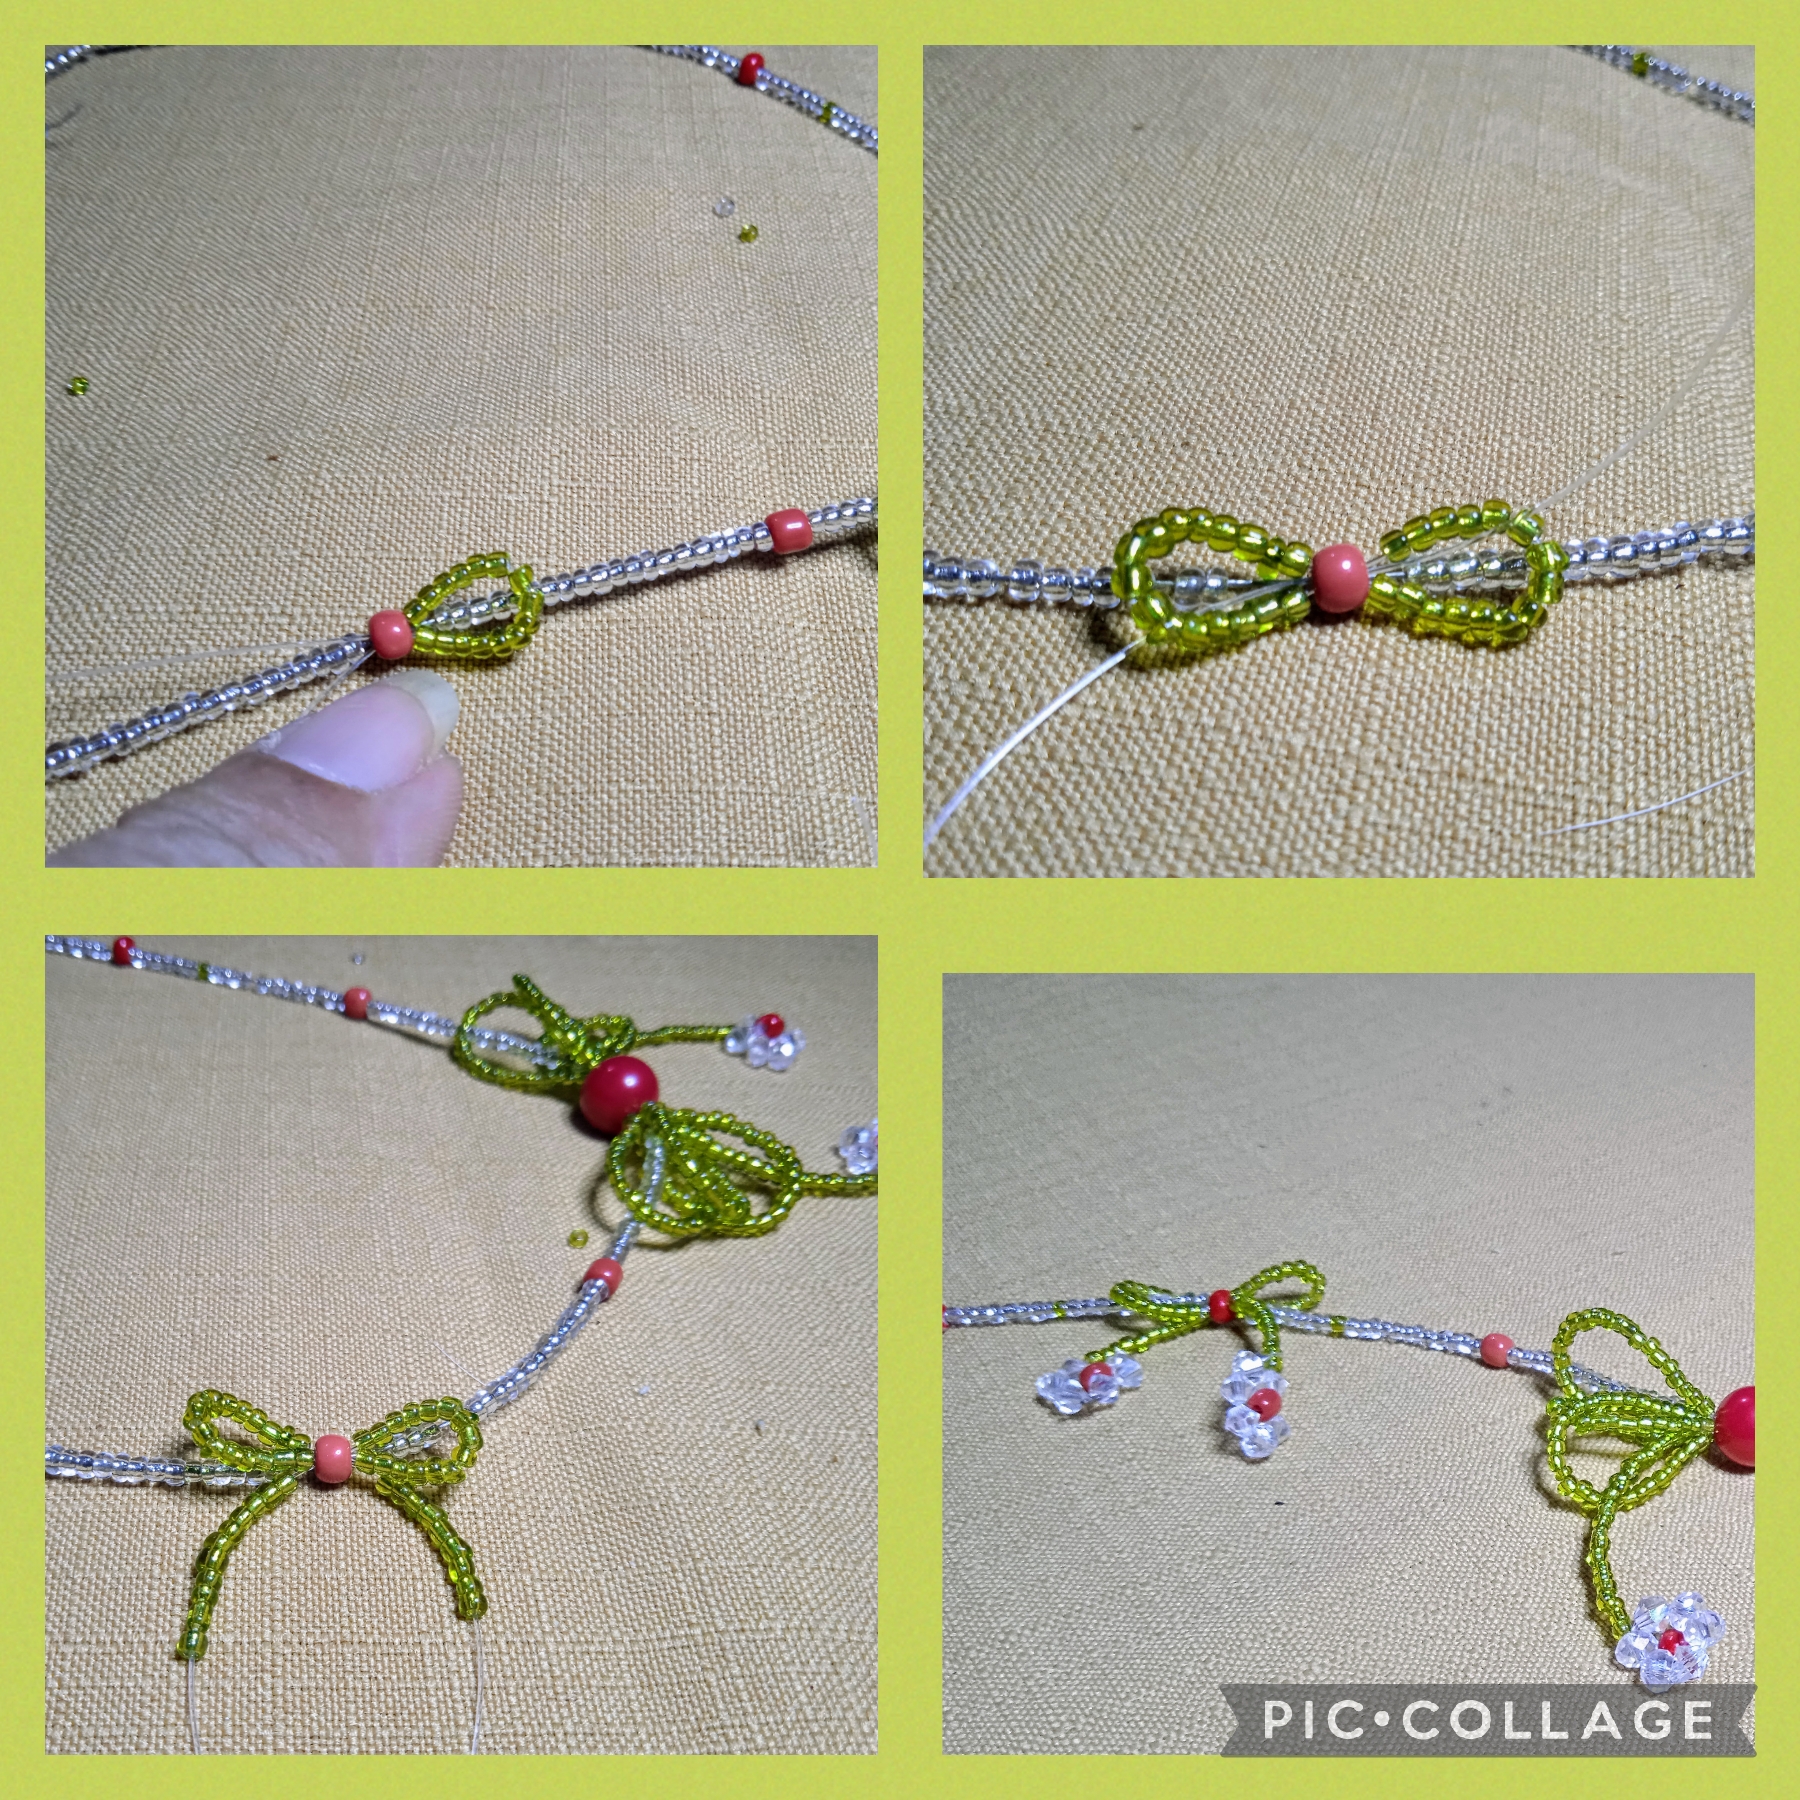
CUARTO PASO:
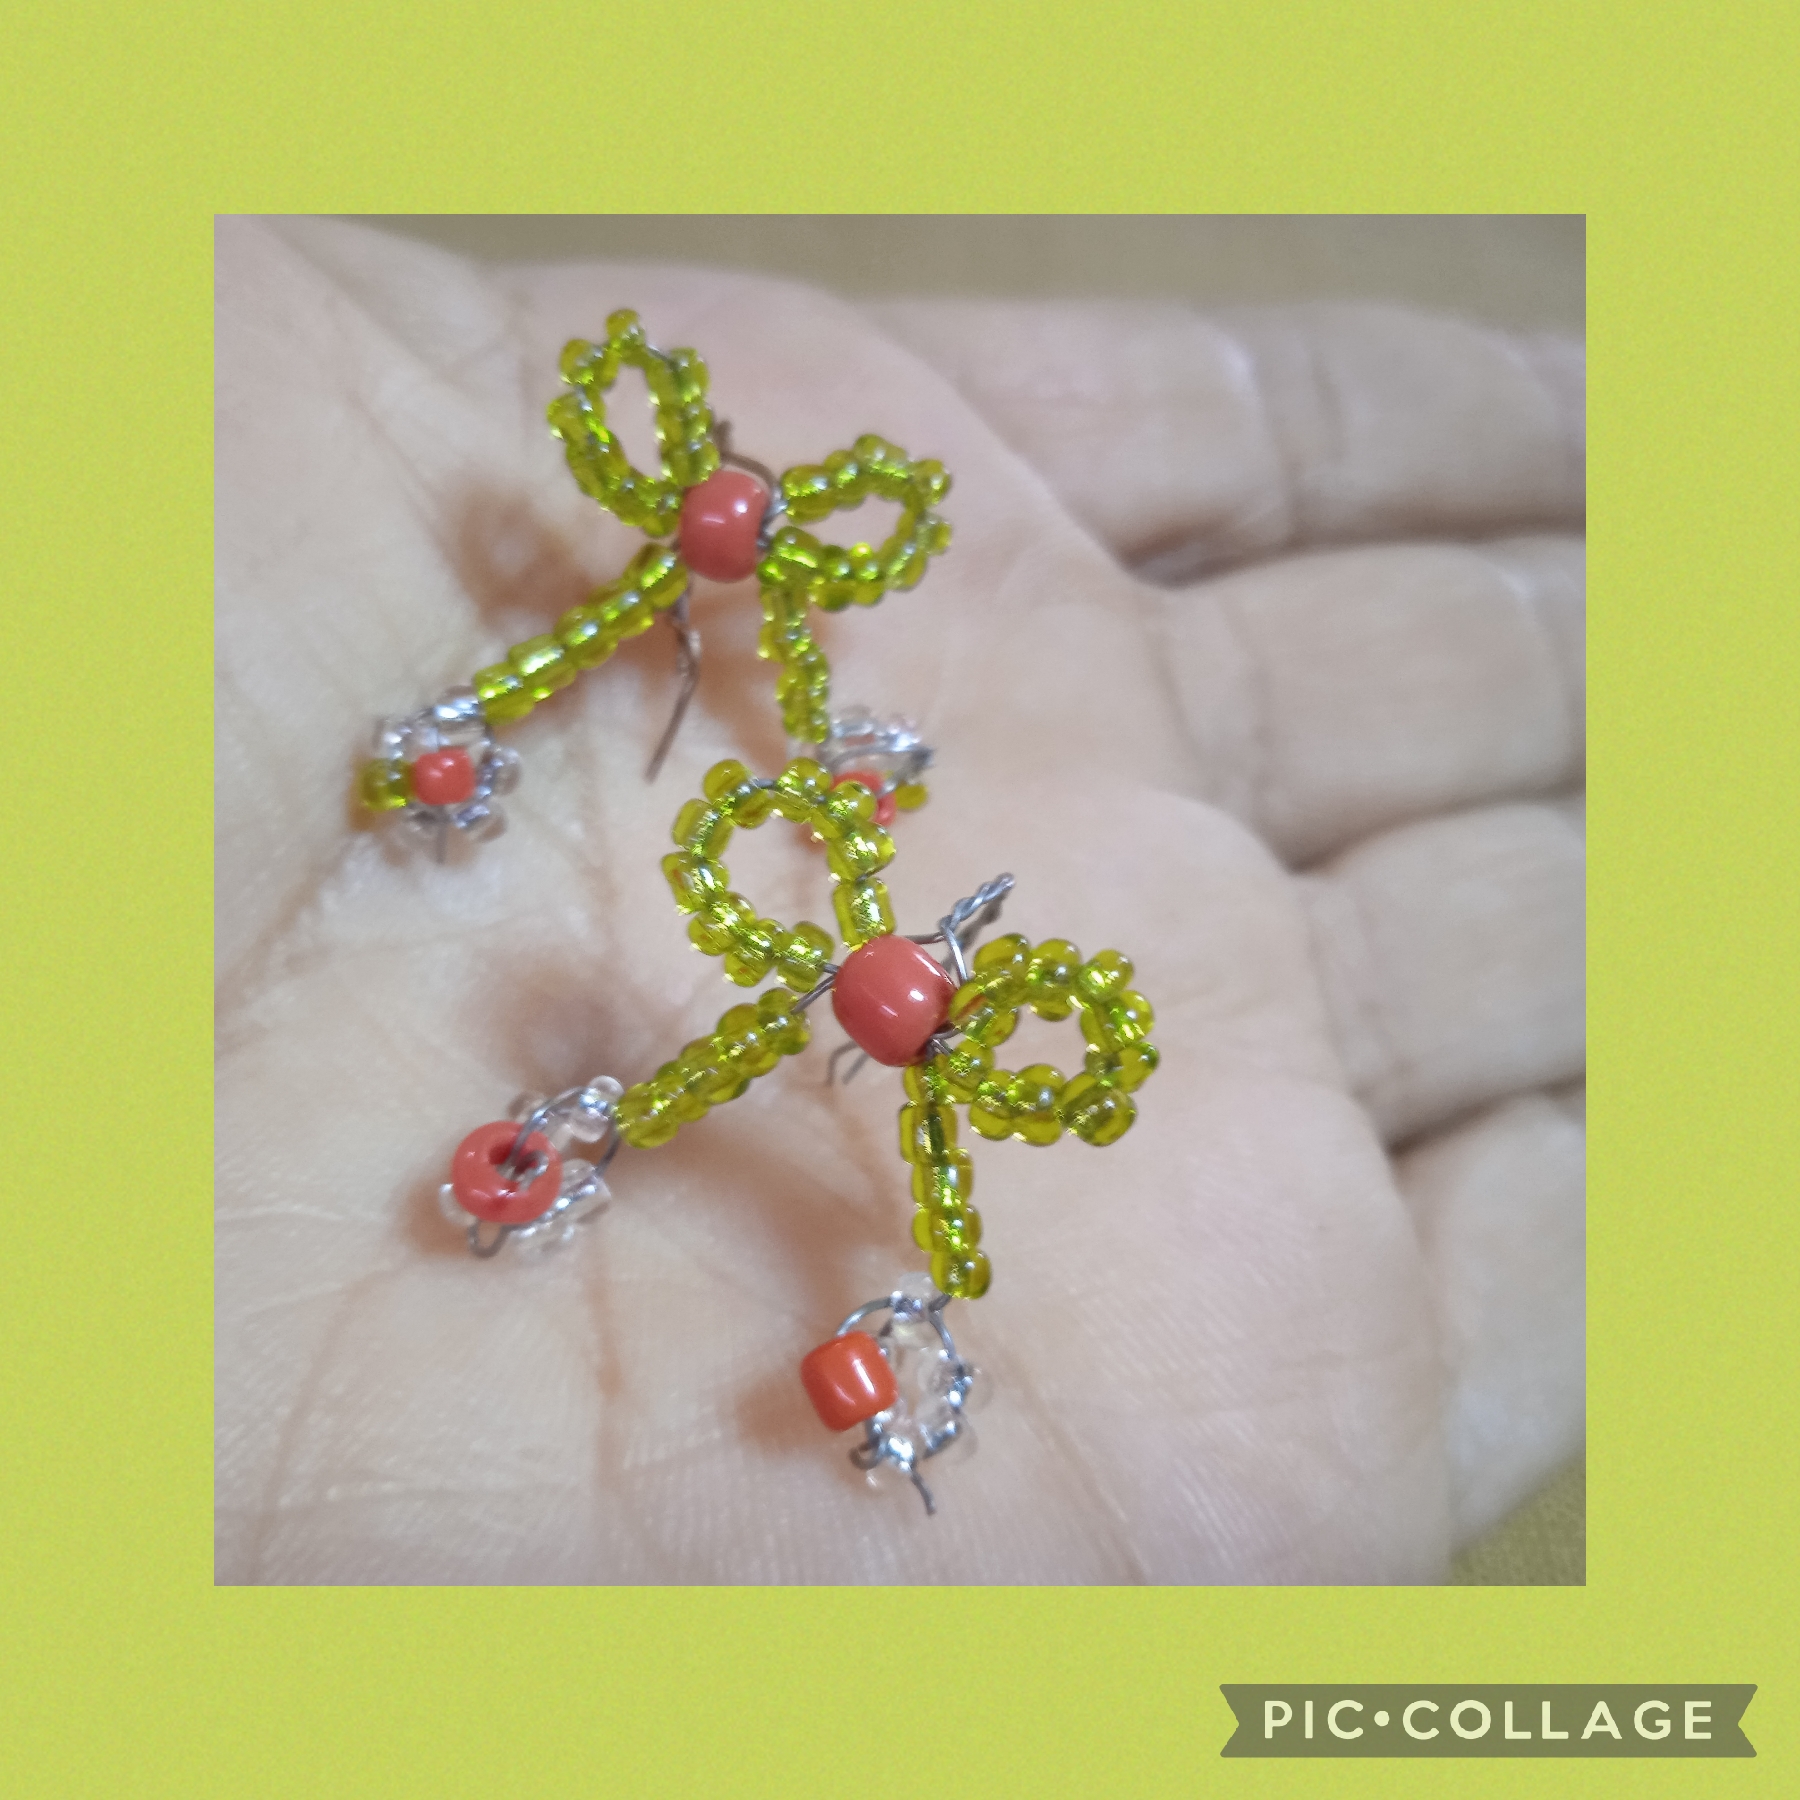
Ahora aquí voy a realizar un par de Aretes para conformar el Set de Accesorios, con el mismo procedimiento que use para realizar los lazos simples hago dos nuevos lazos pequeños y ocupando alambre calibre 26 " corto dos trozos de tres centímetros cada uno; paso el alambre por el mostacillón rojo y usando la pinza punta redonda hago un entorchado de tres vueltas para fijar con la misma pinza hago una especie de anzuelo y así queda listo el Arete.
FOURTH STEP:
Now here I am going to make a pair of Earrings to make up the Accessories Set, with the same procedure that I used to make the simple bows I make two new small bows and using 26" gauge wire I cut two pieces of three centimeters each; pass the wire through the red bead and using the round tip clamp I make a three-turn twist to fix with the same clamp I make a kind of hook and thus the Earring is ready.

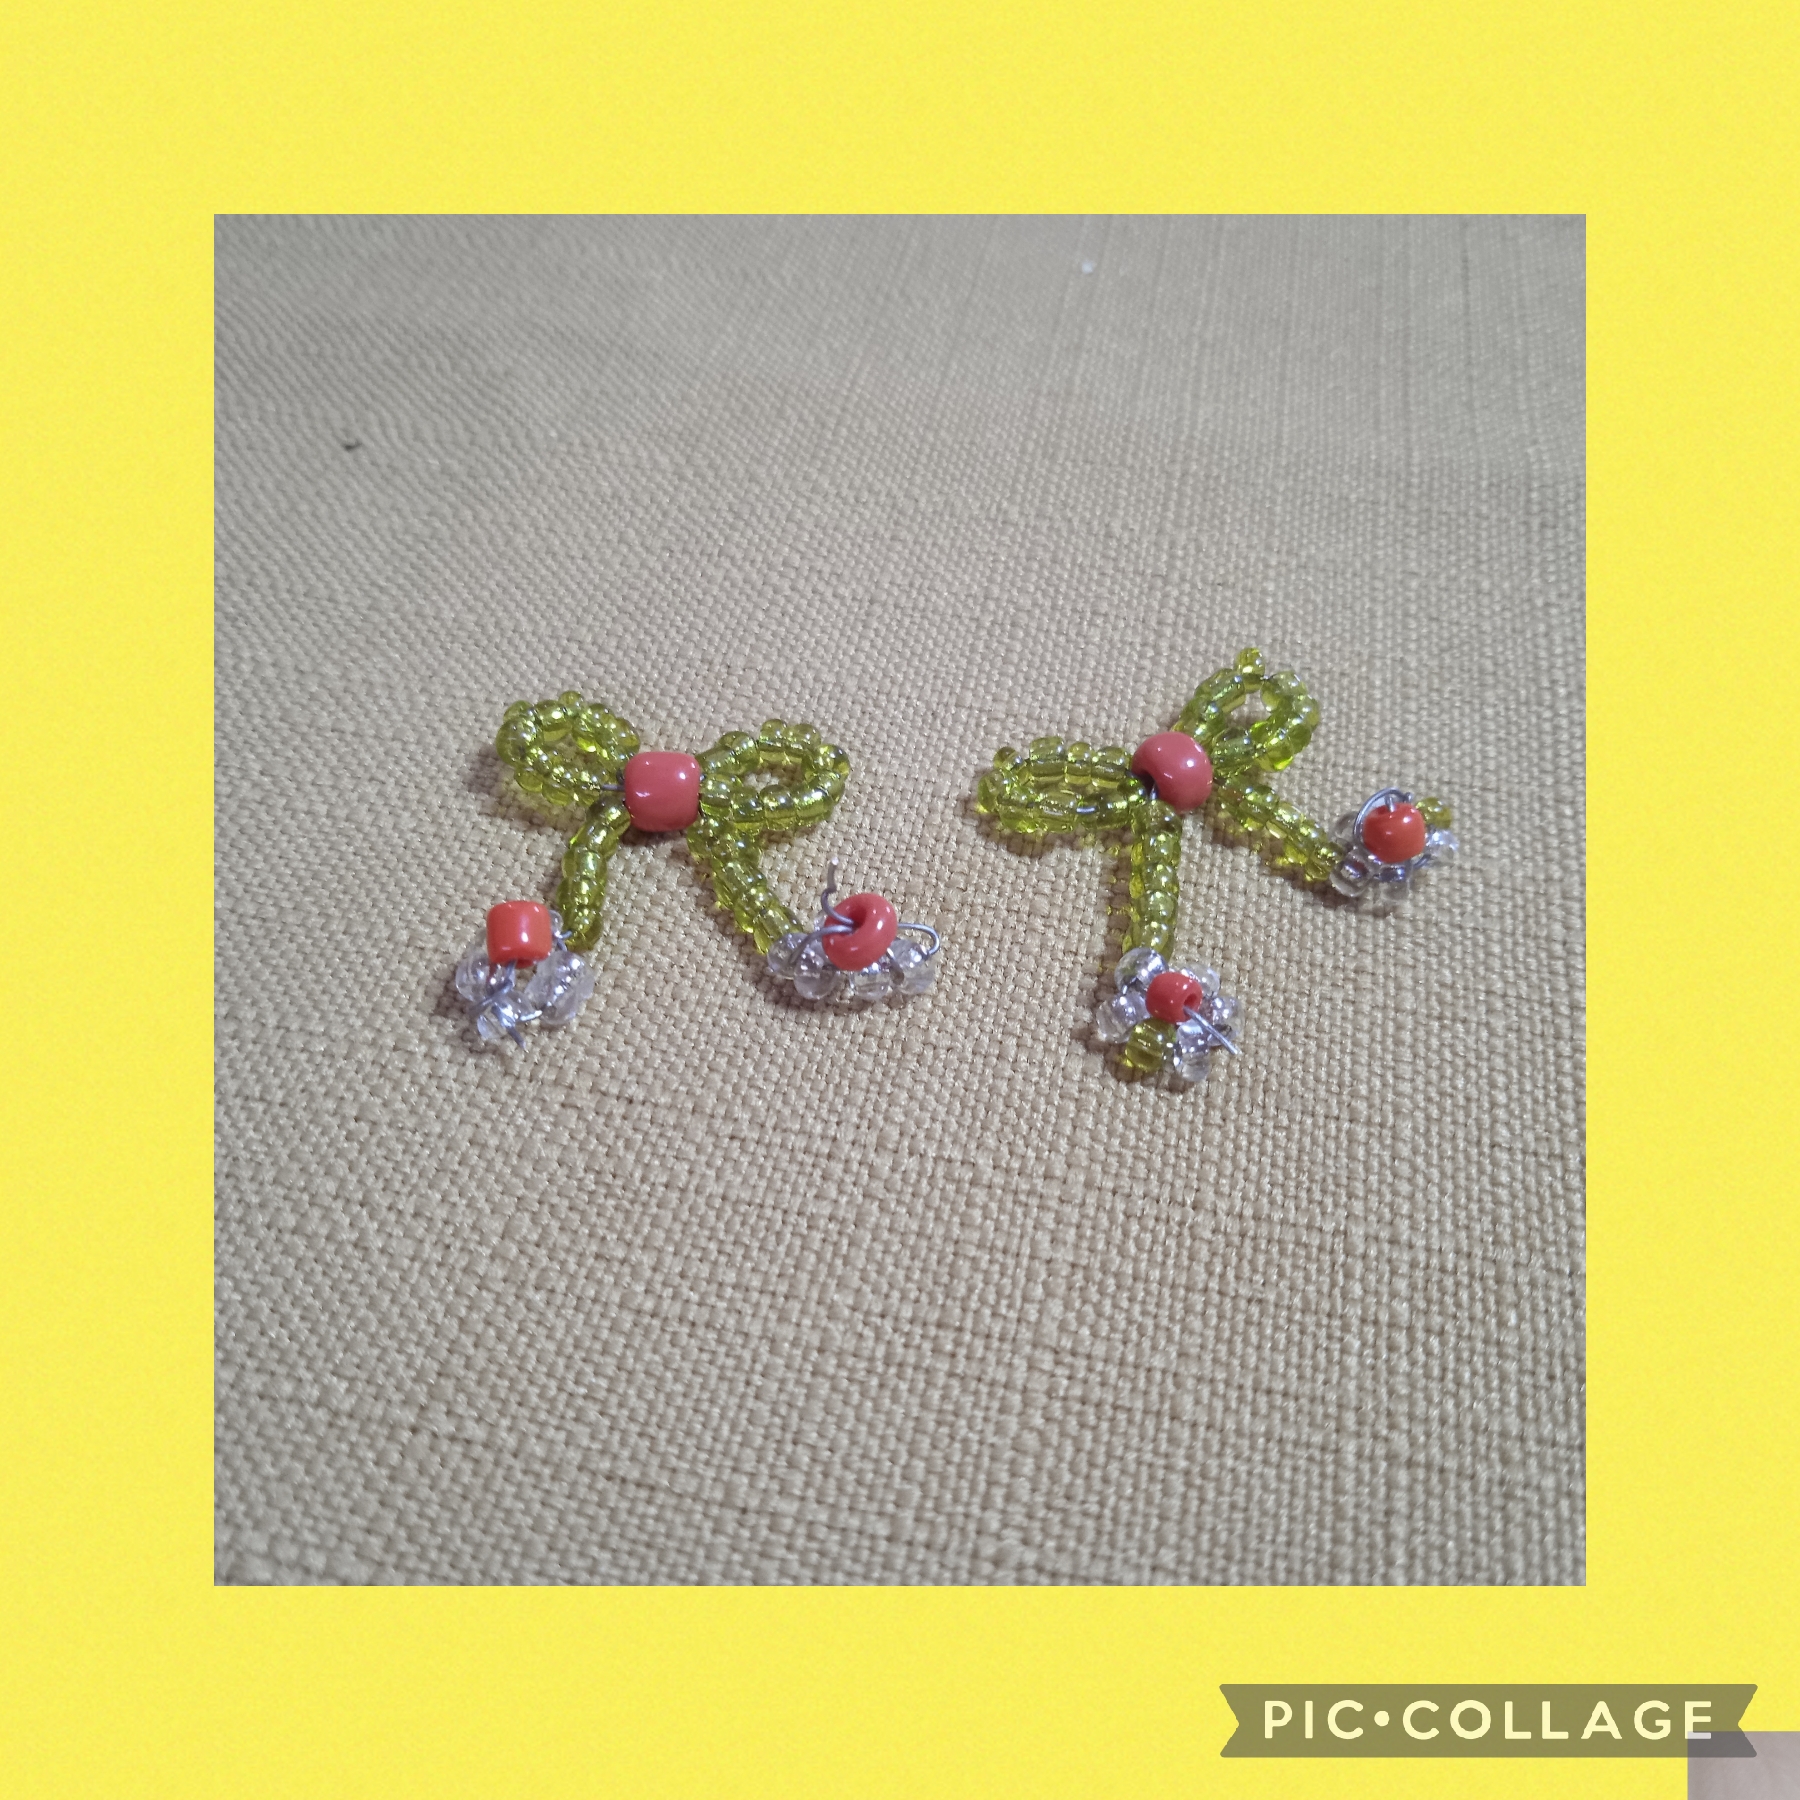
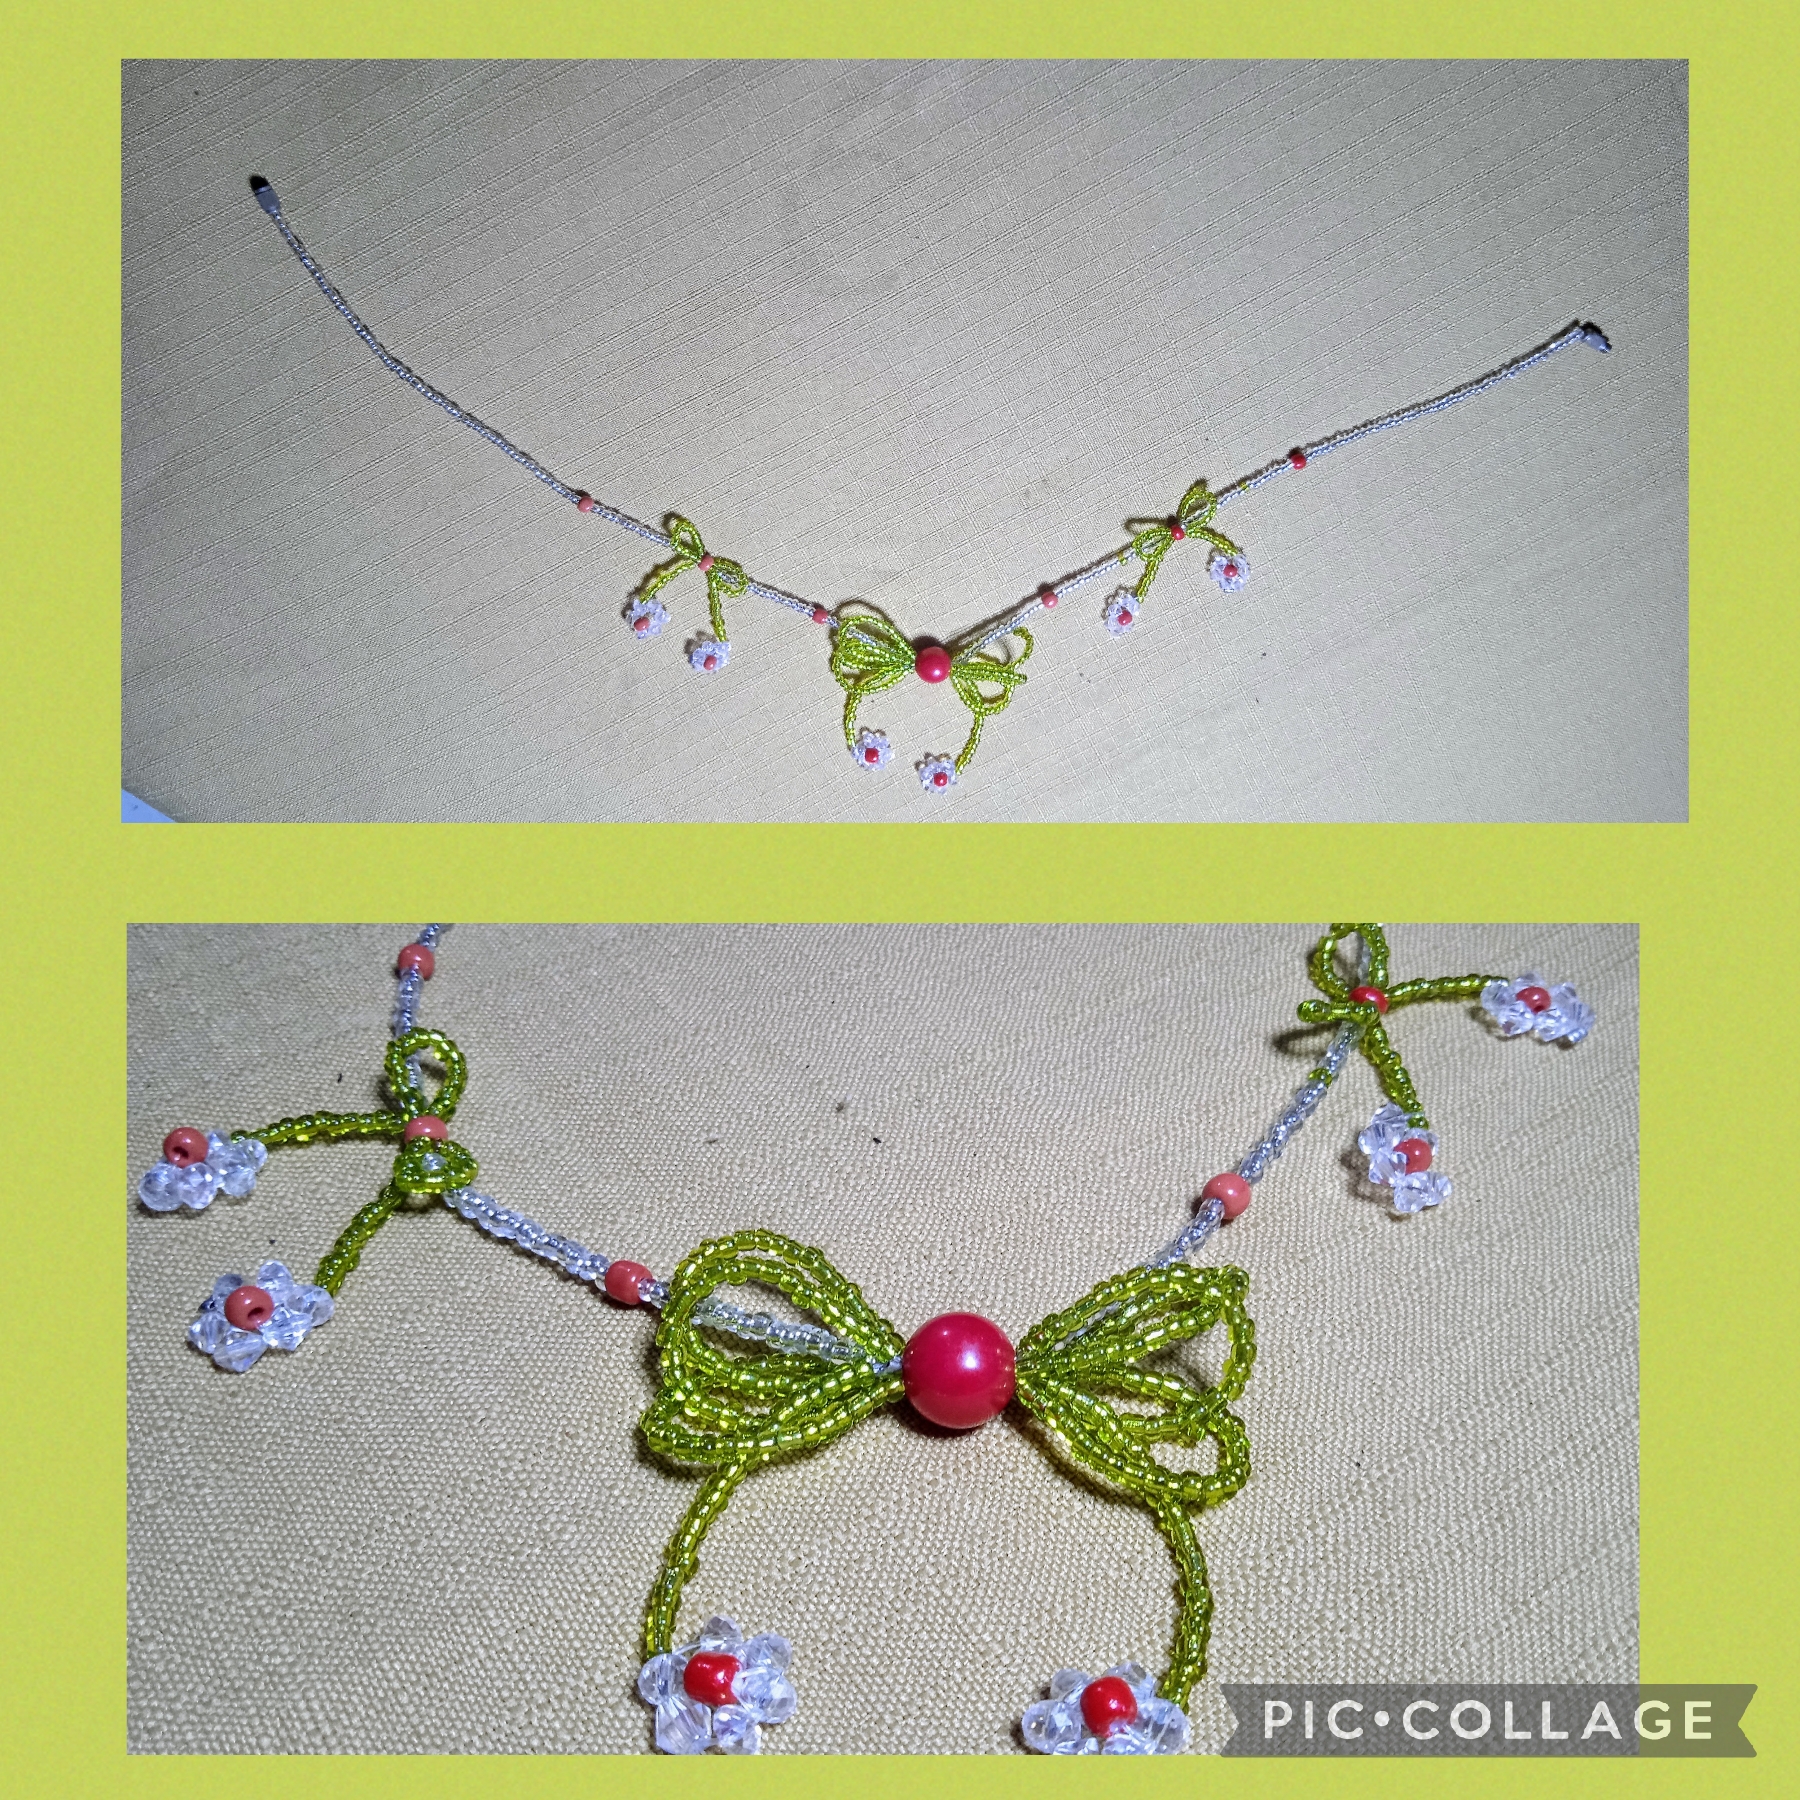
Artistas Creativos de las manualidades y la Joyería, este es el resultado final de mi hermosa creación que realicé en este día un sencillo y juvenil Set de Accesorios con un toque romántico y coqueto para impactar en la moda de ese estilo, espero que les guste, como siempre agradezco mucho por su apoyo y valiosos comentarios. Pasen un estupendo fin de semana, celebren ese día tan especial como es el Día Internacional de la Mujer Trabajadora, un abrazo para todas ellas🌹🥂 y nos vemos en la próxima manualidad, bye , bye
Creative Artists of crafts and Jewelry, this is the final result of my beautiful creation that I made on this day, a simple and youthful Set of Accessories with a romantic and flirtatious touch to impact the fashion of that style, I hope you like it, As always, I am very grateful for your support and valuable comments. Have a great weekend, celebrate that special day that is International Working Women's Day, a hug for all of you🌹🥂 and see you in the next craft, bye, bye
Las imágenes y redacción de este tutorial son de mi propiedad, las fotos fueron tomadas con mi teléfono celular redmi 9 y las edité con una aplicación gratis del mismo.
Para traducir texto use Google traductor.
The images and writing in this tutorial are my property, the photos were taken with my Redmi 9 cell phone and I edited them with a free application.
To translate text use Google translator

Ha quedado bellísimo, me encanta el diseño de lazos que usaste para hacer estos bellos accesorios 👍
Gracias por tu bonito comentario @andreamtovar19 me gustó mucho, que pases feliz noche y muchas felicidades por el Día de la Mujer.🌹
Que lindo quedó, muy buen trabajo ☺️
Saluditos @marile21, agradecida por el buen comentario un abrazo 🤗
Muy lindo querida amiga...mis colores favoritos. Gracias por compartir
Son los colores de la esperanza, el corazón ❤️ el amor la pasión mi querida @katiuskamata, gracias por visitarme, Feliz Día de la Mujer🌹
aha great work, thanks for sharing. keep up the good work.
Grateful as always, hive for the good support of my content.
aha that looks beautiful thanks for sharing. have a great day and week.
!giphy wow
@sagarkothari88 vote
!PIZZA
!DHEDGE
Thank you very much for visiting me and expressing such a flattering comment.
Me encanta esta tendencia. Es delicada y sutil. Además me gusta que hayas usado el color verde, es mi favorito.
Todos los acabados son muy limpios y prolijos. Un excelente trabajo.
Feliz Día de la Mujer amiga, como siempre agradezco mucho tu visita y tu especial comentario.🌹
$PIZZA slices delivered:
@bhattg(8/10) tipped @nhaydu
Thanks @bhattg.
Hermosos feliz día.