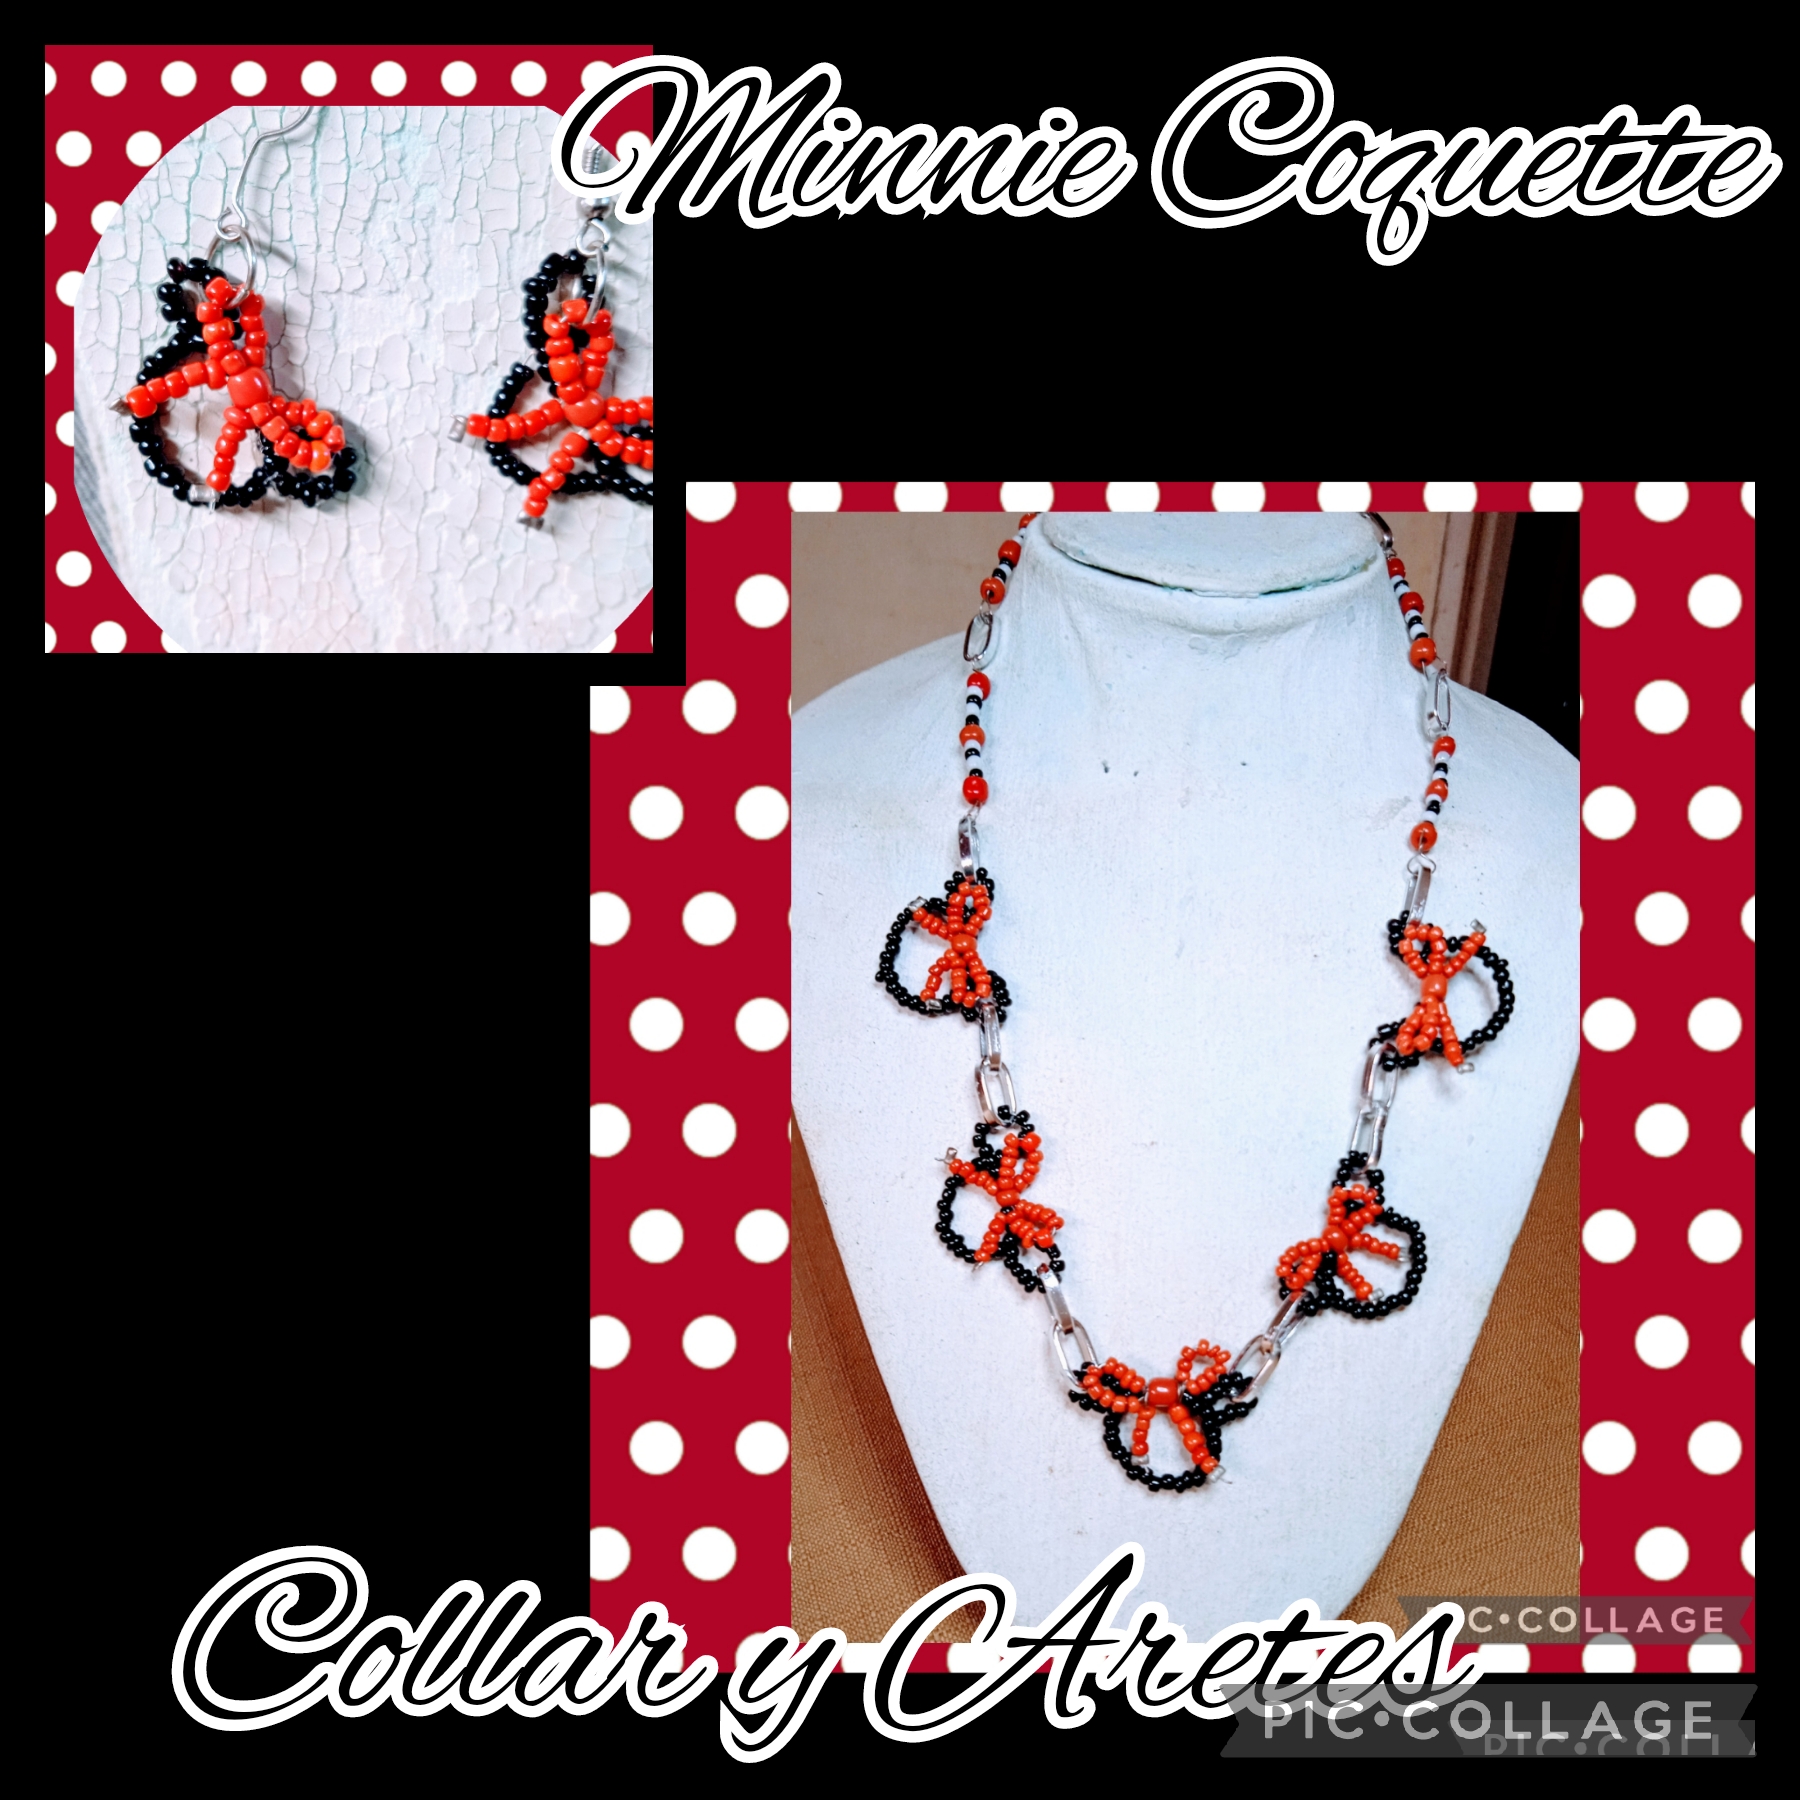
This is how I made this beautiful Minnie Coquette themed jewelry set.//[Esp-Eng]
Saluditos Artistas Creativos de las manualidades y la Joyería; reciban mis deseos de sanidad y felicidad para todos reunidos en unión familiar; hoy es veintinueve de febrero fin de mes y casi fin de semana como cada cuatro años celebramos un año de trescientos sesenta y seis días que denominamos bisiesto y que tiene como particularidad hacer resaltar la diferencia que existe en el calendario por el desfase entre el año trópico y el año calendario de trescientos sesenta y cinco dias. Esta creación se realiza cada cuatro años para coincidir las fechas cronológicas con las astronomicas como lo es este año 2024 dónde febrero tiene veintinueve días.
Y pasamos de la clase de calendario a la clase que más me entusiasma: el Arte las manualidades, y la joyería. Como les comenté en mi manualidad anterior, estoy dedicada a la moda romántica e infantil de los lazos mis últimas creaciones han sido dedicada a la población juvenil, en este caso mi sobrina de diez años me pidió un set de accesorios con motivo de Minnie y Yo, para no perderme la oportunidad de seguir coqueteando le realicé estos graciosos Aretitos y Collar con los que pienso sorprenderla el sábado que es su cumpleaños.
Para que se enteren de como los hice sigan leyendo el paso a paso de su elaboración.
Greetings Creative Artists of crafts and Jewelry; Receive my wishes of health and happiness for all gathered together in family union; Today is the twenty-ninth of February, the end of the month and almost the weekend, like every four years we celebrate a year of three hundred and sixty-six days that we call leap year and whose peculiarity is to highlight the difference that exists in the calendar due to the gap between the tropical year and the calendar year of three hundred and sixty-five days. This creation is carried out every four years to coincide the chronological dates with the astronomical dates, such as this year 2024, where February has twenty-nine days.
And we went from the calendar class to the class that excites me the most: Art, crafts, and jewelry. As I mentioned in my previous craft, I am dedicated to the romantic and children's fashion of bows. My latest creations have been dedicated to the youth population. In this case, my ten-year-old niece asked me for a set of accessories on the occasion of Minnie and Me. So as not to miss the opportunity to continue flirting, I made her these funny Earrings and Necklace with which I plan to surprise her on Saturday, which is her birthday.
So that you can find out how I made them, continue reading the step by step of their preparation.
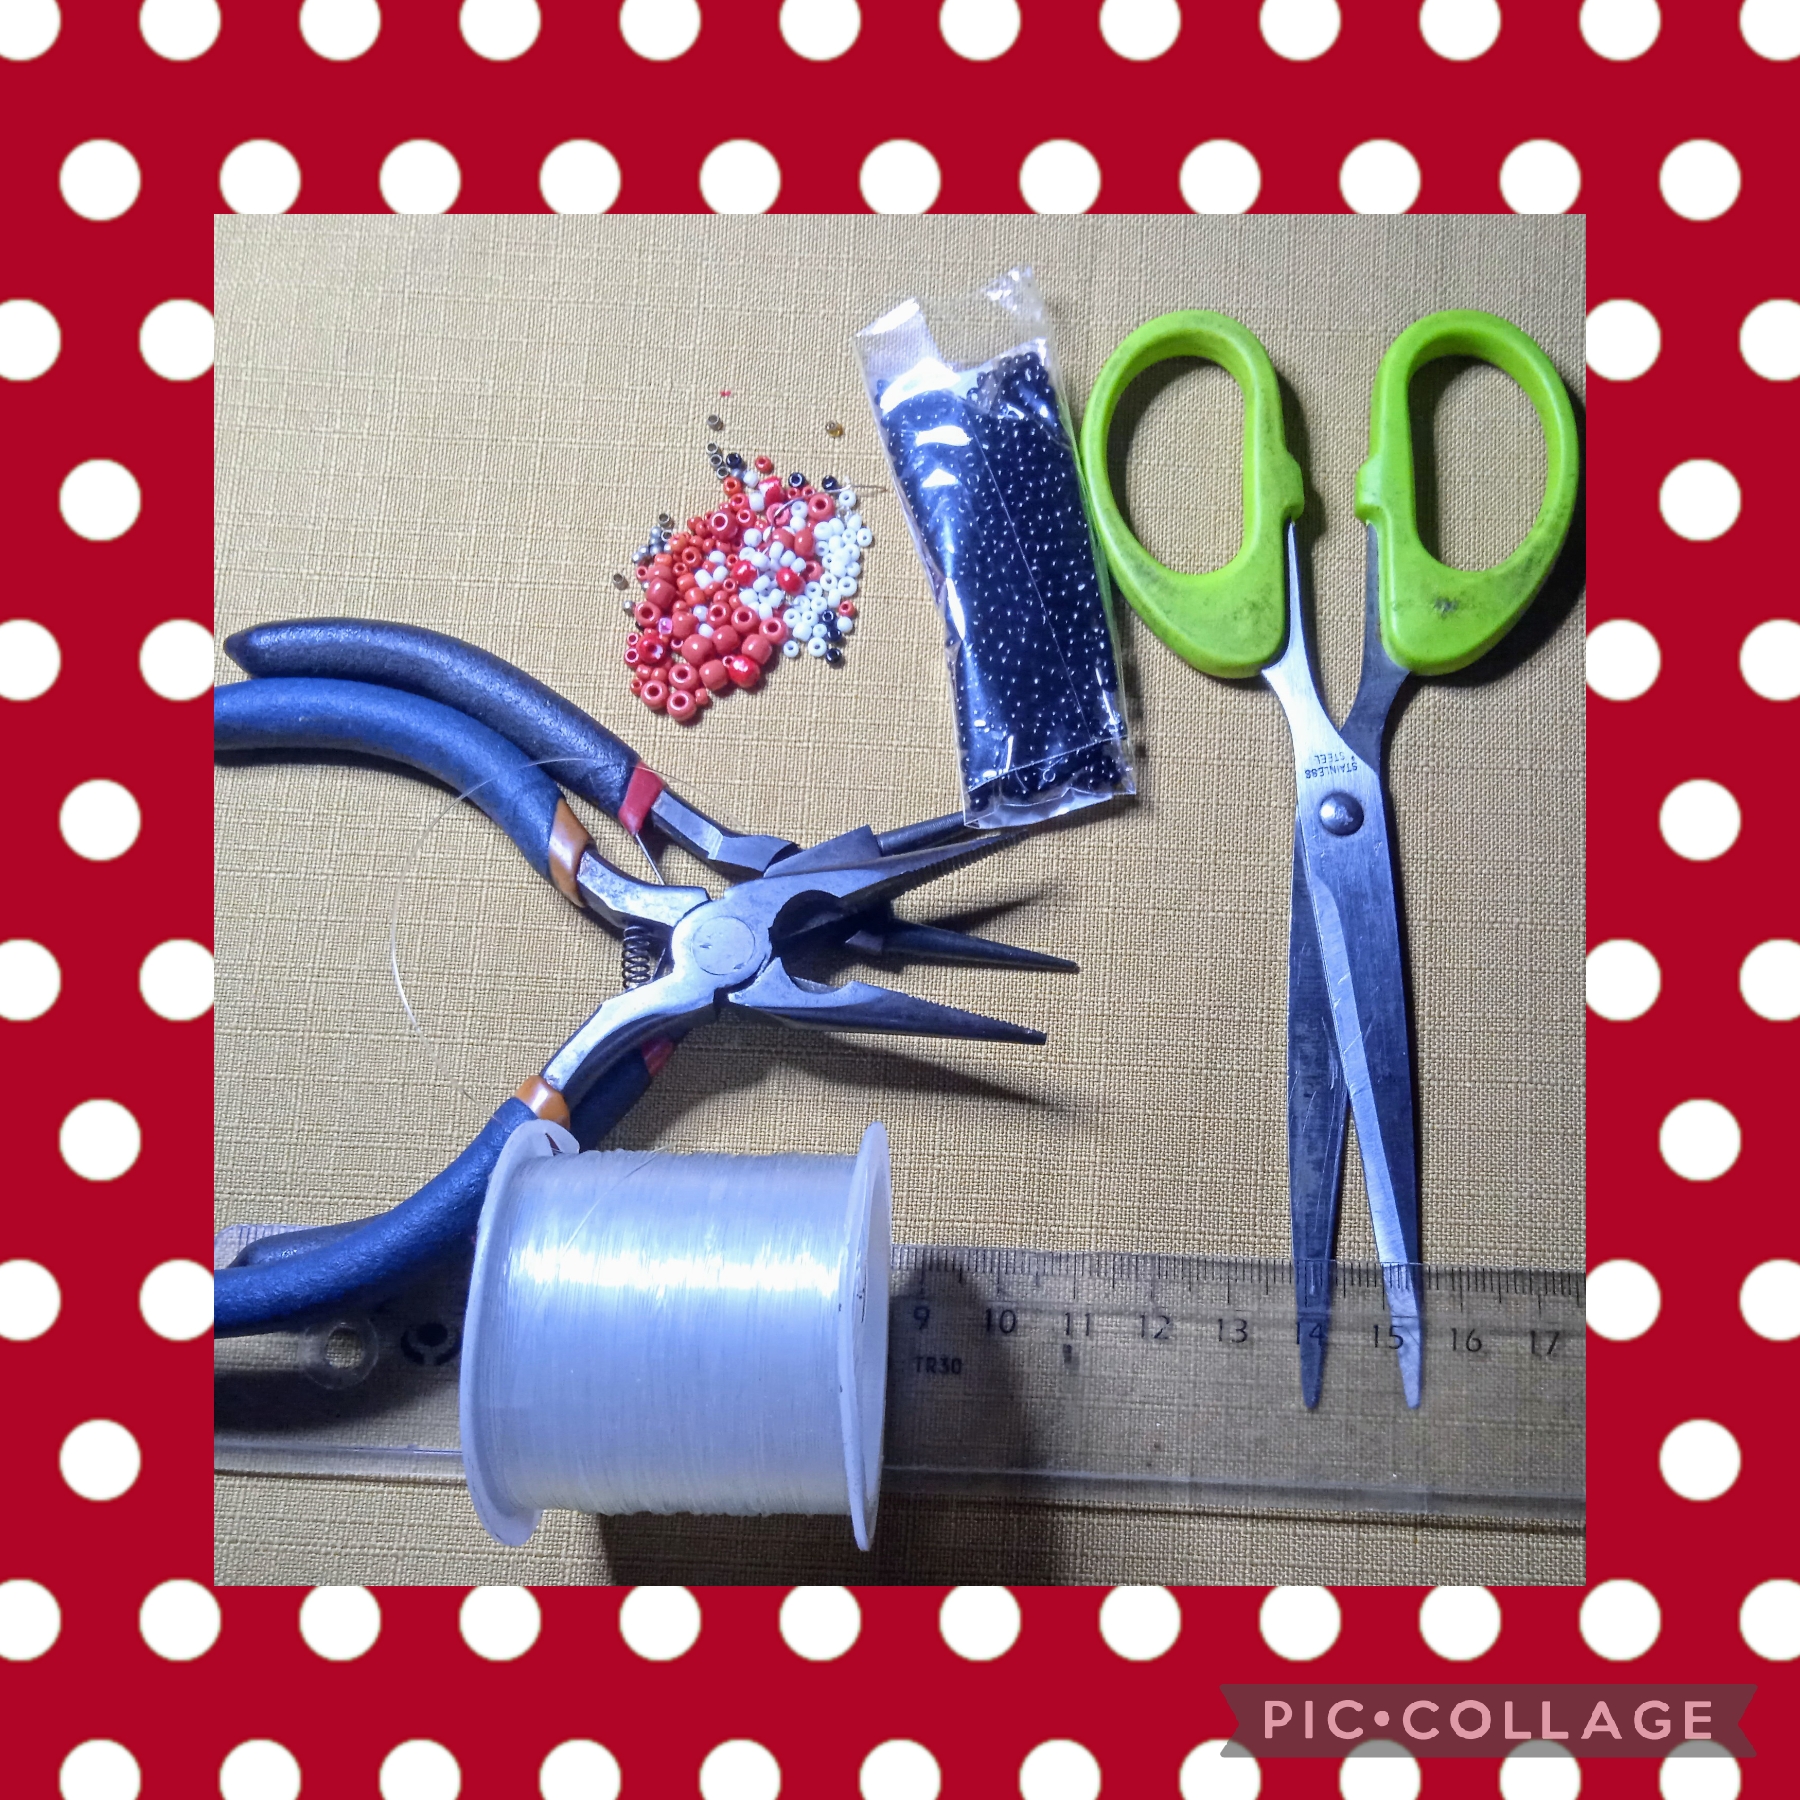
MATERIALES USADOS EN LA ELABORACIÓN DE ESTOS COQUETOS ACCESORIOS:
✓ Mostacillas rojas.
✓ Mostacillas negras.
✓ Mostacillas blancas.
✓ Mostacillones color rojo.
✓ Hilo de naylon.
✓ Argollas.
✓ Alambre calibre 26 "
✓ Pinza punta redonda.
✓ Tijeras.
✓ Regla.
✓ Anzuelo para Aretes.
✓ Pinza de corte.
MATERIALS USED IN THE PREPARATION OF THESE CUTE ACCESSORIES:
✓ Red beads.
✓ Black beads.
✓ White beads.
✓ Red mostacillons.
✓ Nylon thread.
✓ Rings.
✓ 26" gauge wire
✓ Round tip tweezers.
✓ Scissors.
✓ Rule.
✓ Hook for Earrings.
✓ Cutting clamp.
CON ESTOS SENCILLOS PASOS ELABORÉ ESTÁ HERMOSA CREACIÓN.
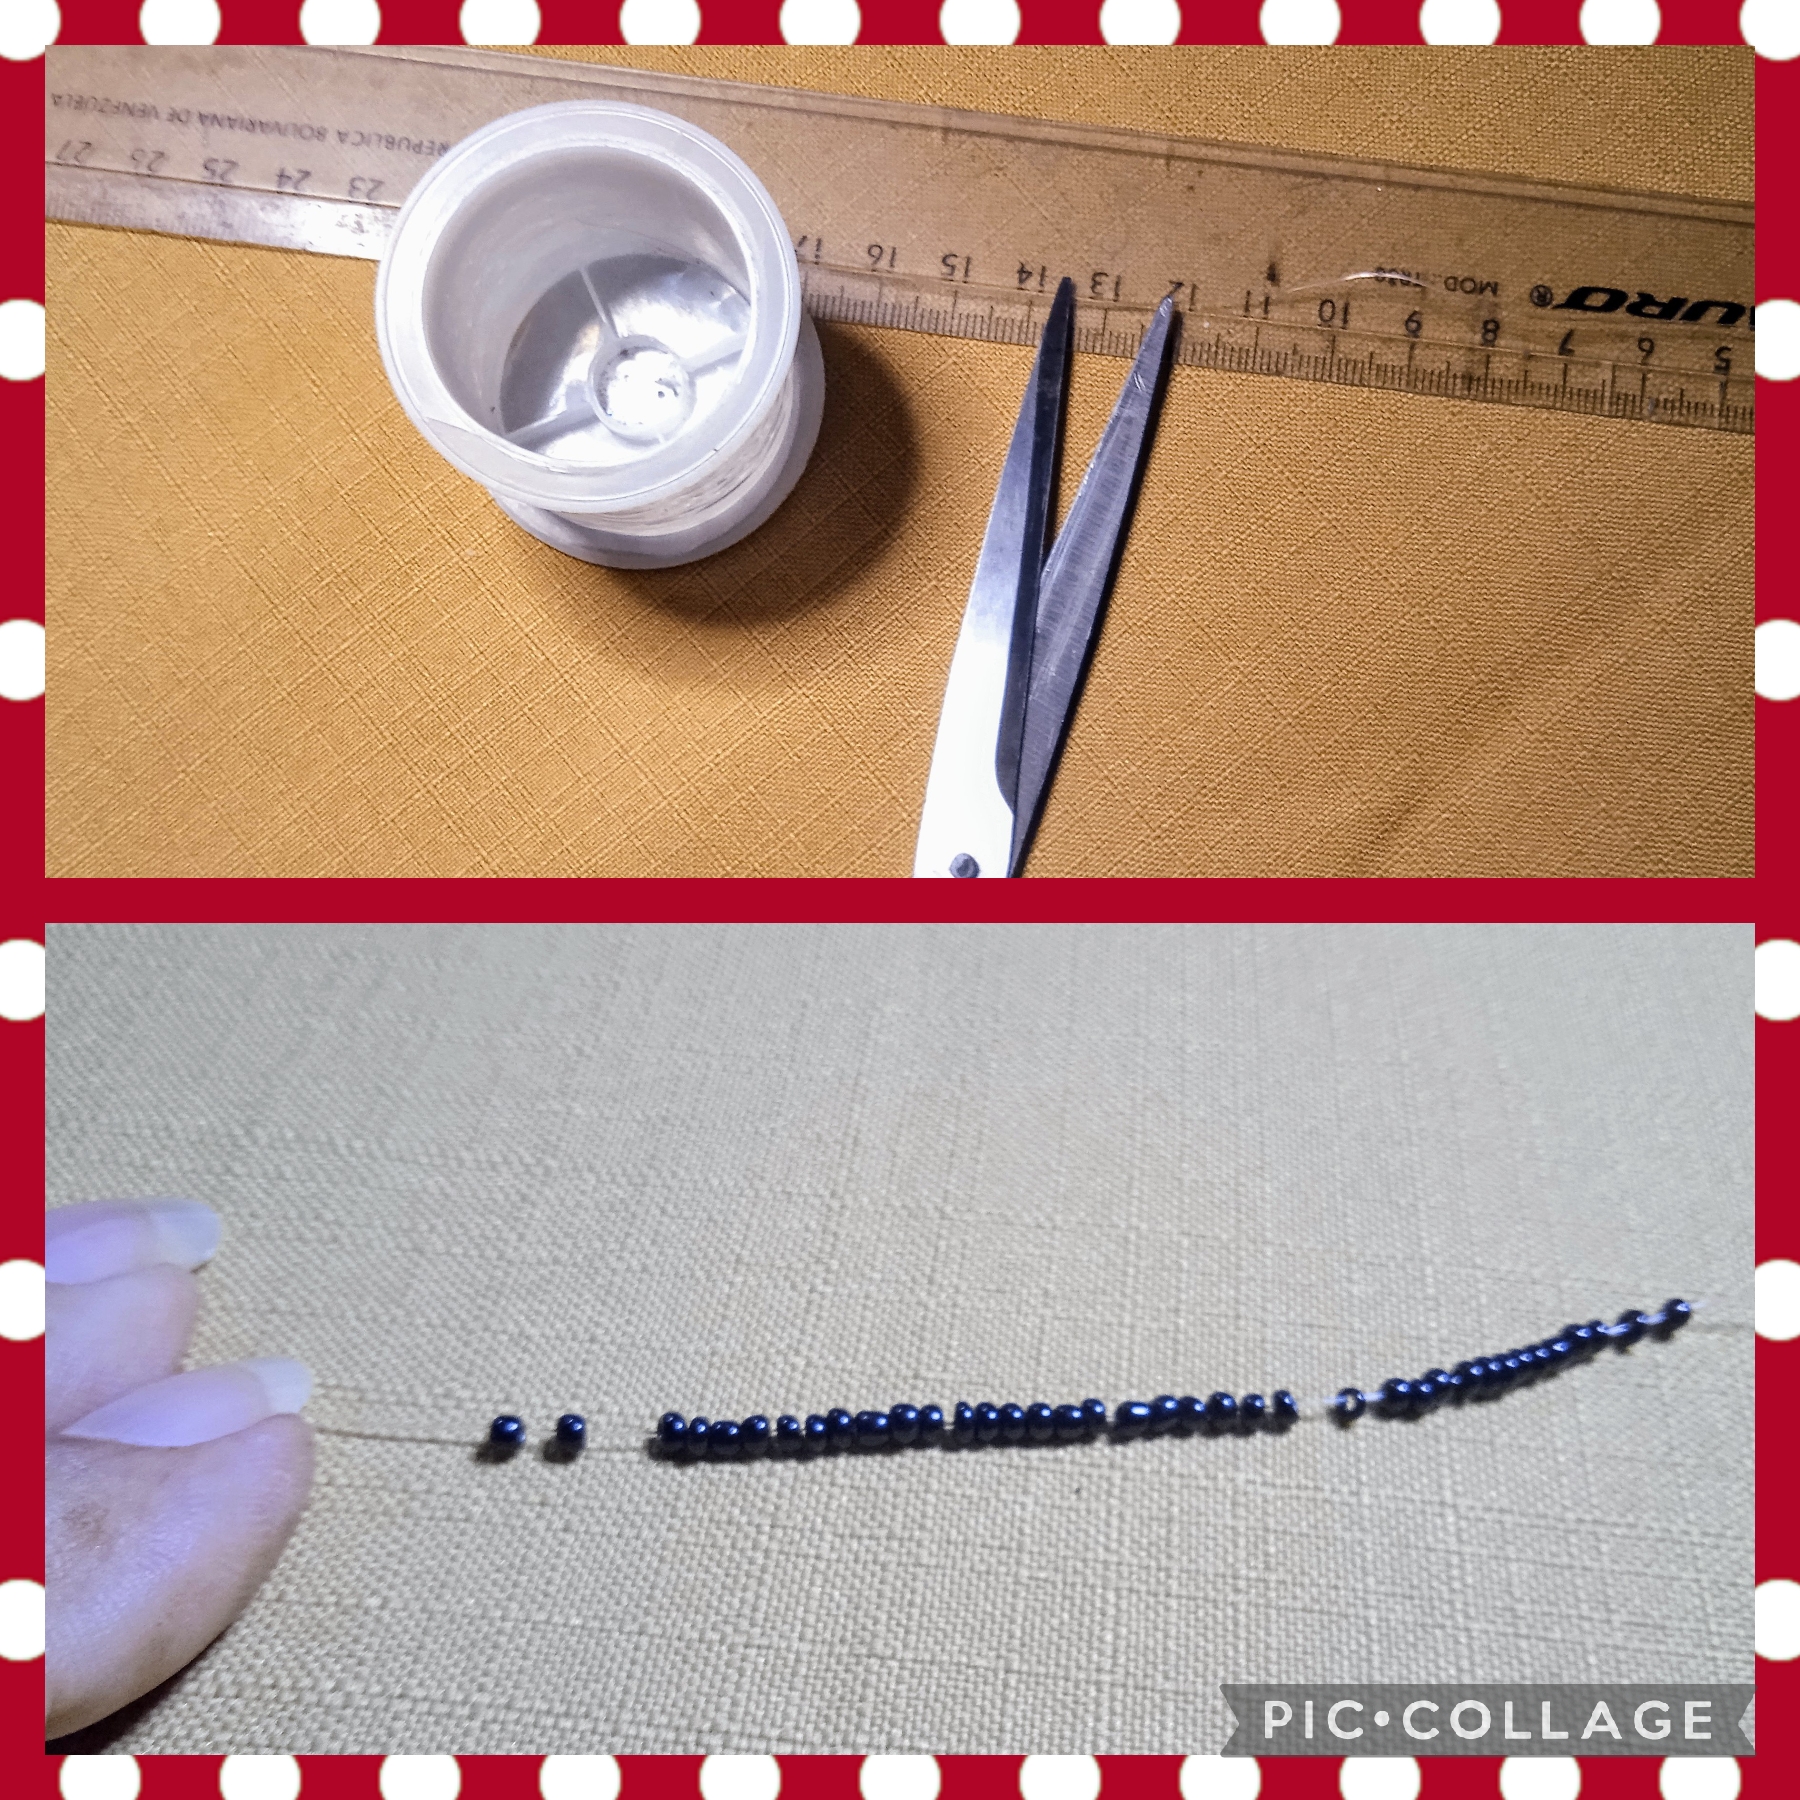
PRIMER PASO:
Para comenzar, usando la regla mido veinte centímetros del hilo de naylon y corto con las tijeras, como muestra la imagen.
Ahora inserto por una punta cuarenta mostacillas negras, una vez qué las tengo todas insertadas separó diez de un extremo y con el mismo hilo de naylon hago un anillo, pasándolo por la última mostacilla de lado inverso halo el hilo y dejo un excedente de ocho centímetros; hago igual procedimiento del otro lado y formo un anillo en cada punta como se ve en el proceso, ahora en el hilo de cada lado inserto dos mostacillas negras luego un mostacillón rojo en una de las puntas que cruzo con el hilo del lado contrario y así va quedando.
✓WITH THESE SIMPLE STEPS I PREPARED THIS BEAUTIFUL CREATION.
FIRST STEP:
To begin, using the ruler I measure twenty centimeters of the nylon thread and cut with the scissors, as shown in the image.
Now I insert forty black beads through one tip, once I have them all inserted, I separate ten from one end and with the same nylon thread I make a ring, passing it through the last bead on the opposite side, I pull the thread and leave an excess of eight centimeters ; I do the same procedure on the other side and form a ring on each end as seen in the process, now in the thread on each side I insert two black beads then a red bead on one of the ends that I cross with the thread on the opposite side and so on. is staying

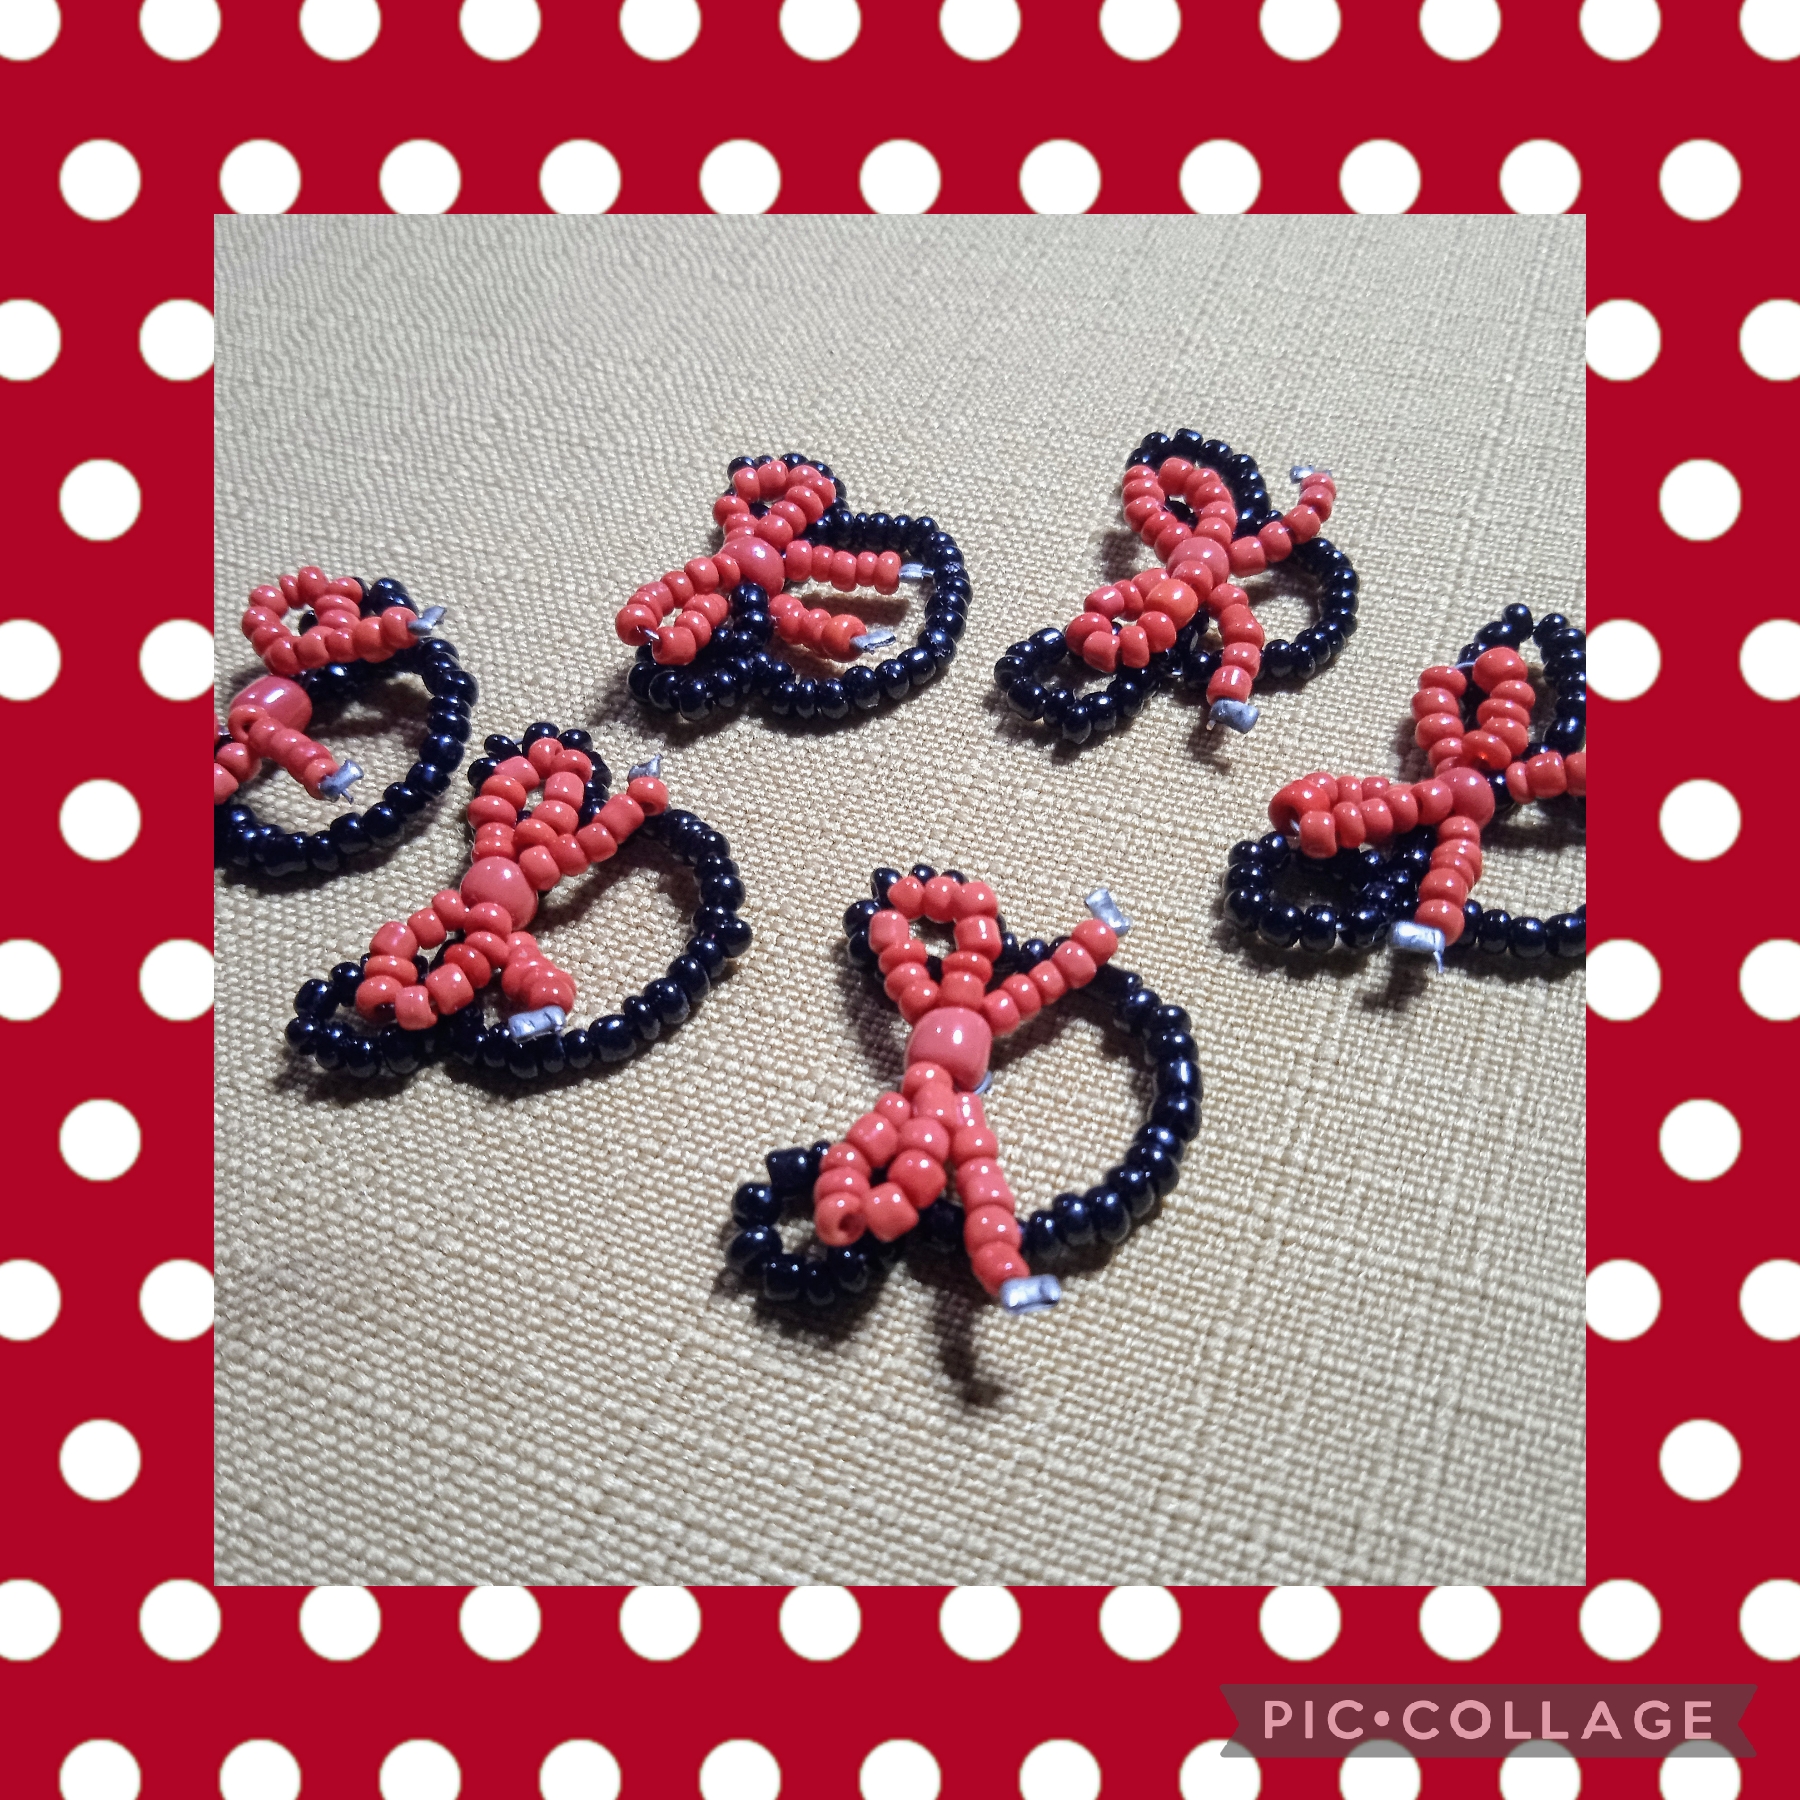
SEGUNDO PASO:
Ahora ocupo diez mostacillas rojas que inserto en uno de los hilos de naylon, de nuevo introduzco el hilo dónde están las mostacillas rojas por el mostacillón rojo, halo la punta y ahora inserto cinco mostacillas rojas aseguro con una grapa y he formado la mitad del 🎀 hago lo mismo del otro lado y así queda como se ve en la imagen.
SECOND STEP:
Now I use ten red beads that I insert into one of the nylon threads, again I introduce the thread where the red beads are through the red bead, I pull the tip and now I insert five red beads I secure with a staple and I have formed half of the 🎀 I do the same on the other side and this is how it looks
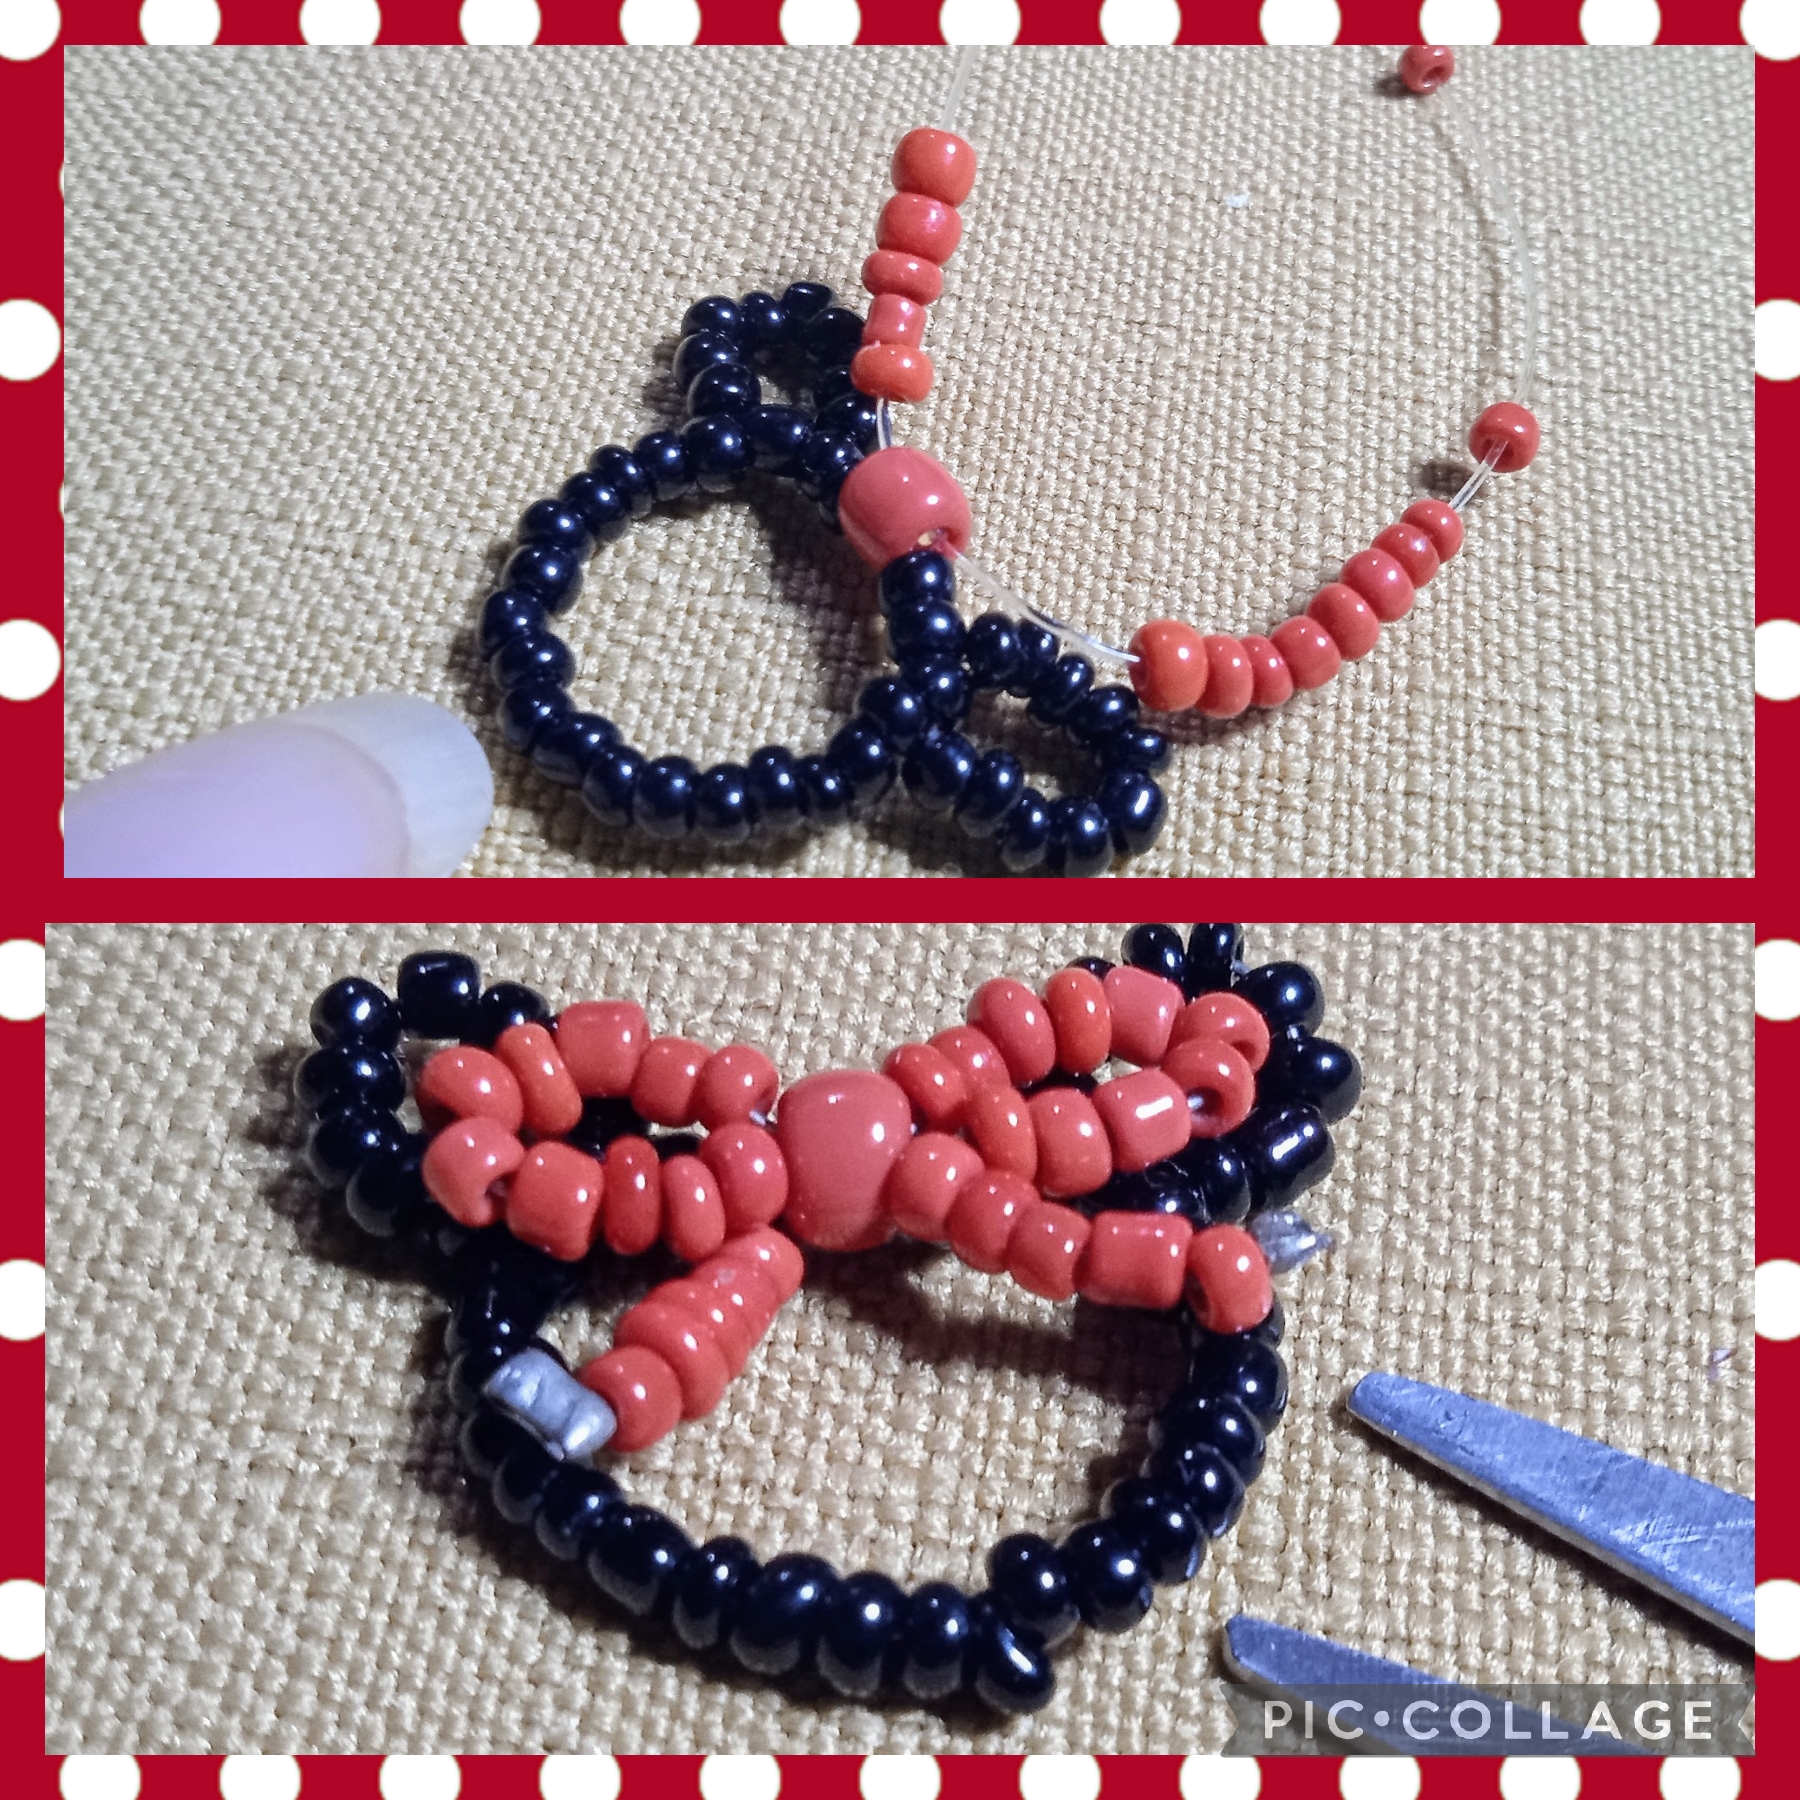
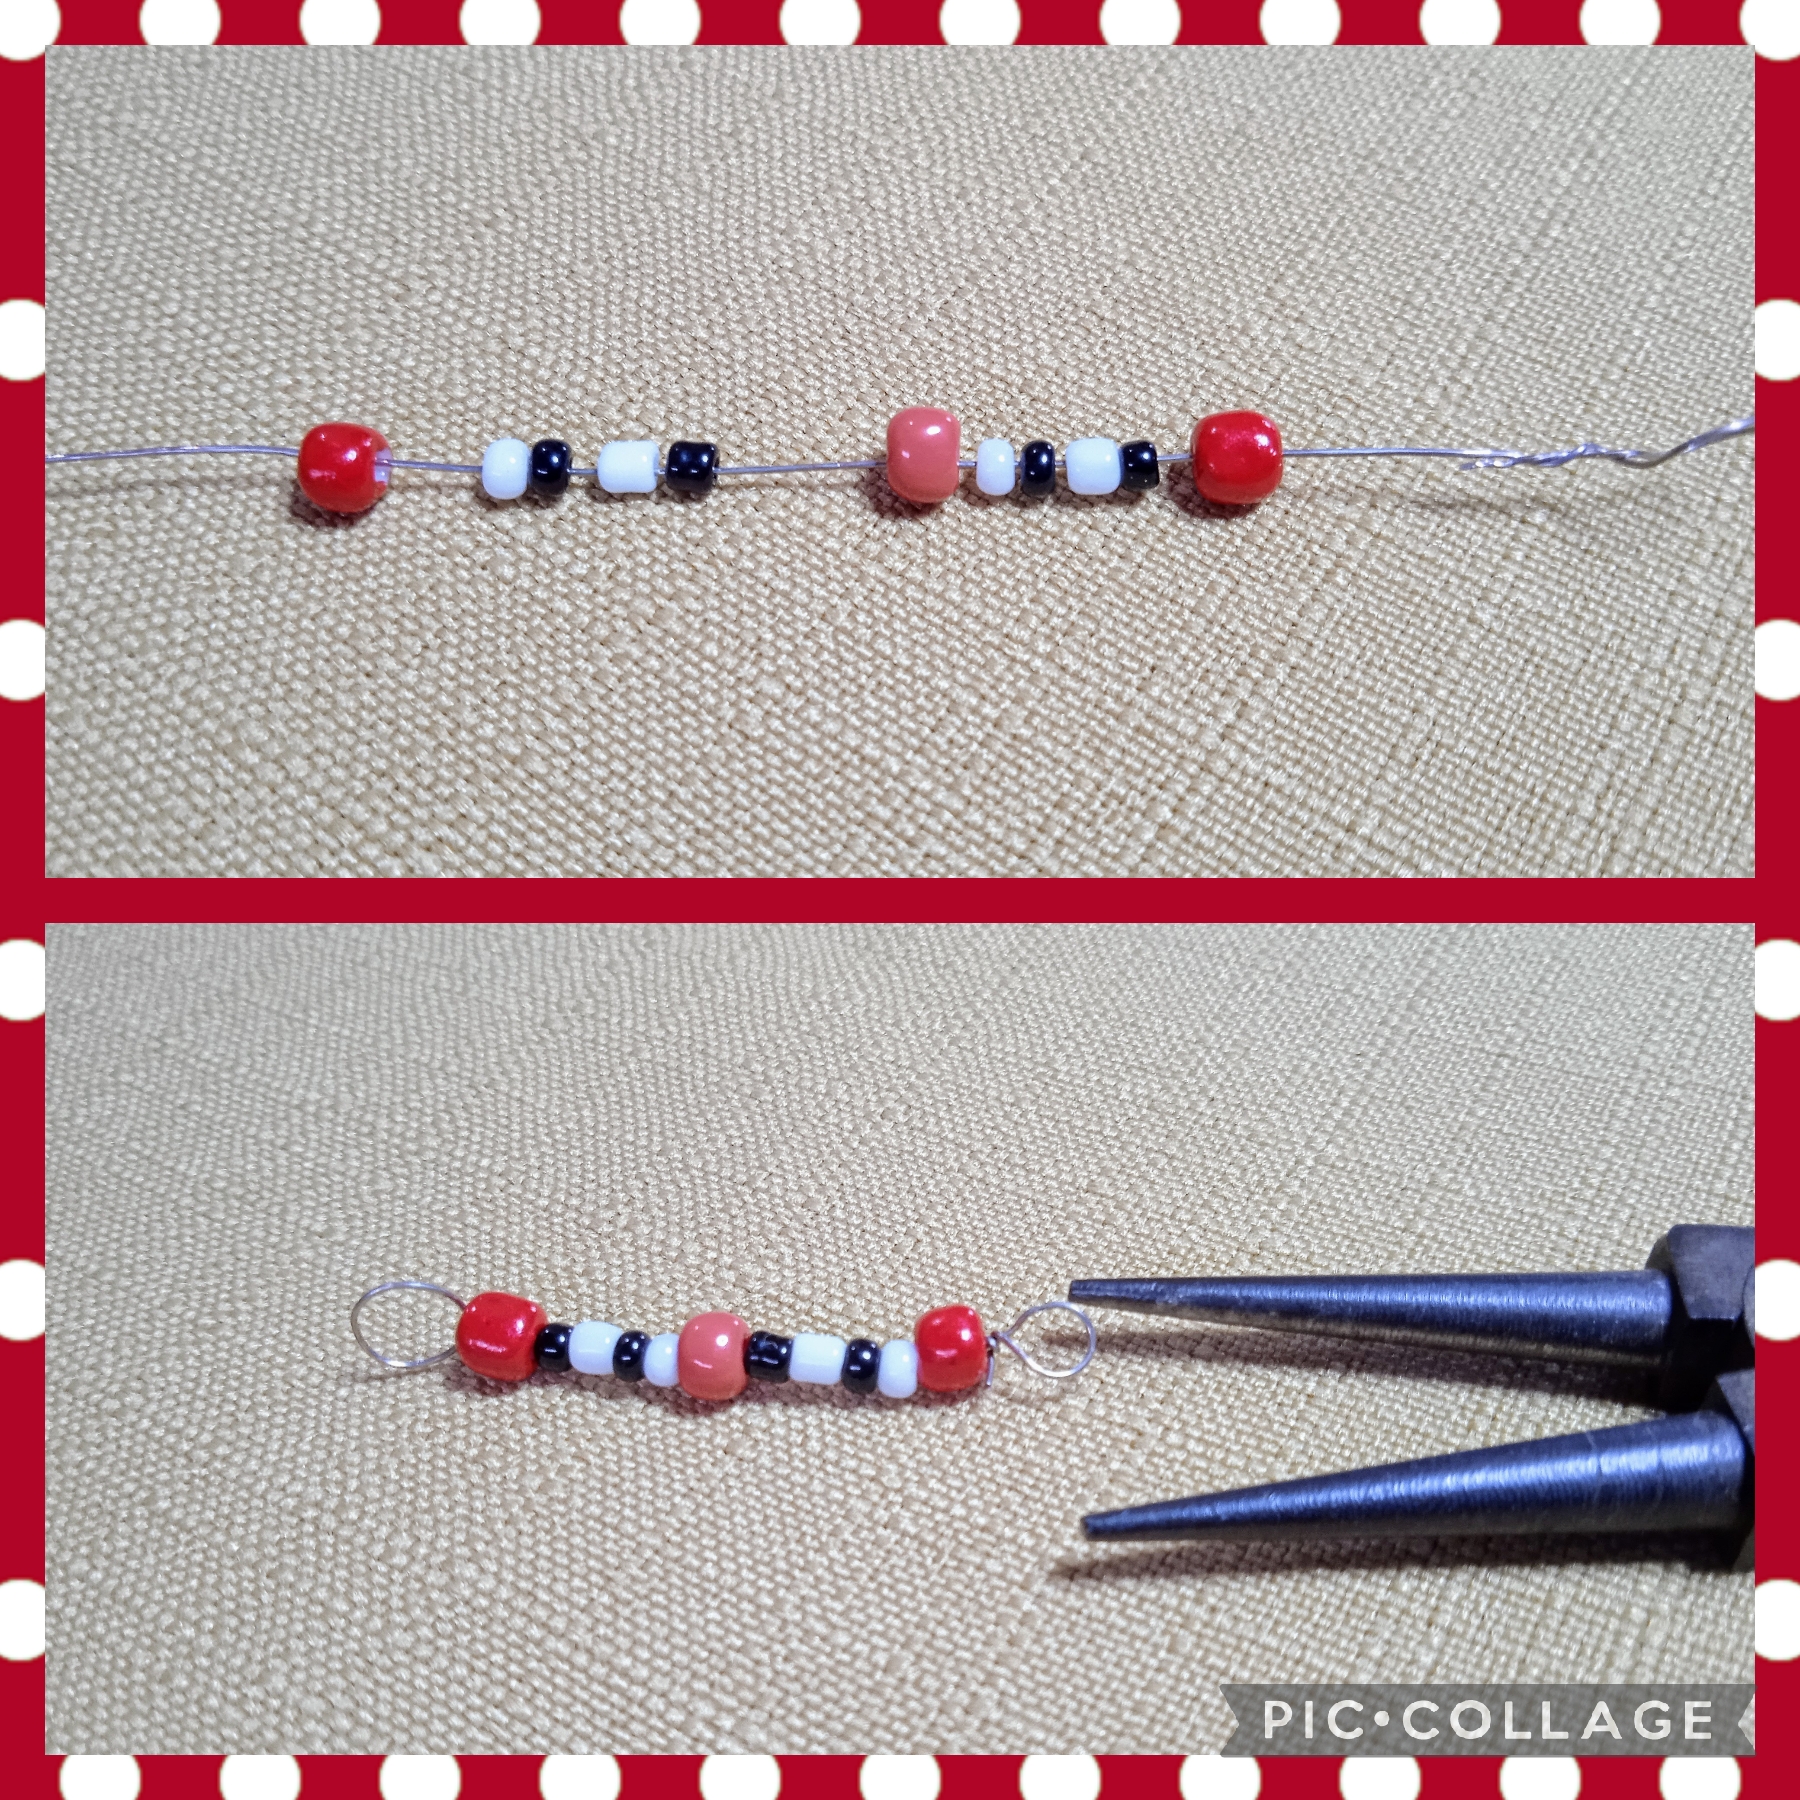
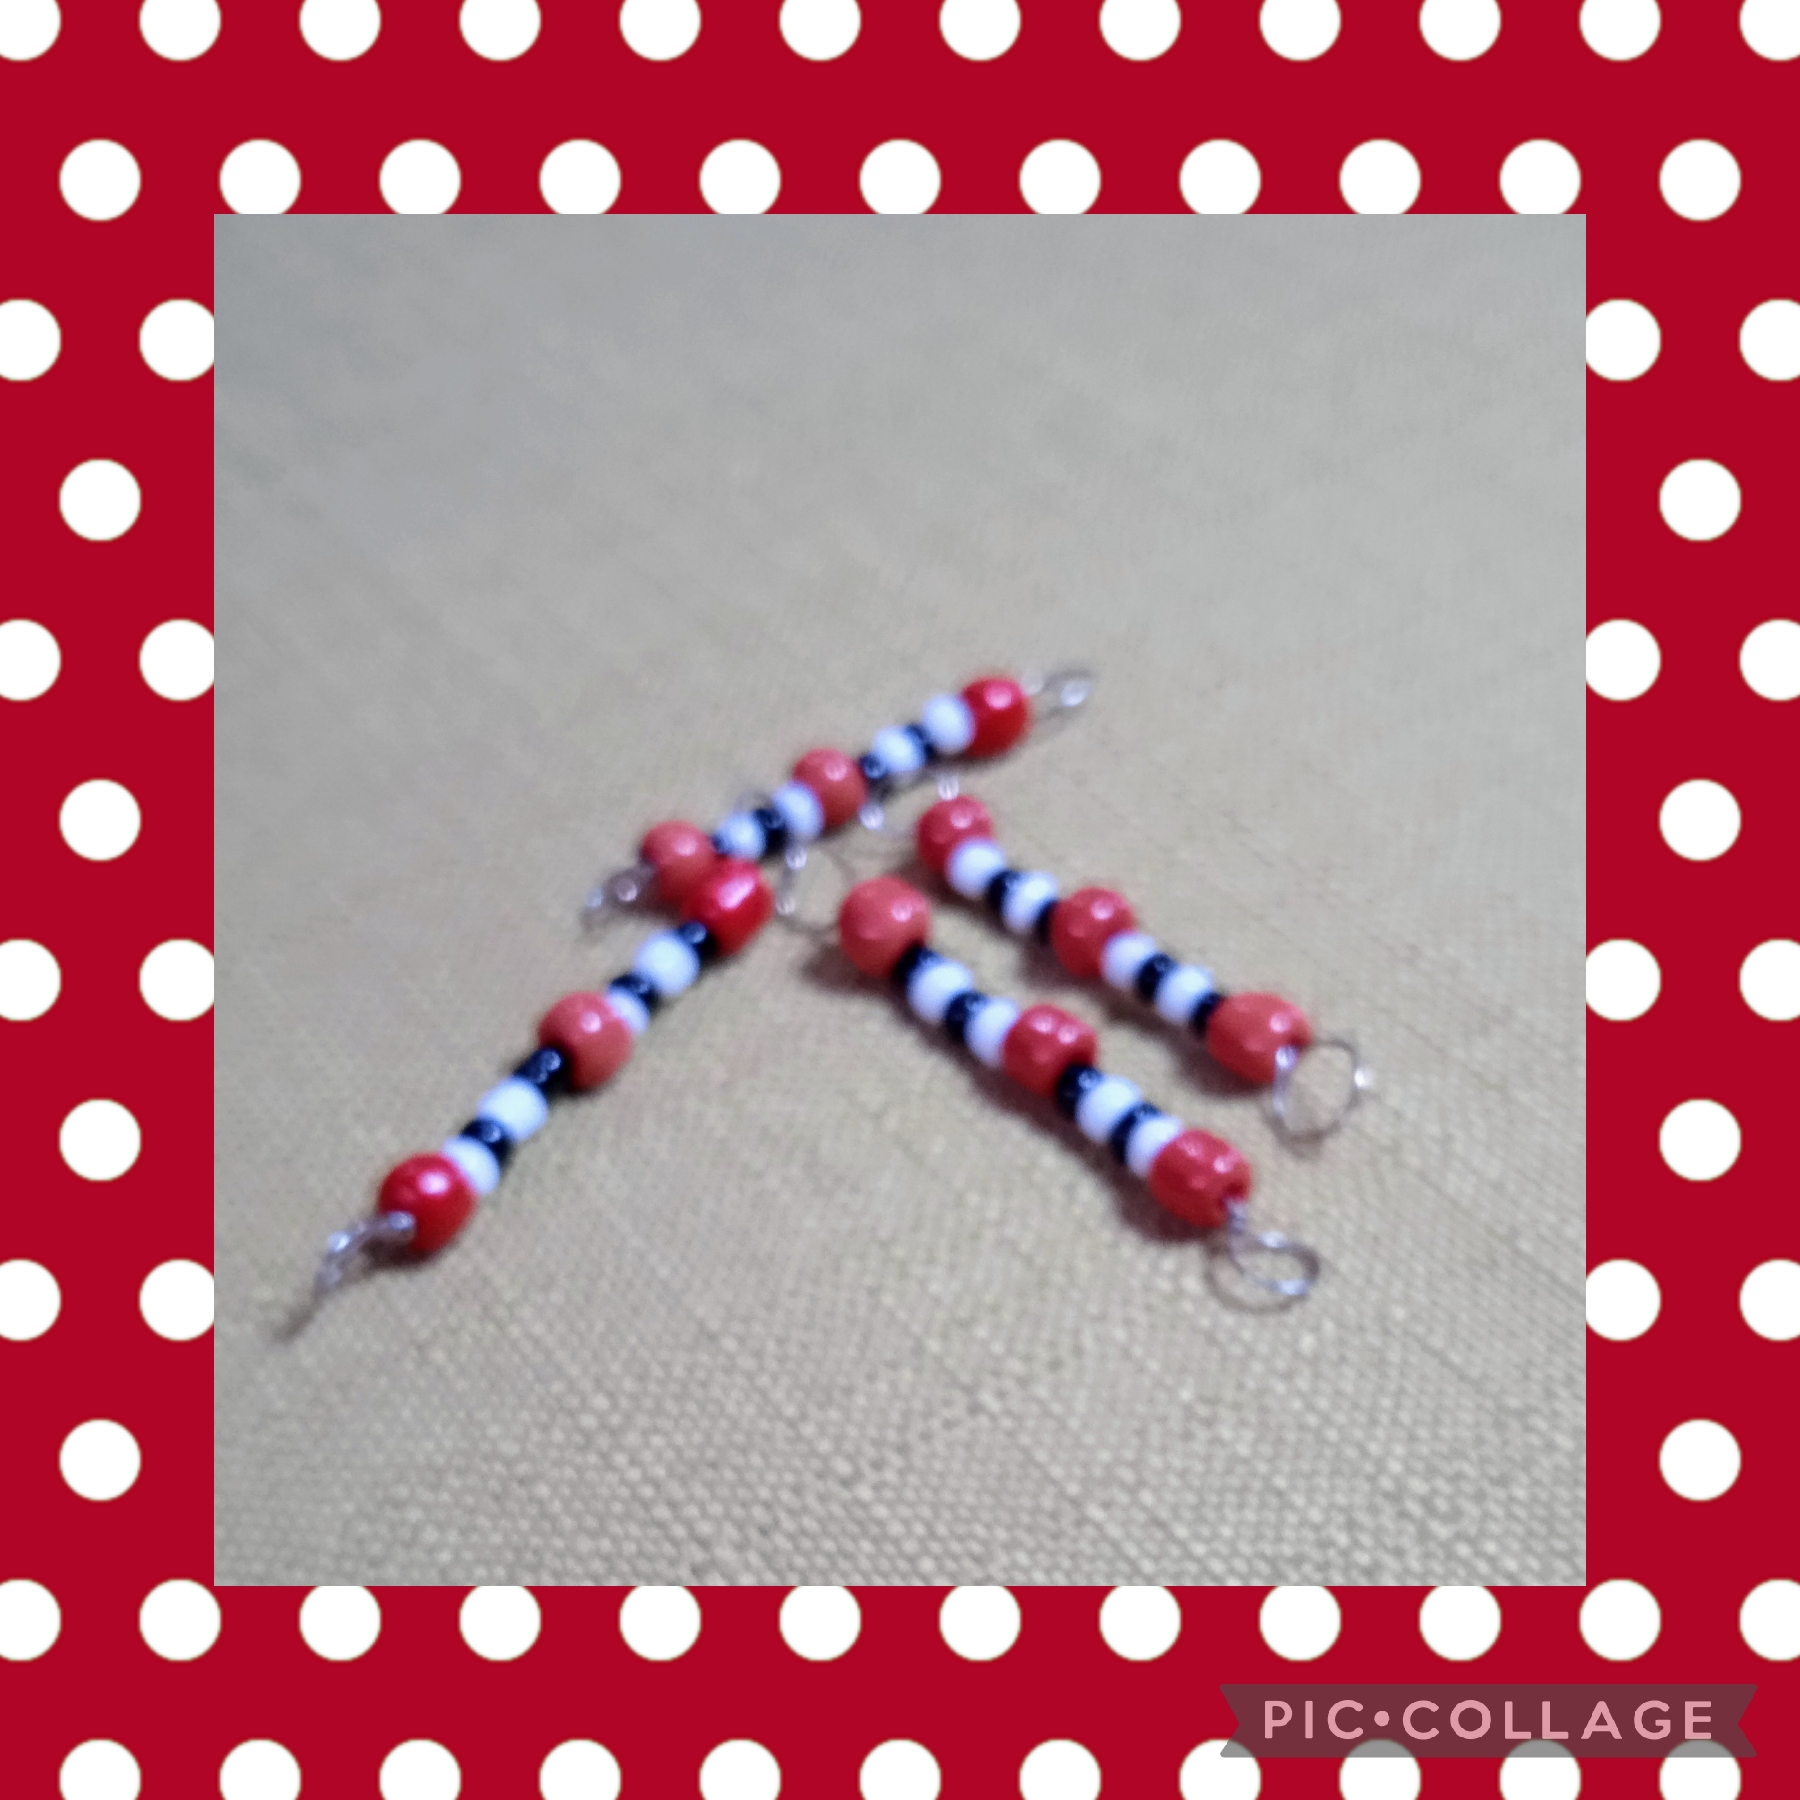
TERCER PASO:
En este paso realizo seis separadores con los que formaré la cuerda del collar, lo hago así, corto seis medidas iguales de alambre calibre 26 " de cuatro centímetros; usando la pinza punta redonda hago una pequeña argolla en la punta ahora inserto un mostacillón rojo, luego una mostacilla negra, una mostacilla blanca, una mostacilla negra, una mostacilla blanca un mostacillón rojo una mostacilla negra, una blanca, una negra un mostacillón rojo, finalizó usando la pinza punta redonda para hacer otra argolla y así realizo los seis separadores ,
THIRD STEP:
In this step I make six separators with which I will form the rope of the necklace, I do it like this, I cut six equal measures of 26 "gauge wire of four centimeters; using the round tip pliers I make a small ring at the tip, now I insert a red bead, then a black bead, a white bead, a black bead, a white bead, a red bead, a black bead, a white one, a black bead, a red bead, he finished using the round tip pliers to make another ring and thus he made the six separators,
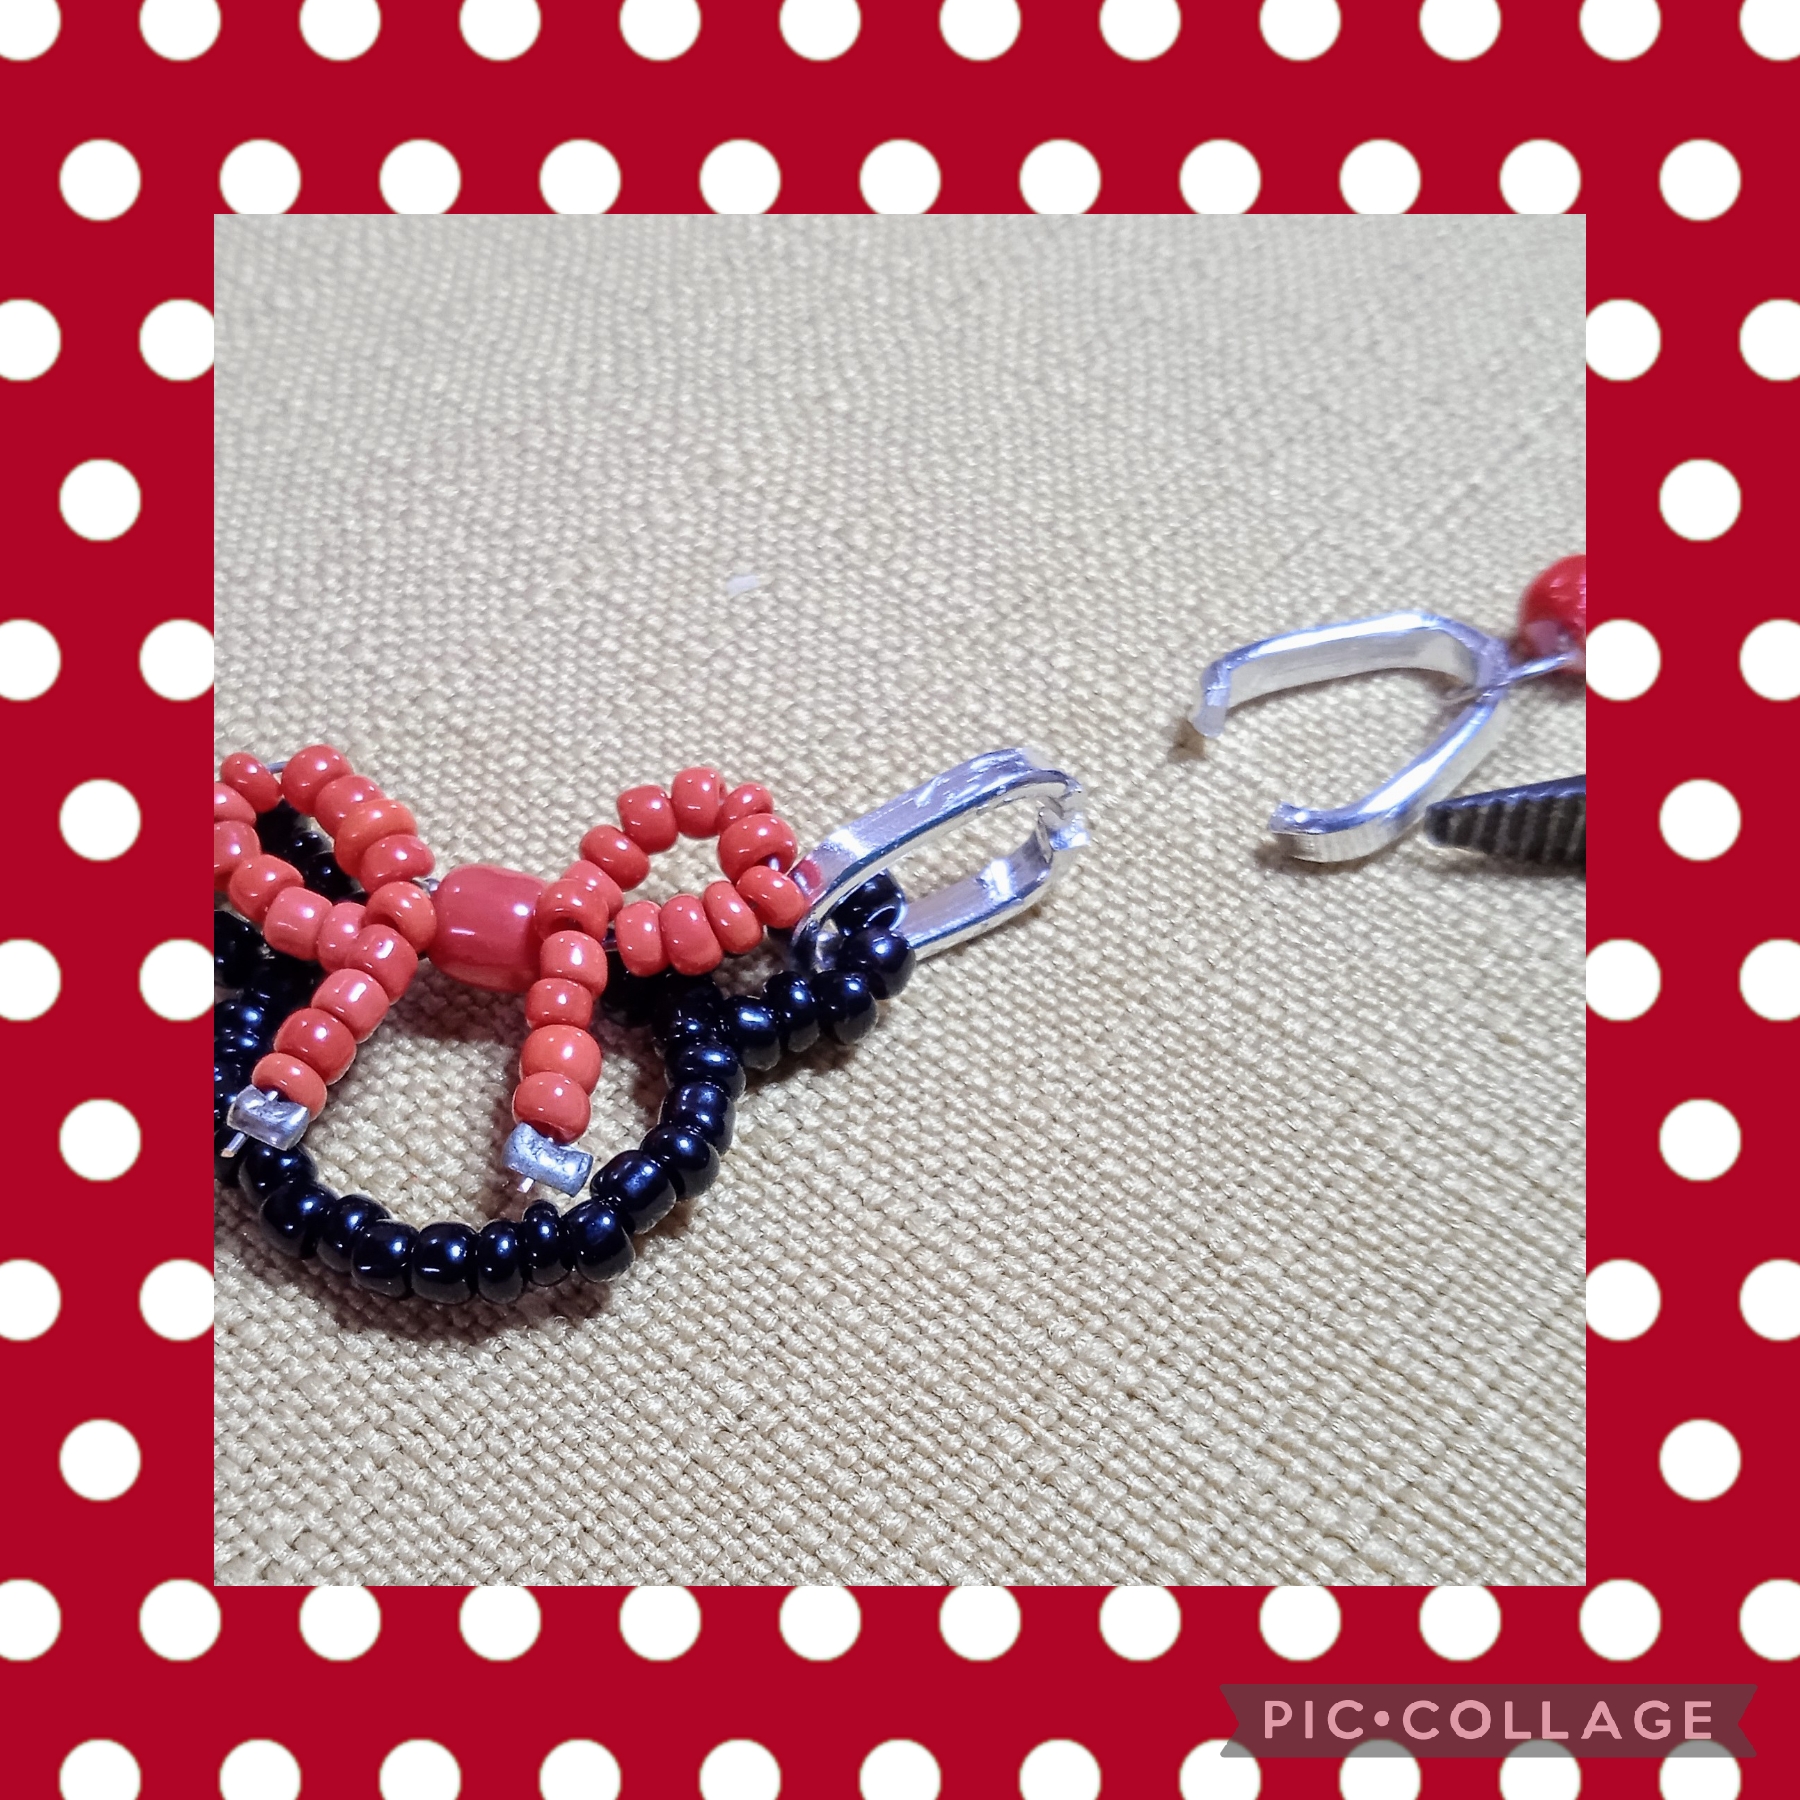
CUARTO PASO:
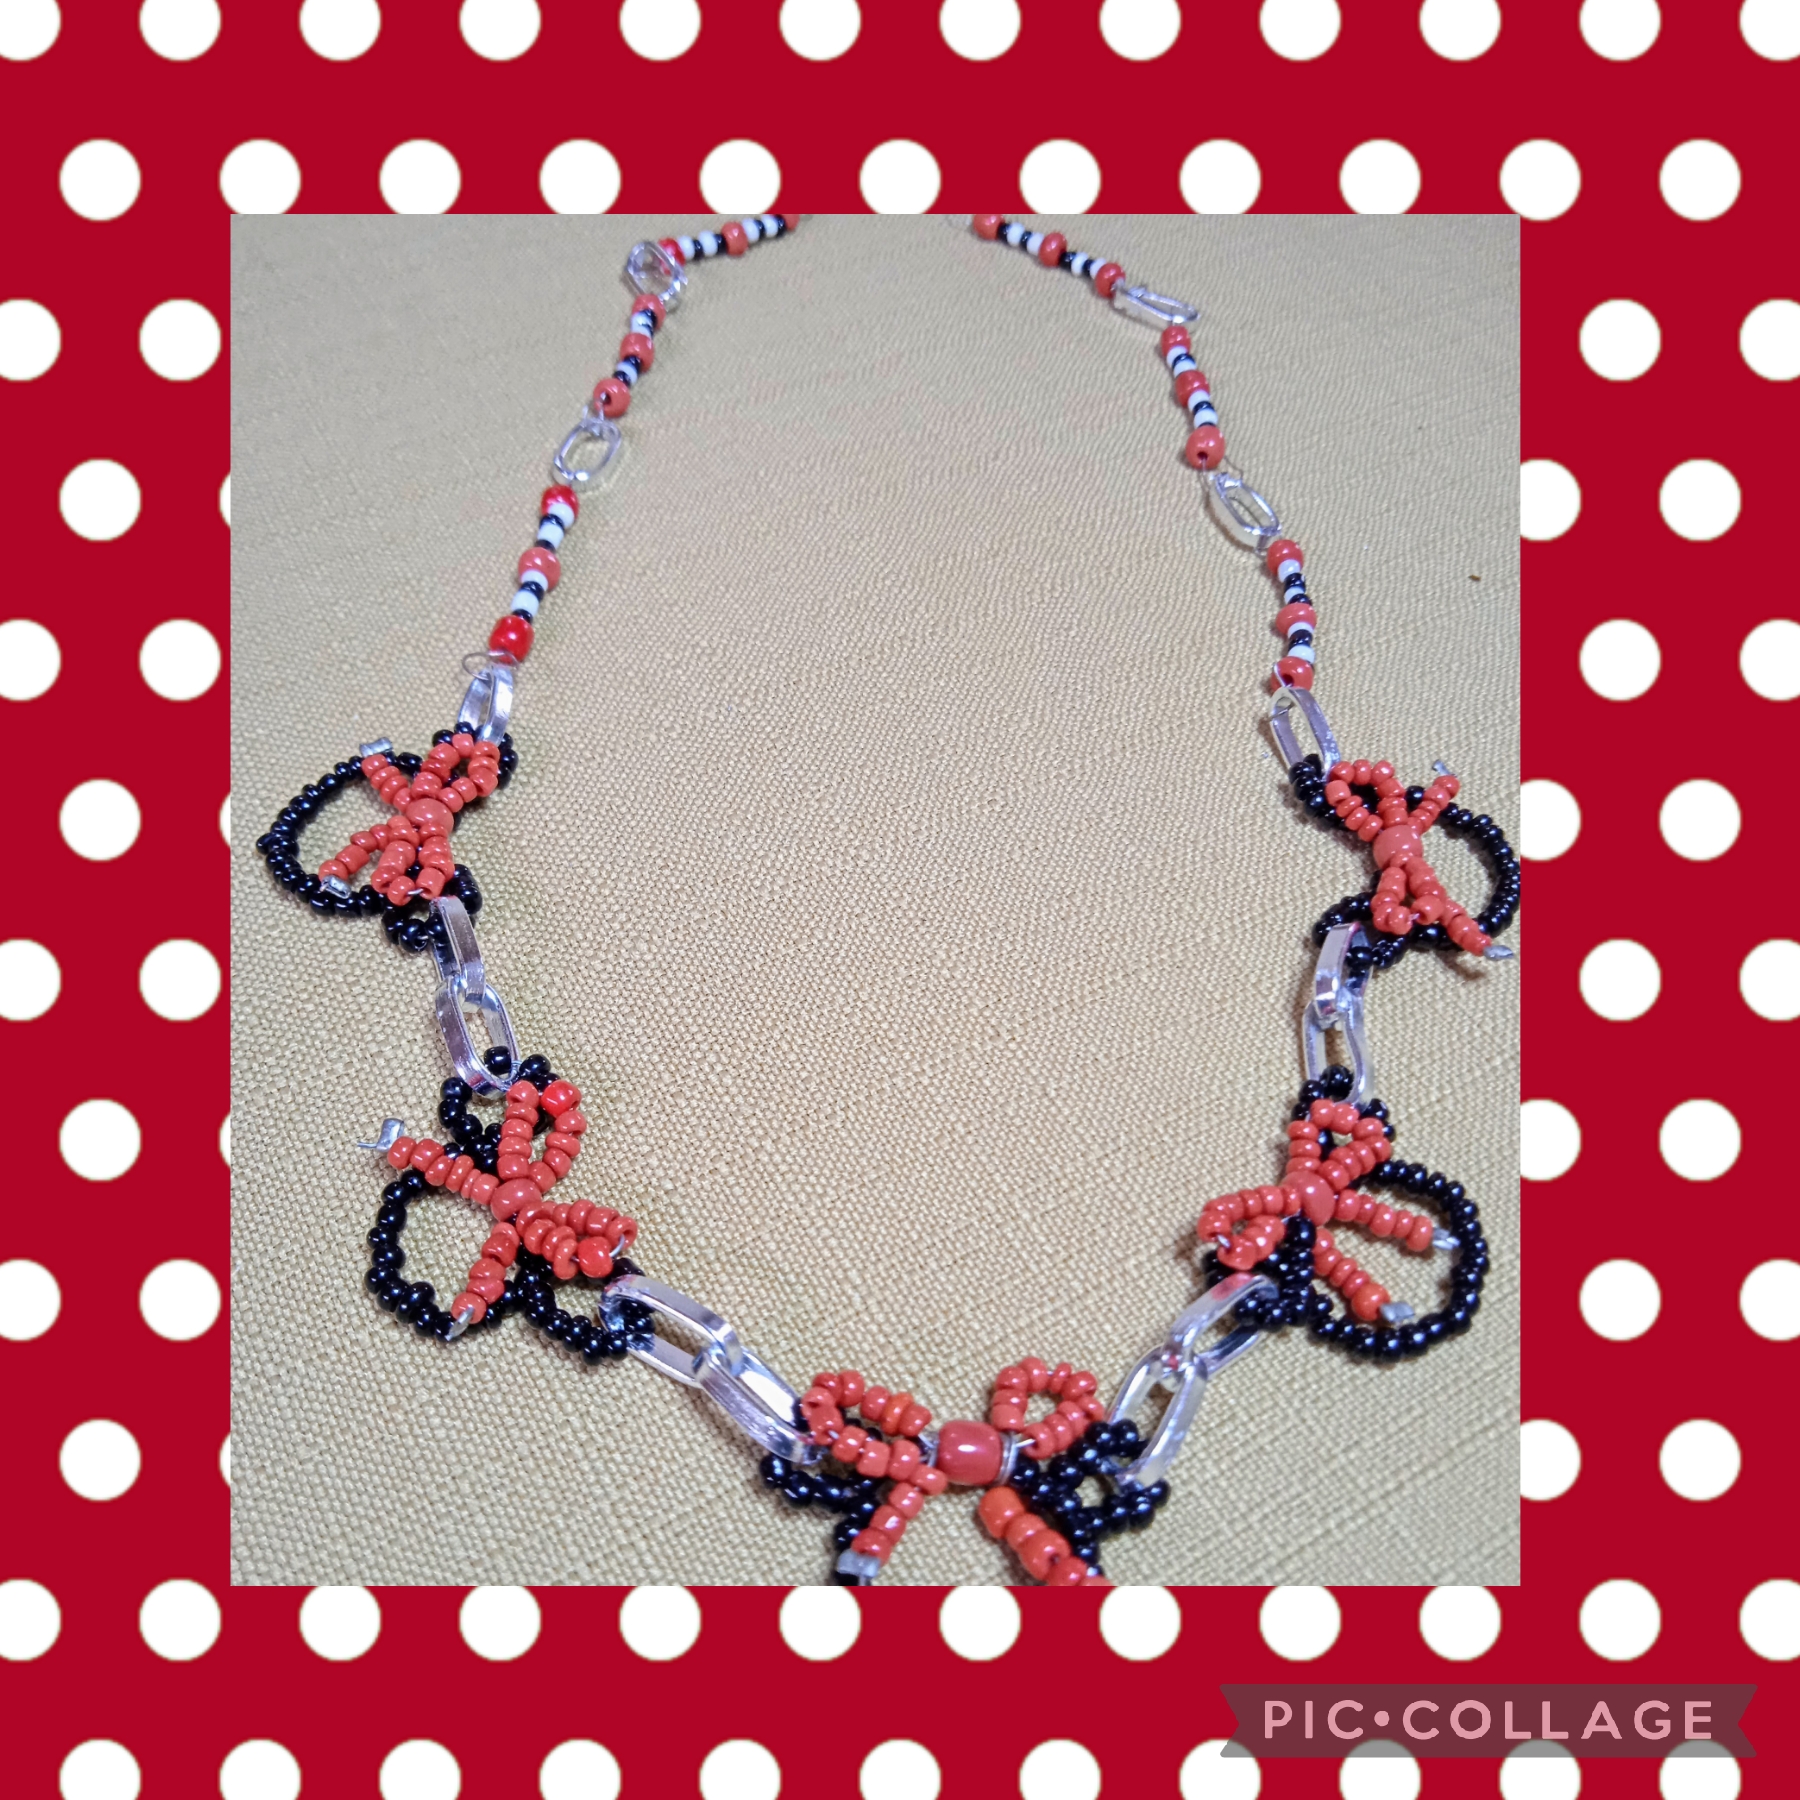
Una vez que tengo realizado los separadores comienzo a formar el collar, uso las argollas para ir uniendo las imágenes de Minnie entre si, ya unidas; también uno los separadores y los coloco tres de cada lado, le coloco un cierre tipo caimán y así queda
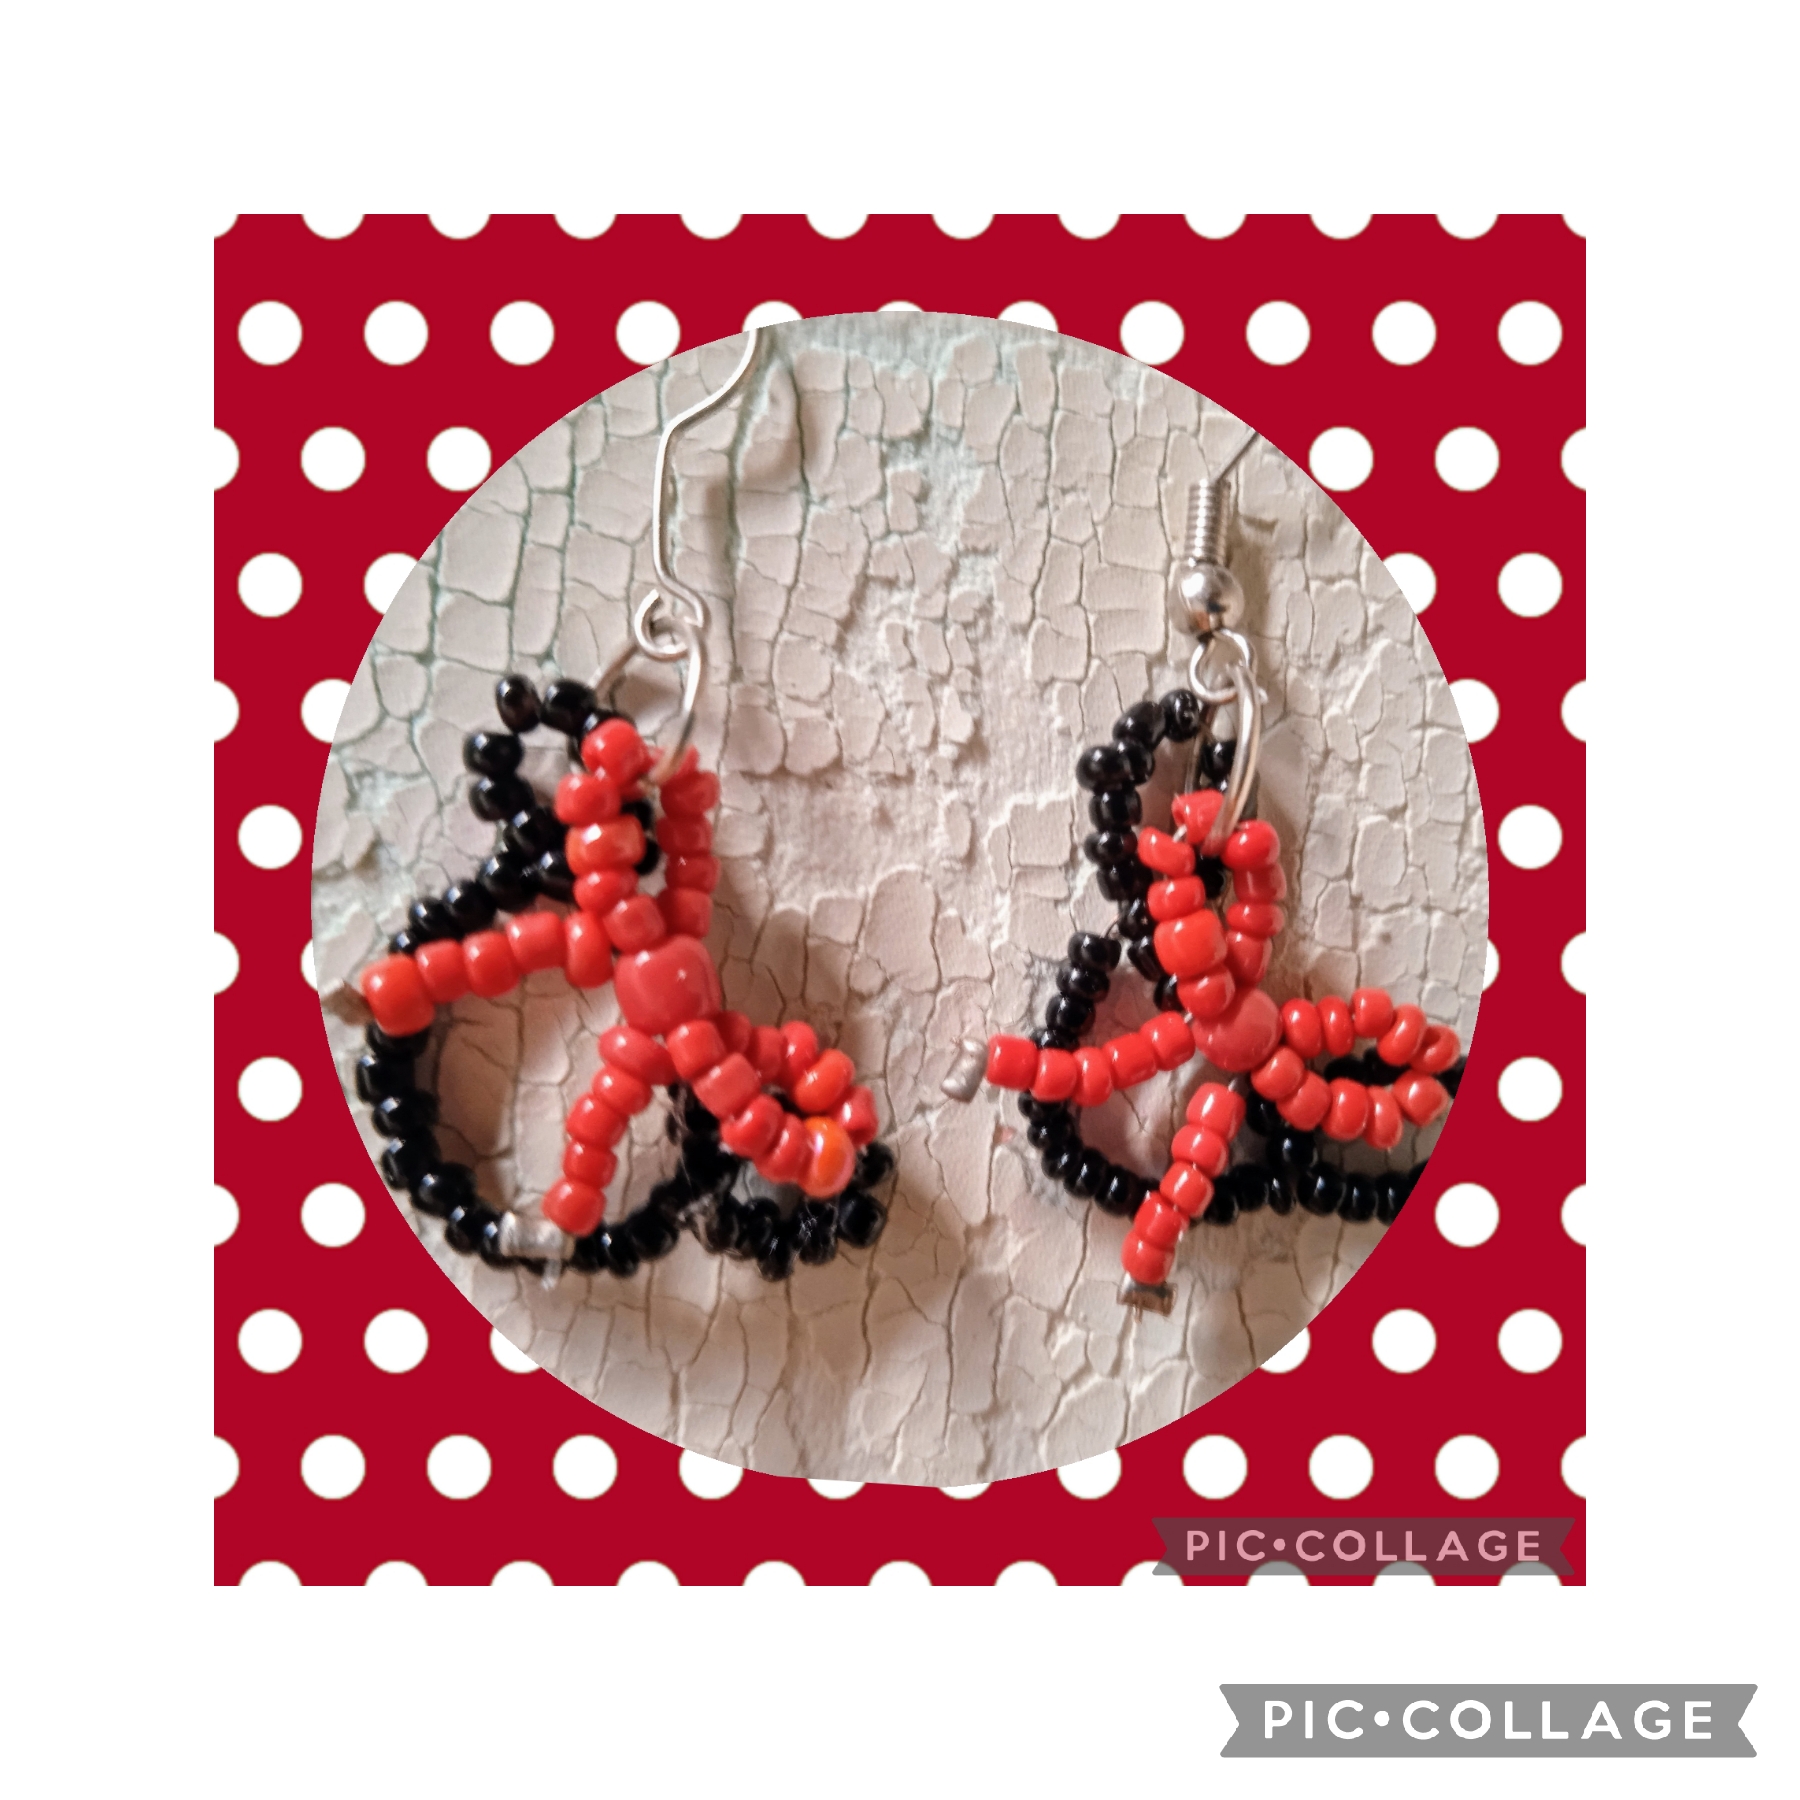
Para los Aretes uso dos de las Minnie que realicé con anticipación y le coloco los Anzuelos para el pago final como en las imágenes.
FOURTH STEP:
Once I have made the separators I begin to form the necklace, I use the rings to join the images of Minnie together, already joined; I also put together the dividers and place them three on each side, I put an alligator-type closure on it and that's how it looks.
For the Earrings I use two of the Minnie ones that I made in advance and I place the Hooks for the final payment as in the images.
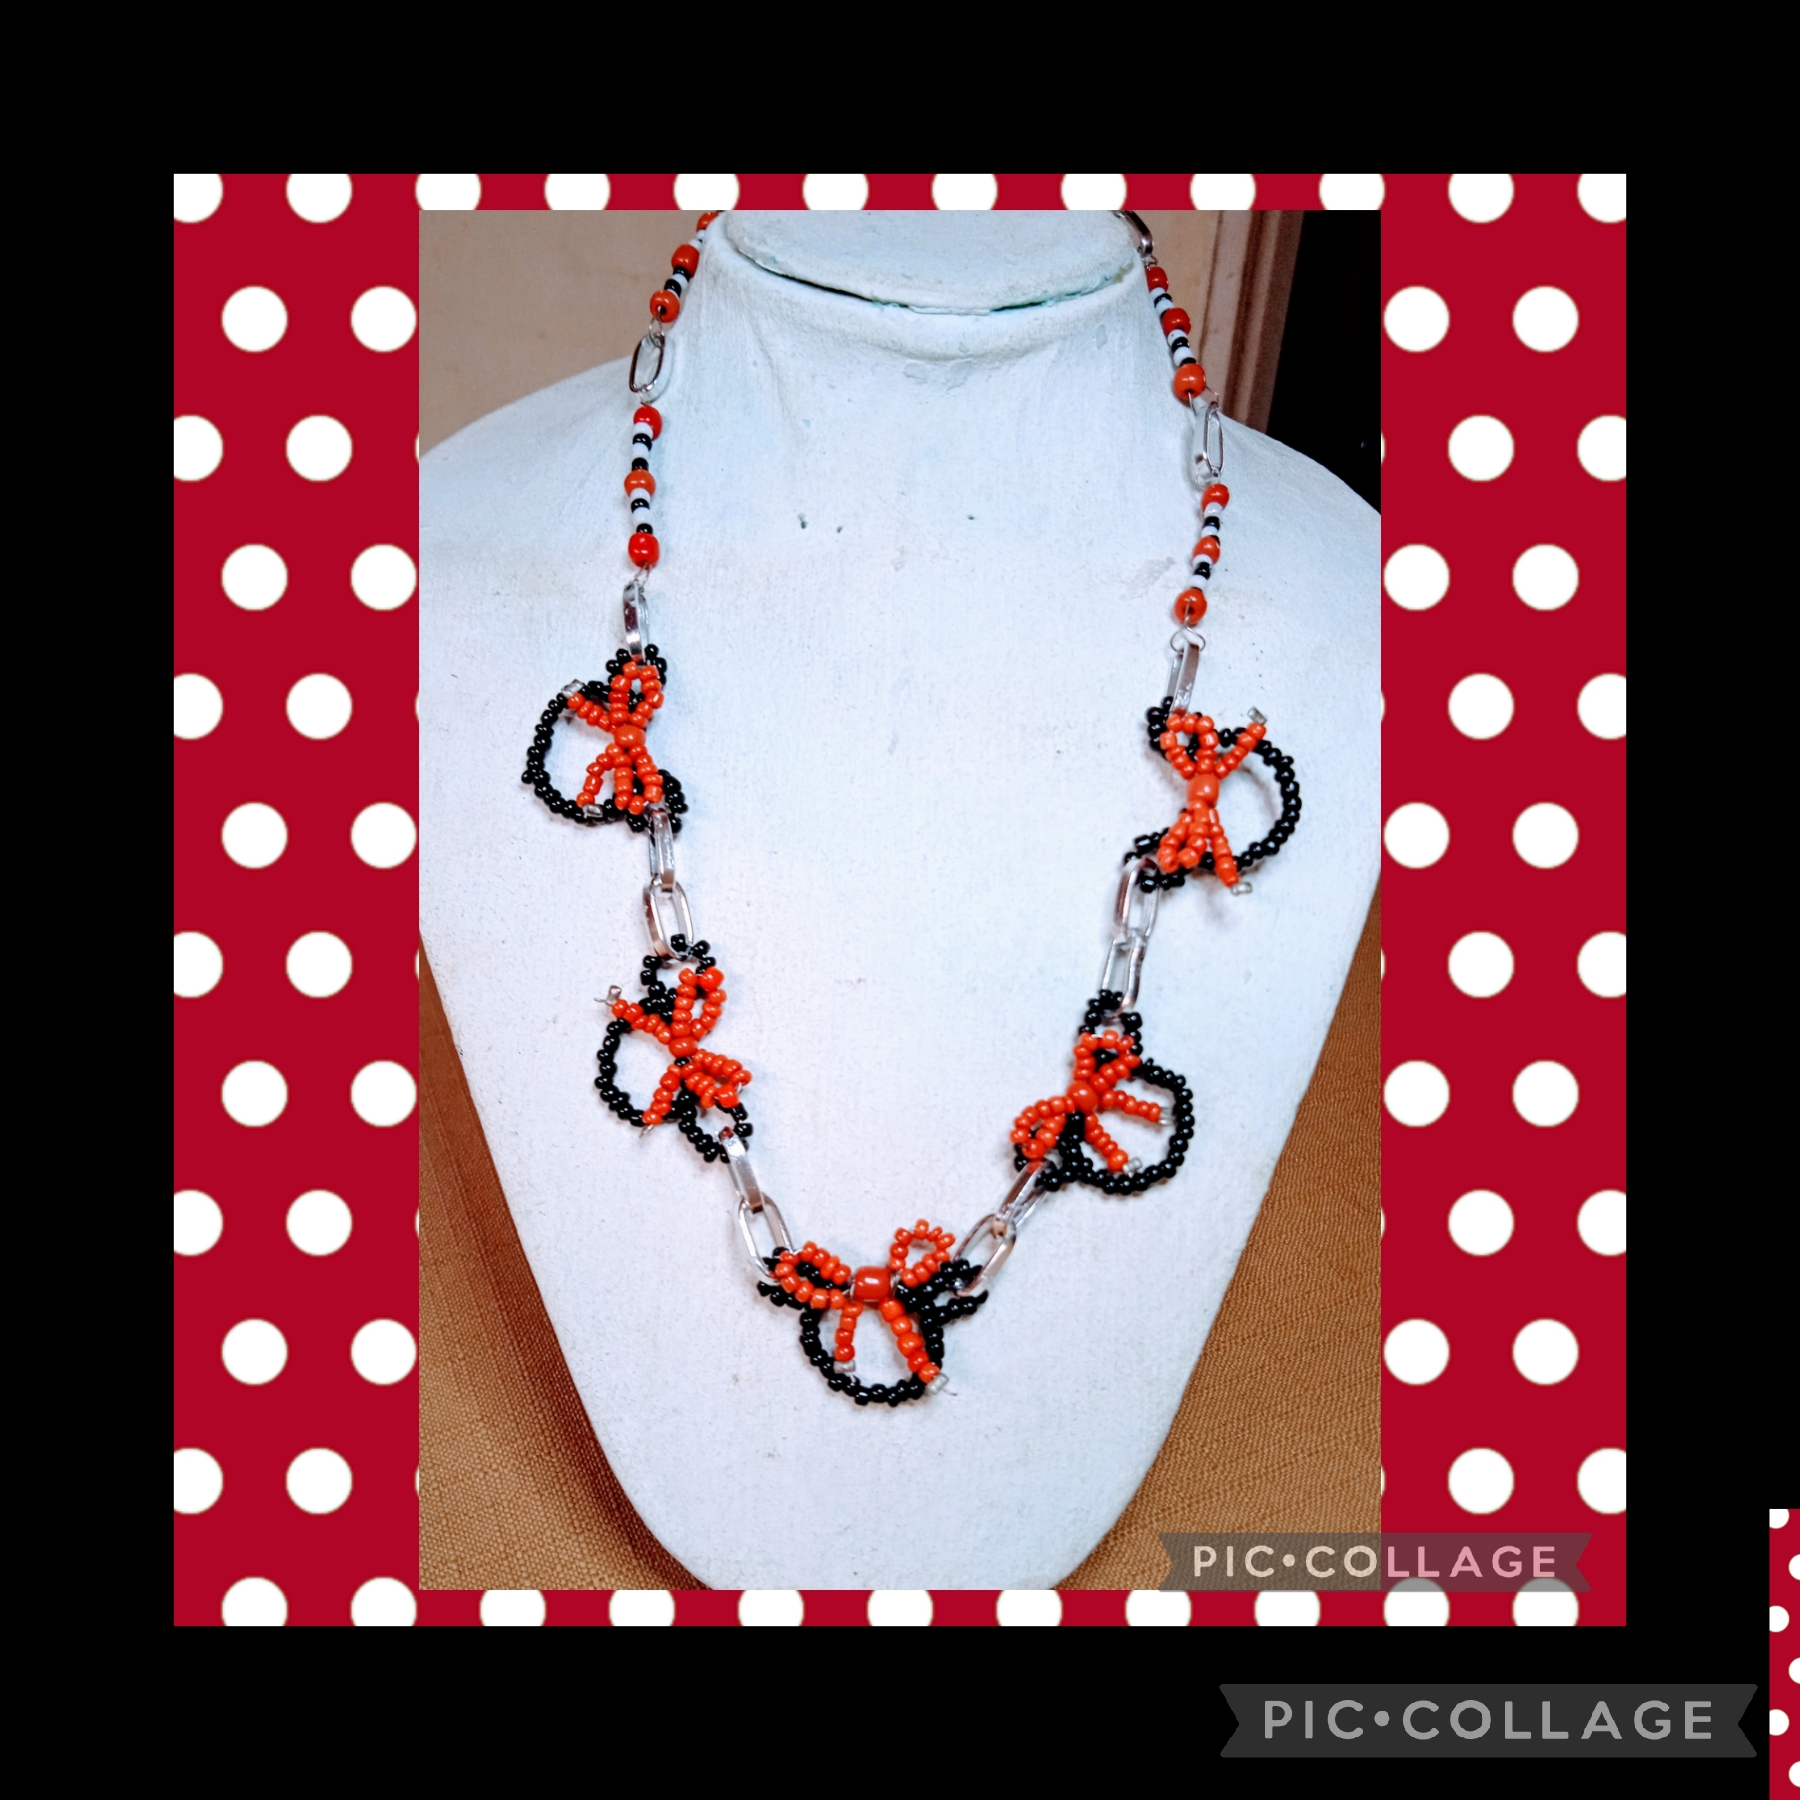
Artistas Creativos de las manualidades y la Joyería este es el resultado final de mi manualidad de hoy un bonito Set de Collar y Aretes con el que espero deslumbrar a mi sobrina 🤭, espero que les guste y como siempre agradezco mucho a todos los que leen y ven mis publicaciones apoyándome con sus valiosos comentarios , nos vemos en la próxima manualidad, bye, bye.
Creative Artists of crafts and Jewelry, this is the final result of my craft today, a beautiful Necklace and Earrings Set with which I hope to dazzle my niece 🤭, I hope you like it and as always I am very grateful to everyone who reads and You see my publications supporting me with your valuable comments, see you in the next craft, bye, bye.

Las imágenes y redacción de este tutorial son de mi propiedad, las fotos fueron tomadas con mi teléfono celular redmi 9 y las edité con una aplicación gratis del mismo.
Para traducir texto use Google traductor.
The images and writing in this tutorial are my property, the photos were taken with my Redmi 9 cell phone and I edited them with a free application.
To translate text use Google translator.
@nhaydu pero que Belleza! Me encantó! , Saludos 🤗
Hola @anamariag cómo estás? Un gusto saludarte, espero que mi sobrina quede tan encantada como Tú, 🤣a mi también me gustó mucho esas figuritas están de moda otra vez, gracias por tu comentario.🌹
Que hermoso quedó amiga @nhaydu , gracias por compartir esta obra de arte, saludos.
Gracias por tu comentario @josdelmi, que bueno saludarte de nuevo, un abrazo 🤗
Que lindo quedó, tu sobrina quedará encantada 😉
Gracias @marile21, estoy esperando a mañana para verle la 😃 saluditos 🤗
Innovador. Me parecen únicos y originales. Me encanta como combinaste cada color y diste la forma deseada para complacer a tu sobrina. Siempre bello todo lo que haces. Un feliz día para ti.
Y Tu, también como siempre llenando de alabanzas mis creaciones @creacioneslelys, agradezco mucho tu apoyo, un abrazo 🤗
Me gustó mucho este collar de Minnie de verdad muy creativo seguro muchas niñas de allá pueden vestirse con tus hermosos accesorios.
Los colores del collar sin duda representan muy bien al personaje.
Ayyy! @yoliimar que te puedo decir las sobrinas no me dejan tiempo para nadie más 😂 viven atosigandome con sus pedidos 🤣pero me hacen feliz con sus risas, gracias por tan lindo comentario 🤗