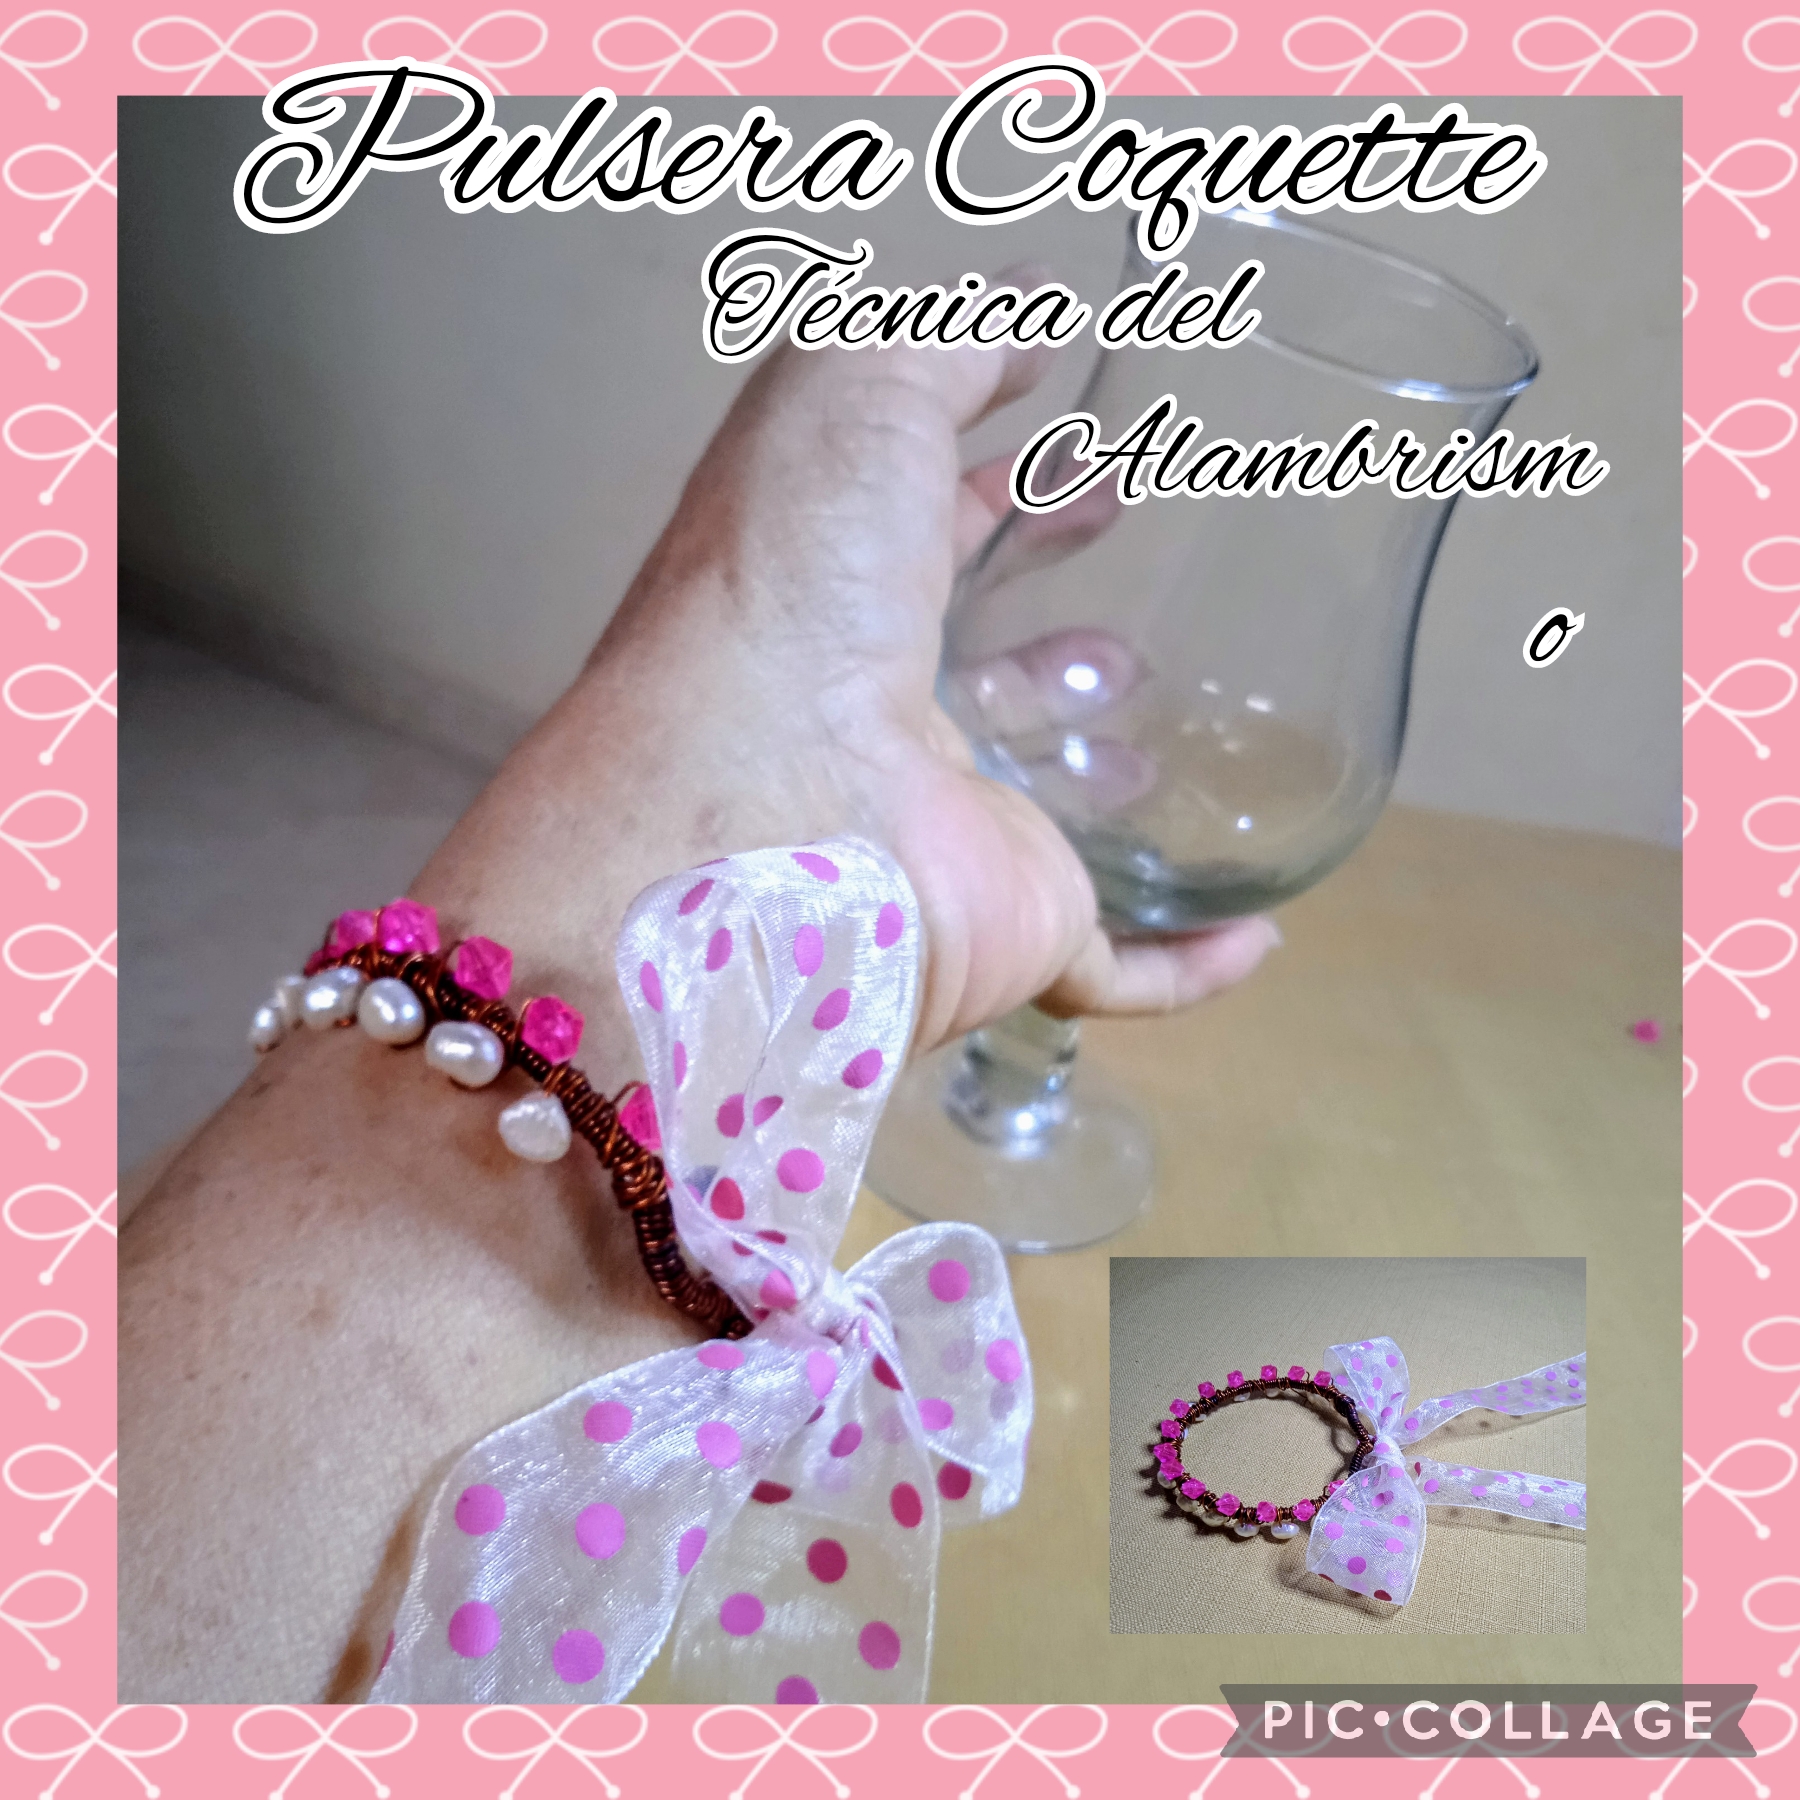
This is how I made this flirty bracelet with the technique of wire, crystals and river pearls.// Tutorial [Esp-Eng]
Saluditos, Artistas Creativos de las Manualidades y la Joyería un placer estar de nuevo compartiendo con ustedes en esta maravillosa comunidad Jewerly alguna de mis creaciones.
No es muy de mi estilo repetir el mismo tipo de contenido en mis publicaciones pero la tendencia que se ha desarrollado en la mentada Moda Coquette; aunque no es nada novedoso se ha popularizado recientemente que es bastante común ver cómo los lazos de todas formas, maneras y tamaños pululan en los distintos accesorios siendo ellos el ícono de la referida moda con un estilo romántico y sutiles por la gama de colores pasteles que lucen.
Para complacer a una coqueta y joven amiga quise hacer gala de su feminidad y le realicé en la técnica de alambrismo una linda Pulsera con cristales rosados y perlas de agua anudados con un hermoso Lazo de cinta como cierre que le da ese toque femenino y sutil coquetería.
Ahora les invito a seguir leyendo para que vean el paso a paso de como la hice.
Greetings, Creative Crafts and Jewelry Artists, it is a pleasure to be sharing some of my creations with you again in this wonderful Jewerly community.
It is not my style to repeat the same type of content in my publications but the trend that has developed in the aforementioned Coquette Fashion; Although it is nothing new, it has recently become popular that it is quite common to see how bows of all shapes, forms and sizes swarm in the different accessories, being them the icon of the aforementioned fashion with a romantic style and subtle due to the range of pastel colors that they shine
To please a flirtatious young friend, I wanted to show off her femininity and I made her using the wire technique a beautiful bracelet with pink crystals and water pearls knotted with a beautiful ribbon bow as closure that gives it that feminine touch and subtle flirtation. .
Now I invite you to continue reading so you can see the step by step of how I made it.
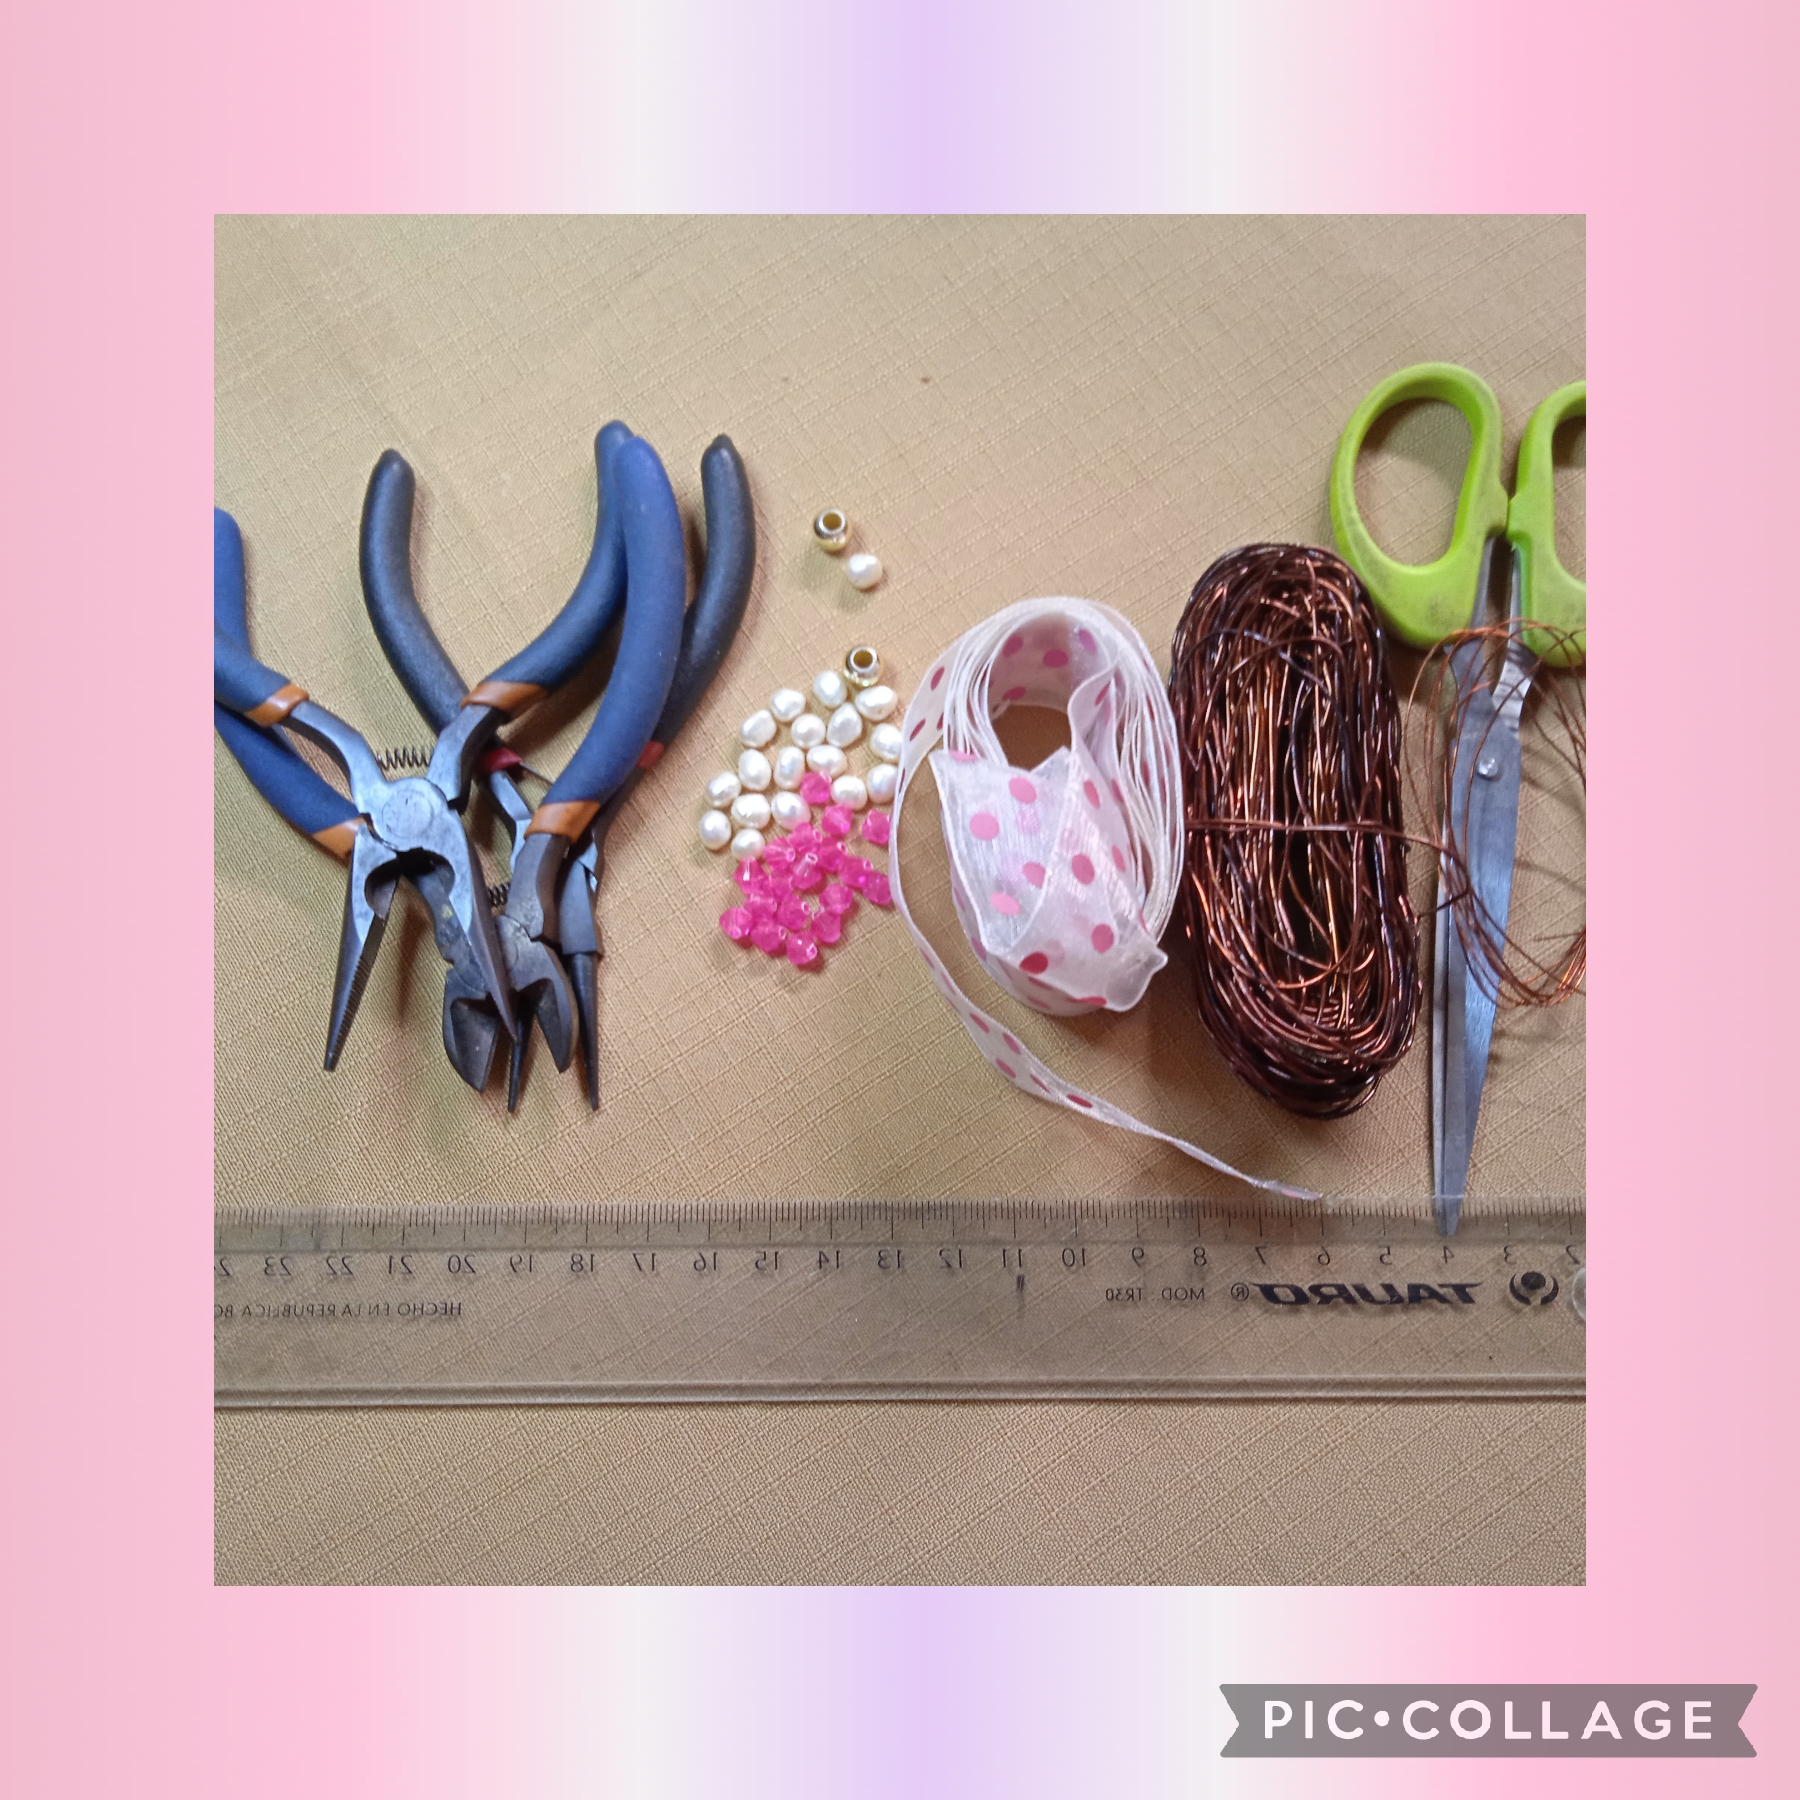
MATERIALES CON LOS QUE REALICÉ ESTE ORIGINAL Y COQUETO PROYECTO:
✓ Catorce cristales rosados.
✓ Trece perlas de rio blancas.
✓ Tres metros de alambre calibre 26"
✓ Dos metros de alambre calibre 28".
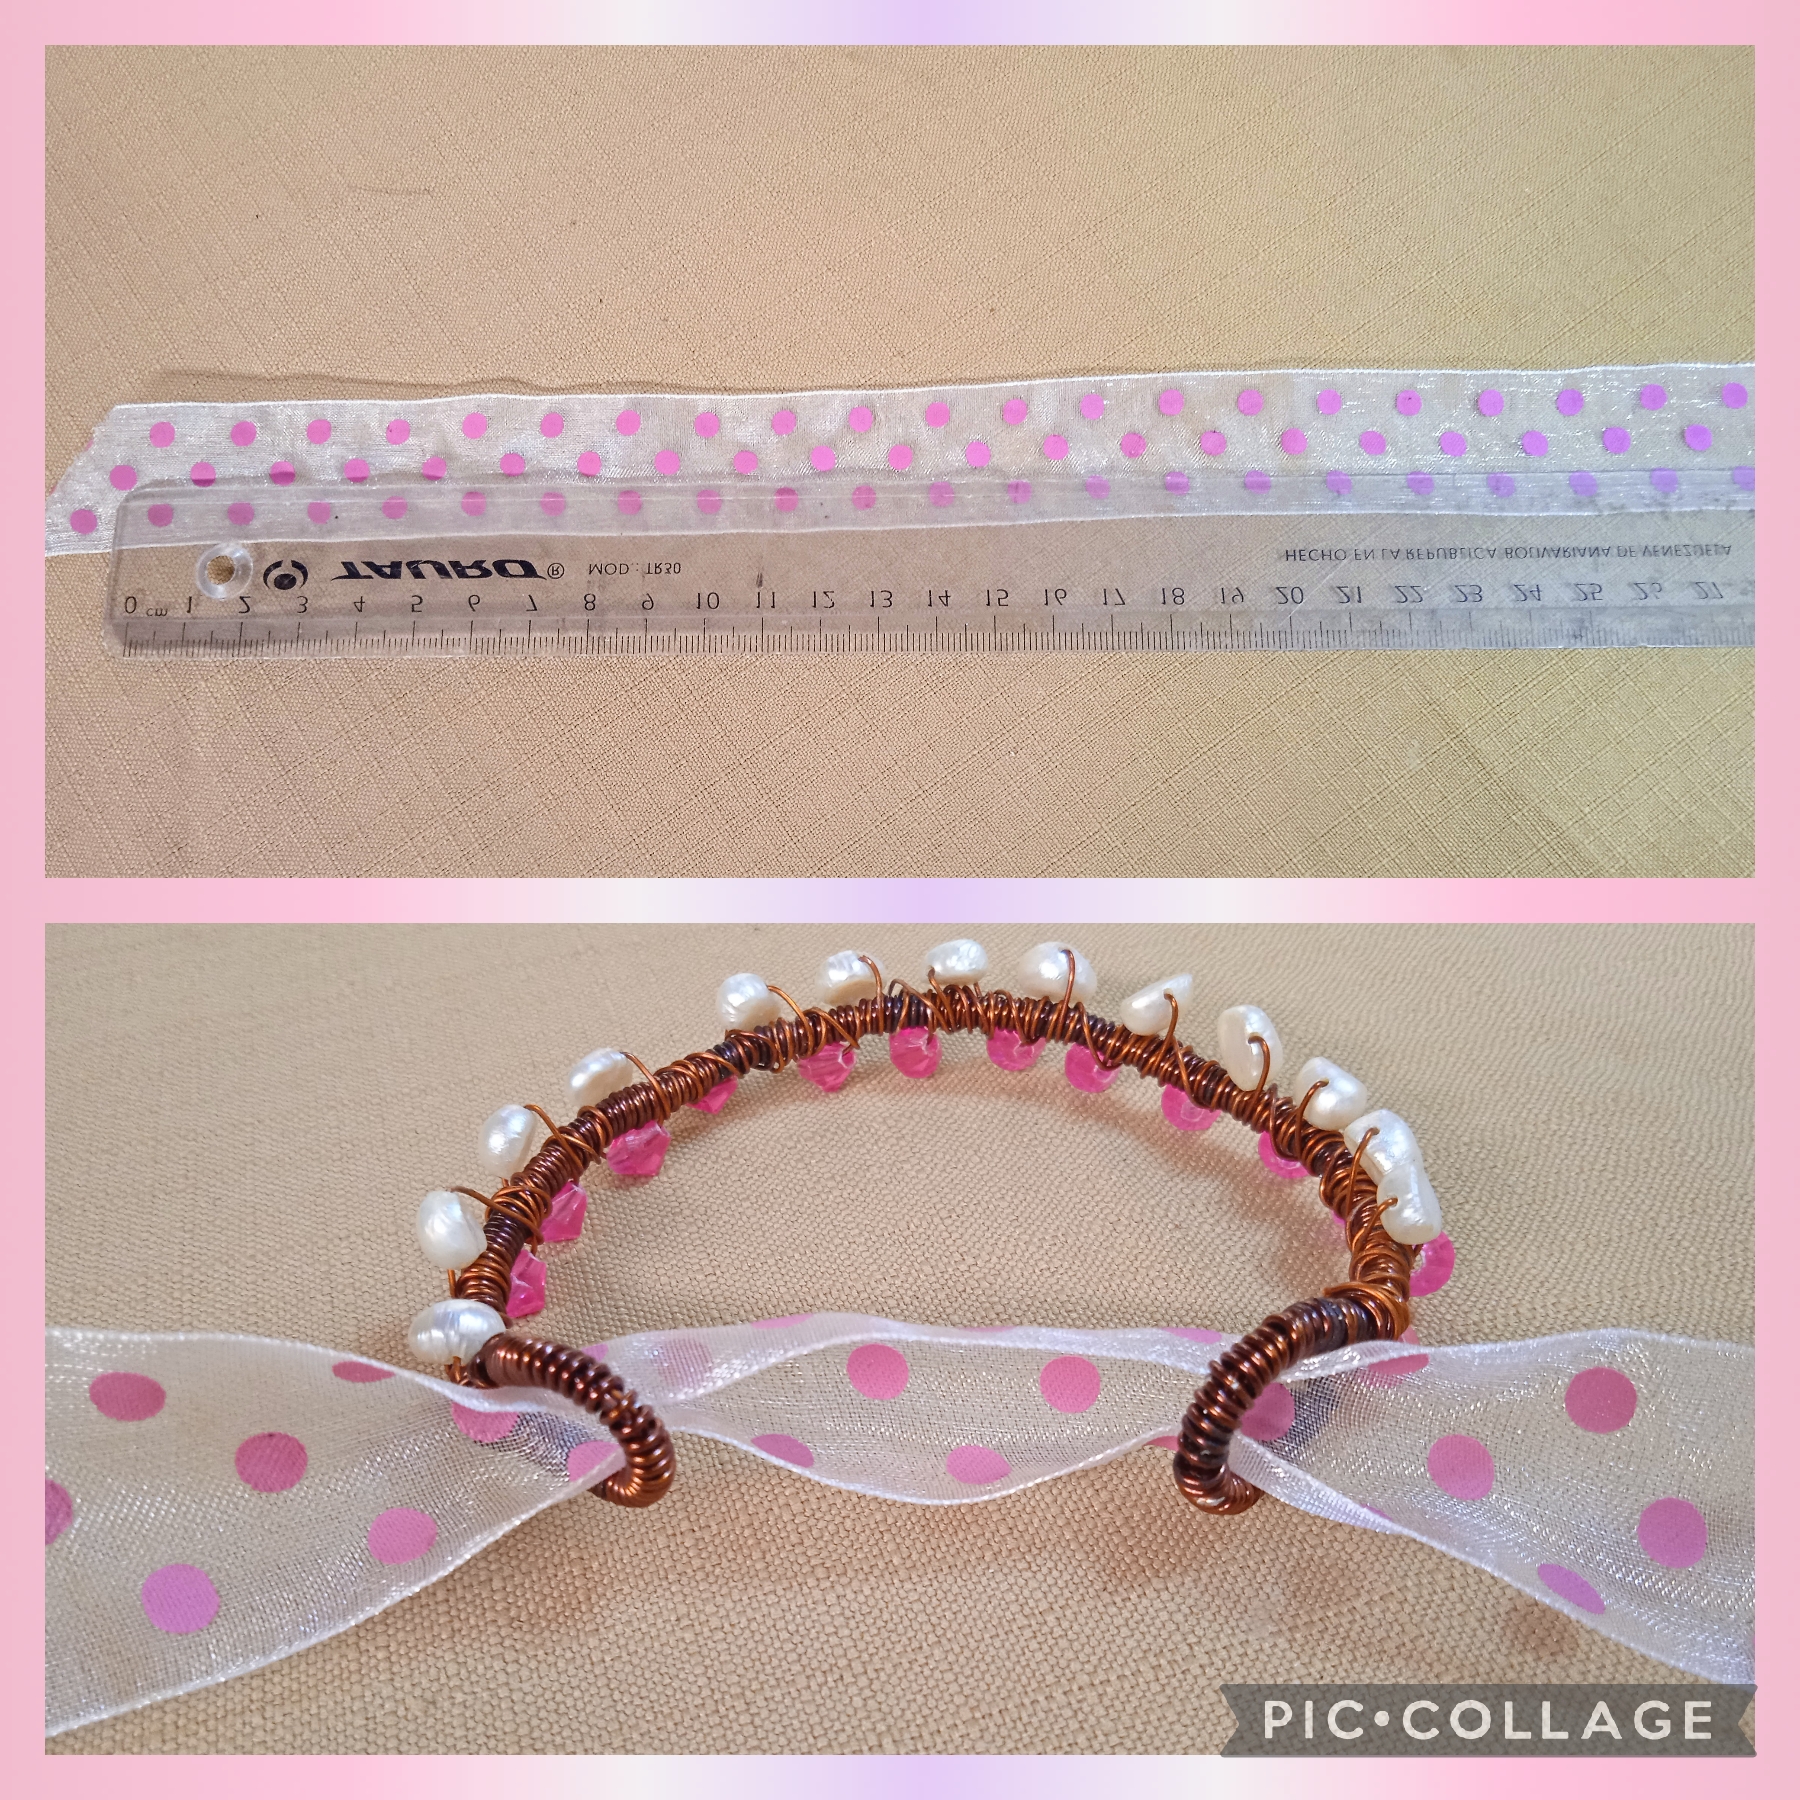
✓ Treinta centímetros de cinta
transparente con lunares rosados.
✓ Tijeras.
✓ Pinza de corte.
✓ Pinza plana.
✓ Regla.
MATERIALS WITH WHICH I MADE THIS ORIGINAL AND CUTE PROJECT:
✓ Fourteen pink crystals.
✓ Thirteen white river pearls.
✓ Three meters of 26" gauge wire
✓ Two meters of 28" gauge wire.
✓ Thirty centimeters of tape
transparent with pink polka dots.
✓ Scissors.
✓ Cutting clamp.
✓ Flat clamp.
✓ Rule.
CON ESTOS FÁCILES Y POCOS PASOS ELABORÉ MI PROYECTO.
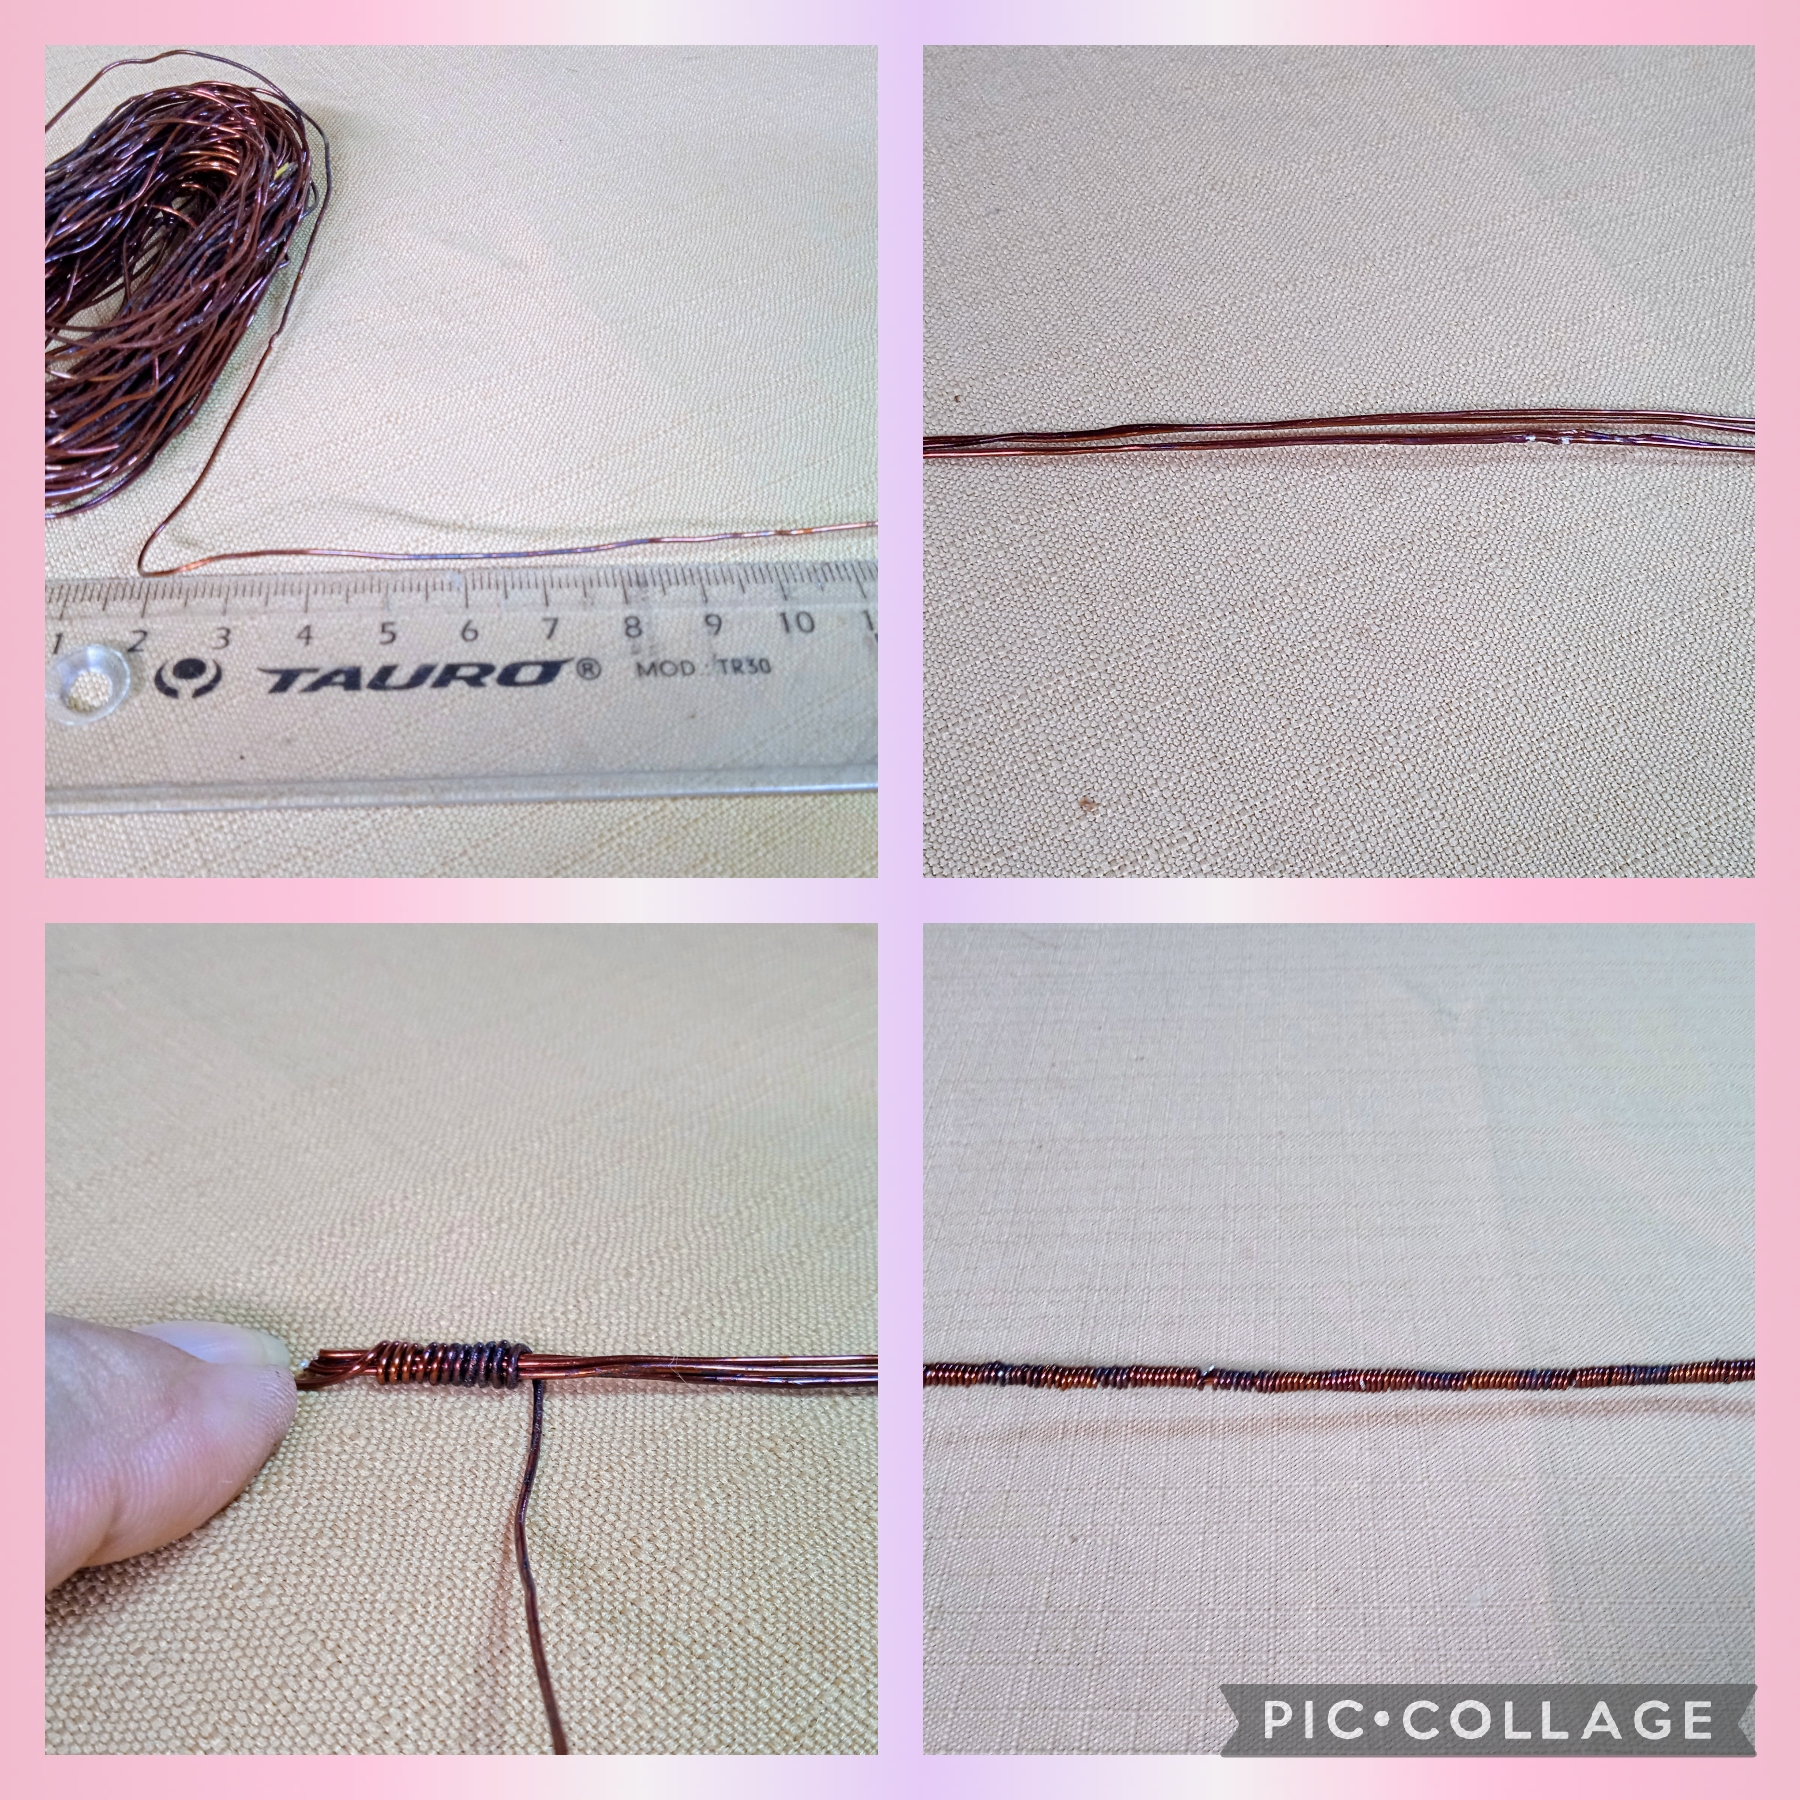
PRIMER PASO:
Comienzo la elaboración de la Pulsera, ocupando la regla para medir dos trozos de alambre calibre 26" de treinta y seis centímetros cada uno, los doblo a la mitad, los uno y rectifico bien las medidas para que queden iguales, con el mismo alambre calibre 26" empiezo a entorchar con forma de espiral los alambres hasta su totalidad como muestra la imagen.
WITH THESE EASY AND FEW STEPS I PREPARED MY PROJECT.
FIRST STEP:
I begin the making of the Bracelet, using the ruler to measure two pieces of 26" gauge wire measuring thirty-six centimeters each, I fold them in half, join them together and correct the measurements so that they are equal, with the same gauge wire. 26" I begin to spirally twist the wires until they are complete as shown in the image.
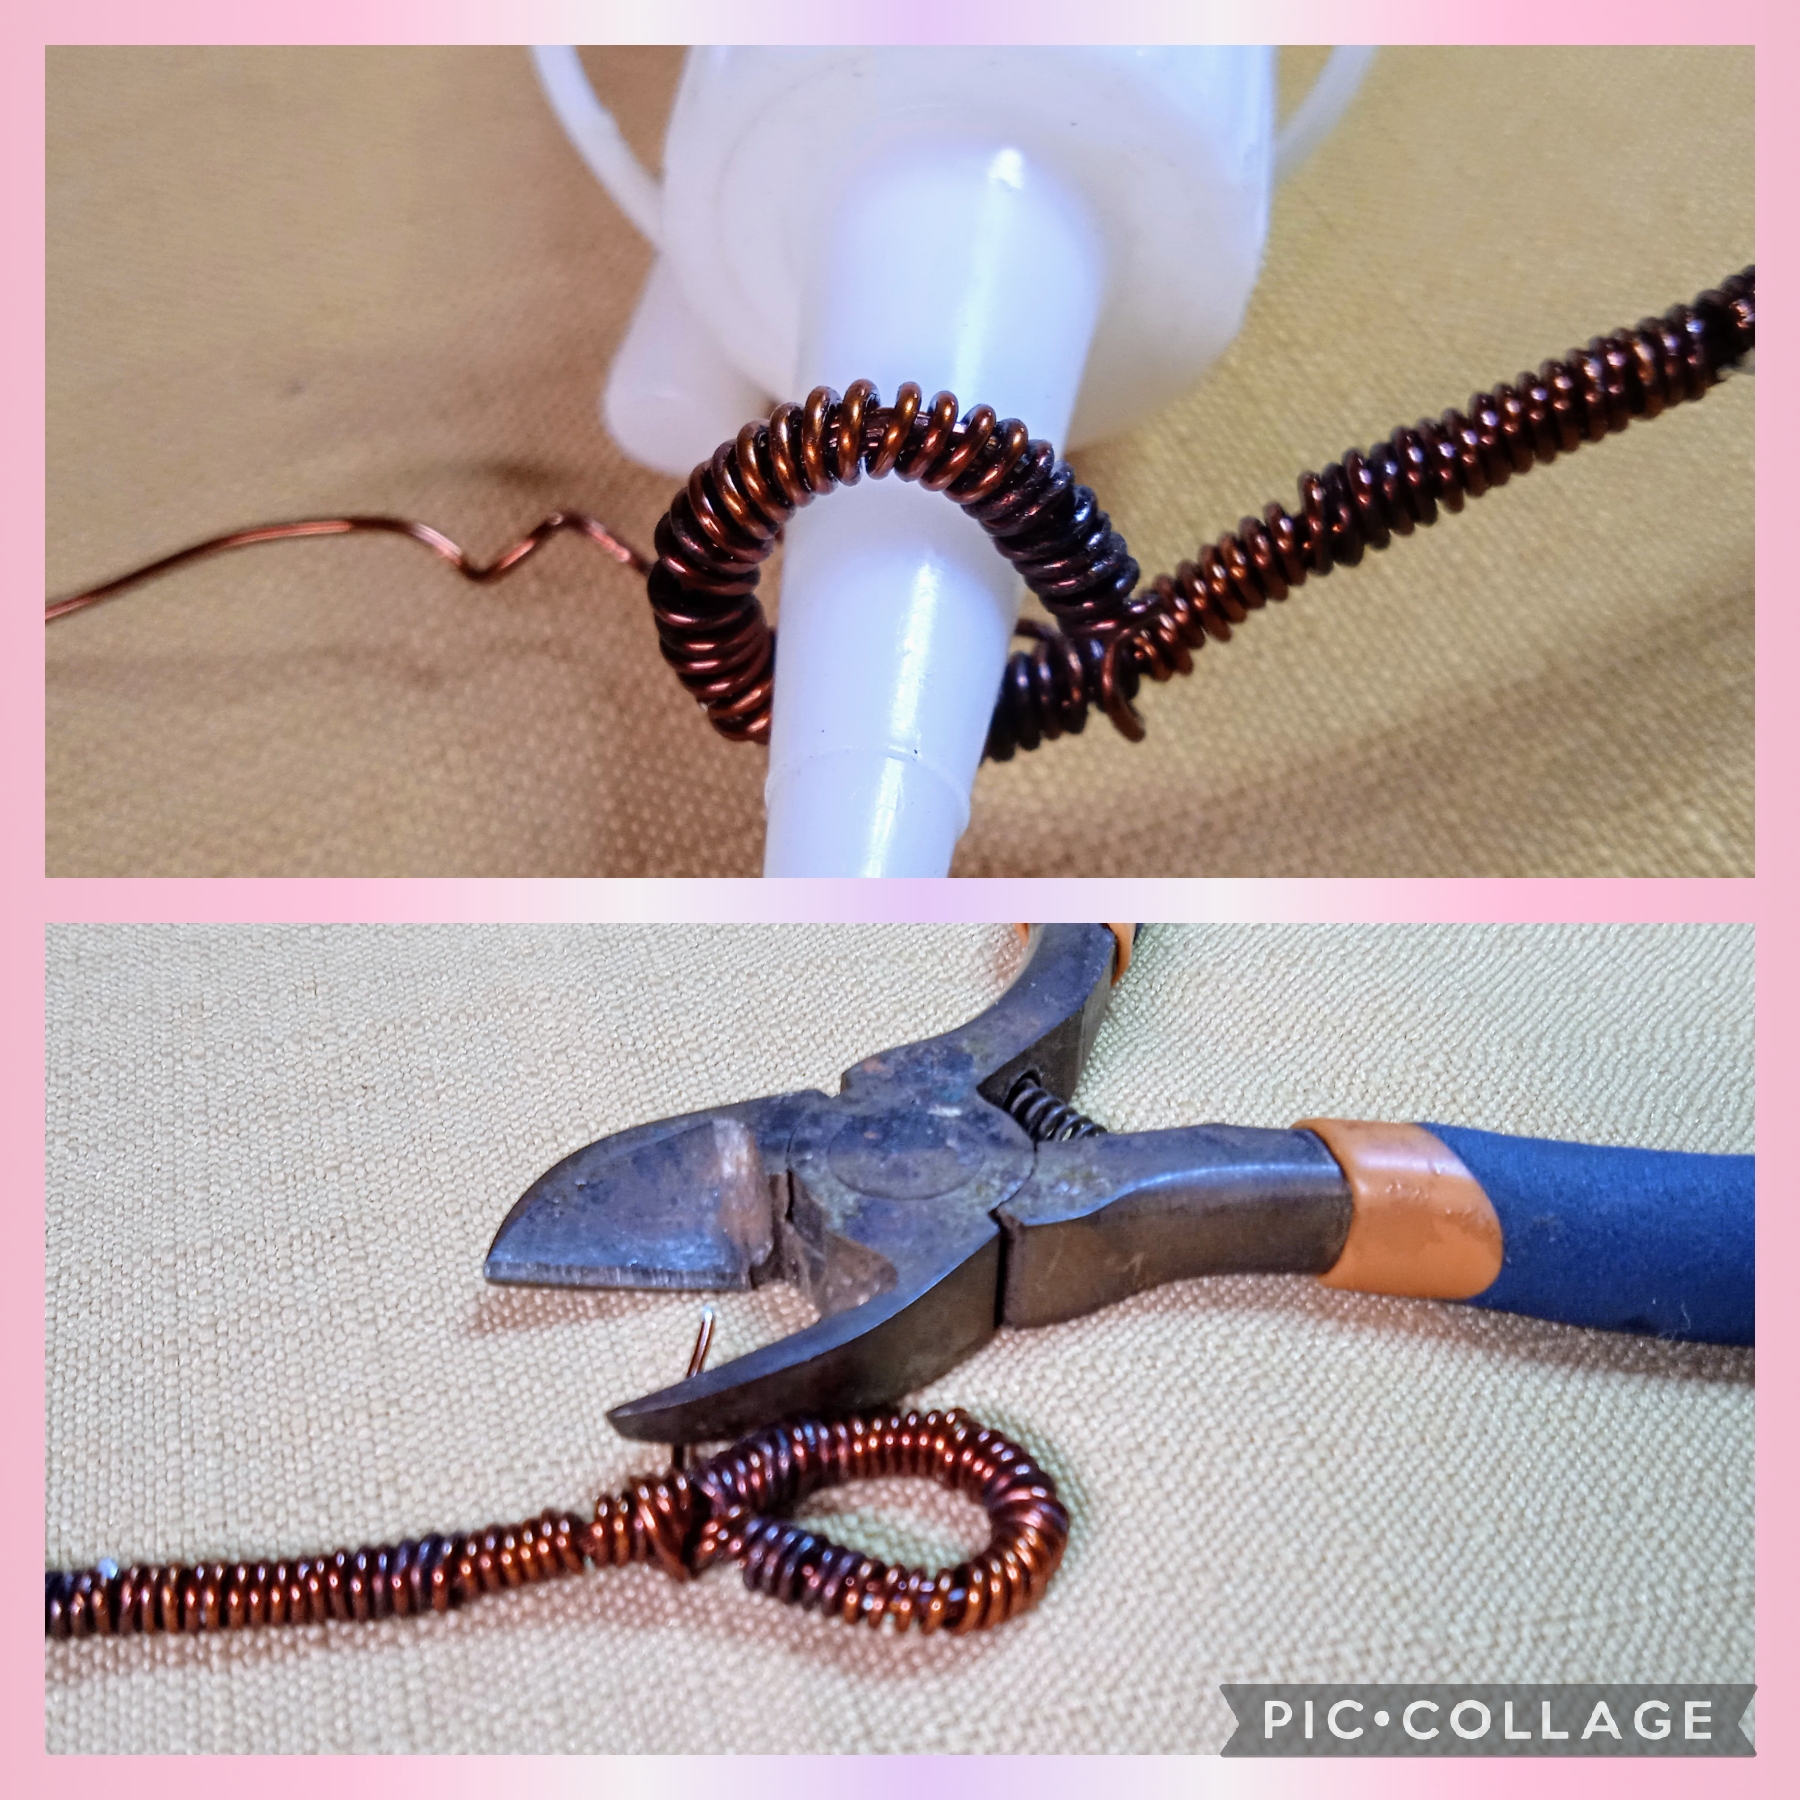
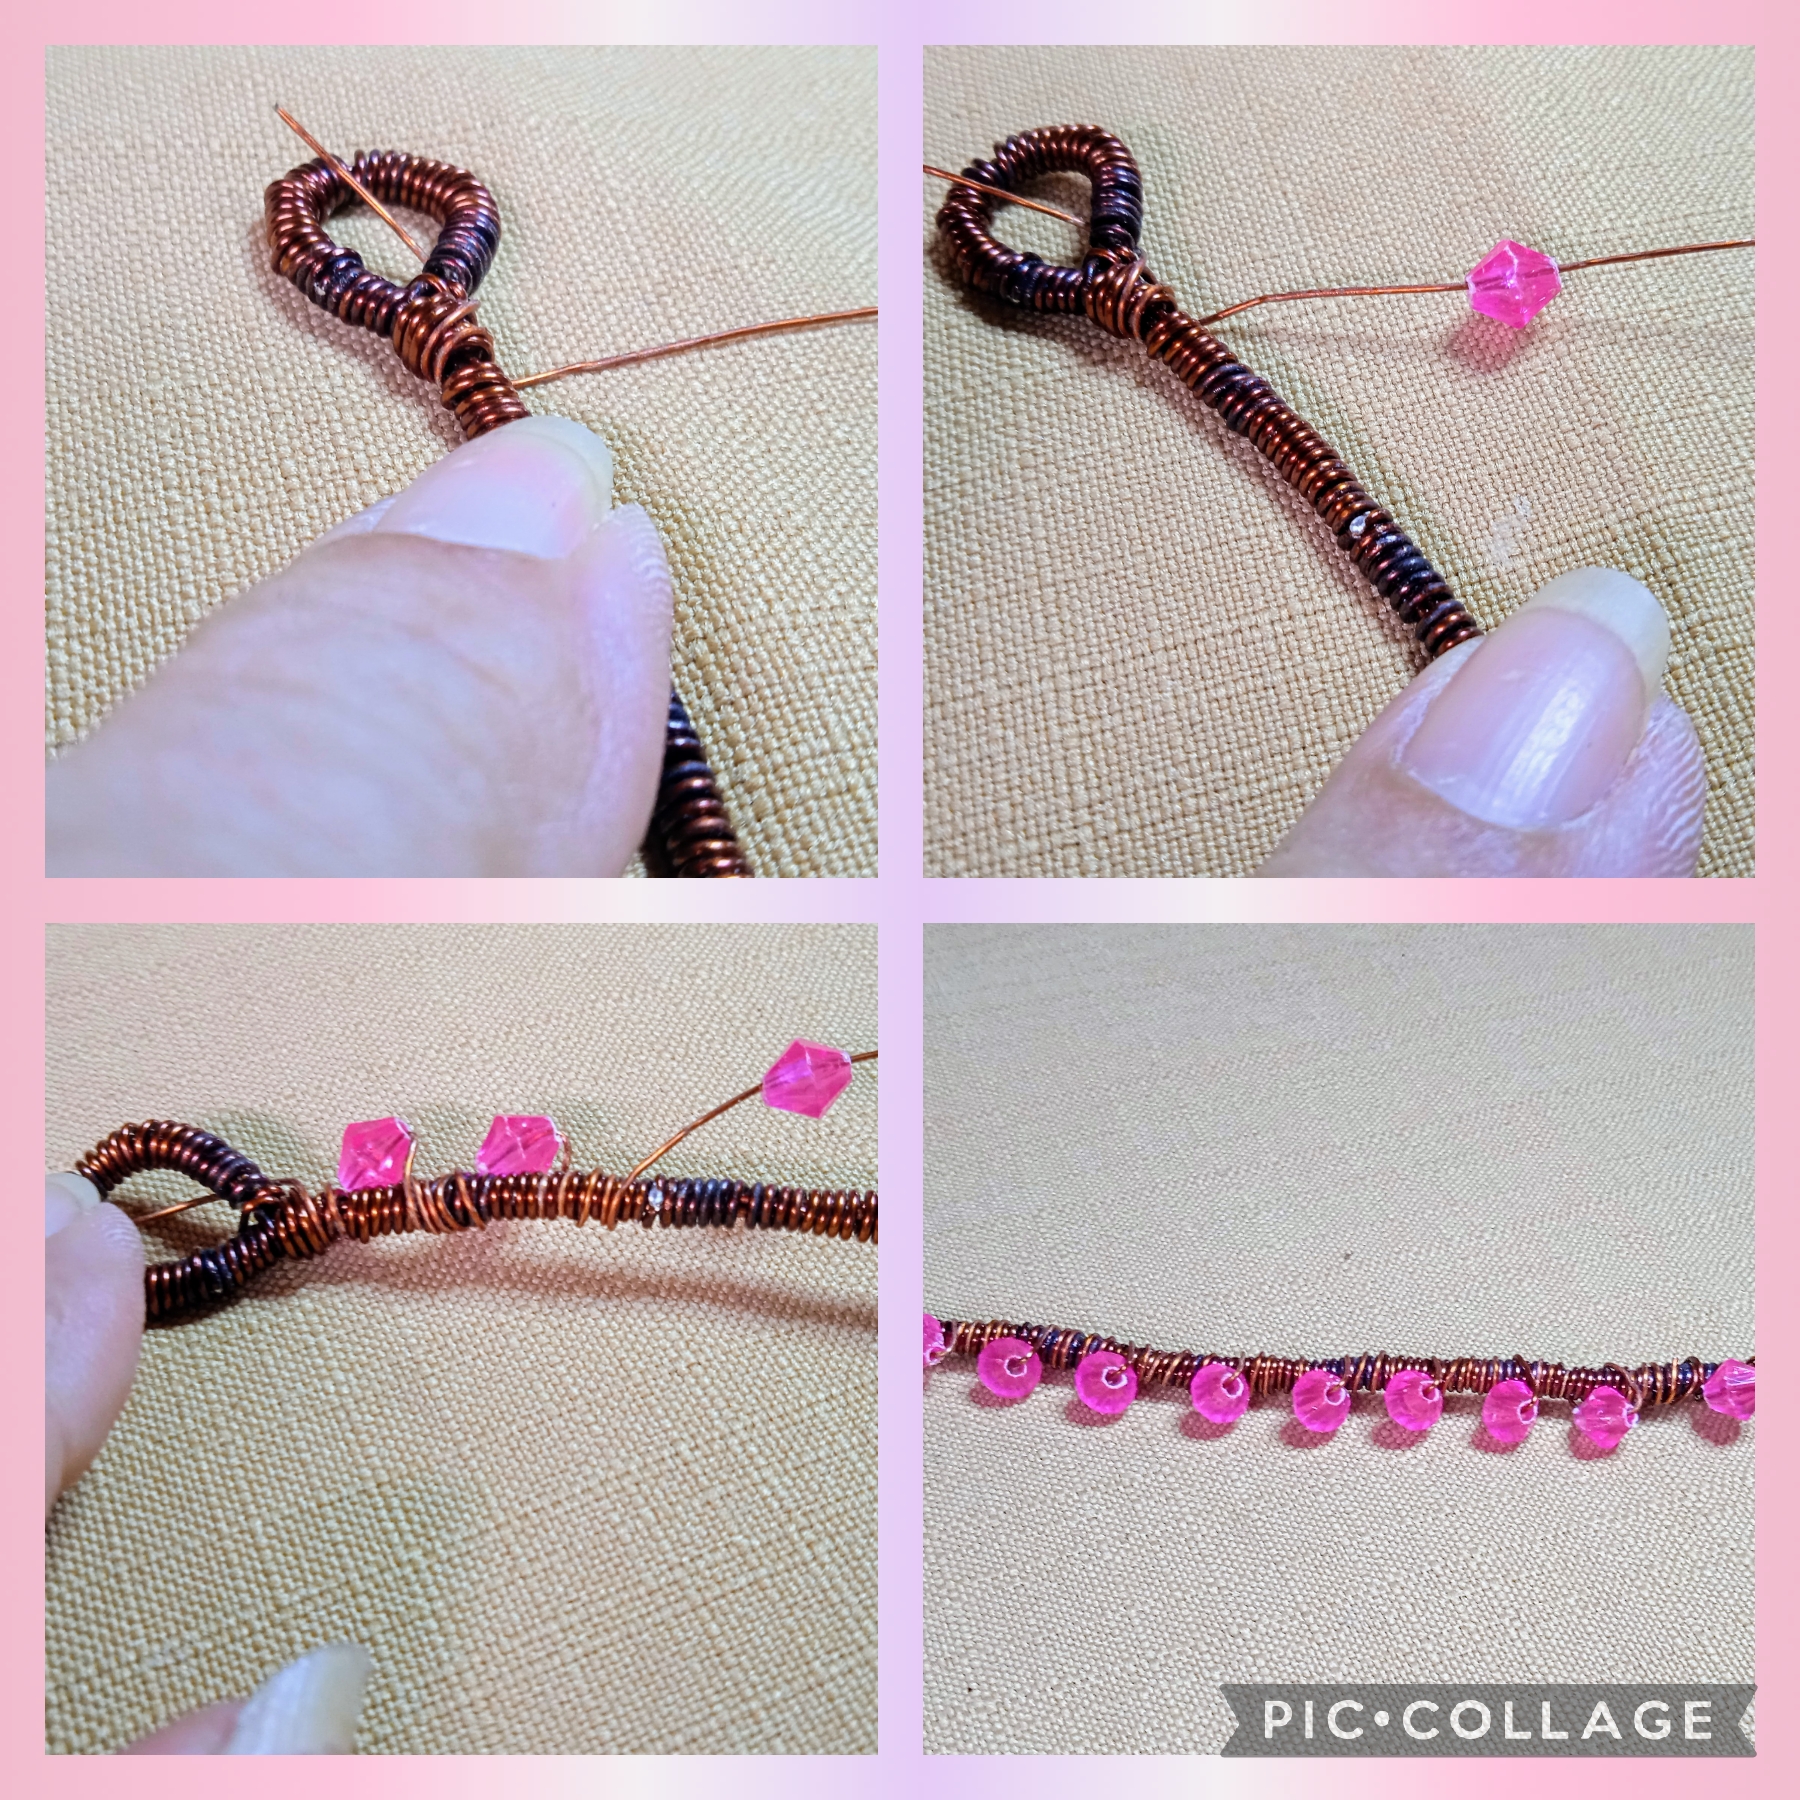
SEGUNDO PASO:
En este paso me ayude con el pico de un frasco de silicón frío y tomando una de las puntas del alambre lo coloco alrededor del pico a la altura de la mitad y hago una especie de argolla como lo muestra la imagen, doy tres vueltas en el alambre para fijar y retiro el excedente con la pinza de corte.
Ahora tomo el alambre calibre 28 " lo inserto por la argolla dejando dos centímetros y doy una vuelta para fijar inserto un cristal rosado y doy tres vueltas en el alambre base y fijo el cristal dando tres vueltas de nuevo para fijarlo y así voy hasta insertar los catorce cristales rosados. Cómo en la imágen.
SECOND STEP:
In this step, help me with the spout of a cold silicone bottle and taking one of the ends of the wire, I place it around the spout at the height of the middle and make a kind of ring as shown in the image, I make three turns in the wire to fix and remove the excess with the cutting pliers.
Now I take the 28" gauge wire, I insert it through the ring, leaving two centimeters and I make one turn to fix it, I insert a pink crystal and I make three turns on the base wire and I fix the crystal making three turns again to fix it and so I go until I insert the fourteen pink crystals. As in the image
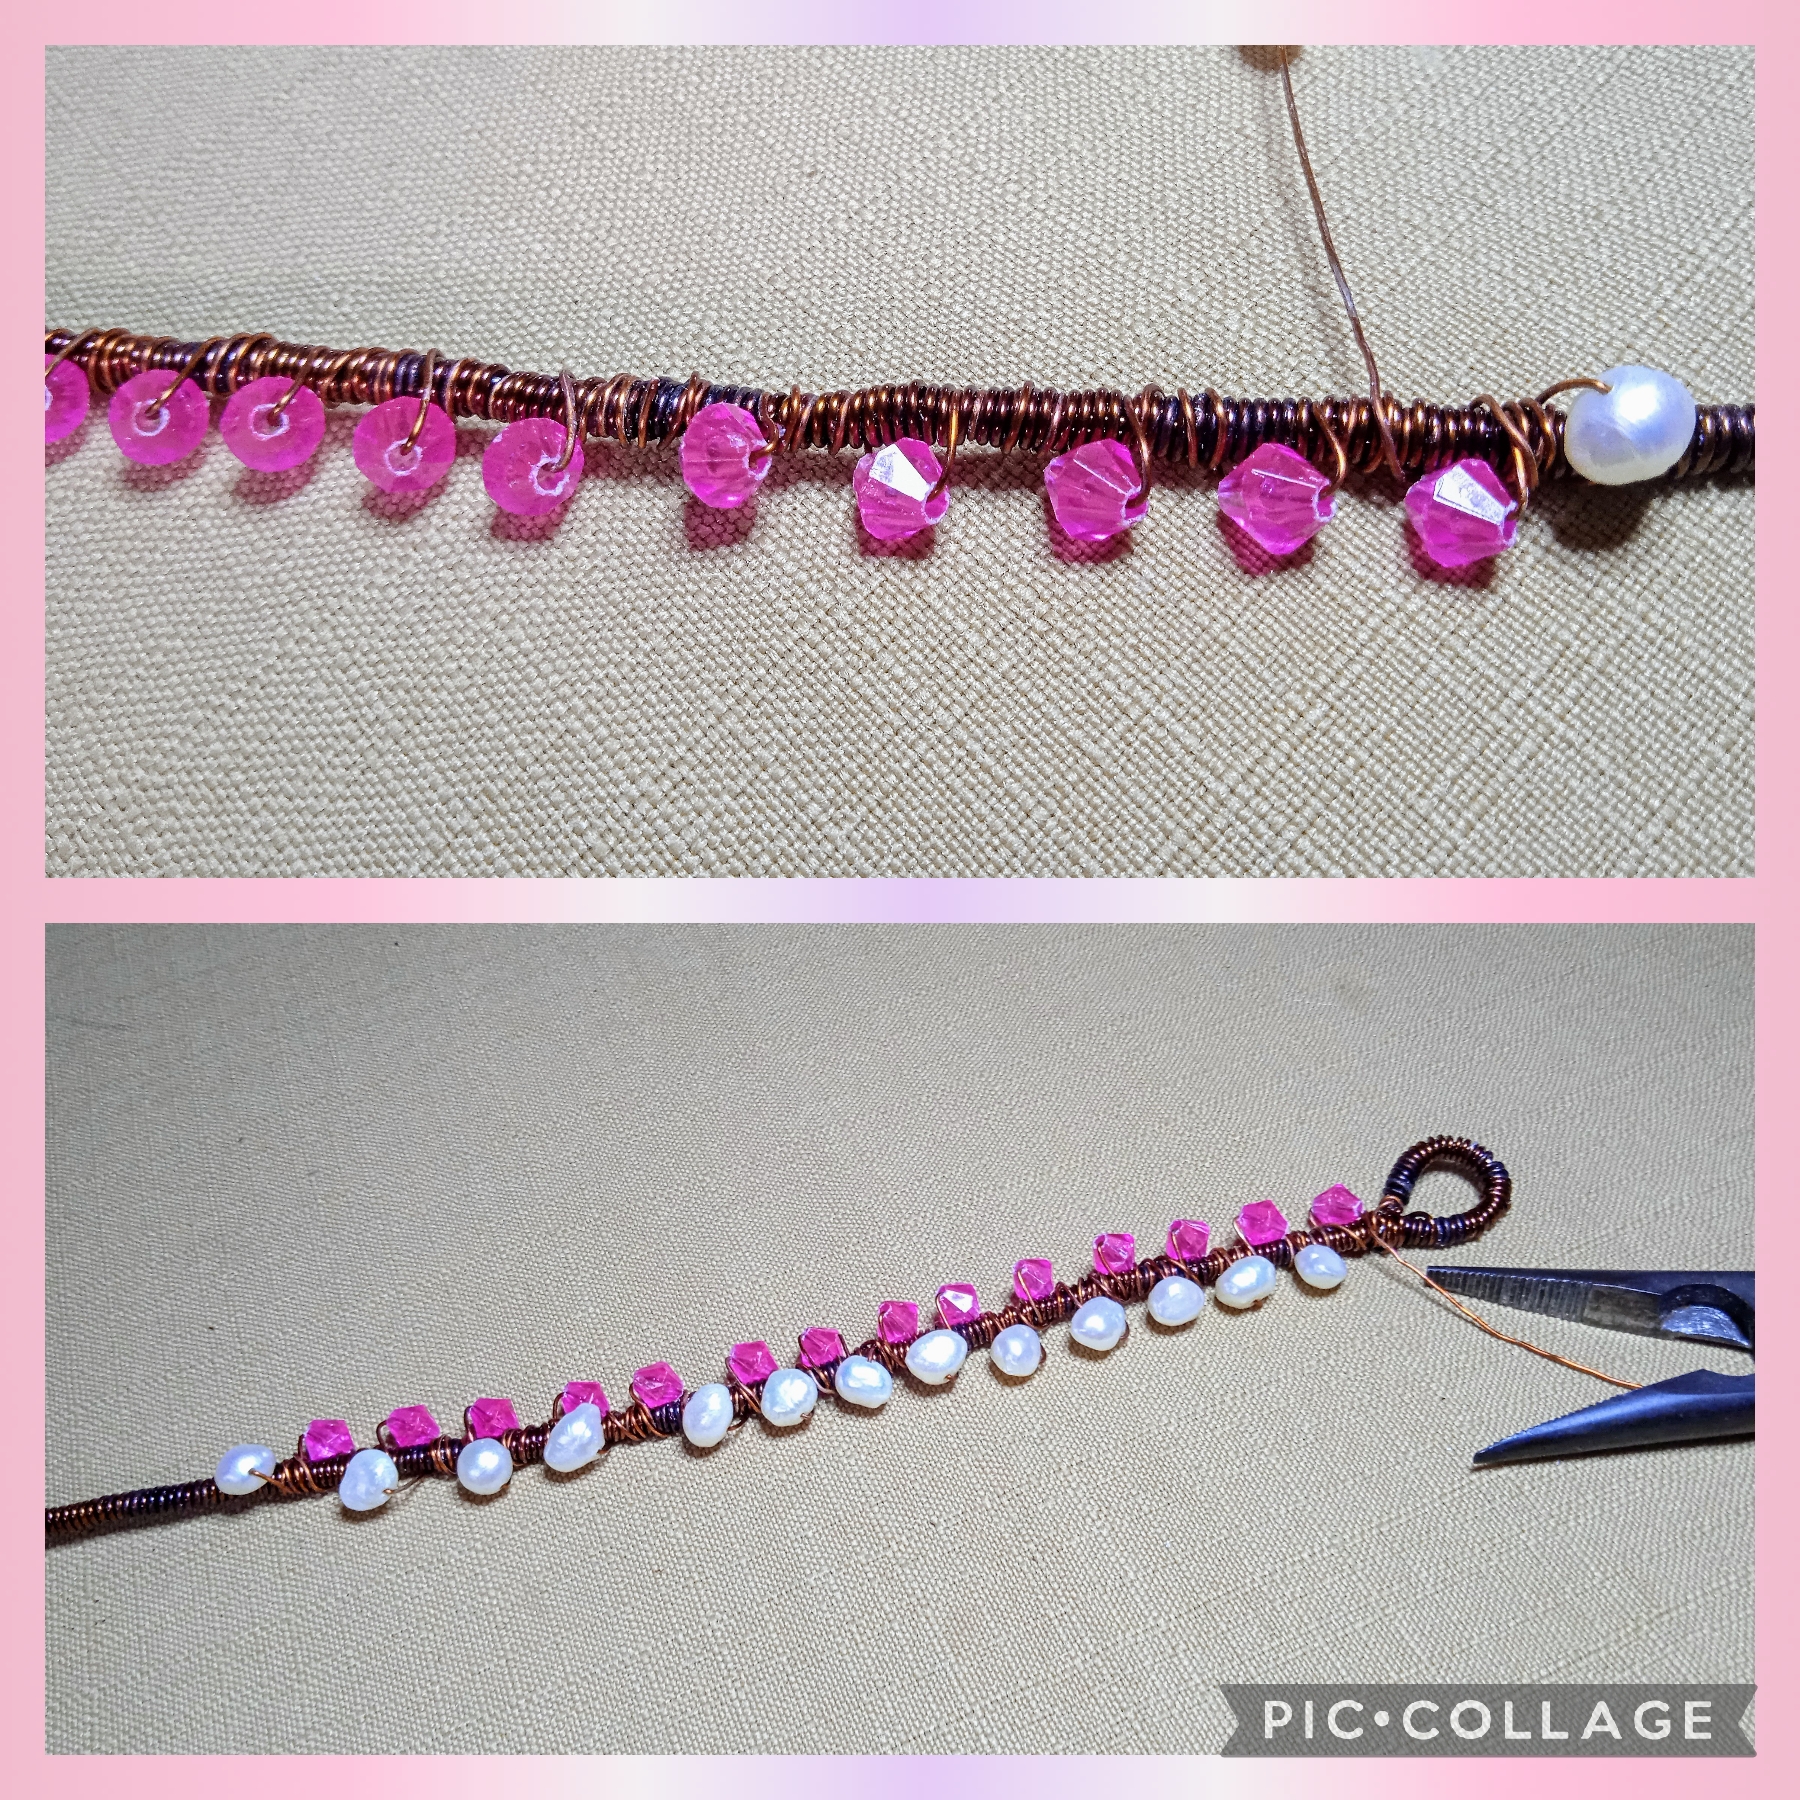
TERCER PASO:
En este paso voy a colocar del otro lado de la misma forma que la anterior trece perlitas de rio, la primera la pongo más arriba que la rosada para hacer un desnivel en el diseño y se vea más prolijo, después de colocar la última fijo con tres vueltas en el alambre, hago igual que el extremo anterior, con el pico del pote de silicón hago la otra argolla, la fijo bien con el alambre y con la pinza corto los excedentes y doblo bien con la pinza plana, así:
THIRD STEP:
In this step I am going to place thirteen river pearls on the other side in the same way as the previous one, I put the first one higher than the pink one to make a difference in the design and make it look neater, after placing the last one fixed with three turns on the wire, I do the same as the previous end, with the spout of the silicone pot I make the other ring, I fix it well with the wire and with the tweezers I cut the excess and fold well with the flat tweezers, like this:
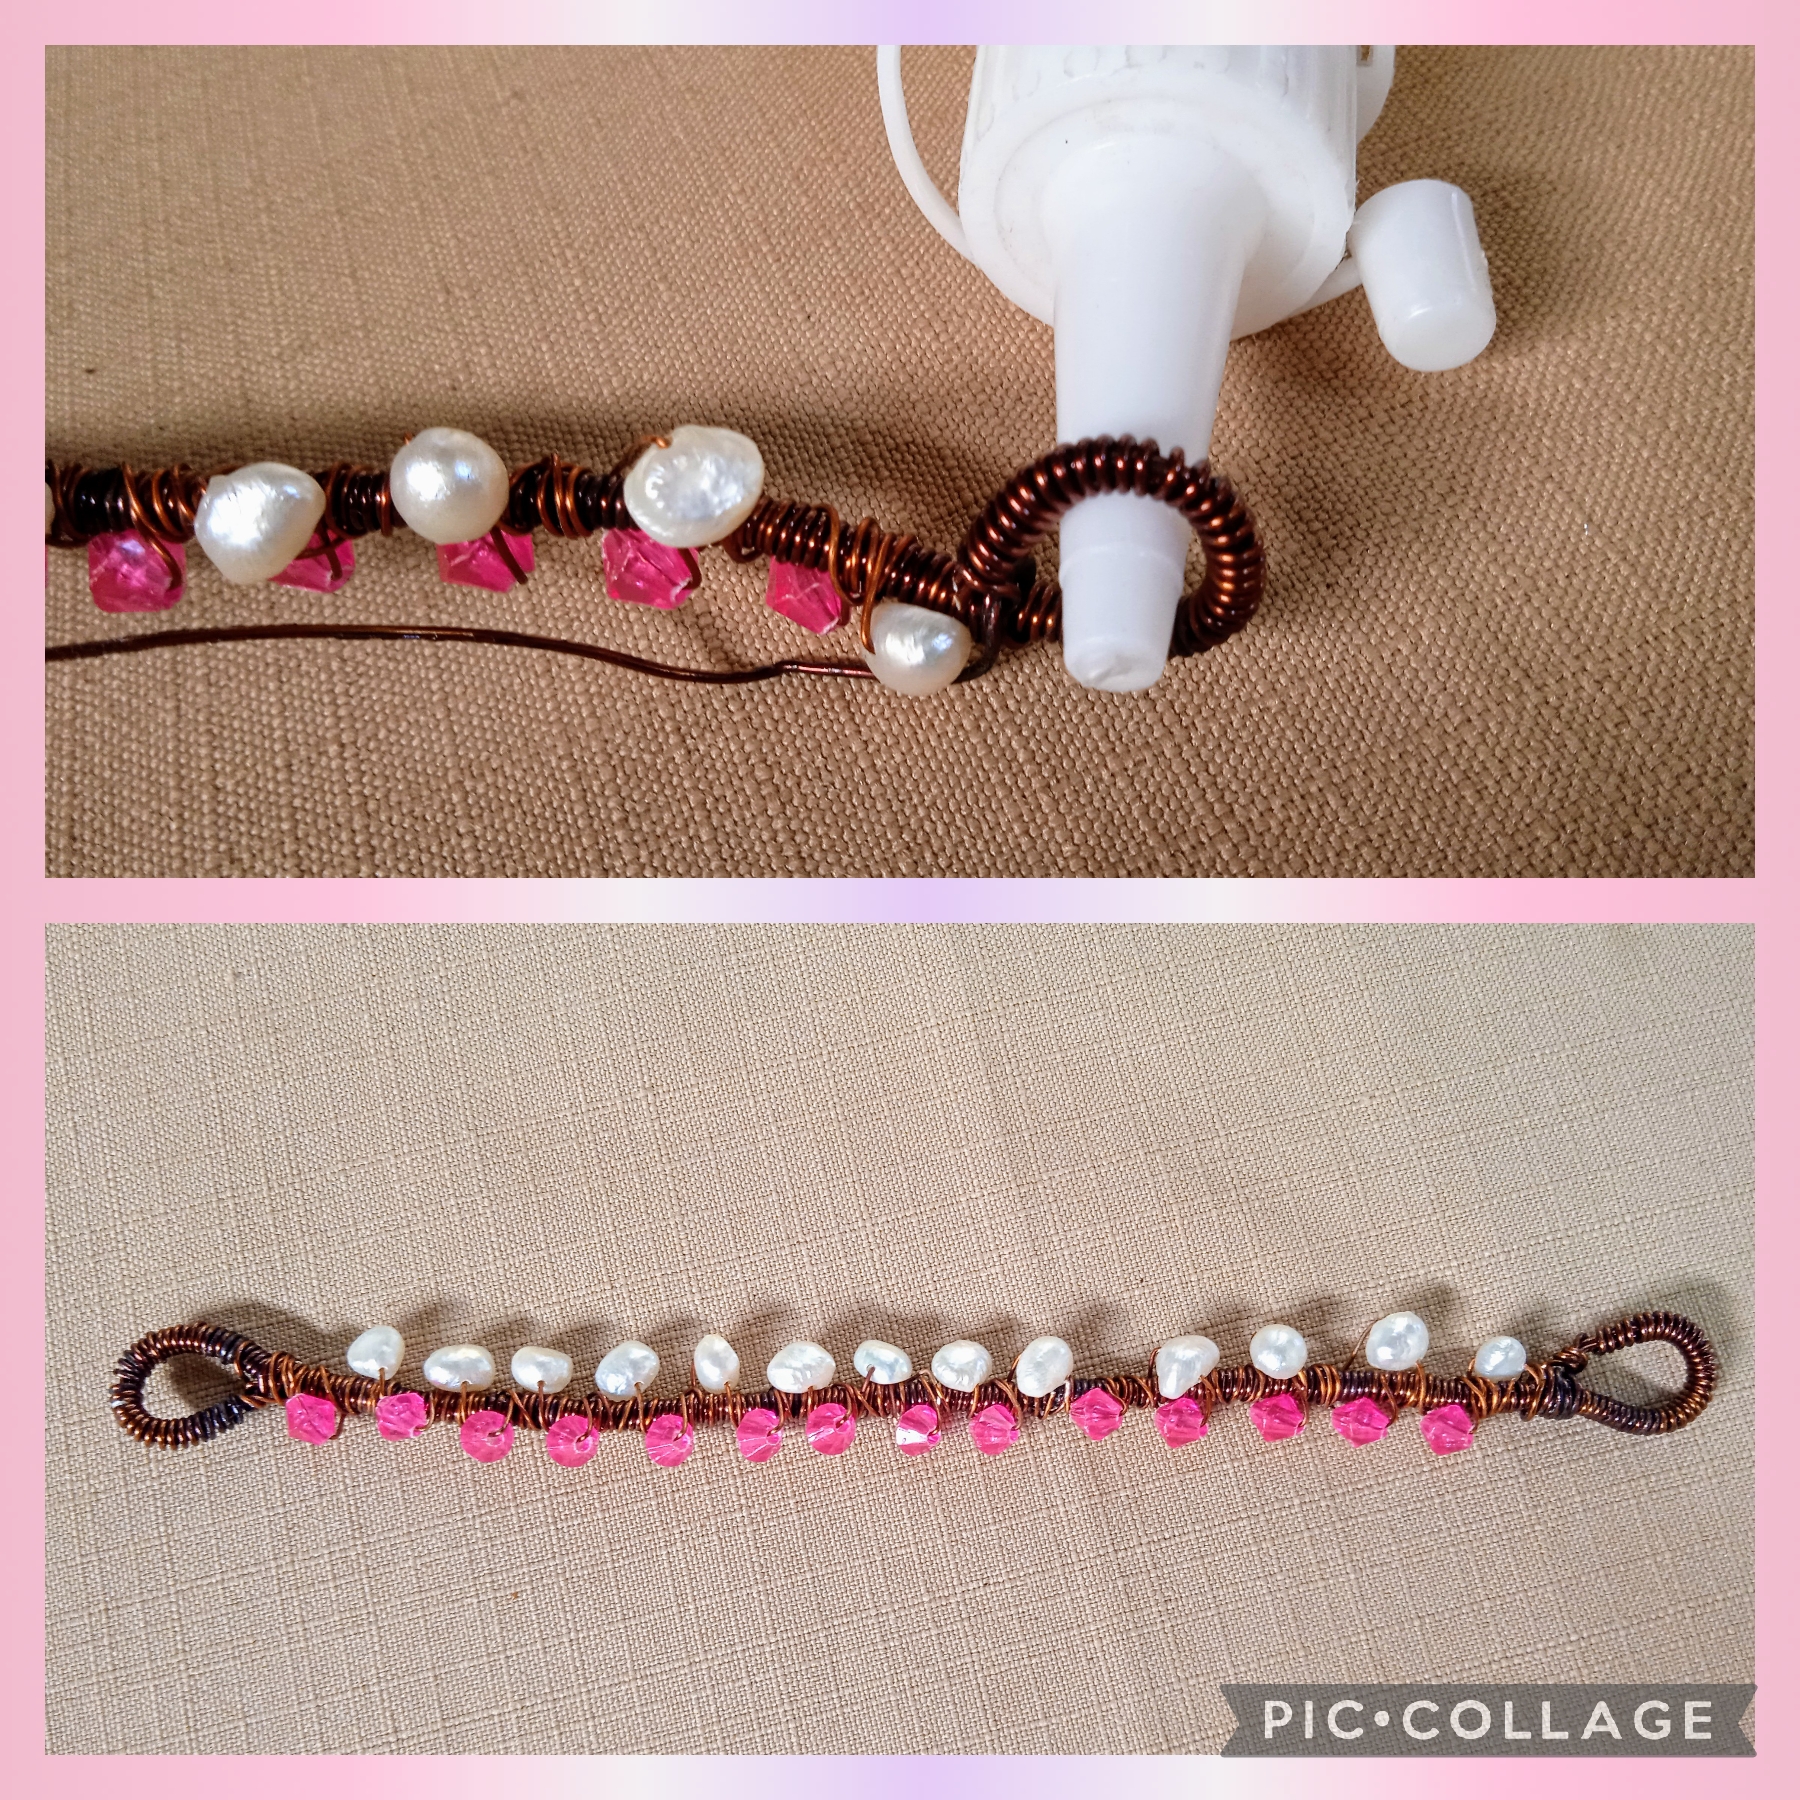
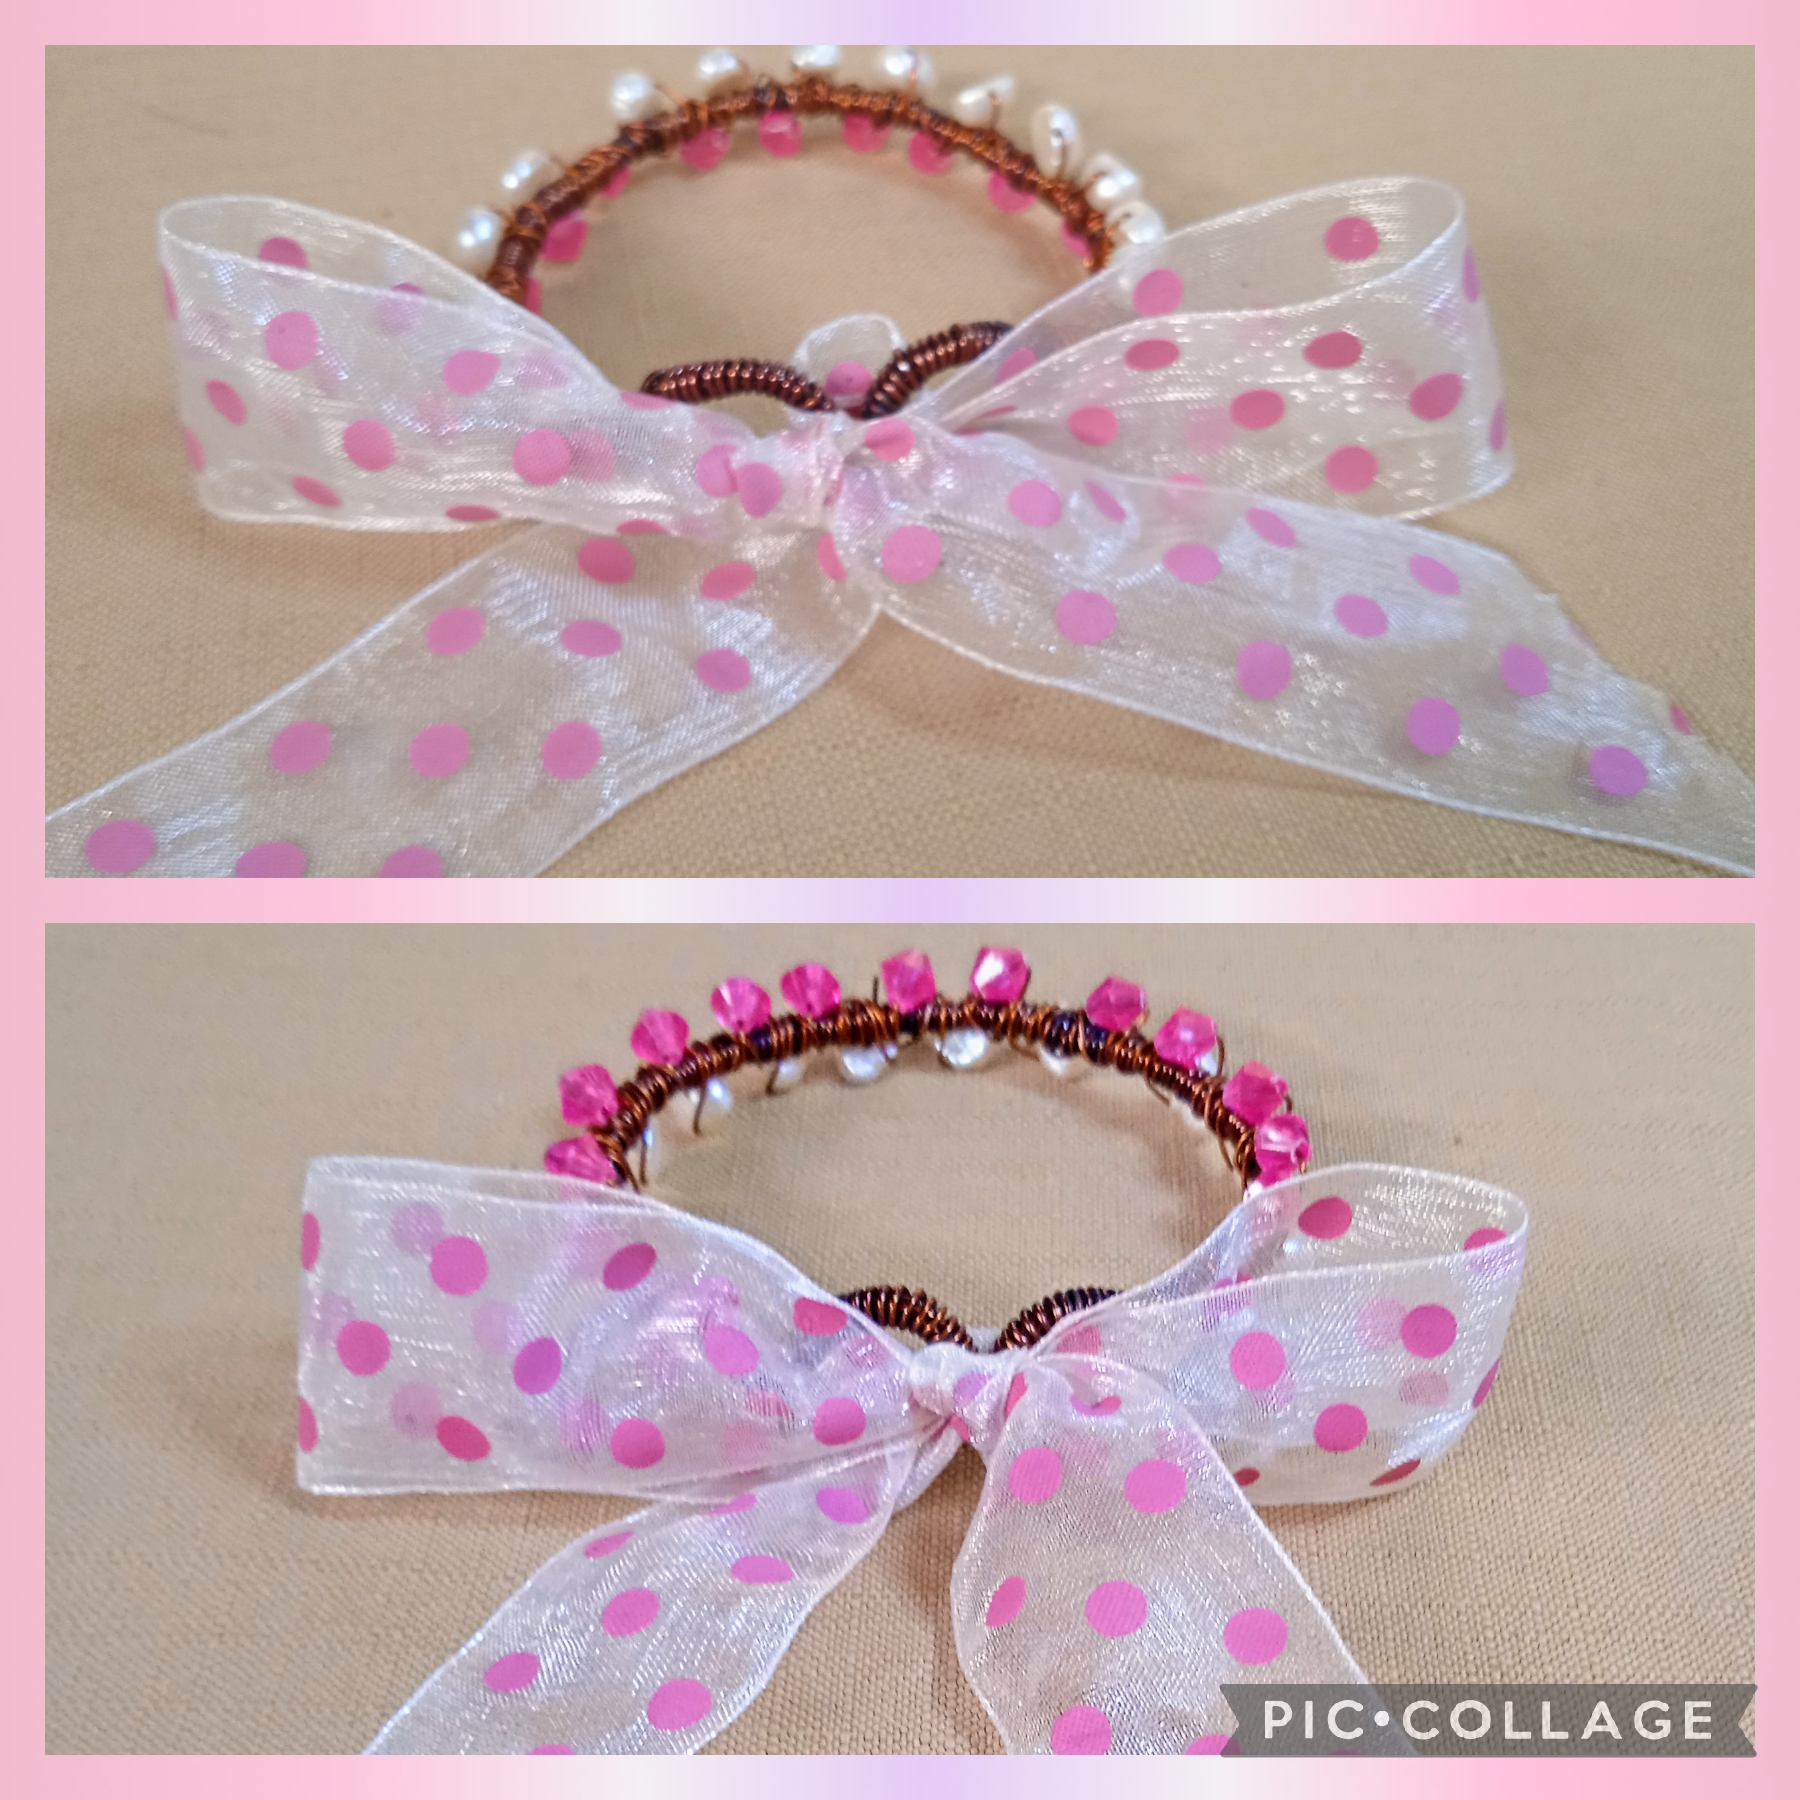
CUARTO PASO:
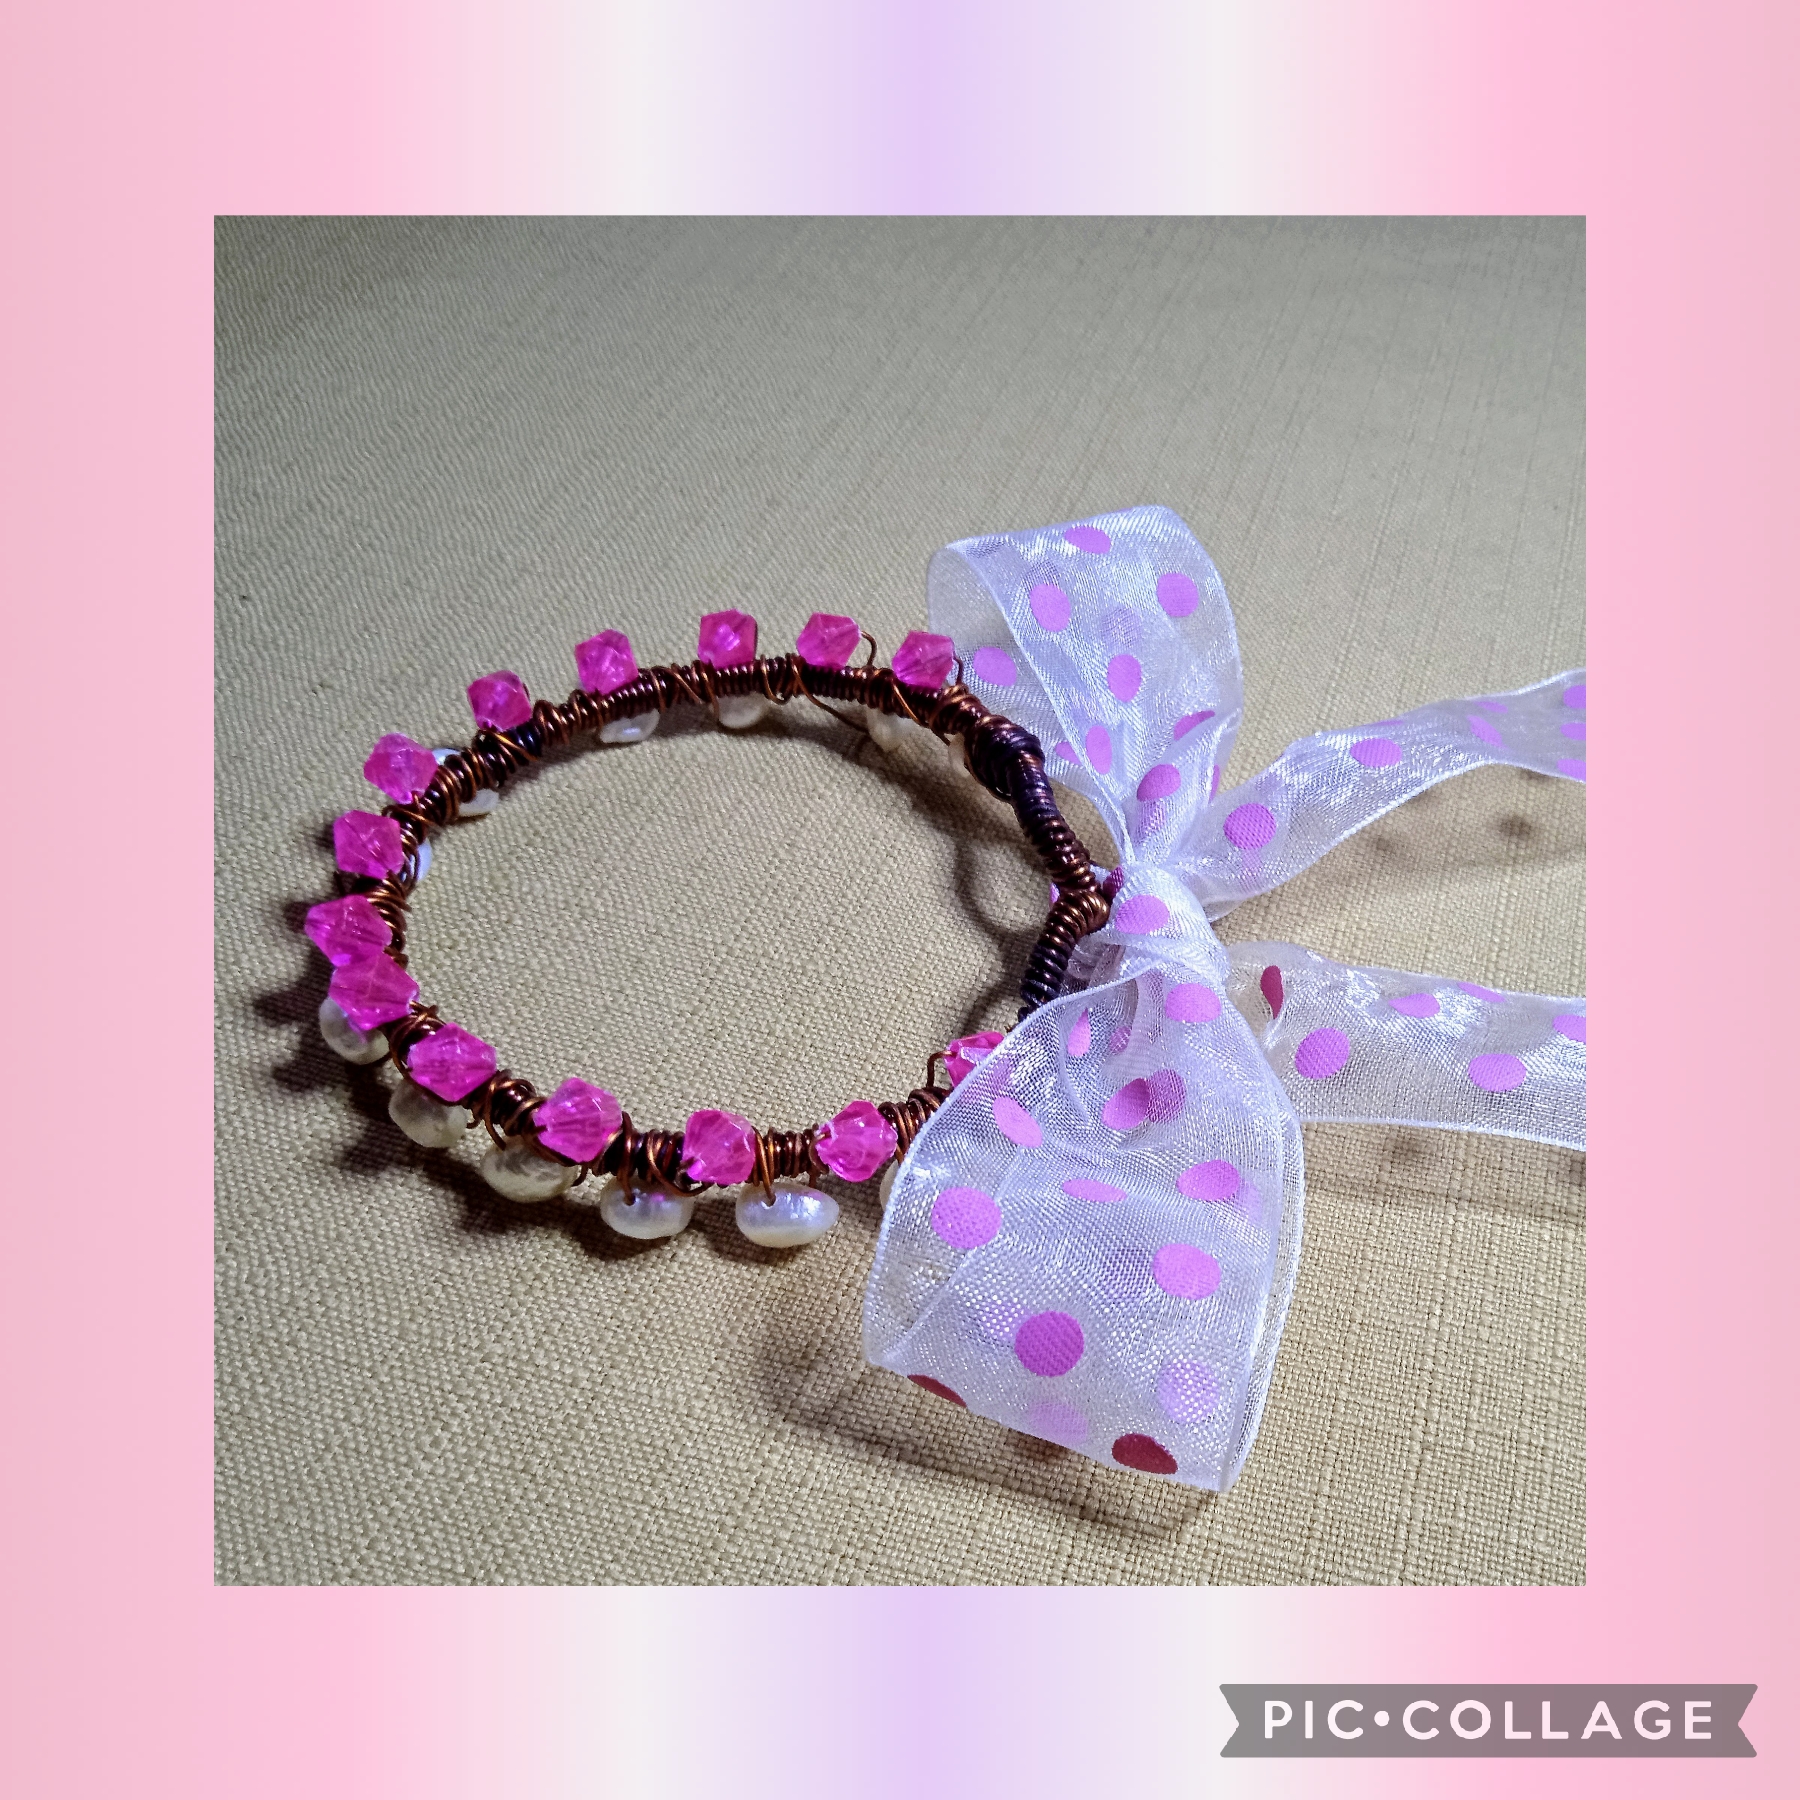
En este paso voy a dar forma a la Pulsera me apoyo con un vaso y la ajusto a el para que tome la forma redonda.
Tomo los treinta centímetros de la cinta transparente con puntos rosados y la inserto en las argollas y realizó un bonito 🎀 para terminar
FOURTH STEP:
In this step I am going to shape the Bracelet, I support myself with a glass and adjust it to it so that it takes the round shape.
I take the thirty centimeters of the transparent ribbon with pink dots and insert it into the rings and make a nice 🎀 to finish
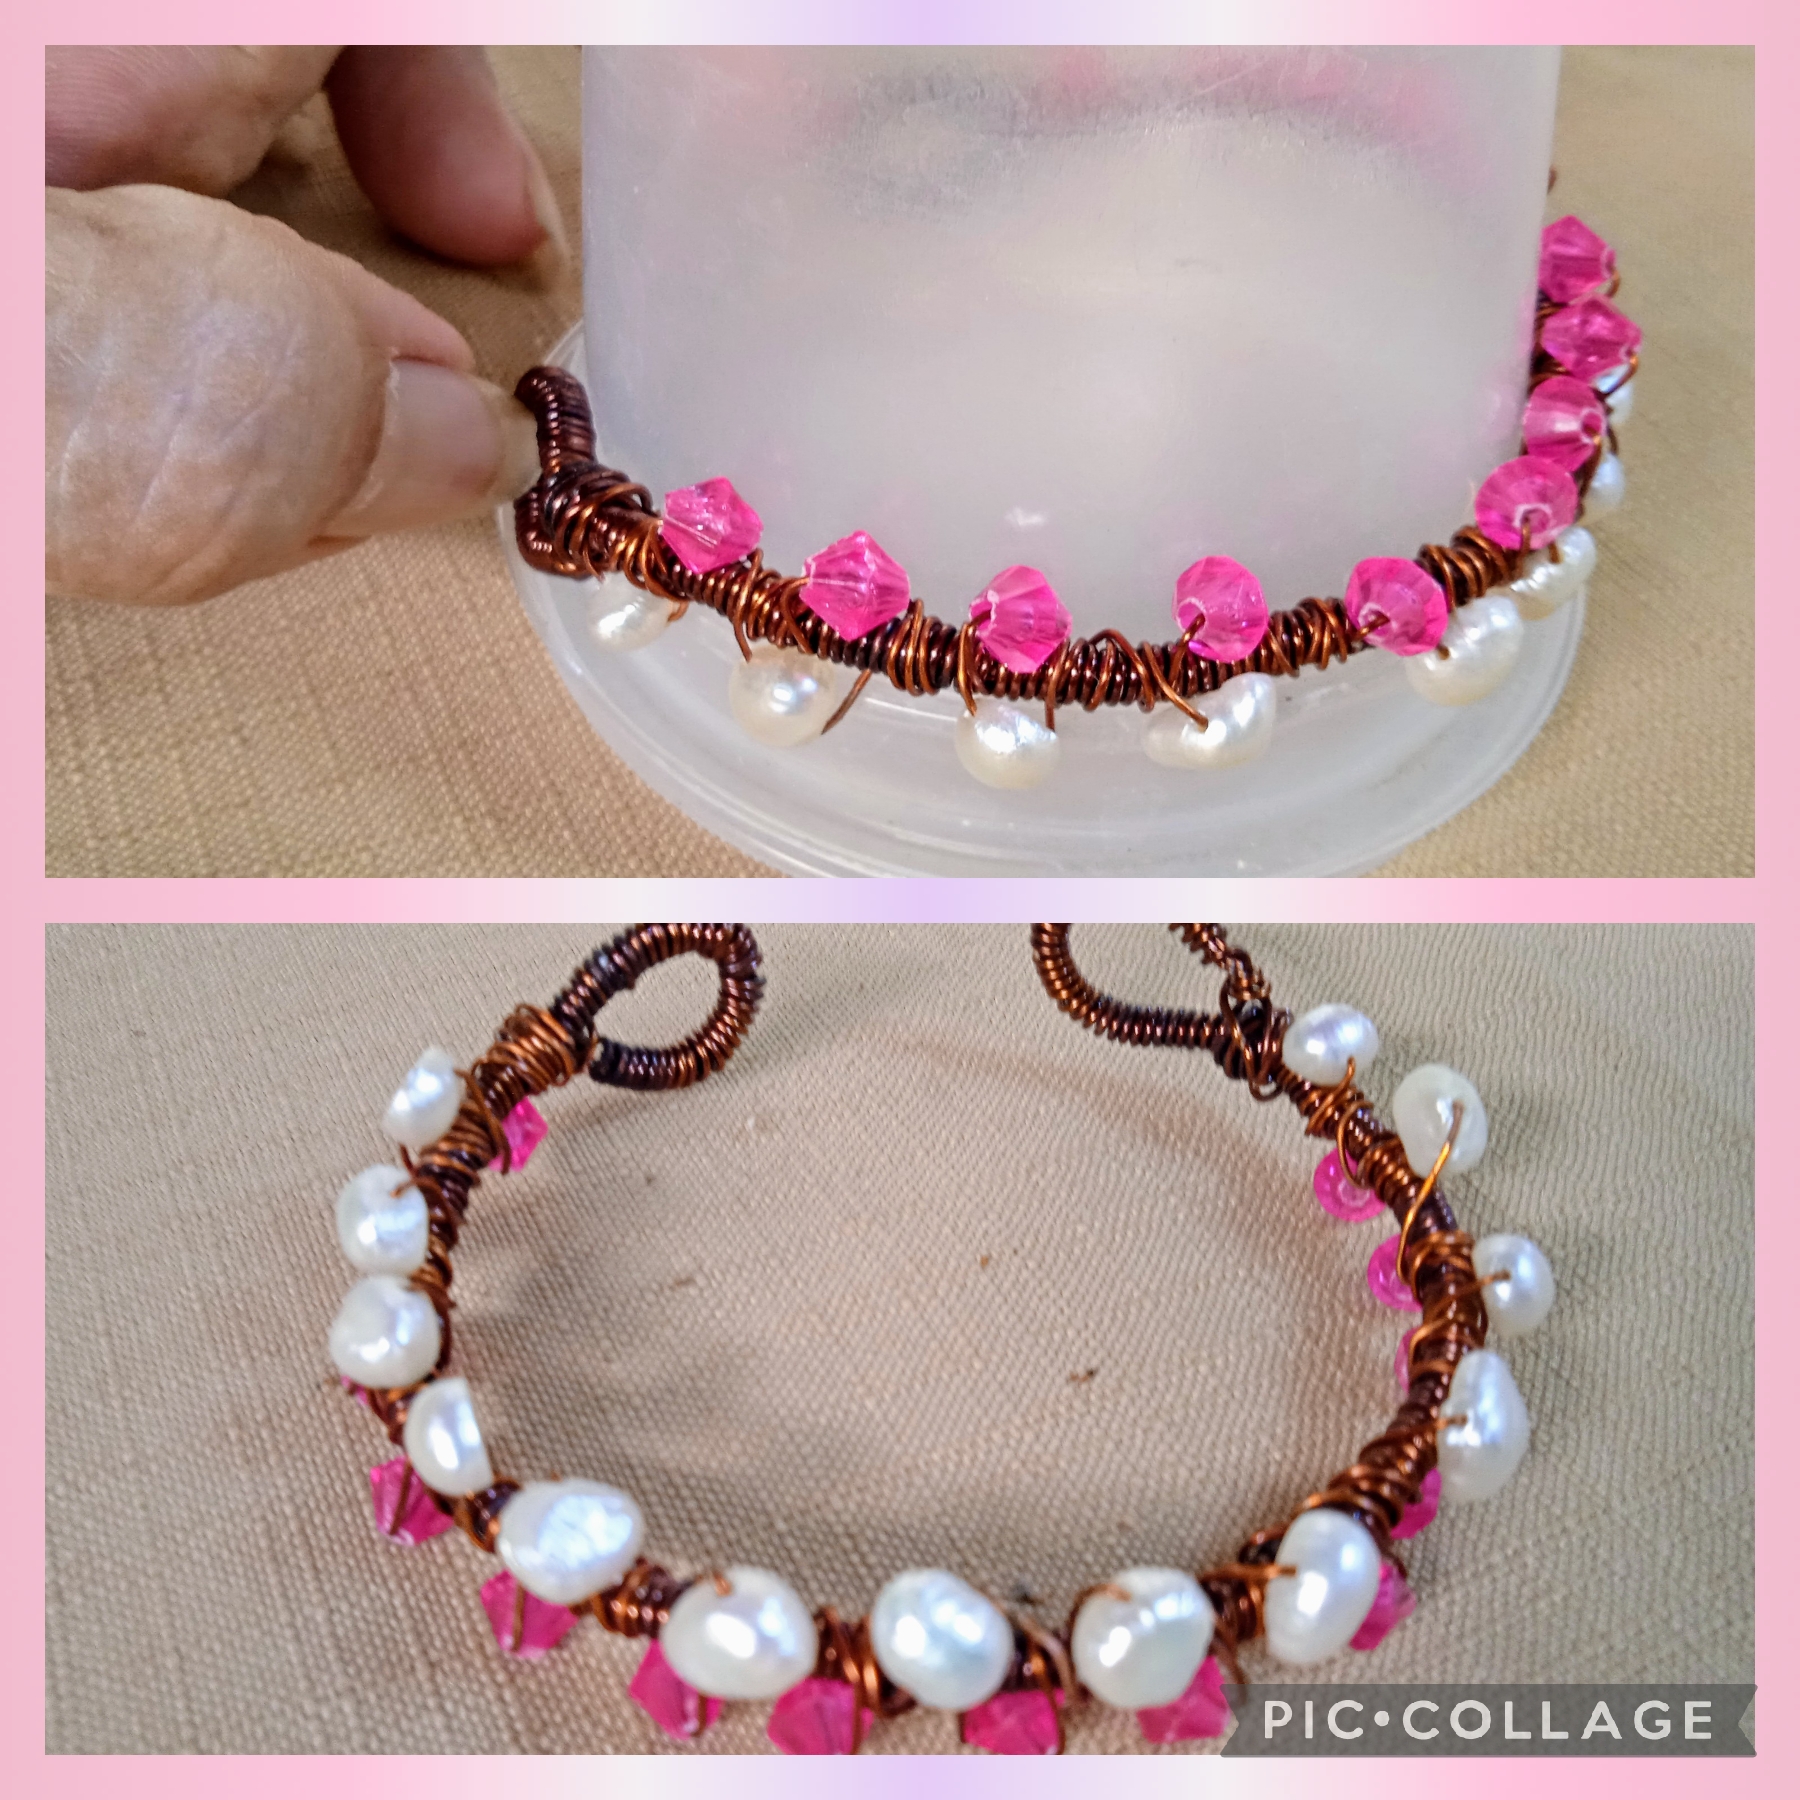
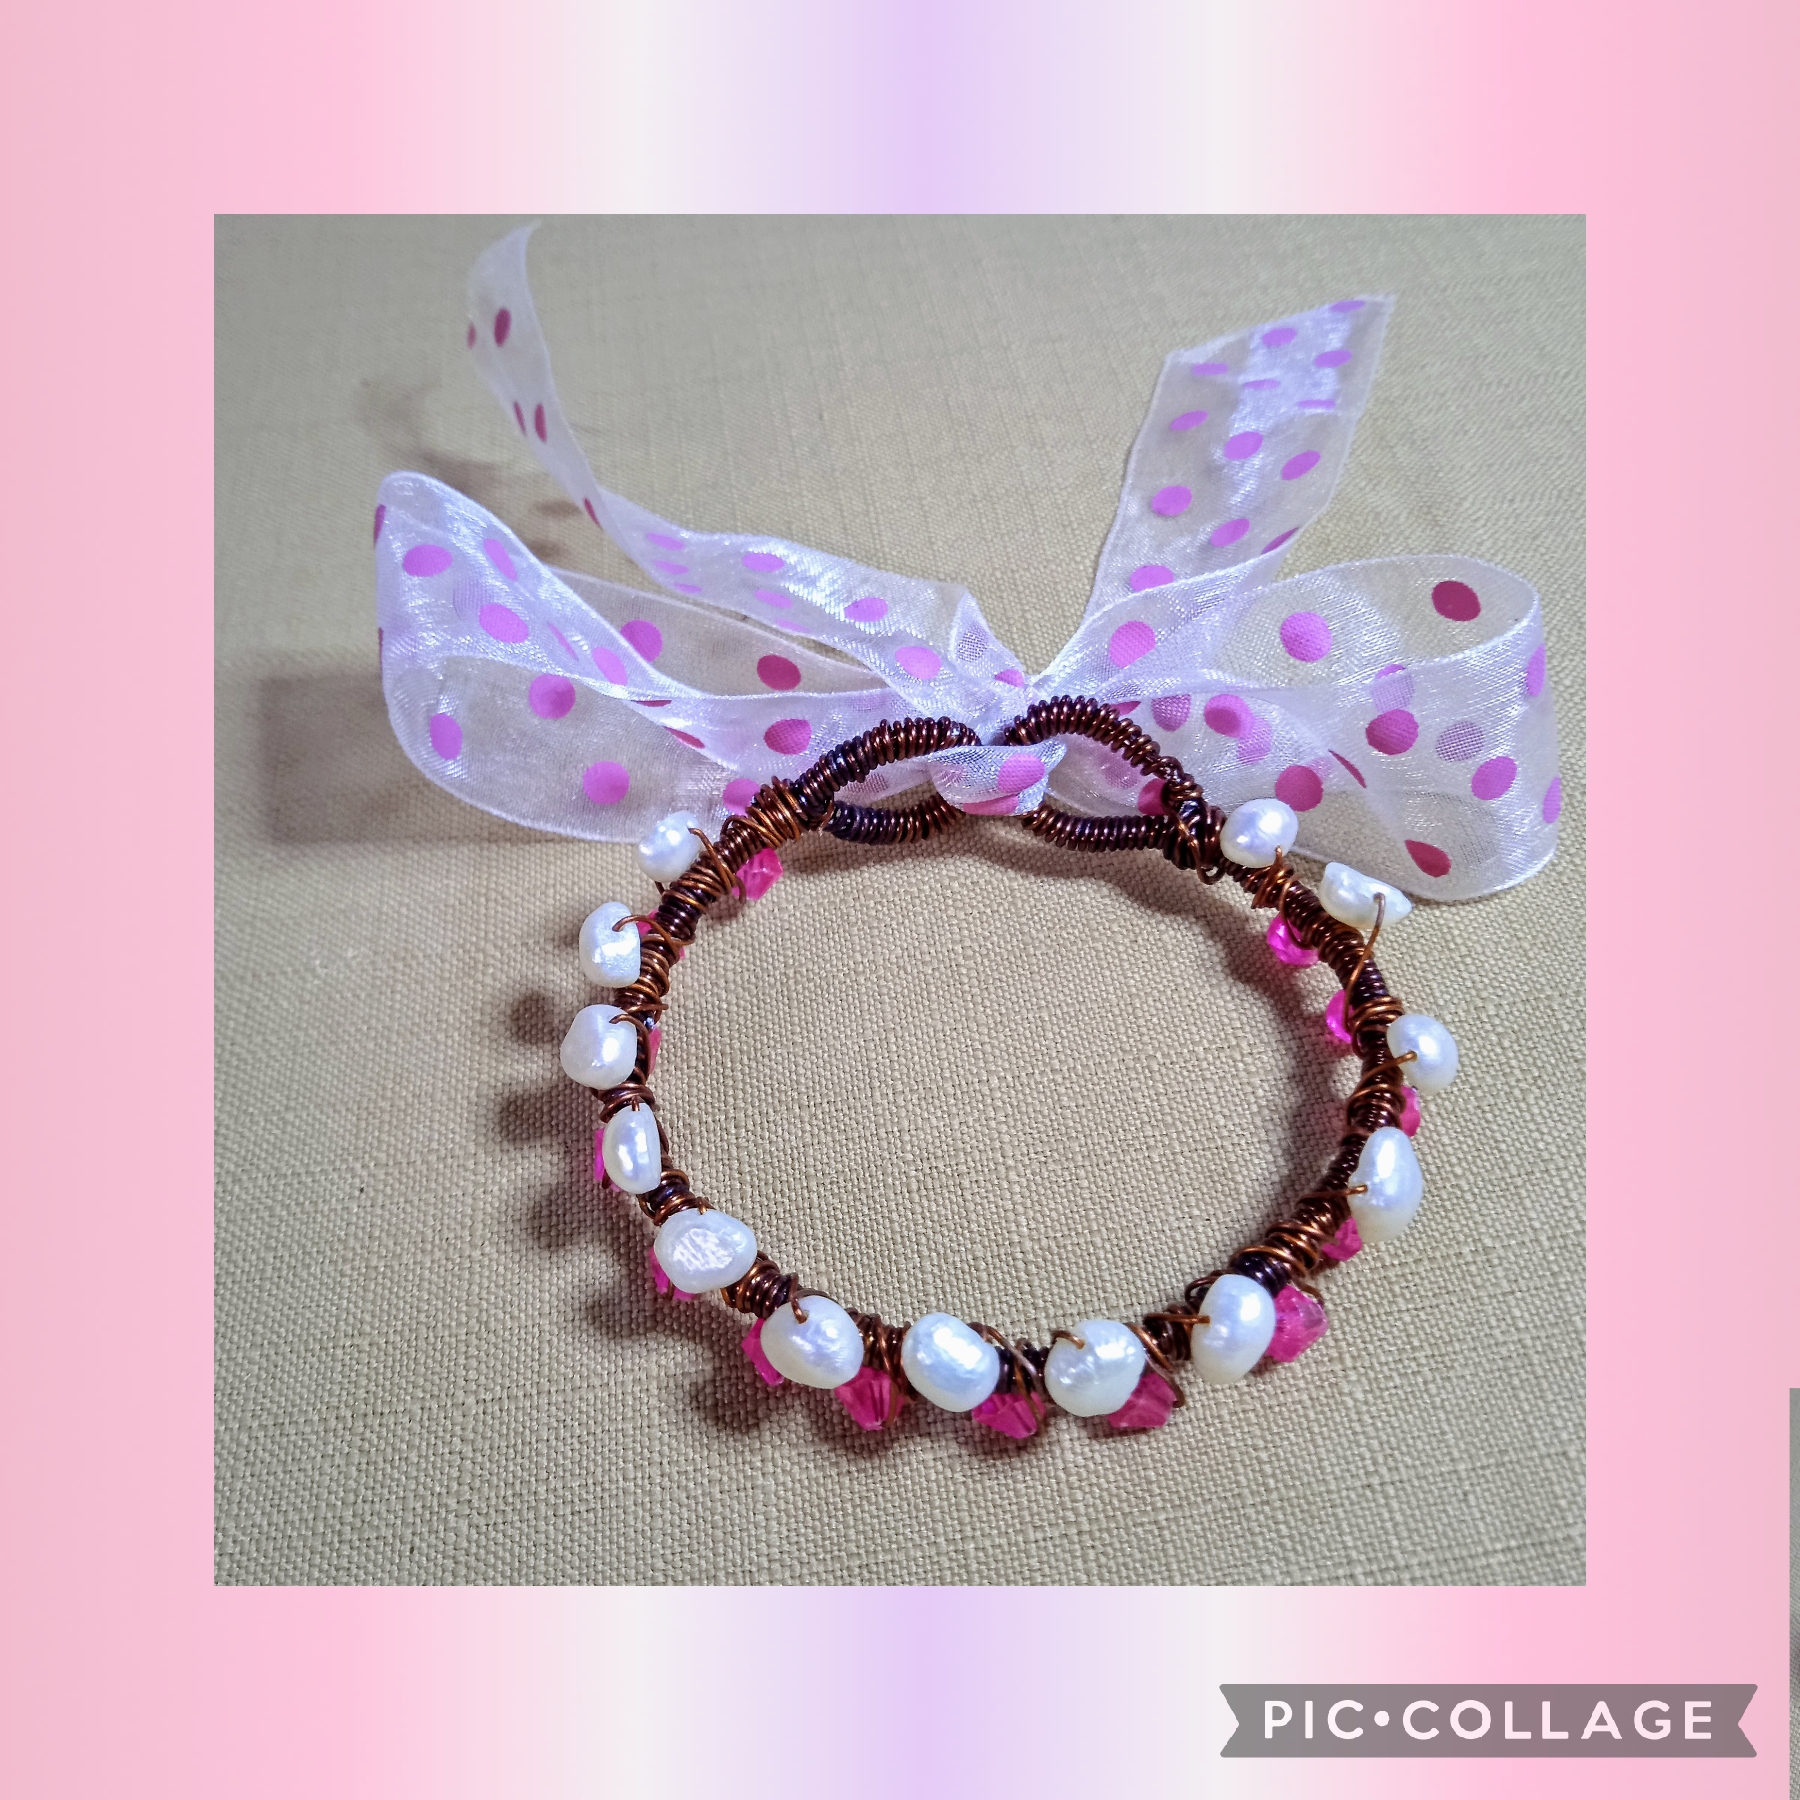
Artistas Creativos de las manualidades y la Joyería este es el resultado final de mi hermoso proyecto una bonita Pulsera realizada con la técnica del alambrismo y la coquetería de la moda espero que les guste y cómo siempre agradezco mucho a todos por leerme y ver mis publicaciones dejando sus valiosos comentarios; nos vemos en la próxima manualidad, bye bye.
Creative Artists of crafts and Jewelry, this is the final result of my beautiful project, a beautiful Bracelet made with the technique of wire work and the coquetry of fashion, I hope you like it and as always, I thank everyone very much for reading me and seeing my publications leaving your valuable comments; See you in the next craft, bye bye.

Las imágenes y redacción de este tutorial son de mi propiedad, las fotos fueron tomadas con mi teléfono celular redmi 9 y las edité con una aplicación gratis del mismo.
Para traducir texto use Google traductor.
The images and writing in this tutorial are my property, the photos were taken with my Redmi 9 cell phone and I edited them with a free application.
To translate text use Google translator.

Has sido votado por
PROYECTO ENLACE
'Conectando Ideas y Comunidades'
PROYECTO ENLACE es un proyecto de curación de habla hispana enfocado en recompensar contenido de calidad y apoyar autores en su proceso de crecimiento en HIVE.
Creemos y apostamos por el futuro de esta gran plataforma, y estamos muy emocionados de poder hacerla crecer junto a esta comunidad. Así que te invitamos a publicar en nuestra COMUNIDAD y estar atento a todas las actividades que tenemos preparadas y que estaremos publicando en breve.
¿QUIERES AUTOMATIZAR TUS GANANCIAS DE CURACIÓN? SE PARTE DEL PROYECTO ENLACE APOYANDO A NUESTRO TRAIL EN HIVE.VOTE INGRESA AQUÍ PARA CONOCER LOS DETALLES.
¿QUIERES INVERTIR ENLACE? DESCUBRE COMO HACERLO Y GENERAR INGRESOS DE FORMA SEMANAL MEDIANTE TU DELEGACIÓN DE HP AQUÍ TE EXPLICAMOS COMO.
Te invitamos a participar en nuestro servidor de Discord: https://discord.gg/3S9y7BbWfS
Atentamente
EQUIPO ENLACE 2024
Agradecida por el apoyo Equipo Enlace, me siento siempre muy halagada, gracias, gracias.
Hermoso estilo amiga @nhaydu ahora esta es la tendencia, lo bueno es que haces diferentes modelos y muy creativos, fuera de lo común, que bonito poder ver este lindo paso a paso y déjame decirte que me encanta el cierre de la pulsera, queda precioso es el toque de la cereza del pastel jeje. Saludos
Que lindo comentario @yolimarsg , la tendencia me lleva loca pues me tocó editar un curso de lazos por tres meses y ya no encuentro donde ponerlos, hasta los accesorios de cocina tienen lazos, y no creas las vaquitas y gallinitas lucen muy Coquette con sus 🎀 🤣🤣🤣 me encanta que te haya gustado la Pulsera, feliz día para ti 🌹
Hola amiga me gustó mucho tu pulsera.. el alambre es muy acertado para este estilo de joya.. y el lazo el color me encanta, saludos y éxitos.
Gracias @rouseeve26, me gustó mucho tu comentario halagador y detallista para describir mi pulsera; me alegro mucho, saluditos que estés muy bien.🌹
Me encanta el toque final del lazo 🎀.
Quedó súper hermosa.
Grácias amiga es el toque de la coquetería, saluditos @emmaris🌹