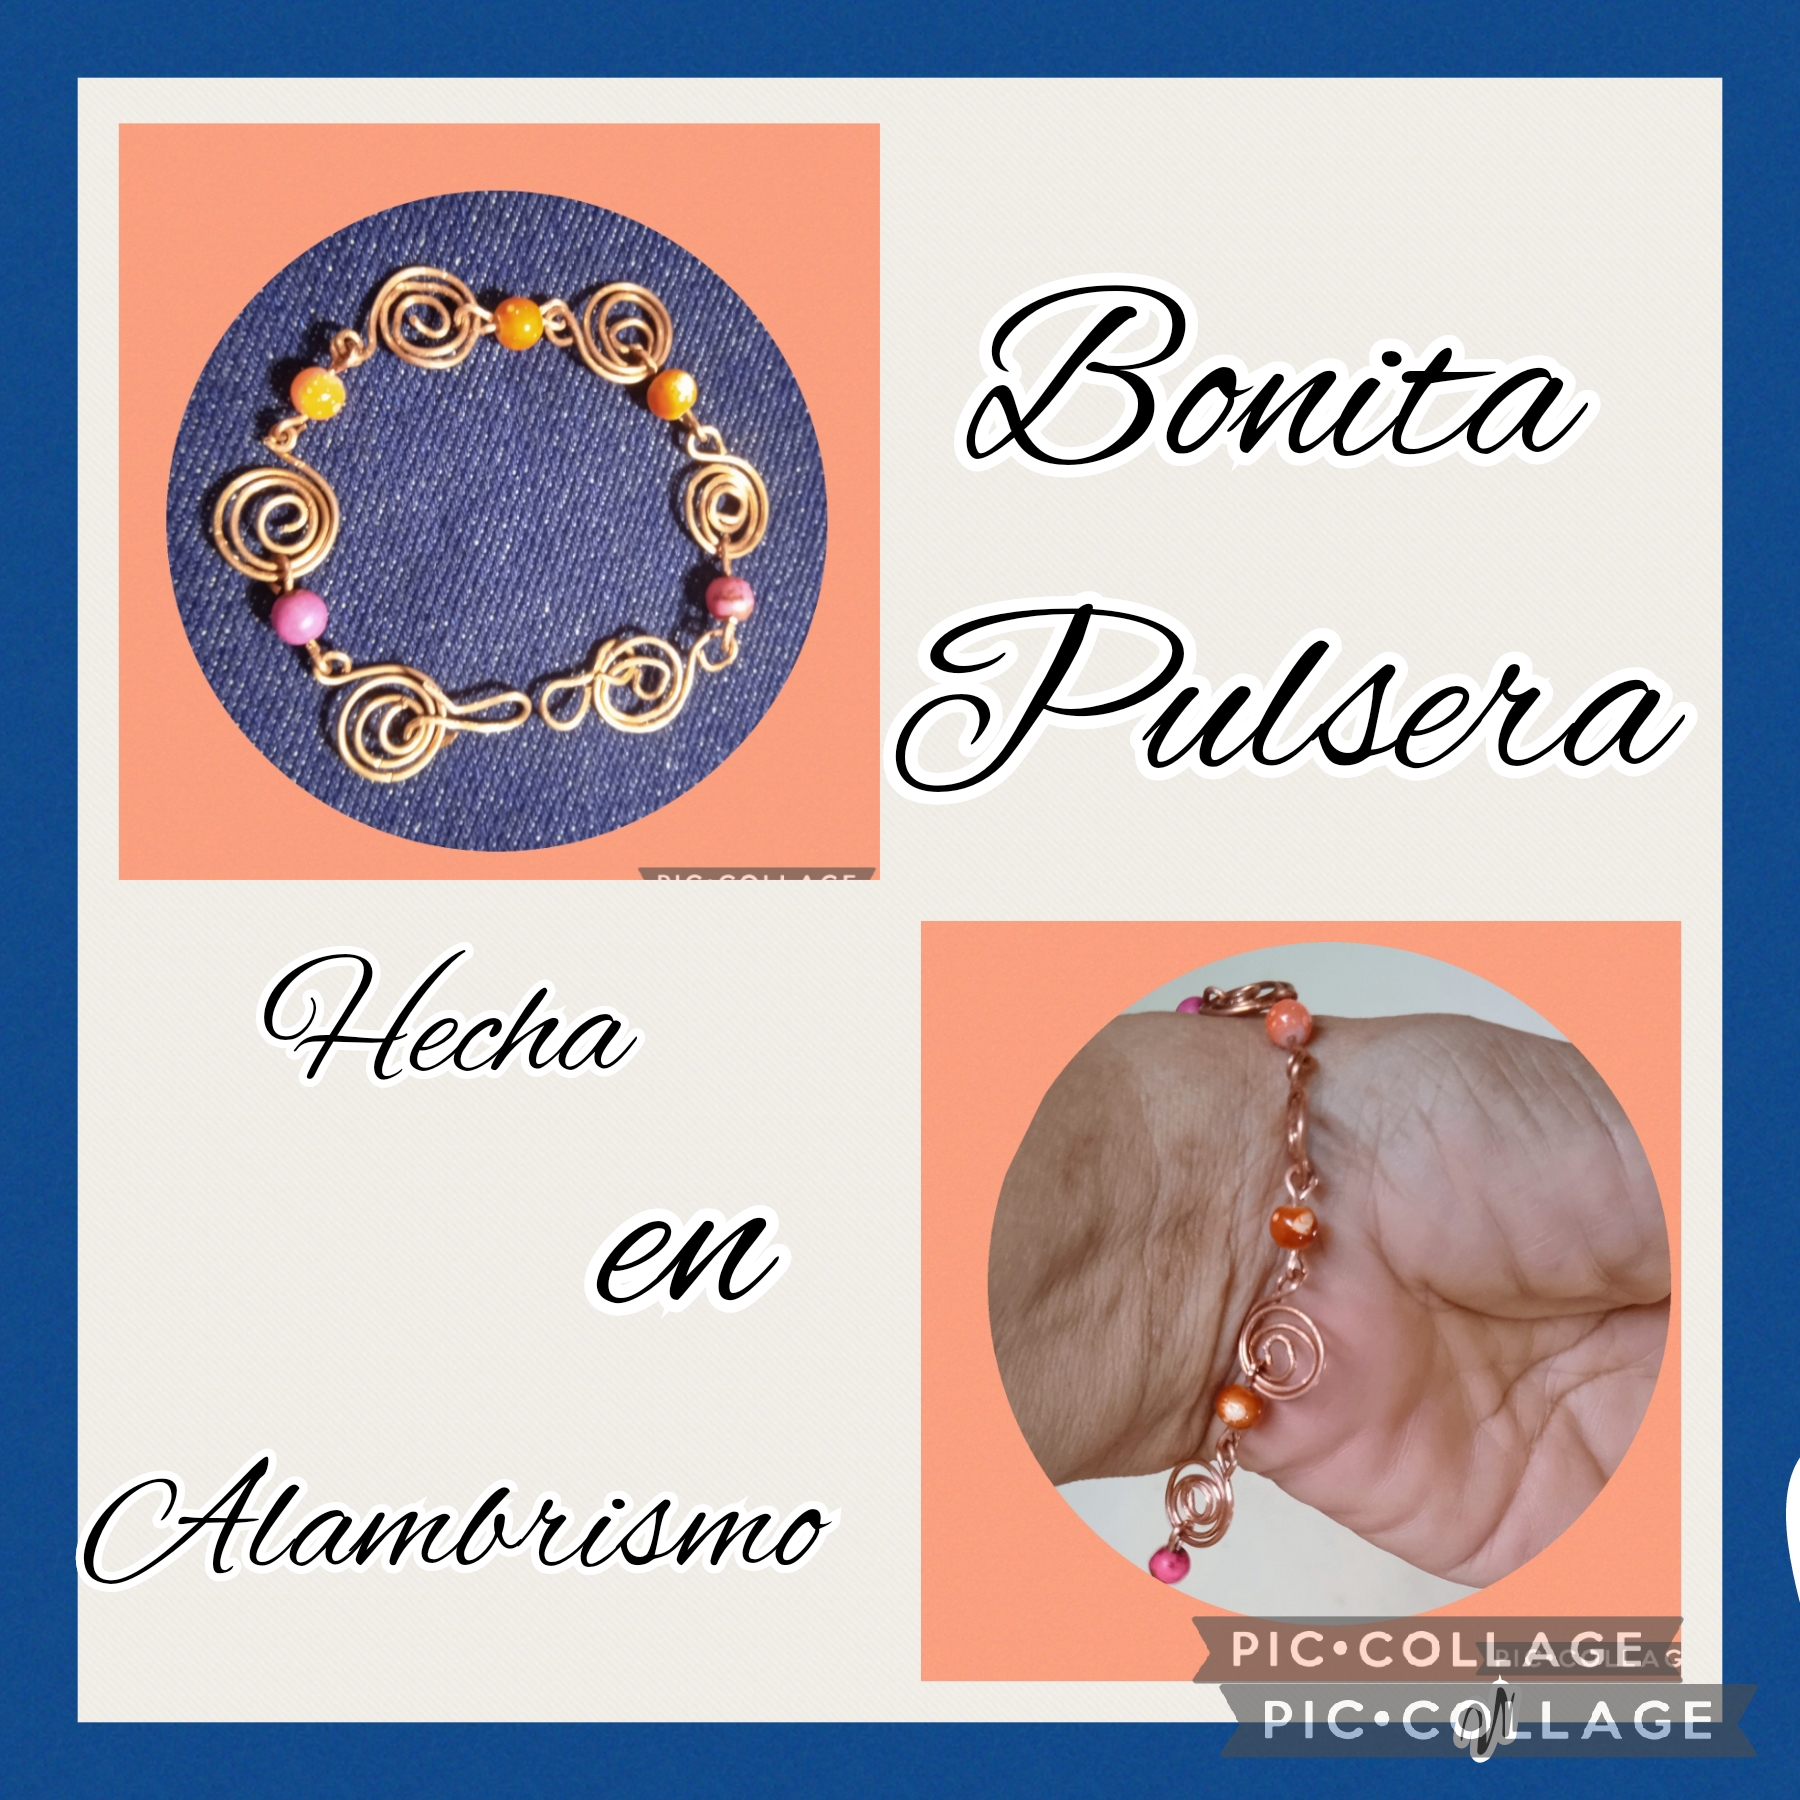
Tutorial: This is how I made a beautiful bracelet using the wire technique.// [Esp-Eng]
Saluditos Artistas Creadores de las manualidades y la Joyería; como siempre mis mejores bendiciones de sanidad y felicidad para todos, ya estamos en la mitad de una nueva semana y casi listos para despedir el mes de marzo un mes que aqui en Venezuela es muy festivo pues en muchos estados tienen a San José como Patrono y celebran ferias en su honor, así como las fiestas de Elorza, que son muy famosas y comentadas.
Bueno en mi manualidad pasada les hablé que mis labores de tres semanas serían dedicada al alambre ya que me fue asignado un programa que tiene que ver con la elaboración de piezas usando la Técnica del Alambrismo, así que empecé diseñando una pulsera muy fácil de elaborar pero mostrando como entorchar el alambre para realizar formas y argollas como primera lección.
Quise compartir con ustedes su elaboración y sigan leyendo para que vean el paso a paso de como la hice:
Greetings Artists Creators of crafts and Jewelry; As always, my best blessings of health and happiness to all, we are already in the middle of a new week and almost ready to say goodbye to the month of March, a month that here in Venezuela is very festive because in many states they have Saint Joseph as Patron and They celebrate fairs in their honor, as well as the Elorza festivals, which are very famous and talked about.
Well, in my last craft I told you that my three-week work would be dedicated to wire since I was assigned a program that has to do with making pieces using the Wire Technique, so I started by designing a bracelet that was very easy to make but showing how to twist the wire to make shapes and rings as a first lesson.
I wanted to share with you its preparation and keep reading so you can see the step by step of how I made it:
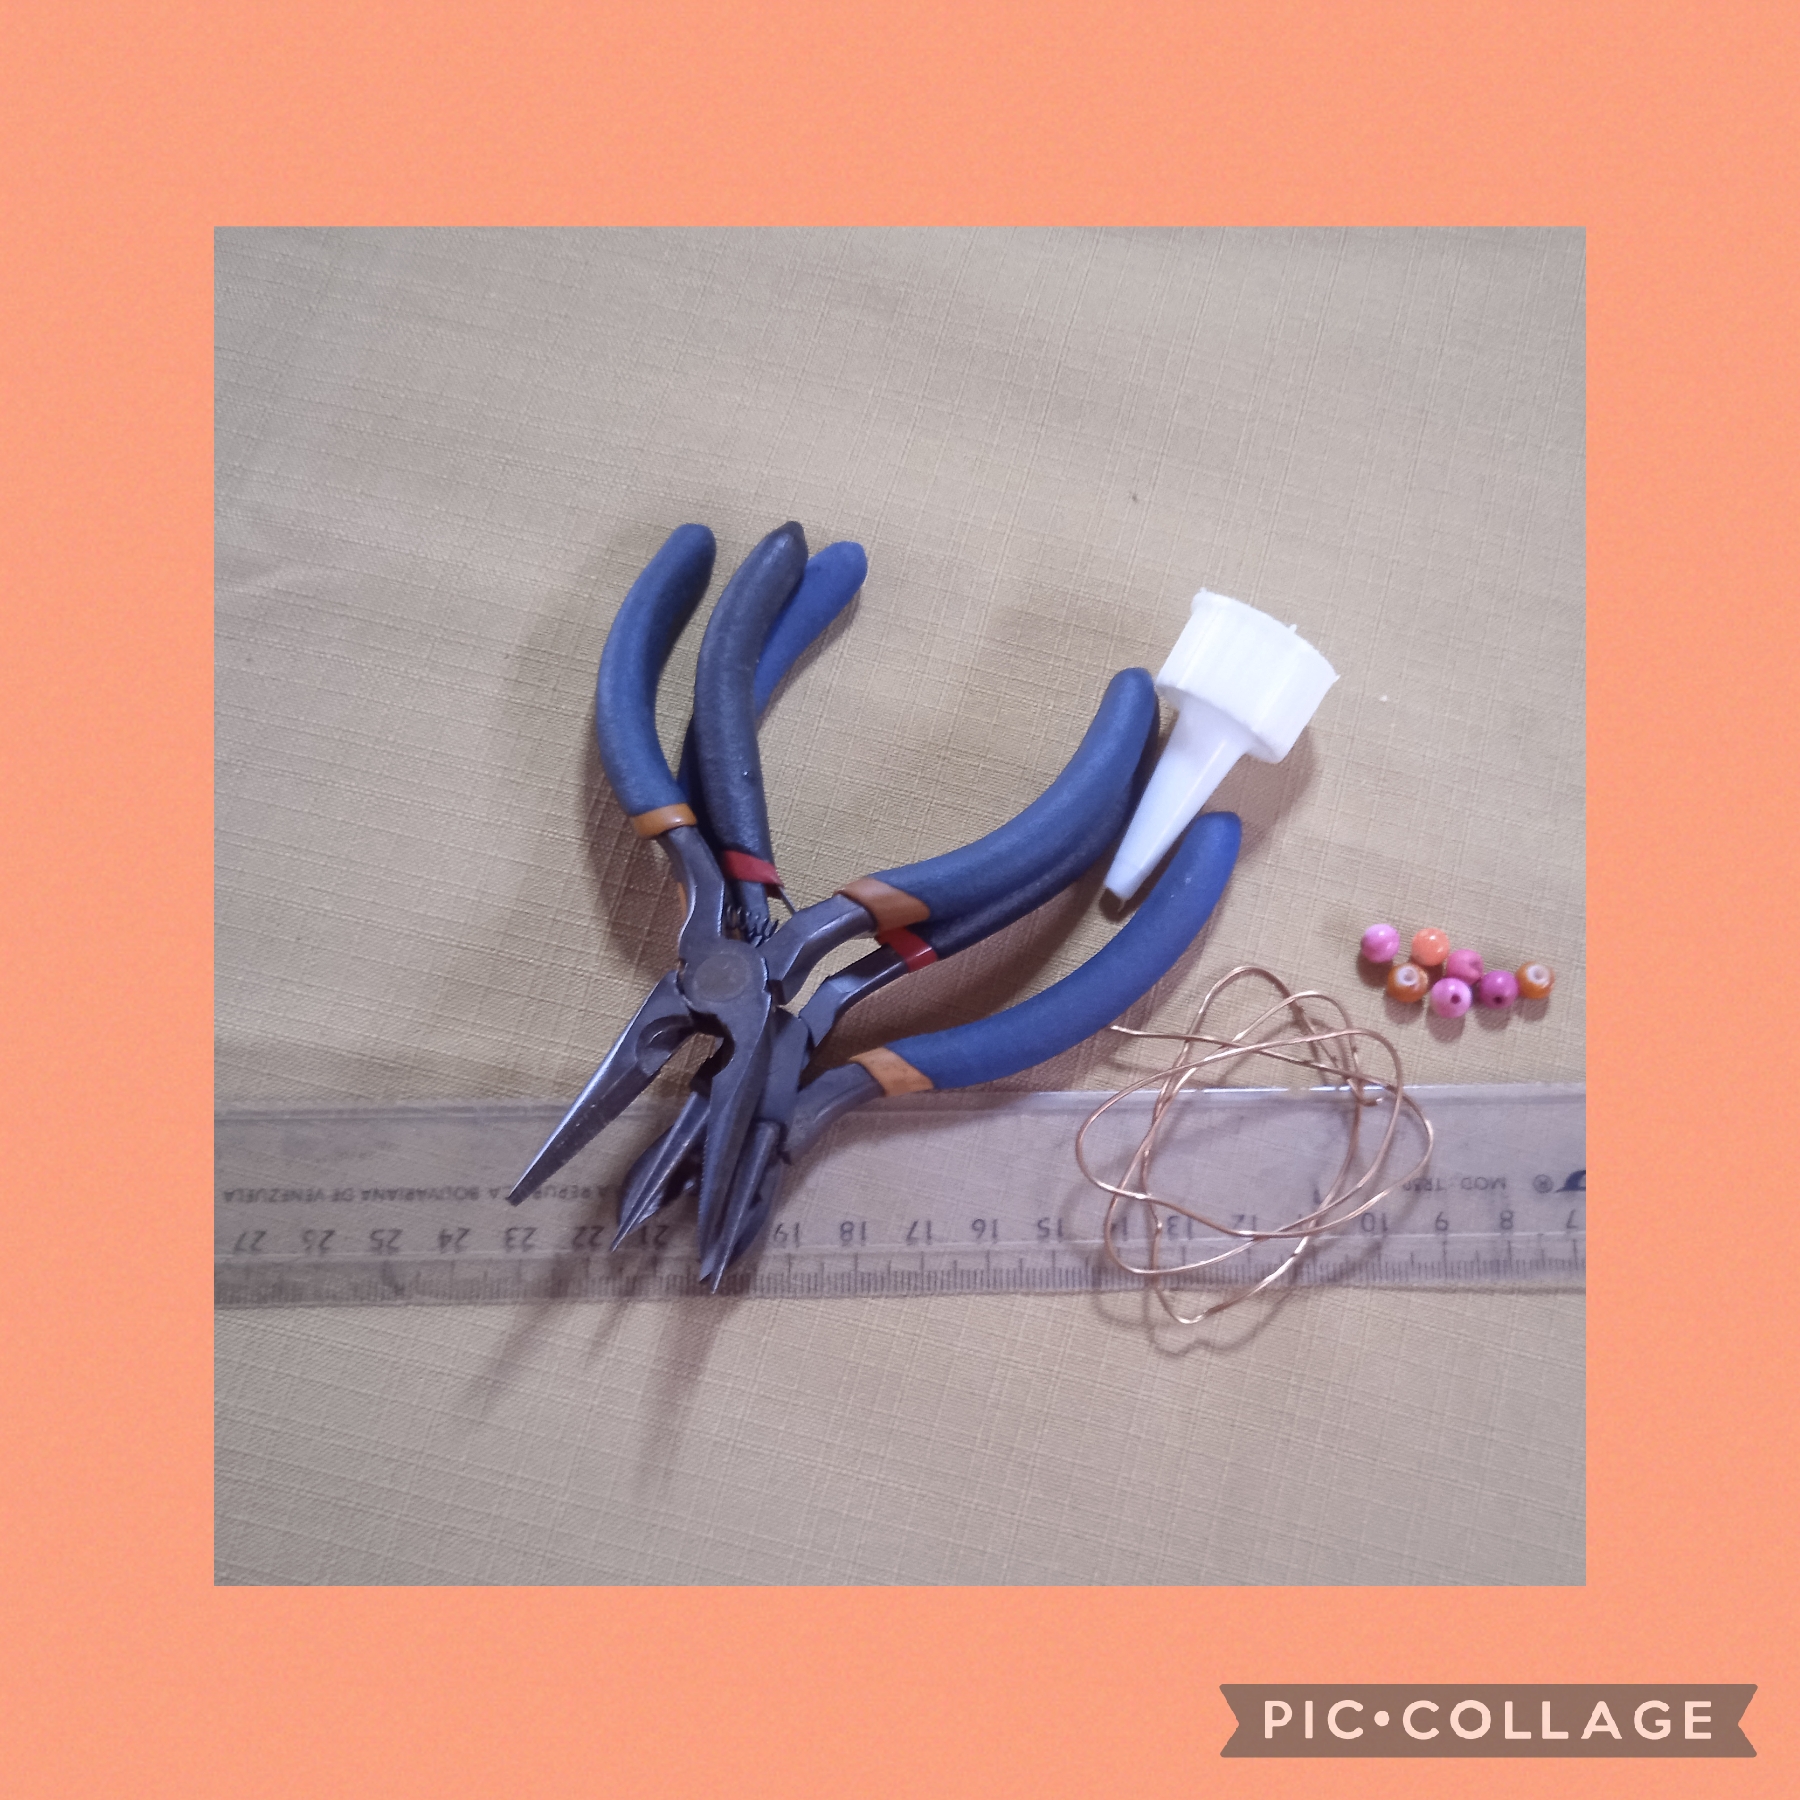
MATERIALES USADOS EN LA ELABORACIÓN DE ESTA BONITA PULSERA:
✓ Alambre de cobre calibre 24 "
✓ Cinco Piedras acrílicas número dos, en
Tonos de rosado y naranja.
✓ Pinza punta redonda.
✓ Pinza plana.
✓ Pinza de corte.
✓ Regla.
✓ Tapa de frasco de silicón.
MATERIALS USED IN THE PREPARATION OF THIS BEAUTIFUL BRACELET:
✓ 24" gauge copper wire
✓ Five acrylic stones number two, in
Shades of pink and orange.
✓ Round tip tweezers.
✓ Flat clamp.
✓ Cutting clamp.
✓ Rule.
✓ Silicone jar lid.
CON ESTOS SENCILLOS Y POCOS PASOS ELABORÉ ESTÁ HERMOSA PULSERA:
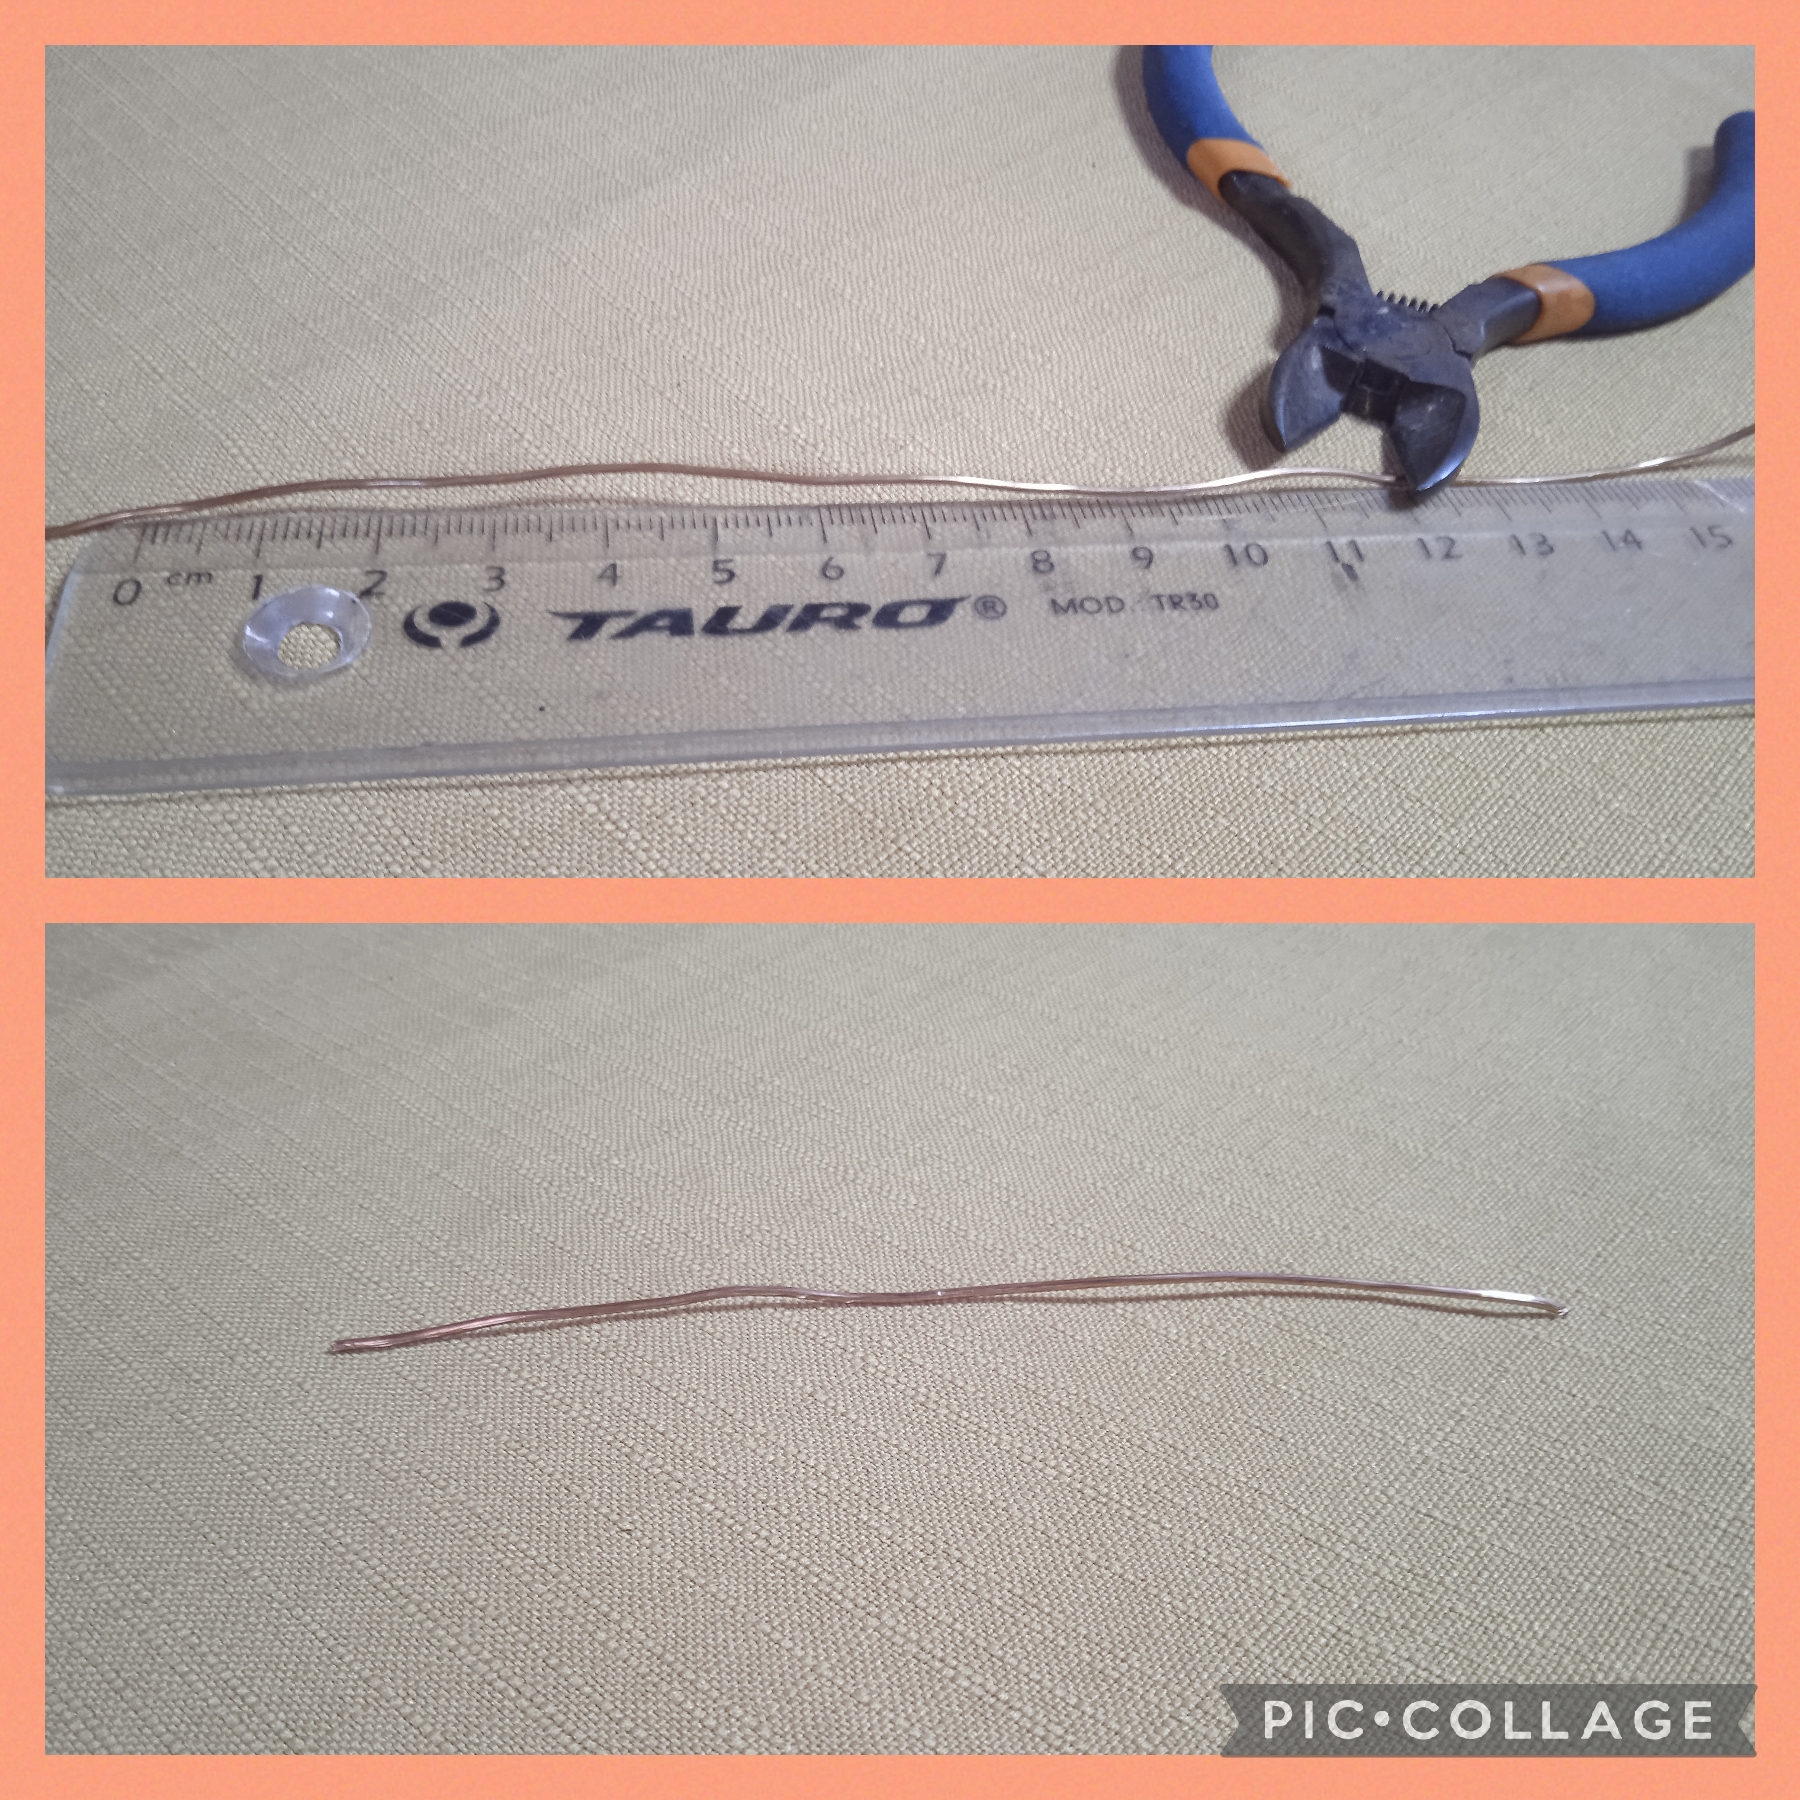
PRIMER PASO:
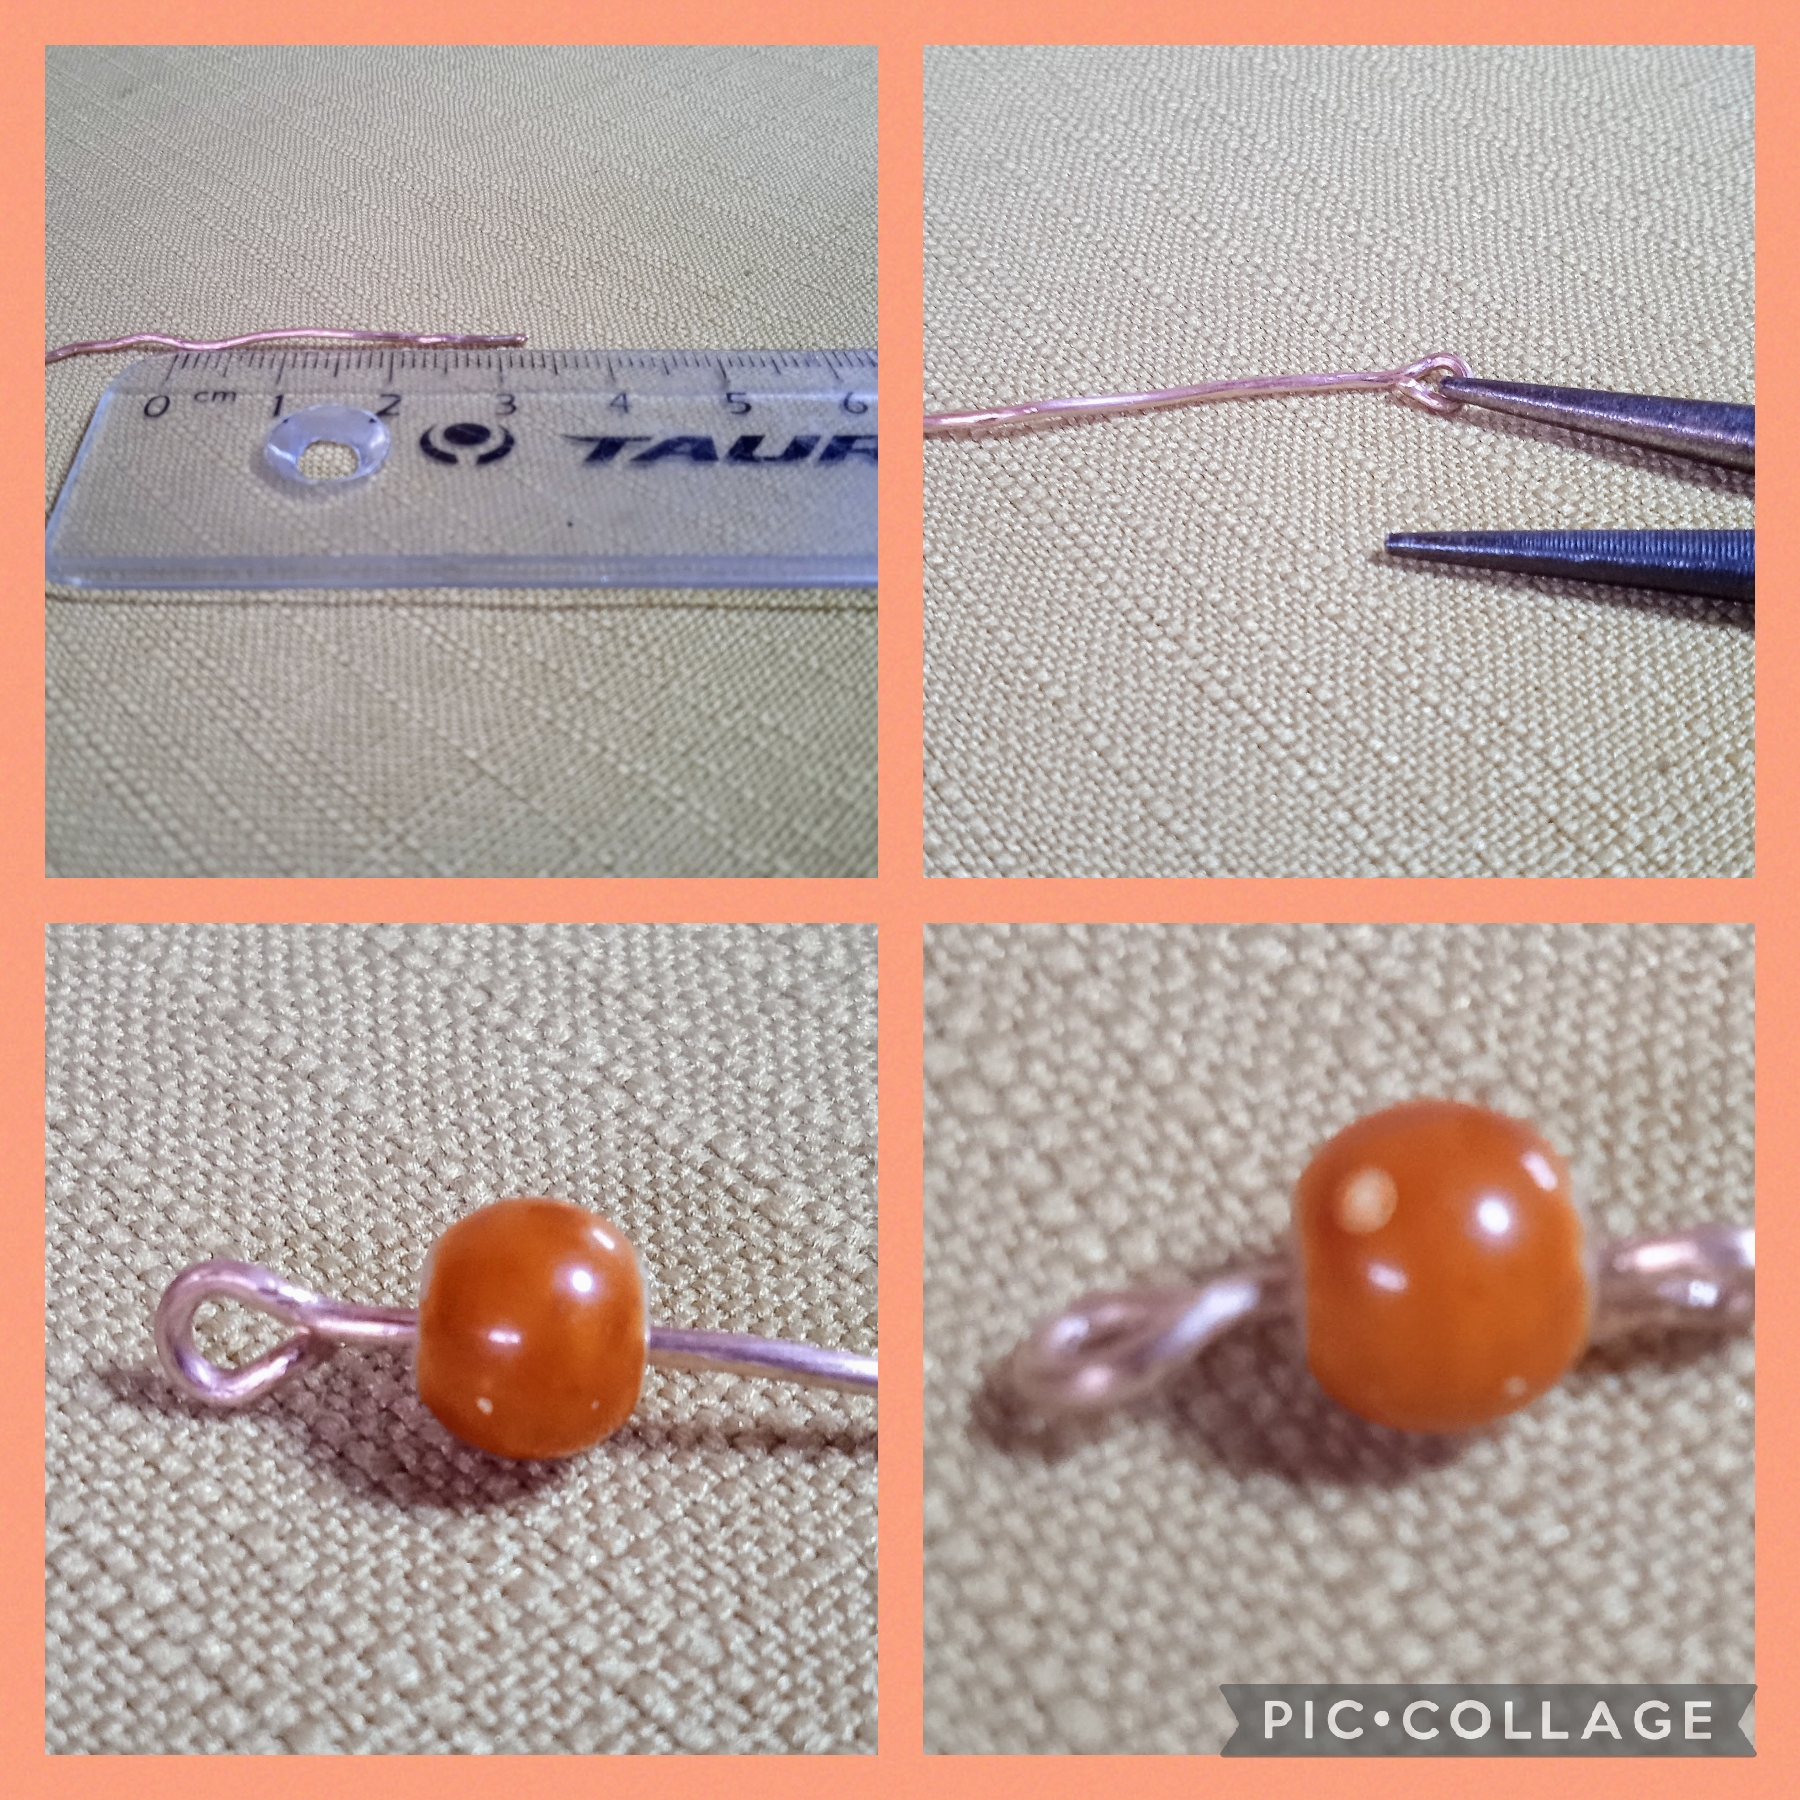
Comienzo usando la regla para tomar una medida de diez centímetros del alambre de cobre calibre 24 " y corto seis piezas de un mismo tamaño, pues voy a elaborar seis formas iguales para realizar la pulsera .
WITH THESE SIMPLE AND FEW STEPS I CREATE THIS BEAUTIFUL BRACELET:
FIRST STEP:
I start using the ruler to take a ten centimeter measurement of the 24" gauge copper wire and cut six pieces of the same size, as I am going to make six equal shapes to make the bracelet.
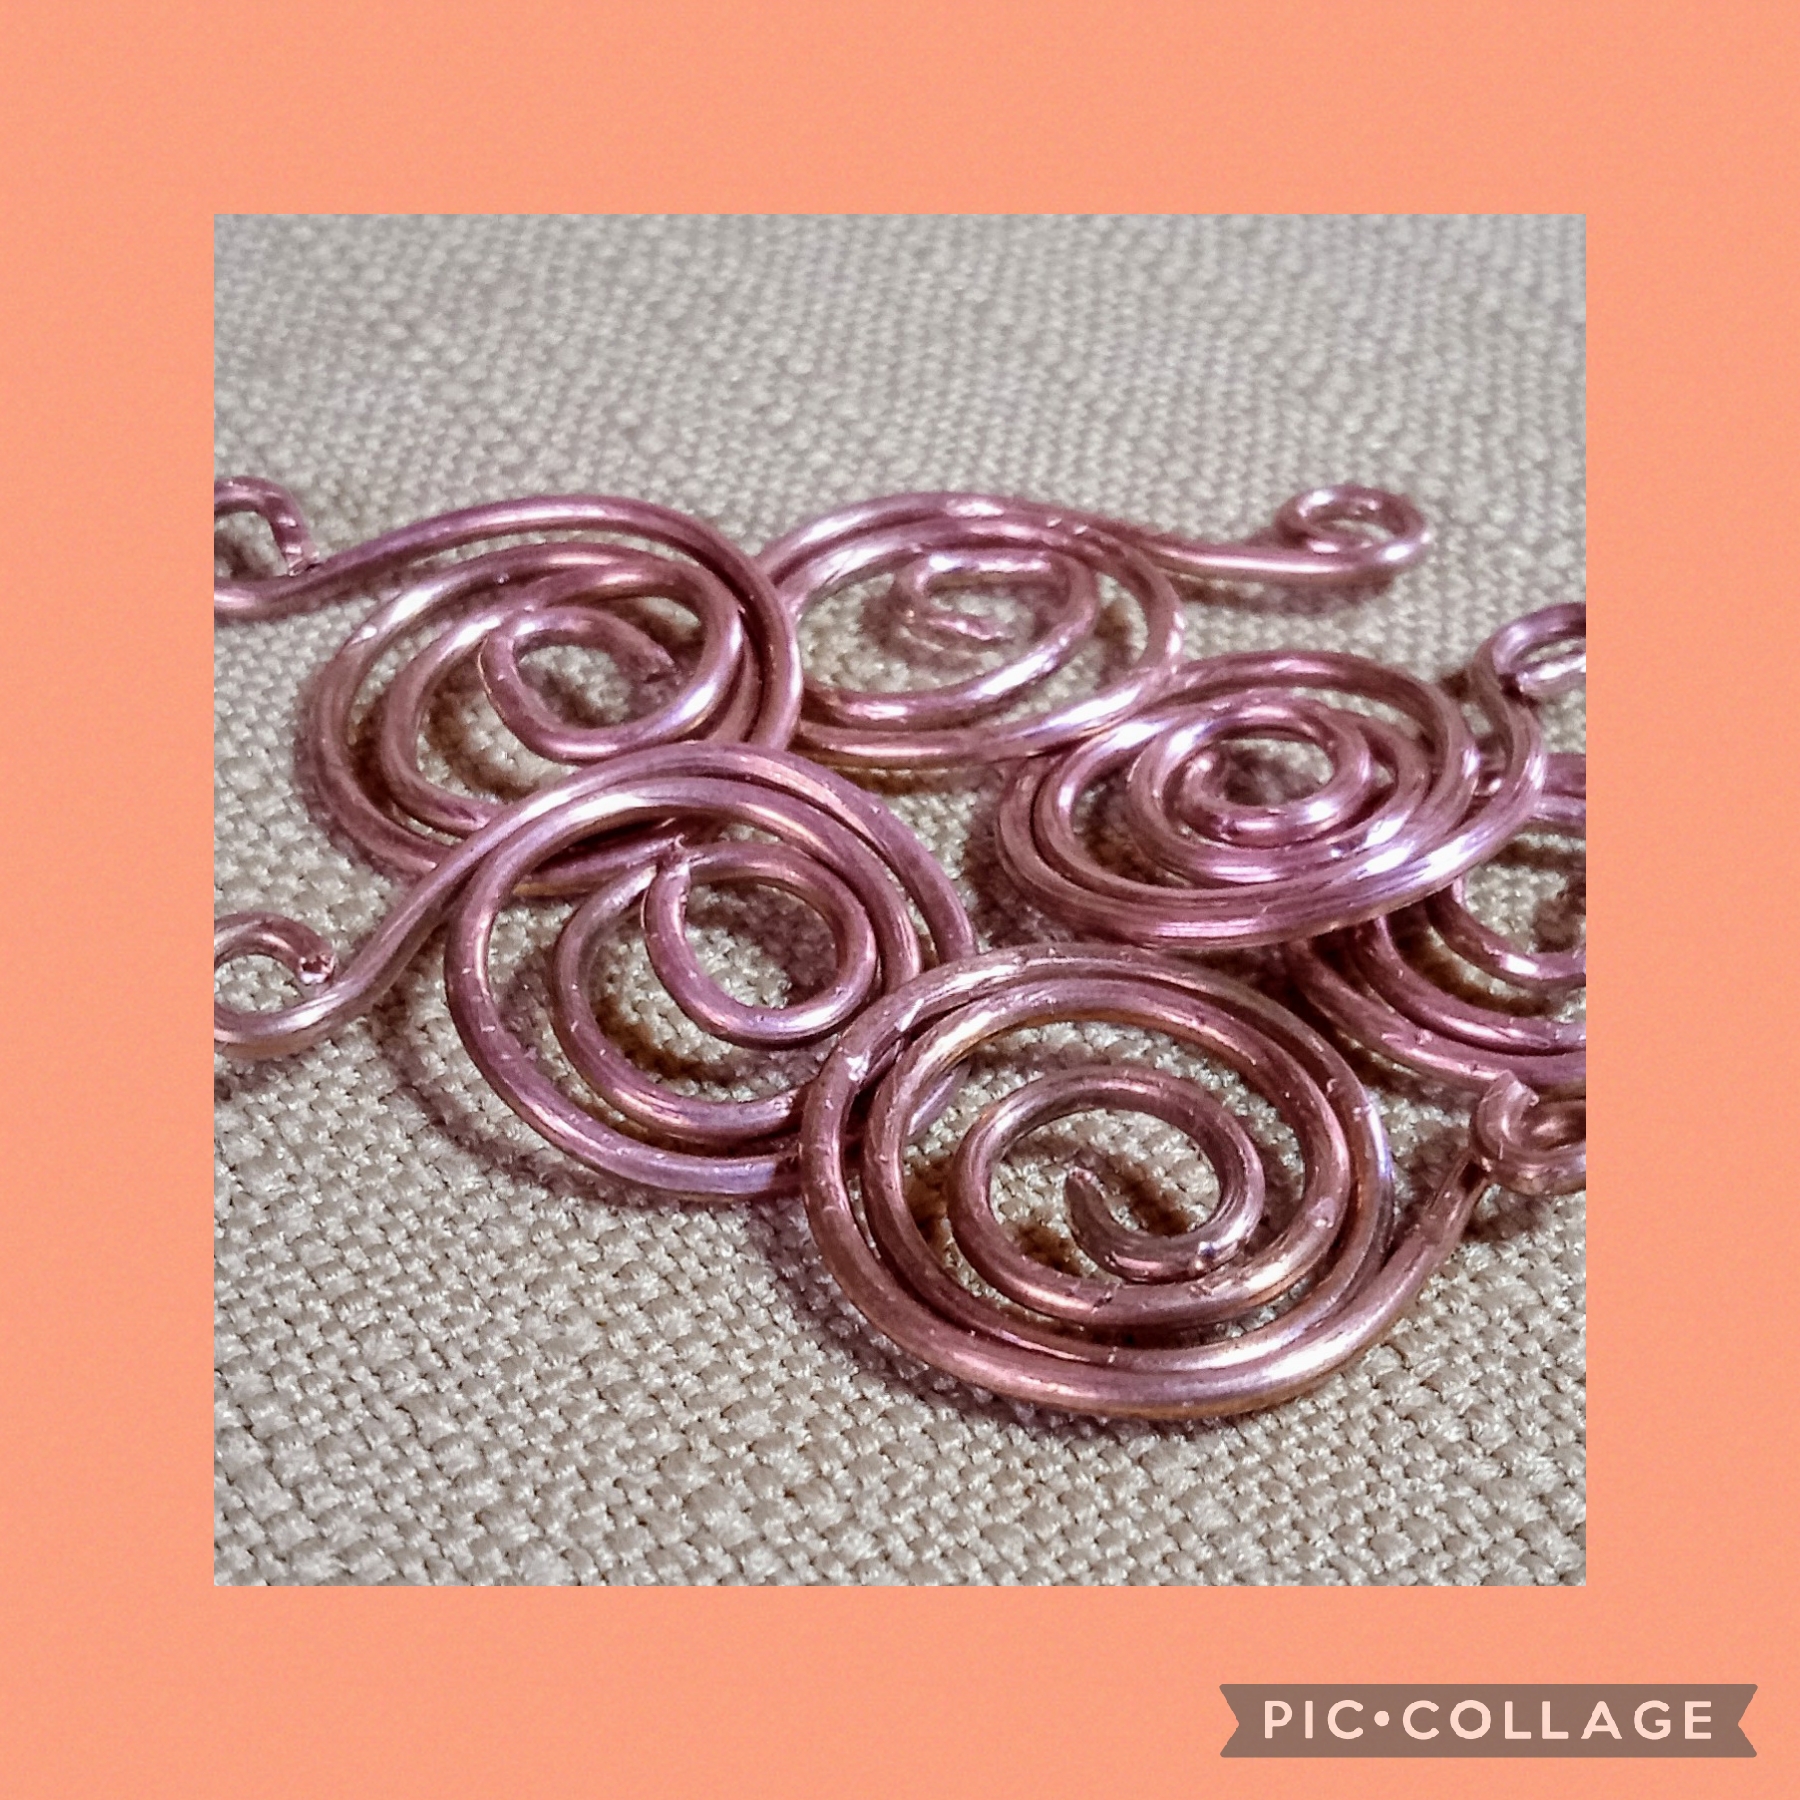
SEGUNDO PASO:
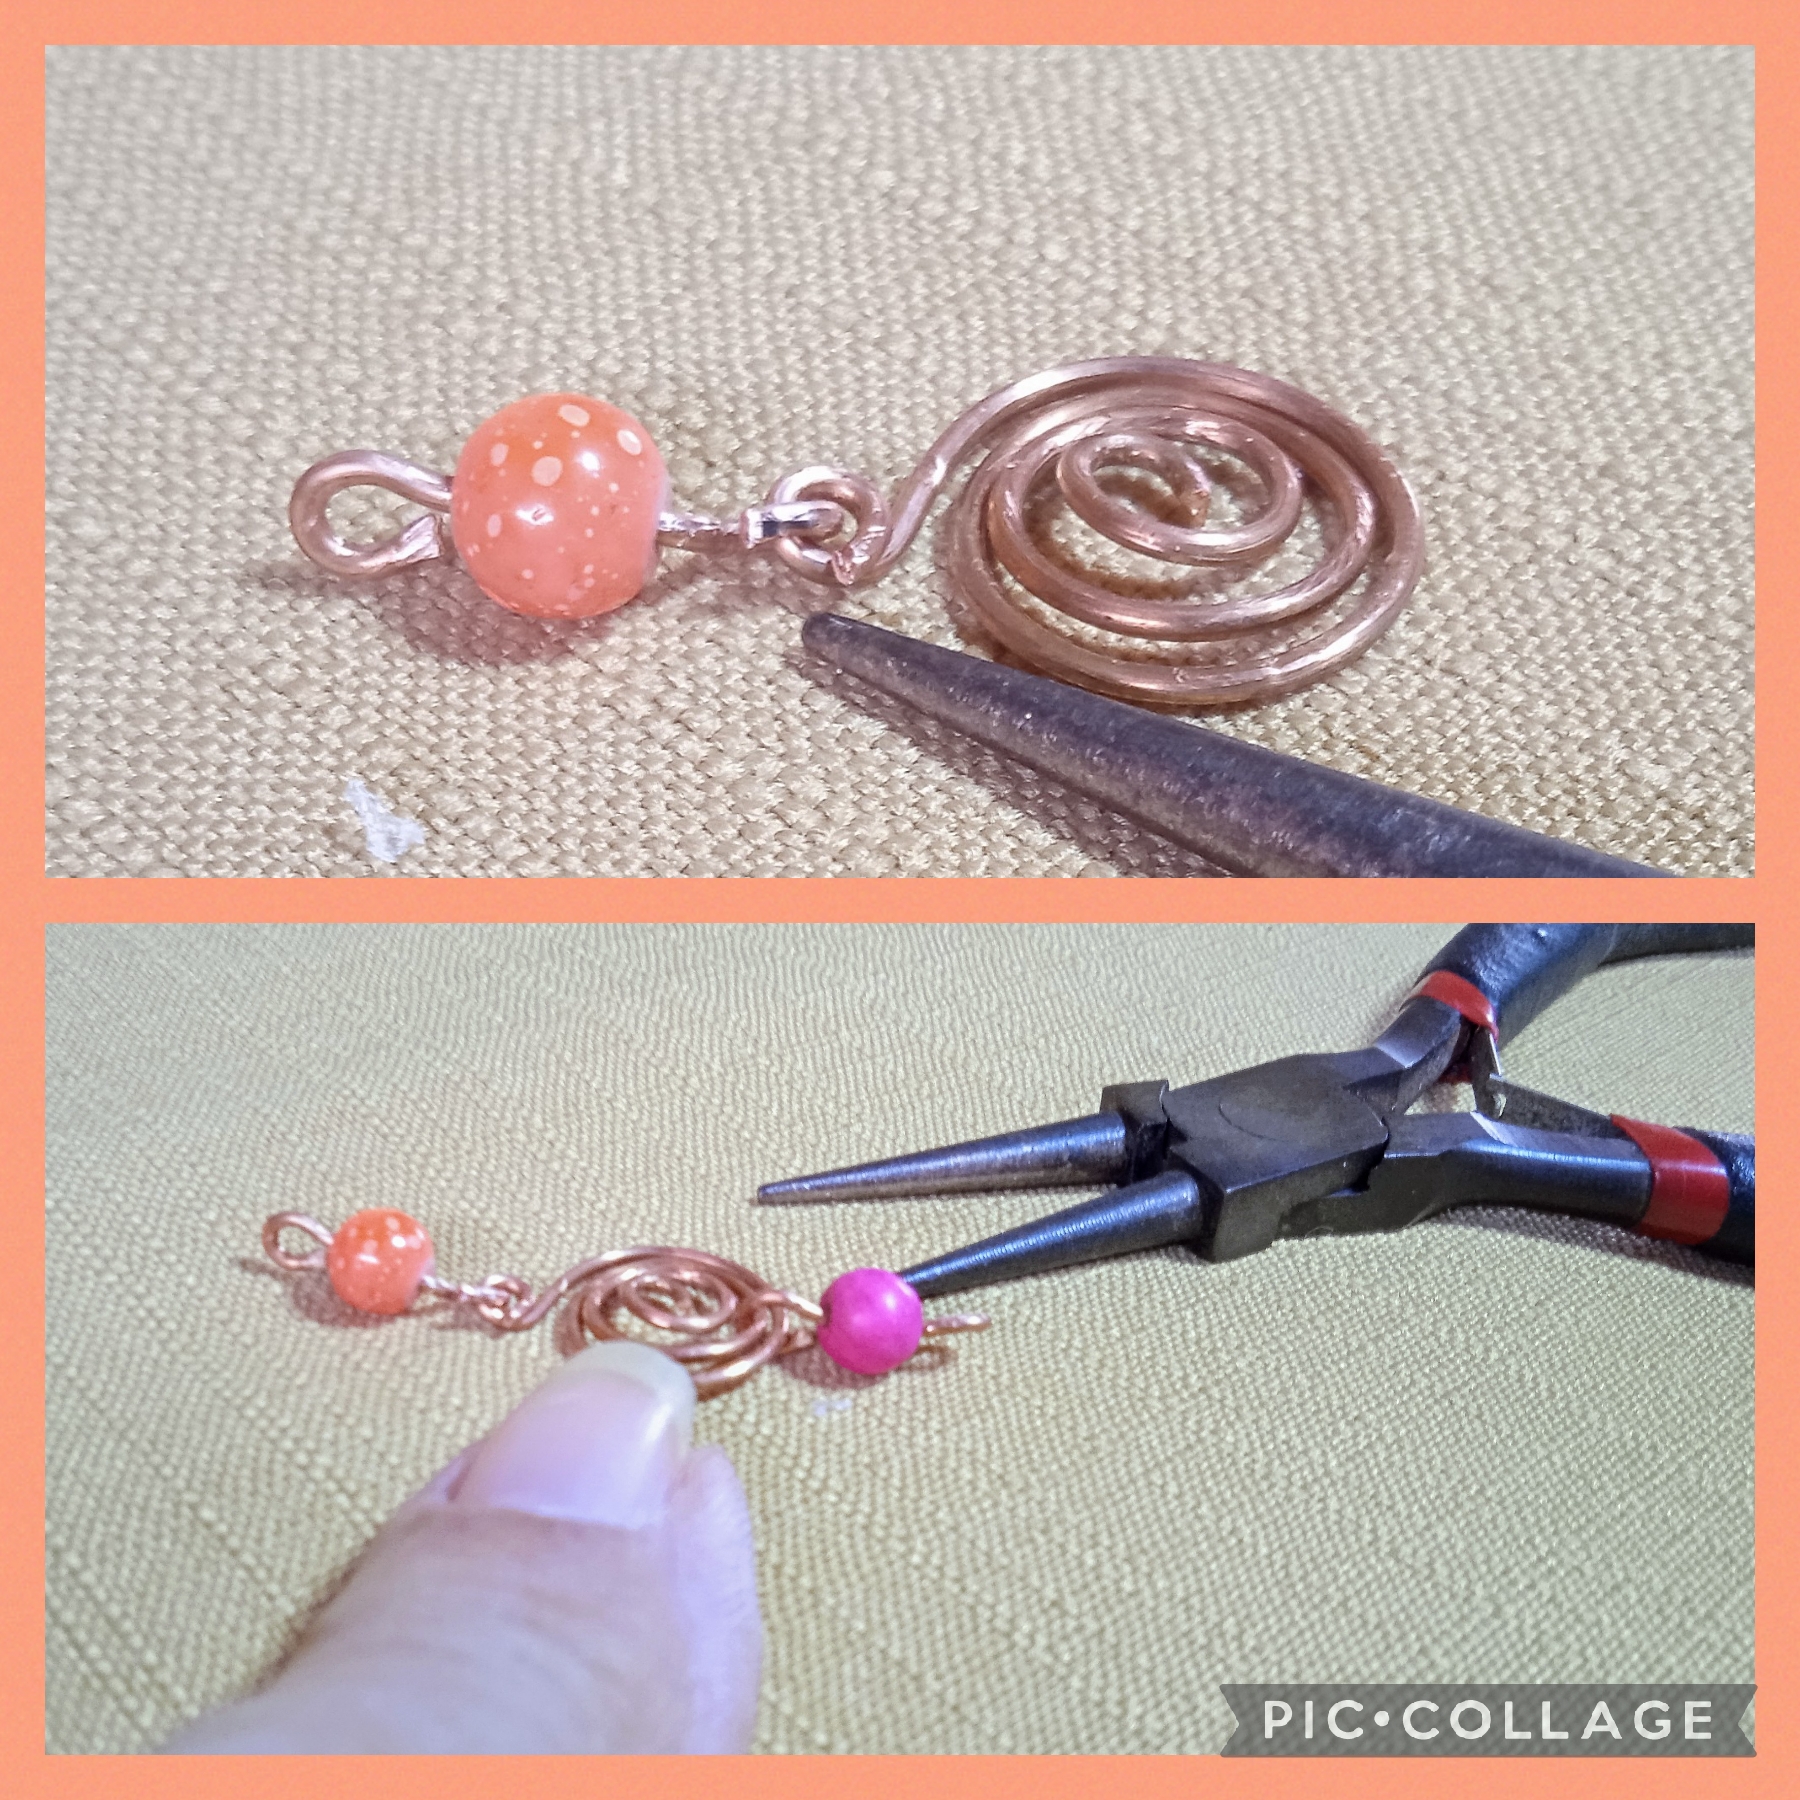
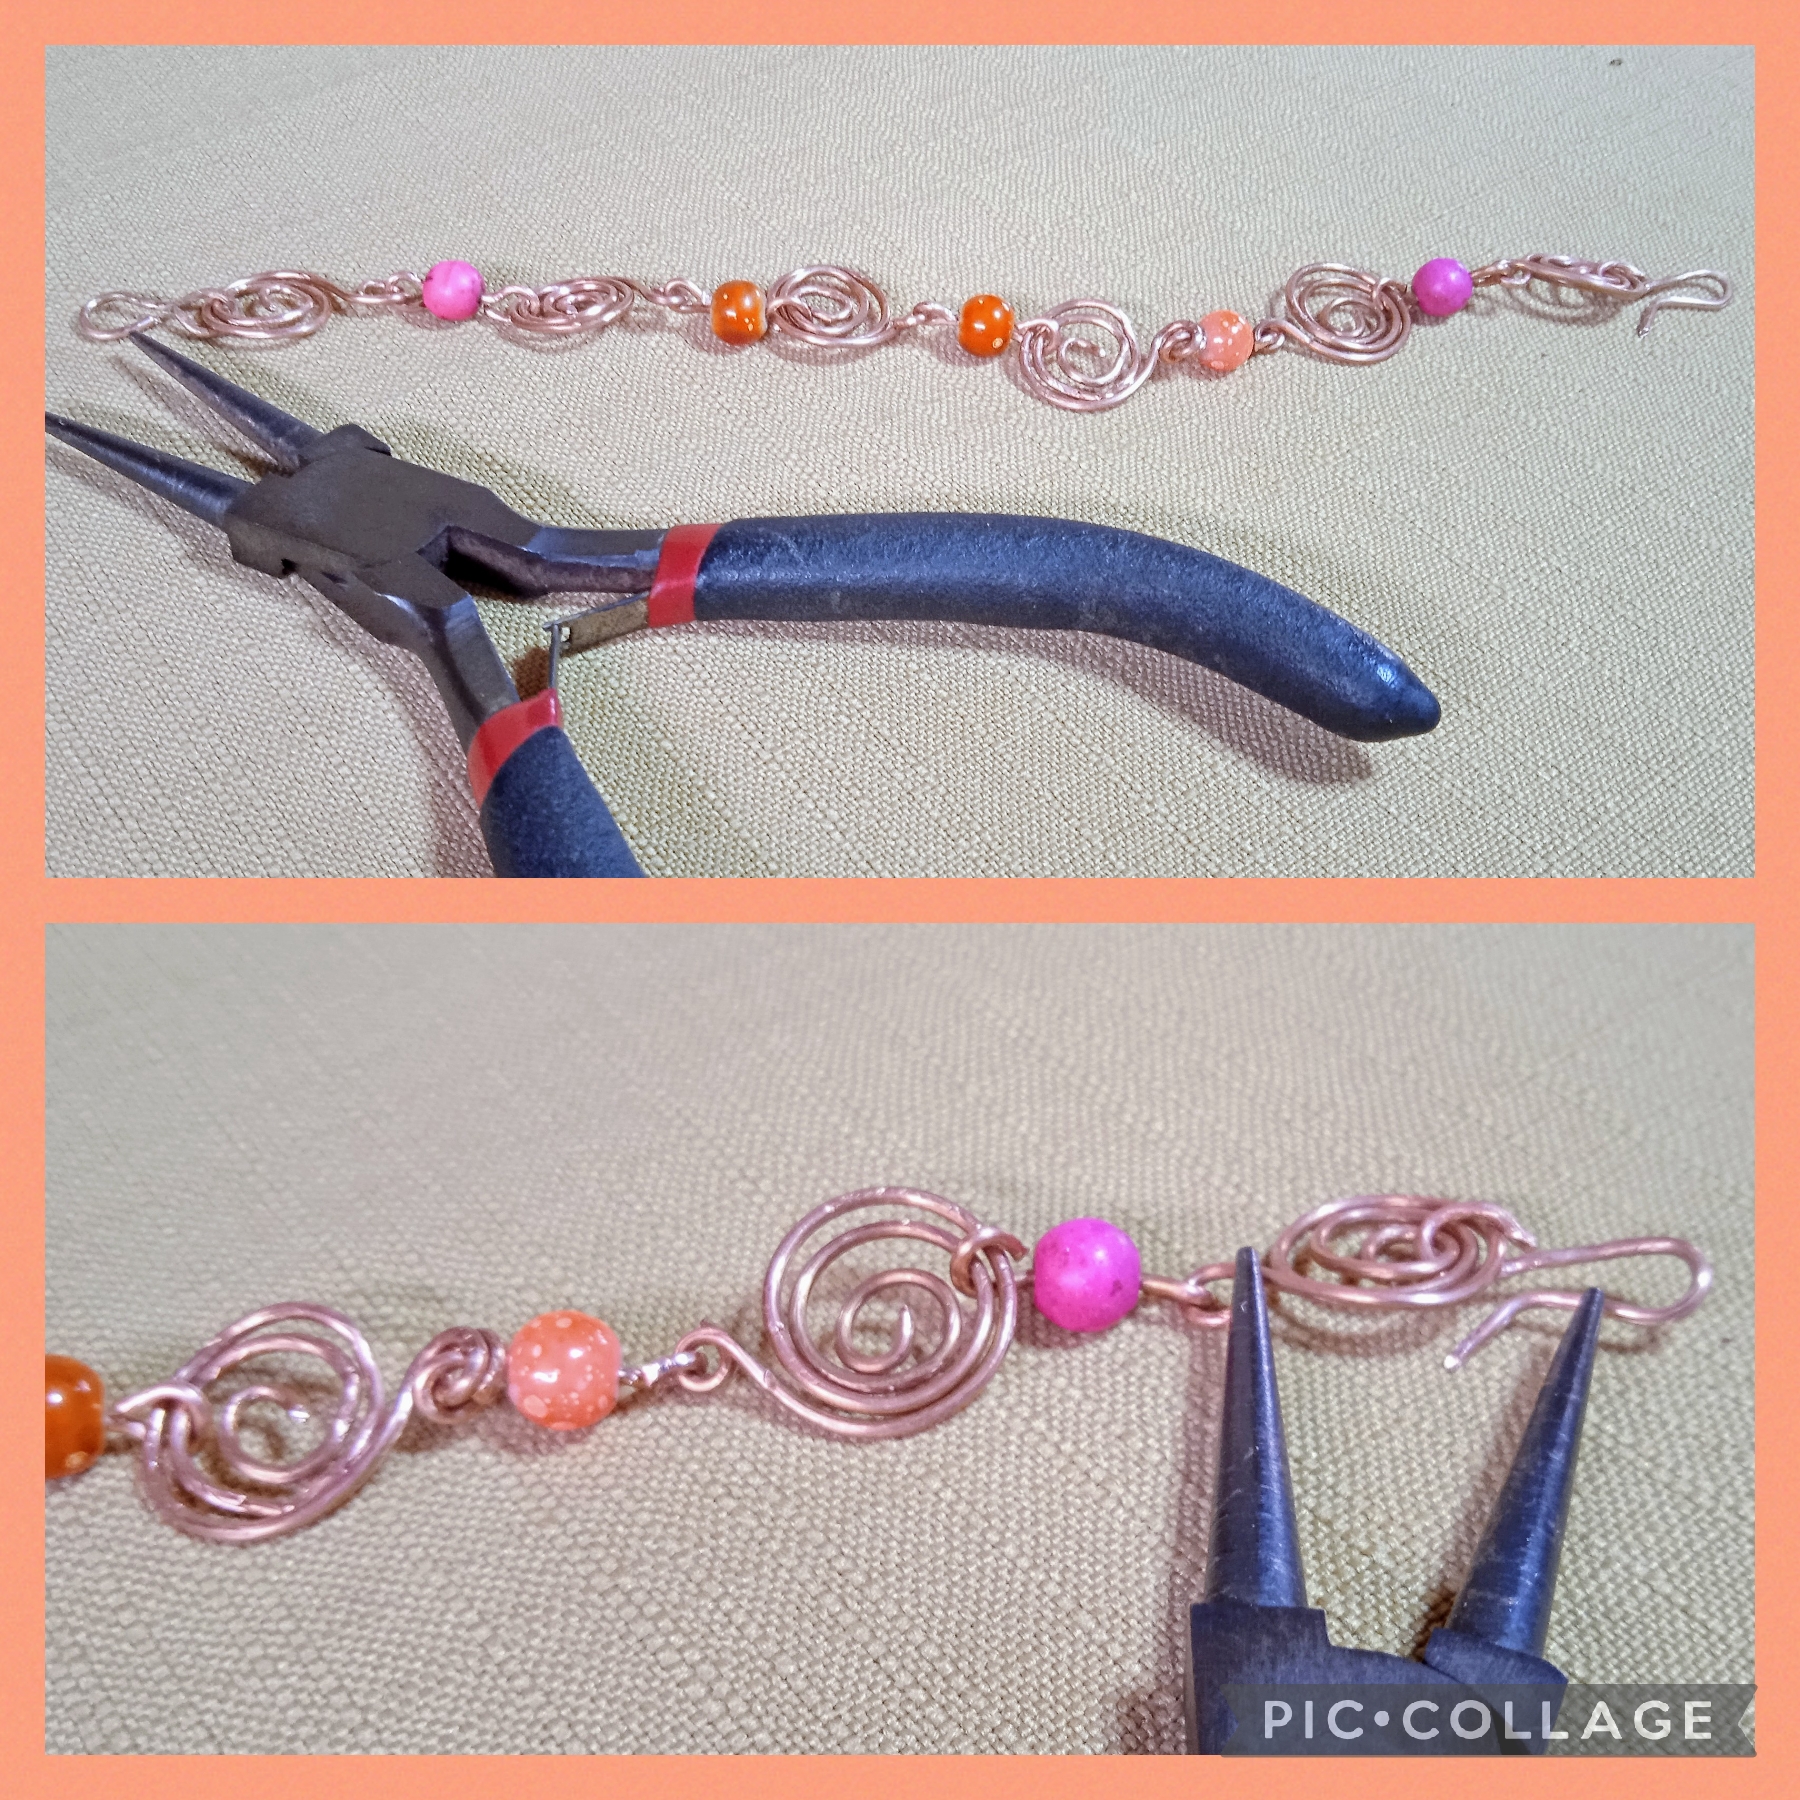
Una vez que tengo listos los seis trozos del alambre, voy a mostrar como realizar una figura en forma de espiral plano: usando una tapa de silicón frío ( me pareció muy apropiado pues tiene forma de mandril) pero ustedes pueden usar el mandril tome uno de los trozos de alambre y lo enrosco en la parte más gruesa de la tapa y doy dos vueltas mas hacia la parte de arriba que es mas delgada, saco la forma de la tapa y uso la pinza punta redonda para darle mejor acabado a la parte central, luego uso la misma pinza para hacer un anillo en la punta de afuera de la forma, con la pinza plana ajusto bien para
que parezca martillada y queda como se ve en las imágenes.
SECOND STEP:
Once I have the six pieces of wire ready, I am going to show how to make a figure in the shape of a flat spiral: using a cold silicone cap (I thought it was very appropriate since it is shaped like a mandrel) but you can use the mandrel, take one of the pieces of wire and I twist it into the thickest part of the lid and I make two more turns towards the upper part that is thinner, I take out the shape of the lid and use the round tip pliers to give a better finish to the central part , then I use the same tweezers to make a ring on the outside tip of the shape, with the flat tweezers I adjust well to
It looks hammered and remains as seen in the images.

PASO TRES:
En este paso voy a mostrar como hacer la segunda forma para la elaboración de la pulsera: uso de nuevo el alambre de cobre calibre 24" y con la regla mido cinco trocitos de tres centímetros cada uno; ahora tomo uno y con la pinza punta redonda en uno de los extremos hago un arito pequeño, inserto una de las piedras de color rosado y de nuevo uso la pinza punta redonda para hacer el otro arito y así queda como muestra las imágenes , con este sencillo procedimiento realizo usando las otras piedras cuatro formas mas.
STEP THREE:
In this step I am going to show how to make the second way to make the bracelet: I use the 24" gauge copper wire again and with the ruler I measure five pieces of three centimeters each; now I take one and with the round tip pliers At one end I make a small ring, insert one of the pink stones and again use the round tip pliers to make the other ring and it looks like the images show. With this simple procedure I make four shapes using the other stones. further.
PASO CUATRO:
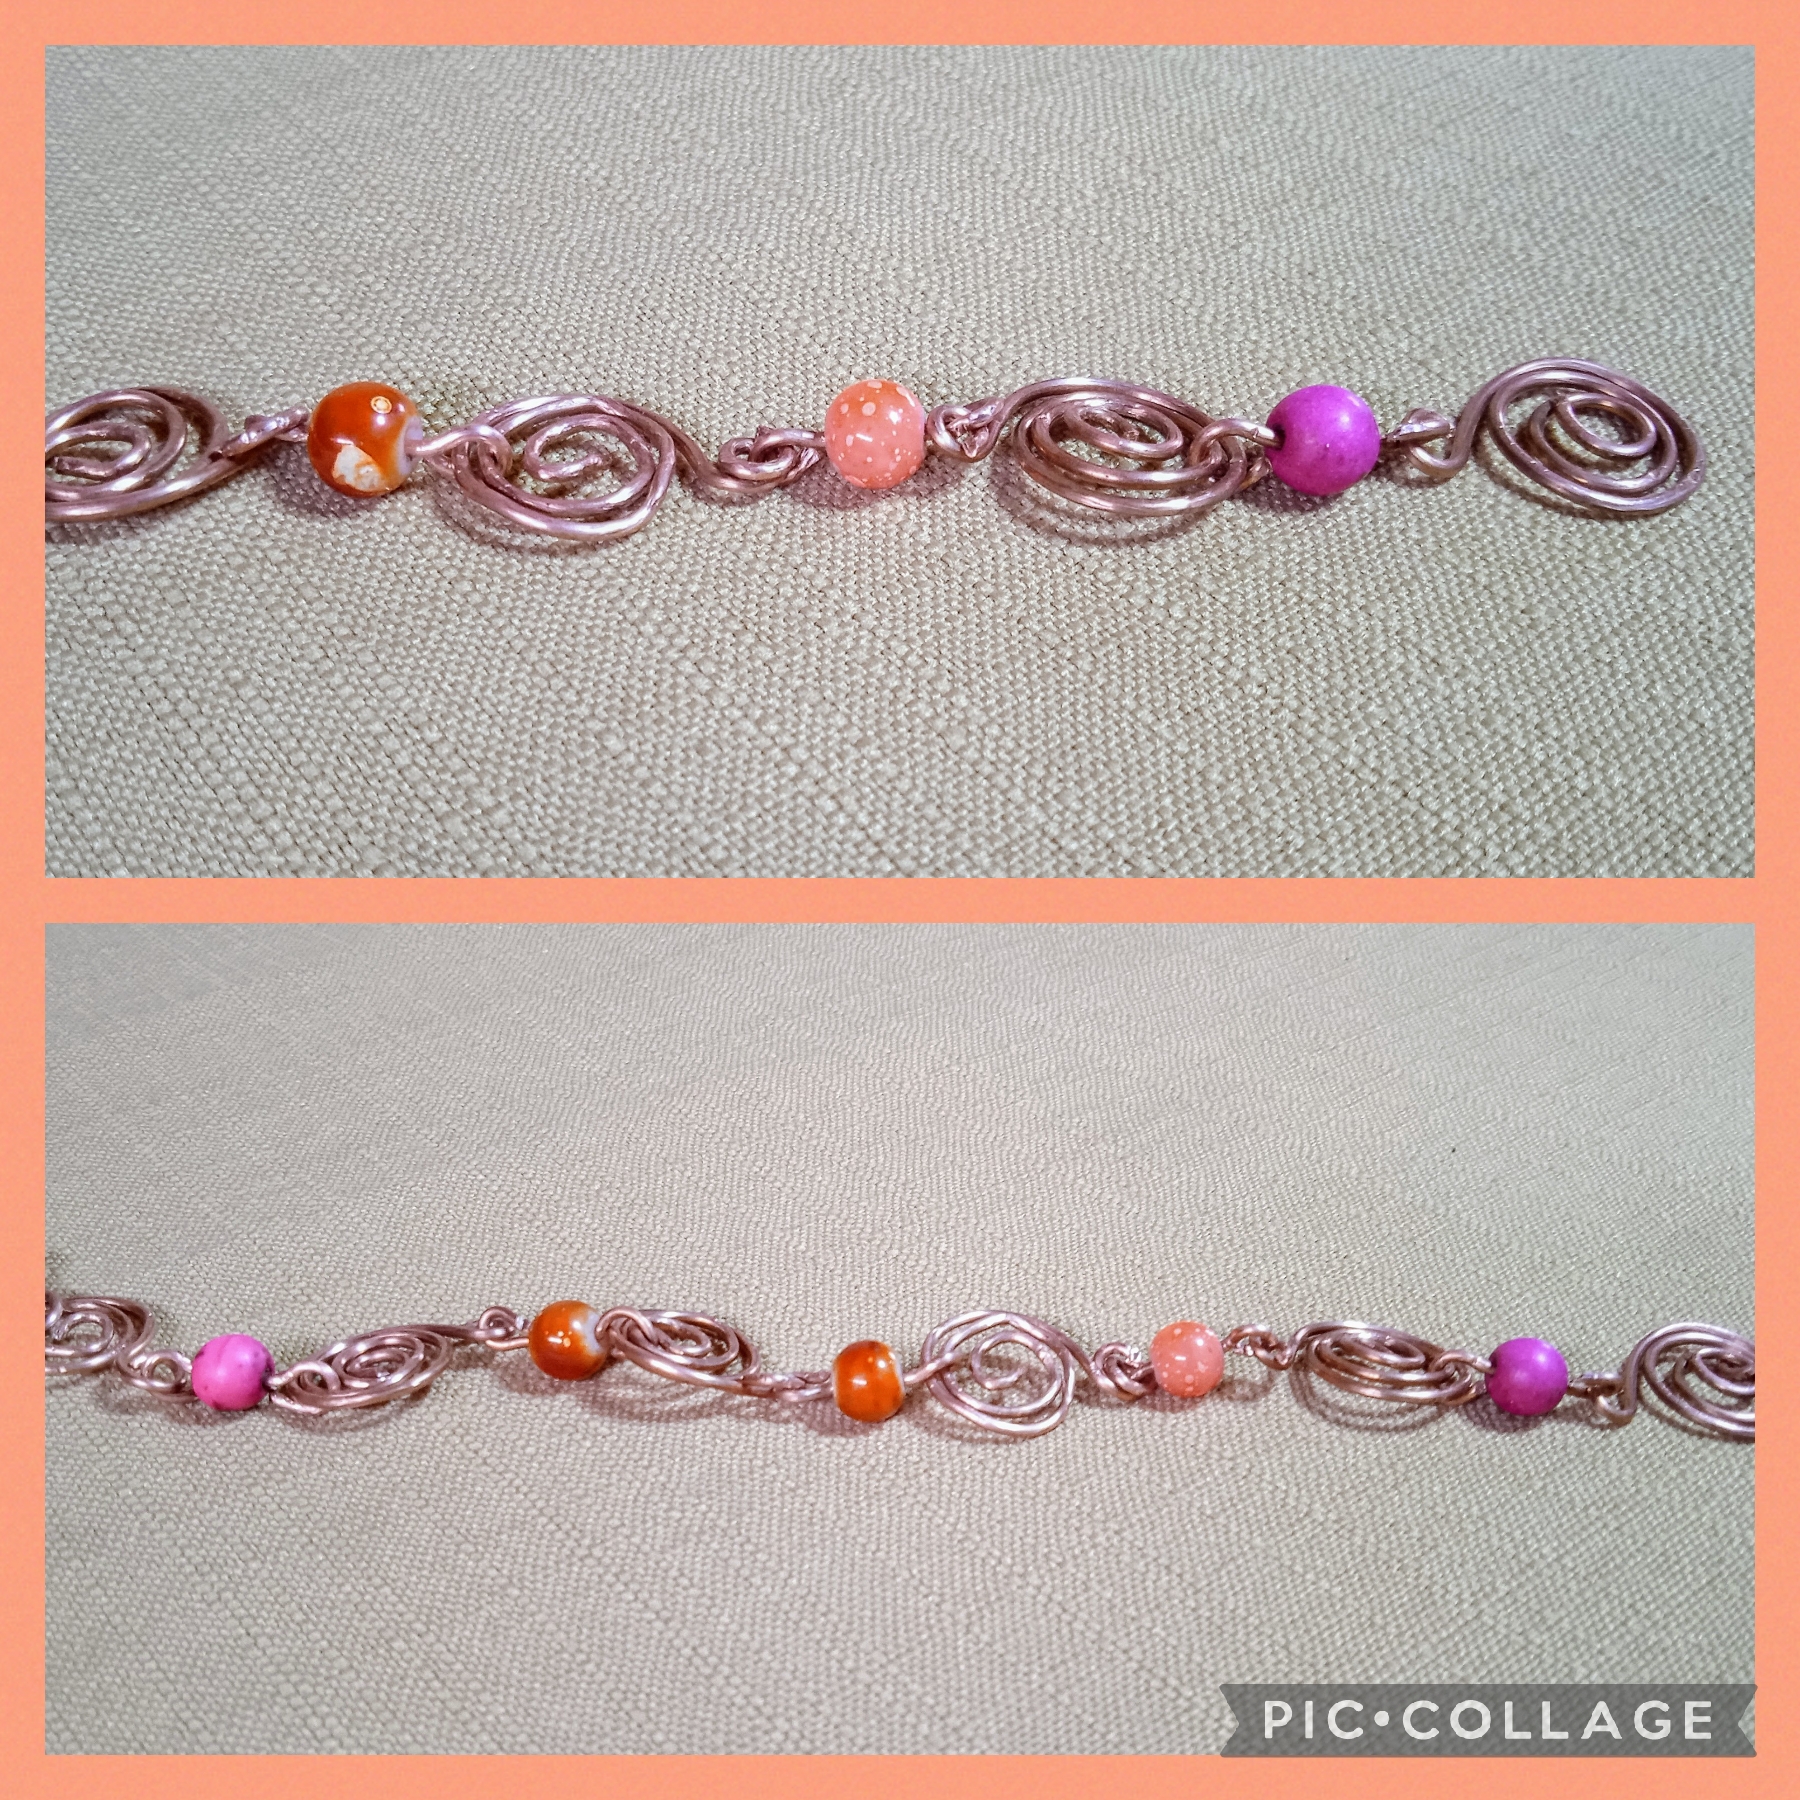
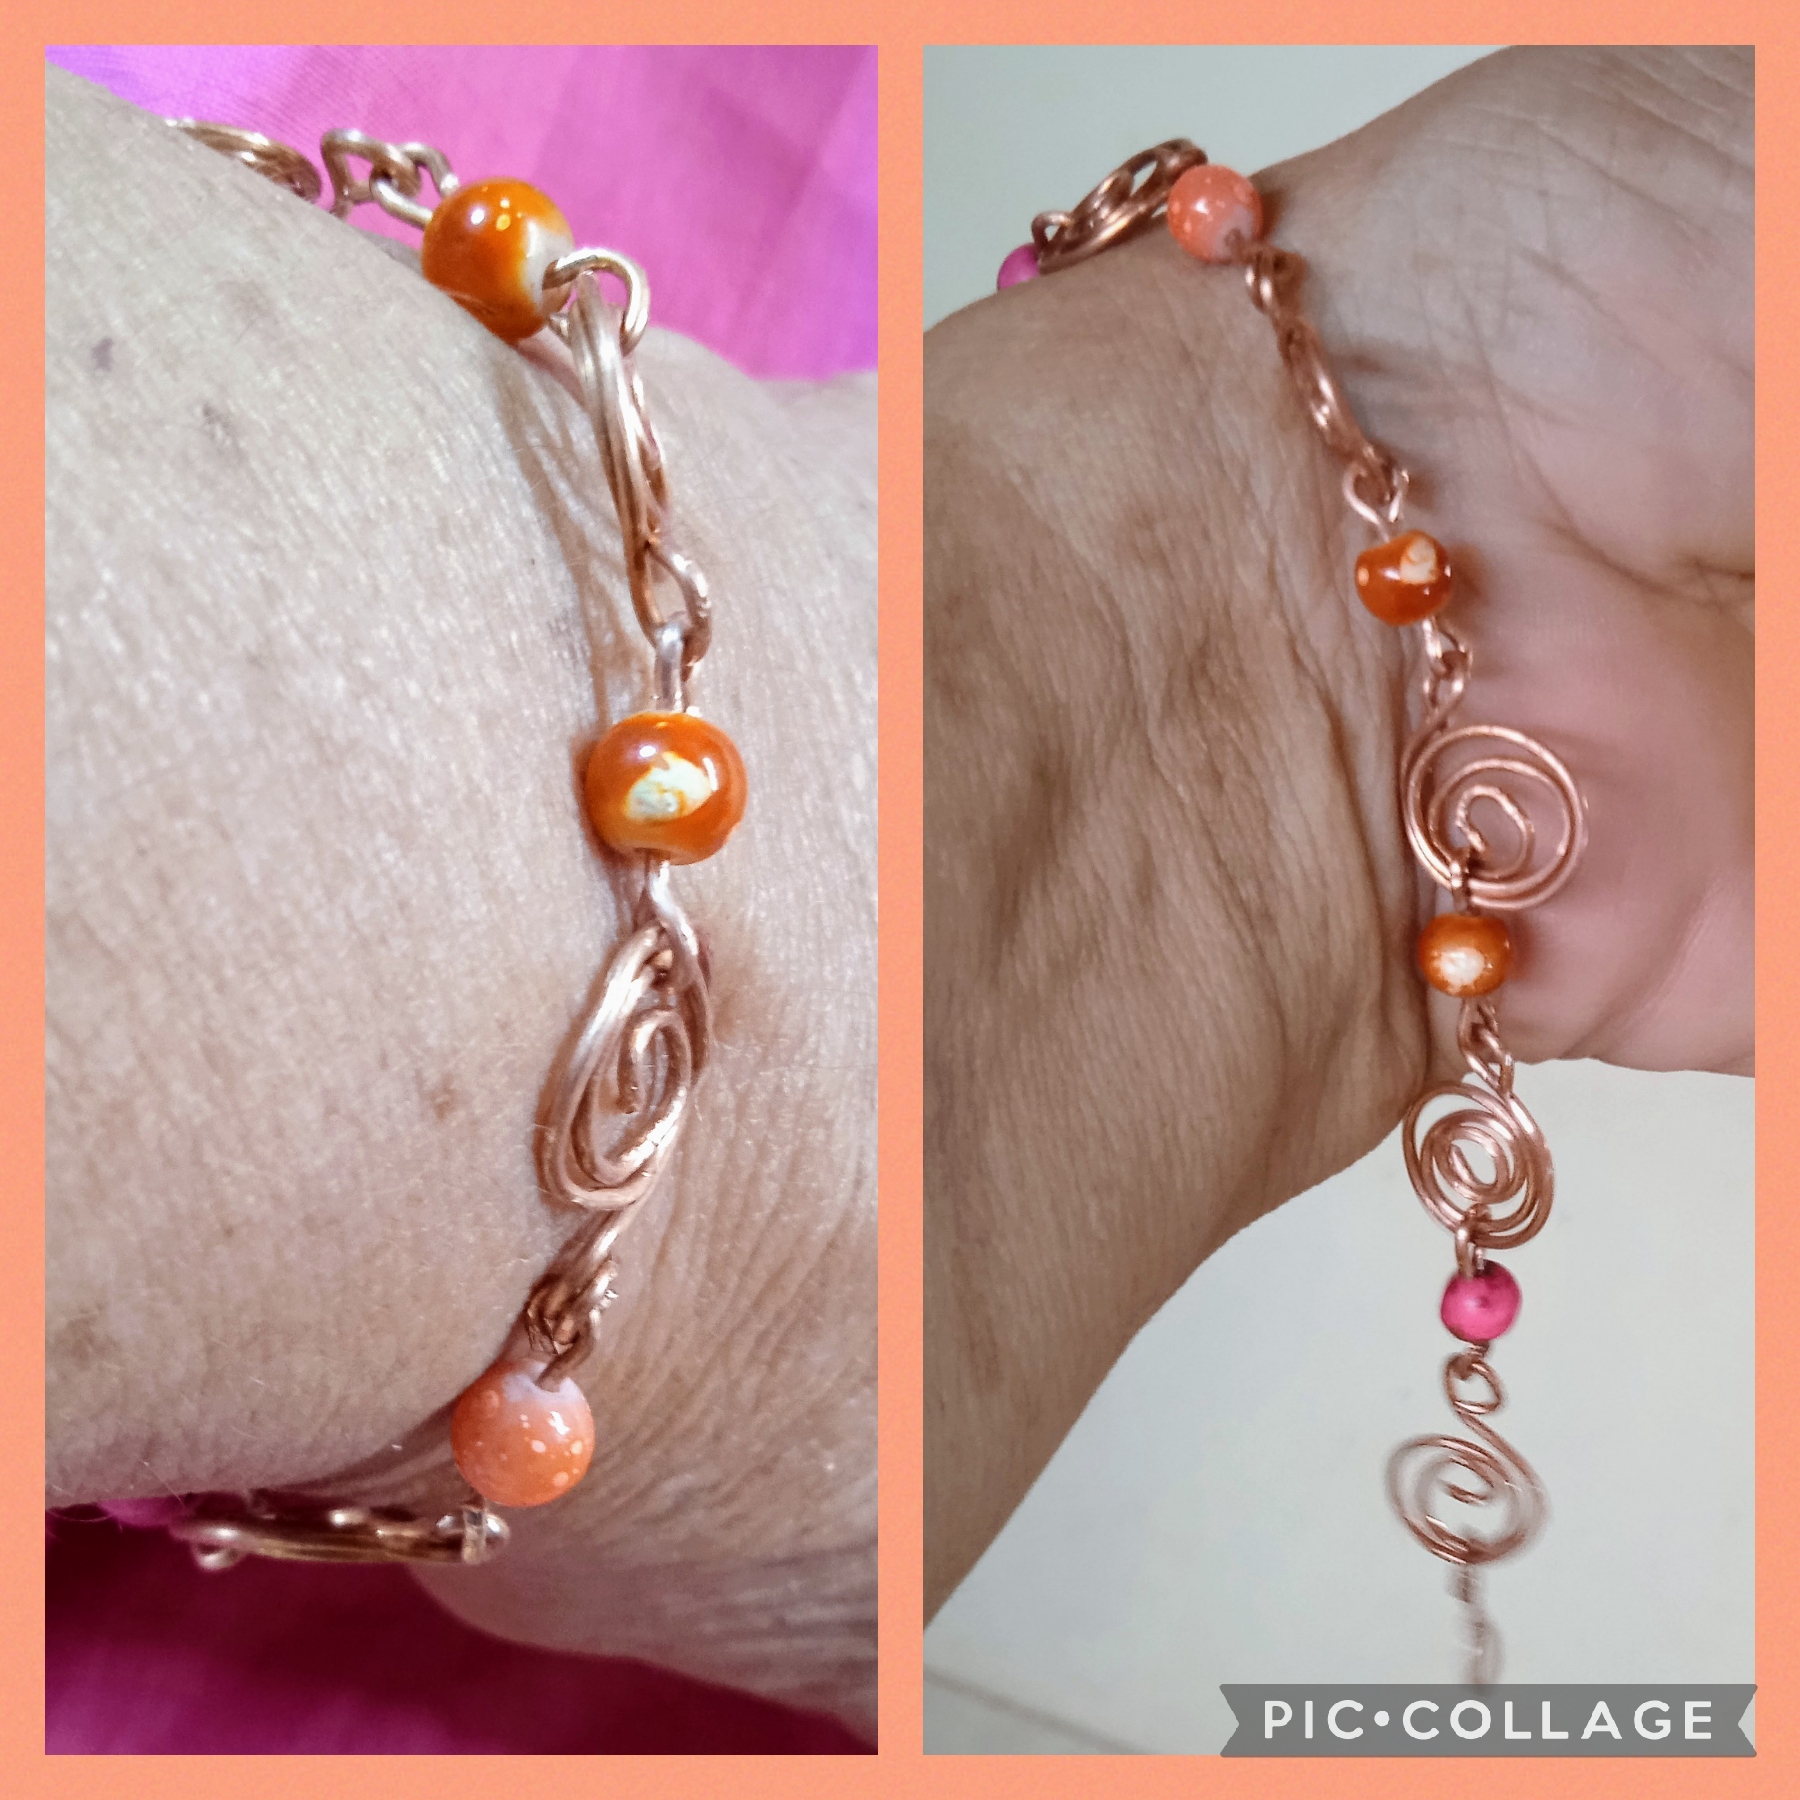
Aquí voy a unir las formas para realizar la pulsera de esta manera: pongo una de los diseños de espiral plano y lo engarzó por el arito con un diseño de la segunda forma, luego engarzo el otro arito de la segunda forma en el diseño de espiral plano por la parte redonda como se ve en la foto; y así voy intercalando una forma con otra hasta tener el largo de la pulsera.
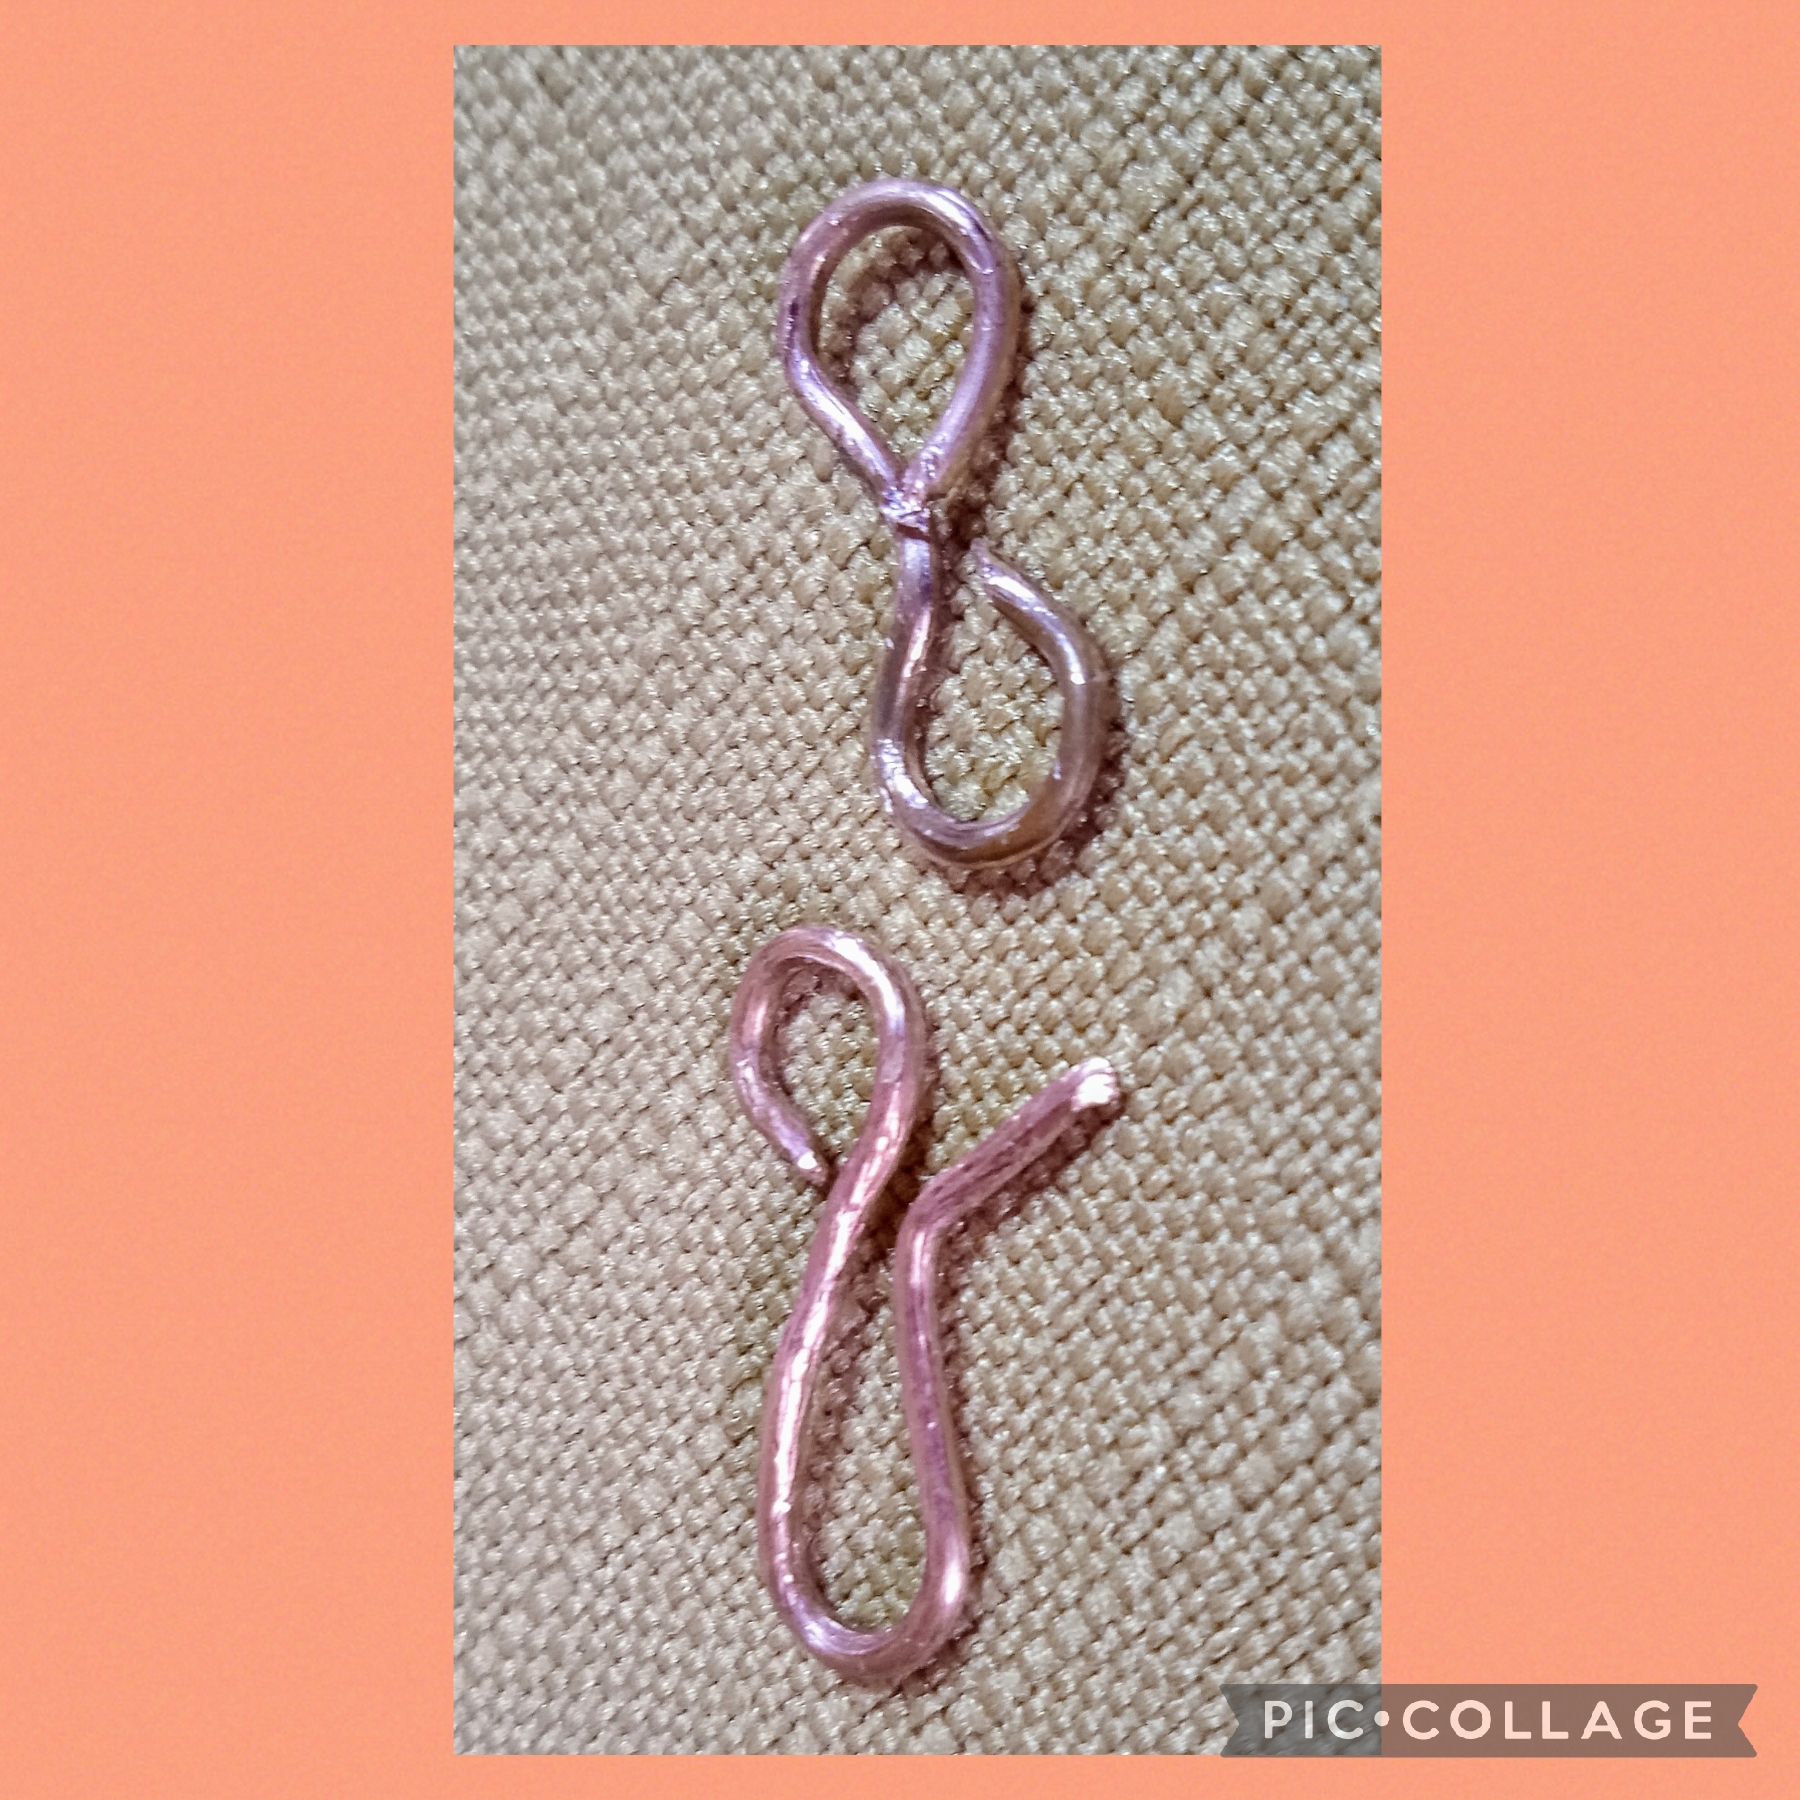
Corto dos pedacitos de alambre de tres centímetros y realizó los terminales para colocarlos en cada extremo de la pulsera y así queda
STEP FOUR:
Here I am going to join the shapes to make the bracelet in this way: I put one of the spiral designs flat and crimp it through the hoop with a design from the second shape, then I crimp the other hoop from the second shape into the spiral design flat on the round part as seen in the photo; and so I alternate one shape with another until I have the length of the bracelet.
I cut two three centimeter pieces of wire and made the terminals to place them at each end of the bracelet and this is how it looks.
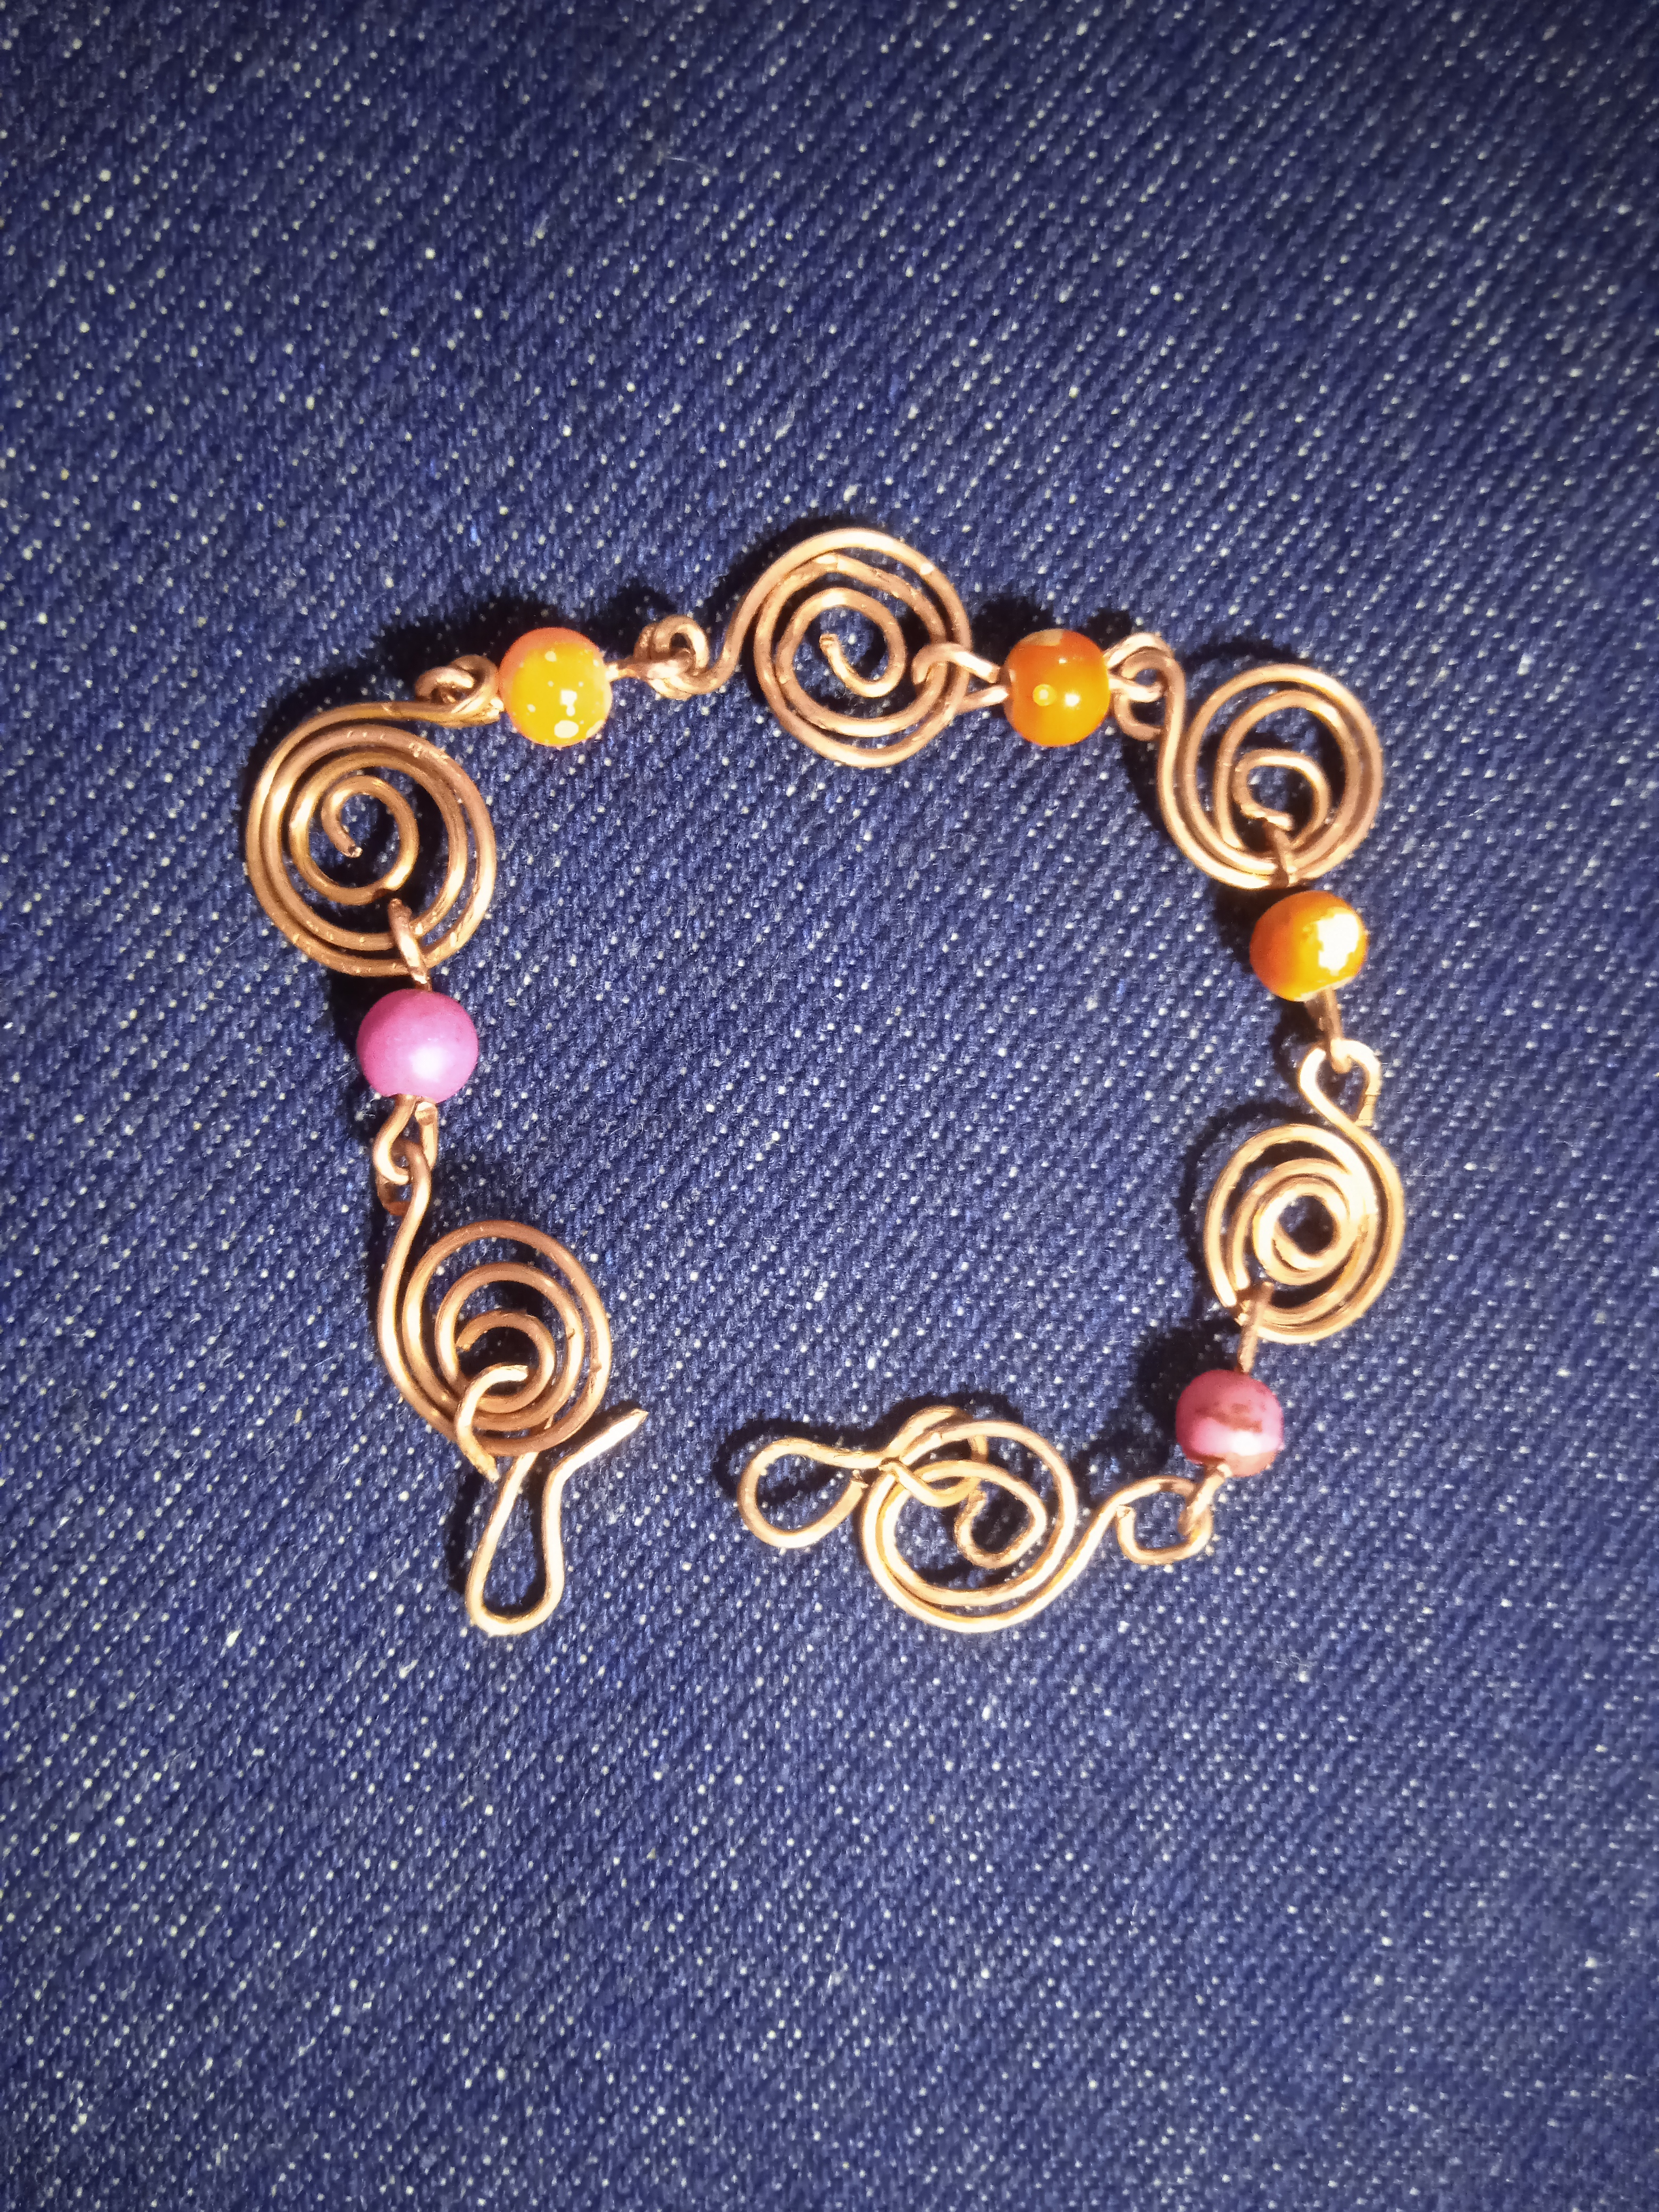
Artistas Creadores de las manualidades y la Joyería este es el resultado final de mi manualidad Creativa, que use para compartir un tutorial de trabajos realizados con la Técnica de Alambrismo, espero que les guste pues me sentí complacida con los resultados aquí en el taller, como siempre agradezco mucho el apoyo y valiosos comentarios que le otorgan a mis publicaciones, y nos vemos en la próxima manualidad, bye bye.
Artists Creators of crafts and Jewelry, this is the final result of my Creative craft, which I used to share a tutorial of works done with the Wire Technique, I hope you like it because I felt pleased with the results here in the workshop, as I always greatly appreciate the support and valuable comments you give to my publications, and see you in the next craft, bye bye.
Las imágenes y redacción de este tutorial son de mi propiedad, las fotos fueron tomadas con mi teléfono celular redmi 9 y las edité con una aplicación gratis del mismo.
Para traducir texto use Google traductor.
The images and writing in this tutorial are my property, the photos were taken with my Redmi 9 cell phone and I edited them with a free application.
To translate text use Google translator.

Muy linda mi querida amiga @nhaydu. Abrazos..
Gracias mi querida @katiuskamata tu siempre tan gentil, feliz día mi amiga, 🤗
Si amiga ya casi se va el mes de marzo tan rápido y este es un mes muy celebrado.
Muy linda la pulsera que nos traes para deleitarnos, estos espirales quedaron hermosos,le dan ese toque especial 😉
Saluditos @yolimarag siempre tan linda, me da gusto tu comentario y lo aprecio un montón, te deseo un día hermoso 😘
Hermoso trabajo, felicidades 😊
Hola @marile21, muchísimas gracias amiga por tu comentario tan gentil , saluditos 🌹