A cordial greeting to the entire community of Hive Diy especially @equipodelta and the entire group of moderators that accompanies it. This time I will show you a beautiful lamp, which is ideal to have at home for those emergencies due to lack of electricity, or for a special occasion when you want to share a TEA, since we can use small round candles called tea light.
This lamp is an original idea, which I managed to make using a glass container, two lids, the base of an LED bulb and the lid of a lock knob, as you can see I'm recycling all the material.
Un cordial saludo a toda la comunidad de Hive Diy en especial @equipodelta y a todo el grupo de moderadores que la acompaña. En esta oportunidad les mostraré una preciosa lámpara, la cual es ideal para tenerla en casa para aquellas emergencias por falta de electricidad, o para una ocasión especial cuando se desee compartir un TÉ, ya que podemos utilizar las pequeñas velas redondas llamadas tea light.
Esta lámpara es una idea original, la cual logré hacer utilizando un frasco de vidrio para hacer la pantalla, dos tapas metálicas, la base de un bombillo led y la tapa de una cerradura de pomo, como podrán ver, todo el material lo estoy reciclando.
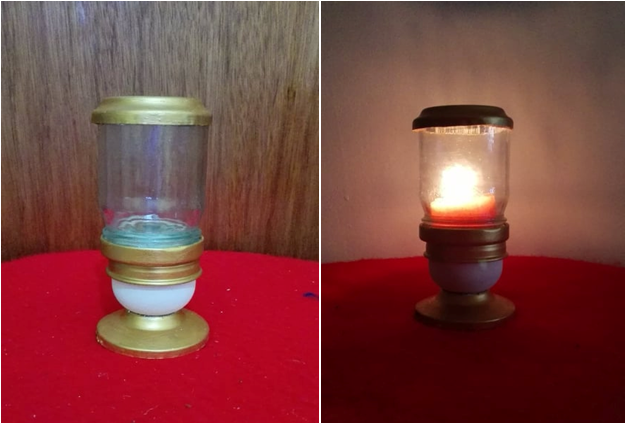
Beautiful candle holder lamp, with glass shade // Preciosa lámpara porta velas, con pantalla de vidrio
|Yes friends, this is a wonderful lamp, which works with a candle, it can be a common candle or the candle called tea light, which is ideal to make a night, a special moment.|Si amigos, esta es una maravillosa lámpara, la cual funciona con una vela, puede ser una vela común o la vela llamadas tea light, la cual es ideal para hacer de una noche, un momento especial.
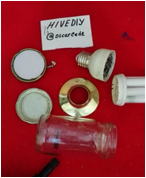
| Materials: | Materiales: |
|---|
| - A base of a household white light bulb | - Una base de un bombillo doméstico de luz blanca |
| lock cap | - Una tapa de cerradura de pomo |
| - A glass jar, for the screen | - Un frasco de vidrio, para la pantalla |
| - Two metal caps | - Dos tapas metálicas |
Process for the elaboration of this wonderful candle holder lamp // Proceso para la elaboración de esta maravillosa lámpara portavelas
| To make this lamp, we need to cut the glass container to make the lampshade, This lamp has a base made up of a white light bulb cup that is attached to a knob-locking cover. In the following image you can see what this idea consists of: | Para hacer esta lámpara, debemos cortar el envase de vidrio para hacer la pantalla, esta lámpara posee una base formada por la copa de un bombillo luz blanca el cual va unido a una tapa de cerradura de pomo, en la siguiente imagen podrán ver en que consiste esta idea: |
|---|
| Step-1: The first thing is to place the materials on the artboard: | Paso-1: Lo primero es colocar los materiales sobre la mesa de trabajo: |
|---|
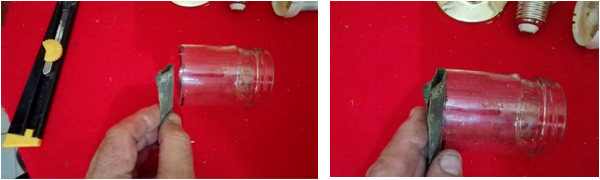
| Step-2: I am going to start by cutting the glass jar, I will do this using a wire ring, which I am going to heat red hot, to place it around the jar, precisely by the mark that we will previously make, the hot wire it is left for 20 seconds and immediately the jar is immersed in cold water, when making contact with the water the jar will split exactly where we placed the hot wire:, in a future publication I will show you all the details about this process, but if want to do it, they can practice with a small jar: | Paso-2: Voy a comenzar cortando el frasco de vidrio, esto lo haré usando un aro de alambre, el cual lo voy a calentar al rojo vivo, para colocarlo alrededor del frasco, justamente por la marca que previamente haremos, el alambre caliente se deja por 20 segundos e inmediatamente se sumerge el frasco en agua fría, al hacer contacto con el agua el frasco se partirá exactamente por donde colocamos el alambre caliente:, en una próxima publicación les enseñaré con todos los detalles sobre este proceso, pero si quieren hacerlo, pueden practicar con un frasco pequeño: |
|---|
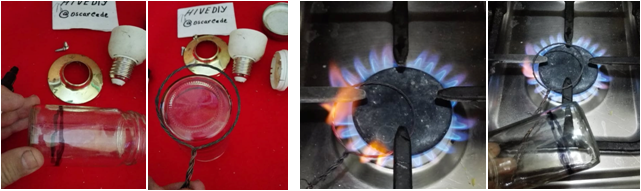
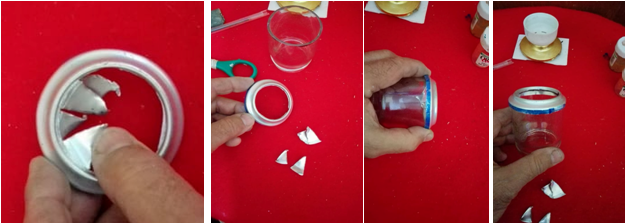
| Step-3: After cutting the jar, I am now going to sand the edge of the rim: | Paso-3: Después de cortar el frasco, ahora voy a lijar el filo del borde: |
|---|
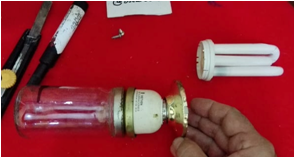
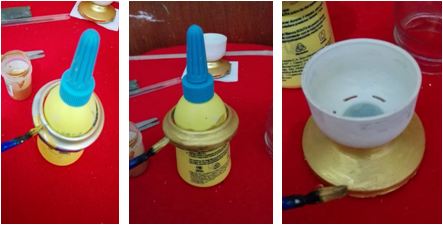
| Step-4: In this step I am going to form the base of the lamp, for this I am going to join the metal cover of the lock with the cup of the light bulb, I will do this by cutting the tip of the thread of the light bulb, then I'm going to put a soda one, which screws perfectly with the thread of the light bulb: | Paso-4: En este paso voy a formar la base de la lámpara, para esto voy a unir la tapa de de cerradura y la copa del bombillo, esto lo haré cortando la mitad de la rosca del bombillo y luego le voy a poner una tapa de refresco que enrosca perfectamente con la rosca del bombillo: |
|---|
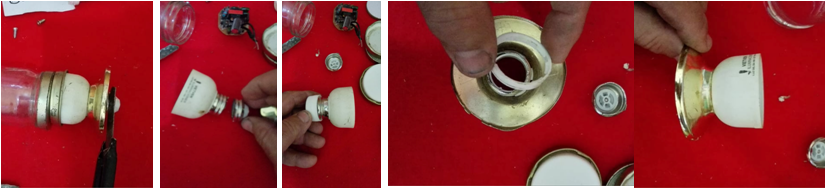
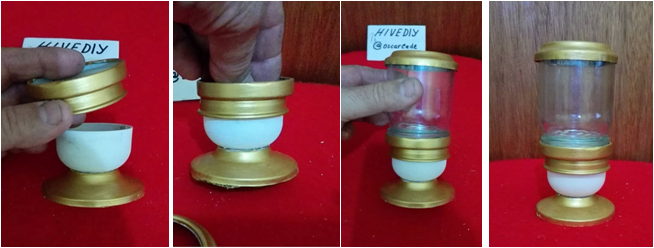
| Step-5: Now I am going to join the two covers with screws, as I explained at the beginning, these two covers will join the glass container with the base of the lamp: | Paso-5: Ahora voy a unir con tornillos las dos tapas, como les expliqué al comienzo, estas dos tapas unirán el envase de vidrio con la base de la lámpara: |
|---|
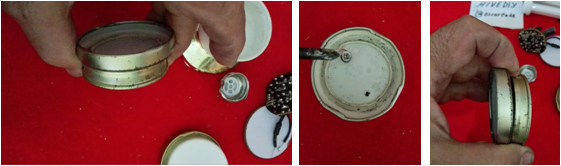
| Step-6: In this step I am going to make a piece to cover the edge of the glass screen, I will do this with the bottom of an aluminum container of a soft drink, to which I will open a hole in the center of 4.5 centimeters : | Paso-6: En este paso voy a elaborar una pieza para cubrir el borde de la pantalla de vidrio, esto lo haré con el fondo de un envase de aluminio de un refresco, al cual le abriré un hueco en el centro de 4.5 centímetros: |
|---|
| Step-7: Now I am going to paint the metallic pieces with gold color and the bulb cup with white color: | Paso-7: Ahora voy a pintar las piezas metálicas con color dorado y la copa del bombillo con color blanco: |
|---|
| Step-8: Now I am going to assemble the pieces to form the lamp: | Paso-8: Ahora voy a ensamblar las piezas para formar la lámpara: |
|---|
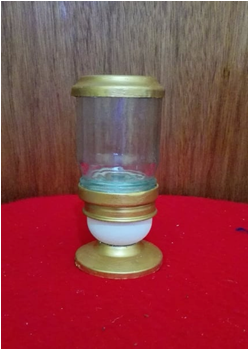
Well friends, after this interesting process, I will show you the result below: // Bueno amigos, después de este interesante proceso, a continuación les mostraré el resultado:
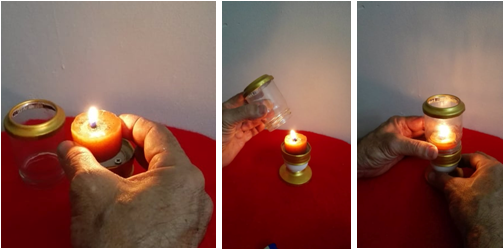
Now I'm going to light the lamp: // Ahora encenderé la lámpara:
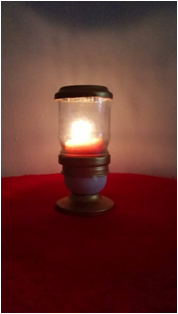
This has been an interesting process, I was anxious to finish this lamp, I really liked it a lot and I hope you too, greetings.
Este ha sido un proceso interesante, yo estaba ansioso de terminar esta lámpara, en verdad me gustó mucho y espero que a ustedes también, saludos.
Congratulations @oscarcede! You have completed the following achievement on the Hive blockchain and have been rewarded with new badge(s):
Your next target is to reach 65000 upvotes.
You can view your badges on your board and compare yourself to others in the Ranking
If you no longer want to receive notifications, reply to this comment with the word
STOPCheck out the last post from @hivebuzz:
Support the HiveBuzz project. Vote for our proposal!