How to locate damaged cells in a car battery // Cómo localizar las celdas dañadas en la batería del carro [ENG-ESP]
Hello friends, I hope you are all well, the days really go by quickly, "Christmas" is almost here, so this week it is important to have the car in good condition to do the errands for the preparations for the 24th. December and more for those who have to travel.
Well friends, I don't know if you remember that a few days ago I told you in a publication that the battery in my car had begun to fail, so I decided to check it, and I was able to verify that one of the Celts' glasses It had a low level of electrolytes, so I proceeded to put distilled water in this cell, but the battery remained the same, what did catch my attention was that the accumulated charge remained at 10 volts, this made me think that one of the cells had been damaged, without a doubt the suspect cell is No. 1, which had a low level of electrolytes.
Well friends, actually when the cells are damaged it is best to buy another battery, well OF COURSE! There are those who repair them, but I think the best thing is to buy it new, it is not easy to pay 75 dollars for a battery, but you have to make the sacrifice, so two days ago I had to buy a new battery. . , "BUT" I'm still curious to know what happened to the battery that was damaged, most likely the bridge that joins one cell to the other has melted, although it could also happen that one of the cells is very dirty or sulfated, to clear up any doubts, a few days ago I started checking each of the battery cells with a multimeter. I did this check simply to locate the cell phone that was not working.
How to locate damaged cells in a car battery.
Yes friends, although I already bought a battery, a few days ago I decided to check the damaged battery with a multimeter with the idea of locating the damaged cell, which is most likely cell number 1, which is the one that is suspicious and I think it is a cell because the battery charge remains at 10 volts, it is only 2.6 volts short for the normal battery charge which is 12 to 12.6 volts volts.
Checking my car battery to locate the damaged cell
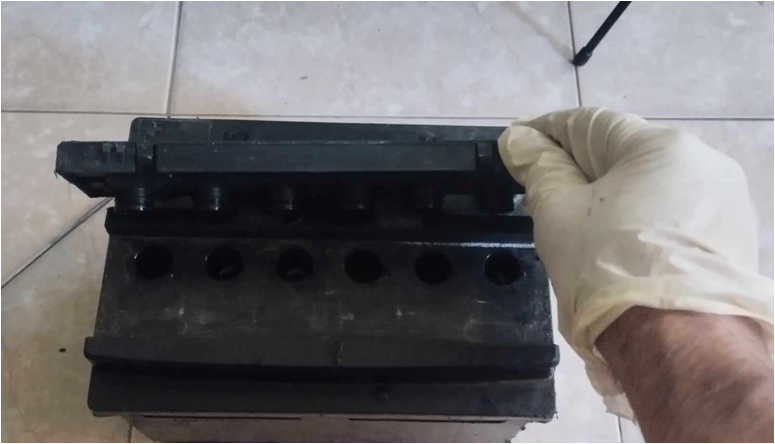
Well friends, since I have to remove the caps from each of the battery cells, I think the most prudent thing to do is to put on gloves and protective glasses to avoid any splashing of battery acid.
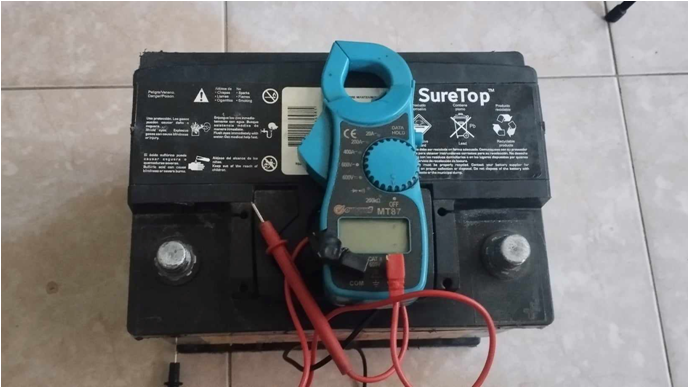
I'm going to use a multimeter:
Process:
Process:
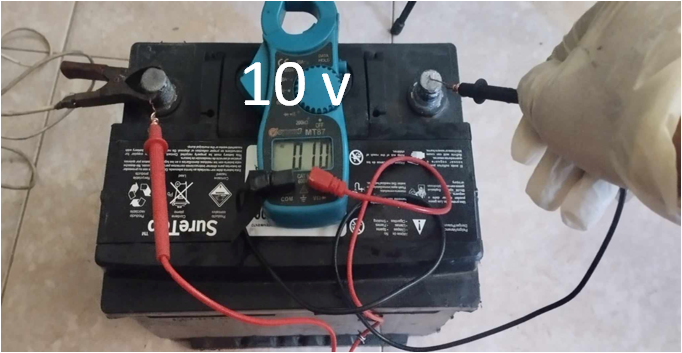
- Checking battery voltage:
- Remove the covers from each cell:
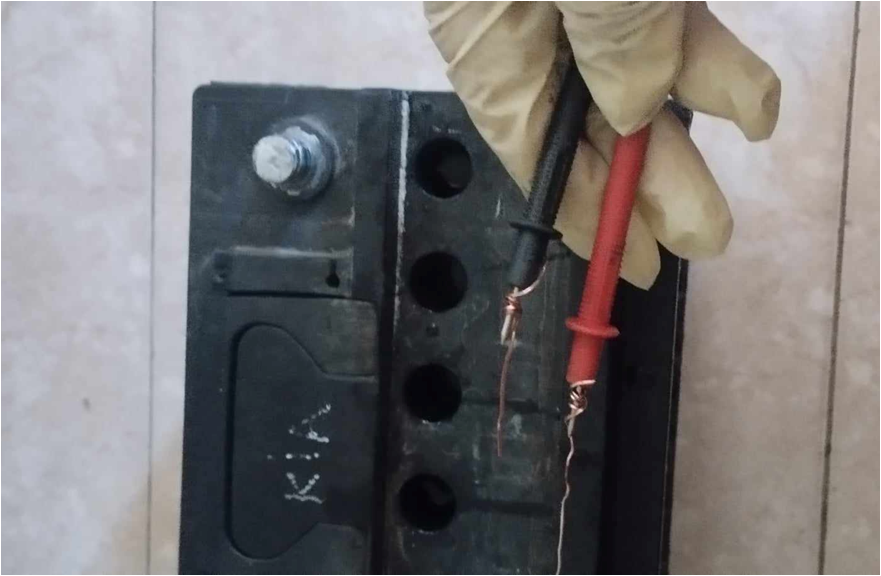
- Well friends, since I have to insert the tips of the TESTER cables inside each cell, it occurred to me to put a copper wire on each end of these cables, so that they do not get dirty with acid:
Performing tests to locate the damaged cell:
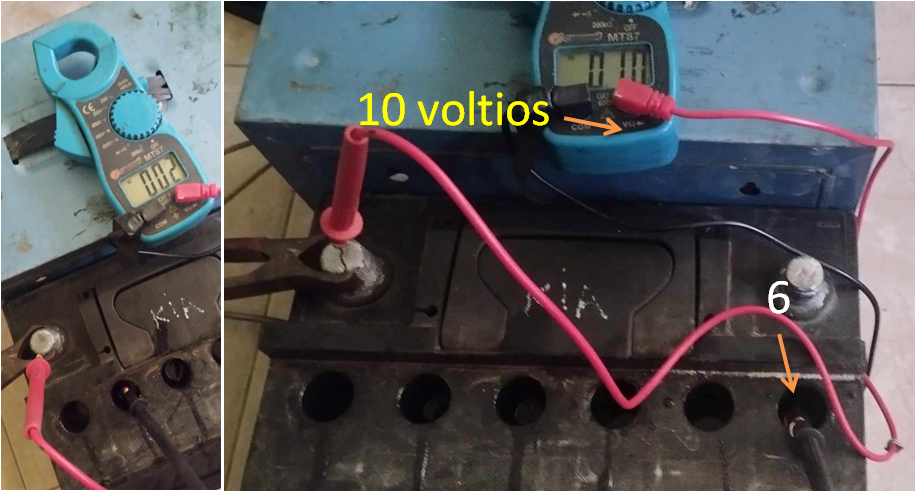
- Test-1: After turning on the TESTER I am going to place the knob in the alternating current function, then I am going to connect the positive cable with the positive terminal of the battery and the negative cable of the tester I will put it inside cell #1 to get the first result:
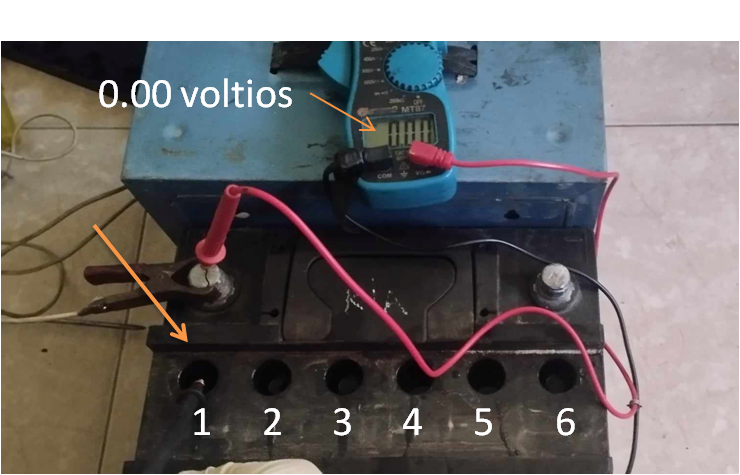
Result: As you have seen, this cell does not register voltage.
- Test-2: Now I am going to place the black tip of the TESTER in cell #2:
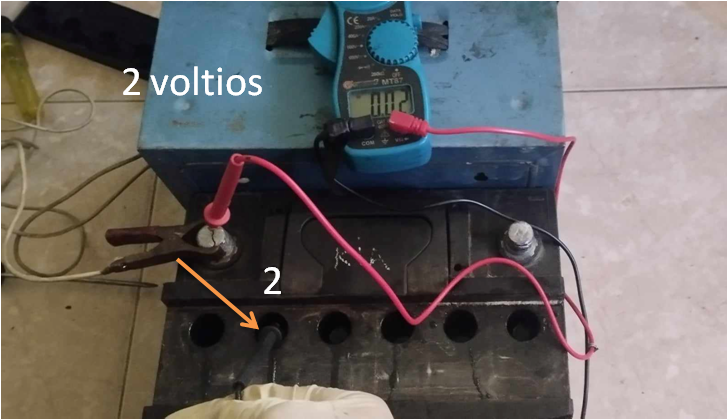
This cell registered 2 volts, so it is in good condition.
- Test-3: Now I will place the tip of the black TESTER wire in cell #3:

This cell registers a cumulative 3 volts, that is, from cell No. 2 to No. 3, it increased 1 volt.
- Test-4: The next thing will be to put the black cable of the tester in cell No. 4:

This cell registered a cumulative voltage of 5 volts, that is, it increased 2 volts with respect to the accumulated voltage of cell #4.
- Test-5: Now I will place the TESTER cable in cell #5:
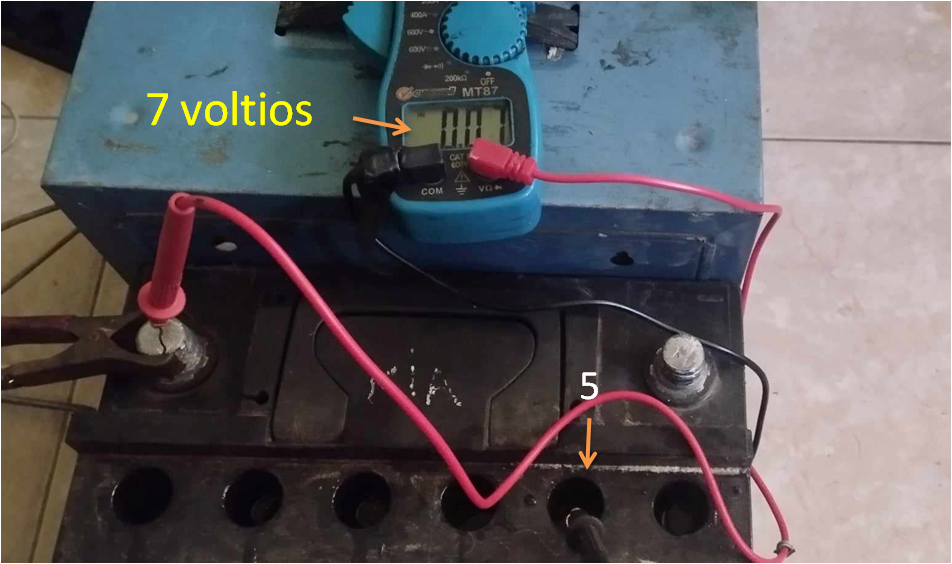
This cell registered a cumulative voltage of 7 volts, that is, it increased 2 volts with respect to the accumulated voltage of cell #4.
- Test-6: I will do the next test in cell #6, so I am going to insert the black tip of the TESTER into this cell.
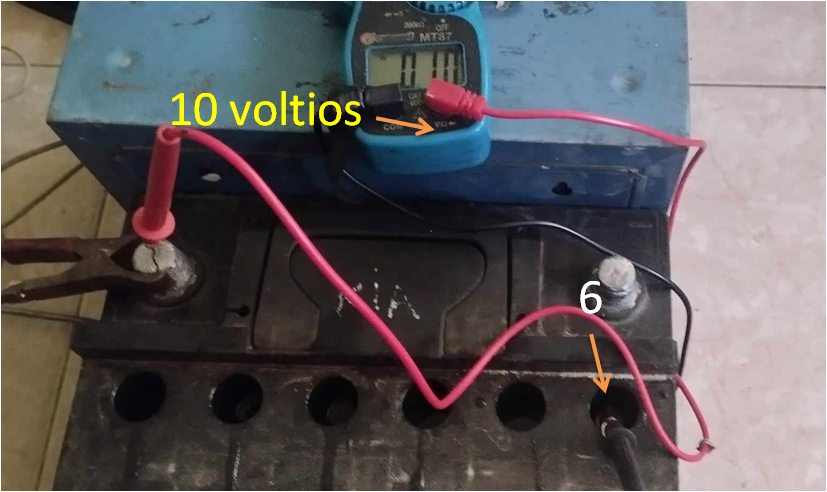
The result of the test is 10 volts, that is, 10 volts have been accumulated up to this cell number 6, so there would be 2 volts missing for the minimum charge of the battery, which is 12 volts.
Definitive diagnosis, according to the 6 tests:
After carrying out all these tests, I no longer have any doubts that the battery problem is being caused by cell #1; it is most likely that the bridge that connects this cell to cell #2 is broken or melted.
I hope this publication is very useful to you, greetings, God bless you.

EN ESPAÑOL:
Hola amigos, deseo que todos estén bien, realmente los días están pasando rápidamente, ya falta poco para la "Navidad", por lo que esta semana es importante tener el carro en buenas condiciones para hacer las diligencias que se requieren para los preparativos del 24 de Diciembre y más para quienes tienen que viajar.
Bueno amigos, no se si recordarán que hace unos días les decía en una publicación que la batería de mi carro había comenzado a fallar, por lo que decidí revisarla, pudiendo constatar que uno de los vasos de las celtas tenía bajo el nivel de los electrolitos, por lo que procedí a ponerle agua destilada a esta celda, pero la batería siguió igual, lo que si me llamó la atención es que la carga acumulada se mantenía en 10 voltios, esto me hizo pensar en que una de las celdas se había dañado, sin ninguna duda la celda sospechosa es la nº 1 la que presentaba un nivel bajo de electrolitos.
Bueno amigos, en realidad, cuando las celdas se dañan lo mejor en comprar otra batería, ¡CLARO! hay quienes las reparan, pero creo que lo mejor es comprarla nueva, no es fácil pagar 75 dolares por una batería, pero bueno hay que hacer el sacrificio, de manera que hace dos días tuve que comprar una batería nueva, "PERO" aun tengo la curiosidad por saber lo que le ha pasado a la batería, lo más seguro es que se haya fundido el puente que une una celda con la otro, aunque también puede suceder que una de las celdas está demasiada sucia o sulfatada, para salir de dudas, hace unos días me puse a revisar cada una de las celdas de la batería con un multímetro, hice esta revisión simplemente para localizar la celda que no estaba funcionando.
Cómo localizar las celdas dañadas en la batería del carro
Si amigos, aunque ya compré una batería, hace unos días decidí revisar la batería dañada con un multímetro con la idea de localizar la celda dañada, que lo más seguro es que sea la celda nº1 que es la que está sospechosa y pienso que es una celda porque la carga de la batería se mantiene en 10 voltios, solo le faltan 2.6 voltios para la carga normal de la batería que es de 12 a 12.6 voltios voltios.
Revisando la batería de mi carro para localizar la celda dañada
Bueno amigos, como tengo que remover los tapones de cada una de las celdas de la batería, creo que lo más prudente es ponerme unos guantes y las gafas de protección para evitar cualquier salpicadura del ácido de la batería.
Voy a usar un multimetro:
Proceso:
- Revisando el voltaje:
- Remover las tapas de cada celda:
- Bueno amigos, como tengo que introducir las puntas de los cables del TESTER dentro de cada celda, se me ocurrió ponerle un alambre de cobre en cada punta de estos cables, para que no se ensucien de ácido:
Realizando las pruebas para localizar la celda dañada:
- Prueba-1: Después de encender el TESTER voy a colocar la perilla en la función de corriente alterna, luego voy a conectar el cable positivo con el borne positivo de la batería y el cable negativo del tester lo pondré dentro de la celda nº1 para obtener el primer resultado:
Resultado: Como han podido observar, esta celda no registra voltaje.
- Prueba-2: Ahora voy a colocar la punta negra del TESTER en la celda nº 2:
Esta celda registró 2 voltios, de manera que está en buen estado.
- Prueba-3: Ahora colocaré la punta del cable negro del TESTER en la celda nº 3:
Esta celda registra un acumulado de 3 voltios, es decir, que de la celda nº 2 a la nº3, aumentó 1 voltio.
- Prueba-4: Lo siguiente será poner el cable negro del tester en la celda nº 4:
Esta celda registró un voltaje acumulado de 5 voltios, es decir, que aumentó 2 voltios con respecto al voltaje acumulado de la celda nº 4.
- Prueba-5: Ahora colocaré el cable del TESTER en la celda nº 5:
Esta celda registró un voltaje acumulado de 7 voltios, es decir, que aumentó 2 voltios con respecto al voltaje acumulado de la celda nº4.
- Prueba-6: La siguiente prueba la haré en la celda nº 6, así que voy a introducir la punta negra del TESTER en esta celda.
El resultado de la prueba es de 10 voltios, es decir que hasta esta celda nº6 se han acumulado 10 voltios, de manera que faltarían 2 voltios para la carga mínima de la batería que son de 12 voltios.
Diagnóstico definitivo, según las 6 pruebas:
Después de realizar todas estas pruebas, ya no me queda dudas de que el problema de la batería lo esta ocasionando la celda nº1, lo más seguro es que el puente que une esta celda con la celda nº2 esté rota o fundida.
Saludos @oscarcede Si recuerdo este caso y como dices existen quienes la reparan pero soy participe de que si se puede, mejor es comprar una nueva, comprendiendo todo lo que nos explicas. Y bueno, me alegra que tengas tu batería nueva y que hayas querido indagar más con la dañada.
Hola Josue., gusto en saludarte, después de las pruebas pude confirmar lo que sospechaba, la primera celda no estaba funcionando, y como tu dices, mejor es comprar una nueva. saludos, deseo que tengas una feliz Navidad en unión familiar.
Wow boss. Thanks for sharing sure a great post, i have learn a lot from this post.
Hello, good friend, the idea is to share experiences to learn from each other, greetings.
Amigo que bueno que pudiste comprar la batería. Gracias por dejarnos este post tan bueno que nos sirve para darle unos días más a la batería mientras se compra la nueva
Excelente Oscar, me alegro que hayas podido comprar la batería nueva. Sin embargo es bueno que nos mostraras que estaba pasando con la batería dañada y sobre todo que mostraras el procedimiento para checar todas las celdas, sirve de mucha ayuda para otros. Saludos
Interesante no sabía está técnica siempre pensé que se reparaba cambiando todas las celdas