Optra electric fan motor repair // Reparación del motor del electroventilador de Optra [ENG-ESP]
IN ENGLISH:
Hello friends, today I want to share with you a new experience related to the repair of the electric fan motor of my son's Optra car. I tell you that last Monday my son went out in the car to work and at noon when he was about to return, when he started the car he heard a noise and the car tried to turn off, he immediately opened the hood, but apparently everything was fine, then it turned on again the car and when he turned on the air conditioning the electric fan did not want to start, so he tried to turn the blade by hand and realized that it was stuck, so he decided to unplug it and return. home without using the air conditioning.
Well friends, given the urgency of the car, my son decided to call a spare parts store and the price was 40 dollars, so he immediately went to buy it, the truth is that it did not take my son long to install the new engine, he assembled it in less than 20 minutes, but I told him to save the damaged engine for inspection. As I told you, this problem occurred on Monday of this week and yesterday afternoon I decided to open this engine to check it, I confess that I could not stand my curiosity to know the damage that this engine had.

Optra electric fan motor repair
Yes friends, yesterday afternoon I couldn't stand my curiosity to discover the failure of the electric fan motor of my son's car, because sometimes these motors can fail when the carbons or brushes wear out, now, when the rotor generally gets stuck We thought it was the bearings, the truth was that something incredible happened, since neither the carbons nor the bearings were the cause of the problem.
Check the electric fan motor
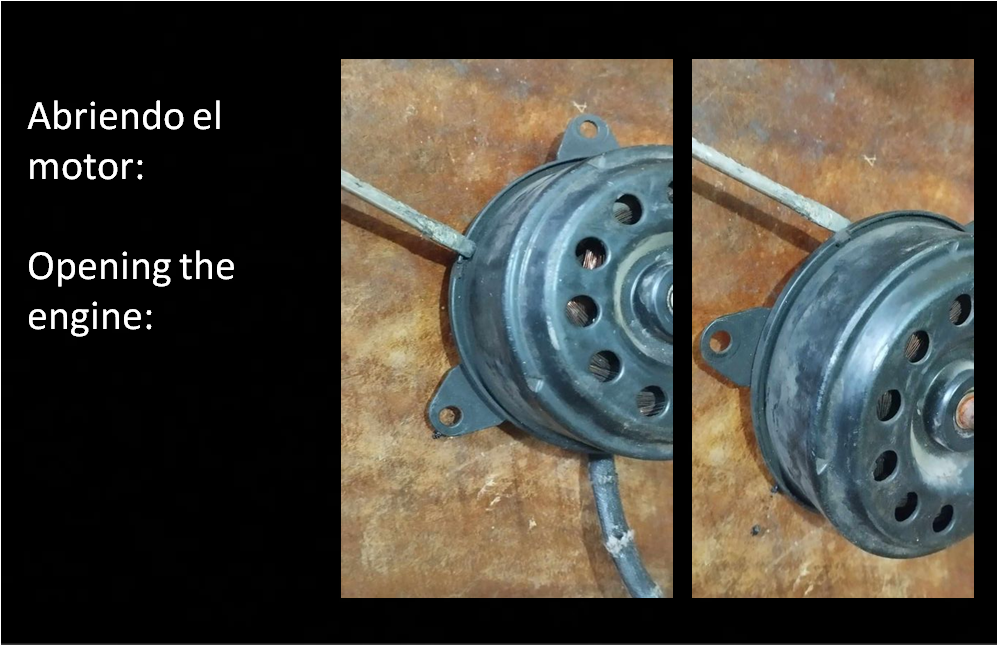
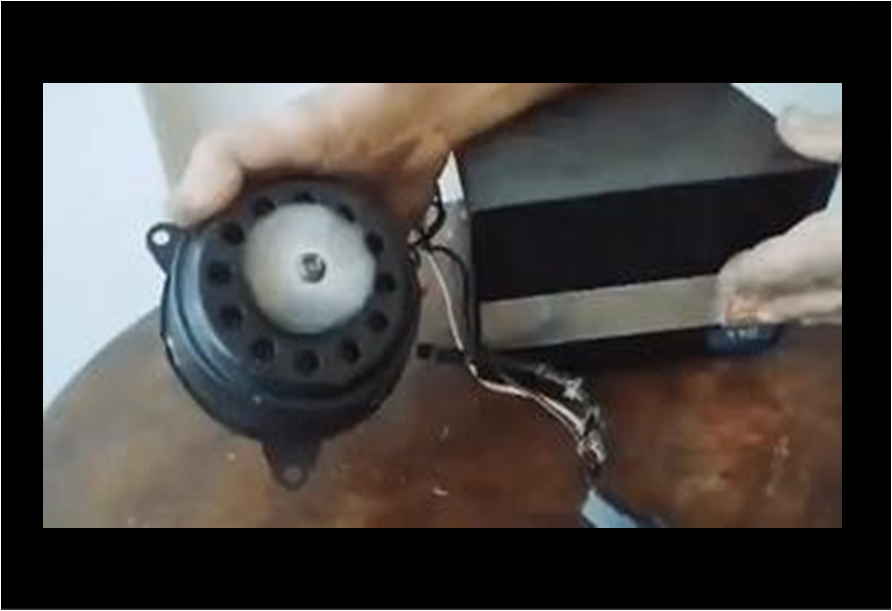
- Next I am going to proceed to open the engine, but first I am going to put a mark on each cover, which will indicate the position of these two pieces:
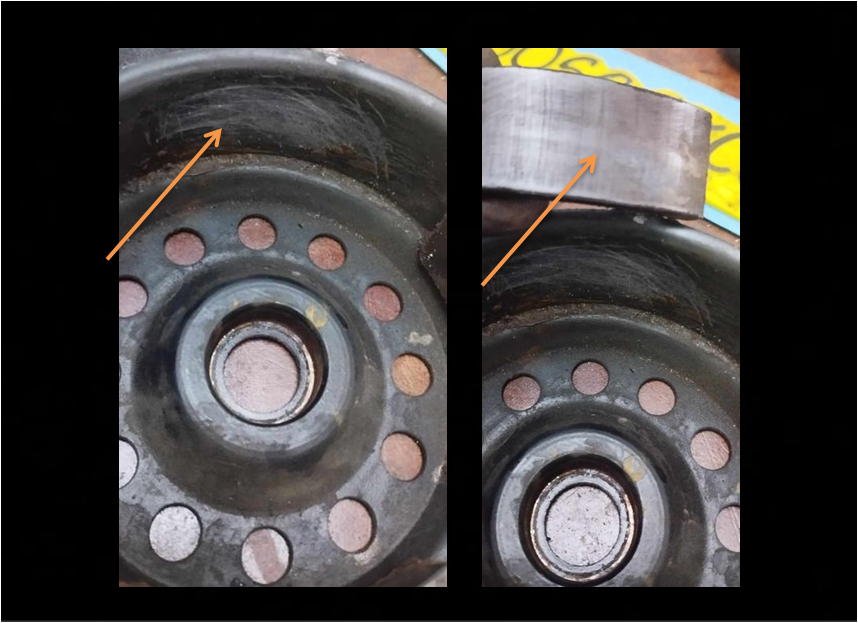
- When disassembling the motor, I could see that the magnet from the magnetic field had come loose:

- The bearings turned smoothly, so I have no doubt that the problem was caused by the magnet.
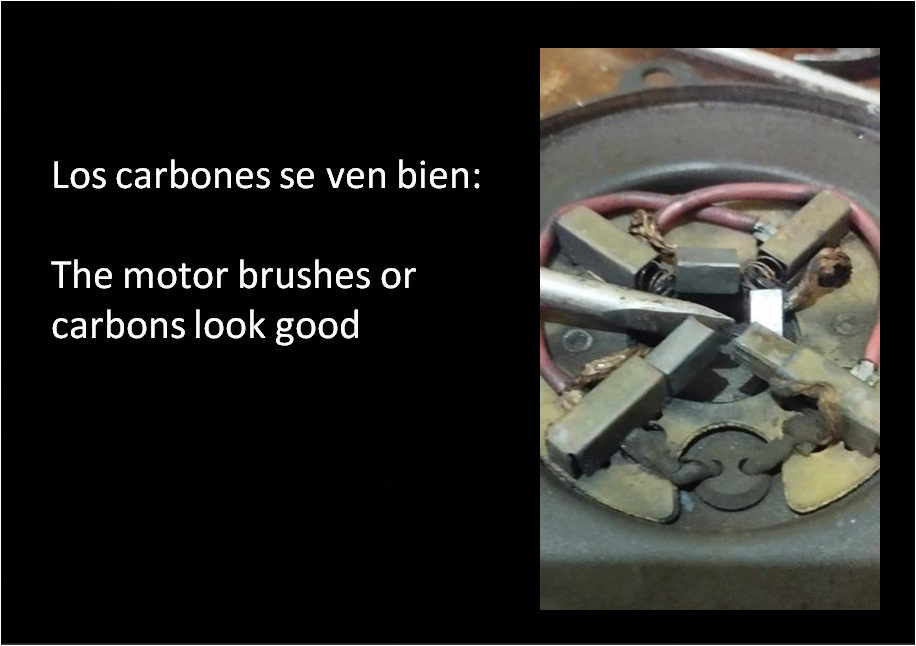
The carbons show a little wear, I would say they have 25% wear, so I consider them to be fine:
- The rotor winding shows no signs of being burned, its wires look good, they are just a little dirty, so I consider that this part is in good condition, although it is worth checking it with the tester:

Diagnosis:
Well friends, logically the motor rotor cannot work with one of the magnets detached, I think perhaps this magnet had a factory defect in terms of glue, because when these parts are vulcanized they last many years, now I have to think about how I will recover this engine.
What should I do to repair this engine?
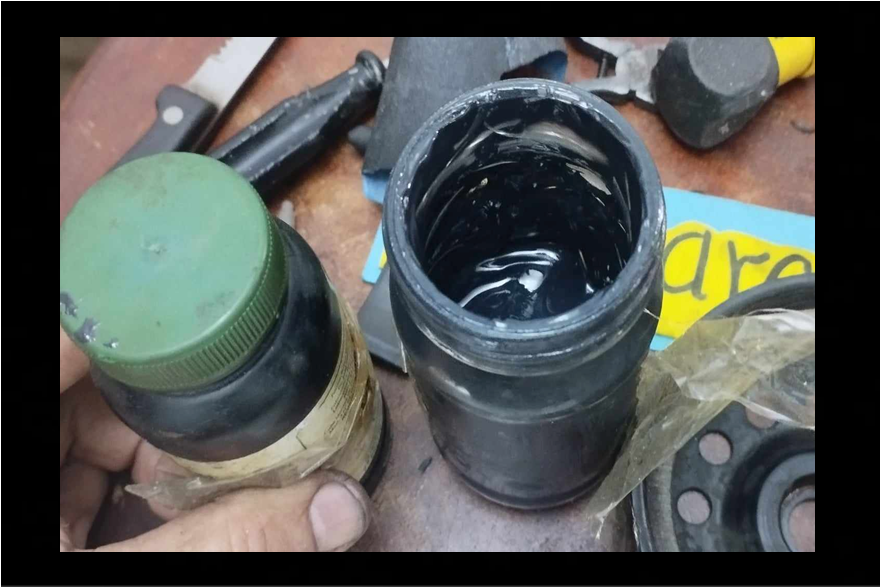
Well friends, the only alternative is to glue the magnet back into place. Fortunately I have a two-component heavy-duty epoxy glue that my niece gave me last year to weld the car radiator. My niece works as an engineer. A company that provides services in the oil area told me that they use this problem a lot for the clutch discs of the machines without having to use an oven. So without thinking twice I decided to fix the magnet with this glue.
- The first thing I will do is sand the area where the magnet was well, so that there is adhesion:
- Mix the two components of the glue, (base + catalyst) Apply the glue to the surface of both pieces and wait 15 minutes before joining the pieces:
- Place the magnet with the glue in the area of the magnetic field following the same order and separations, just as the other magnets are and wait at least 12 hours for the glue to harden:
Replacing the bearings:
There is a saying that says: "He who saves always has something there", well friends, I tell you that more than 4 years ago I installed some bearings in the motor of an electric fan but I could not repair it because the diluents in the collector were very worn, But I saved spare parts for that engine and look, now I will take advantage of these bearings, which are good, to put them in this engine that I am repairing:
Mounting the rotor on the cover that has the carbons or brushes:
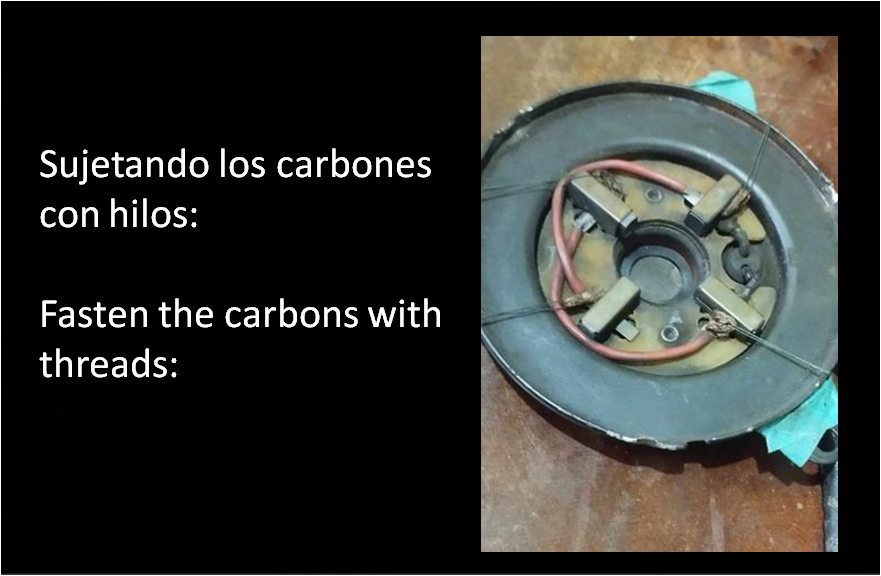
To assemble the collector inside the 4 carbons you have to sink these carbons, in reality I don't know how they do it in the workshops that repair these engines, but it occurred to me to sink the 4 carbons with threads, I have done this procedure made on the three occasions that I have repaired these electric fan motors, I repeat, I don't know how they do it in the electric car workshops, but it has worked for me, look how I do this.
Holding the 4 carbons with threads:
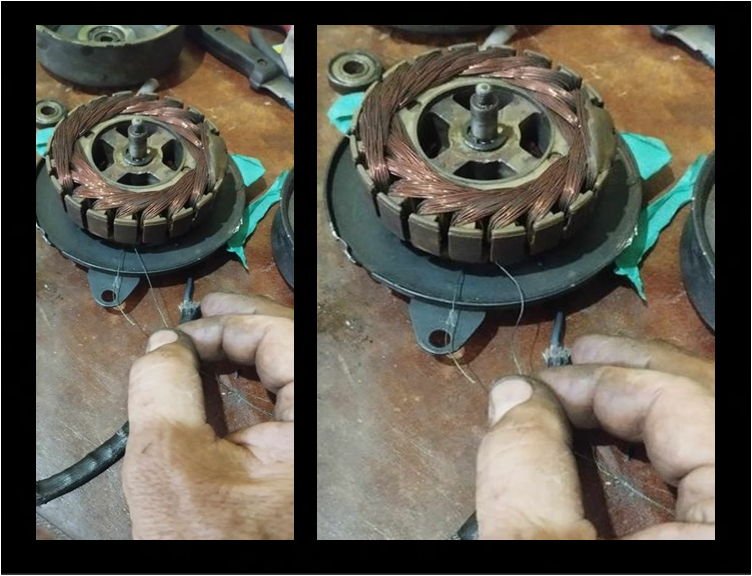
- Place the rotor catcher between the carbons and then release the thread:
The magnet adhered well to the metal.
After waiting at least 12 hours for the glue to harden, this morning I started checking the glue on the edge of the magnet and it was already hard, because I tried to remove some glue from the metal and couldn't, which means that the magnet It should also be well adhered to the metal, I hope this glue is strong.
Joining the two covers of the motor housing:
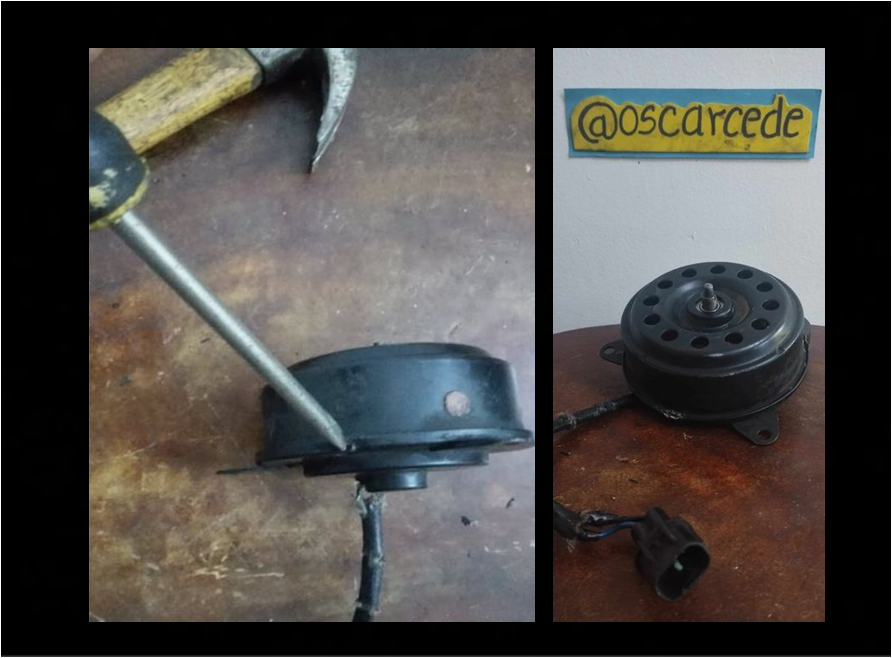
Here I am going to take into account the mark that I made previously on the housing of both covers, and then tighten the three marks on the edges, you just have to fold the edge of the sheet On those three points, I'm going to do this with the use of a flat screwdriver and a hammer:
Well friends, I turned the rotor shaft by hand, and I don't feel any friction on its internal parts, it turns very well, so I just have to put it into operation, but I'm not going to test it on the car, but on my work table, with the use of a 12 volt transformer, which is ideal for this test.
Next I will show you how the motor works using images and GIFs, but first, I will put a piece of paper on the motor shaft so that you can notice the movement of the rotor:


EN ESPAÑOL:
Hola amigos, hoy quiero compartir con ustedes una nueva experiencia relacionado con la reparación del motor del electro ventilador del carro Optra de mi hijo. Les cuento que el pasado lunes mi hijo se fue en el carro para su trabajo y al mediodía cuando se disponía a regresar, al prender el carro sintió un ruido y el carro intentó apagarse, enseguida abrió el capót, pero aparentemente todo estaba bien, luego volvió a encender el carro y al encender el aire acondicionado el electroventilador no quiso arrancar, entonces intentó girar el aspa con la mano y se dio cuenta que estaba trabado, por lo que decidió desenchufarlo y regresar a casa sin usar el aire acondicionado.
Bueno amigos, en vista de la urgencia del carro, mi hijo decidió llamar a una venta de repuesto y el precio era de 40 dolares, así enseguida fue y lo compró, la verdad es que mi hijo no tardó mucho en instalar el nuevo motor, lo montó en menos de 20 minutos, pero le dije que guardara el motor dañado para revisarlo. Como les decía, este problema se presentó el día lunes de esta semana y ayer en la tarde decidí abrir este motor para revisarlo, les confieso que no aguanté la curiosidad por saber el desperfecto que tenía este motor.
Reparación del motor del electroventilador de Optra
Si amigos, ayer en la tarde no aguanté la curiosidad por descubrir la falla que tuvo el motor del electroventilador del carro de mi hijo, porque a veces estos motores pueden fallar cuando los carbones o escobillas se gastan, ahora, cuando el rotor se traba generalmente pensamos en que son los rodamientos, lo cierto fue que sucedió algo increíble, pues ni los carbones ni los rodamientos fueron los causantes del problema.
Revisión del motor del electroventilador
- A continuación voy a proceder a abrir el motor, pero antes voy a ponerle una marca a cada tapa, lo cual me indicará la posición de estas dos piezas:
- Al desarmar el motor, pude constatar que el imán del campo magnético se había desprendido:
- Los rodamientos giraban suavemente, de manera que no tengo dudas en que el problema lo ocasionó el imán:
- Los carbones presentan un pequeño desgaste, yo diría tienen un 25% de desgaste, por lo que considero que están bien:
- El embobinado del rotor no presenta indicios de estar quemado, sus alambres se ven bien, solo están un poco sucios, por lo que considero que esta pieza esta en buen estado, aunque no esta demás hacerle una revisión con el tester:
Diagnostico:
Bueno amigos, por lógica, el rotor del motor no puede funcionar y menos con uno de los imanes desprendido, pienso que quizás este imán tuvo un defecto de fabrica en cuanto al pegamento, porque cuando se vulcanizan estas piezas duran muchos años, ahora debo pensar como recuperar este motor.
¿Que debo hacer para reparar este motor?
Bueno amigos, la única alternativa es pegar nuevamente el imán en su lugar, afortunadamente, por allí tengo un poquito pega epoxi de uso industrial de dos componentes que mi sobrina me regaló el año pasado para soldar el radiador del carro, mi sobrina trabaja como ingeniero en una empresa que presta servicios en el área de petroleo, ella me dijo que esa pega la usan mucho para los discos de embragues de las maquinas sin la necesidad de usar horno. De manera que sin pensarlo dos veces, decidí fijar el imán con este pegamento.
- Lo primero que haré será lijar bien el área donde estaba el imán, para que haya adherencia:
- Mezclar los dos componentes de la pega, ( base + catalizador) Aplicar el pegamento a la superficie de ambas piezas y esperar 15 minutos antes de unir las piezas:
- Colocar el imán con el pegamento en el área del campo magnético siguiendo el mismo orden y las separaciones, tal y como están los demás imanes y esperar al menos 12 horas para que el pegamento se haya endurecido:
Ahora a esperar, por lo menos 12 horas, para que se endurezca el pegamento.
Reemplazando los rodamientos:
Hay un dicho que dice: "El que guarda siempre tiene", bueno amigos les cuento que hace más de 4 años monté unos rodamientos en un motor de electro-ventilador pero no logré repararlo porque las delgas del colector estaban muy desgastadas, pero guardé ese motor para repuesto y miren, ahora aprovecharé estos rodamientos que están buenos, para ponérselos a este motor que estoy reparando:
Montando el rotor en la tapa que posee los carbones o escobillas:
Para montar el colector de las delgas dentro de los 4 carbones hay que hundir estos carbones, en realidad no se como lo hacen en los talleres que reparan estos motores, pero a mi se me ocurrió hundir los 4 carbones con hilos, este procedimiento lo he hechos en las tres ocasiones que he reparado estos motores de electroventiladores, repito no se como lo hacen en los talleres de electroautos, pero a mi me ha funcionado, fíjense como hago esto.
Sujetando los 4 carbones con hilos:
- Colocando el colector del rotor entre los carbones para luego soltar los hilos:
El imán quedó bien adherido al metal
Después de esperar que transcurrieran por lo menos 12 horas para el secado del pegamento, un proceso que comencé ayer a eso de las 7 de la noche, hoy en la mañana me puse a revisar el pegamento del borde del imán y quedó muy bien, porque intente remover un poquito de pegamento del metal y no pude, lo que significa que el imán también debería estar bien adherido al metal, espero que este pegamento sea resistente.
Uniendo las dos tapas de la carcasa del motor:
Aquí voy a tomar en cuenta la marca que hice previamente en la carcasa de ambas tapas, para luego apretar las tres marcas de los bordes, solo hay que doblar el borde de la lámina en esos tres puntos, esto lo voy a realizar con el uso de un destornillador plano y un martillo:
Bueno amigos, giré el eje del rotor con la mano, y no se siente ningún roce en sus partes internas, gira muy bien, de manera que solo tengo que ponerlo en funcionamiento, pero no lo voy a probar en el carro, sino sobre mi mesa de trabajo, con el uso de un transformador de 12 voltios, el cual es ideal para esta prueba.
A continuación les mostraré el funcionamiento del motor mediante imágenes y GIF pero antes, le pondré un pedazo de papel al eje del motor para que se pueda notar el movimiento del rotor:
Así me sucedió una vez te hablo hace más de 5 años fui a dónde un amigo con un electro auto y desarmamos el motor de la misma forma solo que el pego el imán con pega loca porque decía que la pega epoxi es muy gruesa y podía afectar, a Dios gracias aún está en funcionamiento jejeje
Oye funcionó la pegaloca, bueno ese tipo de pega suele cristalizarse, este pegamento que he utilizado es similar al que se usa para vulcanizar no es pega-tanque, al colocar el imán, este ejerce fuerza hacia el metal y hace que la pega brote hace los bordes quedando una fina capa, lo importante es que al girar el rotor no haya algún roce, saludos.
Saludos Oscar, oye que bueno que reparaste ese electro y lo hiciste muy bien, no se porque pero casi siempre los imanes se despegan, gracias a Dios no te daño el embobinado...
Hola ferbu, si el motor quedó muy bien, al menos voy a tener este motor para una emergencia. saludos.
La semana pasada se me trabo también el electro ventilador pero lo tuve que cambiar le coloque uno de esos con carbones hay que hacerle mantenimiento, el carro no puede rodar sin el electro , que bueno que usted mismo lo reviso eso es un ahorro
Feliz día bendiciones 💚