#ViernesDeEscritorio, Linux Mint 21.3 “Victoria XFCE. Curso de Manejo de Terminal parte 3. Árbol de Directorios. ESP/EN.
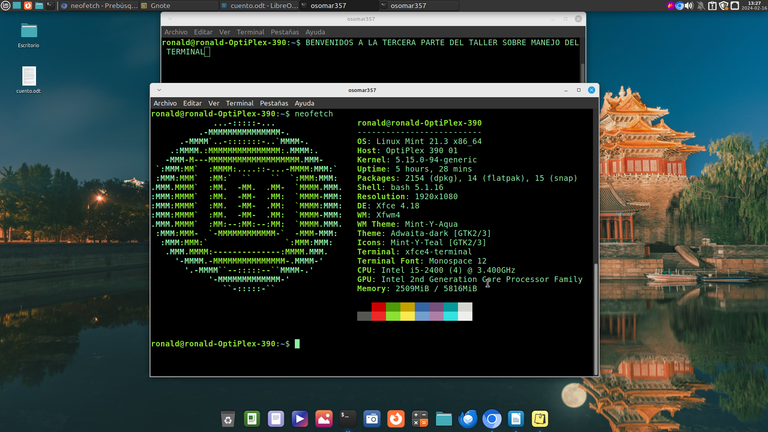
Captura de Pantalla

Saludos #Lunuxeros, comunidad de #Linux&SoftwareLibre y comunidad de ³Linux en #Hive, bienvenidos a un nuevo post de #ViernesDeEscritorio .
Hoy, iniciaremos con la tercera parte del curso sobre el manejo y uso del Terminal. Siempre es bueno recordar, que el buen uso de la terminal el #Linux es sumamente importante, además, aprender usar la terminal es fundamental si queremos trabajar en el área de servidores en una empresa o institución, ya que la mayoría de los servidores en la actualidad se manejan en #Linux, entonces un usuario que domine bien el uso de la terminal de #Linux, podrá entender bien el manejo de un servidor, de manera más rápida y expedita.
Ya, que al conocer el funcionamiento, los comandos y su manejo, el usuario de #Linux, podrá realizar tareas, mantenimiento y organización del sistema, de forma directa y segura, en su equipo, o en un servidor.
Ahora bien, para entender de forma clara, cómo es el funcionamiento de una terminal, debemos conocer algunas diferencias entre el sistema operativo #Linux y otros sistemas, y una de las diferencias más importantes y que debemos conocer bien, para tener claridad en el manejo del terminal, es la ubicación de los directorios.
Cuando hablamos del caso de Windows, podemos ver que los directorios están en el disco ‘‘C’’ pero también, si divides el disco, puedes colocarlos en otras direcciones o ubicaciones, pero en el caso de #Linux, esto no es así, ya que los directorios, están en una sola ubicación, que es en la Carpeta Raíz.
Por eso en #Linux, los directorios están representados por un árbol, conocido como ‘‘Árbol de Directorios’’ cuya base es la carpeta ‘‘raíz’’ que es la ubicación dentro del sistema operativo, donde se guardan los archivos y directorios. Por eso, todas las direcciones de las carpetas o directorios en #Linux, tienen como base la carpeta raíz, que está representada por barra inclinada o slash ( / ). Pero
dependiendo del tipo Prompt que esté utilizando nuestra terminal, en vez de la barra inclinada o slash ( / ), nuestro directorio de usuario, puede estar representado en el prompt, por una virgulilla (~).
Es decir, cuando en nuestro prompt sale el símbolo virgulilla (~) está representa el directorio del usuario y representa al símbolo (/). También hay veces que nos vamos a encontrar con terminales, donde el prompt no contenga información amplia sino que salga o se represente de esta manera (> ~) cuando esto suceda debemos utilizar un comando llamado ‘‘pwd’’ para saber nuestra ubicación.
Pero antes de seguir avanzando, voy a explicar que es el prompt, debido a que este curso es para principiantes y nuevos usuarios y por lo tanto, debemos asumir, que no todos, conocen el significado de los términos utilizados.
¿Qué es el Prompt?
El Prompt, es la información que se nos muestra en la terminal y que está antes del cursor cuando abrimos la terminal y que está justamente en el lugar donde vamos a iniciar a escribir y a introducir los comandos en la terminal.
En las diferentes distribuciones de #Linux, los prompt, se presentan de formas diferentes, pero los usuarios, podemos personalizarlos, un dato importante a tener en cuenta son los símbolos ($) y (#) que aparecen en los prompt, cuando estamos trabajando en al terminal, siendo así, diremos que el símbolo ($) representa a un usuario normal trabajando en la terminal, mientras que el símbolo (#) representa a un usuario con la condición de root, en la terminal
Siendo el usuario root o usuario raíz, es el usuario que tiene el acceso administrativo del sistema operativo, que es una condición que no tiene el usuario normal.
Ver imágenes:

Prompt usuario común. Captura de Pantalla
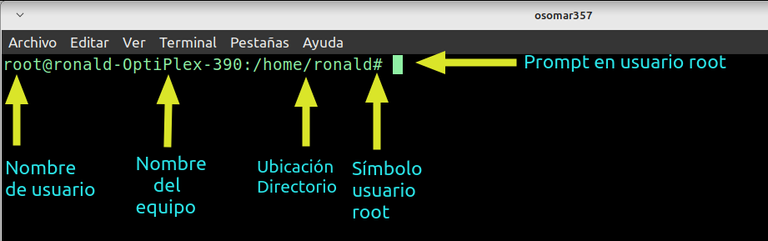
Prompt usuario root. Captura de Pantalla
Ahora vamos a ver qué es el Árbol de Directorios y cómo movernos en él.
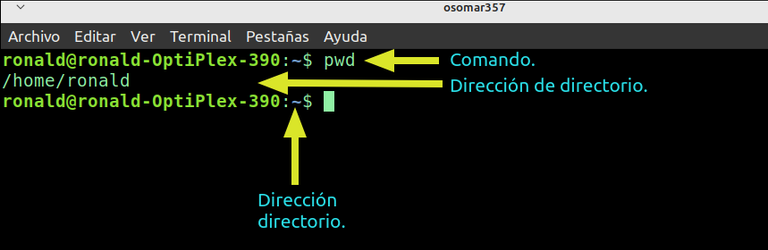
Cuando entramos a una terminal, uno de los primeros comandos que debemos conocer y usar es el ‘‘pwd’’ ya que este comando nos dice en donde estamos ubicados. Como ya sabemos, los símbolos (/ y ~) en #Linux, nos indica que estamos en la carpeta raíz, pero para ver esa dirección completa en la pantalla del terminal, usamos el comando ‘‘pwd’’ y nos dirá la dirección de donde estamos, así que si en algún momento nos perdemos en la terminal, solamente debemos colocar ‘‘pwd’’ para saber en dónde estamos.
Ver imagen:
Captura de Pantalla
Como se puede ver, al usar el comando ‘‘pwd’’ nos mestra la dirección del directorio raíz, que está resumida en el símbolo (~). Pero si estamos en otra ubicación, al usar el comando ‘‘pwd’’ nos dará la información de la ubicación.
Ver el Listado de Directorios.
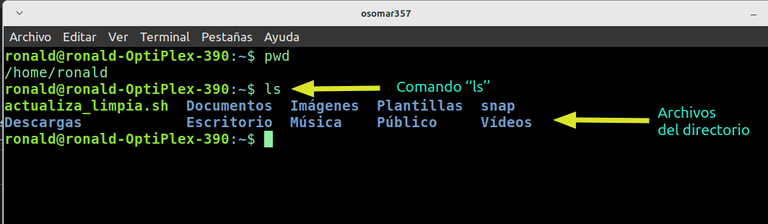
Para ver el listado de directorios, debemos utilizar el comando ‘‘ls’’ al usar ese comando se nos muestra el contenido del directorio donde estamos ubicados.
Ver imagen:
Captura de Pantalla
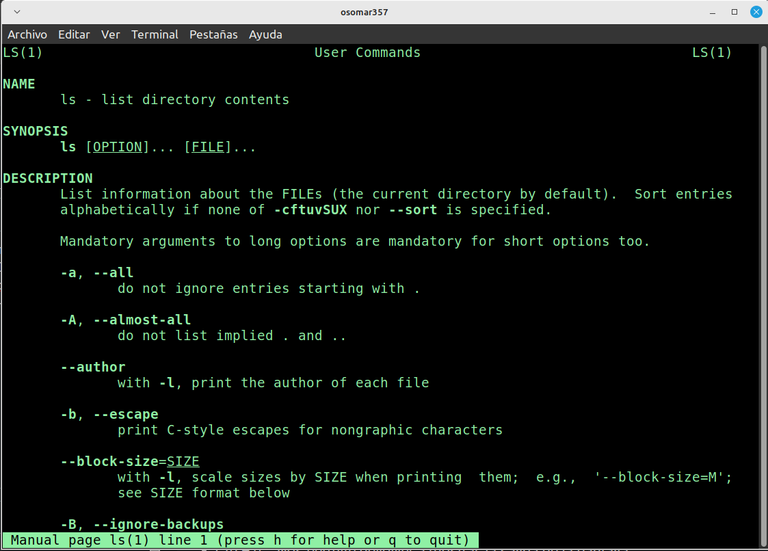
Por otro lado, es muy importante saber, que cuando usas un comando y no sabes todas cualidades y dependencias que pueda tener y que puedes usar para mejorara su uso, puedes usar el comando ‘‘man’’ y después de este comando usas el comando que deseas conocer completamente. En nuestro caso usaremos el comando (man + ls) y nos indicará todo lo que podemos hacer con ese comando y como lo podemos combinar para con otros atributos para una mejor utilización.
Ahora bien, antes de usarlo, voy a utilizar el comando ‘‘clear’’ para limpiar la pantalla y poder usarlo en una pantalla limpia, también se puede usar el atajo Ctrl + l. Si quieres saber más sobre el uso de los atajosdel teclado en la terminal puedes leer este post
Ver imagen:

Captura de Pantalla
Captura de Pantalla
Cómo podemos ver, el comando ‘‘man’’ nos muestra todas las funciones y atribuciones que tiene el comando ‘‘ls’’. Es importante decir, que normalmente el comando ‘‘man’’ normalmente da la información en el idioma en que se coloco el sistema operativo, me imagino que me lo da inglés, debido a que lo tengo en español latinoamericano. Para terminar el uso del comando ‘‘man’’ debemos apretar la letra ‘‘q’’ y nos llevará de nuevo a la pantalla del termina.
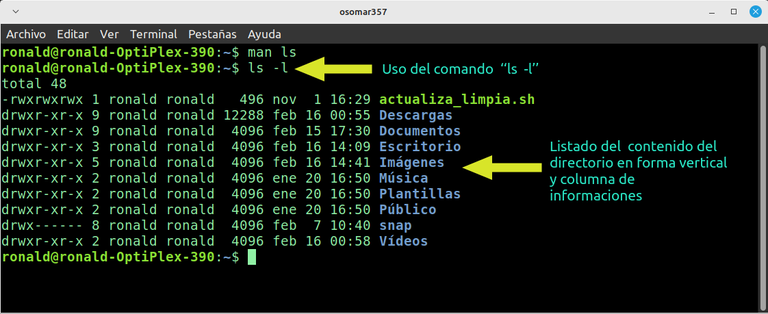
Después de usar el comando ‘‘man’’ voy a usar la opción ‘‘-l’’ ya que la misma permitirá que veamos el contenido del directorio en forma de lista y con varias informaciones.
Es importante que sepamos que son cada una de esas informaciones y que nos dicen, para poder tener seguridad de lo que nos dice la información reflejada en la terminal.
Ver imagen:
Captura de Pantalla
Información de las columnas de los directorios.
Vamos a ellos y veamos que nos dicen estas columnas:
A) En la primera columna veremos un grupo de letras, cuando esas letras comienzan con la letra (d) nos está informando, que el archivo que estamos viendo es un directorio. Y cuando estas letras comienzan con un guión, nos informa que estamos viendo un archivo.
Acá es importante informar que los archivos no siempre vienen acompañados de una extensión. Pero los archivos que vienen acompañados por una extensión,nos permiten reconocer que tipos de archivos son, por ejemplo, si tenemos un archivo con la extensión .bin o .deb en #Linux podemos saber que son archivos ejecutables, lo mismo que si hay un .exe en Windows, igual que cuando vemos un archivo .odt lo reconocemos como parte de una archivo de texto en Linux, mientras que un .doc o un .docx, nos dice que es un archivo de texto de Office en Windows.
Volviendo al tema, cuando en la primera columna nos aparecen las letras, estás nos indican, que tipo de archivo es y los permisos que posee el archivo, por ejemplo: drwxr-xr-x.
Ahora veremos que nos indica, lo vamos a dividir por partes para que se entienda muy bien y no queden dudas:
Parte 1= drwx Parte 2= r - x Parte 3= r - x
1- drwx nos indica lo siguiente, con la letra inicial (d) nos dice que el archivo es un directorio, con la letra (r) nos indica que se puede escribir, con la letra (w)que se puede escribir y con la letra (x) que se puede ejecutar. Es decir, nos dice el tipo de directorio y los permiso que tiene.
- d = Directorio
- r = Lectura
- w = Escritura
- x = Ejecución
2- La parte 2 nos indica el permiso que tienen los grupos de usuarios. Se habla de grupo de usuarios, cuando el administrador del sistema operativo está trabajando en una empresa o institución, y crea grupos de usuarios para el manejo y uso del sistema.
Entonces la parte 2, nos indica el nivel de permisos que tienen los miembros del grupo de usuarios.
En este caso r - x, el grupo de usuarios puede leer y ejecutar el directorio, pero no puede editarlo ya que no tiene permiso para escribir.
Permisos:
- r = El grupo de usuarios puede leer
- — = El grupo de usuarios no tiene permiso para escribir. La negativa se coloca con un guión.
- x = El grupo de usuarios tiene permiso para ejecutar el directorio.
La parte 3, nos indica el permiso que tiene el usuario, que en este caso son los mismos que los del grupo de usuarios, pero esto puede ir cambiando, según los permisos que otorgue cada archivo o directorio.
En este caso r - x, el usuario puede leer y ejecutar el directorio, pero no puede editarlo ya que no tiene permiso para escribir.
Permisos:
- r = El usuario puede leer
- — = El usuario no tiene permiso para escribir. La negativa se coloca con un guión.
- x = El usuario tiene permiso para ejecutar el directorio.
B) La segunda línea, la que tiene los números, nos indica, la cantidad de vínculos que posee ese directorio o archivo en el sistema.
C) La tercera columna identifica al usuario que es el dueño del archivo.
D) La cuarta columna identifica al grupo de usuarios que puede trabajar con el archivo.
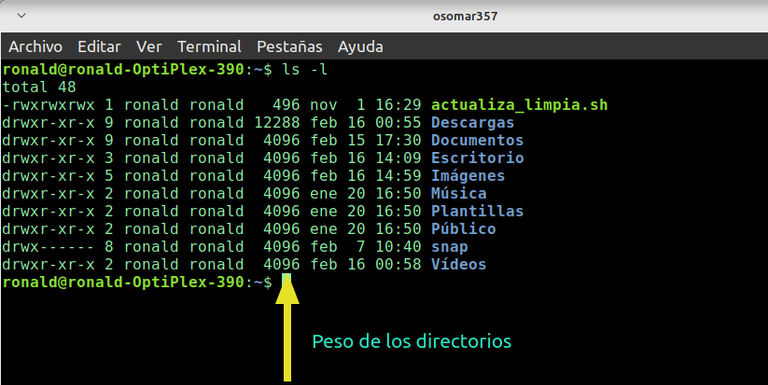
E) La quinta columna, nos da el tamaño del archivo. Ojo acá, si vemos en la pantalla, todos los directorios tienen un peso de 4096, pero eso es algo queda el sistema pueden que pesen más o que pesen menos.
Ver imagen.
Captura de Pantalla
Para poder ver el peso real del directorio en un formato más amigable para el usuario, nos vamos a la terminal, colocamos de nuevo el comando ‘‘man ls’’ y vemos las opciones que tenemos.
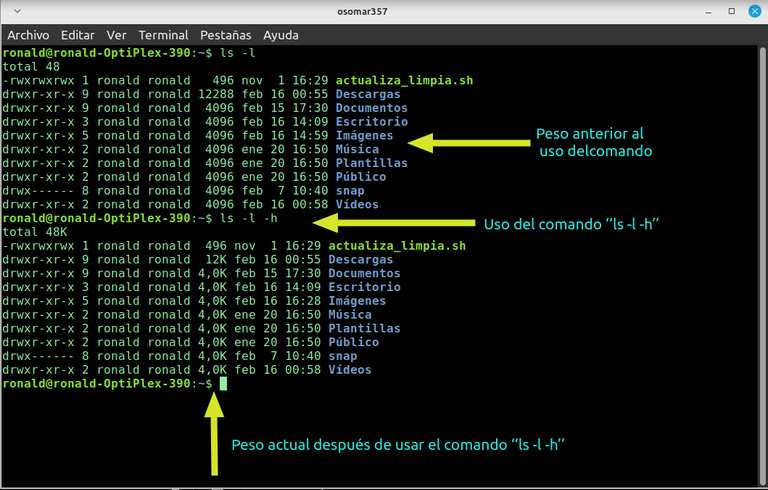
En al comando ‘‘man’’ conseguimos la opción ‘‘-h’’ que unida ala opción ‘‘-l’’ nos dará una información más cercana a la que estamos buscando con respecto al peso de los archivos, así que nos vamos a la terminal y colocamos el siguiente comando ‘‘ls -l -h’’ y vemos el resultado.
Ver imagen.
Captura de Pantalla
F) La sexta, séptima y octava columna, nos dan la fecha de la última modificación del archivo. No la fecha de cuando se creo, sino la fecha de su última modificación.
G) La novena columna, nos da el nombre del archivo o directorio.
Estimada comunidad, esta es la tercera parte del taller del Manejo del Terminal de #Linux, en ella aprendimos a listar el árbol de directorios, a usar el comando ‘‘ls’’ y a utilizar algunas de sus opciones. Sin embargo; reconozco que quedan muchas por aprender y usar, pero para eso también conocimos y usamos el comando ‘‘man’’, lo que te permitirá ir conociendo y practicando las opciones del comando en su equipo.
Y finalmente, aprendimos a reconocer los archivos y los directorios, aprendimos sobre sus permisos y otras funciones, que nos ayudaran a avanzar con mayor seguridad y mejor paso en el desarrollo del curso.
Muchas gracias por leerme.
Paginas Consultadas: 1, 2, 3, 4
To read English
Screenshot
Greetings #Lunuxeros, community of #Linux&Free softwareand community of 3Linux in #Hive, welcome to a new post of #ViernesDeEscritorio.
Today, we will start with the third part of the course on the handling and use of the Terminal. It is always good to remember that the good use of the Linux terminal is extremely important, in addition, learning to use the terminal is essential if we want to work in the server area in a company or institution, since most servers are currently managed in Linux, then a user who masters the use of the Linux terminal well, will be able to understand the management of a server well, faster and expeditiously.
Already, that by knowing the operation, the commands and their handling, the user of #Linux, will be able to perform tasks, maintenance and organization of the system, directly and securely, on his computer, or on a server.
Now, to clearly understand how a terminal works, we must know some differences between the Linux operating system and other systems, and one of the most important differences that we must know well, to have clarity in the management of the terminal, is the location of the directories.
When we talk about the case of Windows, we can see that the directories are on the disk "C" but also, if you divide the disk, you can place them in other addresses or locations, but in the case of #Linux, this is not the case, since the directories, are in a single location, which is in the Root Folder.
That's why in #Linux, the directories are represented by a tree, known as the ‘Directory Tree’ whose base is the ‘root’ folder that is the location within the operating system, where the files and directories are saved. That's why all the addresses of the folders or directories in #Linux are based on the root folder, which is represented by slash ( /). But
depending on the type of Prompt that our terminal is using, instead of the slash (/), our user directory may be represented in the prompt by a hyphen (~).
That is, when in our prompt the virgulilla symbol (~) comes out, it represents the user's directory and represents the symbol (/). There are also times that we are going to encounter terminals, where the prompt does not contain extensive information but exits or is represented in this way (> ~) when this happens we must use a command called "pwd" to know our location.
But before moving on, I will explain what the prompt is, because this course is for beginners and new users and therefore, we must assume that not everyone knows the meaning of the terms used.
What is the prompt?
The prompt is the information that is shown in the terminal and that is before the cursor when we open the terminal and that is just in the place where we are going to start typing and entering the commands in the terminal.
In the different distributions of #Linux, the prompts, are presented in different ways, but users, we can customize them, an important fact to take into account are the symbols ($) and (#) that appear in the prompts, when we are working in the terminal, being this way, we will say that the symbol ($) represents a normal user working in the terminal, while the symbol (#) represents a user with the condition of root, in the terminal
Being the root user or root user, it is the user who has the administrative access of the operating system, which is a condition that the normal user does not have.
See images:
Prompt common user. Screenshot
Prompt root user. Screenshot
Now let's see what the Directory Tree is and how to move in it.
When we enter a terminal, one of the first commands we should know and use is the ‘pwd’ since this command tells us where we are located. As we already know, the symbols (/ and ~) in #Linux, indicates that we are in the root folder, but to see that full address on the terminal screen, we use the ‘pwd’ command and it will tell us the address of where we are, so if at any time we get lost in the terminal, we just have to put ‘pwd’ to know where we are.
See image:
Screenshot
As you can see, when using the "pwd" command we get the address of the root directory, which is summarized in the symbol (~). But if we are in another location, using the ‘pwd" command will give us the location information.
View the Directory Listing.
To see the list of directories, we must use the command "ls" when using that command we are shown the contents of the directory where we are located.
See image:
Screenshot
On the other hand, it is very important to know that when you use a command and you do not know all the qualities and dependencies that it may have and that you can use to improve its use, you can use the ‘man’ command and after this command you use the command that you want to know completely. In our case we will use the command (man + ls) and it will tell us everything we can do with that command and how we can combine it with other attributes for better use.
Now, before using it, I'm going to use the ‘clear" command to clean the screen and to be able to use it on a clean screen, you can also use the shortcut Ctrl + l. If you want to know more about using the keyboard shortcuts in the terminal you can read this post
See image:
Screenshot
Screenshot
As we can see, the ‘man" command shows us all the functions and attributions that the ‘ls’ command has. It is important to say, that normally the ‘man" command usually gives the information in the language in which the operating system was placed, I imagine that it gives it to me English, because I have it in Latin American Spanish. To finish using the ‘man" command we must press the letter "q" and it will take us back to the termina screen.
After using the ‘man" command I'm going to use the ‘-l" option since it will allow us to see the contents of the directory in the form of a list and with various information.
It is important that we know what each of these pieces of information are and what they tell us, in order to be sure of what the information reflected in the terminal tells us.
See image:
Screenshot
Directory column information.
Let's go to them and see what these columns tell us:
A) In the first column we will see a group of letters, when those letters begin with the letter (d) it is informing us, that the file we are looking at is a directory. And when these letters start with a hyphen, it informs us that we are looking at a file.
It is important to note that files do not always come with an extension. But the files that are accompanied by an extension, allow us to recognize what types of files they are, for example, if we have a file with the extension.bin o.deb in #Linux we can know that they are executable files, the same as if there is a .exe in Windows, just like when we see a file.odt we recognize it as part of a text file in Linux, while a.doc or a.docx, tells us that it is an Office text file on Windows.
Returning to the topic, when the letters appear in the first column, they indicate what type of file it is and the permissions that the file has, for example: drwxr-xr-x.
Now we will see what it tells us, we are going to divide it into parts so that it is understood very well and there are no doubts:
Part 1= drwx Part 2= r - x Part 3= r - x
1- drwx tells us the following, with the initial letter (d) it tells us that the file is a directory, with the letter (r) it tells us that it can be written, with the letter (w) that it can be written and with the letter (x) that it can be executed. That is, it tells us the type of directory and the permissions it has.
- d = Directory
- r = Reading
- w = Writing
- x = Execution
2- Part 2 tells us the permission that the user groups have. We speak of a user group, when the operating system administrator is working in a company or institution, and creates user groups for the management and use of the system.
Then part 2, tells us the level of permissions that the members of the user group have.
In this r-x case, the user group can read and execute the directory, but it cannot edit it since it does not have permission to write.
Permissions:
- r = The user group can read
- = The user group does not have permission to write. The negative is placed with a hyphen.
- x = The user group has permission to run the directory.
Part 3, tells us the permission that the user has, which in this case are the same as those of the user group, but this can change, depending on the permissions granted by each file or directory.
In this r-x case, the user can read and execute the directory, but he can't edit it since he doesn't have permission to write.
Permissions:
- r = The user can read
- = The user does not have permission to type. The negative is placed with a hyphen.
- x = The user has permission to run the directory.
B) The second line, the one with the numbers, tells us, the amount of links that that directory or file has in the system.
C) The third column identifies the user who is the owner of the file.
D) The fourth column identifies the user group that can work with the file.
E) The fifth column, gives us the file size. Look here, if we see on the screen, all the directories have a weight of 4096, but that's something the system remains they may weigh more or they may weigh less.
See image.
Screenshot
To be able to see the actual weight of the directory in a more user-friendly format, we go to the terminal, place the ‘man ls’ command again and see the options we have.
In the ‘man" command we get the ‘-h" option that together with the ‘-l" option will give us information closer to what we are looking for regarding the weight of the files, so we go to the terminal and place the following command ‘ls -l -h’ and see the result.
See image.
Screenshot
F) The sixth, seventh and eighth columns, give us the date of the last modification of the file. Not the date of when it was created, but the date of its last modification.
G) The ninth column, gives us the name of the file or directory.
Dear community, this is the third part of the #Linux Terminal Management workshop, in it we learned how to list the directory tree, how to use the ‘ls’ command and how to use some of its options. However; I recognize that there are many more to learn and use, but for that we also got to know and use the ‘man’ command, which will allow you to get to know and practice the command options on your computer.
And finally, we learned to recognize files and directories, we learned about their permissions and other functions, which would help us to move forward with greater security and better pace in the development of the course.
Thank you very much for reading me.
https://twitter.com/ronaldjmarrero/status/1758600807287521328
!discovery 30
!VSC
!PIZZA
@jlinaresp has sent VSC to @osomar357
This post was rewarded with 0.1 VSC to support your work.
Join our photography communityVisual Shots
Check here to view or trade VSC Tokens
Be part of our Curation Trail
@jlinaresp ha enviado VSC a @osomar357
Éste post fue recompensado con 0.1 VSC para apoyar tu trabajo.
Únete a nuestra comunidad de fotografía Visual Shots
Consulte aquí para ver o intercambiar VSC Tokens
Se parte de nuestro Trail de Curación
Hola @jlinaresp, mis saludos, me alegra mucho, que te haya gustado el post, a mí me encanta el #Linux.
Muchas gracias por el apoyo.
This post was shared and voted inside the discord by the curators team of discovery-it
Join our Community and follow our Curation Trail
Discovery-it is also a Witness, vote for us here
Delegate to us for passive income. Check our 80% fee-back Program
Hi, good evening @discovery-it, I'm glad you liked the post, thanks a lot for the support.
$PIZZA slices delivered:
@jlinaresp(4/10) tipped @osomar357
Always good to see posts about linux
`
Want to Know more about Hivepakistan?
Ping Us On Hive Pakistan Discord server
To support HivePakistan, delegate Hive Power to hivepakistan and earn 90% curation reward :)
Here are some handy links for delegation
A delegation of 500 or more HP makes you earn Hivepakistan supporter badge.
`
Hi, good evening @gwajnberg, I'm glad you liked the post, thanks a lot for the support.
♥️♥️♥️
Hola, buenas noches @laexotica, muchas gracias me alegra que te haya gustado el post.
Thanks for your contribution to the STEMsocial community. Feel free to join us on discord to get to know the rest of us!
Please consider delegating to the @stemsocial account (85% of the curation rewards are returned).
You may also include @stemsocial as a beneficiary of the rewards of this post to get a stronger support.