DIY Self-Watering from Recycled Bottles
Hello, fellow HIVErs! If you have been following my posts, you will know that I have started a vegetable patch in the garden. My previous DIY was something for the vegetable patch, DIY Plant Markers. Today's post is again something for the vegetable garden, a DIY self-watering system created from plastic bottles.
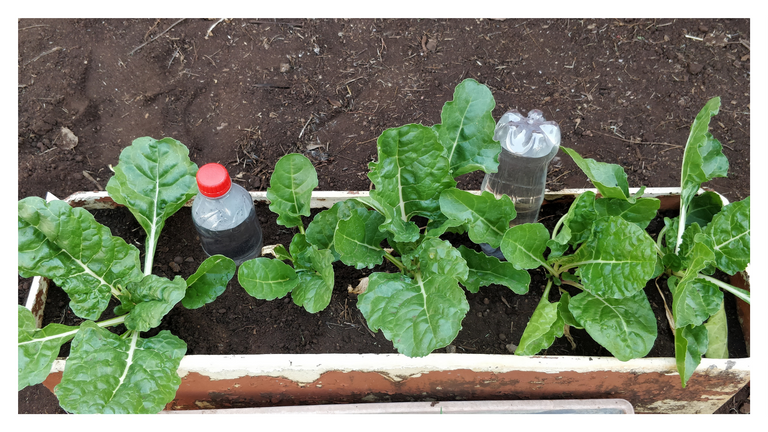
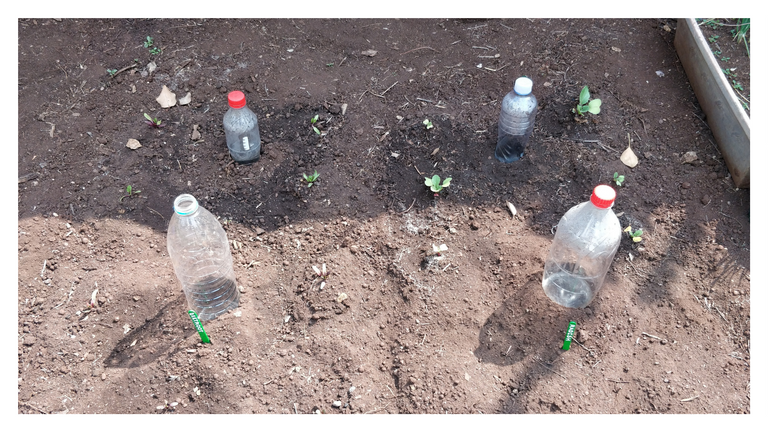
The self-watering bottles in action.
The Why
It started with my spinach, which is growing like crazy! This is of course great! But it also means that the spinach plants are using a lot of water with their big green leafy goodness. I usually check if any of the plants need water once a day or every second day. The spinach, however, was needing a lot more water than that. There was more than once when I checked in on them, to find them wilted and looking very thirsty.
This isn't unusual, given they get a lot of sunlight and their large dark green leaves transpire a lot. In combination with the current growth the plants are undergoing, they need more water than most of my other veggie plants.
But who has the time to spend all day checking on their plants? I love going to check on them, but life doesn't always allow that. So I had to figure out a way to get water to them a little more reliably.
The Supplies
As I don't have a job at the moment, my budget is zero. Sure it would be great to go out and buy a drip feed system, but I just can't do that. In addition, I have a great love for crafting as well as recycling wherever I can. So without further ado, I dove into what I had lying around and made a plan.
For this project, you will need:
- Empty plastic bottles. Empty soda and water bottles are ideal. The size of the water bottle will depend on what space you have in the plant's pot or area, and how long you want the water to last before refilling.
- A needle or pin. If you use a pin, make sure it is one without plastic on it.
- A pair of pliers.
- A candle.
- A lighter.
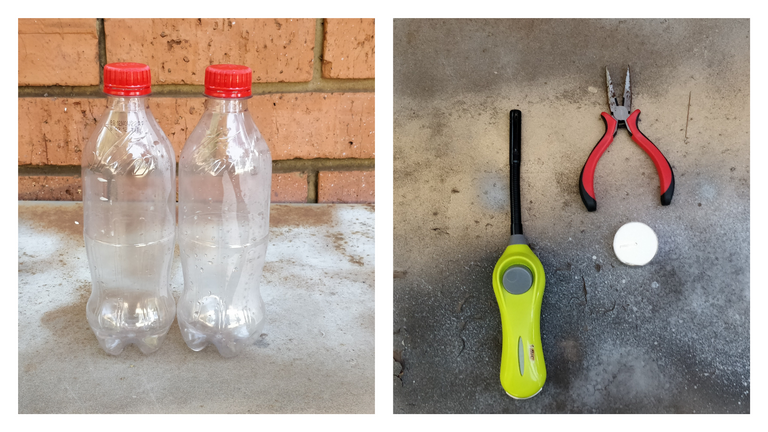
The supplies for the DIY.
I am using two 440ml Coca-cola bottles. I took off the label and rinsed out the bottles to make sure there was no soda residue left in them. I am making use of a flat-nose pair of pliers. The candle can be any candle you have, as long as you can get easy access to the flame. I am using a simple tealight candle. You can see the needle next to the pliers. Please excuse my outdoor crafting table, it has been used to spray paint a lot, haha.
The Process
The process is pretty simple, but I do need to caution you around it. You will be working with a flame and heating a needle, so there is a risk of burning. Definitely not something you want to allow young children to do. Older kids might be okay with supervision, but please use your common sense. I can't be held liable for any burns you may happen to get. I already have enough risk dealing with my own stupidity (and clumsiness), I can't shoulder yours as well! 😂
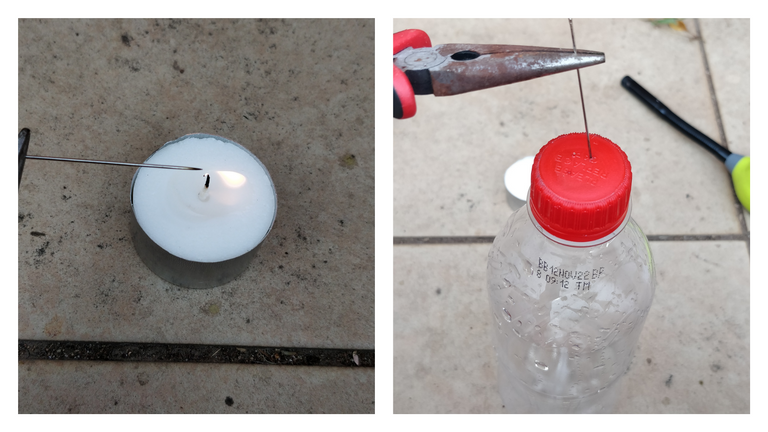
Heating the needle and pushing holes into the plastic lid.
First, light your candle. If you are going to work outside, you want an area that isn't windy. Use the pliers to grip the needle at the back and hold it near or just into the flame of the candle. This is to heat the needle so that it will easily go through the plastic.
I was not sure which side of the bottle would work better so in one bottle I put holes in the lid and in the second bottle I did holes in the bottom.

Pushing holes in the bottom of the bottle.
For these test bottles, I did three holes each. Three in the bottle top and with the second bottle, three in the bottom, spaced out. Do not touch the needle during this process. It is heated metal and will burn you. If the needle does not go through easily, reheat the needle in the candle flame and try again.
And that's it! Your self-watering bottles are ready to be put to use. All you need to do now is fill the bottles with water and place them at the plants you want to be watered.
Pros and Cons
I am going to go over my experience with these self-watering bottles to give you a better idea of what might work better for you.
Upright Bottle
The upright bottle was definitely the more stable of the two. I buried it partway into the soil near the plants I wanted it to feed water to. You should see an occasional air bubble rise in the bottle which is a sure indication that water is seeping out into the soil. It is also easier to refill with water as you simply remove the bottle cap and pour water in without needing to disturb the soil at all. The biggest drawback of the upright bottle is that it takes up a fair amount of space.
Upside-down Bottle
This one took less space, so it may be more suited to smaller pots. Yet I found it to be pretty unstable even after I buried part of it. So it may require extra items to stabilize it, such as a stake to which you tie the bottle to. I found it released water less reliably, and I had to move the bottle around a little before getting a regular air bubble to pulse. The other major drawback of the upside-down bottle is that to refill it you would need to remove it from the soil completely to take the cap off.
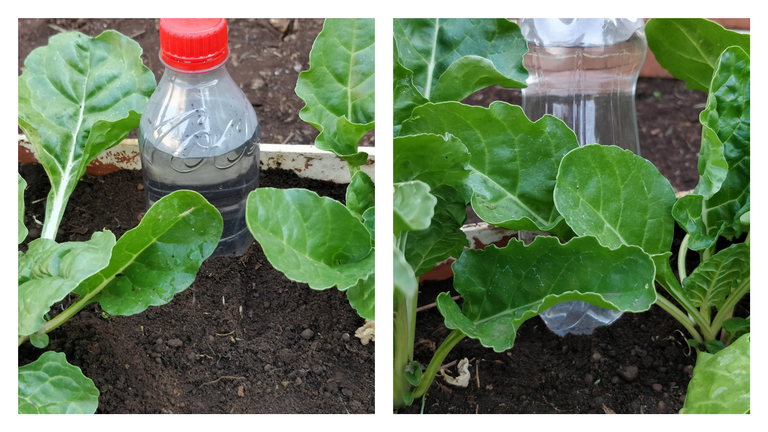
Side by side of the two self-watering bottles.
Additional Notes
I have since made a few more of these bottles to use in my veggie patch, specifically around the seedlings which need to stay slightly moist for optimum growth. I expanded on the above using the upright bottle. Here are some things to keep in mind:
- Do not make the holes too big or make too many of them. This will allow the water to drain very quickly. It can leave you with soggy soil in a pot, or if your plants are in the ground, it will not provide moisture for the plants long term as the water will drain away.
- You want to see one air bubble per second give or take. Lots of air bubbles quickly means that the water is draining very fast. Probably too fast. Either your holes are too big or too many. You can attempt to compact the soil slightly tighter around the bottle to see if you can stem the flow a bit.
- Keep the cap on the bottle. I had one bottle laying around with no cap and decided to use it. Because it has no cap on the water drains faster from it because of science (of vacuums, pressure and cohesion and whatnot, someone smarter will have to explain that better). It also leaves the water open to evaporation out the top of the bottle.
- This does not replace regular normal watering. It is a stop gap. Useful if you are going away for a few days and need your pot plants to be watered for a weekend. Or in my case, to help keep my really thirsty spinach from wilting between my usual watering schedule.
My expanded self-watering (currently empty).
Bonus
As a last bonus, if you are looking for a quick way to make a DIY watering can of sorts, use the same method to poke several holes in the cap of a larger soda bottle. I used a 2l one. Fill the bottle, replace the cap, turn the bottle upside down and voila, instant watering 'can'.
All the plastic bottles, your self-watering ones, and the watering 'can' will eventually succumb through use and exposure to sunlight. This means you will eventually have to replace them. With the watering 'can' you can keep the cap, which will likely last longer and just put it on a new bottle. The same applies if you are using upside-down bottles for self-watering.
If you are using the upright bottles, you will have to go through the process of heating a needle and poking holes again. At least it is quick and easy.
Conclusion
This quick and cheap self-watering system may not be the most efficient or high-tech, but it definitely has helped. Since installing the bottles into the spinach pot, I have not gone out to find wilted spinach except for one occasion where the upside-down bottle's holes somehow got clogged and the water had not been released. It makes a good stop-gap watering system to help keep the soil moist when I am busy with life. As I said before, it is not a way to replace normal watering, so please keep that in mind. I don't wish to be held responsible for plant babies dying off!
Thanks!
As always thanks for stopping by and reading my post! I hope you found it helpful in some way.
Credits:
- Photographs by me.
- Crafting by me.
- Canva for helping me make the photos look pretty.
Congratulations @pixelhuntersam! You have completed the following achievement on the Hive blockchain and have been rewarded with new badge(s):
Your next target is to reach 5000 upvotes.
You can view your badges on your board and compare yourself to others in the Ranking
If you no longer want to receive notifications, reply to this comment with the word
STOPCheck out the last post from @hivebuzz:
I love creativity especially when it comes to recycling and re-using plastic. In this case, you've not only reduced cost but probably used tools that you already had in your possession.
Nice job, and I do hope that others who might not have the resources for an irrigation system to find your interesting and probably find inspiration in developing something similar:)
Great of you to also stress that it's not a replacement for normal watering 👍
Thank you so much for your reply! Yes, I had everything on hand already. Plus I get to give the plastic bottles a second life before they eventually go for recycling. It is a very low-cost solution which makes it more accessible. And growing your own food is not only fun it's therapeutic 😃
I definitely don't want people's plants dying because they think this can completely replace normal watering, haha. But it helps in really hot dry places. We get a lot of hot sunshine here in South Africa and not all plants appreciate it.
Your content has been voted as a part of Encouragement program. Keep up the good work!
Use Ecency daily to boost your growth on platform!
Support Ecency
Vote for new Proposal
Delegate HP and earn more
Thank you so much for the support @ecency you guys are awesome!
This is a brilliant idea !
If you like spinach, have you tried growing Swiss Chard ? It's very similar, with crazy amounts of minerals and vitamins. Leaves and stems are both edible and very tasty, and even the roots can be eaten (if you cook well and add a bit of honey to take away the bitterness).
Best of all, it'll grow in both summer and winter - planting a winter crop will allow you to pull occasional leaves off throughout the "food drought" months of late winter and early spring. But you need to protect them from snails and slugs, especially when young and tender. My brother has told me that on a raised bed, stapling wide strips of rough glasspaper or sandpaper onto the wooden beams to make an unbroken ring does the job nicely.
Swiss Chard, I will keep a lookout for seeds and seedlings when next I get to a garden center. I am not sure we will have too much of a problem with snails and slugs. Our resident Olive Thrush pair and their offspring tend to make short work of most of the insects in our yard.
With the exception perhaps of mole crickets, as our Jack Russell has a vendetta against them. I am pretty sure he is almost single-handedly the reason we don't have a mole cricket problem, haha.
That is an incredibly brilliant idea. We quite often install dripper irrigation systems, or a basic leaky hose system. These just keep the ground moist constantly, and the results are massive. Very similar to this in principle.
We haven't had rain in months though we are due to start getting soon with the change in seasons. But for now, the ground is really dry and we have been having very hot weather already. I needed to come up with something that wasn't costly and wouldn't waste too much water. This has been surprisingly effective!
I did this purely as an experiment, as I wasn't sure it would work. But after seeing how well it did, I definitely had to share it. 😃
Wow! I forgot this already! I can use this style here in UAE! Thank you so much... This is the importance of always reading and checking the post! ^_^
I imagine the UAE gets as much sun if not more than we do! So this would definitely help those plants that have a higher water need not to suffer wilting between watering. What are you planing to plant?
Right now, I am making my post about my new plant! Squash or pumpkin! ^_^
Looking forward to seeing your post!
Wow! Good job there Sam! I will have to try this in my garden as well!
Cheers
!PIZZA
You probably get enough rain on that side though. We are still waiting for the first rain here. It does definitely help to keep the seedlings moist either way!
We have winter rain though.
Also true. At least this is a cheap alternative to help keep your plants from drying out.
I think I need to give it a shot!
I will definitely be doing gardening this weekend!
PIZZA Holders sent $PIZZA tips in this post's comments:
@zakludick(2/5) tipped @pixelhuntersam (x1)
You can now send $PIZZA tips in Discord via tip.cc!
Amazing! Great and informative post! Thank you so much for sharing your experience!
You are welcome! I hope you find it useful!
❤️❤️❤️
resourceful and self sufficient! That is a smart idea for spinach love to drink a lot. But this cannot be apply to other plants. We also need to know the types of plants that loves water. In my case, I find it hard to keep stevia and rosemary thriving. They hate water and too much sun also kills them. Lately this year , the weather is just acting so weird that it kept me replacing those herbs. You seems like very good at tilling your plants healthy. Great job @pixelhuntersam !
I am still quite the amateur gardener, but I try to pay attention to the plants and sometimes it is quite easy to see when they are not doing as well as they could. Sometimes the answer is obvious, but other times less so. The weather has been pretty unpredictable and I suspect that I will lose some plants along the way. But that doesn't stop me from trying to find solutions and I learn a lot in the process. 💜
We are unstoppable for sure. Giving up is not in our vocabulary when it comes to planting. Good thing you have the patient.
Indeed! You need a lot of patience and determination, but the reward is well worth it!
https://twitter.com/Jonalyn95497828/status/1574031490966380544
The rewards earned on this comment will go directly to the people( @jonalyn2020 ) sharing the post on Twitter as long as they are registered with @poshtoken. Sign up at https://hiveposh.com.
Very innovative way. I can now leave home without worrying my plants getting watered. Thanks for this @pixelhuntersam.😍
You are very welcome! I would suggest you do this while you are at home first so that you can see how many days the water will last. That way you will be able to leave without worrying.
Incredible. I commend your ingenuity!
Thank you so much! It's simple but it works!
I needed to come pack to this. Going to be using it in my garden too.