How to have a Pfsense Firewall in Windows 10
Greetings to all the community
In my previous post: "How to protect my PC from cyber attacks", I mentioned the possibility of having as a first line of defense some kind of hardware perimeter Firewall like the Pfsense products. The fact is that sometimes we do not have that possibility and we only have the Windows one or some other software.
In this writing I explain how to have in our computer a Pfsense as a personal Firewall to add greater security to our Operating System. What we must do is to reproduce a configuration with two independent machines, taking into account that our Windows computer will connect to the Internet using a virtual machine as an additional network device connected to our PC. This will be possible thanks to the Hypervisor VMware workstation Pro software which is the one I am going to use to virtualize our firewall.
We can virtualize Pfsense on Windows in multiple ways including also Virtualbox or Windows Hyper-V.
The main objective of the post is to show how to configure the network on the computer to have our firewall. Here I show what is related to the network and the concepts involved.
As prerequisites:
- It is necessary to have VMware Workstation Pro software installed.
- To have created a virtual machine.
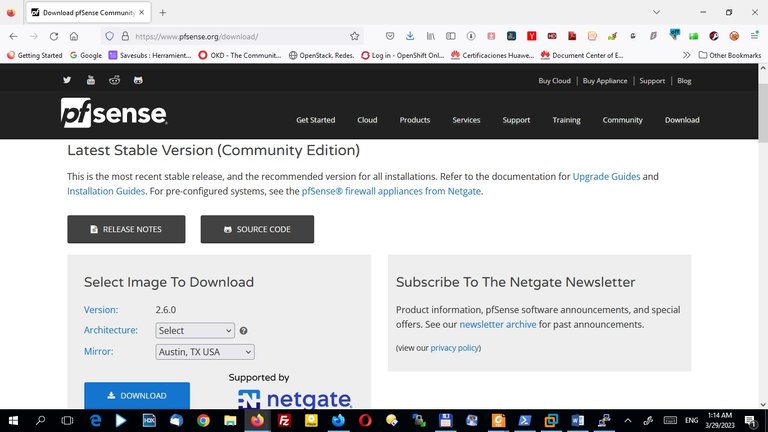
- To have the ISO image of Pfsense to perform the installation in the virtual machine, the image can be downloaded from the Link
I personally use Windows 10, as I said in my previous post I use its Firewall, but in addition to that I have Pfsense installed in a virtual machine in VMware® Workstation 16 Pro with two Network interfaces. The idea is that the Virtual Machine (Pfsense) is connected directly to the internet and that our Windows 10 sends all its data traffic through the virtualized firewall, and that any traffic coming from the internet has to pass first through the Pfsense, and then to our computer. To achieve this environment we have to make a series of network configurations in the Vmware Workstation software and in our operating system.
In the following diagram you can see the idea of what we want to achieve:
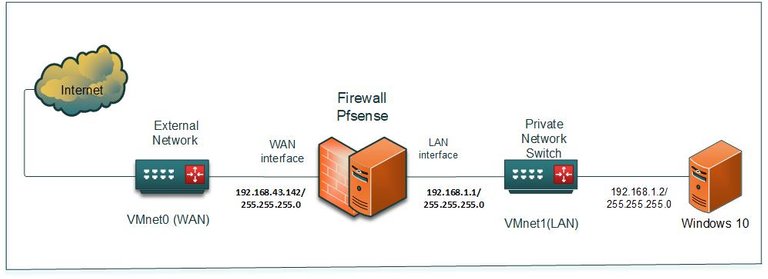
In the image you can see that the Pfsense Firewall has two network interfaces, one connected to a Switch that is part of the Private LAN to which is connected a PC with Windows 10, and the other interface is connected to a Switch which is facing the internet. In the figure I put the IP addresses that I am using in the configuration of my PC.
Network Configuration in VMware® Workstation 16 Pro:
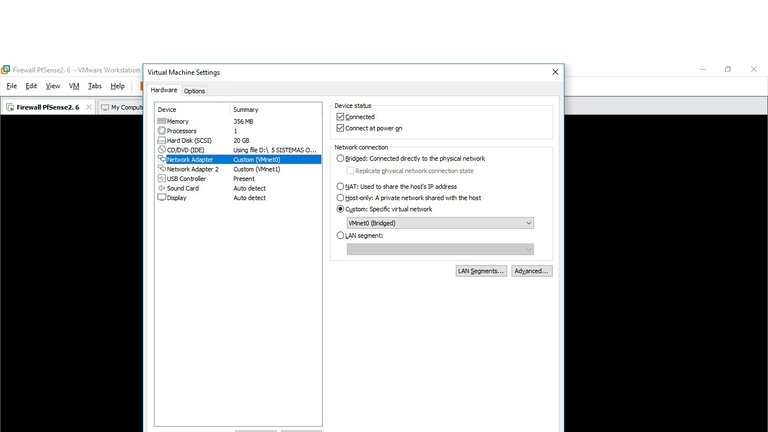
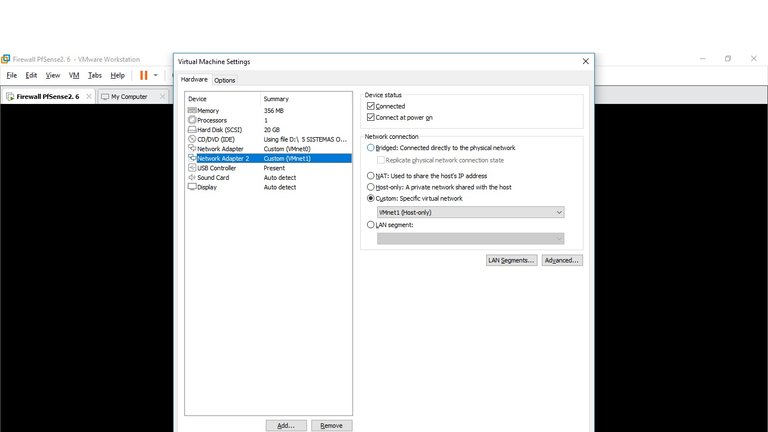
To configure the Network in Vmware it is necessary to have in the Virtual Machine two network interfaces, one for the WAN in bridge mode with the Windows 10 Wifi card. And the other Network interface must be configured in Host-Only network mode. This can be seen in the following two screenshots.
Note:
The interface in bridge mode allows the virtual machine to connect to a network using the physical adapter of our computer, for me the network in this case is the configured hotspot of my cell phone. What my cell phone does is to function as a wireless access point to access the internet from the laptop.
The interface in Host-Only network mode (VMnet1) is very useful if you need to create a private network between the virtual machine and the virtual adapter of my computer that installs Vmware.
In VMWare ® Workstation 16 Pro a few network configuration options are provided such as bridged networking, network address translation (NAT), host-only networking and custom networking. Virtual network components such as virtual switches, virtual network adapters, DHCP server and NAT device can be used. Virtual switches, which are also called virtual networks, are called VMnet0, VMnet1, VMnet2.
Continuing with the configuration:
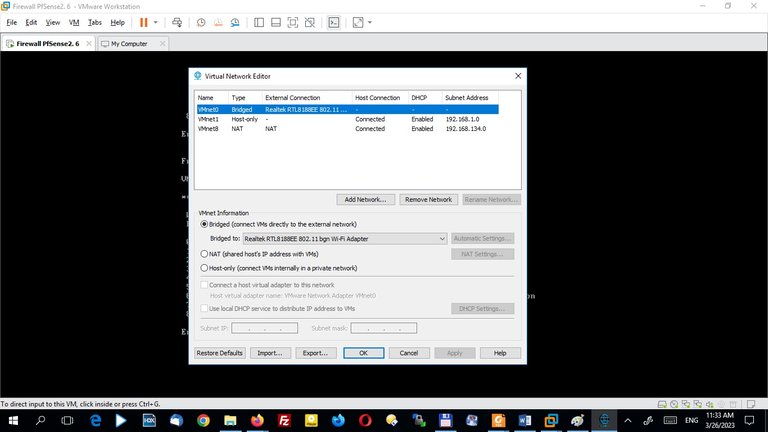
Network settings in VMware® Workstation 16 Pro software are made by following the steps below: Click on the Edit menu, then Virtual Network editor, then Change settings. Here you make all the Network settings that are needed.
Note: You need to have administrator privileges for this.
In the following screenshot you can see the configuration of my virtual network cards, I have VMnet1 configured for the LAN as the second adapter. You can see that this is configured as the Host-only adapter, which will allow the Pfsense virtual machine to be on the same private LAN as my Windows 10, and I have VMnet0 in Bridged mode to give internet connection to the Pfsense.
Network Configuration in Windows 10:
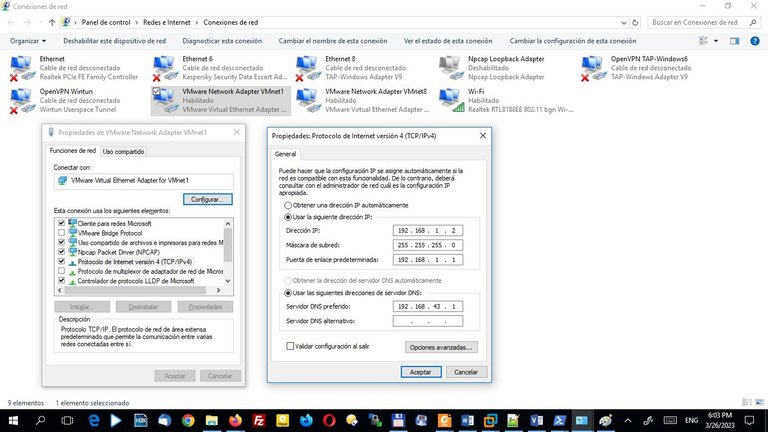
In my physical computer what I want to achieve is that all the network traffic from my Windows goes through the virtual machine (Pfsense), through the Vmware Vmnet1 Host-only network and not through the wireless network card (WIFI). To achieve this we have to select the physical network card I am using and disable the protocols Internet Protocol version 4 (TCP/IPv4) and Internet Protocol version 6 (TCP/IP v6). With this configuration we leave our computer without IP connectivity on the WIFI card. This is also applicable in case we have an Ethernet Network card, we can do the same configuration.

Then we go to configure the virtual adapter of our Host-only Network with an IP address, a gateway and a DNS server. As you can see in the image the Vmware Network Adapter Vmnet1 is the network card that Windows is using to connect to the LAN interface of the Pfsense, the IP address is 192.168.1.2/24 the gateway is 192.168.1.1.1 which is the LAN network card of the Pfsense and the DNS 192.168.43.1 which is the IP that has the hotspot of my cell phone that by DHCP gives the IP address to the WAN interface of the Pfsense and also provides the DNS configuration.
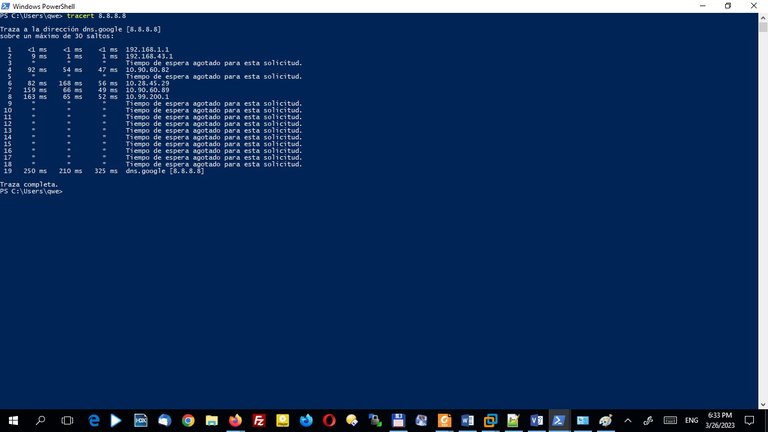
Finally, if we try doing a tracert to one of the google DNS as shown below, we see that the network packets pass through the virtual interfaces that were configured. The IP address 192.168.1.1 is the LAN interface of the Pfsense and the IP 192.168.43.1 is the ip of the hotspot configured on my cell phone.
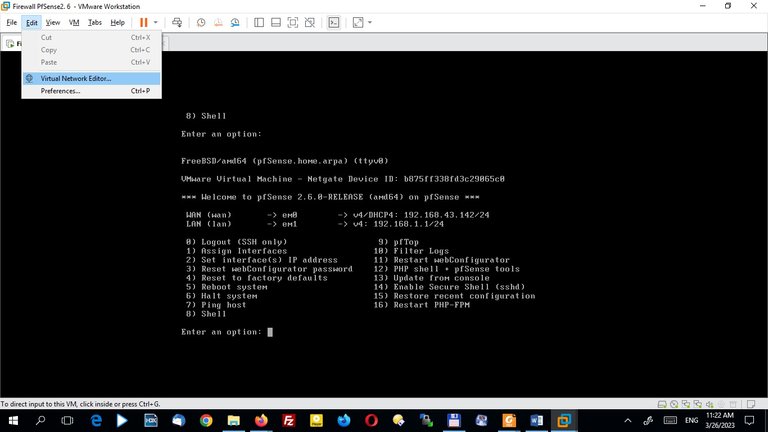
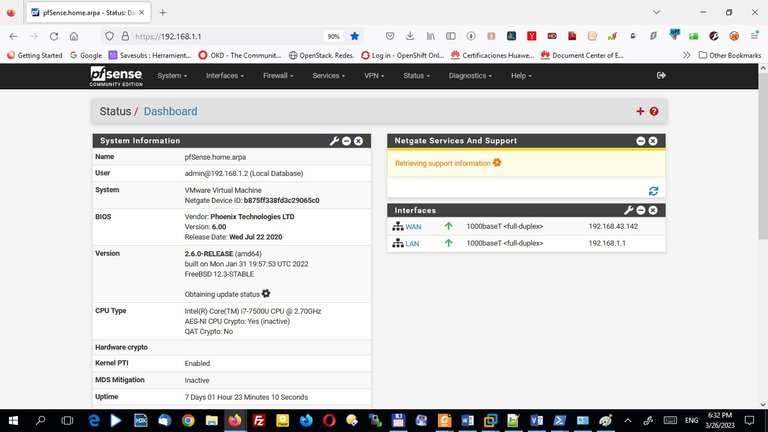
The final image shows the administration panel of the Pfsense that I have installed as a personal firewall on my PC.
I hope this post has been useful and let me know if you have anything to share about this topic or any questions.
-All images are my own, taken from screenshots of my computer.

Thanks for your contribution to the STEMsocial community. Feel free to join us on discord to get to know the rest of us!
Please consider delegating to the @stemsocial account (85% of the curation rewards are returned).
You may also include @stemsocial as a beneficiary of the rewards of this post to get a stronger support.
Thank you @stemsocial for the support.
Congratulations @rainerlester8308! You have completed the following achievement on the Hive blockchain And have been rewarded with New badge(s)
Your next target is to reach 700 upvotes.
You can view your badges on your board and compare yourself to others in the Ranking
If you no longer want to receive notifications, reply to this comment with the word
STOPCheck out our last posts:
Support the HiveBuzz project. Vote for our proposal!
Yay! 🤗
Your content has been boosted with Ecency Points, by @lileisabel.
Use Ecency daily to boost your growth on platform!
Support Ecency
Vote for new Proposal
Delegate HP and earn more
Thank you @lileisabel and @ecency for the support.
Post votado por la Curación de la Comunidad de Mundo Virtual. Recibes algunos Huesos
Te invitamos a que conozcas nuestra Comunidad de Hive
Muchas gracias por el apoyo.
Hi, I wish you could expand your interaction from other platforms, so you can meet new users and promote the good content you create, which I think is very useful. It will be very beneficial and useful for you to use LeoThreads. That's why I want to invite you to their adoption campaign, where in addition to competing for a 10K USD prize in LEO tokens, you will learn a lot about the use of LeoThreads and interact with different users.
https://zealy.io/c/leofinance-4960/invite/-LUR_nzoryUIXzn9ghSZs
Cheers 😉