How to repair a microphone cable, diagram included Esp-Eng
Saludos Hivers.
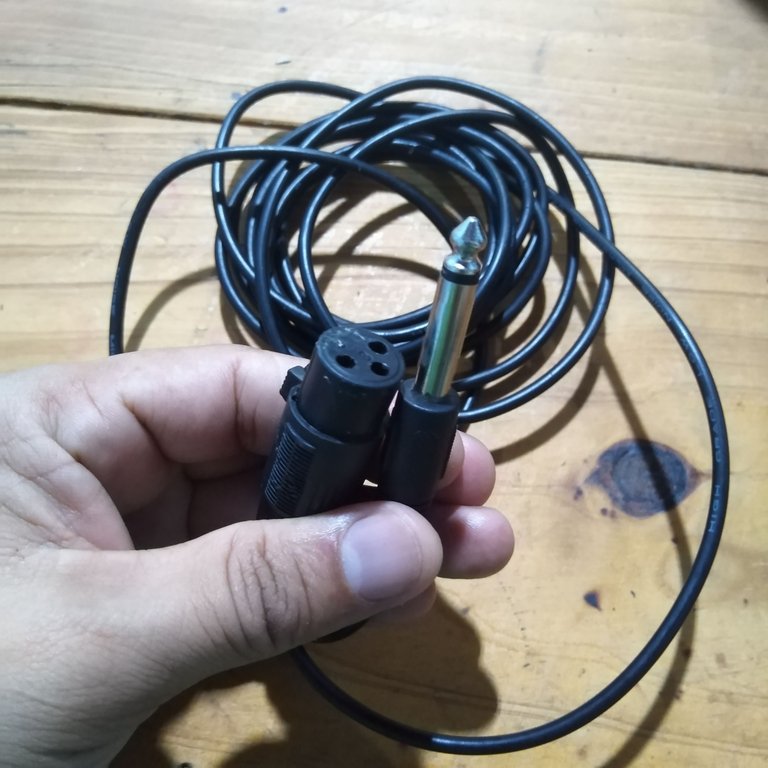
en esta oportunidad les presentaré un pequeño tutorial sobre la reparación de un cable de micrófono, seguramente muchos Hivers de esta comunidad están familiarizados con este cable, pero si por alguna razón este cable se les llega a romper, ¿saben cómo van conectados los cables internos?
Greetings Hivers.
In this opportunity I will present a small tutorial on repairing a microphone cable, surely many Hivers in this community are familiar with this cable, but if for some reason this cable breaks, do you know how the internal cables are connected?
Aquí podrán saber cómo reparar el cable de una forma muy sencilla.
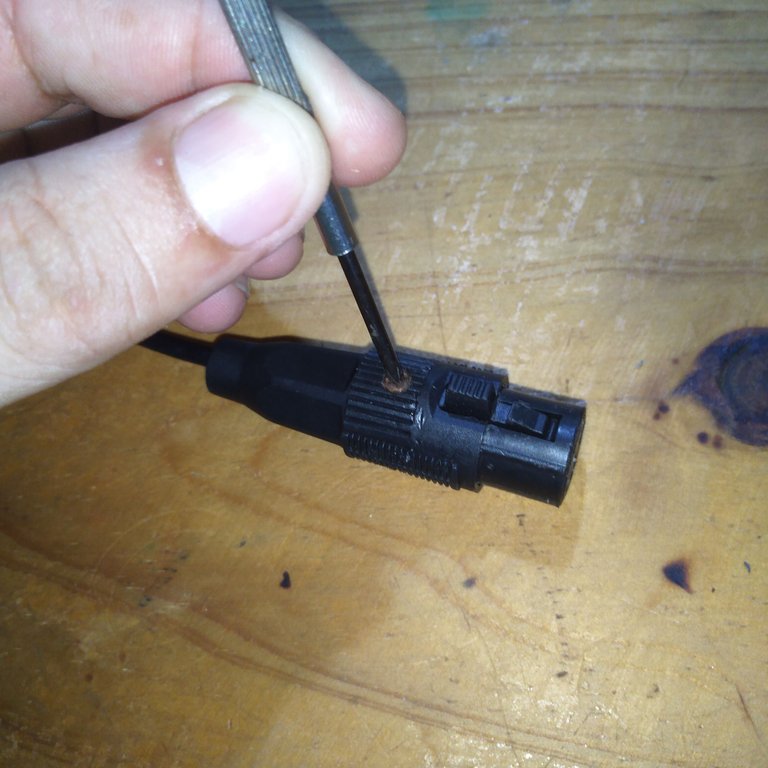
Lo primero que debemos hacer es abrir la cubierta del pin hembra XLR, iniciamos aquí porque es la parte que tiene más movilidad debido a que es donde se conecta el micrófono.
Here you will be able to know how to repair the cable in a very simple way.
The first thing to do is to open the cover of the XLR female pin, we start here because it is the part that has more mobility because it is where the microphone is connected.
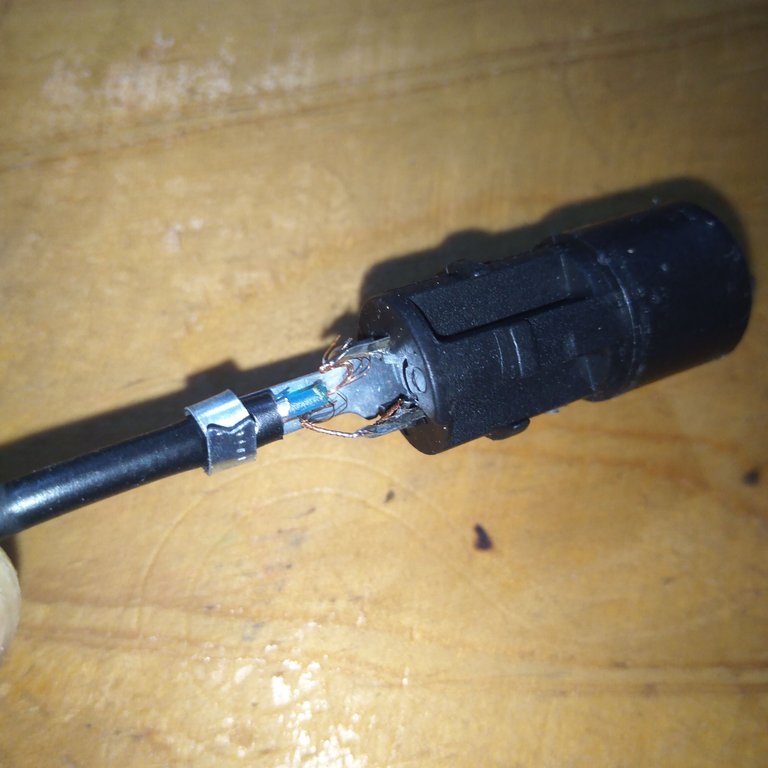
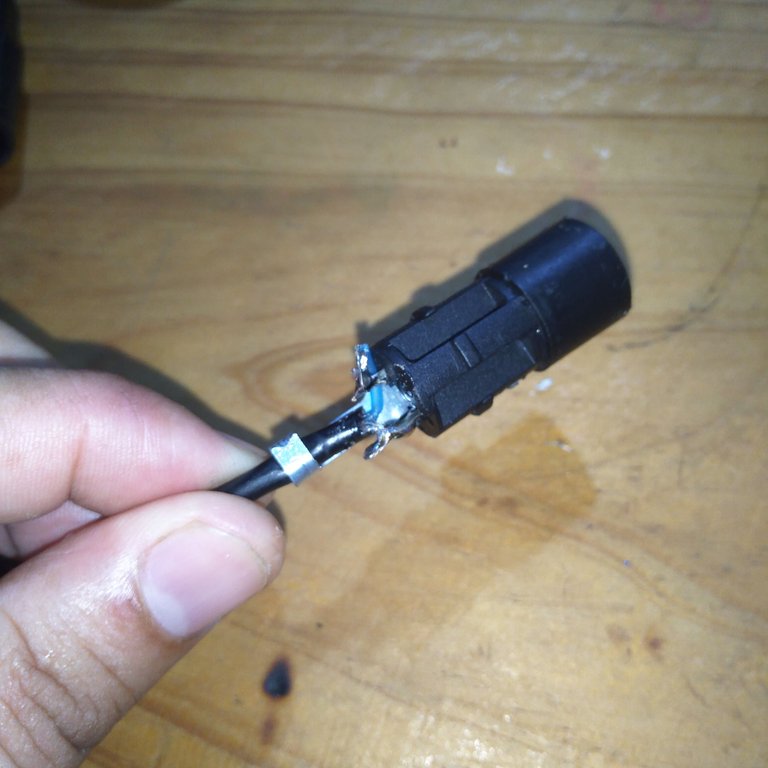
En la imágen siguiente podrán observar que los cables ya estaban bastante deteriorados y además estaban prácticamente desnudos y con el alambre muy largo, es decir que internamente los cables hacían contacto y por esta razón fallaba el micrófono.
In the following image you can see that the cables were already quite deteriorated and were practically naked and with very long wires, that is to say that internally the cables made contact and for this reason the microphone failed.

Bajo ninguna circunstancia los cables deben hacer contacto en su interior porque sí esto sucede se escuchará un ruido muy feo al poner en funcionamiento el micrófono.
Under no circumstances should the cables make contact inside the microphone because if this happens, a very ugly noise will be heard when the microphone is turned on.
Aquí procedemos a desoldar los cables para cortar, pelar y volver a soldar cada cable en la posición correcta.
Entonces para saber que estamos conectando cada cable en su lugar, debemos guiarnos de un diagrama.
Esto se hace cuando te encuentres con los cables partidos y no tengas idea de dónde van.
Y es que este tipo de cables puede confundir porque el conector hembra tiene tres orificios enumerados con el 1,2,3.
Here we proceed to unsolder the wires to cut, strip and re-solder each wire in the correct position.
Then to know that we are connecting each wire in place, we must be guided by a diagram.
This is done when you find yourself with split wires and have no idea where they go.
And is that this type of wires can be confusing because the female connector has three holes numbered 1,2,3.
Entonces podrías a llegar a le se que el cable que viene en el medio que podría decirse que es el cable positivo va en el pin 1, pero no es así.
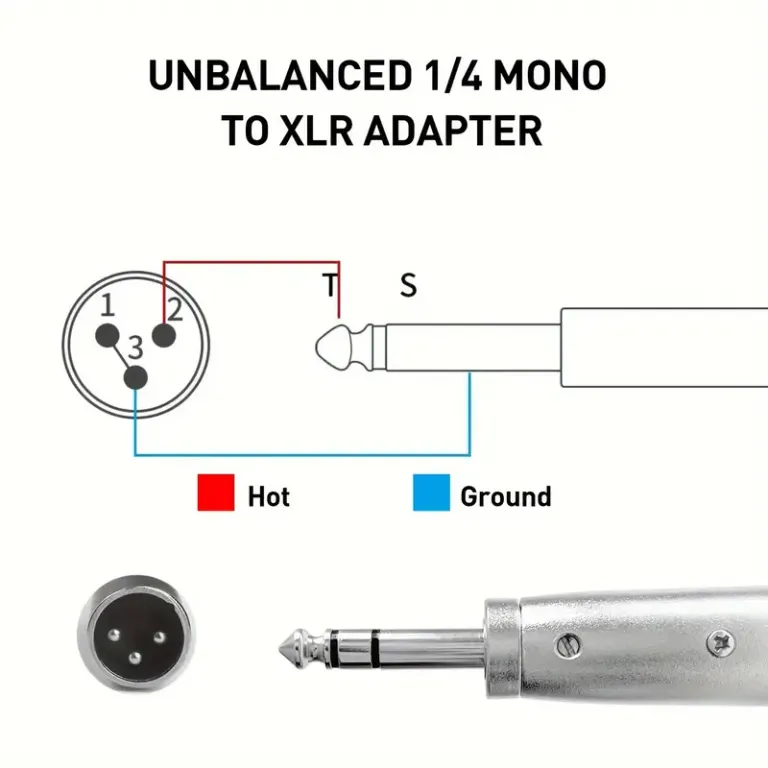
Resulta que el cable de centro va en el pin número 2 y el negativo va en el pin 1, en unos casos unido con el 3.
Pero este conector trajo inoperante el pin 3.
It turns out that the center wire goes on pin number 2 and the negative goes on pin 1, in some cases joined with pin 3.
But this connector brought inoperative pin 3.

Aquí podemos visualizar los orificios con sus numeraciones.
Al pelar los cables y soldarlos en la posición correspondiente procedí a asegurarme de que los cables no puedan hacer contacto en su interior.
Here we can visualize the holes with their numbering.
When stripping the wires and soldering them in the corresponding position I proceeded to make sure that the wires cannot make contact inside.
La mejor forma de hacer esto es soldar muy cerca el cable en el conector y no dejar cables descubiertos en forma inapropiada.
Aseguramos el cable cubierto con el seguro del conector, volvemos a colocar la carcasa del conector XLR y solo nos toca probar que haya continuidad desde el conector macho 1/4 al hembra.
Al probar la continuidad corroboré de que no se perdía la continuidad a pesar de moverlo varias veces.
Este cable es de la escuela de mi niña, así que esperaré a que me diga!si todo funcionó bien, ya que no me enviaron el micrófono para probar.
Ahora podrán saber cómo conectar el cable de micrófono internamente porque este tipo de conexión es universal.
Hasta la próxima amigos, gracias por su visita.
The best way to do this is to solder the cable very close to the connector and not to leave any wires uncovered inappropriately.
We secure the covered cable with the connector latch, replace the XLR connector housing and just test for continuity from the 1/4 male connector to the female connector.
When testing the continuity I confirmed that the continuity was not lost in spite of moving it several times.
This cable is from my daughter's school, so I will wait for her to tell me if everything worked fine, since they did not send me the microphone to test.
Now you will be able to know how to connect the microphone cable internally because this type of connection is universal.
Until next time friends, thank you for your visit.
Traducido en Deepl
Todas las fotografías fueron tomadas con mí Smartphone Huawei Dub-Al00.

Has sido votado por
PROYECTO ENLACE
'Conectando Ideas y Comunidades'
PROYECTO ENLACE es un proyecto de curación de habla hispana enfocado en recompensar contenido de calidad y apoyar autores en su proceso de crecimiento en HIVE.
Creemos y apostamos por el futuro de esta gran plataforma, y estamos muy emocionados de poder hacerla crecer junto a esta comunidad. Así que te invitamos a publicar en nuestra COMUNIDAD y estar atento a todas las actividades que tenemos preparadas y que estaremos publicando en breve.
¿QUIERES AUTOMATIZAR TUS GANANCIAS DE CURACIÓN? SE PARTE DEL PROYECTO ENLACE APOYANDO A NUESTRO TRAIL EN HIVE.VOTE INGRESA AQUÍ PARA CONOCER LOS DETALLES.
¿QUIERES INVERTIR ENLACE? DESCUBRE COMO HACERLO Y GENERAR INGRESOS DE FORMA SEMANAL MEDIANTE TU DELEGACIÓN DE HP AQUÍ TE EXPLICAMOS COMO.
Te invitamos a participar en nuestro servidor de Discord: https://discord.gg/3S9y7BbWfS
Atentamente
EQUIPO ENLACE 2024
Amigo esa avería ocurre con mucha frecuencia. Me parecen que eate tipo de dispositivos son bastante frágiles y se deben usar con delicadeza. Me encantó el tutorial. Me alegra saber que es sencillo repararlo y que contamos con este tutorial para si un día me toca hacer esta reparación yo misma. Un gusto leerte y gracias por compartir.
Hola amiga, gracias por interesarte en mi contenido. Sí, el micrófono es un dispositivo delicado pero a veces es porque sus cables son débiles y las personas los echan a un lado al empezar a fallar.
Debemos atrevernos a destapar y buscar la forma de solucionar.
Congratulations @rmm32! You have completed the following achievement on the Hive blockchain And have been rewarded with New badge(s)
Your next target is to reach 400 replies.
You can view your badges on your board and compare yourself to others in the Ranking
If you no longer want to receive notifications, reply to this comment with the word
STOPCheck out our last posts: