🏀Maqueta de Basquet con Materiales Reciclables🏀 //🏀 Basketball Model with Recyclable Materials 🏀

Que tal amigos! Espero se encuentren muy bien.
🏀🏀🏀🏀🏀🏀🏀🏀🏀🏀🏀🏀🏀🏀🏀🏀🏀🏀🏀🏀🏀🏀🏀🏀
Quiero Mostrarles la elaboración de una maqueta que he realizado para mis estudios en la preparatoria, exactamente en el área de deporte. Nos mandaron a realizar la maqueta de una cancha de Basquetbol 🏀. He trabajado esta con algunos materiales materiales reciclables.
El baloncesto es uno de los deportes más mafosos en todo el mundo y tambien uno de los más practicados. Poder conocer las lineas de la cancha es una forma de iniciarme en este lindo deporte.
Espero que les guste el procedimiento.
Materiales utilizados:
🏀

- Foami azul
- Foami verde
- Foami naranja
- Cartón
- Una Hoja Blancas
- Silicón
- Cartón
- 2 palitos de Altura
- Dos Pitillos
- pedazo de Estambre
Paso a Paso
1

Se coloca el foami verde sobre el carton para medir las dimesnnsiones del cartón y dejar un margen que sobresalga hacia el cartón de 6 cm.
2

Se coprtan finas tiras de una hoja blanca tipo carta.

Se pegan las finas tiras sobre el margen de la cancha que se desea marcar. Yo marque un margen de 1,5 cm

Luego se pegan estas para delinear todo la zona de juego y la de fuera de juego que sería despues de las lineas blancas. Siempre las lineas de un acancha de basquek deben estar marcadas con lineas blancas.
3

Sobre la hoja blanca tambien se marca un circulo. el cual se divide justo a la mitad.
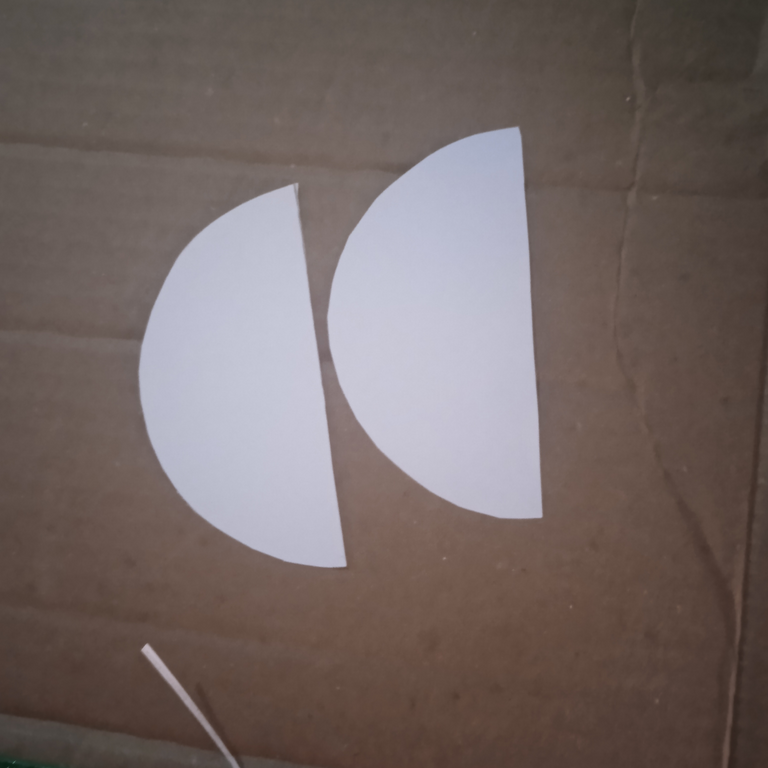
Se corta dicho circulo a la mitad.
4

Se va a cortar alrededor de 0,50 cm de grosor los medios arcosa de cada mitad de circulo.

Se debe pegar en la zona central de la cancha para marcar lña zona de tiro.

Luego se pegan tres circulos más. Uno en la parte central de la cancha. Los otros dos en cada zona del aro de basquet.
5

Luego se marca la linea de tiros libres sobre los circulos pequeños.
6

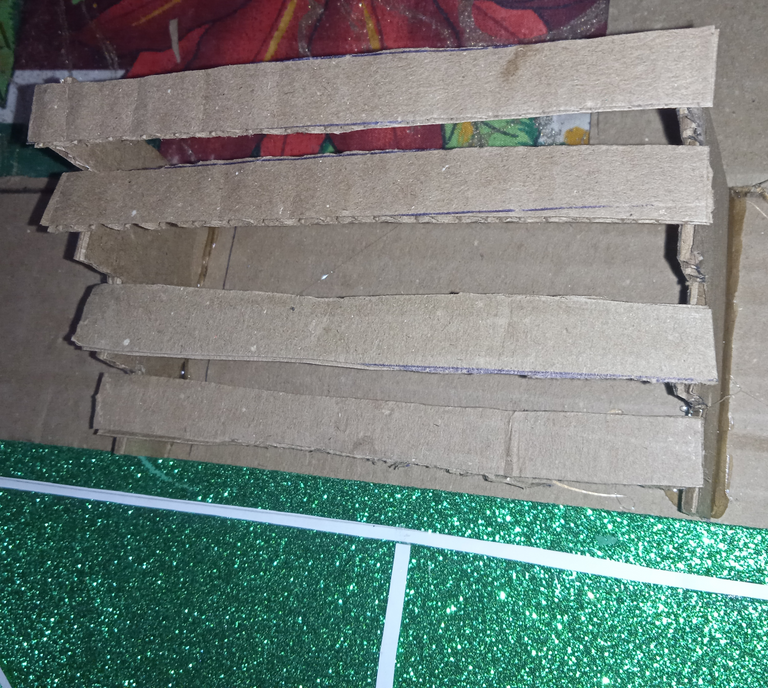
Es hora de crear las gradas de la cancha. para esto vamos a dibujar sobre el carton unas escaleras de 4 escalones.

Se recortan dos escaleras y unas tiras de cartón.

De esta manera se pegan las dos escaleras sobre el cartón!
7

Luego se van pegando de una a una las tiras de cartón.
Este seria el resultado de nuestras gradas.
8

YA lo que resta en pegar el foami naranja en todo el piso fuera del area de juego.

Tambien se forran las escaleras con el foami azul.
9

El diseño del aro de basque se hace utilizando los palitos de altura como un cartel, se pegan en la parte baja de un cuadrado de cartón que seria nuestro tablero.
Luego para que tenga soporte se pega un pitillo en la parte trasera del cartel.

Finalmente se pega el aro en la parte baja del tablero, se utiliza alambre de cobre y el estambre para hacer la canasta de basket.

Así tenemos la cancha lista!
Espero que les guste la forma en la cual elaboré mi maqueta para el Liceo.🏀
saludos @Hivers
Las imagenes son de mi autoria y fueron Tomadas a traves de un Telefono Redmi A9
Traductor utilizado: Deepl
Edición: Canva
Hello friends! I hope you are very well.
🏀🏀🏀🏀🏀🏀🏀🏀🏀🏀🏀🏀🏀🏀🏀🏀🏀🏀🏀🏀🏀🏀🏀🏀
I want to show you the elaboration of a model that I have made for my studies in high school, exactly in the area of sports. We were sent to make a model of a basketball court 🏀. I have worked with some recyclable materials.
Basketball is one of the most challenging sports in the world and also one of the most practiced. Being able to know the lines of the court is a way to initiate me in this beautiful sport.
I hope you like the procedure.
Materials used:
- Blue Foami
- Green Foami
- Orange Foami
- Cardboard
- One white sheet
- Silicone
- Cardboard
- 2 Height sticks
- Two straws
- Piece of yarn
Step by Step
1
Place the green foami on the cardboard to measure the dimensions of the cardboard and leave a margin of 6 cm overhanging the cardboard.
2
Cut thin strips of a white sheet of cardboard.
Glue the thin strips on the margin of the court to be marked. I marked a margin of 1.5 cm.
Then these are glued to delineate the entire playing area and the offside area which would be after the white lines. The lines of a basquek field should always be marked with white lines.
3
On the white sheet also mark a circle, which is divided right in the middle.
Cut the circle in half.
4
Cut about 0.50 cm thick the half arches of each half of the circle.
It should be glued in the central area of the court to mark the shooting area.
Then glue three more circles. One in the central part of the court. The other two in each zone of the basketball hoop.
5
Then mark the free throw line on the small circles.
6
Now it's time to create the bleachers of the court. For this we are going to draw on the cardboard some stairs with 4 steps.
Cut out two stairs and some strips of cardboard.
This is how to glue the two stairs on the cardboard!
7
Then glue the cardboard strips one by one.
This would be the result of our stairs.
8
Now all that remains is to glue the orange foami all over the floor outside the playing area.
We also cover the stairs with the blue foami.
9
The design of the basque hoop is made using the sticks of height as a poster, they are glued on the lower part of a square of cardboard that would be our board.
Then for support, a straw is glued to the back of the poster.
Finally, the hoop is glued to the bottom of the board, copper wire and yarn are used to make the basketball basket.
Now we have the basket ready!
I hope you like the way I made my model for the Liceo. 🏀
Greetings @Hivers
The images are my own and were taken with a Redmi A9 phone.
Translator used: Deepl
Editing: Canva
Thank you for sharing this post on HIVE!
Your content got selected by our fellow curator sharminmim & you just received a little thank you upvote from us for your great work! Your post will be featured in one of our recurring compilations which are aiming to offer you a stage to widen your audience within the DIY scene of Hive. Stay creative & HIVE ON!
Please vote for our hive witness <3
Muchas felicidades te quedo muy bonita ĺa cancha,tienes mucho talento éxitos que Dios te bendiga
Muchas gracias. amen
Que recuedos de mis épocas de estudiante, te quedo muy linda la maqueta. Te felicito 👏
jeje. bueno, muchas gracias... 😎