Progresiones explicadas de la full planche [Esp 🇪🇦 | Eng 🇺🇲]
Buen día queridos amigos de Hice y de la comunidad full deportes. Soy @royvegas y la tarde de hoy vengo a traerles un post sobre un tema muy interesante, se trata de la explicación correcta para las progresiones adecuadas a realizar para poder conseguir un isométrico muy anhelado por muchos atletas de calistenia e incluso de gimnasio. Hablamos de la full planche.
Good morning dear friends of Hice and the full sports community. I'm @royvegas and today afternoon I come to bring you a post on a very interesting topic, it is the correct explanation for the appropriate progressions to perform in order to achieve an isometric that many calisthenics and even gym athletes desire. We talk about the full planche
Es importante resaltar que, al trabajar en los distintos ejercicios, debes esforzarte por mantener las caderas al nivel de los hombros y asegurarte que los codos están rectos ya que doblar los codos disminuye en gran medida la intensidad de estos ejercicios y ralentizará tu progreso. La posición de las manos en los distintos ejercicios de planche es completamente opcional. Algunos prefieren los dedos hacia delante, otros hacia los lados. Otros prefieren soportar el peso en la punta de los dedos y otros sobre la palma. Experimenta y encuentra la posición que prefieras. Si ves que el mantener las manos en el suelo es demasiado duro para tus muñecas, consigue un par de barras paralelas. De esta manera sentirás un gran cambio con respecto a la tensión articular que recae sobre tus muñecas.
It is important to note that, when working on the different exercises, you should strive to keep your hips at shoulder level and ensure that your elbows are straight since bending your elbows greatly decreases the intensity of these exercises and will slow down your progress. The position of the hands in the different plank exercises is completely optional. Some prefer their fingers forward, others to the sides. Others prefer to support the weight on the tips of their fingers and others on the palm. Experiment and find the position you prefer. If you find that keeping your hands on the floor is too hard on your wrists, get a pair of parallel bars. In this way you will feel a great change with respect to the joint tension that falls on your wrists.
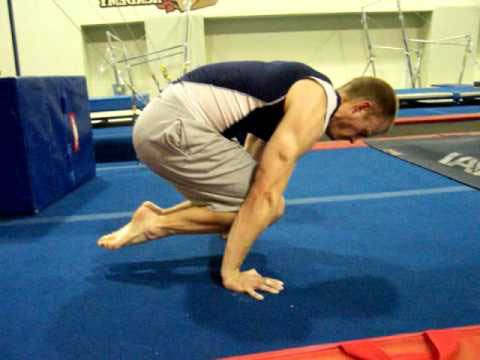
Comienza realizando una sentadilla profunda y poniendo tus manos en el suelo delante de los pies, justo después de los dedos de los pies. Coloca las rodillas de forma que descansen sobre tus codos doblados. Ahora inclínate hacia delante gradualmente, llevando el peso a tus manos y a tus rodillas mientras las inclinas sobre los codos. El poner las rodillas sobre los codos permitirá que tus piernas ayuden a tus hombros a sostener la carga del peso de tu cuerpo. Conforme te sigues inclinando tus pies se despegarán del suelo y te mantendrás sólamente con tus manos en el suelo y las rodillas en tus codos actuando como soporte.
El equilibrio es clave también en este ejercicio. Probablemente mientras aprendes, más de una vez te inclinarás demasiado y te caerás hacia delante. No te preocupes, estás aprendiendo algo nuevo.
Start by doing a deep squat and placing your hands on the floor in front of your feet, just after your toes. Place your knees so that they rest on your bent elbows. Now gradually lean forward, putting the weight on your hands and knees while leaning them over your elbows. Placing your knees over your elbows will allow your legs to help your shoulders support the load of your body weight. As you continue to lean, your feet will leave the ground and you will remain with only your hands on the ground and your knees on your elbows acting as support. Balance is also key in this exercise. Probably as you learn, more than once you will lean too far and fall forward. Don't worry, you're learning something new.
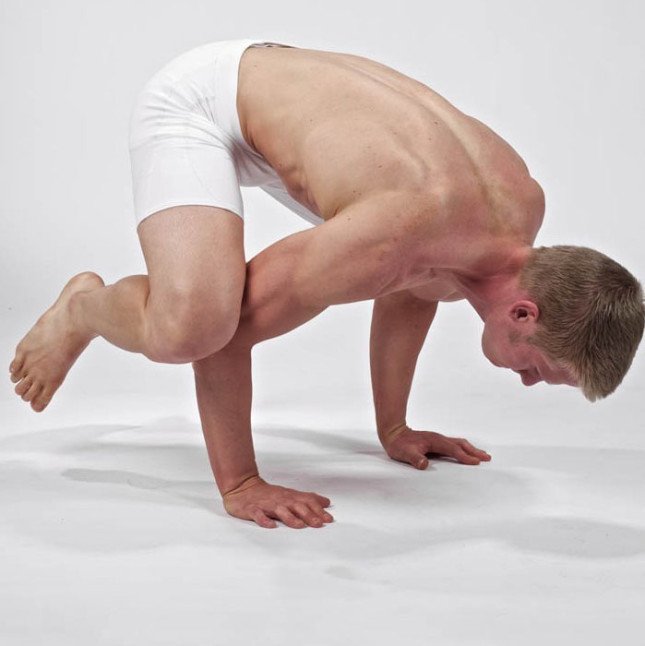
La diferencia principal entre el Frog Stand y la Tuck Planche es que en esta última el peso será soportado sólamente por los brazos. Comienza con una sentadilla completa y pon tus manos cerca de los dedos de los pies. Inclínate hacia delante como en el Frog Stand, poniendo el peso sobre tus brazos y hombros solamente. No te apoyes en las rodillas o en los codos. El mantener las rodillas firmemente pegadas al pecho hace más fácil este ejercicio.
Al principio solamente serás capaz de levantarte del suelo por una fracción de segundo. No te preocupes. Sigue añadiendo pequeñas series hasta llegar al total de 60 segundos. Simplemente continúa trabajando la posición, esforzándote por levantar tus caderas a la altura de los hombros. Con práctica consistente es posible aumentar la fuerza en las posiciones estáticas de manera relativamente rápida.
The main difference between the Frog Stand and the Tuck Planche is that in the latter the weight will be supported only by the arms. Start with a full squat and place your hands near your toes. Lean forward as in the Frog Stand, putting the weight on your arms and shoulders only. Do not lean on your knees or elbows. Keeping your knees firmly drawn to your chest makes this exercise easier. At first you will only be able to get off the ground for a fraction of a second. Don't worry. Keep adding small sets until you reach a total of 60 seconds. Simply continue working the position, working to lift your hips to shoulder height. With consistent practice it is possible to increase strength in static positions relatively quickly.
.
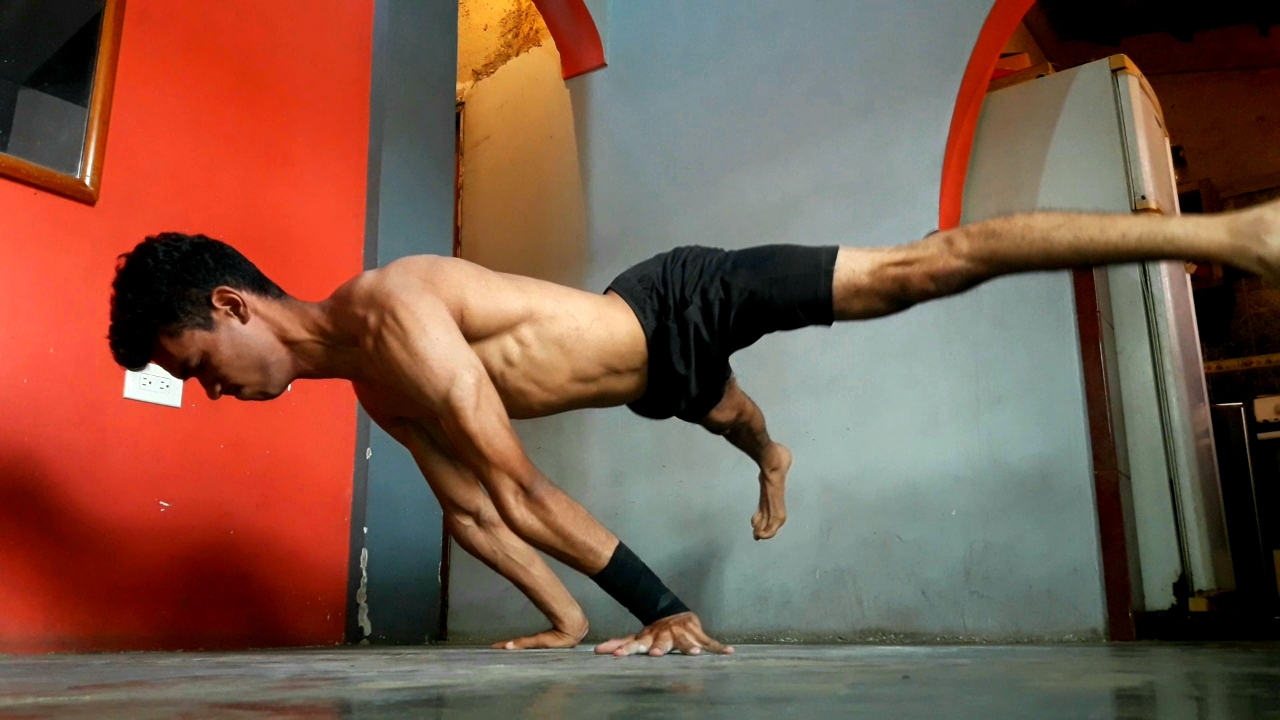
Cuando seas capaz de mantener la tuck planche durante 60 segundos, pasa a esta variante. La diferencia principal es la posición de la espalda. En la Tuck Planche la espalda está curvada, mientras que en la Advanced Tuck Planche la espalda se mantiene plana. A la vez que mantienes las caderas a la altura de los hombros. Esta simple modificación aumentará la intensidad del ejercicio en gran manera.
Continúa trabajando esta posición hasta que una vez más seas capaz de sostenerla durante 60 segundos de manera correcta en una sola serie con tu espalda plana.
.
When you are able to hold the tuck planche for 60 seconds, move on to this variation. The main difference is the position of the back. In the Tuck Planche the back is curved, while in the Advanced Tuck Planche the back remains flat. While keeping your hips at shoulder height. This simple modification will increase the intensity of the exercise greatly. Continue working this position until you are once again able to hold it for 60 seconds correctly in a single set with your back flat.
.

Tras un tiempo de trabajo consistente y haber dominado la posición de Advanced Tuck Planche, estás listo para comenzar a trabajar esta progresión. Mientras aprendes esta posición es beneficioso ir practicando también la siguiente (la flexión en tuck planche o tuck planche push-up). Una ayudará al progreso en la otra.
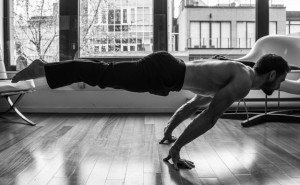
Ponte primero en la posición de Advanced Tuck Planche, y desde ahí, simplemente comienza a extender tus rodillas. El equilibrio es muy importante aquí y mientras extiendes tus piernas hacia atrás necesitas inclinarte un poco más hacia delante para compensar. Cuanto más abras las piernas, más fácil será realizar la Straddle Planche. Conforme te vas volviendo más fuerte, puedes cerrar más las piernas para hacerla más difícil. Este movimiento es tan difícil que no es necesario esperar a sostenerlo durante 60 segundos antes de avanzar. Una vez que seas capaz de sostener una Straddle Planche de forma correcta durante 10 segundos, ya puedes continuar. Aunque parezcan pocos, 10 segundos son muchos cuando la estás haciendo. Poco a poco ve juntando ambas piernas hasta que puedas sostener la full planche por un par de segundos. Justo en este momento tendrás la fuerza necesaria para ir ganando resistencia en este movimiento y ya estarás por conseguir la tan deseada full planche.
After a period of consistent work and having mastered the Advanced Tuck Planche position, you are ready to start working on this progression. While you learn this position, it is beneficial to also practice the next one (the tuck planche push-up or tuck planche push-up). One will help progress in the other. Get into the Advanced Tuck Planche position first, and from there, simply begin to extend your knees. Balance is very important here and as you extend your legs back you need to lean forward a little more to compensate. The wider you open your legs, the easier it will be to perform the Straddle Planche. As you get stronger, you can close your legs more to make it more difficult. This move is so difficult that you don't need to wait to hold it for 60 seconds before moving forward. Once you are able to hold a Straddle Planche correctly for 10 seconds, you are good to go. Although they may seem few, 10 seconds are a lot when you are doing it. Little by little, bring both legs together until you can hold the full planche for a couple of seconds. Right at this moment you will have the necessary strength to gain resistance in this movement and you will be about to achieve the much desired full planche.

Eso ha sido todo por hoy amigos. Espero les haya gustado este post
That's all for friends today. I hope you liked this post

0
0
0.000
Excelente contenido, felicidades. Yo tengo ya algunos meses haciendo deporte, soy de contextura delgada y hago bastantes flexiones, sé que la alimentación es importantísima, espero pronto poder entrar a un gimnasio para que me orienten mejor pero de todas formas, te reconozco. Saludos!!
Me alegra que te haya gustado la publicacion hermano
Congratulations @royvegas! You have completed the following achievement on the Hive blockchain And have been rewarded with New badge(s)
Your next target is to reach 3250 upvotes.
You can view your badges on your board and compare yourself to others in the Ranking
If you no longer want to receive notifications, reply to this comment with the word
STOPCheck out our last posts:
¡Felicitaciones!
1. Invierte en el PROYECTO ENTROPÍA y recibe ganancias semanalmente. Entra aquí para más información.
3. Suscríbete a nuestra COMUNIDAD, apoya al trail de @Entropia y así podrás ganar recompensas de curación de forma automática. Entra aquí para más información sobre nuestro trail.
4. Creación de cuentas nuevas de Hive aquí.
5. Visita nuestro canal de Youtube.
Atentamente
El equipo de curación del PROYECTO ENTROPÍA
Buen día, estimado @royvegas
Nos encanta, cuando los contenidos suman valor, al ecosistema de Hive. ¡Genial!
Tenemos algunas recomendaciones, en pos de mejorar nuestros contenidos.
Utiliza esta página, en línea y gratuita, para mejorar tus escrituras.
Utiliza bancos de imágenes, como Pixabay, que te garantizan libertad para utilizarlo.
En el hashtag, no es recomendable, colocar proyectos y/o ballenas. Muchas veces, son considerados spam.
Gracias por comprender.
Sigamos creciendo juntos e interactuando.
Saludos.
Muchisimas gracias, para los proximos post lo tendre en cuenta y disculpen
Gran información para atletas a mi juicio de alto rendimiento, gracias por compartir esta información con la comunidad... también te aconsejo seguir las sugerencias de los moradores de la comunidad. Saludos cordiales!
Muchas gracias