Working without blueprints [Eng+Spa]
English
Greetings to the people of the DIY community, I hope you are having a good week, but if for some reason you are having a hard time, I wish you a lot of encouragement to overcome the situation you are facing. And if you can't this week, nothing happens. You'll make it for sure in the next one, just don't give up on problems.
I take the opportunity to share one of my workshop repair jobs. It happens that in all workshop services, the ideal would be to have all the tools, the plans to solve each repair.
When I do restorations, repairs of electronic equipment, household appliances, or toys, it is normal that I do not have a plan available, nor any particular special tool. On the internet there are many pages that promise to give you the information you need, if you subscribe or pay first. To later realize that in most cases, they do not have what they have really offered.
You can compensate for the problem by following an organized repair method. Step by step, what is suitable for the type of equipment in which you have to work.
Image's Source - Fuente de la Imagen
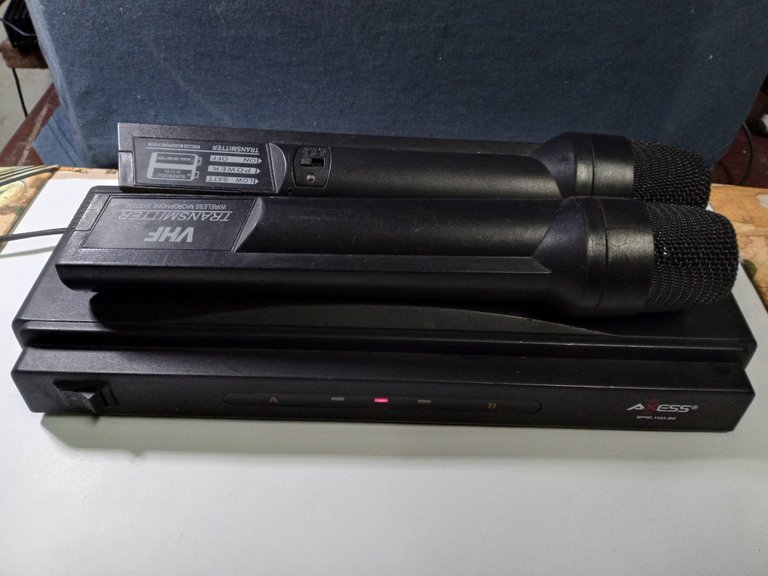
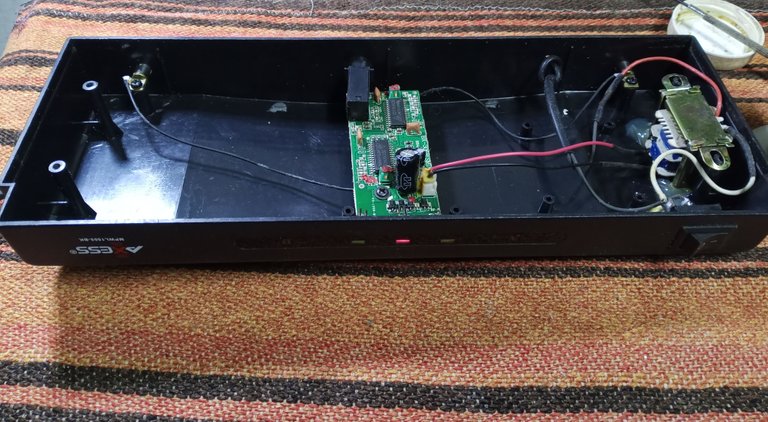
In this case, which makes the cover of the publication, it is a VHF transmitter from a set of wireless microphones, bought at an auction, that do not work and that they left me to review.
As a detail, the size of the component kit is really small, but the popular idea from a while ago was that if the equipment was bigger, it was of better quality. People back then did not buy compact equipment. In fact, some even added something to make it heavier, if the inside was heavy, it was a good piece of equipment, that's what many people thought.
That is why they made very large boxes to install the components, despite taking up almost no space inside the casing.
The first thing in the repair was to check the electrical connection cable, that it had continuity and brought the 110 volts to the power source. Use a breadboard, to avoid short circuits. Uninsulated and unsafe electricity from the wall outlet should not be used for review.
Image's Source - Fuente de la Imagen
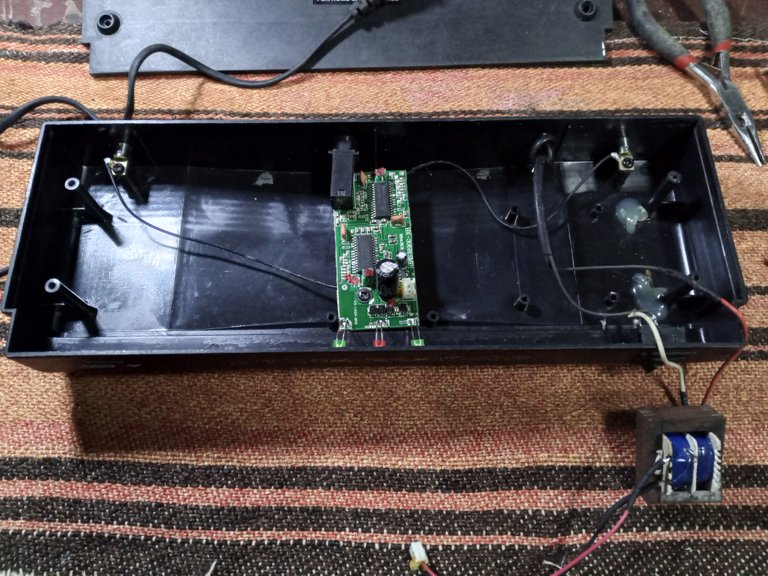
The electrical cable carried the 110 volts without problems to the input of the source, which in this case was an iron core transformer. So, then without electricity, we went on to check the state of the transformer.
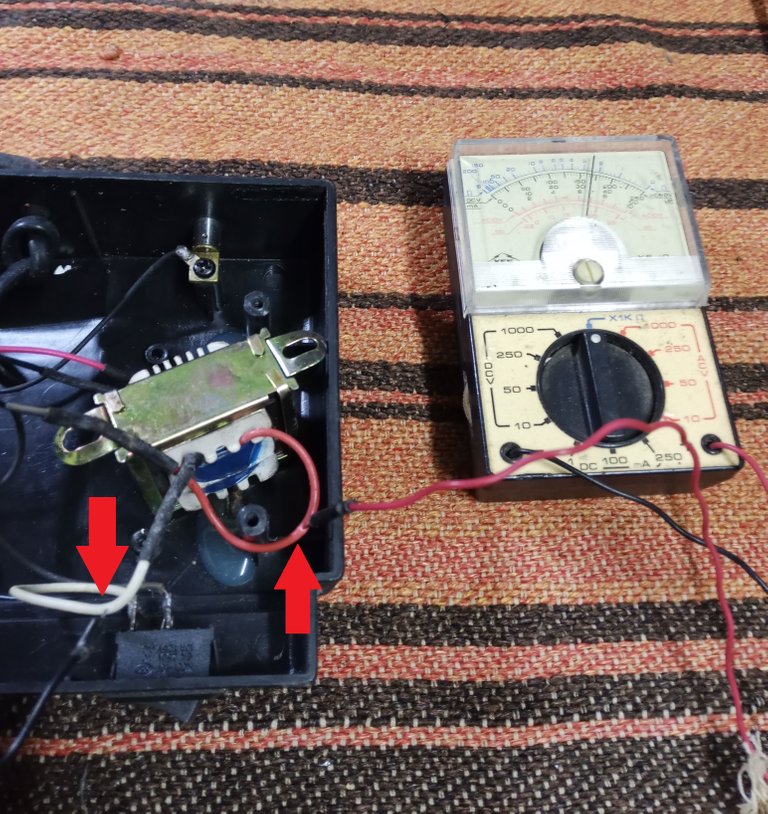
The input or primary winding of the transformer had continuity in acceptable values, but when measuring the output or secondary winding of the transformer we do not have continuity, it was interrupted.
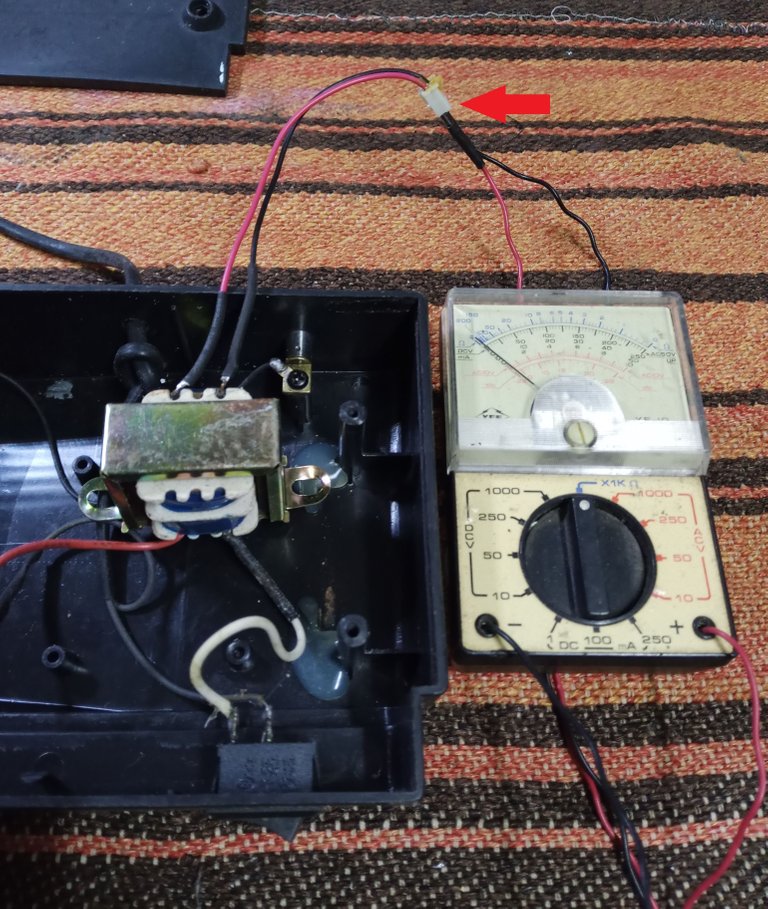
At first I wanted to replace the transformer, but had no indication of what its output voltage was. Check the capacitor where the voltage should reach after rectifying the voltage of the transformer, the correct thing is that it has twice the voltage for which it is going to work, and it indicated 16 working volts.
But then I remembered that to save money on parts, companies often drive components to their lowest capacity limits, so it wasn't safe to know the actual output voltage.
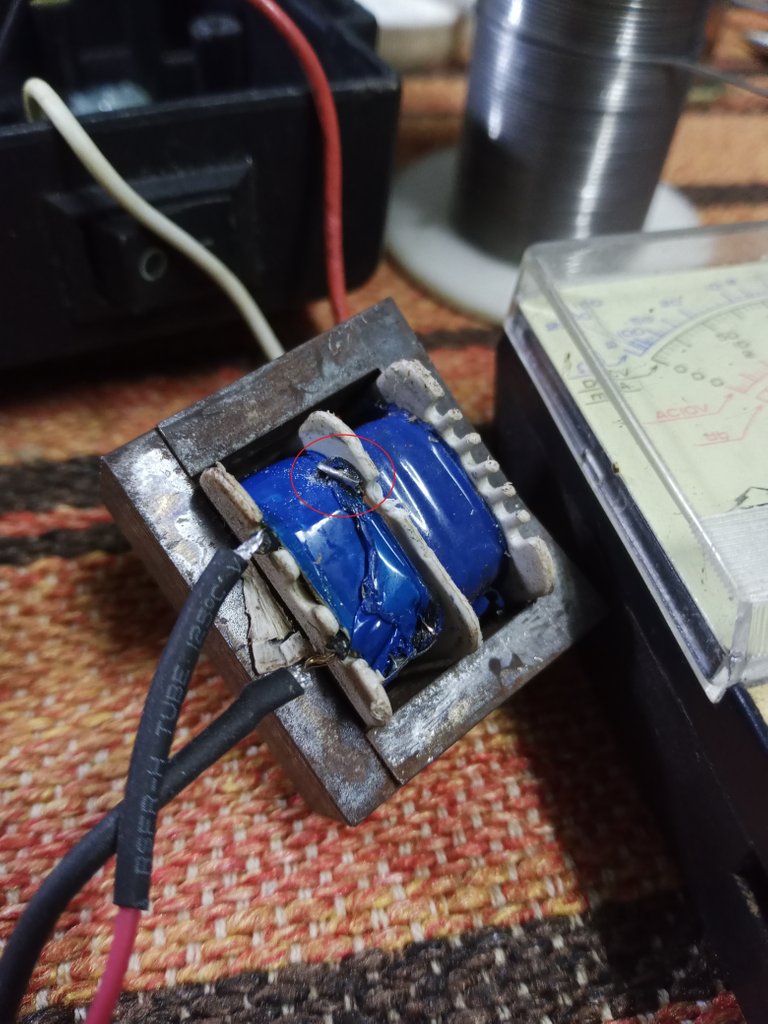
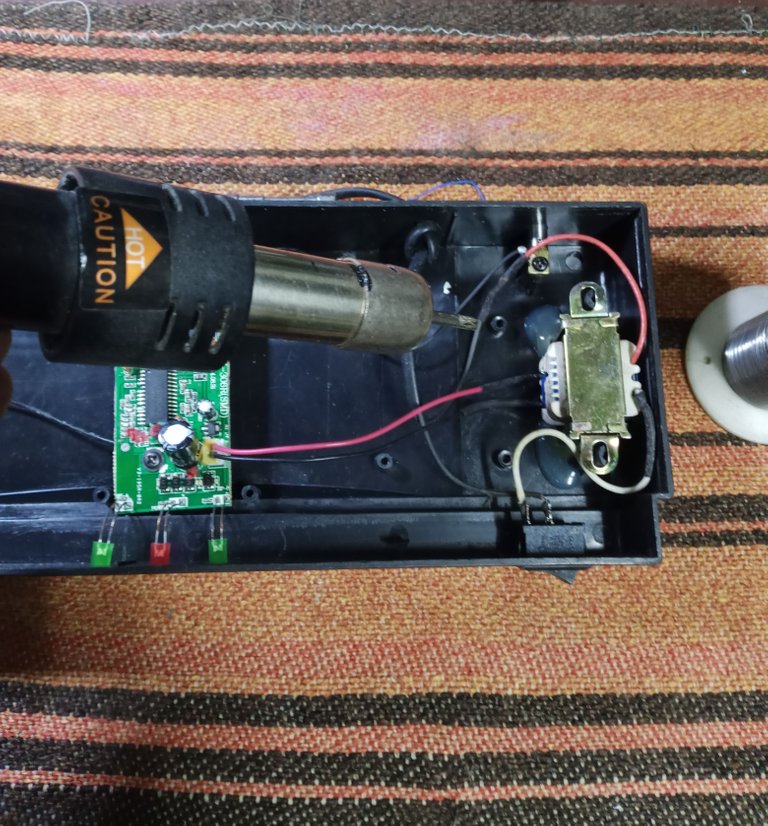
I ended up discovering the secondary winding of the transformer, until I found the interrupted wire, I was able to do the welding, it is a very thin wire, it can hardly be seen in the image.
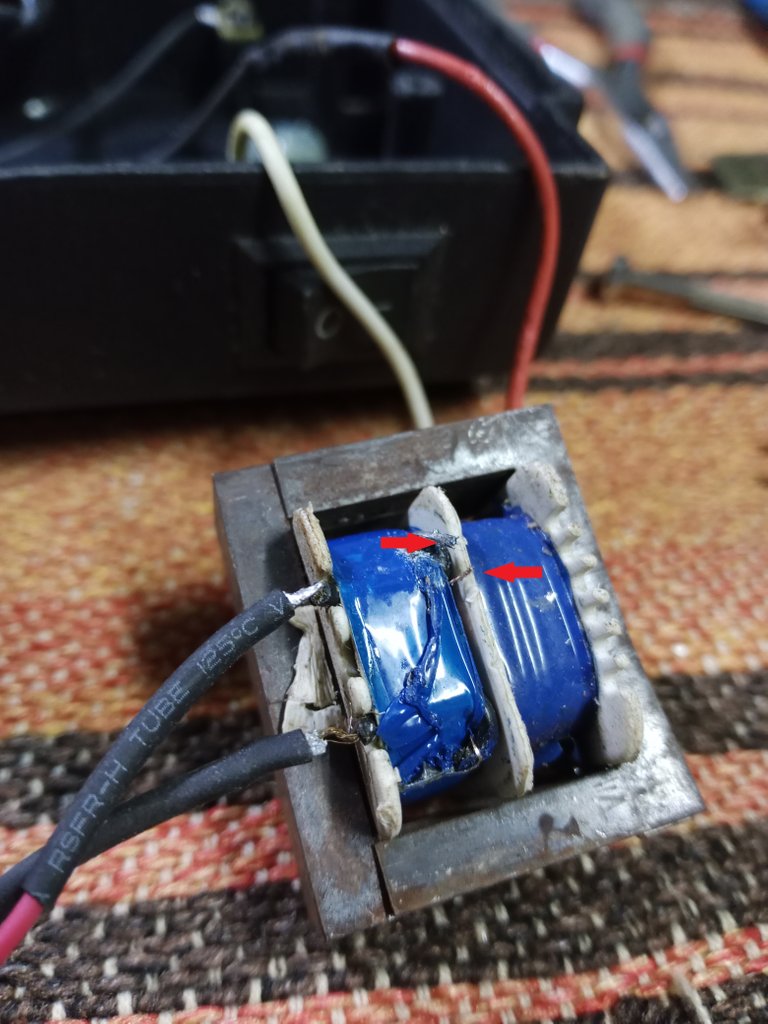
And the output voltage when energizing the transformer after the repair was 12 volts. The correct thing for the capacitor where the rectified voltage from the transformer arrives, should be 24 volts, at least not 16 volts.
I've tested the kit, and it works fine, so I put everything together and used the hot air soldering iron to melt the silicone on the base and snap the transformer back into place.
So I left ready to deliver the equipment. If you have the plan, you have a great advantage to work with, but in these cases where we don't have it, we can still do a good repair job, we just have to follow a logical step-by-step method to work.
I remind you that my publication is not a tutorial, it is part of my workshop work, how I solve the different situations in which I am working. As always, I advise you:
If you do not have knowledge of working with electricity, first get trained in working with electricity, so as not to suffer accidents and not end up damaging the equipment.
Thank you very much for stopping by and reading.
Have a very nice day.
Peace.
I have used Google translate for the English language.
The images, unless indicated, are screenshots of my work in the workshop
Español
Saludos a las personas de la comunidad DIY, espero que estén teniendo una buena semana, pero si por algún motivo lo están pasando mal, les deseo mucho ánimo para poder superar la situación a la que se enfrentan. Y si no se puede esta semana, no pasa nada. Lo lograrán de seguro en la próxima, solo no se rindan ante los problemas.
Aprovecho la oportunidad, para compartir uno de mis trabajos de reparación del taller. Sucede que en todos los servicios de taller, lo ideal sería contar con todas las herramientas, los planos para resolver cada reparación.
Cuando hago restauraciones, reparaciones de equipos electrónicos, electrodomésticos, o juguetes, lo normal es que no tenga disponible un plano, tampoco alguna herramienta especial particular. En el internet hay multitud de páginas que prometen dar la información que necesitas, si te suscribes o pagas primero. Para luego darte cuenta de que en la mayoría de los casos, no tienen lo que han ofrecido realmente.
Puedes compensar el problema siguiendo un método de reparación organizado. Paso a paso, qué este adecuado al tipo de equipo en que tengas que trabajar.
Image's Source - Fuente de la Imagen
En este caso, que hace de portada de la publicación, es un transmisor VHF de un juego de micrófonos inalámbricos, comprados en un remate, que no funcionan y que me dejaron para revisar.
Como detalle, el tamaño del juego de componentes es realmente pequeño, pero la idea popular de hace un tiempo era de que si el equipo era grande era de mejor calidad. Las personas de ese entonces no compraban equipos compactos. De hecho, a algunos, hasta se les agregaba algo que hiciera más peso, si era pesado lo de adentro, era un buen equipo, es lo que muchas personas pensaban.
Por eso hacían cajas muy grandes para instalar los componentes, a pesar de no ocupar casi espacio dentro de la carcasa.
Lo primero en la reparación era revisar el cable de conexión eléctrico, que tuviese continuidad y llevase los 110 volts a la fuente de alimentación. Use un tablero de pruebas, para evitar cortos circuitos. No se debe usar la electricidad sin aislante ni seguridad de la toma de la pared, para una revisión.
Image's Source - Fuente de la Imagen
El cable eléctrico llevaba sin problemas los 110 volts a la entrada de la fuente, que en este caso era un transformador de núcleo de hierro. Así, luego sin electricidad, pasamos a revisar el estado del transformador.
La entrada o bobinado primario del transformador tenía continuidad en valores aceptables, pero al medir la salida o bobinado secundario del transformador no tenemos continuidad, estaba interrumpido.
A primeras quería reemplazar el transformador, pero no tenía indicación alguna de cuál era su voltaje de salida. Verifique el capacitor a donde debía llegar el voltaje después de rectificar el voltaje del transformador, lo correcto es que tenga el doble del voltaje para el que va a trabajar, y me indicaba 16 volts de trabajo.
Pero luego recordé que para ahorrar dinero en las partes, las compañías suelen colocar los componentes al límite mínimo de su capacidad, así que no era seguro saber el voltaje de salida real.
Termine por ir descubriendo el bobinado secundario del transformador, hasta dar con el alambre interrumpido, pude hacer la soldadura, es un alambre muy delgado, casi no puede apreciarse en la imagen.
Y el voltaje de salida al energizar el transformador después de la reparación, era 12 volts. Lo correcto para el capacitor a donde llega el voltaje rectificado del transformador, debía ser de 24 volts, como mínimo no de 16 volts.
Probé el equipo, y funciono sin mayor novedad, así que arme todo y aproveche el soldador de aire caliente para derretir la silicona en la base y volver a fijar el transformador en su sitio.
Así dejé listo para entregar el equipo. Si se dispone del plano, se tiene de una gran ventaja para trabajar, pero en estos casos que no lo tenemos, aún podemos hacer un buen trabajo de reparación, solo tenemos que seguir un método lógico por pasos para trabajar.
Les recuerdo que mi publicación no es un tutorial, es parte de mi trabajo de taller, de como resuelvo las diferentes situaciones en que voy trabajando. Como siempre, les aconsejo:
Si no tienes conocimientos de trabajo con electricidad, primero capacítese en el trabajo con electricidad, para no sufrir accidentes y no terminar dañando los equipos.
Muchas gracias por pasar y leerme.
Que tengan un muy buen día.
Paz.
He usado el traductor de Google para el idioma inglés.
Las imágenes, a menos que se indique, son capturas de mi trabajo en el taller
De verdad que uno se sorpende de que la caja por dentro este casi vacía 😀
Stay !ALIVE
!LOLZ
!GIF Good Job!
!MEME
!PGM
!LUV
!CTP
Via Tenor
@soltecno! You Are Alive so I just staked 0.1 $ALIVE to your account on behalf of @pedrobrito2004. (1/10)
The tip has been paid for by the We Are Alive Tribe through the earnings on @alive.chat, feel free to swing by our daily chat any time you want.

BUY AND STAKE THE PGM TO SEND A LOT OF TOKENS!
The tokens that the command sends are: 0.1 PGM-0.1 LVL-0.1 THGAMING-0.05 DEC-15 SBT-1 STARBITS-[0.00000001 BTC (SWAP.BTC) only if you have 2500 PGM in stake or more ]
5000 PGM IN STAKE = 2x rewards!
Discord
Support the curation account @ pgm-curator with a delegation 10 HP - 50 HP - 100 HP - 500 HP - 1000 HP
Get potential votes from @ pgm-curator by paying in PGM, here is a guide
I'm a bot, if you want a hand ask @ zottone444
Credit: thereadingman
Earn Crypto for your Memes @ HiveMe.me!
This post has been manually curated by @bhattg from Indiaunited community. Join us on our Discord Server.
Do you know that you can earn a passive income by delegating to @indiaunited. We share more than 100 % of the curation rewards with the delegators in the form of IUC tokens. HP delegators and IUC token holders also get upto 20% additional vote weight.
Here are some handy links for delegations: 100HP, 250HP, 500HP, 1000HP.
100% of the rewards from this comment goes to the curator for their manual curation efforts. Please encourage the curator @bhattg by upvoting this comment and support the community by voting the posts made by @indiaunited.
Thank you very much for the support, have a good week.
https://twitter.com/2165453306/status/1640901838776987650
The rewards earned on this comment will go directly to the people( @pedrobrito2004 ) sharing the post on Twitter as long as they are registered with @poshtoken. Sign up at https://hiveposh.com.
Congratulations @soltecno! You have completed the following achievement on the Hive blockchain And have been rewarded with New badge(s)
Your next target is to reach 20000 upvotes.
You can view your badges on your board and compare yourself to others in the Ranking
If you no longer want to receive notifications, reply to this comment with the word
STOPCheck out our last posts:
Greetings, friends, you were missed. Thanks for stopping by.
Have a nice day.
You're welcome @soltecno! Have a nice day too 😊👍
Oh God! 😂 This is all Chinese for me as I've never done such jobs. I have my private electrician who is repairing everything that needs to be repaired and I'm happy with that setup.
However, congratulations for what you do as repairing is cheaper than buying an new one, not to mention the stop of waste. Well done!
Thanks for stopping by and commenting on the post.
Repairing and restoring is, as you say: a way to avoid more waste, for the environment.
But apart from everything, it's something I really enjoy, a way to feel like I'm doing something useful for others.
Have a nice day.
Yay! 🤗
Your content has been boosted with Ecency Points, by @soltecno.
Use Ecency daily to boost your growth on platform!
Support Ecency
Vote for new Proposal
Delegate HP and earn more
Good morning, thank you very much for the support.
Que grandes consejos nos traes hoy, dibujar sin planos es ideal para quienes no tienen experiencia.
Saludos, muchas gracias por pasar a leerme y comentar.
Que tenga usted un buen día.
Me parece un poco gracioso como ha cambiado la mentalidad de la gente respecto a los equipos, es verdad que antes si todo era grande era mejor, ahora la gente quiere todo plano que ocupe menos espacio de ser posible.
Me molesta que las empresas sigan haciendo todo por ahorrar y ganar más y no pensar en la durabilidad de los componentes por cierto.
Que paciencia hay que tener para reparar un equipo, a veces uno cono usuario le da rabia y dan ganar de echarlo a la basura.
Saludos 😊
Me pasa igual, como usted piensa. Cuando el cliente lo permite, le hago los cambios al equipo para aumentar su vida útil.
Pero hay una serie de conductas que la gente adopta y no acepta ideas contrarias. Algunos equipos electrónicos incluso traían unos pesos adicionales para que el cliente lo sintiese sólido.
Las empresas muchas veces dejan trabajando los componentes de los equipos, al límite de funcionamiento, para asegurarse de vender más seguido. Pero siempre encontraremos la manera de resolver ese problema.
Las personas tienen que cambiar de mentalidad, o el ambiente no lo soportara.
Muchas gracias por pasar y dejar su comentario. Lo aprecio mucho.
Que bueno que puedas compartir esta reparación y tu método de trabajo, cada persona tiene su método pero muchas veces estos se pueden complementar para lograr hacerlo de una forma más sencilla. Siempre me sorprende como llegas a tu objetivo, aunque sea muy difícil y te lleve tiempo.
Sí, solía trabajar con maestros alemanes, cuando inicie como mecánico. Se esmeraron mucho en enseñarnos a seguir un plan hecho con base en un algoritmo. Y plasmado en un diagrama de flujo.
Terminas por acostumbrarte a lo cómodo y lógico del proceso.
Gracias por pasar amigo.