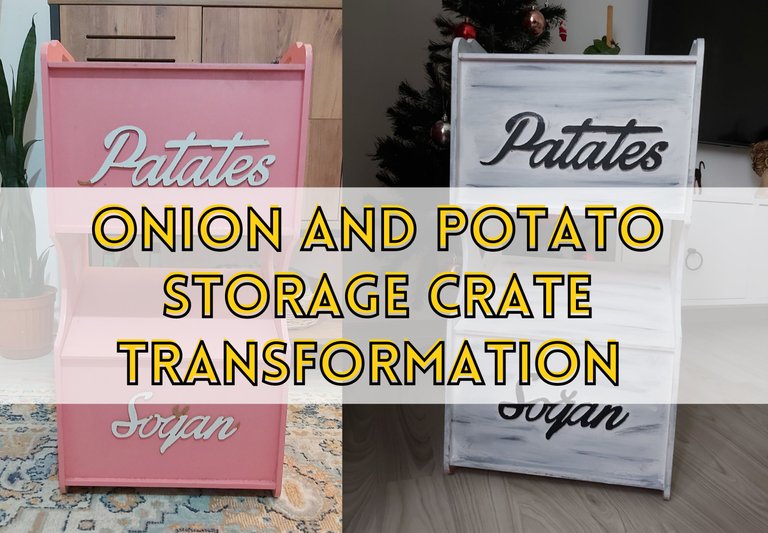
Onion and Potato Storage Crate Transformation | Do it yourself
[ENGLISH]
Hello.
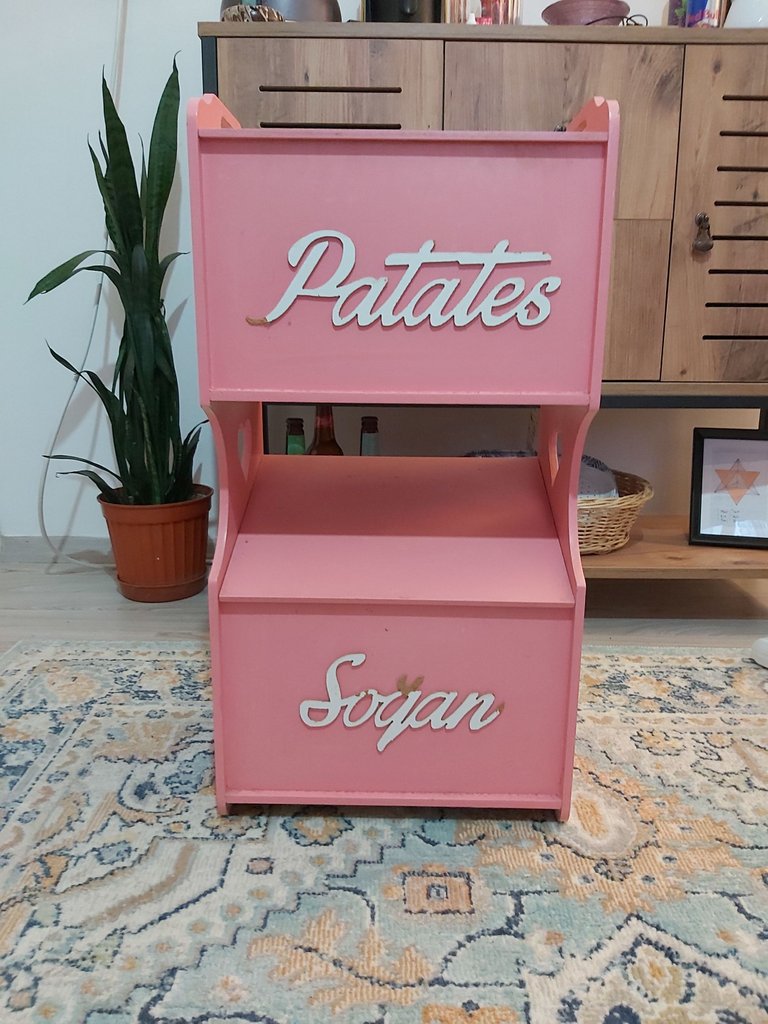
I'm a person who likes to renew old things rather than throw them away. Winter has come and I'm bored because we can't go outside as much as before and we are closed to our houses. While I was thinking what can I do, my mother asked me to renew the wooden box where we keep the potatoes and onions.
She had asked before, but I had not had the opportunity. We use this wooden storage container in our kitchen. Since the cabinets of our kitchen were in white and apple green tones, it did not suit it at all. We had to use it in the pink way for a while. While I was looking for something ready to make, I wanted to paint it and renew it. Renovating something like this with my own hands feels like therapy to me. Actually, I used to be so scared that I couldn't do it, I never dared, but I'm not afraid of painting anymore.
[TÜRKÇE]
Merhabalar.
Ben eski eşyaları atmak yerine yenilemeyi seven bir insanım. Kış geldi ve korona yüzünden eskisi kadar dışarılarda gezemediğimiz ve evlere kapandığımız için canım sıkılıyor. Ben de ne yapabilirim acaba diye düşünürken annem patates ve soğanları sakladığımız ahşap kutuyu yenilememi istedi.
Daha önce de istemişti ama ben fırsat bulamamıştım. Bu ahşap saklama kabını mutfağımızda kullanıyoruz. Mutfağımızın dolaplarının rengi beyaz ve elma yeşili tonlarında olduğu için oraya hiç yakışmıyordu. Bir süre pembe şekilde kullanmak zorunda kaldık. Bende hazır yapacak bir şeyler ararken onu boyayıp yenilemek istedim. Bu tarz bir şeyleri kendi ellerimle yenilemek bana terapi gibi geliyor. Aslında eskiden yapamam diye çok korkar hiç cesaret edemezdim ama artık boyamaktan hiç korkmuyorum.
I have prepared this box, which has two storage compartments and is very useful, for you in detail. I wiped it clean with a nice clean cloth before I prepared it for painting. If your paint is not the paint that clings to every surface, you should definitely sand it. I didn't do it because the paint I was going to use didn't require sandpaper. I couldn't find any sandpaper at home, if I had found it, maybe I could sand it to make it more solid. Make sure to sand the wooden item that you will transform and make it ready for painting. If you want, let's move on to the painting stages. Are you ready?
İki adet saklama gözü olan ve oldukça kullanışlı bu kutuyu yenileme aşamasını sizlere detaylı şekilde hazırladım. Boyamaya hazırlamadan önce onu bir güzel temiz bez ile silerek temizledim. Eğer boyanız her yüzeye tutunan boya değilse mutlaka zımpara yapmalısınız. Benim kullanacağım boya zımpara istemediği için ben yapmadım. Zaten evde zımpara bulamadım bulsaydım belki daha sağlam olması için zımparalayabilirdim. Siz mutlaka dönüştüreceğiniz ahşağ eşyayı zımparalarak onu boyamaya hazır hale getirin. İsterseniz artık boyama aşamalarına geçelim. Hazır mısınız?
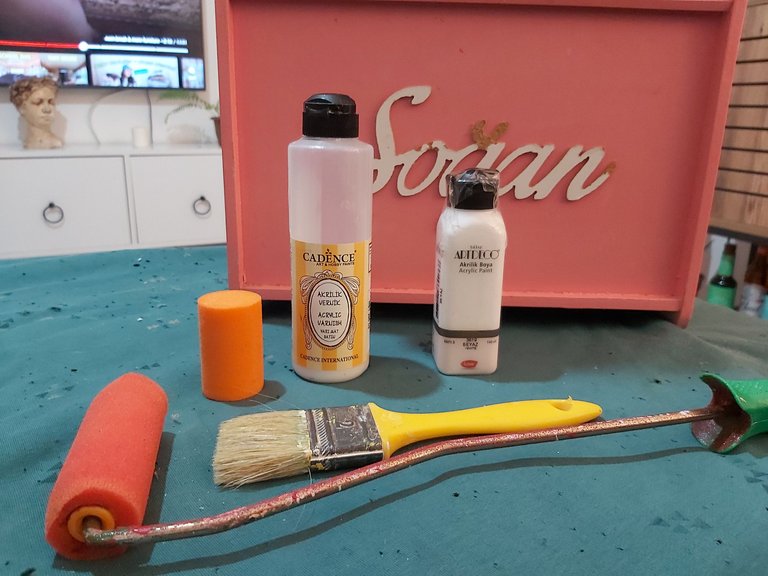
Required Materials
- Wood Paint (Artdeco White)
- Varnish Brush (velvet)
- Sponge Roller Brush
- Brush
- Varnish
Gereken Materyaller
- Ahşap Boyası ( Artdeco Beyaz)
- Vernik Fırçası (kadife)
- Sünger Rulo Fırça
- Fırça
- Vernik
First, we load the paint on our roller brush. I prefer a roller brush as much as possible on flat areas. My roller brush is made of sponge and does not streak paint.
I loaded the sponge with white paint. Then I took the excess by pressing lightly a few times in an empty area to remove the excess of paint. You should definitely do this. If you apply the paint directly to the furniture, it creates a thick layer and this crust layer will easily come off the furniture in the future. It also does not create a flat image. That's why you should throw the primer thinly. My paint has high coverage, so I'm a little lucky.
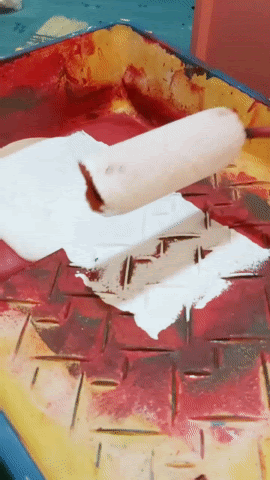
Öncelikle rulo fırçamıza boyayı yüklüyoruz. Düz yerlerde mümkün olduğunca rulo fırça tercih ediyorum. Benim rulo fırçam süngerden yapılmış ve boya izi yapmıyor.
Süngere beyaz boyayı yükledim. Ardından boyanın fazlalıklarını almak için boş bir alanda bir kaç kere hafif bastırarak fazlalığını aldım. Bunu mutlaka yapmalısınız. Eğer direk olarak mobilyaya boyayı sürerseniz kalın bir tabaka oluşturur ve ileride bu kabuk tabaka mobilyadan kolayca çıkar. Ayrıca düz bir görüntü oluşturmaz. Bu yüzden astarı ince şekilde atmalısınız. Benim boyamın kapatıcılığı yüksek bu yüzden biraz şanslıyım.
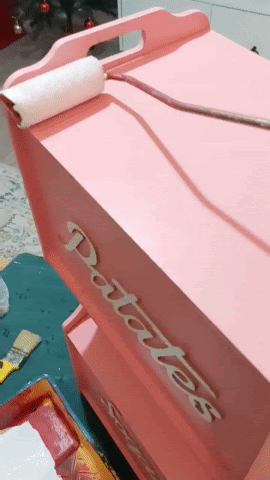
I applied the painted sponge to the surface to be painted gently without pressing too much.
Boyalı süngeri fazla bastırmadan nazikçe boyayacağım yüzeye uyguladım.

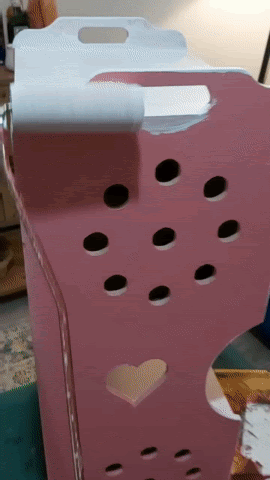
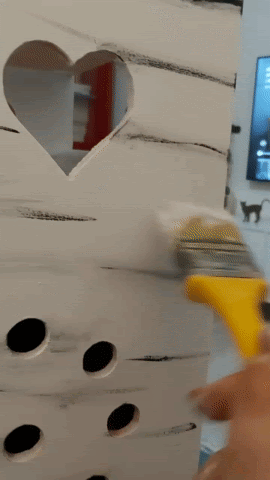
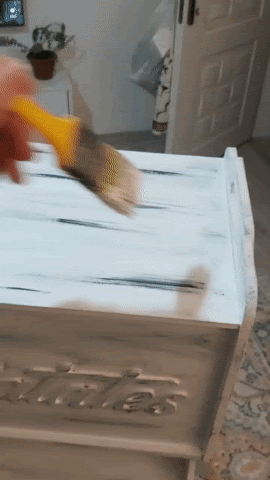
First of all, I wanted to test if the paint was spoiled since I have had it for a long time. Finally the paint came out intact. Before painting the wood completely, I painted the edges with a small brush. Make sure to paint the areas that the roller cannot reach with a brush. After the edges are finished, proceed to the painting process completely.
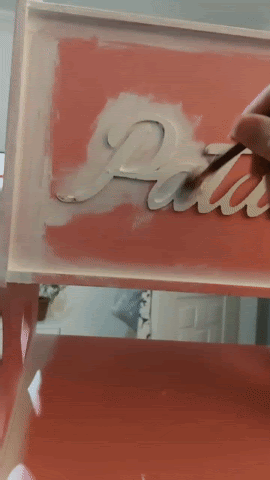
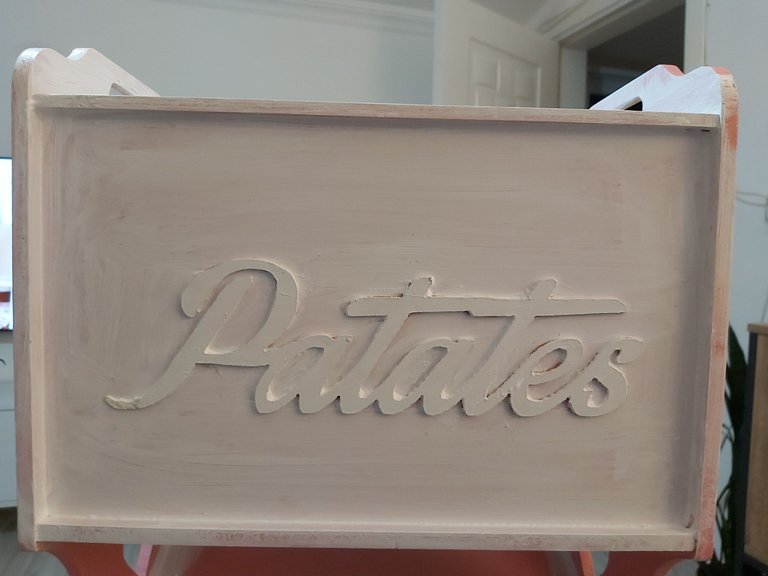
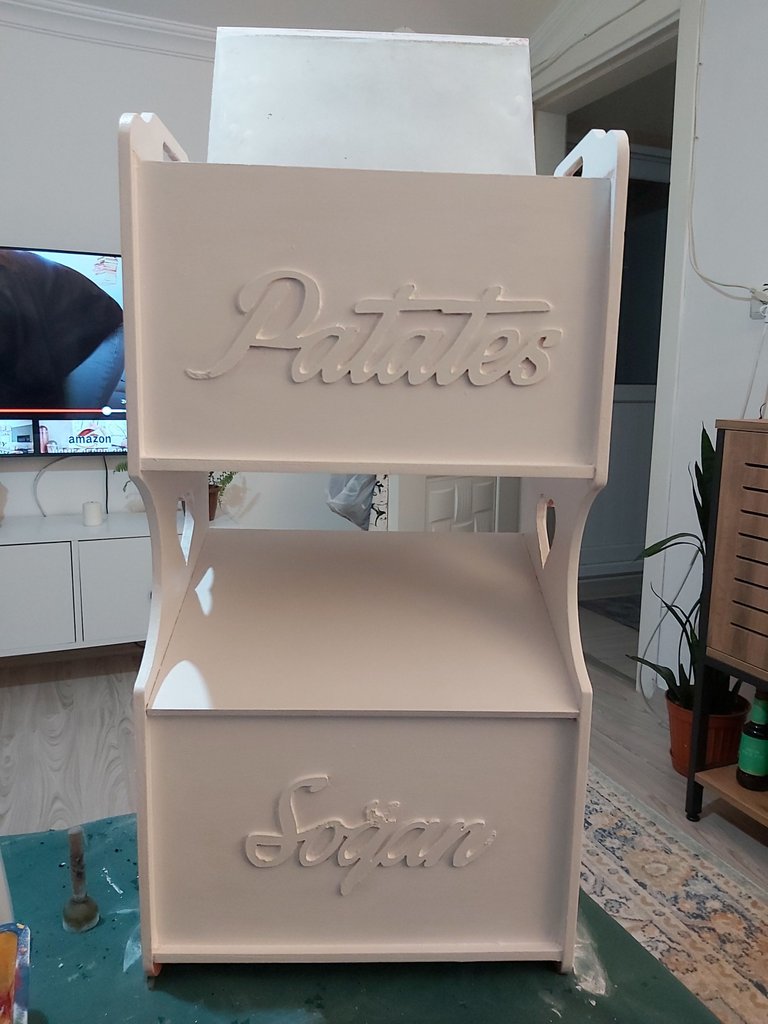
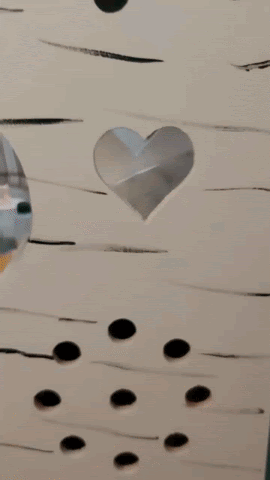
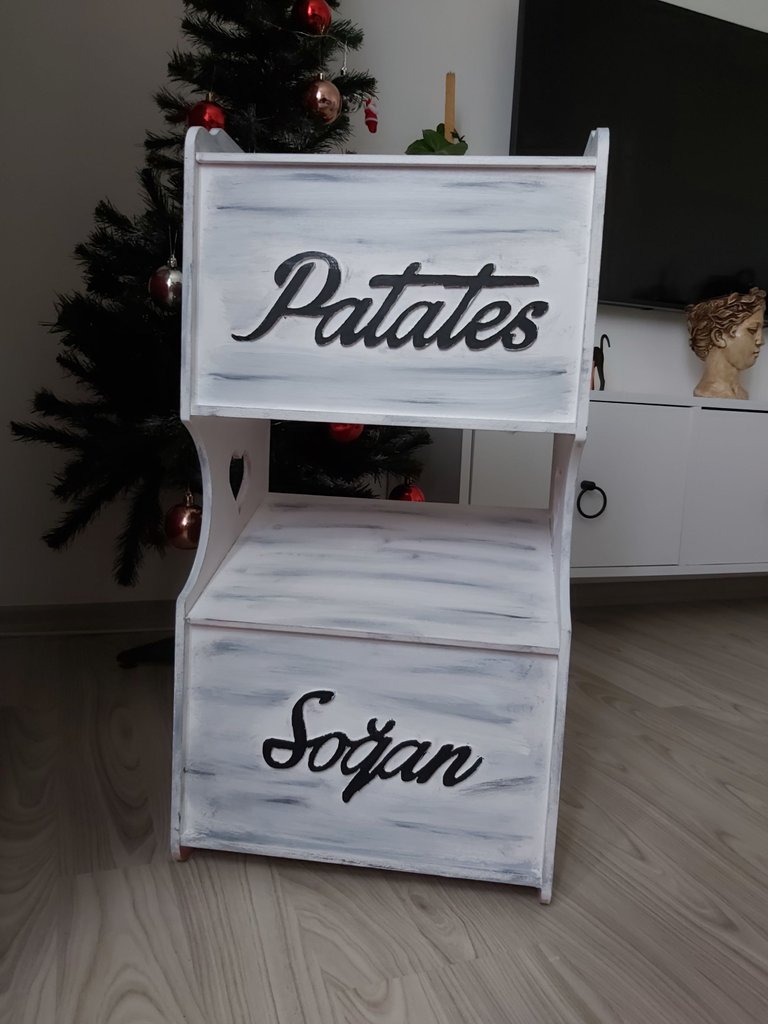
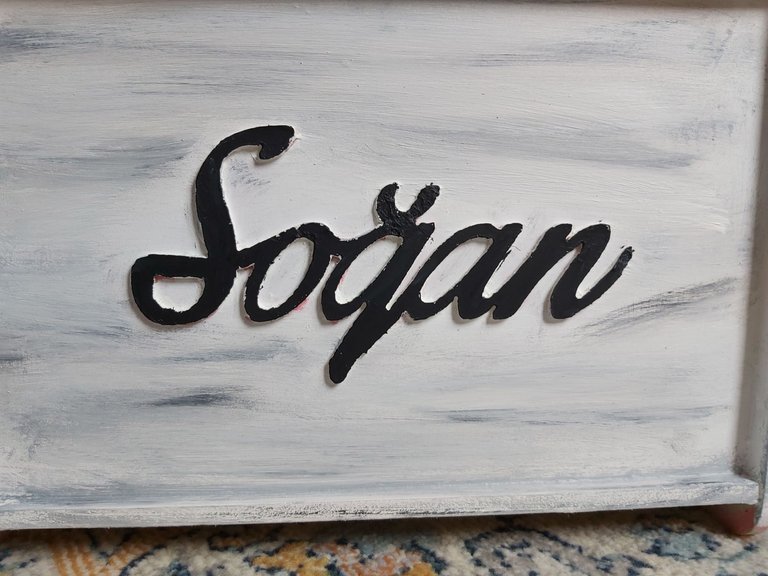
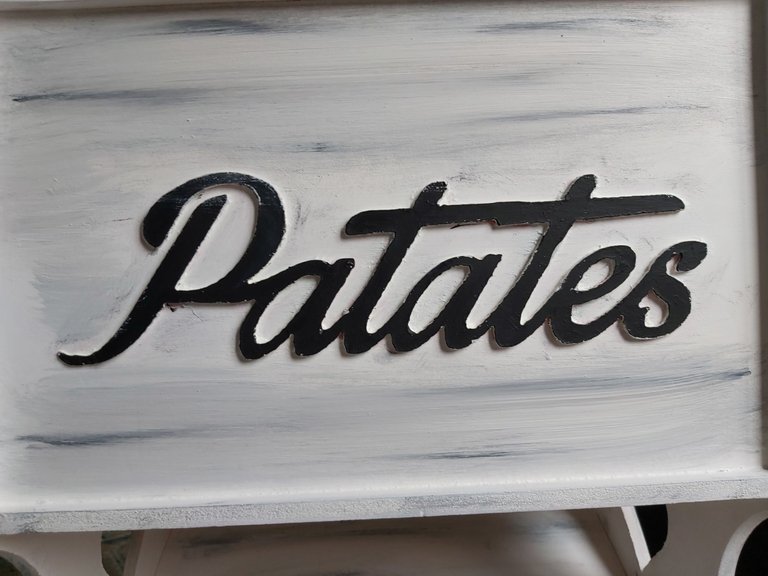
There is an inscription on my box that says 3D potatoes and onions. That would bother me a bit. I actually wanted to remove it and replace it with a different wooden ornament, but my mom wanted me to keep it that way. That's why I painted every single part of the summer with a small brush.
Öncelikle boya uzun zamandır elimde olduğu için bozulup bozulmadığını denemek istedim. Nihayet boya sağlam çıktı. Ahşabı tamamen boyamadan önce kenarları ufak fırça ile boyadım. Rulonun erişemediği yerleri mutlaka fırça ile boyayın. Kenarlar bittikten sonra tamamen boyama işlemine geçin.
Benim kutumun üzerinde üç boyutlu patates ve soğan yazan bir yazı var. Bu biraz beni uğraştıracaktı. Aslında onu söküp yerine farklı ahşap bir süs takmak istedim ama annem onu bozmamamı bu şekilde kalmasını istedi. Bu yüzden yazların tek tek ufak fırça ile her yerini boyadım.
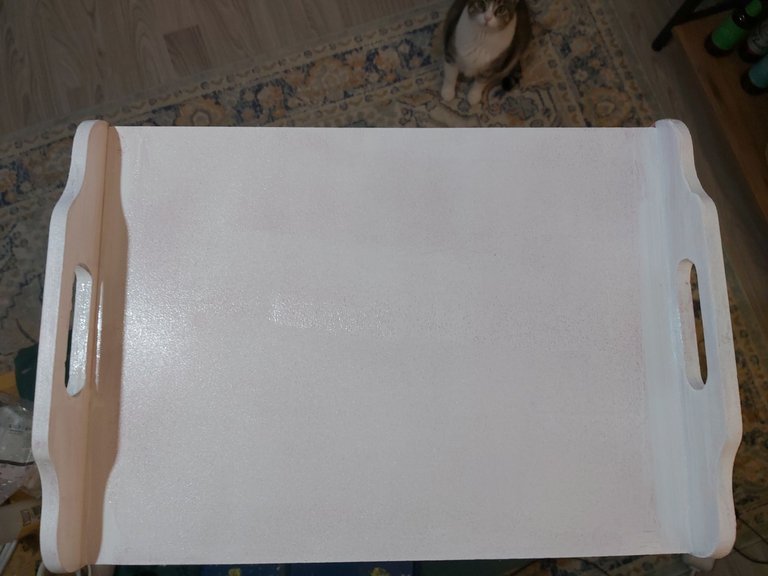
I painted it the same way on all sides and applied the first coat. Now my primer was ready and I let it dry for a while.
Her tarafını aynı şekilde boyayarak ilk katını attım. Artık astarım hazırdı ve onu bir süre kuruması için beklettim.
--
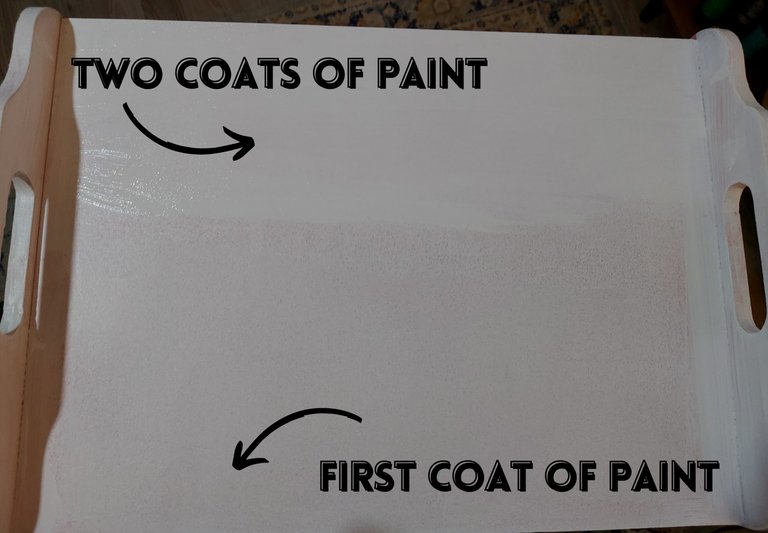
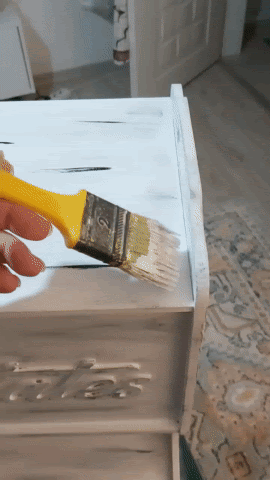
After making sure that the paint was thoroughly dry, I painted the second coat. The paint we paint in the first coat needs to dry well, if the paint does not dry, there may be traces when painting the second coat. You have to wait patiently without rushing.
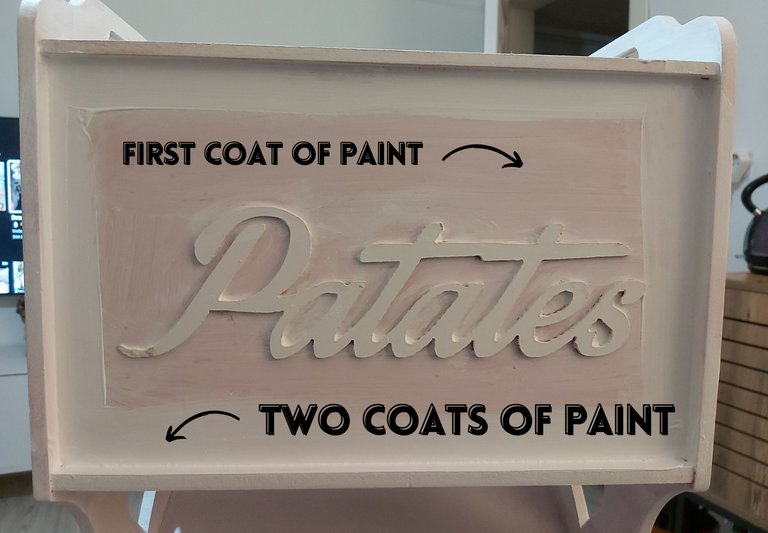
Boyanın iyice kuruduğundan emin olduktan sonra ikinci katı boyadım. İlk kat boyadığımız boyanın iyice kuruması gerkeiyor eğer boya kurumazsa ikinci kat boyarken izler olabilir. Acele etmeden sabırla beklemelisiniz.
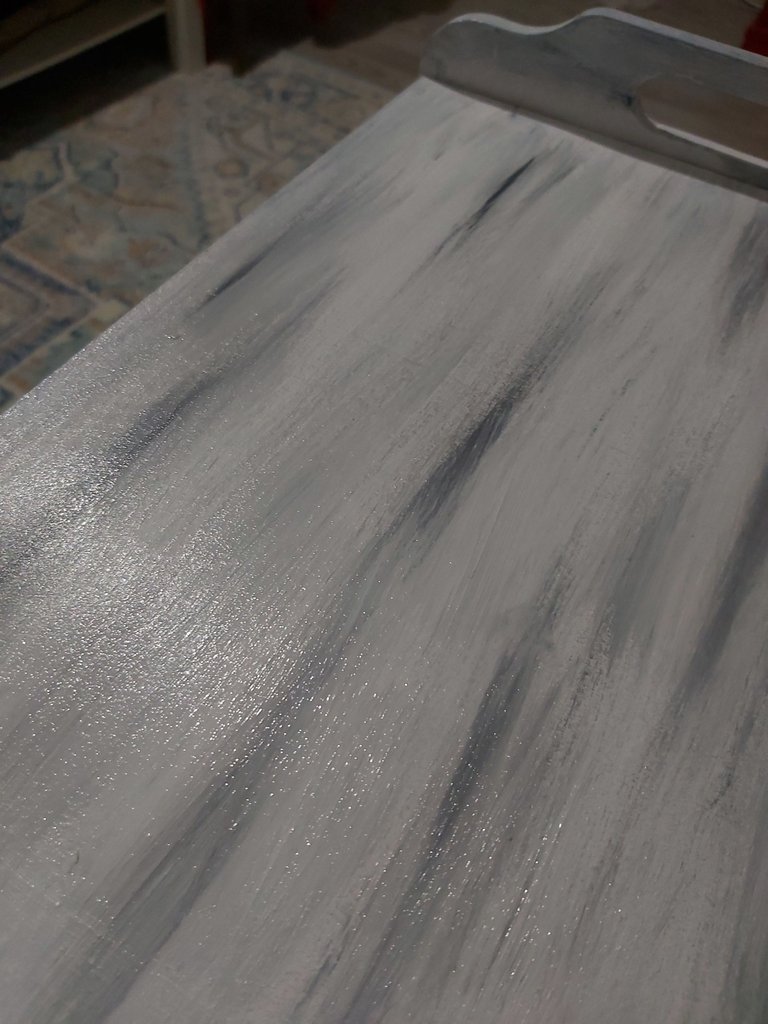
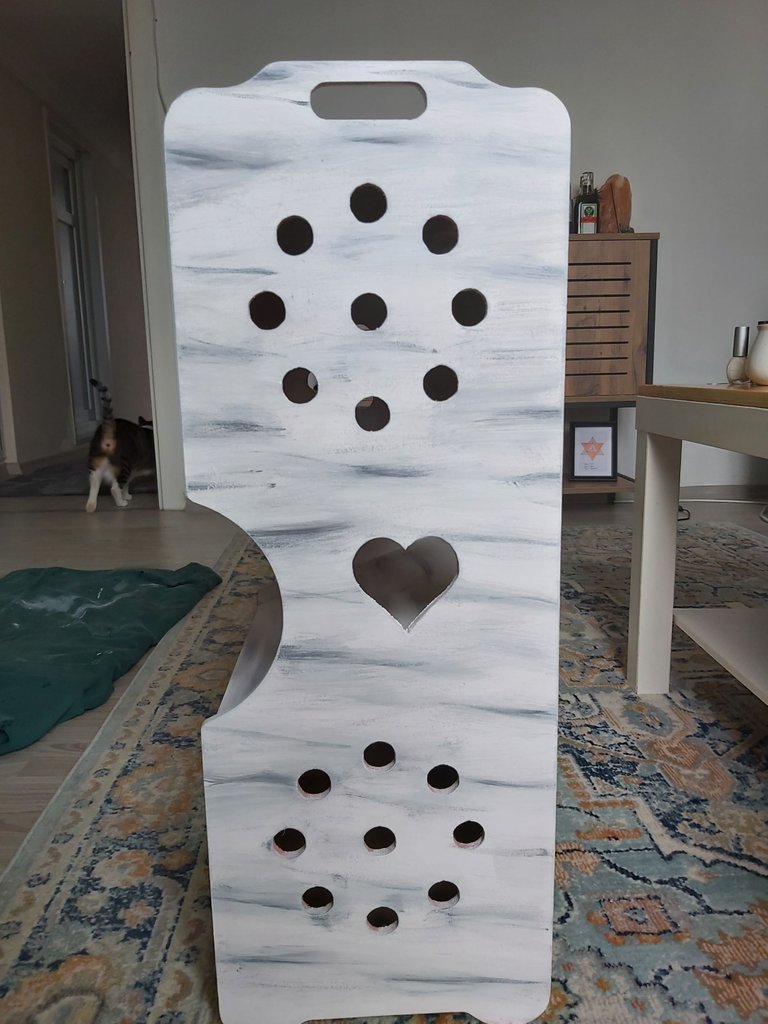
The paint is gone but I felt like something was missing. So I wanted to differentiate it even more. It would be nice to give it a slightly worn look. In this way, it could have left a more effective impression instead of a plain image.
Boya bitti ama sanki bir şeyler eksik gibi hissettim. Bu yüzden onu daha da farklılaştırmak istedim. Biraz eskimiş bir görüntü vermek hoş olabilirdi. Bu sayede sade görüntü yerine daha etkili bir izlenim bırakabilirdi.
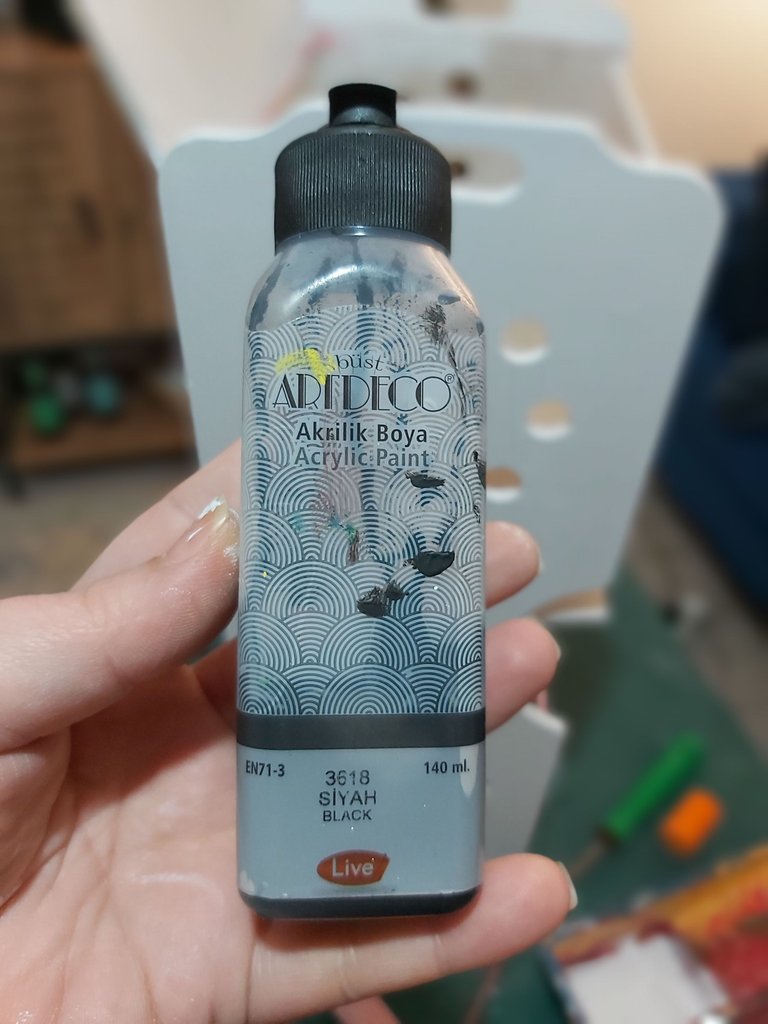
I've never painted wood in an aging style before. I usually paint the furniture a solid color. I had no experience, but I dared without fear. I wouldn't know if I could do it without the courage, would I? That's why I thought that we would get an old-fashioned look with black color, and I chose the black paint of the Artdeco brand.
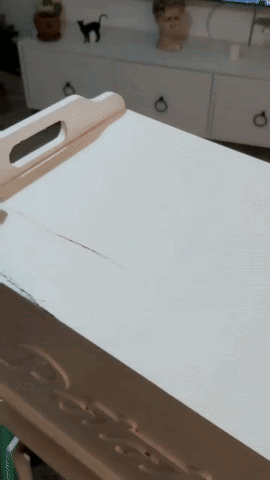
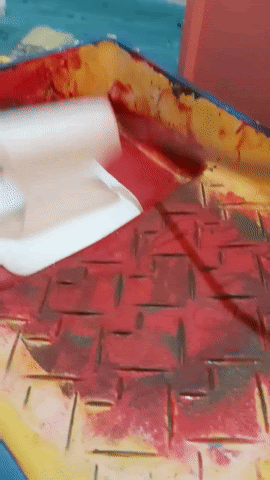
I applied the black paint on the surface as if drawing a line with a thin brush. While doing this, I did it at a certain interval. I randomly applied the black paint to get the worn look. Then, before it dries completely, I spread the black paint in the same direction by pressing lightly with a sponge pom-pom brush.
Siyah boyayı ince bir fırça ile çizgi çeker gibi yüzeye sürdüm. Bunu yaparken belli bir aralıkla yaptım. Eskimiş görüntü elde etmek için siyah boyayı rastgele uyguladım. Ardından tamamen kurumadan önce sünger pon pon fırça ile siyah boyayı hafifçe bastırarak aynı yönde dağıttım.
I applied the same process all over the wood. I can't say that I did it diligently, it's completely random. It didn't look pretty as it wasn't finished as an image, but I continued anyway.
Aynı işlemi ahşabın her tarafına uyguladım. Özenerek yaptığımı söyleyemem tamamen rast gele. Görüntü olarak tamamlanmadığı için hoş durmuyordu ama yine de devam ettim.
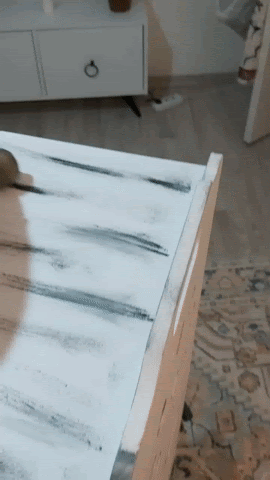
Then I took white paint on the brush and went over the black colors. I applied the white color by pressing it lightly. If I pressed too hard, the bottom black color would disappear. It is important to be gentle at this stage. When some parts were overpainted, I drew lines with black color again and strengthened the insufficient parts. I continued this process until it was enough for my eyes.
Daha sonra fırçaya beyaz boya alarak siyah renklerin üzerinden geçtim. Beyaz rengi hafifçe bastırarak uyguladım. Eğer çok bastırırsam alttaki siyah renk kaybolacaktı. Bu aşamada nazik davranmanız önemli. Bazı yerleri fazla boyandığı zaman tekrar siyah renk ile çizgiler çekerek yetersiz kalan yerleri güçlendirdim. Gözüme yeterli gelene kadar bu işleme devam ettim.
I gave the appearance of aging by going over it with white paint in the same way.
Her tarafı aynı şekilde beyaz boya ile üzerinden geçerek eskitme görüntüsü verdim.
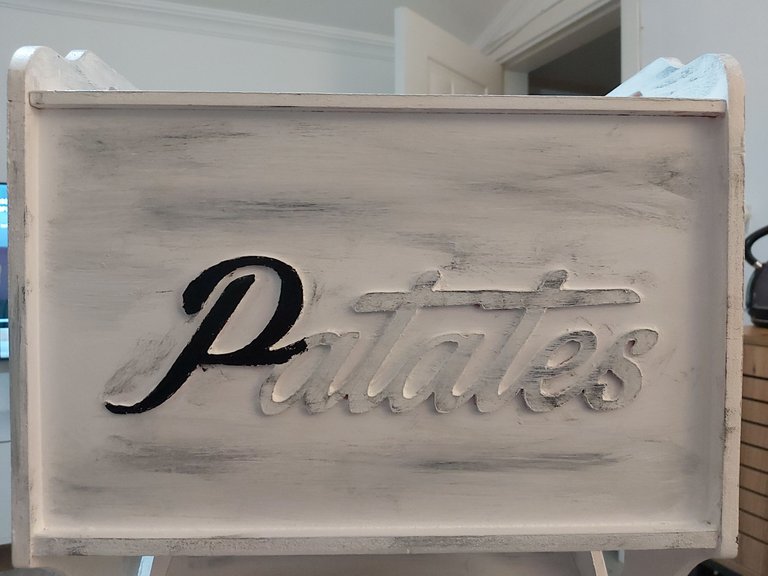
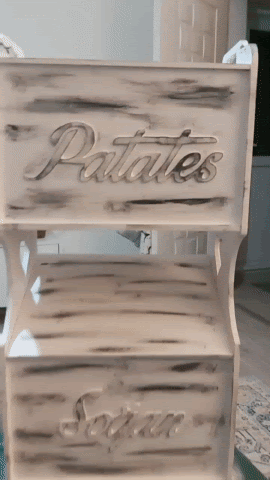
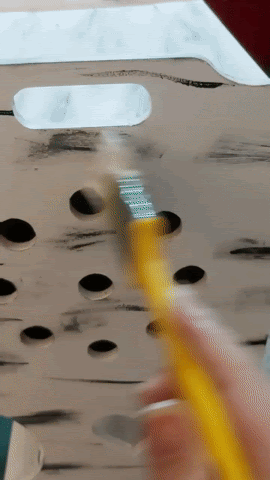
Then, finally, all that remained was to bring the three-dimensional writing on the wood to the fore. I chose to do this with completely black paint. I painted all of them one by one with black color with a fine painting brush. The storage box was starting to look more pleasing to the eye now.
Daha sonra son olarak geriye ahşabın üzerinde ki üç boyutlu yazıyı ön plana çıkartmak kaldı. Bunu da tamamen siyah boya ile yapmayı tercih ettim. İnce resim fırçası ile hepsini tek tek siyah renk ile boyadım. Depolama kutusu artık tamamen göze daha hoş gelmeye başlamıştı.
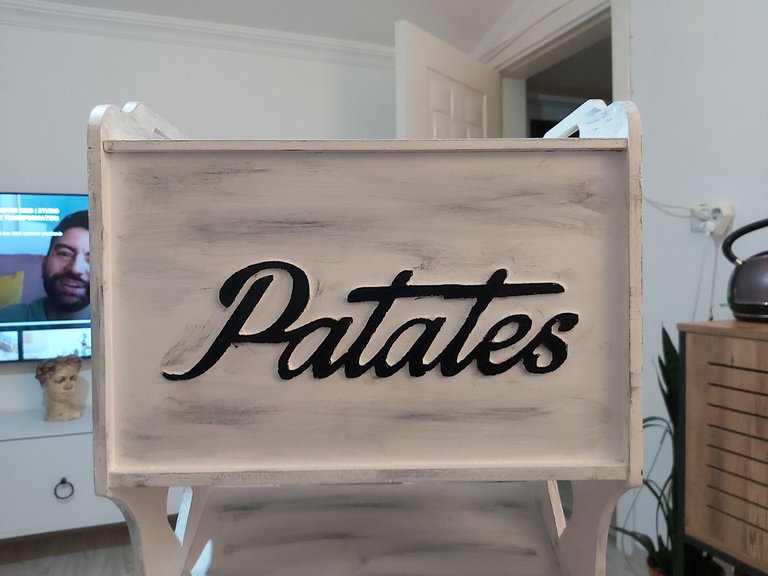
I set it aside to wait for my storage box to dry completely. Finally, there is the varnishing process.
Depolama kutumun tamamen kurumasını beklemek için bir kenara aldım. Son olarak artık vernikleme işlemi kaldı.
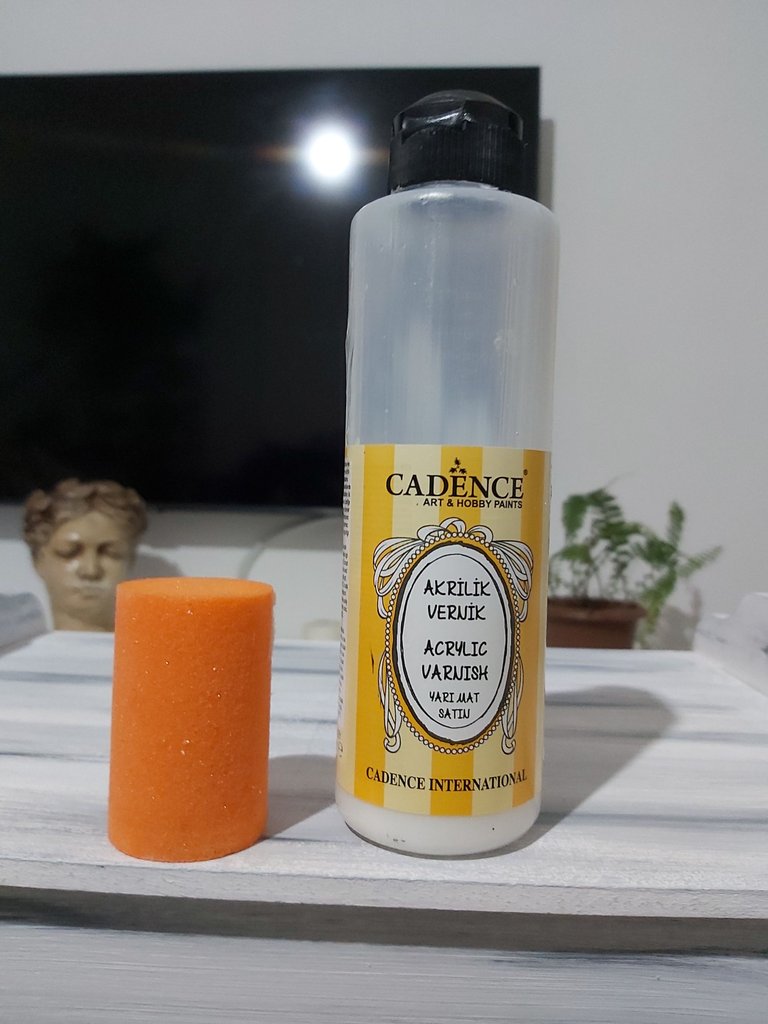
I used cadence brand semi-matt varnish as varnish. Semi-matte was more suitable for me as I didn't want it to be completely glossy.
Vernik olarak cadence markasının yarı mat verniğini kullandım. Tamamen parlak olmasını istemediğim için yarı mat benim için daha uygundu.
I usually apply two coats of varnish. I believe it makes the paint adhere better to the wood. I use a varnish roller sponge as a brush. Its texture is velvety and it has tiny hairs. This brush leaves no trace of varnish.

Verniği genellikle iki kat uyguluyorum. Boyanın ahşapta daha iyi tutunmasını sağladığına inanıyorum. Fırça olarakta vernik rulo süngeri kullanyorum. Yapısı kadife gibi ve minicik tüyleri var. Bu fırça vernik izi bırakmıyor.
Are you ready for the end?
Sonuca hazır mısınız?
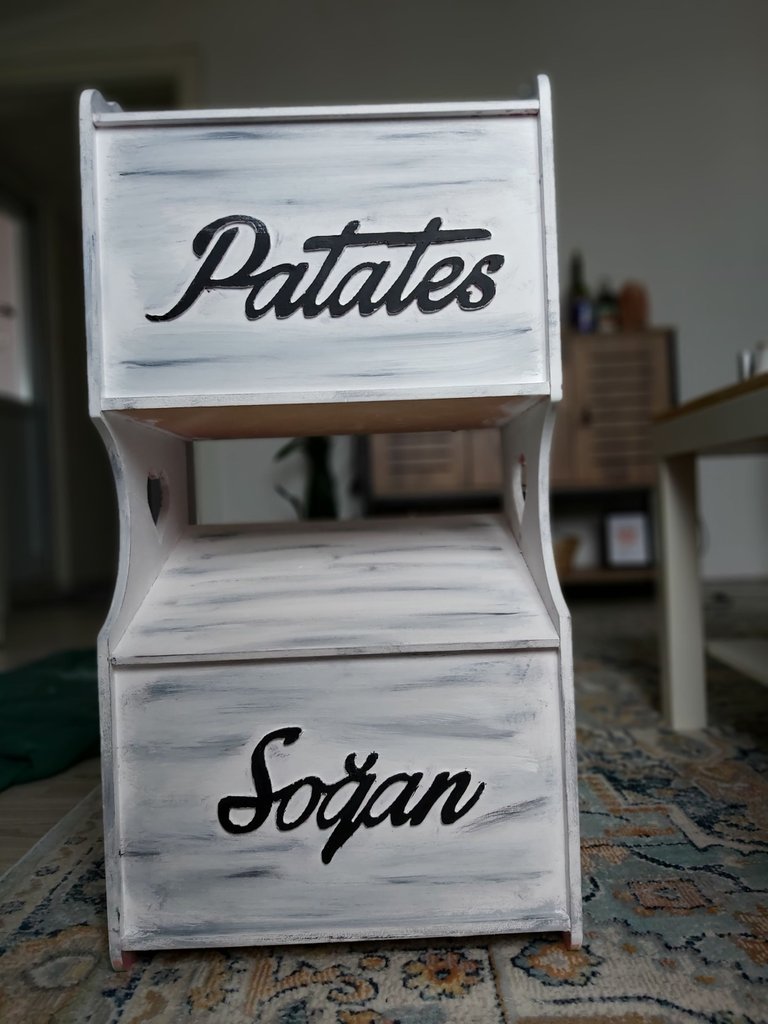
I really liked the result. I enjoyed it immensely while applying it. My neighbor liked it very much and asked if I could do the same application to the wooden napkin holder, and of course I accepted.
Ben ortaya çıkan sonucu çok beğendim. Uygularkende inanılmaz keyif aldım. Komşum çok beğendi aynı uygulamayı ahşap peçete tutucusuna yapıp yapmayacağımı sordu bende tabi ki kabul ettim.
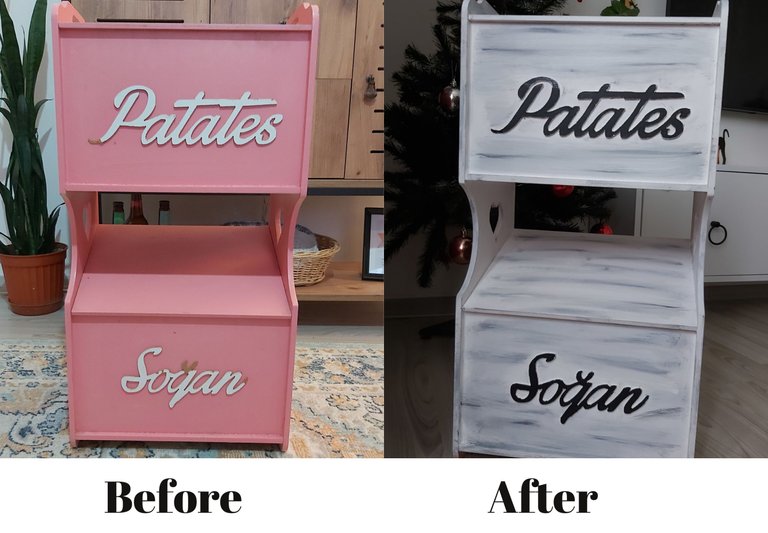
How do you think my transformation was?
I think I will share such transformation articles with you as much as I can. Now I will make the napkin holder. I will do the same with him. Then I want to change the color of the interior of my library. When I implement it, I will post it here again. Take care of yourself, see you again.
Thank you in advance for your support and comments.
You can let me know what you want to ask in the comment section.
Love,
xoxo
Sizce dönüştürme işlemim nasıl olmuş?
Bu tarz dönüşüm yazılarını elimden geldiğince sizlerle paylaşmayı düşünüyorum. Şimdi peçete tutucusunu yapacağım. Onada aynı işlemi uygulayacağım. Ardından kitaplığımın iç kısmının rengini değiştirmek istiyorum. Uyguladığım zaman buraya tekrar post olarak atacağım. Tekrar görüşmek üzere kendinize çok iyi bakın.
Şimdiden desteğiniz ve yorumlarınız için teşekkür ederim.
Sormak istediklerinizi yorum kısmından bana iletebilirsiniz.
Sevgiler,
xoxo

Great job👍🏻😉 I loved the final result🤗☺️😊
Thank you. Your positive feedback made me happy 🥰
Oh incredible job!! Super nice and yes, I LOVE renewing and repurposing things too.
Following you from over here in Northern Thailand, cos you can never be connected to enough strong, smart and resourceful women!!
I am pleased to hear that. Thank you very much for your kind comment. Greetings from Turkey 🥰
Your project looks great, thanks for showing us how we can repair, modify and improve these boxes and apply it to other ideas.
Thank you for stopping by. I'm happy to make my first post in the community. Thanks for creating such a community. 🤗
Hola amiga.👋 Te quedó fabulosa la transformación de ese mueble para verduras. La idea del envejecido fue genial. Felicidades y un exitoso 2022.
Hola.
Me alegra mucho que te guste 🥰 Que el año 2022 también te traiga felicidad. Gracias.