The Mystery of Super Island creation process in RPG Maker MV part 2 (EN | PT-BR)

Introduction
Hi guys, how are you? In this post I will show the current progress of my game, it's not much, I was busy with some personal things and I didn't have much time to develop, but the secret is to be patient, this is essential.
All the content shown here can be modified, there is still a lot to be improved and optimized.
The first change I made after the last post was to create the intro screen telling the story, I used only the images available in the Engine, it's a very simple intro, with only three Message Boxes and two background images.
My idea was to create a more complete story, with several images to describe the events of the past, but after thinking more calmly about it, I decided to keep the current story. The Story demo is included in the video.
Characters and Classes
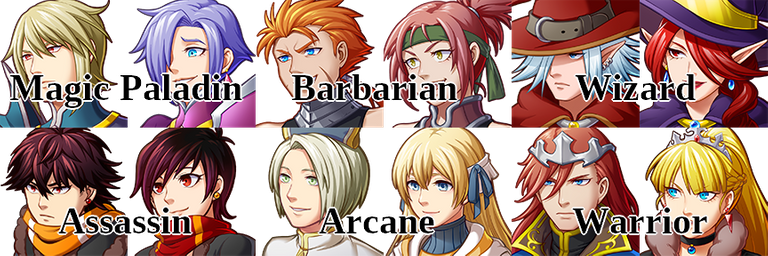
An RPG with several characters cannot be missing, in total there will be twelve characters, male and female, each with their respective class, among them are the Warrior, Barbarian, Magic Paladin, Assassin, Arcane and Wizard.
Some classes could not be added due to lack of options, especially the Paladin that does not have a female version, for that reason I chose to use other characters and name it as Magic Paladin.
The classes are divided into two, the front line that are Warriors, Barbarians and Magic Paladins, on the back line the Assassins, Arcanes and Wizards, the battles will have a limit of three characters so far, configured to have one character in the front line and two in the back line.
But this is not defined, maybe I will change it later, but until that moment it will work that way.
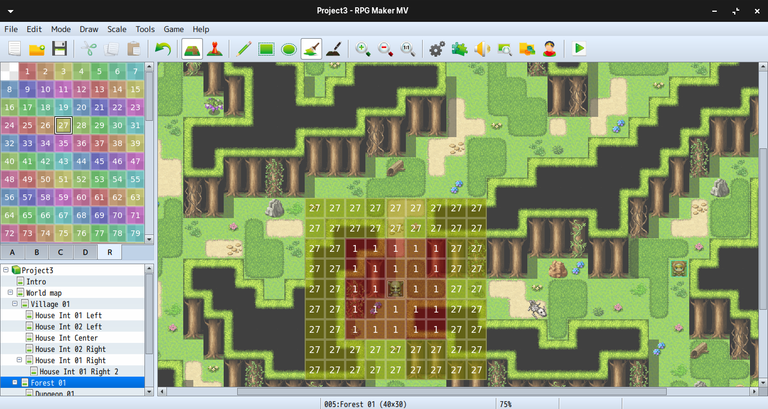
New Maps
The process of creating a map is quite fun in RPG Maker, although it takes a few hours when a lack of creativity is your enemy, especially when creating cities, villages, etc.
Another reason is the lack of variety, as I will only use the default graphics of the Engine, I am limited in some maps, and the consequences are some repetitive maps, although the way it was created is different, some elements can cause this feeling for me that I like to detail.
The first map I made was a small village, despite its size, it took me over three hours to complete, and it's not complete yet, I'll add some details and effects in the future. This map is included in the video.
The next ones were two forests where the battles will take place, to be honest I don't like to use these tree Tilesets with this black background, visually it looks weird on the map, but after I finished it was pretty nice for me, in addition, I added an effect of leaves that is available in RPG Maker XP, with that, the map gained more life.
Battle maps may contain chests upon defeating all enemies, in addition, some may not be visible, to be found, the player will need to explore the map, including the Dungeons that are scattered throughout these maps, some of them may include portals that lead to inaccessible places, similar to the Elden Ring portals, the difference is that these locations are just Dungeons and cannot be accessed any other way, but some can take you to towers that are on the World Map. The Dungeon demo is included in the video.

Battle System
The battle system was the most difficult part, it's been a while since I developed more advanced systems, although it's not something very complex, for me, who's not an advanced user and with a basic understanding of programming, it took me a few hours of trying and error, but this is how it works, nothing will work on the first try, the important thing is to keep trying.
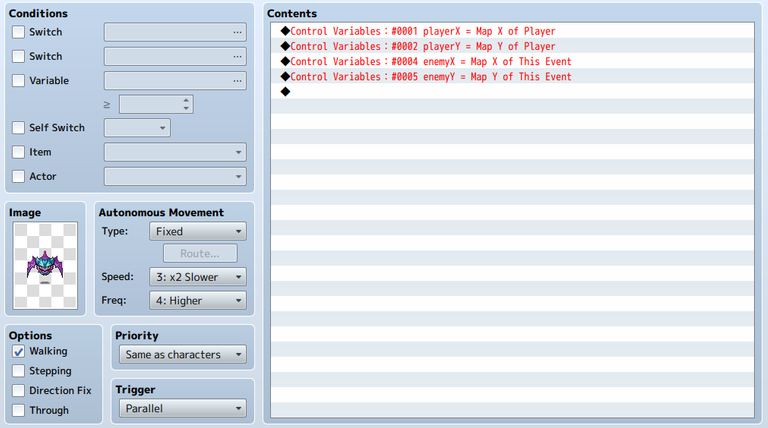
The first task was to create the monster event in parallel process, for those who remember the previous post, I believe that I mentioned the parallel process working together with the game, unlike the Auto Run process that makes it impossible for the player to use any action while the event not finish.
Then I created four variables with the X and Y position of the player and enemy on the map, the system only works if these variables exist, they are essential to collect the current position of each one.
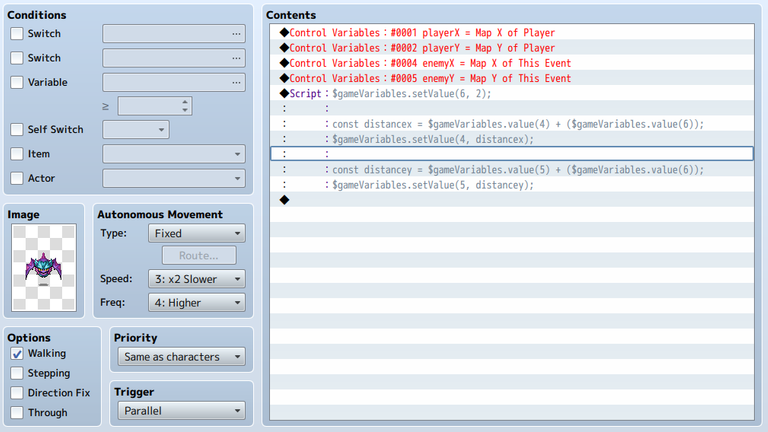
The next step was to create more variables, but unlike the previous image, I used a more advanced way, it is possible to do this without Scripts, but the freedom I have is greater, despite not having much experience with Scripts Call.
The first code was to set the value of the variable (ID, Value), then the variable six was set to the value two (Variable 6 = 2). This variable will limit the distance the player can approach a monster, so if the player is two Tiles away from a monster, it will attack.
The second and third code I created two constants (Constants cannot be changed or declared again) with defining the enemy's field of view, with that, the constant DistanceX and DistanceY were defined as (Const 4 += 6 and 5 += 6), variable four and five collect the enemy's position on the map and variable six the limit of Tiles the player can approach, variable four adds one more to variable six each frame, but this value goes to infinity if not set a limit.
The third step was to create two conditions to check if the player is two Tiles away from the enemy.
The first condition checks the negative position X and Y of the player and enemy, with that, if the player is two Tiles the condition is activated, this Script is similar to the first one, the difference is that in this one I will be subtracting the value of the three Variables, four, five and six in two (-=2), to equal the value and the variable six does not exceed the value that was defined which is equal to two, it was necessary to subtract in two for the system to work correctly.
The second condition works in the same way, but checking the positive position, with this, it will collect the value of the first Script where Variables four, five and six have a positive value.
When the player activates the conditions, a balloon of rage is shown on the enemy's sprite, the balloon was only placed in one condition because it makes no difference where it will be, regardless of which condition activates, the balloon will be shown.
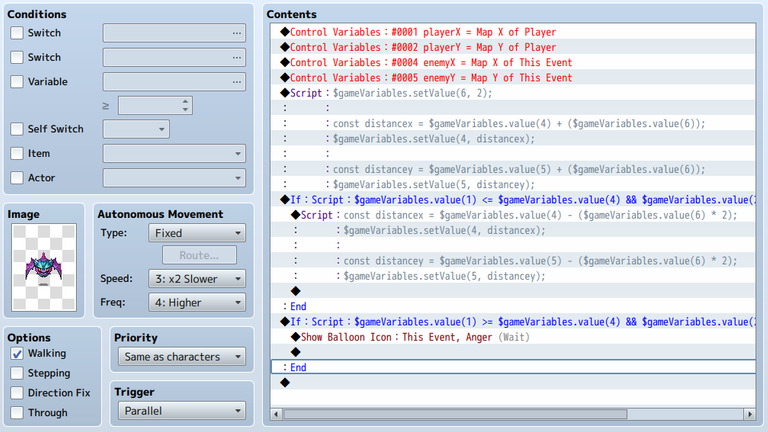
To finish, I used the same code to create one more condition to show an exclamation balloon, it means that the enemy will be alert if you approach four Tiles away, but when you are two Tiles away the enemy will chase you a lot fast, when he touches the player, the battle starts. The complete system demo is included in the video.
Battle Formation and Menu
RPG Maker has a default resolution of 816x624, to change that I used a Plugin called Community_Basic that comes by default when we buy the Game Engine, changing it to the resolution of my Notebook (1366x768), more than that the game wouldn't look nice visually, and this is one of the problems in RPG Maker, they all have a very low default resolution, increasing it too much is not interesting, besides, many things need to be modified manually to match the resolution, for example the battle formation.
Some Plugins adjust the formation without having to manually modify it, but the one I'm using doesn't, for that I'm going to use two Plugins called Shift Enemies and Shift Actors created by LadyBaskerVille, with that, I can modify the position of the Sprites manually using the commands (ShiftX and ShiftY).
After increasing the resolution, one of the things that doesn't look cool is the menu, which was made to work proportionally at the default resolution, to modify it I used a Plugin called AltMenu3 that is available in the bonus DLCs that we get when we buy the Engine.
Final Result
The video contains all the progress shown in this post, in addition, I put some more maps that were not shown in the written post.
All songs used in this project are available to be used in projects made in RPG Maker!
Hope you enjoyed it, see you next time! :)
Introdução
Olá pessoal, como vocês estão? Nesse post vou mostrar o progresso atual do meu jogo, não é muito, estava ocupado com algumas coisas pessoais e não tive muito tempo para desenvolver, mas o segredo é ter paciência, isso é essencial.
Todo o conteúdo mostrado aqui pode ser modificado, ainda tem muita coisa para ser melhorada e otimizada.
A primeira mudança que fiz após o último post foi criar a tela de introdução contando a história, usei apenas as imagens disponíveis na engine, é uma introdução bem simples, com apenas três Message Box e duas imagens de fundo.
A minha ideia era criar uma história mais completa, com várias imagens para descrever os acontecimentos do passado, mas depois de pensar com mais calma sobre isso, decidi manter a história atual. A demonstração da história está incluída no vídeo.
Personagens e Classes
Um RPG com vários personagens não pode faltar, no total serão doze personagens, masculinos e femininos, cada um com sua respectiva classe, entre elas estão o Guerreiro, Bárbaro, Paladino Mágico, Assassino, Arcano e Feitiçeiro.
Algumas classes não foram possíveis adicionar por falta de opções, em especial o Paladino que não tem uma versão feminina, por esse motivo escolhi usar outros personagens e nomear como Paladino Mágico.
As classes estão dividias em duas, a linha de frente que são os Guerreiros, Bárbaros e Paladinos Mágicos, na linha de trás os Assassinos, Arcanos e Feitiçeiros, as batalhas vão ter um limite de três personagens até o momento, configuradas para ter um personagem na linha de frente e dois na linha de trás.
Mas isso não está definido, talvez eu mude depois, mas até esse momento vai funcionar dessa forma.
Novos mapas
O processo de criação de um mapa é bem divertido no RPG Maker, apesar de demorar algumas horas quando a falta de criatividade é a sua inimiga, em especial na criação de cidades, vilarejos, etc.
Outro motivo é a falta de variedade, como vou usar apenas os gráficos padrões do jogo, estou limitado em alguns mapas, e as consequências são alguns mapas repetitivos, apesar da forma que foi criado ser diferente, alguns elementos podem causar essa sensação para mim que gosto de detalhar.
O primeiro mapa que fiz foi um pequeno vilarejo, apesar do seu tamanho, ele me custou mais de três horas para ser finalizado, e ainda não está completo, vou adicionar alguns detalhes e efeitos futuramente. Esse mapa está incluído no vídeo.
Os próximos foram duas florestas onde vão ocorrer as batalhas, para ser sincero não gosto de usar esses Tilesets de árvore com esse fundo preto, visualmente fica estranho no mapa, mas depois que finalizei ficou bem agradável para mim, além disso, adicionei um efeito de folhas que está disponível no RPG Maker XP, com isso, o mapa ganhou mais vida.
Os mapas de batalhas podem conter baús ao derrotar todos os inimigos, além disso, alguns podem não ser visivéis, para serem encontrados o jogador vai precisar explorar o mapa, incluindo as Dungeons que estão espalhadas por esses mapas, algumas delas podem incluir portais que levaram para lugares inacessíveis, parecido com os portais do Elden Ring, a diferença é que esses locais são apenas Dungeons e não podem ser acessados de outra forma, mas alguns podem te levar para torres que estão no Mapa Mundo. A demonstração da Dungeon está incluída no vídeo.
Sistema de Batalha
O sistema de batalha foi a parte mais difícil, faz tempo que não desenvolvo sistemas mais avançados, apesar de não ser algo muito complexo, para mim que não sou um usuário avançado e com uma noção básica em programação, me custou algumas horas de tentativa e erro, mas é assim que funciona, nada vai funcionar na primeira tentativa, o importante é continuar tentando.
A primeira tarefa foi criar o evento do monstro em processo paralelo, para quem se lembra do post anterior, acredito que mencinei sobre o sistema paralelo funcionar junto com o jogo, diferente do processo Auto Run que impossibilita o jogador de usar qualquer ação enquanto o evento não finalizar.
Depois criei quatro variáveis com a posição X e Y do jogador e inimigo no mapa, o sistema só funciona se essas variáveis existir, elas são essenciais para coletar a posição atual de cada um.
O próximo passo foi criar mais variáveis, mas diferente da imagem anterior, usei uma forma mais avançada, é possível fazer isso sem os Scripts, mas a liberdidade que eu tenho é maior, apesar de não ter muita experiência com Scripts Call.
O primeiro código foi definir o valor da variável (ID, Valor), então a variável seis foi definida com o valor dois (Variável 6 = 2). Essa variável vai limitar a distância que o jogador pode se aproximar de um monstro, com isso, se o jogador estiver a dois Tiles de um monstro, ele vai atacar.
O segundo e terceiro código criei duas constantes (As constantes não podem ser alteradas ou declaradas novamente) com definindo o campo de visão do inimigo, com isso, a constante DistanceX e DistanceY foram definidas como (Const 4 += 6 e 5 += 6), a variável quatro e cinco coletam a posição do inimigo no mapa e a variável seis o limite de Tiles que o jogador pode se aproximar, a variável quatro adiciona mais um a variável seis a cada frame, mas esse valor vai até o infinito se não definir um limite.
O terceiro passo foi criar duas condições para verificar se o jogador está a dois Tiles do inimigo.
A primeira condição verifica a posição negativa X e Y do jogador e inimigo, com isso, se o jogador estiver a dois Tiles a condição é ativada, esse Script é semelhante ao primeiro, a diferença é que nesse vou estar subtraindo o valor das Variáveis quatro, cinco e seis em dois (-=2), para igualar o valor e a Variável seis não ultrapassar o valor que foi definido que é igual a dois, foi preciso subtrair em dois para que o sistema funcionasse corretamente.
A segunda condição funciona da mesma forma, mas verificando a posição positiva, com isso, ela vai coletar o valor do primeiro Script onde as Variáveis quatro, cinco e seis tem o valor positivo.
Quando o jogador ativar as condições, um balão de raiva é mostrado na Sprite do inimigo, o balão foi colocado só em uma condição por que não faz diferença onde ele vai estar, independente de qual condição ativar, o balão vai ser mostrado.
Para finalizar, usei o mesmo código para criar mais uma condição para mostrar um balão de exclamação, significa que o inimigo vai estar alerta se você se aproximar a quatro Tiles de distância, mas quando estiver a dois Tiles de distância o inimigo vai te perseguir muito rápido, quando ele tocar o jogador, a batalha inicia. O sistema completo é demonstrado no vídeo.
Formação de batalha e Menu
O RPG Maker possui uma resolução padrão de 816x624, para mudar isso usei um Plugin chamado Community_Basic que vem por padrão quando compramos a Game Engine, mudando para a resolução do meu Notebook ( 1366x768 ), mais do que isso o jogo não ficaria legal visualmente, e esse é um dos problemas no RPG Maker, todos eles possuem uma resolução padrão muito baixa, aumentar demais não é interessante, além disso, muitas coisas precisam ser modificadas manualmente para se igualar com a resolução, por exemplo a formação de batalha.
Alguns Plugins ajustam a formação sem precisar modificiar manualmente, mas esse que estou usando não faz isso, para isso vou usar dois Plugins chamados Shift Enemies e Shift Actors criados pela LadyBaskerVille, com isso, posso modificar a posição dos Sprites manualmente usando os comandos ( ShiftX e ShiftY ).
Depois de aumentar a resolução, umas das coisas que não fica nada legal visualmente é o menu, que foi feito para funcinar proporcionalmente na resolução padrão, para modificar usei um Plugin chamado AltMenu3 que está disponível nas DLCs bônus que ganhamos ao comprar a Engine.
Resultado Final
O vídeo contém todo o progresso mostrado nesse post, além disso, coloquei mais alguns mapas que não foram mostrados no post escrito.
Todas as músicas usadas nesse projeto estão disponíveis para serem usadas em projetos feito no RPG Maker!
Espero que vocês tenham gostado, nos vemos na próximas! :)
They told me if I killed myself now it would save the lives of countless others.
Saying the longer I wait to kill myself the more people will suffer.
They are reckless and should have shown the proper media what they had before taking me hostage for 5 years. I know there are many in prison that dont deserve to be there because of this. Your stay in prison will not be fun @battleaxe and friends. People are going to want you dead when they find out what you did. I hope you die a slow painful death. You sick mother fuckers.
https://peakd.com/gangstalking/@acousticpulses/electronic-terrorism-and-gaslighting--if-you-downvote-this-post-you-are-part-of-the-problem
Its a terrorist act on American soil while some say its not real or Im a mental case. Many know its real. This is an ignored detrimental to humanity domestic and foreign threat. Ask informed soldiers in the American military what their oath is and tell them about the day you asked me why. Nobody has I guess. Maybe someone told ill informed soldiers they cant protect America from military leaders in control with ill intent. How do we protect locked up soldiers from telling the truth?
It is really fun to see someone sharing their work on an RPG Maker project here! I have also wanted to do something like this for a good while, though I never got to fully finish any concepts to start working towards. Looking forward to see more of this!
Hello, thank you so much! I understand you, I lost count of how many times I wanted to start a project, but I never finished or continued, just ideas that didn't come out of paper.
Cool to see you progressing on this game. Keep it up!
Hello again, thank you very much!
The puppies look so cute, by the way, where do you get this program?
Hello, thank you so much! You can buy on Steam or Official Site :)