PUFFED RICE! - How to make it and some extras [ENG-ESP]
Arroz inflado - Cómo hacerlo y algunos extras
Hello, bees!!! In today's learning, because that's what it is for me right now, we are going to learn how to make puffed rice. It's kind of easy, it requires time because is a whole process, and you need to have a dense metallic strainer that you can use with hot oil, because the last part will be fast, so don't start this process if you don't have a good tool to take the rice out of a generous amount of oil.
Now that you know that, let's start!
¡¡¡Hola abejas!!! En el aprendizaje de hoy, porque es lo que es para mi, vamos a aprender a hacer arroz inflado. Es fácil, pero requiere tiempo porque es todo un proceso, y necesitan tener un colador metálico fino que puedan usar con el aceite caliente, porque la última parte será rápida, así que no empiecen este proceso si no tienen una buena herramienta para sacar el arroz de una cantidad generosa de aceite.
Ahora que ya lo saben, ¡Vamos a empezar!.


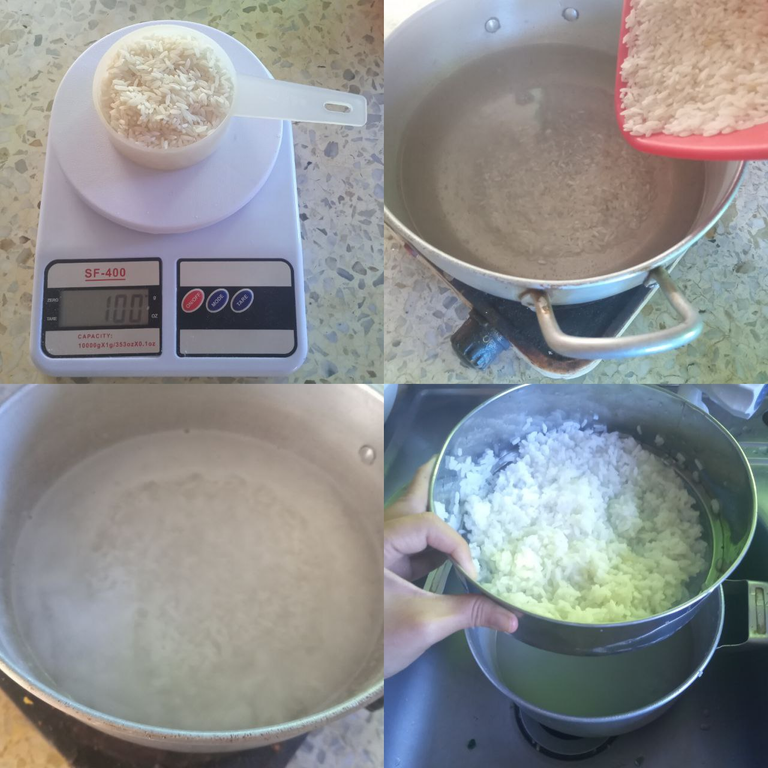
Ingredients: Rice 😀 hahaha 100gr, and water, and oil. Actually, the amount you want but this is a manageable amount.
First, put water to boil, not the 1 - 2 ratio, more than that, like you were to do pasta, the grains need to float around. Add the rice when it's boiling, cook it for 18 minutes, strain, and rinse with cool water. Strain again and take as much water as you can.
Then spread it in a baking tray, don't let them overlap, there will be some dense spots but try to reduce them as much as possible. We are going to dry the rice, and this can be done in different ways.

Ingredientes: Arroz 😀 jajaja 100gr, y agua, y aceite. En realidad, la cantidad que quieran pero esta es una cantidad manejable.
Primero, pongan agua a hervir, no la proporción 1 - 2, más que eso, como si fueras a hacer pasta, los granos tienen que flotar. Añadan el arroz cuando esté hirviendo, cocer durante 18 minutos, colar y enjuagar con agua fría. Se vuelve a colar y se saca toda el agua posible.
Luego, extiéndanlo en una bandeja, no dejen que se superpongan, habrá algunos puntos densos pero intenten reducirlos al mínimo. Vamos a secar el arroz, y esto se puede hacer de diferentes maneras.

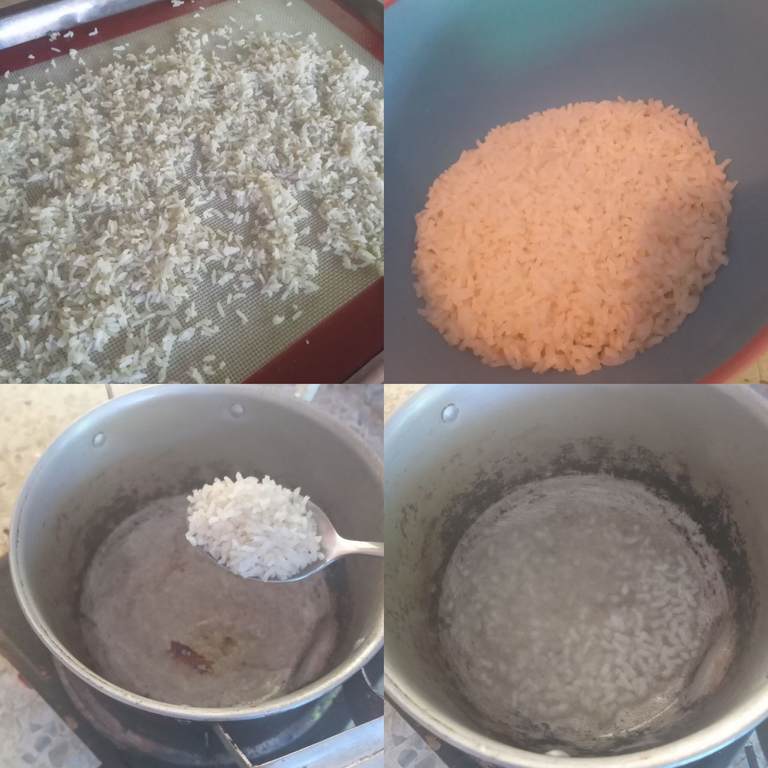
First way: Let them under the sun, with a natural airflow or a fan. This was can take a whole day or even more depending on the temperature. The rice has to be really dry.
Second way: into the oven at very low heat with the door slightly open. It can take from 2 to 4 hours. You have to move every 30 minutes or as you feel it needs to. We don't need to cook the rice, just dry it. It will be ready when you can roll them between your hands and the grains can be all separated.
The way I did: my oven has a grill on top, I placed the tray all the way down and let the door slightly open. It took 3 hours, moving when I saw the top rice were dryer than the bottom ones. I felt with my hands that there was no humidity and the grains could be all separated. They will be hard, crunchy but not fluffy, so now we do the next step. You need a frying basket with very tiny holes or a metal strainer. I did mine because I had one frying basket with too big holes and a very fine wire mesh.
La primera forma: Dejarlos bajo el sol, con una corriente de aire natural o un ventilador. Esto puede llevar un día entero o incluso más, dependiendo de la temperatura. El arroz tiene que estar muy seco.
Segunda forma: en el horno a fuego muy bajo con la puerta ligeramente abierta. Puede tardar de 2 a 4 horas. Hay que mover cada 30 minutos o según se crea necesario. No hace falta cocer el arroz, sólo secarlo. Estará listo cuando se pueda hacer rodar entre las manos y se puedan separar todos los granos.
La forma en que yo lo hice: mi horno tiene un gratinador en la parte superior, coloqué la bandeja hasta abajo y dejé la puerta ligeramente abierta. Tardó 3 horas, moviéndose cuando vi que los arroces de arriba estaban más secos que los de abajo. Sentí con mis manos que no había humedad y que los granos estaban todos separados. Estarán duros, crujientes pero no esponjosos, así que ahora hacemos el siguiente paso. Necesitas una cesta de freír con agujeros muy pequeños o un colador de metal. Yo hice el mío porque tenía una cesta de freír con agujeros muy grandes y una malla metálica muy fina.
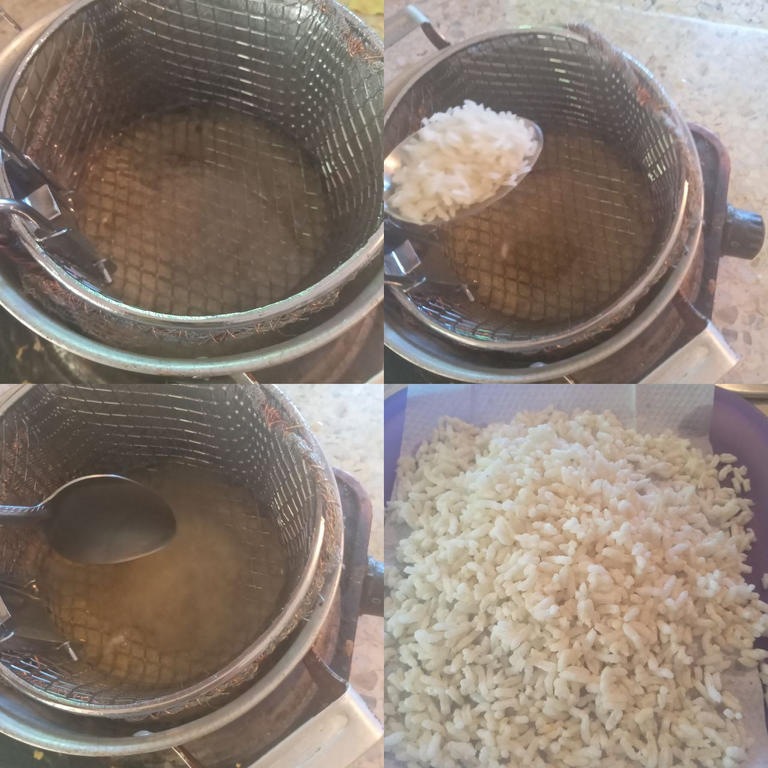
Use a lot of oil, it won't have time to burn and you need to be able to use your strainer or basket really quickly, the best way is to have it already on the pan or pot and fry the rice inside. The oil has to be really hot, you can test it with a grain or with some chopsticks, if it makes bubbles is ready.
Utilizen mucho aceite, no le dará tiempo a quemarse y tienen que poder utilizar el colador o cesta muy rápidamente, lo mejor es tenerlo ya en la sartén u olla y freír el arroz dentro. El aceite tiene que estar muy caliente, pueden probarlo con un grano o con unos palillos, si hace burbujas está listo.
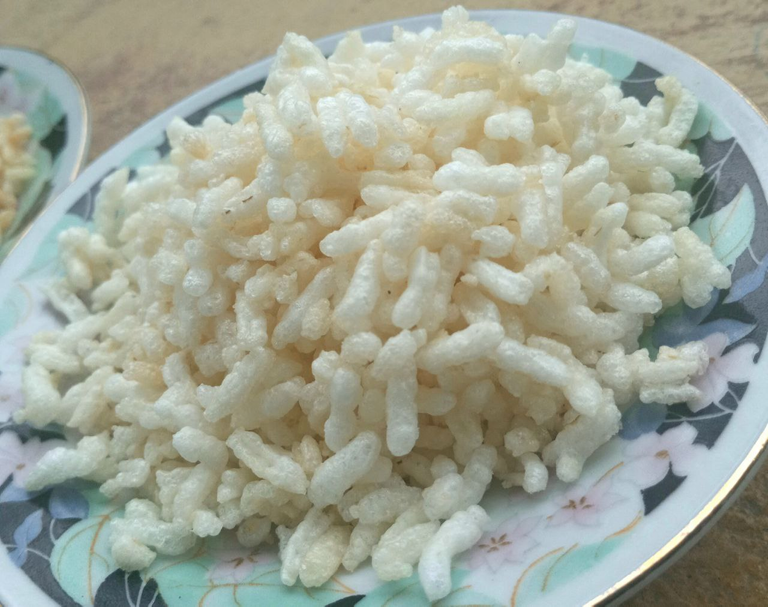
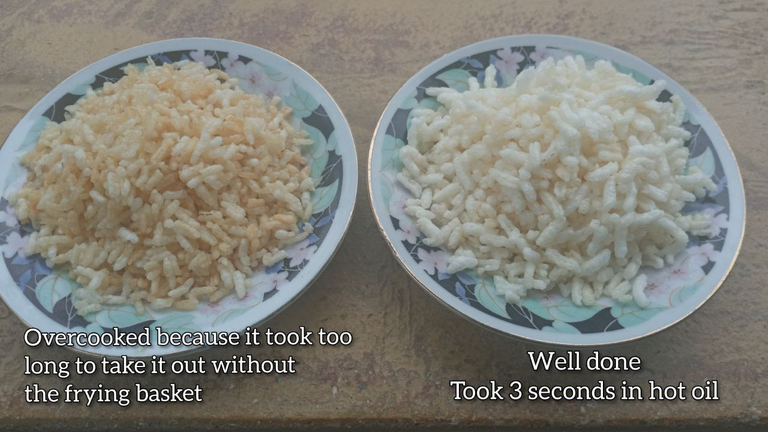
Fry a little bit at a time, one tablespoon will be fine, they will puff very quickly, like 3 seconds, take them out as soon as they all float and are still white. If you wait too much they will be golden brown and will become hard again, not fluffy as we want, if the oil is not hot enough, it will take longer and won't puff, so very hot oil and really quickly.
Frían un poco cada vez, una cucharada estará bien, se hincharán muy rápido, como 3 segundos, hay que sacarlos en cuanto todos floten y estén todavía blancos. Si esperan demasiado se dorarán y volverán a estar duros, no esponjosos como queremos, si el aceite no está lo suficientemente caliente, tardarán más y no se hincharán, así que aceite muy caliente y muy rápido.
Y así es como se hace el arroz inflado. En mi ciudad, Barquisimeto, es muy difícil de encontrar y bastante caro, por lo que poder hacerlo es impresionante y se ahorra mucho dinero, ¡Espero que sea útil y lo disfruten!

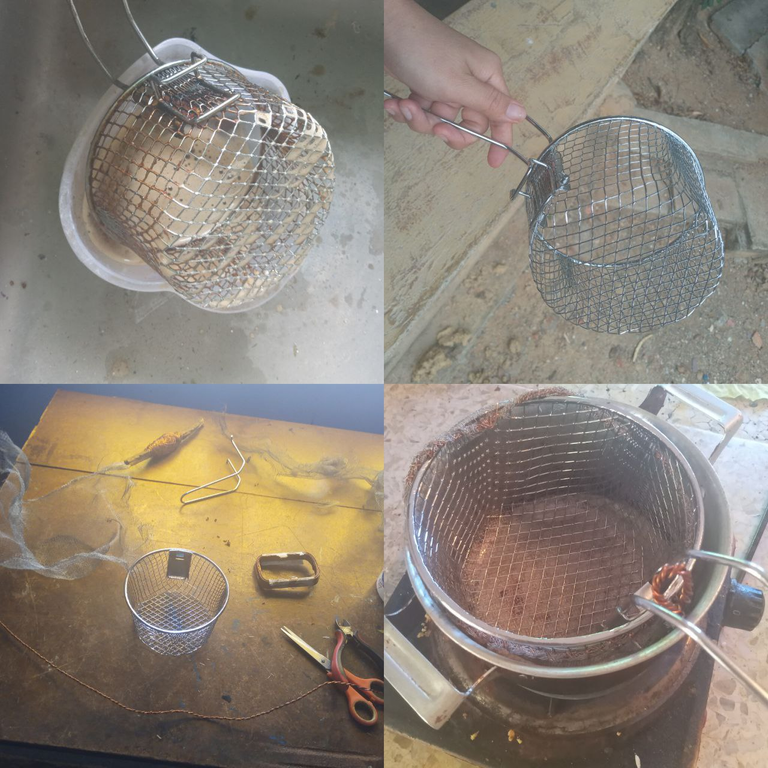
This basket wasn't mine, we rescued it but it was too dirty, I had to give it a good cleaning with a degreaser. It went from a greasy orange color to shiny silver. Then I sewed a fine metal mesh with copper wire to make another basked, weaker, that goes outside of the main one. One is for support and the other to be able to strain something so small like rice.
Esta cesta no era mía, la rescatamos pero estaba muy sucia, tuve que darle una buena limpieza con un desengrasante. Pasó de un color naranja grasiento a un plateado brillante. Luego cosí una malla metálica fina con alambre de cobre para hacer otra cesta, más débil, que va por fuera de la principal. Una es para soporte y la otra para poder colar algo tan pequeño como el arroz.
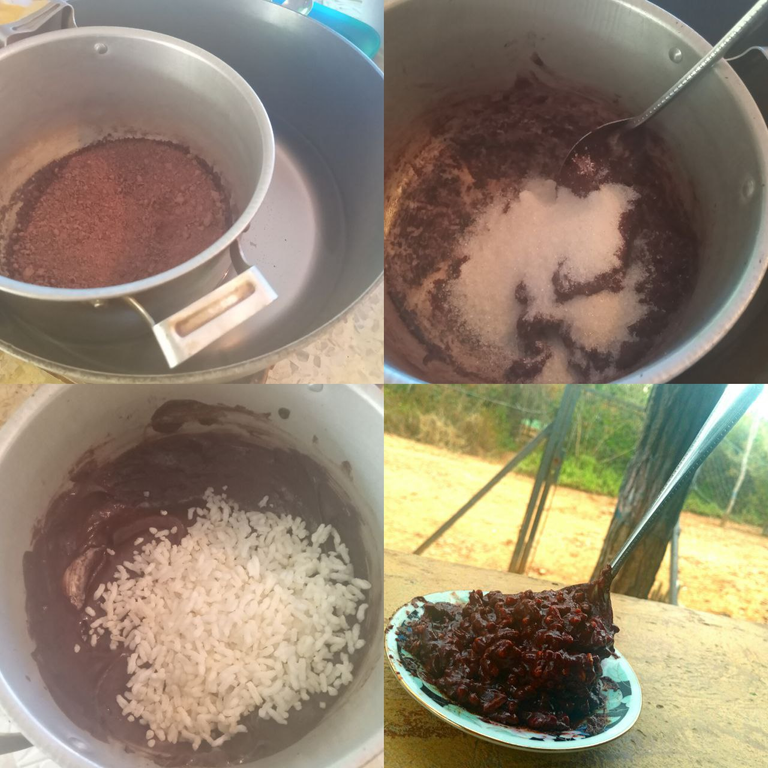
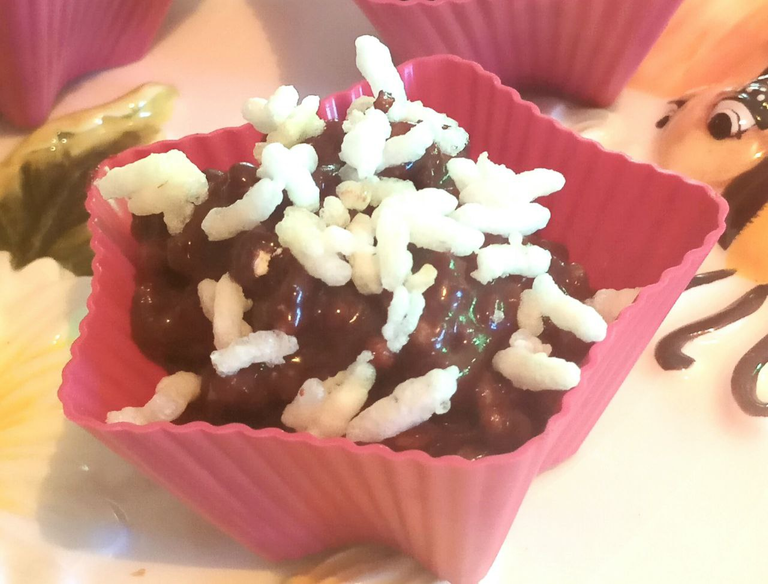
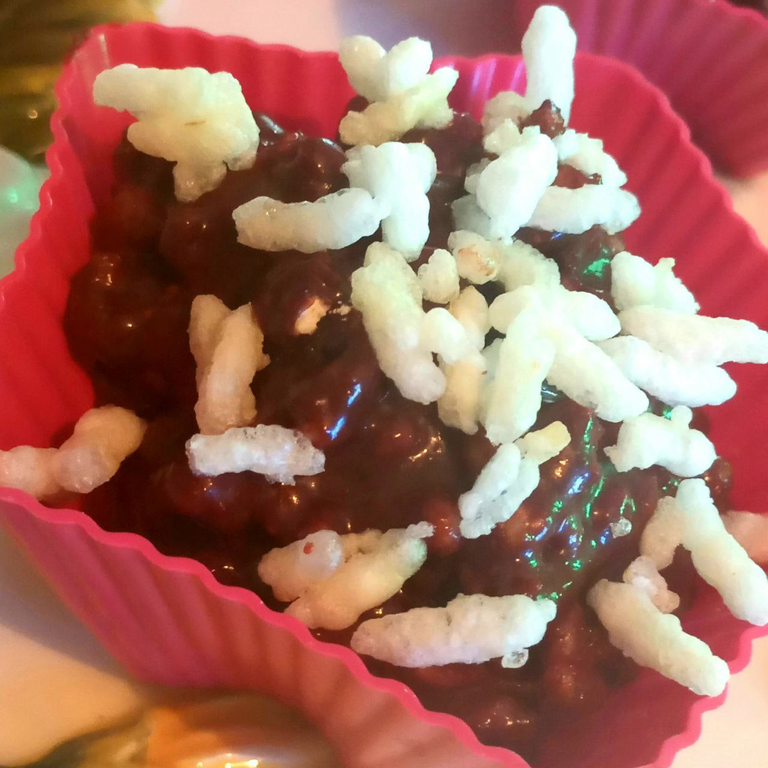
One way and the best for me, to use this puffed rice is melting some chocolate and mixing it. This I made was with one bar I processed myself, but due to its process of creation, it doesn't melt very liquid, I had to add water to make it runnier but it makes the rice a bit wet so, I recommend that you just melt a chocolate bar, mix with the rice when is warm, not too hot, and let it sit in the refrigerator so it solidifies quickly.
Una forma y la mejor para mí, de utilizar este arroz inflado es derritiendo algo de chocolate y mezclarlo. Este lo hice con una barra que procesé yo misma, pero debido a su proceso de creación, no se derrite muy líquida, tuve que agregar agua para hacerla más fluida pero hace que el arroz quede un poco húmedo así que, les recomiendo que simplemente derritan una barra de chocolate, la mezclen con el arroz cuando esté tibio, no muy caliente, y lo dejen reposar en el refrigerador para que se solidifique rápidamente.
Espero les haya gustado, hasta la próxima publicación
Hope you liked it, until the next time

Designed by @jes.seth
 |  |  |  |
|---|
---f
Se ve muy bueno ese arroz inflado, se que diste dos formas para secarlo, me parece mejor la del horno pero lleva bastante tiempo y el gas es difícil de conseguir aquí la verdad. Excelente receta 👍
Por la temperatura a la que hay que trabajar sí, dura mucho encendido, pero una opción es encenderlo, calentar el horno, apagar, e ir así, solo dejar que se caliente, a fin de cuentas no se necesita cocer, solo sacar la humedad.
Además. si toca dejar enfriar entre etapas, la humedad va a seguir escapando y al final tendremos igual el arroz completamente seco.
En mi casa también es un lío el gas, en eso el gratinador que tiene el horno nos ayuda mucho jajaja.
Gracias por comentar
Oye que buen dato gracias 🙂 🤗
Congratulations @tsunsica! You have completed the following achievement on the Hive blockchain and have been rewarded with new badge(s):
Your next target is to reach 600 comments.
You can view your badges on your board and compare yourself to others in the Ranking
If you no longer want to receive notifications, reply to this comment with the word
STOPTo support your work, I also upvoted your post!
Check out the last post from @hivebuzz: