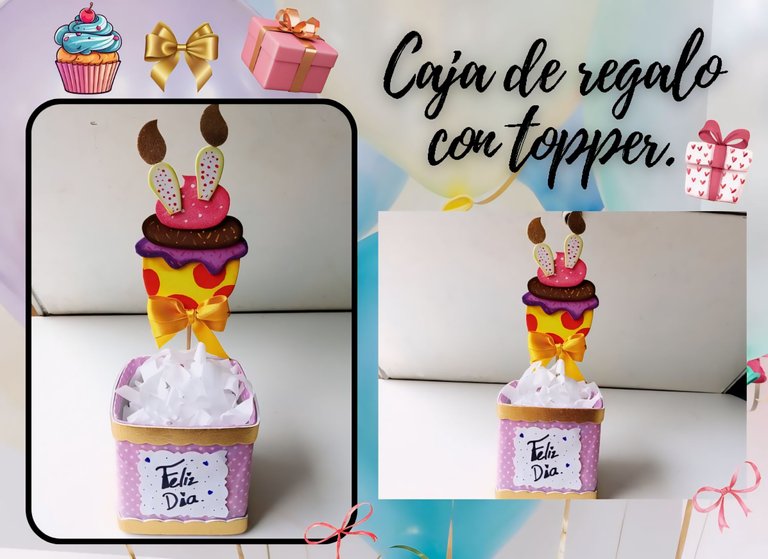
[Esp/Eng] ✨Caja de regalo con Topper. // Gift Box with Topper.✨
✨🎀🧁¡Hola amigos amantes de la creatividad! Espero que hayan pasado un muy buen comienzo de semana.✨
🔸Sin más que añadir, a continuación los dejo con el paso a paso:
✨🎀🧁¡Hello friends who love creativity! I hope you had a very good start to the week.✨
Good afternoon friends. I hope you are having a great week. For my part, I'm quite busy and worried about things that have happened, but hoping that everything will get better, of course. Today I share with you the step by step to make a beautiful gift Box with Topper. My beautiful mother's birthday is today, so a few days ago she wanted to make a nice box with a cupcake topper, so I could give her some of her favorite sweets.
I hope you like it and have a great time on her day, sharing it with your family. I'm going to prepare her favorite cake, but I wanted to share this simple idea with you so you can make it for a loved one-
🔸Without more to add, then I leave you with the step by step:
♥️ESPERO QUE TE GUSTE,
¡Empecemos!
♥️I HOPE YOU LIKE IT,
Let's start!

✂️ MATERIALES | ✂️ MATERIALS
🧁Para la base:
- Caja de jugo o de tu preferencia.
- Tela de color o diseño deseado.
- Foami metalizado dorado.
- Hoja blanca.
🎀Para el topper:
- Foami amarillo, morado,
blanco y marrón. - Foami escarchado rosado.
- Pinturas.
- Marcador negro.
- Palillo de altura.
- Lazo.
- Pegamento.
- Tijeras.
- Lápiz.
- Regla.
🧁For the base:
- Juice box or your preference.
- Fabric of desired color or design.
- Gold metallic foam.
- White sheet.
🎀For the topper:
- Foami yellow, purple,
white and brown. - Pink frosty foam.
- Paintings.
- Black marker.
- Tall stick.
- Ribbon.
- Glue.
- Scissors.
- Pencil.
- Ruler.
🎀 PROCEDIMIENTO | 🎀 PROCESS
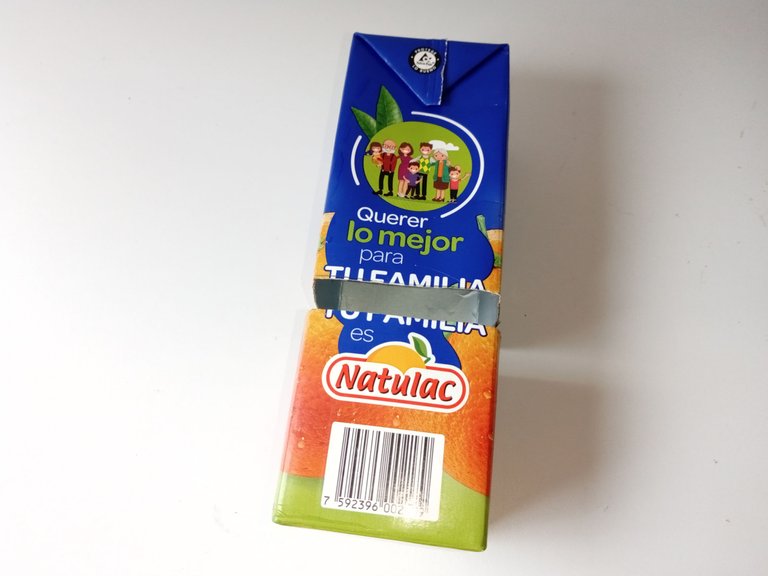
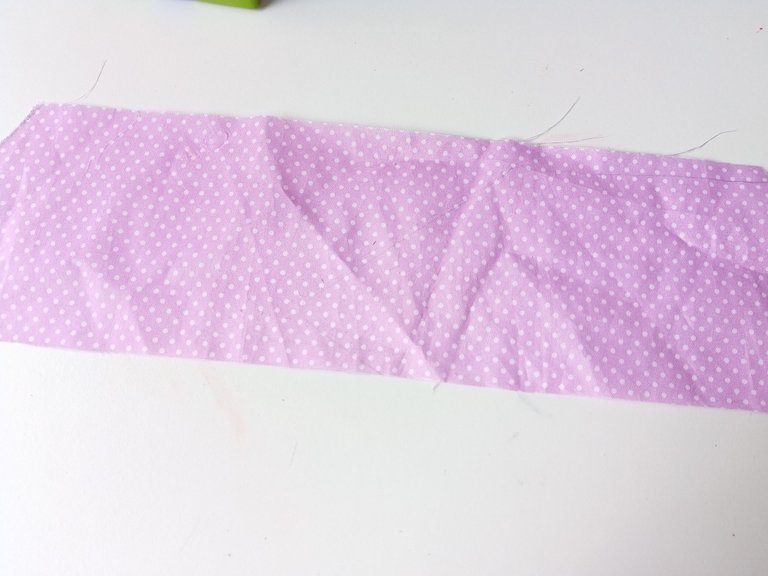
- 🎀PASO 1:
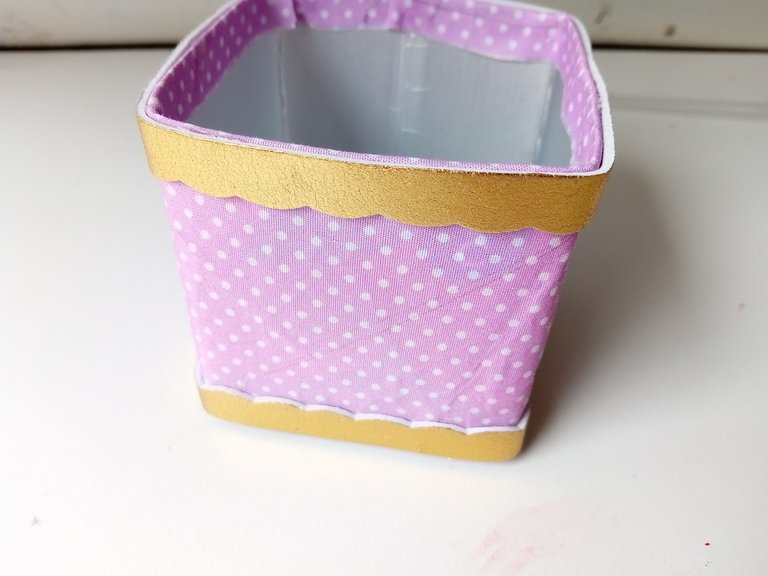
Lo primero que hice fue tomar la caja de jugo y trazar las medidas del alto que quería para la base, que fuero de 7 cm de alto. Marqué por todas las paredes y corté con ayuda de las tijeras, pero pueden utilizar un exacto para que sea mucho más fácil. Después recorté una tira bastante larga para forrar la caja, pero 2 cm más ancho que el alto de la caja, es decir, 9 cm de ancho en total. Por último, pegué la tela a la caja, dejando 1 cm arriba y otro abajo, los cuales pegué dentó de la caja y en la parte inferior de la misma.
- 🎀STEP 1:
The first thing I did was take the juice box and trace the measurements of the height I wanted for the base, which was 7 cm high. I marked all the walls and cut with the help of scissors, but you can use an exact to make it much easier. Then I cut a fairly long strip to line the box, but 2 cm wider than the height of the box, that is, 9 cm wide in total. Finally, I glued the fabric to the box, leaving 1 cm above and another below, which I glued to the inside of the box and to the bottom of it.
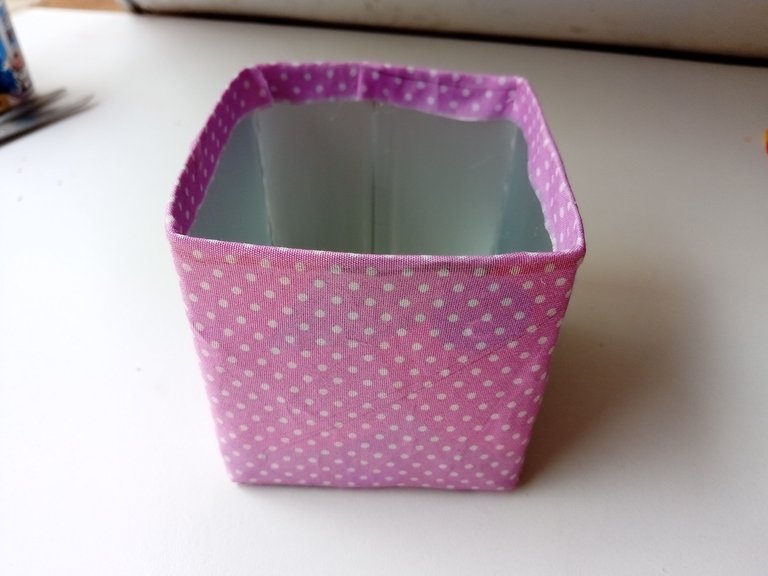
- 🎀PASO 2:
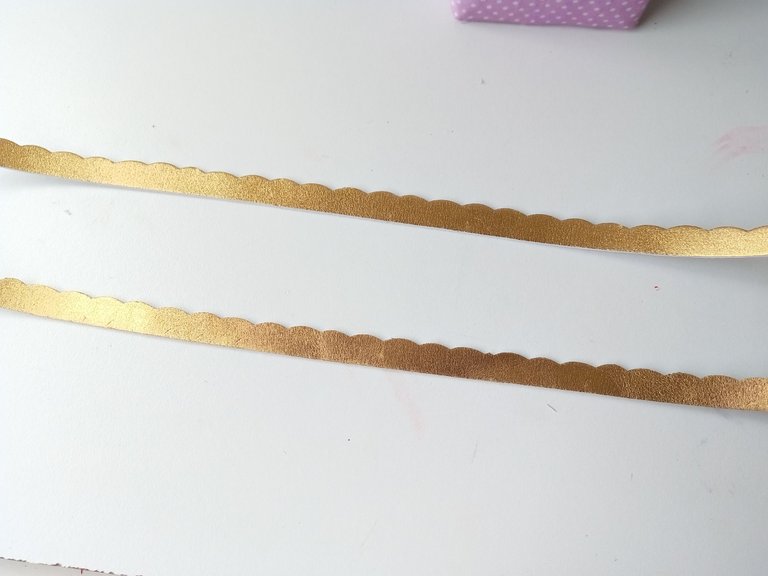
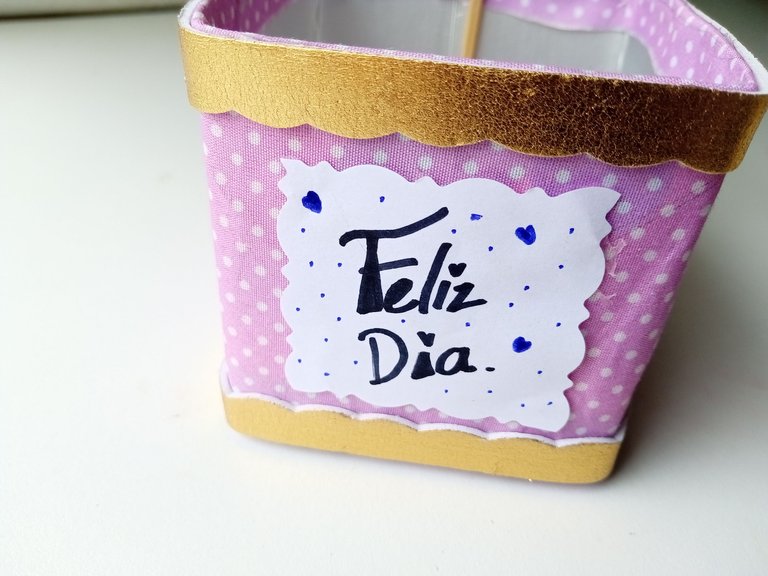
Luego, recorté con tijeras de figuras 2 tiras de 1 cm de ancho en foami metalizado dorado y pegué por el borde superior e inferior de la caja. Luego, escribí en una hoja blanca ‘‘feliz día’’ lo recorté dando un diseño por los bordes, pegué en la pared delantera de la caja, bien centrado, dibujé algunos puntos y corazones con marcador.
- 🎀STEP 2:
Then, with figure scissors, I cut out 2 1 cm wide strips of gold metallic foam and glued them to the top and bottom edge of the box. Then, I wrote on a white sheet of paper 'happy day', I cut it out giving a design along the edges, I stuck it on the front wall of the box, well centered, I drew some dots and hearts with a marker.
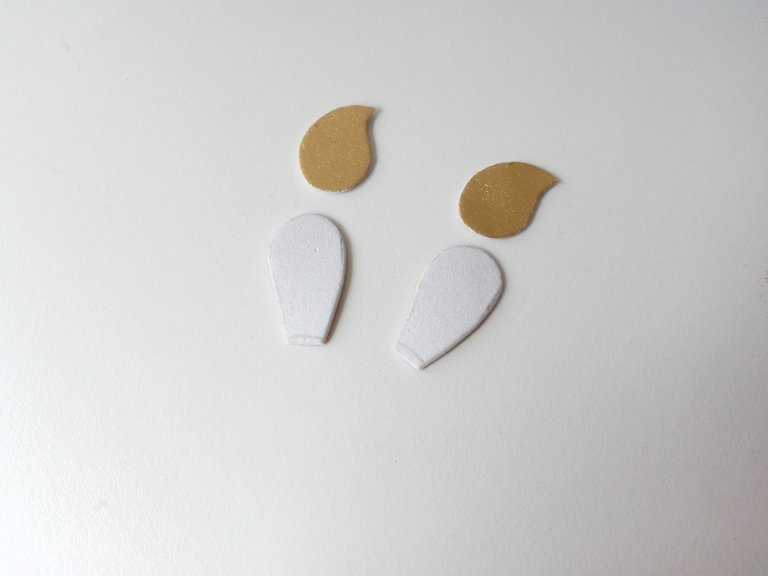
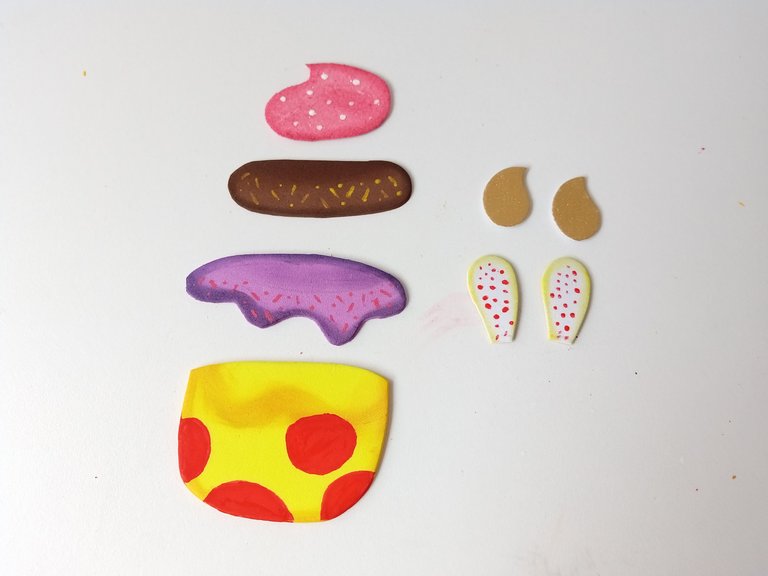
- 🎀PASO 3:
Ahora vamos con el topper. Comencé dibujando el patrón de un cupcake en una hoja blanca, luego lo pasé a los colores correspondientes de foami, que en este caso fueron los siguientes: la base en amarillo, primera capa morada, segunda capa marrón, la última en rosado escarchado, las velas en blanco y metalizado dorado.
- 🎀STEP 3:
Now let's go with the topper. I started by drawing the pattern of a cupcake on a white sheet, then I transferred it to the corresponding colors of foam, which in this case were the following: the base in yellow, first layer purple, second layer brown, the last in frosty pink, the candles in white and metallic gold.

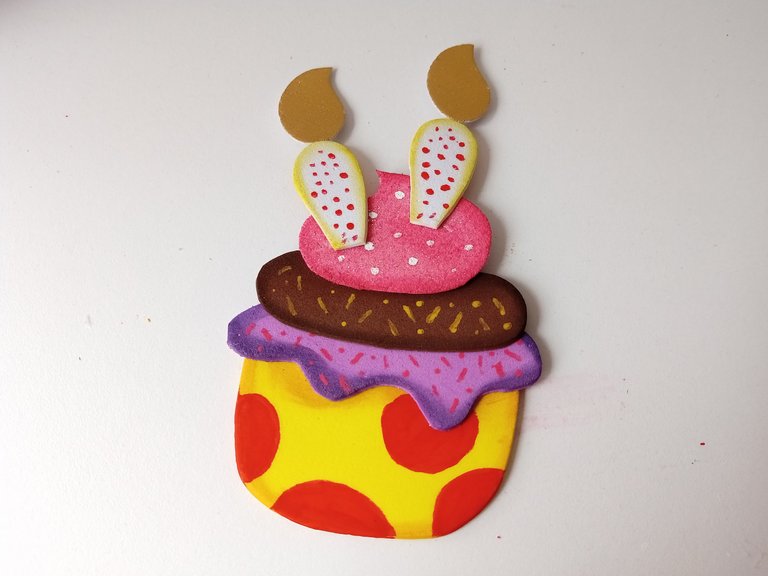
- 🎀PASO 4:
Al tener listas todas las piezas, pinté el borde de cada una con un tono de pintura más oscuro, difuminando con ayuda de un pañito. Luego, le pinté a la base un diseño de círculos en rojo, a las capas lluvia de distintos colores y a las velas unos puntos rojos. Después, pegué todas las piezas.
- 🎀STEP 4:
Once I had all the pieces ready, I painted the edge of each one with a darker tone of paint, blending it with the help of a cloth. Then, I painted a design of circles in red on the base, rain layers of different colors on the layers, and red dots on the candles. Then I glued all the pieces together.
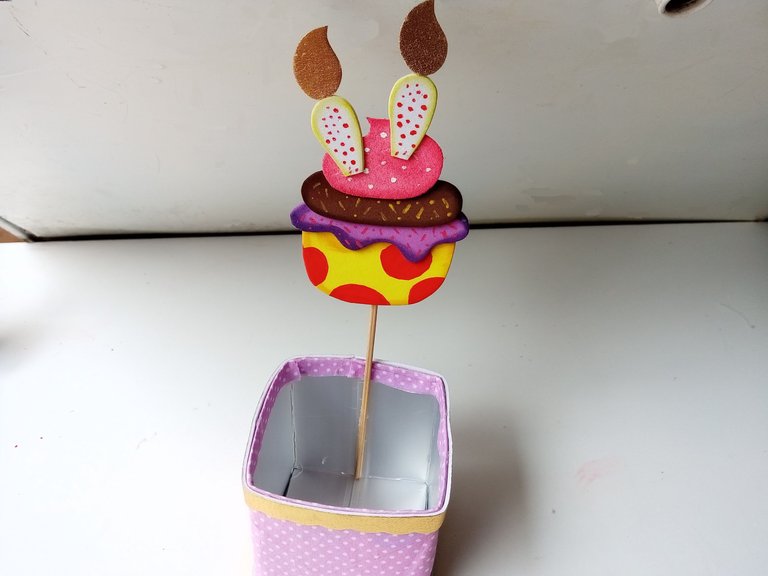
- 🎀PASO 5:
Pegué el cupcake al palito de altura, el cual pegué dentro de la caja en la pared trasera. Por último, pegué el lazo abajo del cupcake y solo si lo desean, pueden recortar tiras de papel de seda para que al momento de agregar las golosinas o el detalle se vea llena.
- 🎀STEP 5:
I glued the cupcake to the height stick, which I glued inside the box on the back wall. Lastly, I glued the bow below the cupcake and only if you wish, you can cut strips of tissue paper so that when you add the sweets or the detail it looks full.
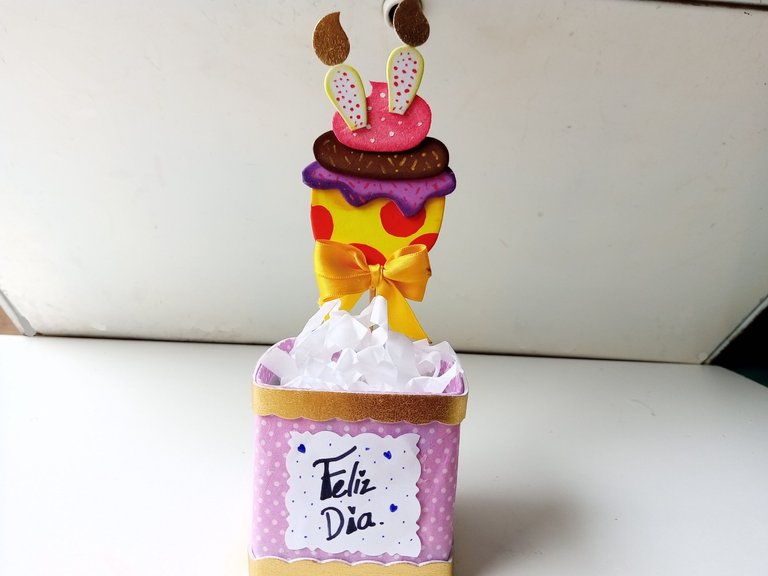
✨¡And ready!✨I hope you liked this beautiful, super simple idea, in which we also recycled some of the materials, but which still looks delicate and to which we can give an original design. Also, we can add sweets, chocolates or any other details. I hope you liked the step by step and are encouraged to make it.
❤️Until the next post.
✨RESULTADO: | ✨RESULT:


Todas las fotografías son de mi propiedad.
Separador y Fotos editadas en Canva
All photographs are my property.
Photos edited in Canva
Ami que bello. Algo que me encanta es que usas mucho tela en tus creaciones y eso les da un gran toque combinado con los otros materiales.
Esa cajita quedó bella
Muchas gracias mi Rosita! Así es Ami, me encanta utilizar telas en mis creaciones, le da un aspecto muy bonito,pues hace pensar que quizá es otro material más caro jaja , pero es solo una telita.
Gracias Ami bella 💕
Quedó preciosa, muy colorida 😍 que tengas feliz día ☺️
Muchas gracias amiga! Lindo día para ti también ✨😊
Very beautiful!
Muchas gracias amiga! ✨
Congratulations, your post has been upvoted by @dsc-r2cornell, which is the curating account for @R2cornell's Discord Community.
Me encantó 😍 y me encanta que reciclaste varios materiales. Hermoso quedó!
Muchas gracias mi Eve! Así es, siempre intento reciclar algún material o utilizar materiales faciles de adquirir y económico.
Gracias belleza .💕
That is a wonderful gift to celebrate your mum's birthday.
Thanks very much buddy!! I'm very glad you liked it.💕 Greetings.
Muchas gracias amigos! ✨
Este es un detalle muy lindo para tu mamá, te ha quedado muy bonito la verdad. Ella debe estar feliz. Dale feliz cumpleaños de mi parte, y recuerda: No todos los días son iguales, todo lo malo pasará, todo es temporal. Saludos
Muchas gracias linda! La verdad que sí le gustó mucho su detallito.💕🤭
Que linda, de verdad que muchas gracias por esas palabras.
Espero pases un lindo día.✨
Que bonito, mis hijas y nieta hacen arreglos de globos y yo no le agarro bien el tiro a eso, pero me parece arte
Que bonito amiga, pues yo nunca he elaborado un arreglo con blobitos y aunque parezca fácil, no lo es, se nota que para obtener un bonito resultado hay que tener mucha práctica y paciencia.
Saludos y bendiciones.✨
Ami que bello te quedó esto, me encantó ese topper tan lindo y colorido, es un detalle perfecto para regalar. Siempre haciendo cositas hermosas ami 😍😍
Muchas gracias Mary!!! Que tú lo digas significa mucho, pues para mí, eres la mejor haciendo Toppers 💕. Tan bella amiga, muchas gracias por tus palabras.✨
Te quedó hermoso mi Valen, seguro que a tu mamá le encanto este detalle tan lindo que tuviste con ella, eres demasiado creativa 😍🩷
Muchas gracias Ami!! Así es, le gustó mucho su detallito. 💕 Jejje Muchas gracias mi Vane linda.✨
https://twitter.com/hivediy47901/status/1767777532919566482
Contáctenos para saber más del proyecto a nuestro servidor de Discord.
Si deseas delegar HP al proyecto: Delegue 5 HP - Delegue 10 HP - Delegue 20 HP - Delegue 30 HP - Delegue 50 HP - Delegue 100 HP.