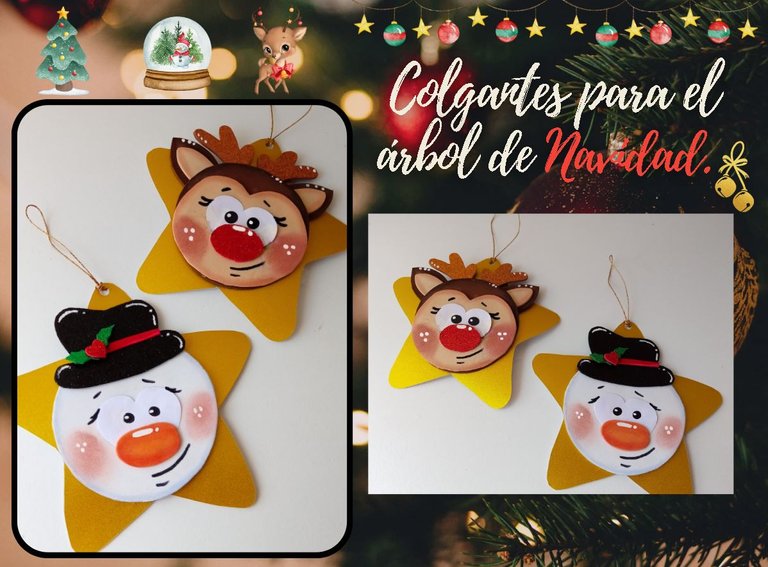
[Esp/Eng] ✨Colgantes para el árbol de navidad. // Christmas tree pendants.✨
✨🌟☃️🦌¡Hola amigos amantes de la creatividad! Espero que hayan pasado un muy buen comienzo de semana.✨
🔸Sin más que añadir, a continuación los dejo con el paso a paso:
✨🌟☃️🦌¡Hello friends who love creativity! I hope you had a very good start to the week.✨
I hope you are doing well and had a nice Monday. On this occasion I share with you the step by step to make some pendants for the Christmas tree. Something that I remember with a lot of love in these beautiful times is seeing my mother making beautiful Christmas decorations, in that first moment I totally fell in love with crafts. I remember that I was super little when I saw my mother creating those beauties with her hands. She was about 4 or 5 years old, that's why I think my favorite creations are those from these dates.
But well, on this occasion I share two beautiful figures that you can make to decorate your trees, of course the idea is that you make several or perhaps a few more to fill the tree. They are quite simple ideas, which require a small amount of these materials that we will use.
🔸Without more to add, then I leave you with the step by step:
♥️ESPERO QUE TE GUSTE,
¡Empecemos!
♥️I HOPE YOU LIKE IT,
Let's start!

🎄 MATERIALES | 🎄 MATERIALS
🦌Para el reno:
- Foami marrón.
- Foami color piel.
- Foami escarchado rojo y cobre.
☃️Para el muñeco de nieves:
Foami blanco, naranja y rojo
Foami escarchado negro, verde y rojo.
Cartulina escarchada dorada.
Tizas, marcadores y pinturas.
Pegamento.
Abre huecos.
Hilo grueso.
Hoja blanca.
Lápiz.
🦌For the reindeer:
- Brown foam.
- Skin-colored foami.
- Red and copper frosted foam.
☃️For the snowman:
White, orange and red foami
Black, green and red frosted foam.
Gold frosted cardstock.
Chalk, markers and paints.
Glue.
Open holes.
Thick thread.
White sheet.
Pencil.
🌟 PROCEDIMIENTO | 🌟 PROCESS
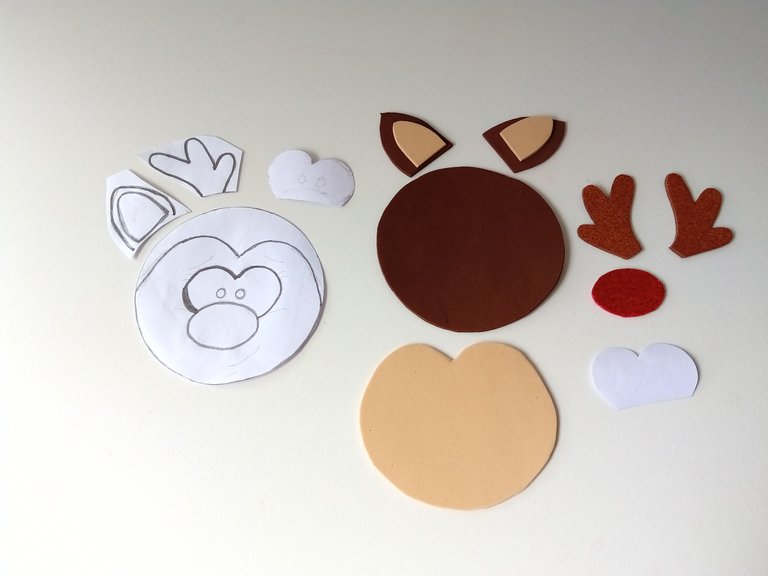
- PASO 1:
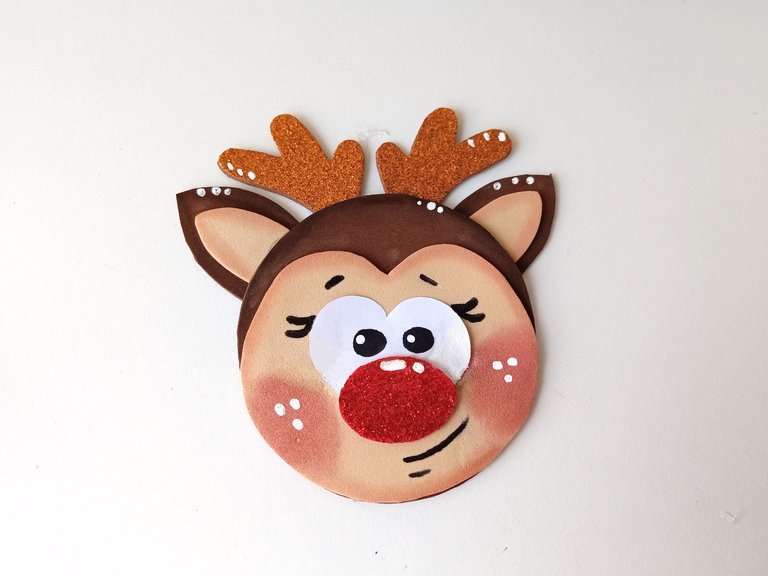
Lo primero que hice, fue comenzar con una de las dos figuras, en este caso comencé por el reno. Dibujé el patrón, que es simplemente un círculo, y de ahí dibujé el rostro del reno, orejas y cuernos. Una vez listo, lo transferí a los colores correspondientes de foami, en este caso la cabeza y orejas en marrón, la parte interna de las orejas y rostro en color piel, nariz en rojo escarchado, los cuernos en cobre escarchado y los ojos en hoja blanca. Por último, recorté todas las piezas.
- STEP 1:
The first thing I did was start with one of the two figures, in this case I started with the reindeer. I drew the pattern, which is simply a circle, and from there I drew the reindeer's face, ears, and antlers. Once ready, I transferred it to the corresponding colors of foami, in this case the head and ears in brown, the inner part of the ears and face in skin color, nose in frosted red, the horns in frosted copper and the eyes in leaf white. Lastly, I cut out all the pieces.
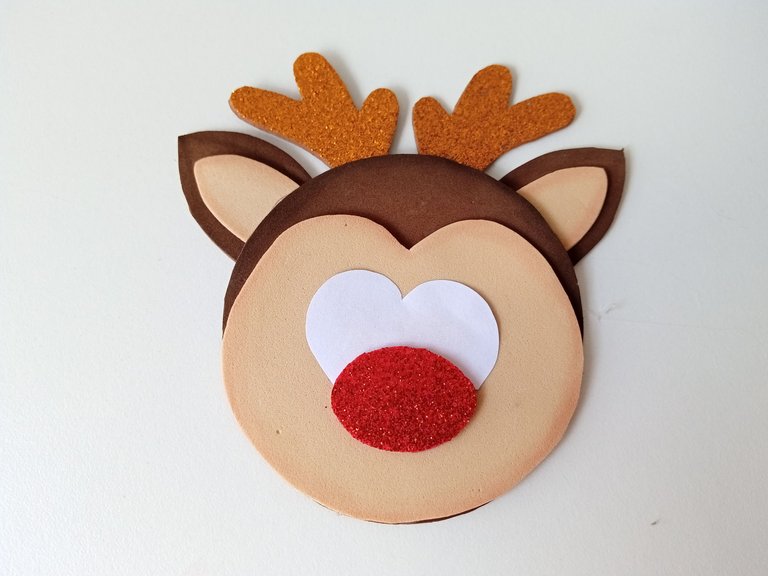
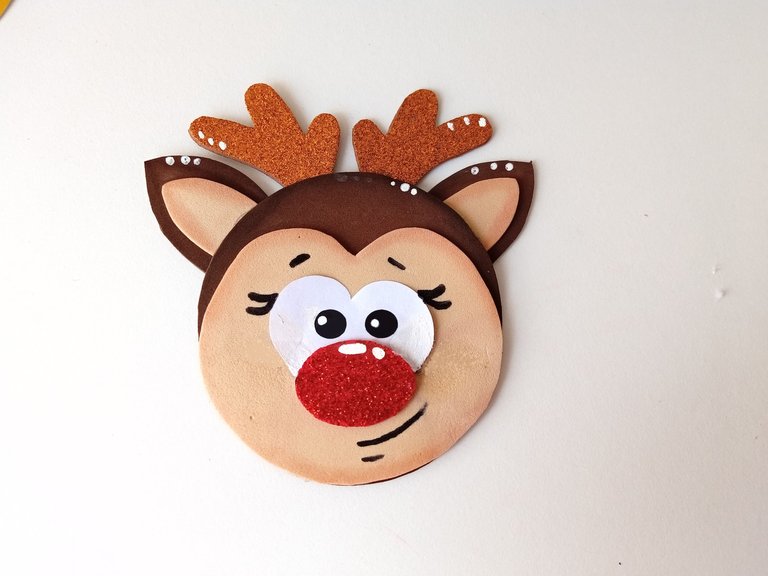
- PASO 2:
Al borde de todas las piezas les pasé tiza de un color, un tono más oscuro y pegué todas las piezas. Luego, con marcador negro, pinté las cejas, pestañas, boca y ojos. También pinté las mejillas y por último, pinté puntos de luz en las mejillas, orejas, cuernos nariz y los ojos.
- STEP 2:
On the edge of all the pieces I applied chalk of one color, a darker tone, and glued all the pieces together. Then, with black marker, I painted the eyebrows, eyelashes, mouth and eyes. I also painted the cheeks and lastly, I painted highlights on the cheeks, ears, nose horns and eyes.
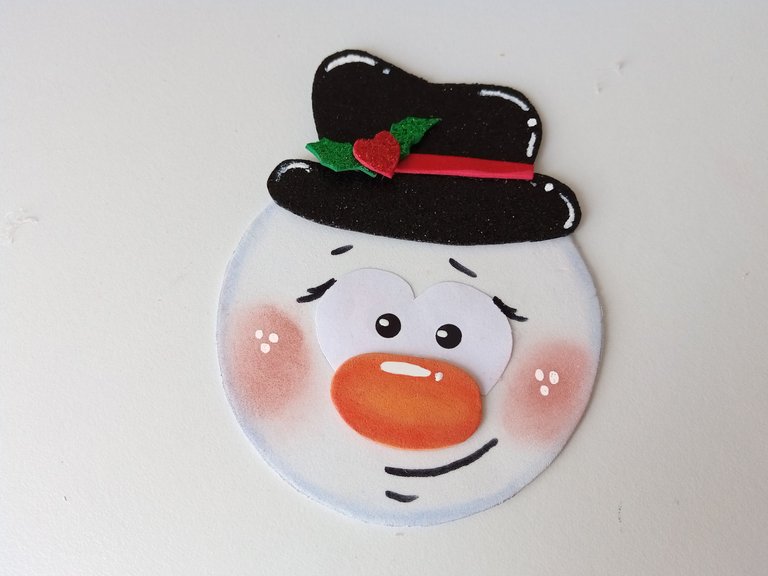
- PASO 3:
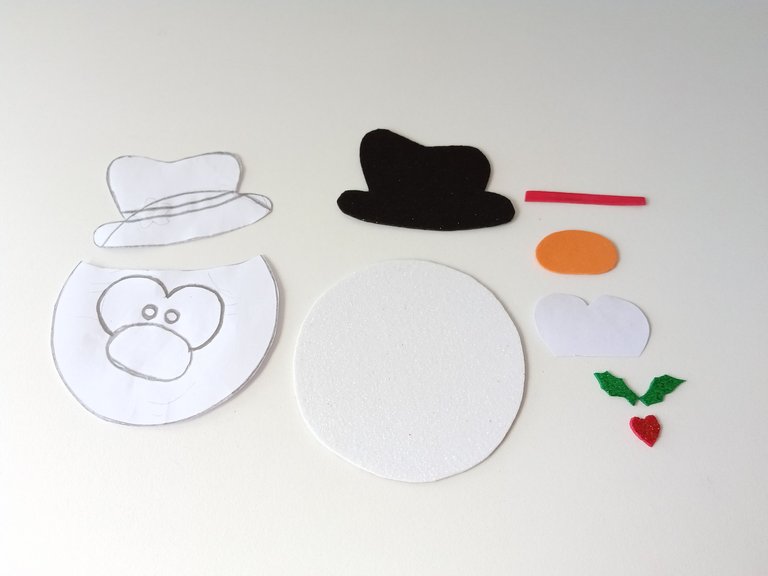
Ahora vamos con el muñeco de nieves que es prácticamente lo mismo, tracé un círculo para la cabeza, dibujé el rostro, sombrero y detalles para el sombrero. Luego los pase al color correspondiente de foami, en este caso la cabeza en foami blanco, nariz en naranja, cinta del sombrero en rojo, hojas navideñas en verde escarchado, corazón rojo escarchado, sombrero en negro escarchado y ojos en hoja blanca.
- STEP 3:
Now let's go with the snowman which is practically the same, I drew a circle for the head, drew the face, hat and details for the hat. Then I transferred them to the corresponding color of foam, in this case the head in white foam, nose in orange, hat band in red, Christmas leaves in frosted green, red heart frosted, hat in frosted black and eyes in white sheet.
- PASO 4:
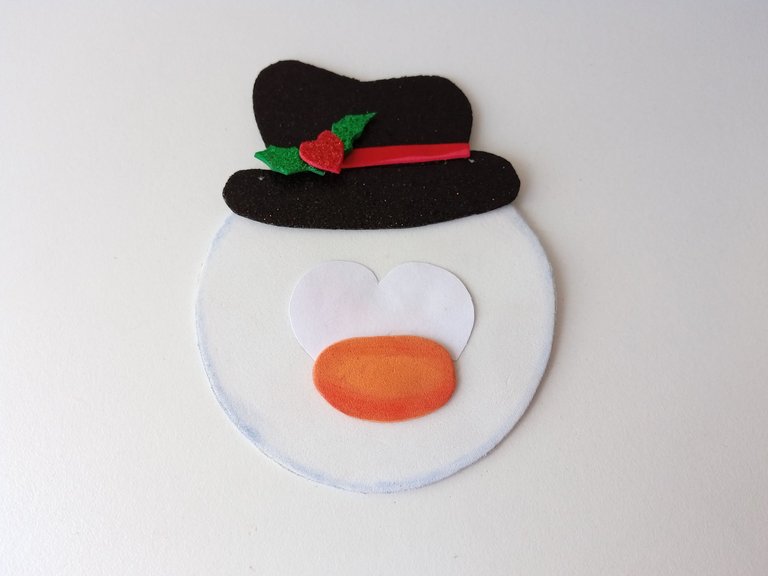
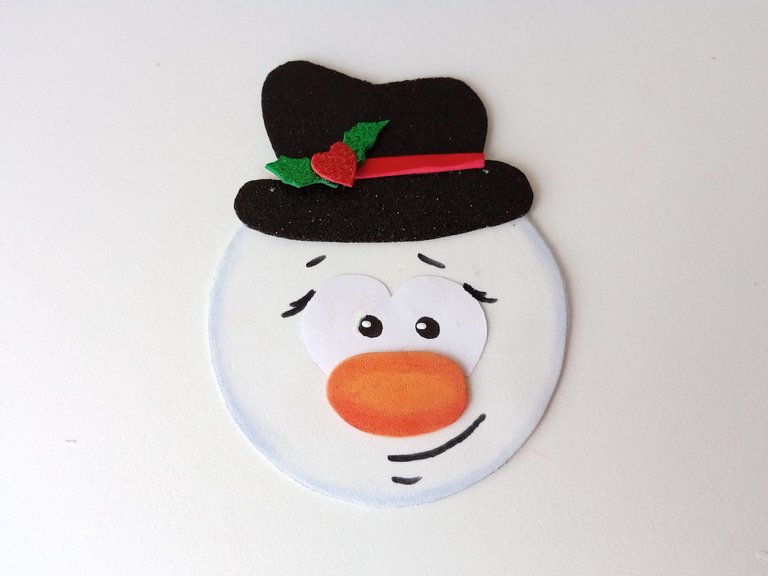
Una vez listas todas las piezas, al borde de la cabeza pasé tiza azul claro y a la nariz, tiza un tono más oscuro. Luego, pegué todas las piezas formando la figura, dibujé el rostro con marcador negro, pinté las mejillas y di detalles de luz.
- STEP 4:
Once all the pieces were ready, I applied light blue chalk to the edge of the head and a darker tone to the nose. Then, I glued all the pieces together to form the figure, drew the face with black marker, painted the cheeks and gave light details.
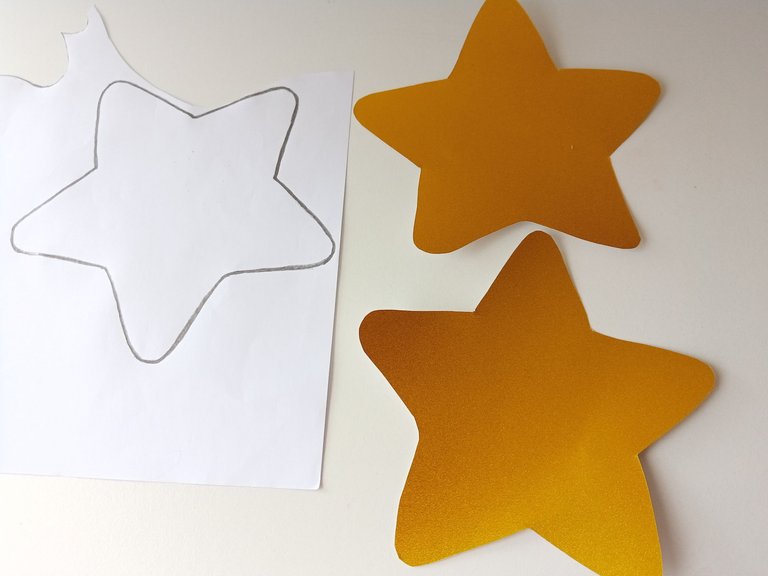
- PASO 5:
Una vez listo el reno y el muñeco de nieves, recorté dos estrellas un poco más grandes que las figuras y los pegué en medio de cada una. Luego, abrí un agujero en la punta superior de las estrellas y amarré el hilo.
- STEP 5:
Once the reindeer and snowman were ready, I cut out two stars a little larger than the figures and glued them in the middle of each one. Then, I cut a hole in the top tip of the stars and tied the thread.

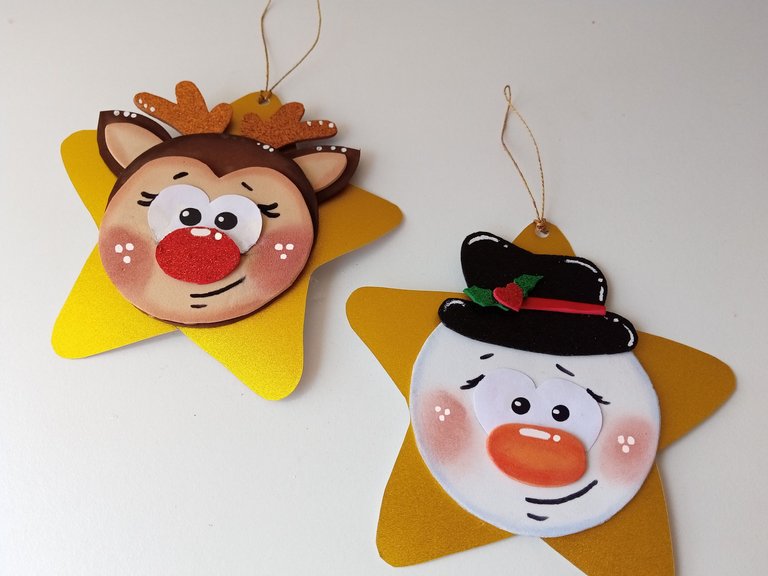
✨¡And ready!✨This way you can make these beautiful pendants for the tree, I decided to share with you a reindeer and a snowman, but you can make them with several characters or just one, it all depends on your taste. I hope you liked it and are encouraged to make it.
❤️Until the next post.
✨RESULTADO: | ✨RESULT:


Todas las fotografías son de mi propiedad.
Separador y Fotos editadas en Canva
All photographs are my property.
Photos edited in Canva
Te quedaron muy hermosos estos colgantes; ideal para adornar en estas fechas
Muchas gracias amiga 💕. Así es , perfectos para crear algo bonito en estas fechas.
Saludos.✨
Que trabajo tan hermoso, te felicito hiciste un trabajo hermoso, felicidades.
Muchas gracias amiga, me alegra mucho que te haya gustado ✨😊
Estos detalles para el árbol están de verdad hermosos te felicito amiga
Muchas gracias. 😊 Me alegra mucho que le haya gustado.🥰
Preciosos! Que talento tienes, trabajar con foami no es nada fácil.
Ahora quedará muy preciosa la decoración de Navidad ✨
Muchas gracias amiga! Así es, puede llegar a ser un poco complicado a veces, pero siempre es divertido crear decoraciones nuevas.
Saludos.✨🎄
Yay! 🤗
Your content has been boosted with Ecency Points, by @valenpba.
Use Ecency daily to boost your growth on platform!
Support Ecency
Vote for new Proposal
Delegate HP and earn more
Congratulations, your post has been upvoted by @dsc-r2cornell, which is the curating account for @R2cornell's Discord Community.
Enhorabuena, su "post" ha sido "up-voted" por @dsc-r2cornell, que es la "cuenta curating" de la Comunidad de la Discordia de @R2cornell.
Muchas gracias por el apoyo amigos 💕✨🎄
https://twitter.com/hivediy47901/status/1732368532170572267
Esos colgantes lucirían hermosos en mi arbolito de navidad 🤭 Te quedaron demasiado bellos mi Valen!!! Sin duda sacaste eso de tu mami, las manualidades son lo tuyo 💕
Ay ño mio pero cosita más bella amiga. Esto está precioso!!
El trabajo que haces es increíble mi Valen ♥️
Amiga están preciosos esos colgantes, super tiernos y elegantes, tu arbolito se debe ver hermoso con tanton adornitos lindos! ❣️
Hola, estos adornos quedaron preciosos 😊 y tienen detalles muy lindos.