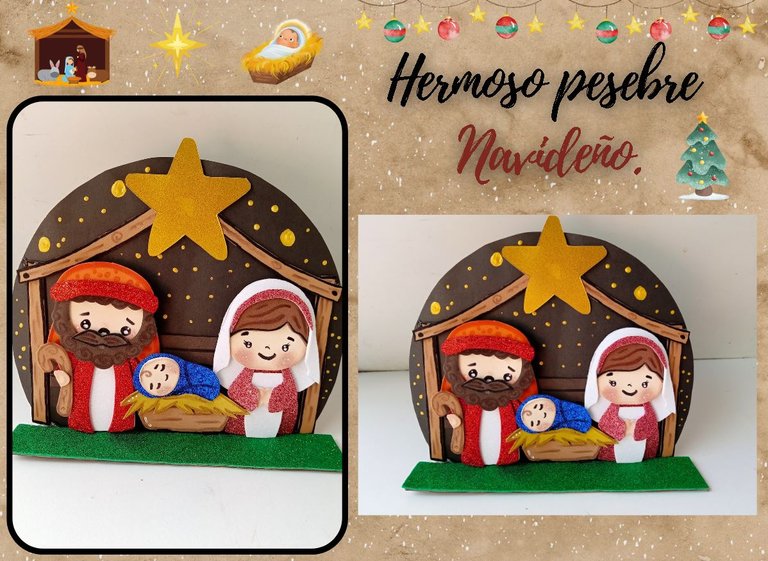
[Esp/Eng] ✨ Pesebre navideño. // Christmas manger.✨
✨🎄¡Hola amigos amantes de la creatividad! Espero que hayan pasado un muy buen comienzo de semana.🎄✨
🔸Sin más que añadir, a continuación los dejo con el paso a paso:
✨🎄¡Hello friends who love creativity! I hope you had a very good start to the week.🎄✨
I hope you are feeling well and have enjoyed a nice Monday. On this occasion I share with you the step by step to make a beautiful Christmas nativity scene. I always heard my mother talk that she wanted a manger, so she was once given one to decorate under the Christmas tree, but as time went by it broke when we moved.
Last year, when I started hive and saw what the materials were, she asked me to make one for her, but I told her that she still didn't have that much experience in making dolls. This year, if I feel like I have a little more experience when making my crafts, of course I told him that I could do something that didn't look so complicated, we looked for some references and I got going.
I'm not saying it's the best result, I still need to practice, but I'm really happy with the final result and I hope you enjoy this tutorial.
🔸Without more to add, then I leave you with the step by step:
♥️ESPERO QUE TE GUSTE,
¡Empecemos!
♥️I HOPE YOU LIKE IT,
Let's start!

🎄 MATERIALES | 🎄 MATERIALS
- Cartulina negra.
- Cartón grueso.
- Foami marrón en distintos tonos.
- Foami colores piel, naranja y blanco.
- Foami escarchado, azul, rojo,
verde y rosado. - Marcadores, tizas y pinturas.
- Pegamento.
- Tijeras.
- Hoja blanca
- lápiz.
- Black cardboard.
- Thick cardboard.
- Brown foam in different shades.
- Foami in skin, orange and white colors.
- Frosted foam, blue, red,
green and pink. - Markers, chalk and paints.
- Glue.
- Scissors.
- White sheet
- pencil.
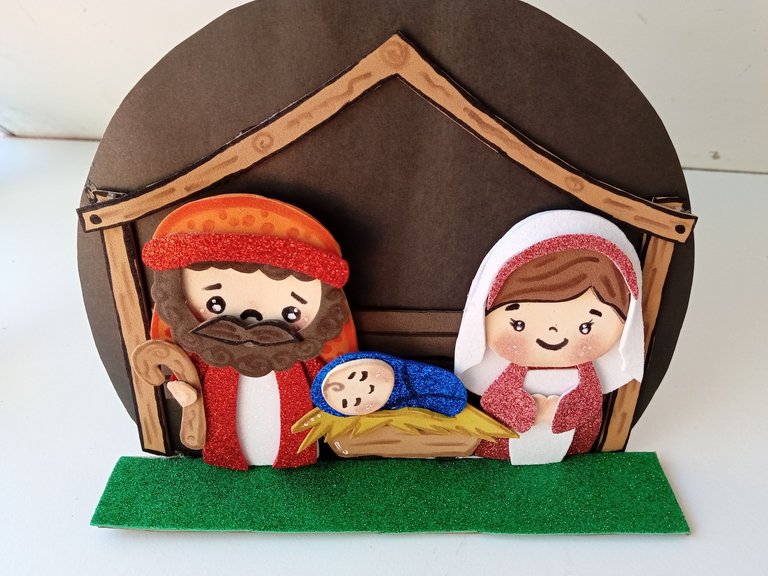
🎄 PROCEDIMIENTO | 🎄 PROCESS
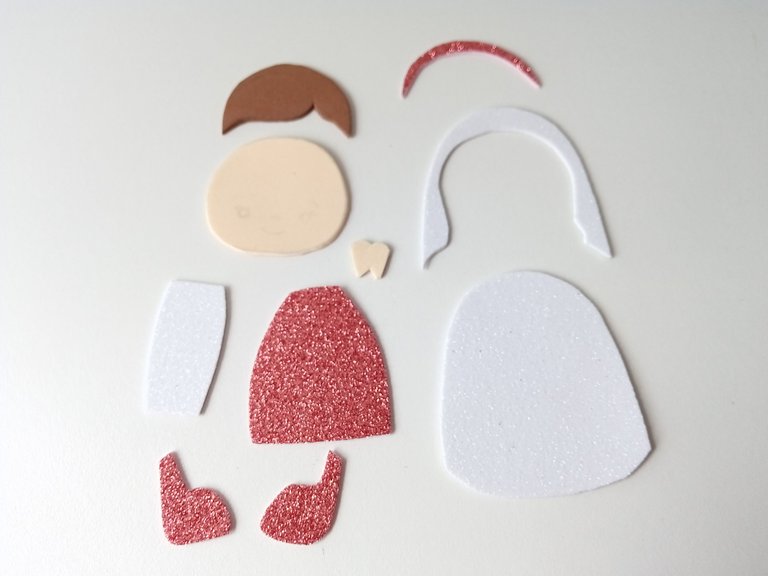
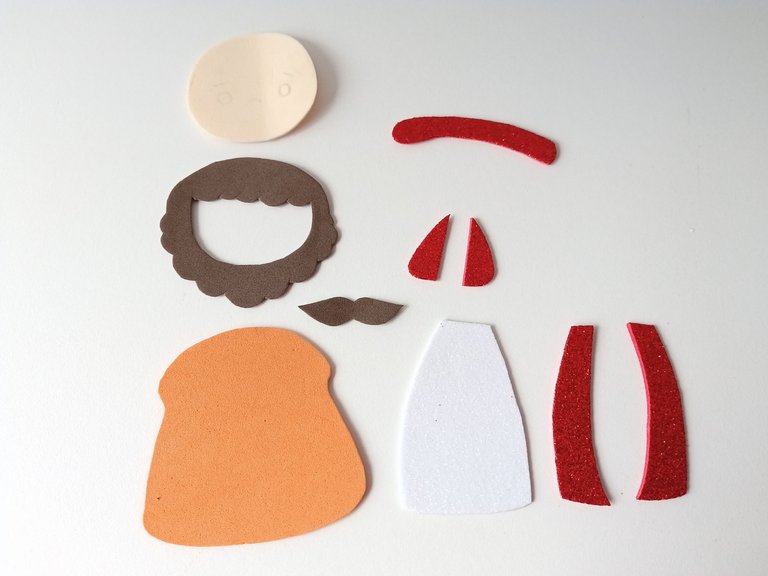
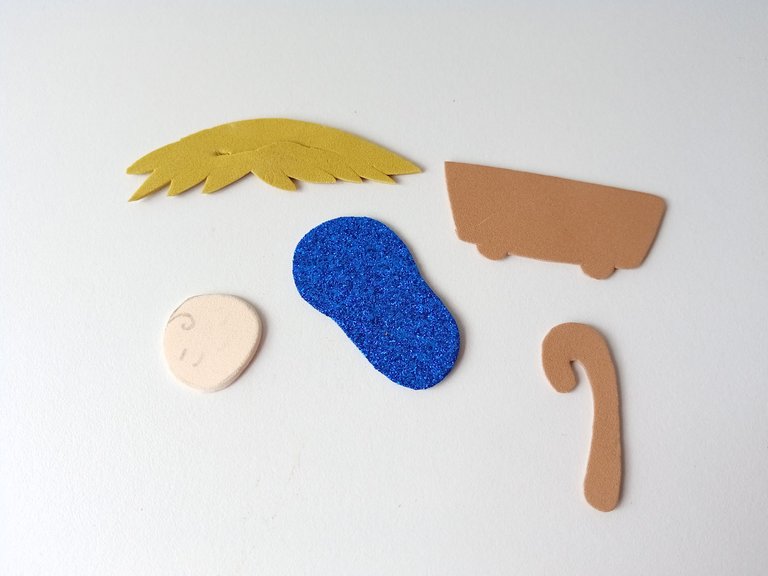
- PASO 1:
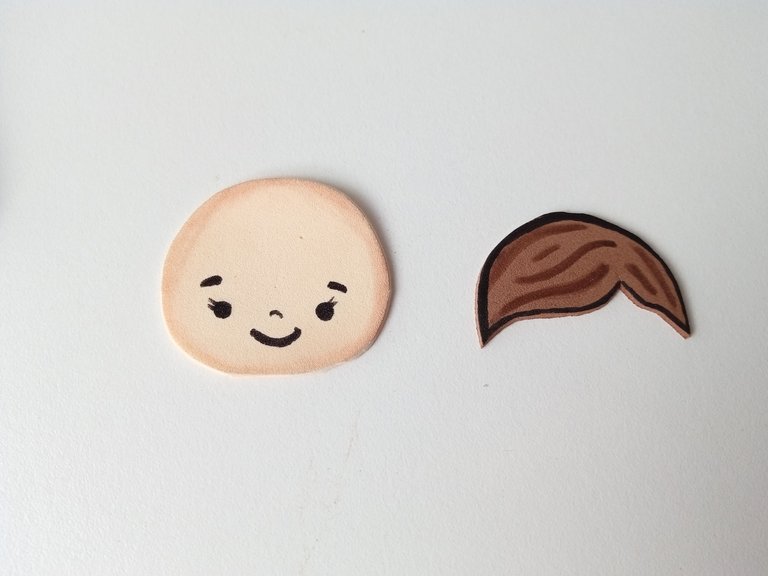
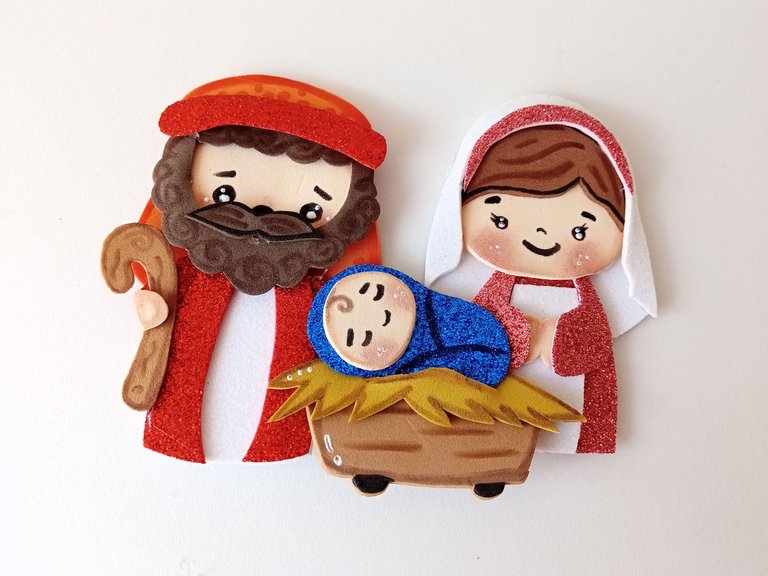
Comencé haciendo el patrón de los personajes que es María, José y el niño Jesús. Una vez listo el patrón, pasé al color correspondiente de foami y recorté. En cada uno de los personajes utilicé los siguientes colores de foami:
Para maría: Cabeza y manos en foami color piel, vestuario y velo blanco y rosado escarchado, y cabello en un tono marrón.
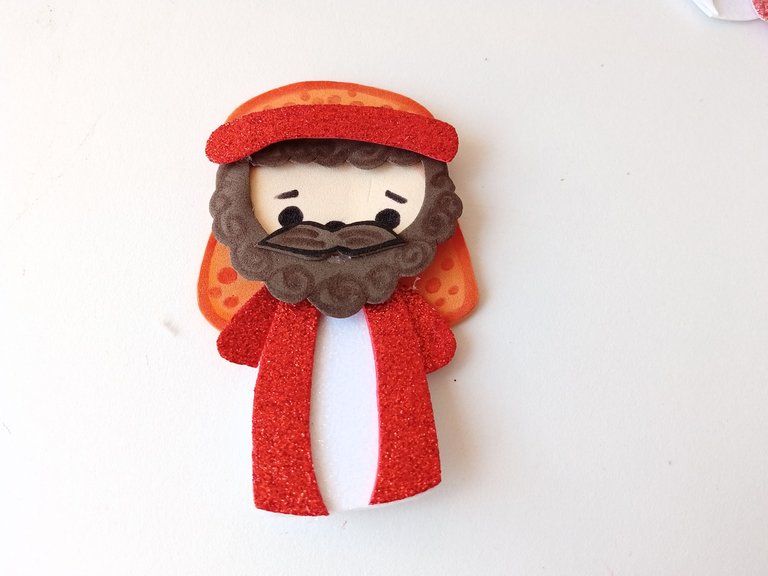
Para José: Cabeza y manos en foami color piel, vestuario en naranja, blanco y rojo escarchado, cabello, barba y bigote en foami marrón oscuro, y para el bastón marrón.
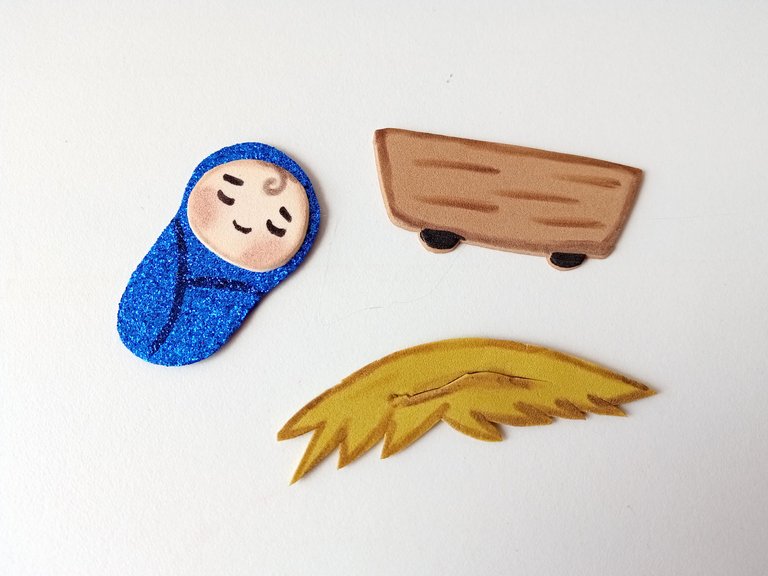
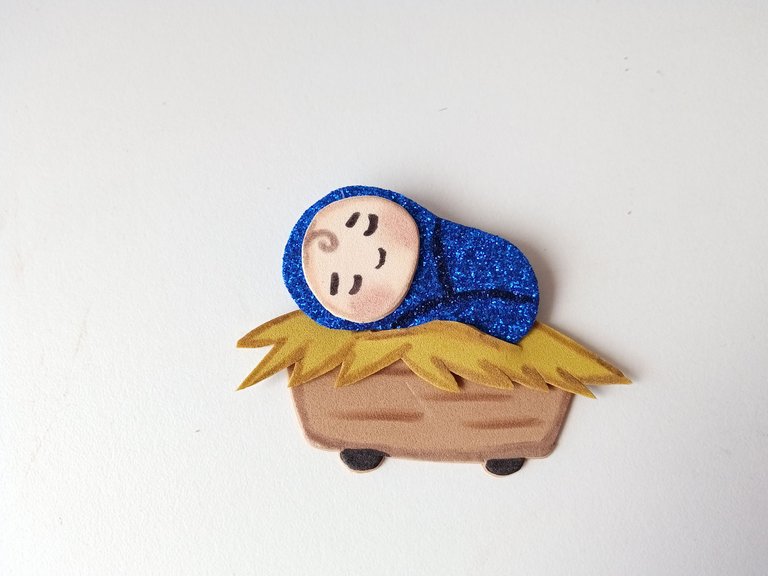
Para el niño Jesús: Cabeza en foami color carne, vestuario azul escarchado y el pesebre en marrón y la paja en amarillo o un color similar.
- STEP 1:
I started making the pattern of the characters that is Mary, Joseph and the baby Jesus. Once the pattern was ready, I moved on to the corresponding color of foam and cut out. In each of the characters I used the following foam colors:
For Maria: Head and hands in skin-colored foam, white and frosty pink clothing and veil, and hair in a brown tone.
For José: Head and hands in skin-colored foam, costume in orange, white and frosty red, hair, beard and mustache in dark brown foam, and for the brown cane.
For the baby Jesus: Head in flesh-colored foam, frosty blue clothing and the manger in brown and the straw in yellow or a similar color.
- PASO 2:
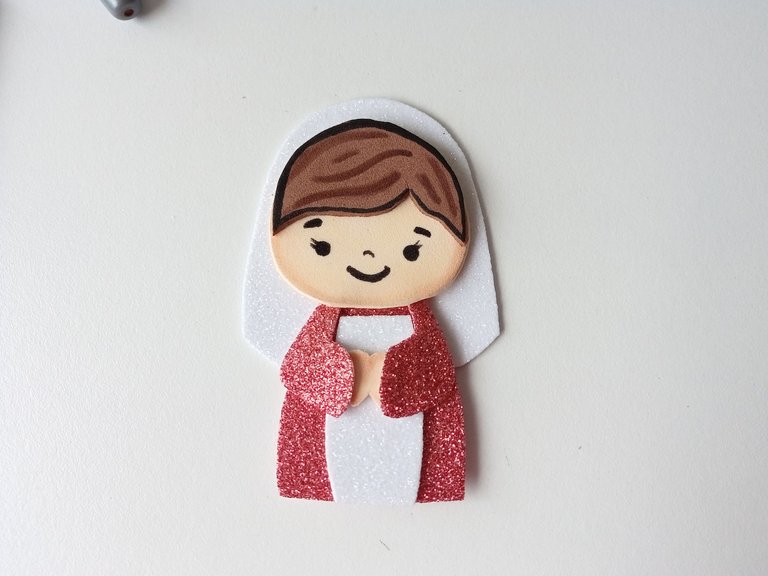
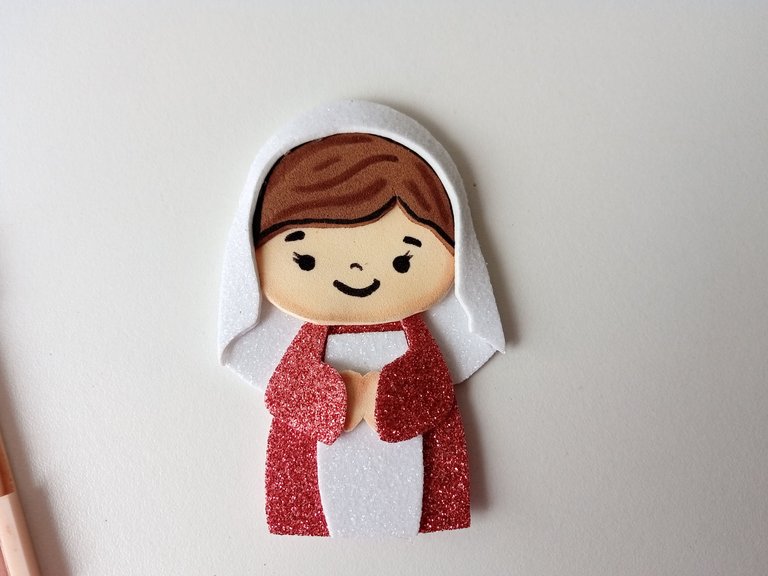
Una vez todas las piezas listas comencé a armar cada uno de los personajes. Tomé una tiza un tono más oscuro que el color piel y la pasé por el borde de la cabeza y las manos, dibujé el rostro y di detalles en el cabello con marcador marrón y negro, en el caso de maría algunas líneas curvas y pegué todas las piezas comenzando del vestuario para arriba. Luego la cabeza, el cabello, la parte más larga del velo y encima la otra parte junto con la cinta que decora el velo.
- STEP 2:
Once all the pieces were ready I began to assemble each of the characters. I took chalk a tone darker than the skin color and ran it along the edge of the head and hands, I drew the face and gave details in the hair with brown and black marker, in Maria's case some curved lines and I glued them all the pieces starting from the wardrobe up. Then the head, the hair, the longest part of the veil and on top the other part along with the ribbon that decorates the veil.
- PASO 3:
Luego seguí con José, que es prácticamente lo mismo, dar detalles a la cabeza con tiza, luego dibujé el rostro y di detalles al cabello, barba y bigotes, pero en el caso de José unos rulos. Para el manto, pase marcador y pinté algunos puntos desordenados. Luego pegué todo en el mismo orden que el anterior. En este caso, José tiene un bastón en la mano al cual le hice detalles con marcador marrón.
- STEP 3:
Then I continued with José, which is practically the same, giving details to the head with chalk, then I drew the face and gave details to the hair, beard and mustaches, but in José's case some curlers. For the mantle, pass marker and paint some dots in messes. Then I glued everything in the same order as before. In this case, José has a cane in his hand to which I made details with brown marker.

- PASO 4:
Al niño Jesús le pasé tiza por el borde de la cabeza, dibujé el rostro y le hice un mechón de cabello. Después, pegué la cabeza en el vestiario o manta, al cual le di detalles con marcador negro, e hice lo mismo con el pesebre, dando detalles de madera. Pegué el resto de las piezas, pero a la paja le recorté una línea en medio para poder meter y pegar al niño. Una vez listo, pegué todas las piezas, pinté las mejillas con tiza, di detalles de luz a los ojos, mejillas y al pesebre.
- STEP 4:
I rubbed chalk on the edge of baby Jesus's head, drew his face and made a lock of hair. Afterwards, I glued the head on the bestiary or blanket, to which I gave details with black marker, and I did the same with the manger, giving wooden details. I glued the rest of the pieces, but I cut a line in the middle of the straw so I could put the child in and glue it. Once ready, I glued all the pieces, painted the cheeks with chalk, gave light details to the eyes, cheeks and the manger.
- PASO 5:
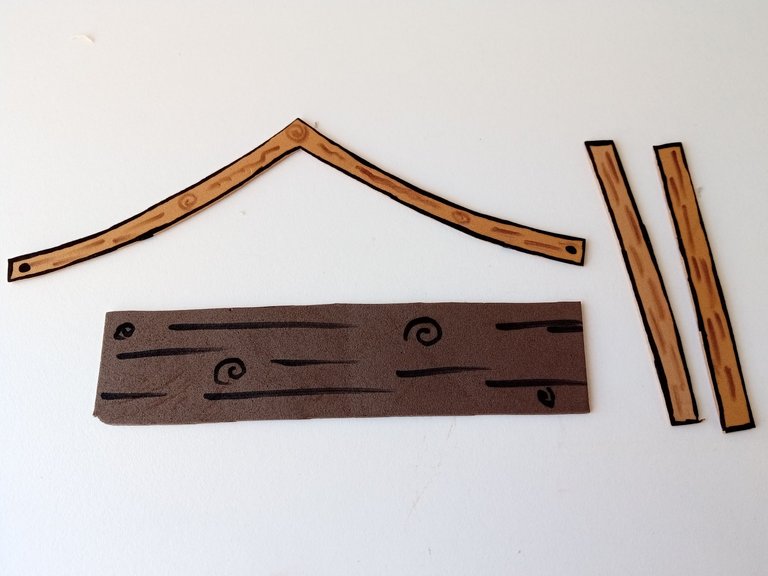
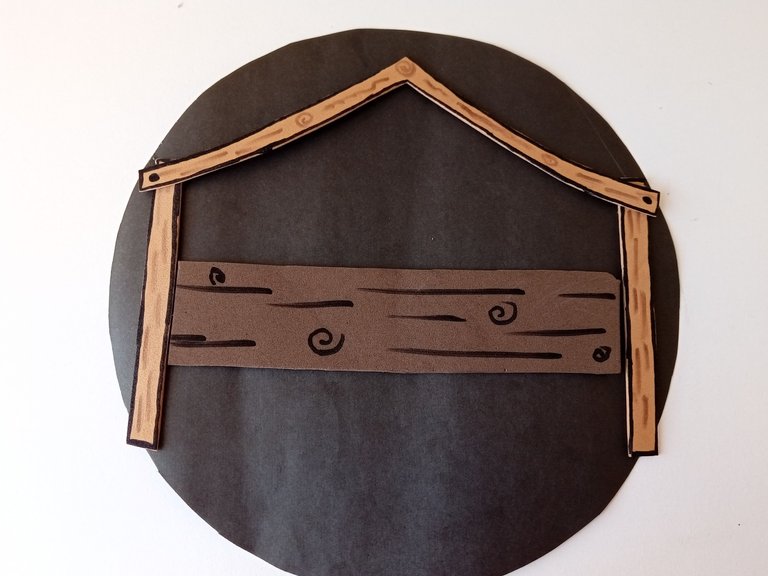
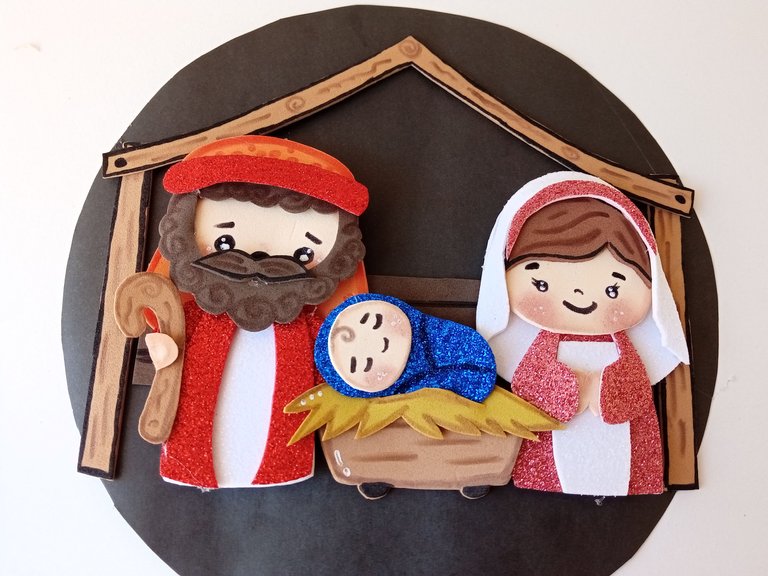
Para el fondo dibujé y recorté un techo y paredes en foami marrón a las que le di detalles de madera. Luego, armé y pegué las piezas sobre un círculo de cartulina negra un poco más grande, y en el medio pegué los personajes.
- STEP 5:
For the background I drew and cut out a ceiling and walls in brown foam to which I gave wooden details. Then, I assembled and glued the pieces on a slightly larger circle of black cardboard, and in the middle I glued the characters.
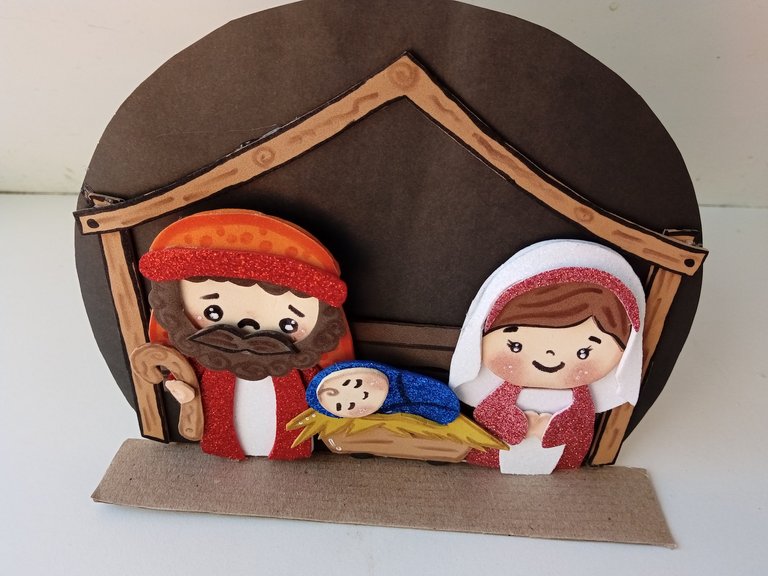
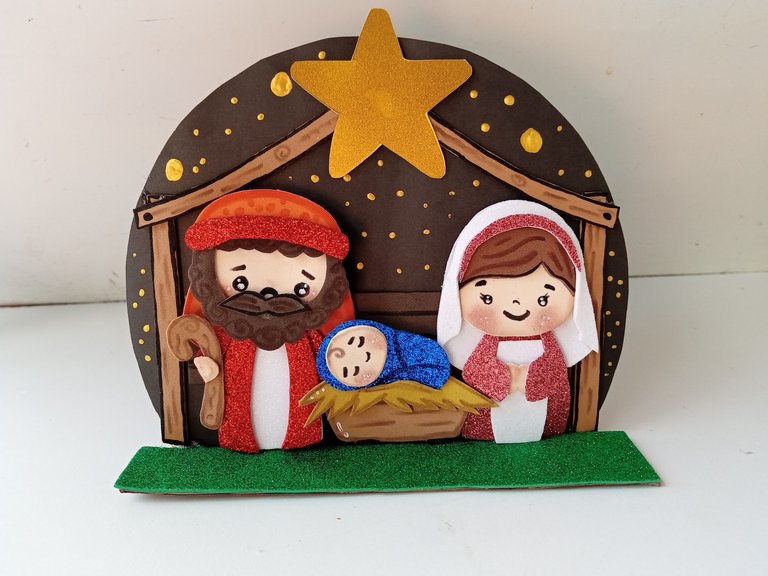
- PASO 6:
Para finalizar, recorté el fondo un poco más abajo de las figuras y pegué un cartón para que se mantuviera de pie, y al cartón le pegué encima foami verde escarchado. Por último, pinté las estrellas haciendo puntos de diferentes tamaños e hice una estrella que pegué en medio del techo.
- STEP 6:
To finish, I cut out the background a little below the figures and glued a cardboard so that it would stand up, and I glued frosty green foam on top of the cardboard. Lastly, I painted the stars by making dots of different sizes and made a star that I glued in the middle of the ceiling.

✨¡And ready!✨ You don't know how happy I am with this beautiful result, friends. I know I used quite a few materials, but you can repeat some colors or use different materials that you have at your disposal. I hope you liked it and are encouraged to make this step by step.
❤️Until the next post.
✨RESULTADO: | ✨RESULT:


Todas las fotografías son de mi propiedad.
Separador y Fotos editadas en Canva
All photographs are my property.
Photos edited in Canva
Dicen que la práctica hace al maestro puedes hacer alarde de ello te quedo estupendo un muy bonito resultado. Saludos
Muchas gracias amiga ! Agradezco mucho tu comentario. Me alegra mucho que te haya gustado mi creación ✨🎄
Saludos.✨
Manaaaaaa, pero que cosaaaa tan HERMOSAAAAA😍
No definitivamente, cada vez haces una belleza tras otra!
Me encantó y me dió ganas de hacer un nacimiento así puesto que no tengo ¿Que opinas? Jajaja
Chama me encantó 🥰🥰
Gracias amiga bella 🥰 Gracias por darme tantos ánimos siempre.💗
Obvio!! Me encantaría que hicieras un nacimiento para tu arbolito. Estoy segura de que te quedará mucho más lindo 💗🎄
Amiga, quedé fascinada con tu pesebre, luce muy delicado y hermoso,,, Yo sería feliz teniendo uno en mi mesita de noche.
Muchas gracias por compartir tu lindo talento, feliz tarde!
Muchas gracias Kris! Agradezco mucho tus palabras. Me alegra que siempre me digas dónde pondrías todas mis creaciones 🤭.
Saludos amiga.✨🎄
Pero tiene una buena manos para el foami. Me encanto tu artes. Porque de verdad te quedó increíble para usarla en temporada navideña. Si sigue así puede hacer mucha cosa más.
Veo que el desafío te da confianza y esto me agrada mucho de ti. 🤗💟 Me encanto todo el proceso.
Pero qué hermoso pesebre! Me encantó 🥺
¡Felicidades! Esta publicación obtuvo upvote y fue compartido por @la-colmena, un proyecto de Curación Manual para la comunidad hispana de Hive que cuenta con el respaldo de @curie.
Si te gusta el trabajo que hacemos, te invitamos a darle tu voto a este comentario y a votar como testigo por La Colmena.
Si quieres saber más sobre nuestro proyecto, te invitamos a acompañarnos en nuestro servidor de Discord.
Muchísimas gracias por apoyar mi post, amigos.
Lindo día 💗🎄
Ami, pero que belleza!!! Los detalles que le pones a las caras, las sombras, todo eso hace que tu trabajo sea único.
Amé este nacimiento mi Valen, gracias por compartir
Congratulations, your post has been upvoted by @dsc-r2cornell, which is the curating account for @R2cornell's Discord Community.
Enhorabuena, su "post" ha sido "up-voted" por @dsc-r2cornell, que es la "cuenta curating" de la Comunidad de la Discordia de @R2cornell.
Muchas gracias por el apoyo, amigos. Lindo día ✨🎄
ami HERMOSISISIIIIMOOO te quedó 😍😍 estoy segura tu mamá quedó encantada, ami Dios bendiga ese don que tienes, de verdad💗💗
Muchas gracias Mili bella! Que hermosa, asi fue Ami, se puso contenta con el resultado, ya tiene un mini Nacimiento para colocar en una mesa o bajo el arbolito.
Gracias por tus palabras bella!! 💗
Me encantó tu pesebre amiga. Muy delicado y con mucho amor.
Que hermosura de pesebre amiga, amé ada detalle, está increíble para decorar 🥰
Muchas gracias amiga bella! 🤭 Me alegra muchísimo que te haya gustado. Admito que extraño ver tus creaciones más seguido.🥺🥰
Que ternura de pesebre, te quedó super lindoooooo 😊🥰😊
Muchas gracias, linda! Me alegra mucho que te haya gustado.
Saludos.🎄✨
No puede ser! Que belleza mi Valen, te quedo demasiado curiosito y hermosooo 🥺😍
Me encantaría uno para mi casa por favor jajaja, esta precioso amiga 💕
Pero que belleza valen, me encanta como te quedo cada detalle🥰