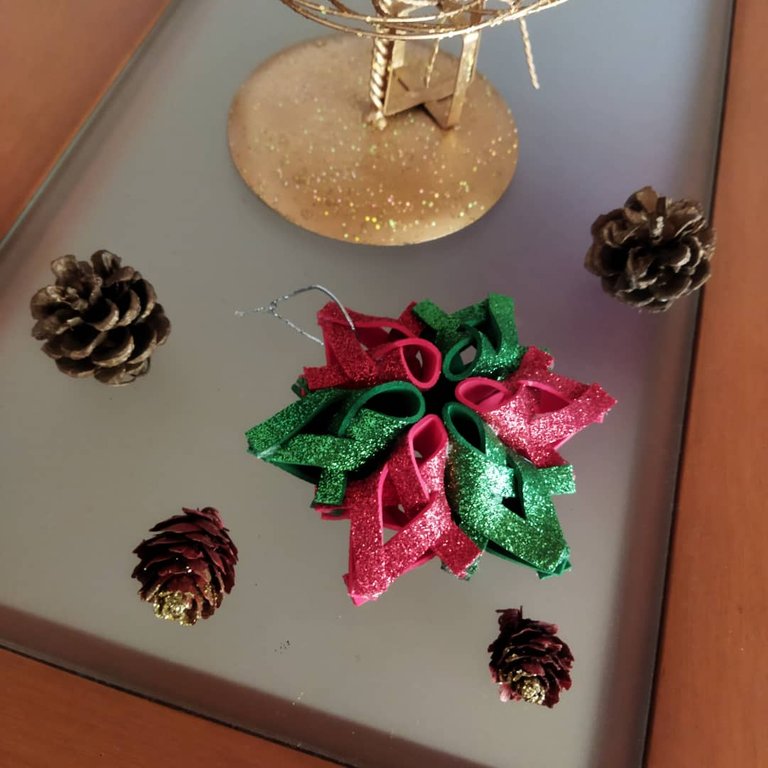
Hermosa guirnalda para decorar tu árbol de navidad o para cualquier decoración navideña // Beautiful garland to decorate your Christmas tree or for any Christmas decoration.
Hola queridos amigos, que gusto saludarlos el día de hoy, espero se encuentren muy bien. Esta es mi primera publicación en esta hermosa comunidad, donde la creatividad no tiene límites, me place poder compartir mi primer diseño con todos ustedes, espero sea de su agrado pero sobre todo de utilidad. Hoy les traigo el paso a paso de una guirnalda hermosa hecha con pocos materiales, que les puede servir para decorar su árbol de navidad o para cualquier otra idea de decoración navideña que se les ocurra, ya verán que es muy fácil de hacer y queda muy bonita. Sin más vamos manos a la obra.
Hello dear friends, what a pleasure to greet you today, I hope you are very well. This is my first publication in this beautiful community, where creativity has no limits, I am pleased to share my first design with all of you, I hope you like it but above all useful. Today I bring you the step by step of a beautiful garland made with few materials, which can serve to decorate your Christmas tree or for any other Christmas decoration idea that comes to mind, you will see that it is very easy to make and looks very nice. Without further ado, let's get to work.

- Foami escarchado rojo y verde
- silicón caliente
- palito de madera
- regla
- tijera
Bill of Materials:
- Red and green frosted Foami
- hot silicone
- wooden stick
- ruler
- scissors

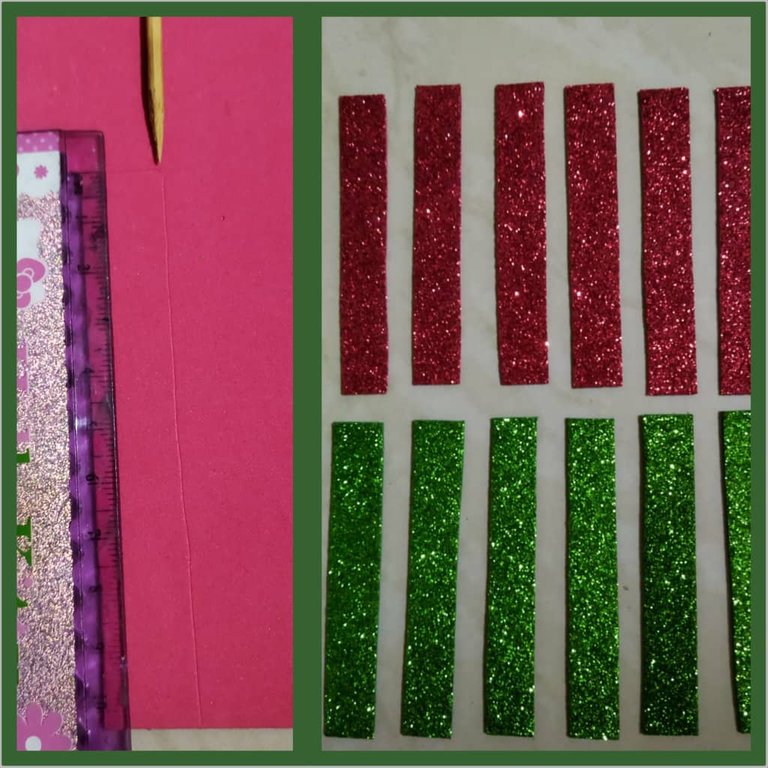
Paso 1: tomamos el foami y con la ayuda de la regla tomamos las medidas que vamos a usar, y vamos marcando el patrón con el palito de madera, para no usar lápiz y de esa forma no manchar el foami , necesitaremos 12 tiras de foami, 6 verdes y 6 rojas cada tira debe tener las siguientes medidas 5 cm de largo por 1,5 de ancho.
Step 1: we take the foami and with the help of the ruler we take the measures that we are going to use, and we mark the pattern with the wooden stick, not to use pencil and thus not to stain the foami, we will need 12 strips of foami, 6 green and 6 red each strip should have the following measures 5 cm long by 1.5 wide.
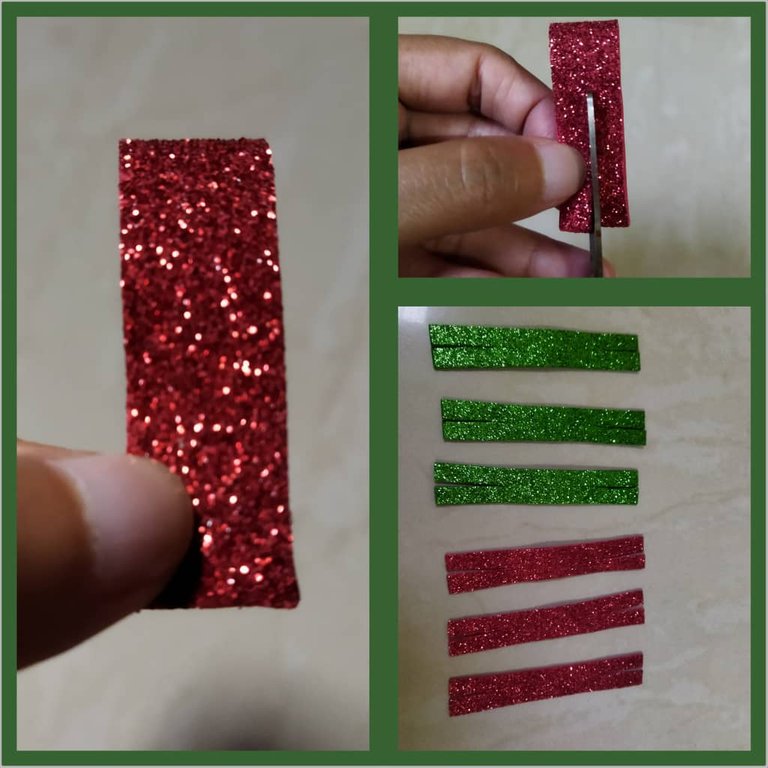
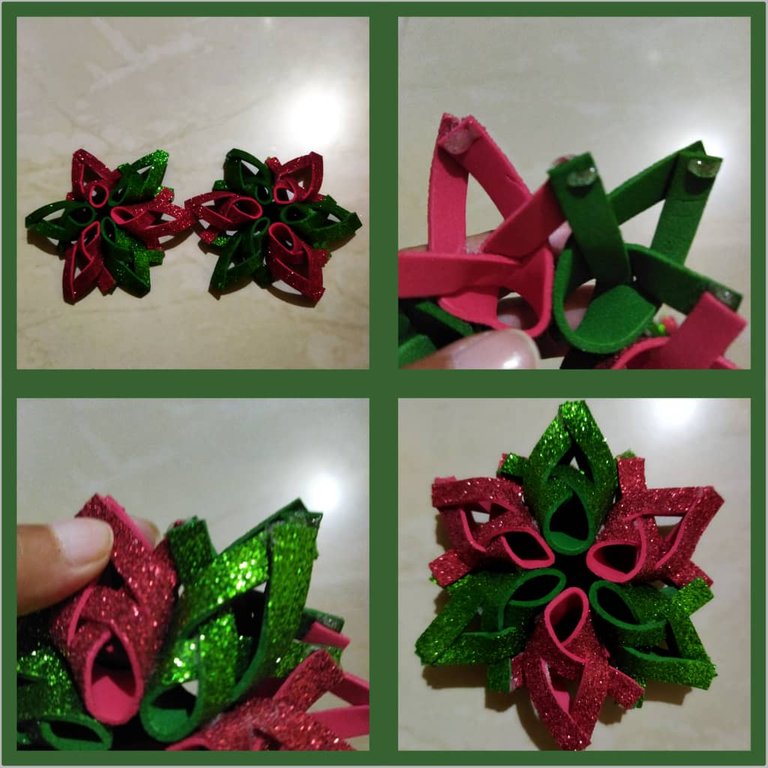
Paso 2: la guirnalda tiene 2 caras, empezamos haciendo la primera cara, tomamos una tira de foami la doblamos a la mitad y le hacemos un corte exacto por la mitad de 3,5 cm de largo como lo indica la imagen, este mismo corte deben hacerlo a las 6 tiras de foami con las medidas exactas.
Step 2: the garland has 2 sides, we start making the first side, take a strip of foami, fold it in half and make an exact cut in half 3.5 cm long as shown in the image, this same cut should be done to the 6 strips of foami with the exact measurements.
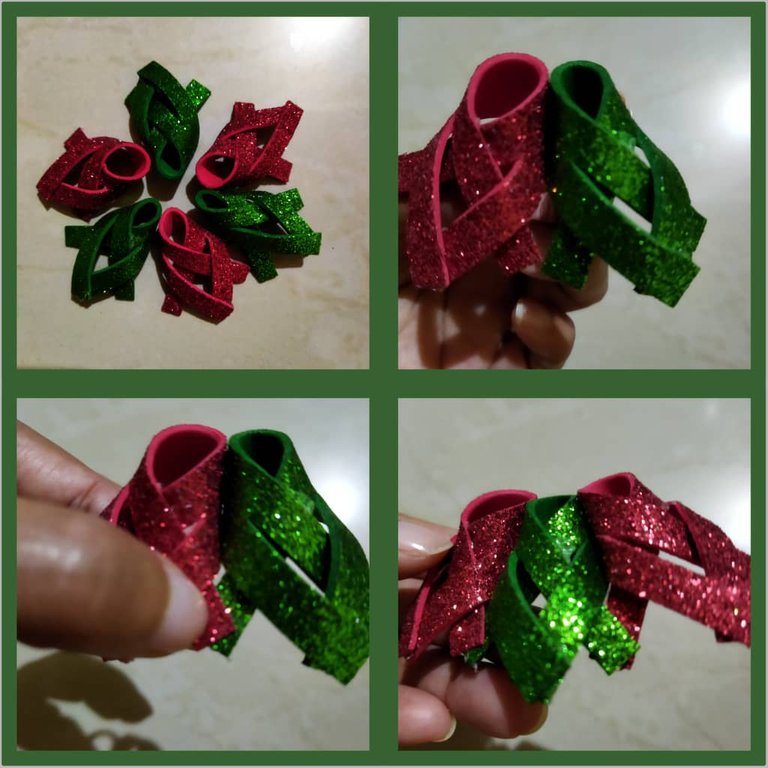
Paso 3: Luego de hacerle los cortes a las 6 tiras, toman una tira la doblan y unen las 2 tiras de abajo con un poco de silicón caliente, y las 2 tiras de la parte de arriba la pasan en forma de x por el aro que se formó, así como lo indica la imagen, a esa x le colocan un toquecito de silicón caliente para unirlas y quede fija la x, deben de repetir ese procedimiento con las 6 piezas de foami.
Step 3: After making the cuts to the 6 strips, take one strip, fold it and join the 2 bottom strips with a little hot silicone, and the 2 strips of the top part pass it in the shape of an x through the ring that was formed, as shown in the image, put a little touch of hot silicone on that x to join them and fix the x, repeat this procedure with the 6 pieces of foami.

Paso 4: una vez que tengan las 6 piezas listas, lo siguiente es unir todas la piezas intercalando los colores una verde y una roja, le aplican un poco de silicón caliente en la parte de arriba y en las puntas, y van uniendo todas las piezas como en especie de una flor, una vez que estén pegadas todas las piezas tanto en el medio como todas la puntas, entonces ya tienen lista la primera cara de la guirnalda, para hacer la segunda cara deben repetir el mismo procedimiento con exactitud.
Step 4: once you have the 6 pieces ready, the next thing is to join all the pieces interspersing the colors one green and one red, apply a little hot silicone on the top and at the tips, and are joining all the pieces as a kind of a flower, once they are glued all the pieces both in the middle and all the tips, then you have ready the first side of the garland, to make the second side must repeat the same procedure exactly.
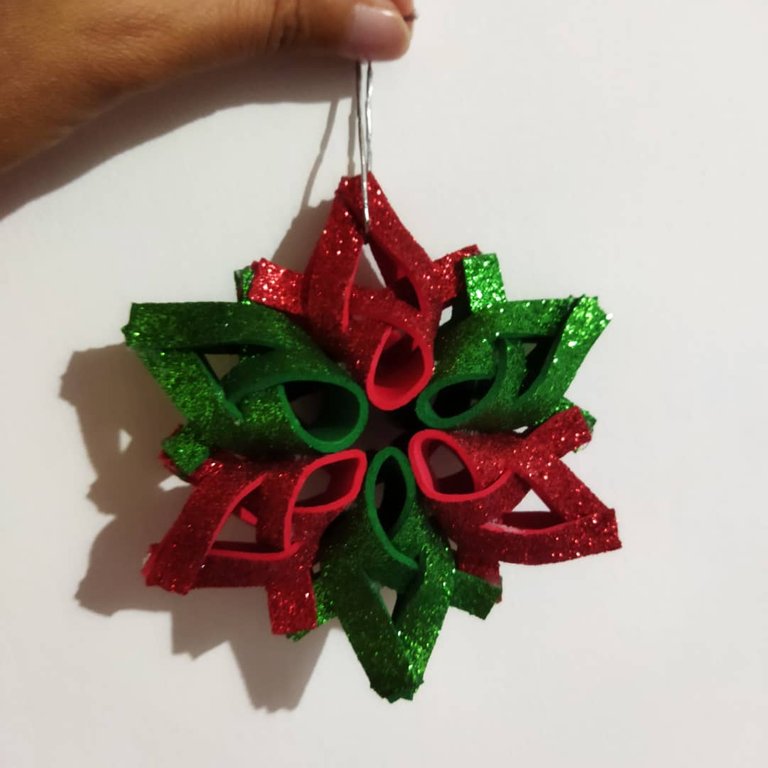
Paso5: luego que realicen las 2 caras de la guirnalda, solo deben unirlas poniendo silicón caliente a todas sus puntas y pegarlas para que queden unidas, luego le colocan un hilo para colgarla y de esa forma estaría lista su guirnalda para formar parte de su hermosa decoración navideña, espero les haya gustado esta idea que les presente el día de hoy. Nos vemos pronto con un nuevo diseño.
Step 5: after making the 2 sides of the garland, you only have to join them by putting hot silicone to all its ends and glue them together, then place a thread to hang it and that way your garland would be ready to be part of your beautiful Christmas decoration, I hope you liked this idea that I present to you today. See you soon with a new design.
¡¡¡Muchas gracias por visitar mi blog y por todo su apoyo!!!
Si tienen alguna duda o sugerencia por favor me lo hacen saber en los comentarios, hasta una nueva oportunidad.!!!
Traductor usado: deepl.com
Imágenes editadas en: Canva
fotos tomadas por mí, con mi celular xiaomi poco M3.
Copyright @veruramirez - Todos los derechos reservados.

https://twitter.com/1567555845684183043/status/1601804591913439232
The rewards earned on this comment will go directly to the people sharing the post on Twitter as long as they are registered with @poshtoken. Sign up at https://hiveposh.com.
Muy hermosa guirnalda!! me gusta mucho el brillo del foami, con las luces de navidad del arbolito va a resaltar mucho ✨✨
@imena gracias hermosa, me alegra que te haya gustado, saludos.
Thank you for sharing this post on HIVE!
Your content got selected by our fellow curator semarekha & you just received a little thank you upvote from us for your great work! Your post will be featured in one of our recurring compilations which are aiming to offer you a stage to widen your audience within the DIY scene of Hive. Stay creative & HIVE ON!
Please vote for our hive witness <3
@diyhub muchas gracias por su apoyo.
You're welcome. You did fantastic with your decoration idea there. Keep up the great work.
gracias ❤️
¡Felicitaciones!
1. Invierte en el PROYECTO ENTROPÍA y recibe ganancias semanalmente. Entra aquí para más información.
3. Suscríbete a nuestra COMUNIDAD, apoya al trail de @Entropia y así podrás ganar recompensas de curación de forma automática. Entra aquí para más información sobre nuestro trail.
4. Creación de cuentas nuevas de Hive aquí.
5. Visita nuestro canal de Youtube.
Atentamente
El equipo de curación del PROYECTO ENTROPÍA
@entropia gracias por su valioso apoyo.