Devlog Developing a Hyper Casual Game - Part 1: Initial Structure and Game Design [English/Português]
English
Greetings to everyone in the community.
I've recently been participating in some Game Jams while I still have some time off work. I'm currently working on a prototype for the MURPH is $DED - Hypercasual Game Jam. The proposed theme is to create something Hyper Casual related to ☠️ESCAPE FROM DEATH☠️.
Game Jam: Competitions for amateur game development, either in teams or individually.
I don't have much knowledge about Hyper Casual games or anything similar to that. I've gained some knowledge through YouTube videos.
This post may not contain a step-by-step tutorial, but rather a Devlog about the process. In a way, some parts may serve as learning for others.
───────•••───────
Programs used:
- Game Maker Studio 1.4 (Same coding functionality as Game Maker Studio 2)
Basic knowledge of Game Maker Studio is required, as well as GML, the programming language it uses.
───────•••───────
Starting with the structure
I like to start with organizing the foundation, separating all Objects by category, and having each one prefixed with obj_ before its name. This makes the project's coding and structure cleaner and more organized for better understanding.
My main idea is that the game has to be fast, with easy one-touch gameplay. Considering this, it will be a game of evolution and battle mechanics without the need for player intervention, except for selecting options for it.
───────•••───────
Note: Use ( /// ) to create comments in the code.
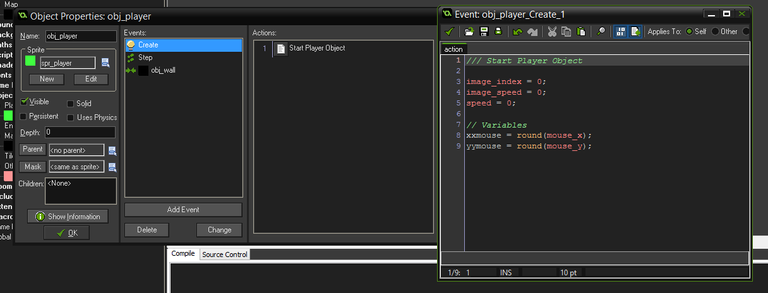
I always like to start with the object that will guide me through the scenario, as we don't have any menus or cameras yet, it will be the obj_player.
obj_player
Create
/// Start Player Object

image_index = 0;
image_speed = 0;
speed = 0;

// Variables
xxmouse = round(mouse_x);
yymouse = round(mouse_y);
Always remember to set the image and speed options of the object to 0; this prevents future conflicts. Adding variables directly. I'm using the round(x) command to set a value for the mouse position and then round it to avoid X, Y position errors.
───────•••───────
obj_player
Step Event
///State Movement

// Update mouse X,Y
xxmouse = mouse_x;
yymouse = mouse_y;

// Move to Mouse point
if instance_exists(obj_directpoint)
{
    if !place_meeting(obj_directpoint.x,obj_directpoint.y,obj_wall)
    {
        move_towards_point(obj_directpoint.x, obj_directpoint.y, 4)
        state = 1;
    }
}
else
{
    speed = 0;
}
if mouse_check_button(mb_left)
{
    if !instance_exists(obj_directpoint) && state = 0
    {
        instance_create(xxmouse, yymouse, obj_directpoint);
    }
}
else
{
    if instance_exists(obj_directpoint)
    {
        state = 0;
        with(obj_directpoint)
        {
            instance_destroy();
        }
    }
}
In summary, this code will check whenever possible if there is an object to prevent it from moving, then it will execute the action up to the point where instance_create(xxmouse, yymouse, obj_directpoint) was created. This type of movement is designed for mobile devices, simulating a finger on the screen.
Don't forget to eliminate the objects created by this code, such as obj_directpoint. You don't want to waste performance resources on that. It doesn't necessarily need to be visible, but it makes it easier to understand what's happening. Add the following code;
obj_directpoint
Collision
/// Stop movement player and instance_destroy;

// Change state movement obj_player
with(obj_player)
{
    state = 0;
    speed = 0;
}

// Destroy self object
instance_destroy();
Regarding the state variable, this is a pre-definition for us in the future; it will contain the animation states for obj_player.
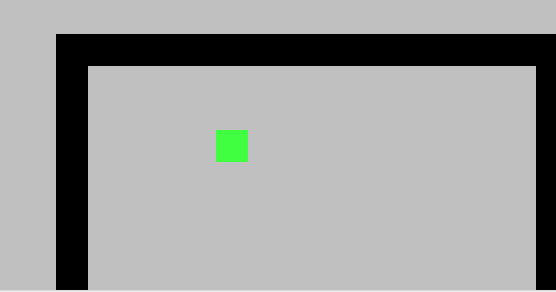
Our main character now has the ability to roam the scene after this, appearing as follows;
───────•••───────
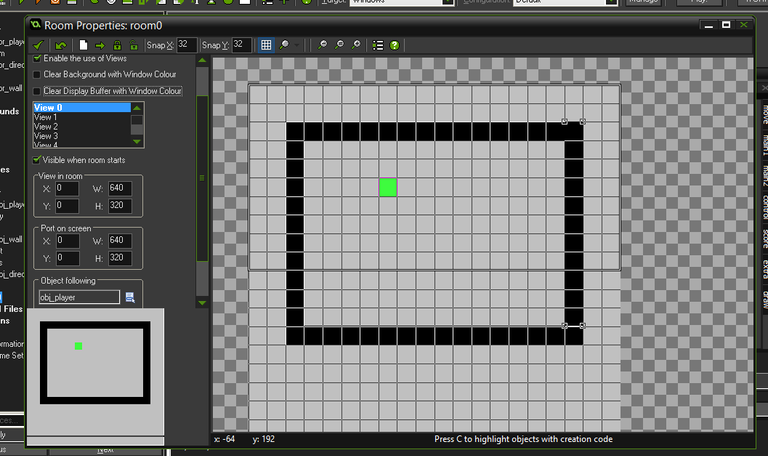
Camera Settings + Scene
The goal now is to get a camera to follow our main object so that it moves smoothly without changing our main resolution or cutting important objects from the player's screen.
For this, we use Views. Using a screen size of 640x320 while our map has a size of 640x640, we select the obj_cameraview to be created shortly to be followed in Object Following.
Creating a new object called obj_cameraview, there is no need to add any image for this; it will become something fixed to the scene, just select it as Persistent.
/// Camera Follow obj_player

if (instance_exists(obj_player))
{
    x = lerp(x, obj_player.x , .2);
    y = lerp(y, obj_player.y , .2);
}
───────•••───────
Ending the first part
- Movement Click/Tap to Move.
- Camera following the object.
- Simple collision.
In the next update and devlog, I will implement new mechanics and the game's art. As I mentioned earlier, everything has to start simple, and you gradually add more over time.
───────•••───────
Português-BR
Saudações a todos da comunidade.
Recentemente, estou participando de algumas Game Jams enquanto ainda estou com um tempo fora do trabalho. Estou criando um tipo de protótipo ainda para MURPH is $DED - Hypercasual Game Jam. O tema proposto é ser algo Hyper Casual sobre algo relacionado a ☠️ESCAPE FROM DEATH☠️.
Game Jam: são competições sobre desenvolvimento de jogos amadores em equipe ou individual.
Não tenho muito conhecimento de jogos Hyper Casuais ou algo semelhante a isso; obtive um pouco de conhecimento através de vídeos no Youtube. Provavelmente, essa postagem não contenha um tutorial passo-a-passo, mas sim uma forma de Devlog sobre o processo. De certa forma, uma parte pode ficar de aprendizado para os demais.
───────•••───────
Programas utilizados:
- Game Maker Studio 1.4 (Mesma funcionalidade de codificação no Game Maker Studio 2)
Necessário conhecimento básico de Game Maker Studio, além de GML, a linguagem de programação utilizada pelo mesmo.
───────•••───────
Começando pela estrutura
Gosto de começar pela organização da base, separando todos os Objetos por categoria, além de todos terem antes de seu nome o obj_. Isso torna a codificação e estrutura do projeto mais limpa e organizada para entender melhor o que você está fazendo.
Minha ideia principal é: O jogo tem que ser rápido, de fácil jogabilidade de apenas um toque. Pensando nisso, ele será um jogo de mecânicas de evolução e batalha sem a necessidade de intervenção do jogador, a não ser de fato por selecionar as opções para isso.
Lembrando: Utilize ( /// ) para criar comentários no código.
───────•••───────
Sempre gosto de começar pelo objeto que vai me guiar pelo cenário, como ainda não temos nenhum tipo de menu, ou câmeras para isso, será o obj_player.
obj_player
Create
/// Start Player Object

image_index = 0;
image_speed = 0;
speed = 0;

// Variables
xxmouse = round(mouse_x);
yymouse = round(mouse_y);
Sempre lembrando de definir as opções de imagem e velocidade do objeto em 0, isso evita conflitos futuros que teremos. Adicionando as variáveis diretamente. Estou utilizando o comando round(x), isso irá definir um valor para a posição do mouse, e então arredondar, para evitar erros de posição X,Y.
───────•••───────
obj_player
Step Event
/// State Movement

// Update mouse X,Y
xxmouse = mouse_x;
yymouse = mouse_y;

// Move to Mouse point
if instance_exists(obj_directpoint)
{
    if !place_meeting(obj_directpoint.x,obj_directpoint.y,obj_wall)
    {
        move_towards_point(obj_directpoint.x, obj_directpoint.y, 4)
        state = 1;
    }
}
else
{
    speed = 0;
}
if mouse_check_button(mb_left)
{
    if !instance_exists(obj_directpoint) && state = 0
    {
        instance_create(xxmouse, yymouse, obj_directpoint);
    }
}
else
{
    if instance_exists(obj_directpoint)
    {
        state = 0;
        with(obj_directpoint)
        {
            instance_destroy();
        }
    }
}
Uma Game Jam é definida muitas vezes em poucos dias, ou seja, você não tem muito tempo para organizar tudo da melhor forma, desde programação, game design, arte em geral e outros semelhantes a isso. Então tornar o código o mais simples e funcional possível é a chave para você conseguir entrar algo a tempo.
Esse código, em resumo, irá checar sempre que possível se há algum objeto para impedir que ele se movimente, em seguida, irá executar a ação até o ponto onde o instance_create(xxmouse,yymouse, obj_directpoint) foi criado. Esse tipo de movimentação foi designado para dispositivos móveis, simulando o dedo na tela.
Não podemos esquecer de eliminar os objetos criados por esse código, sendo o obj_directpoint. Você não vai querer gastar recursos de performance geral com isso. Ele não necessariamente precisa estar visível, mas isso facilita para melhor entendimento do que está acontecendo. Adicione o seguinte código;
obj_directpoint
Collision
/// Stop movement player and instance_destroy;

// Change state movement obj_player
with(obj_player)
{
    state = 0;
    speed = 0;
}

// Destroy self object
instance_destroy();
Sobre a variável state, isso é uma pré-definição para nós futuramente, é essa variável que irá conter os estados de animação para obj_player.
Nosso personagem principal já tem a possibilidade de vagar pelo cenário após isso, ficando dessa seguinte forma;
───────•••───────
Configurações de Câmera + Cenário
O objetivo agora é obter uma câmera para seguir nosso objeto principal, de modo que ela se movimente suavemente, sem alterar nossa resolução principal ou cortar objetos importantes da tela do jogador.
Para isso utilizamos Views. Utilizando o tamanho de tela 640x320 enquanto nosso mapa contém o tamanho 640x640, selecionamos o obj_cameraview que criaremos logo em seguida para ser seguido em Object Following.
Criando um novo objeto chamado obj_cameraview, não há necessidade de adicionar alguma imagem para isso, ele se tornará algo fixo ao cenário, basta
selecionar como Persistent.
/// Camera Follow obj_player

if (instance_exists(obj_player))
{
    x = lerp(x, obj_player.x , .2);
    y = lerp(y, obj_player.y , .2);
}
───────•••───────
Encerrando a primeira parte
- Movimentação Click/Tap to Move.
- Câmera seguindo objeto.
- Colisão simples
No próximo update e devlog, irei implementar novas mecânicas e a arte do jogo. Como eu mencionei anteriormente, tudo tem que começar simples, e com o tempo você irá adicionando aos poucos.
───────•••───────
Links importantes
Posted Using InLeo Alpha
Posted Using InLeo Alpha
Your post was manually curated by @CrazyPhantomBR.
Delegate your HP to the hive-br.voter account and earn Hive daily!
🔹 Follow our Curation Trail and don't miss voting! 🔹
Obrigado por promover a comunidade Hive-BR em suas postagens.
Vamos seguir fortalecendo a Hive
game jams are fun. i have met a few game makers here on hive. we should make a Hive game maker squad and make a game together. hive needs a great game-maker community. i feel like this is the perfect platform for networking about game making.
I totally agree with you. Maybe better developed games on Hive will attract a better audience.
Congratulations @vicvondoom! You have completed the following achievement on the Hive blockchain And have been rewarded with New badge(s)
Your next target is to reach 300 upvotes.
Your next target is to reach 50 comments.
Your next target is to reach 50 replies.
You can view your badges on your board and compare yourself to others in the Ranking
If you no longer want to receive notifications, reply to this comment with the word
STOPCheck out our last posts: