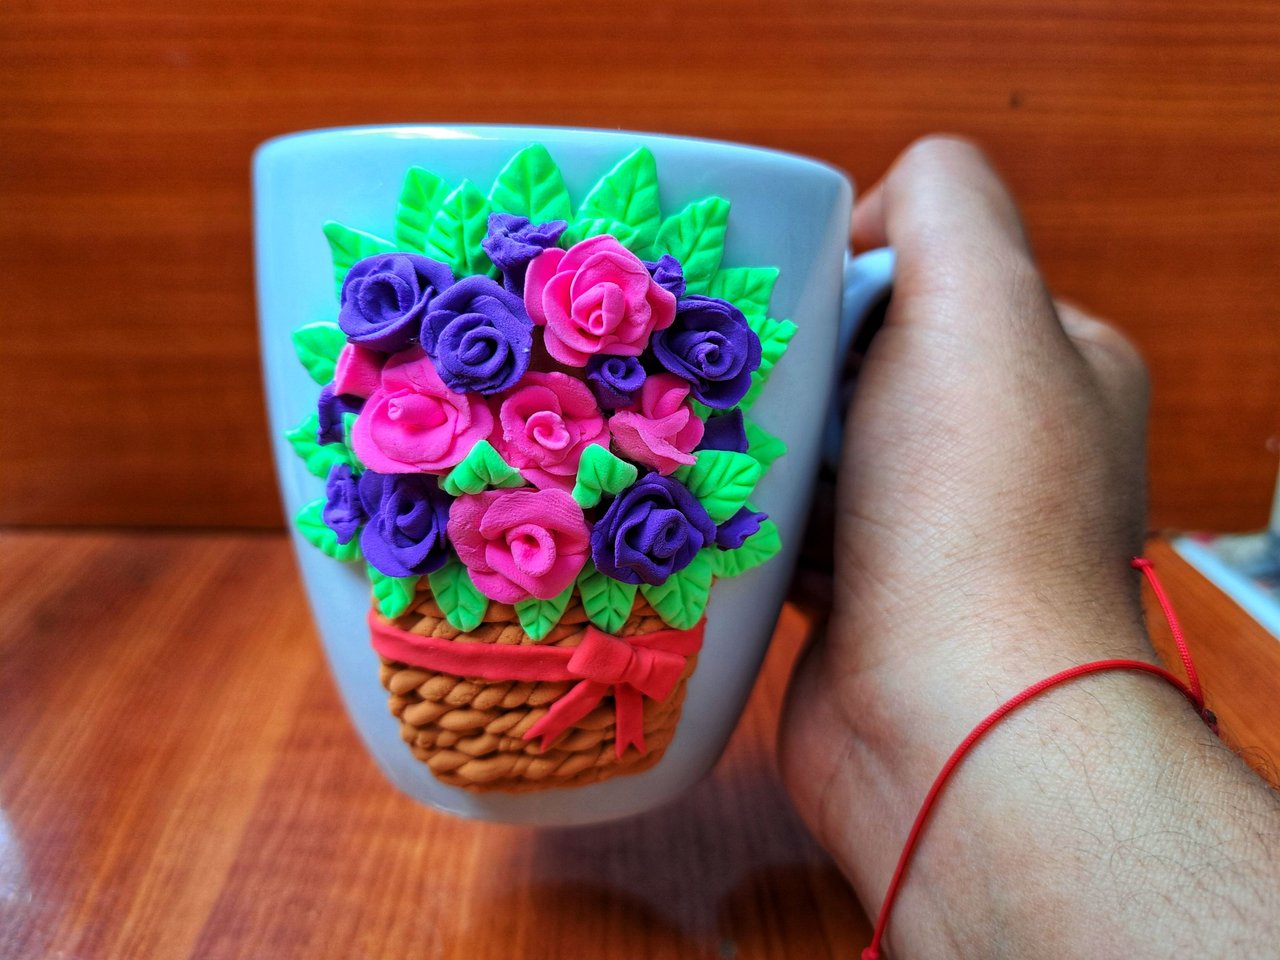
[EN-ES] Decorated mug, gift for women's day. // Taza decorada, regalo para el día de la mujer.
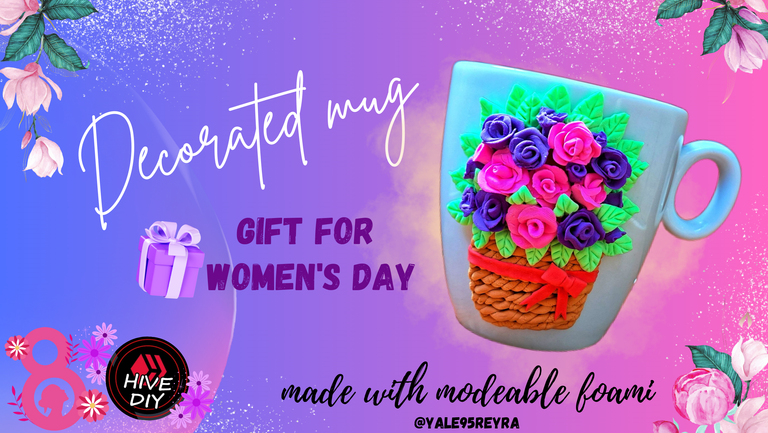
Hello friends craft lovers, soon is coming March 8, Women's Day, therefore, today I wanted to bring you something delicate and beautiful that I know that some other woman may like to not generalize. Just like Mother's Day, this is a special date for all women where we have parties and exchange gifts with our closest women and this idea that I present to you can be a beautiful gift for one of them. Almost always women love flowers, so I decided to decorate this simple mug with a beautiful floral arrangement that stands out to the eye, with bright colors that completely eliminate the simplicity that characterizes it. Below, I show you the step by step of how I decorated it:
Hola amigos amantes de las manualidades, pronto se acerca el 8 de marzo, Día de la Mujer, por lo tanto, hoy quise traerles algo delicado y hermoso que sé que les puede gustar a alguna que otra mujer para no generalizar. Al igual que el día de las madres esta es una fecha especial para tosas las mujeres donde realizamos fiestas e intercambiamos regalos con nuestras féminas más allegadas y esta idea que les presento, puede ser un bello obsequio para una de ellas. Casi siempre a las mujeres nos encantan las flores, pues por ello decidí decorar esta escueta taza con un hermoso arreglo floral que resalte a la vista, con unos colores llamativos que eliminen totalmente esa simplicidad que la caracteriza. A continuación, te muestro el paso a paso de como la decoré:

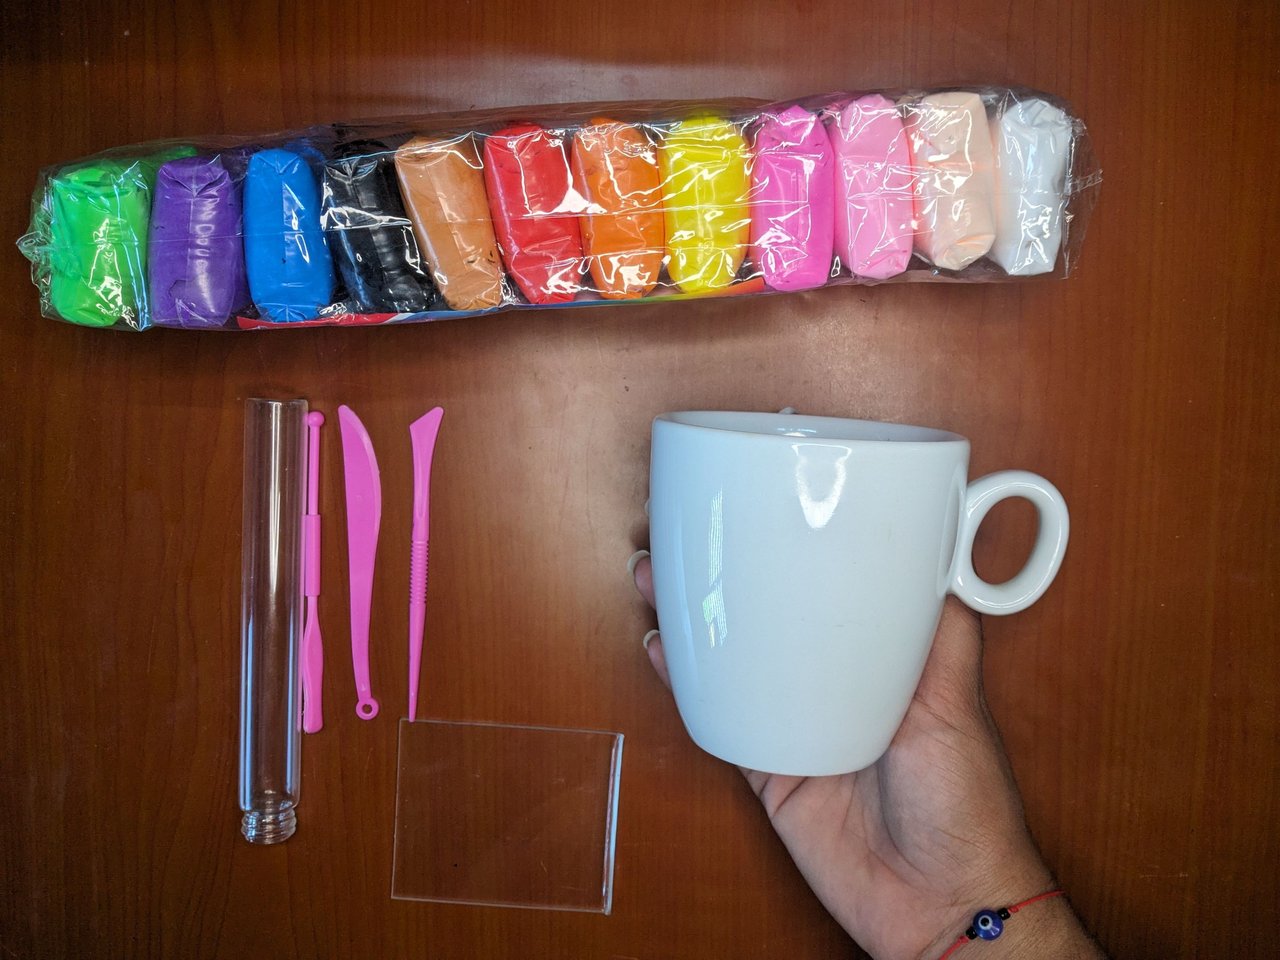
Materials // Materiales
- 1 cup / 1 taza
- Moldable Foami of various colors / Foami moldeable de varios colores
- Stakes / Estecas
- Roller / Rodillo
- Clear acrylic plate / Placa de acrílico transparente
Step by step // Paso a paso
 |
 |
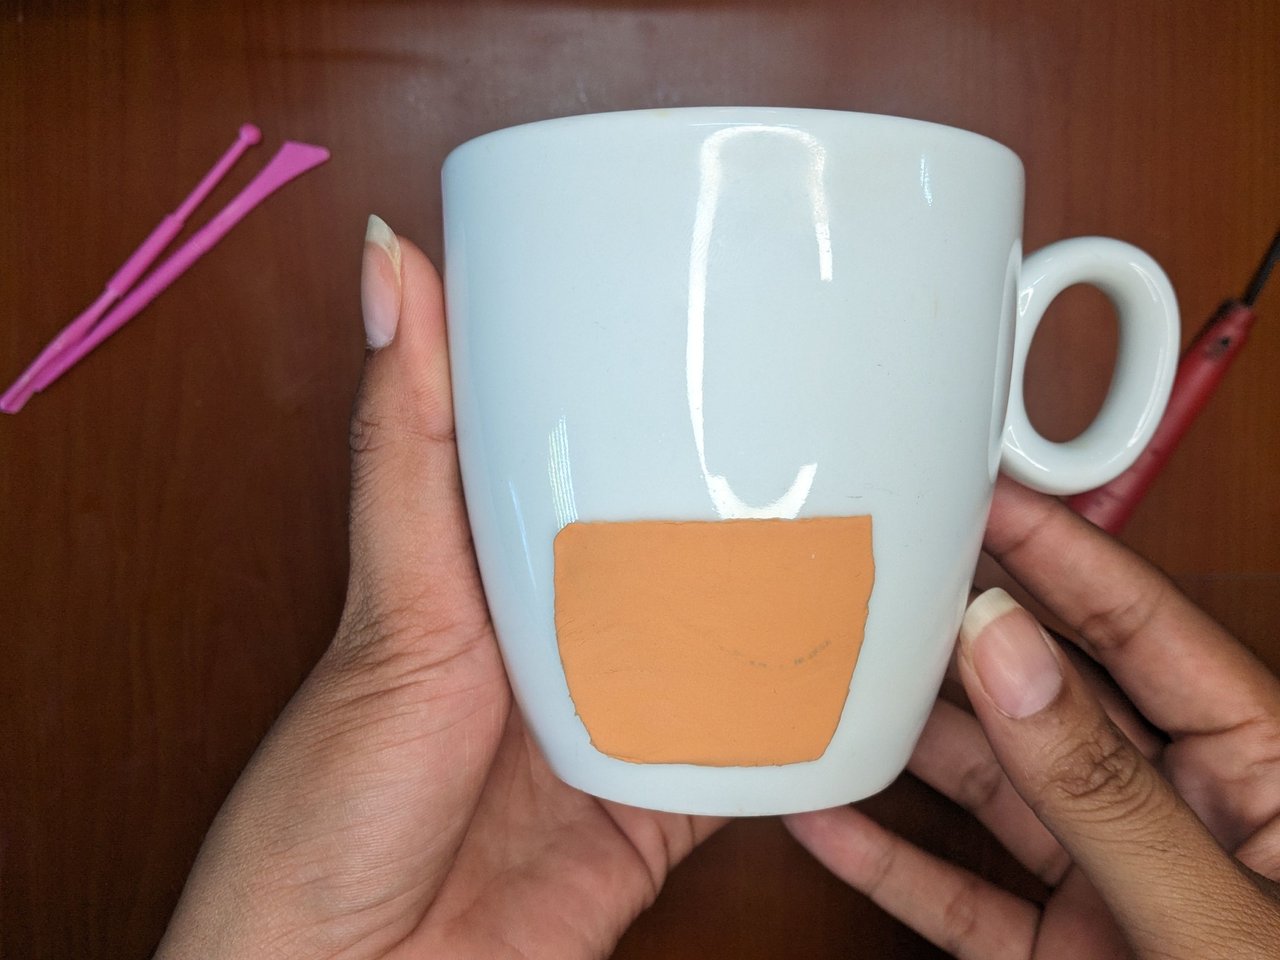 |
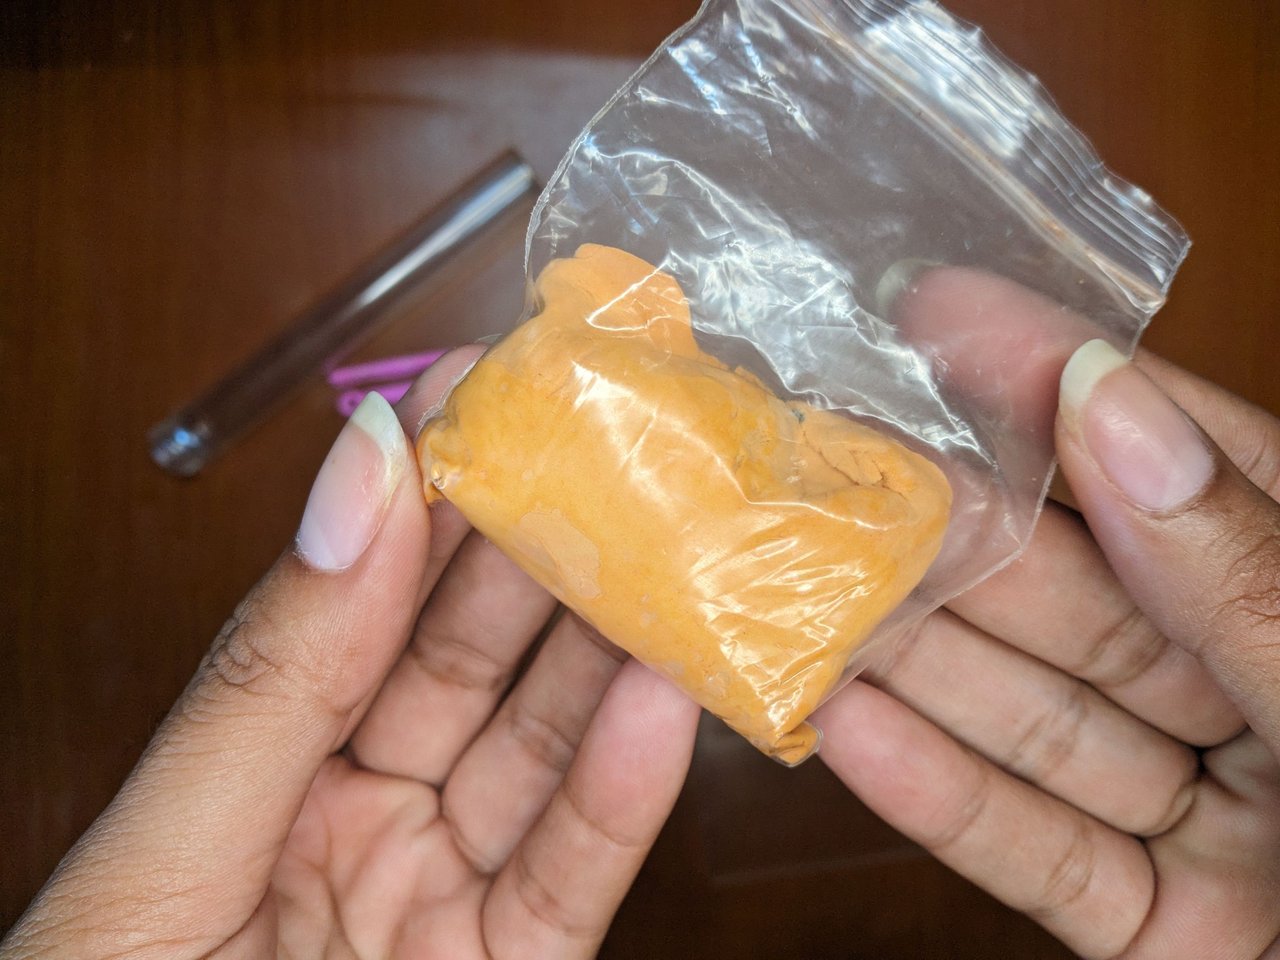
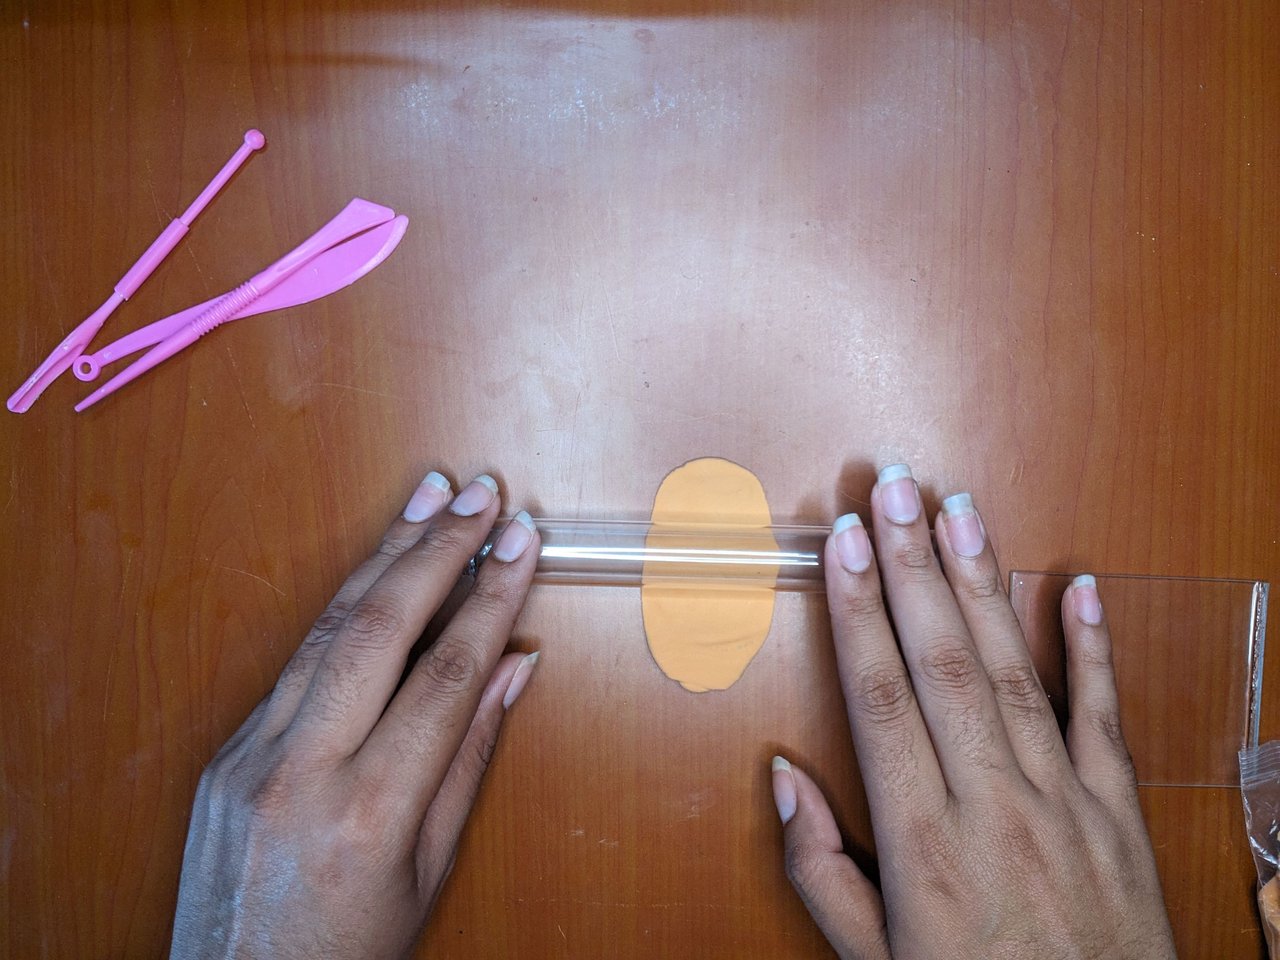
The material I used was moldable foami, you can also use cold porcelain which is much better because when it dries it has more hardness, but that depends on the availability you have. The first thing to do is to make a base, for this I used ocher colored foami. Knead and flatten with a rolling pin until it is a thin layer. Cut it in the shape of a basket and glue it to the cup quickly before it starts to dry to take advantage of the moisture of the foami itself.
El material que utilicé fue foami moldeable, también pueden utilizar porcelana fría que es mucho mejor porque al secar tiene más dureza, pero ya eso depende de la disponibilidad que tengan. Lo primero es hacer una base, para ello tomé foami color ocre. Amasar y aplanar con el rodillo hasta que quede una capa fina. Cortar con la forma de una cesta y pegar a la taza rápidamente antes de que comience a secar para aprovechar la humedad del propio foami.
 |
 |
In the same way make the base where we will place the flowers, this will be the size we want.
De igual forma hacer la base donde colocaremos las flores, esta será del tamaño que deseemos.
 |
 |
 |
 |
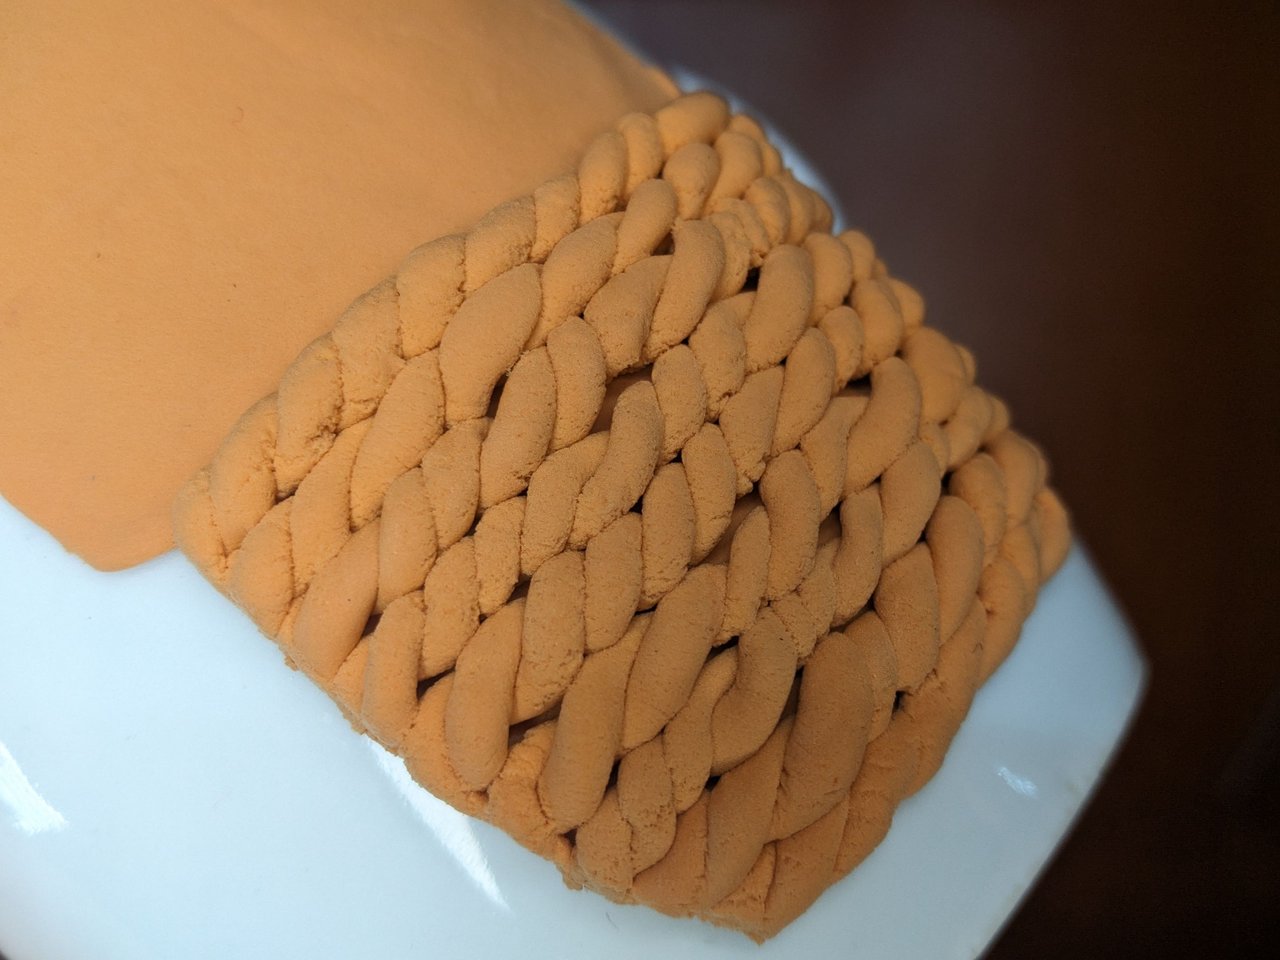 |
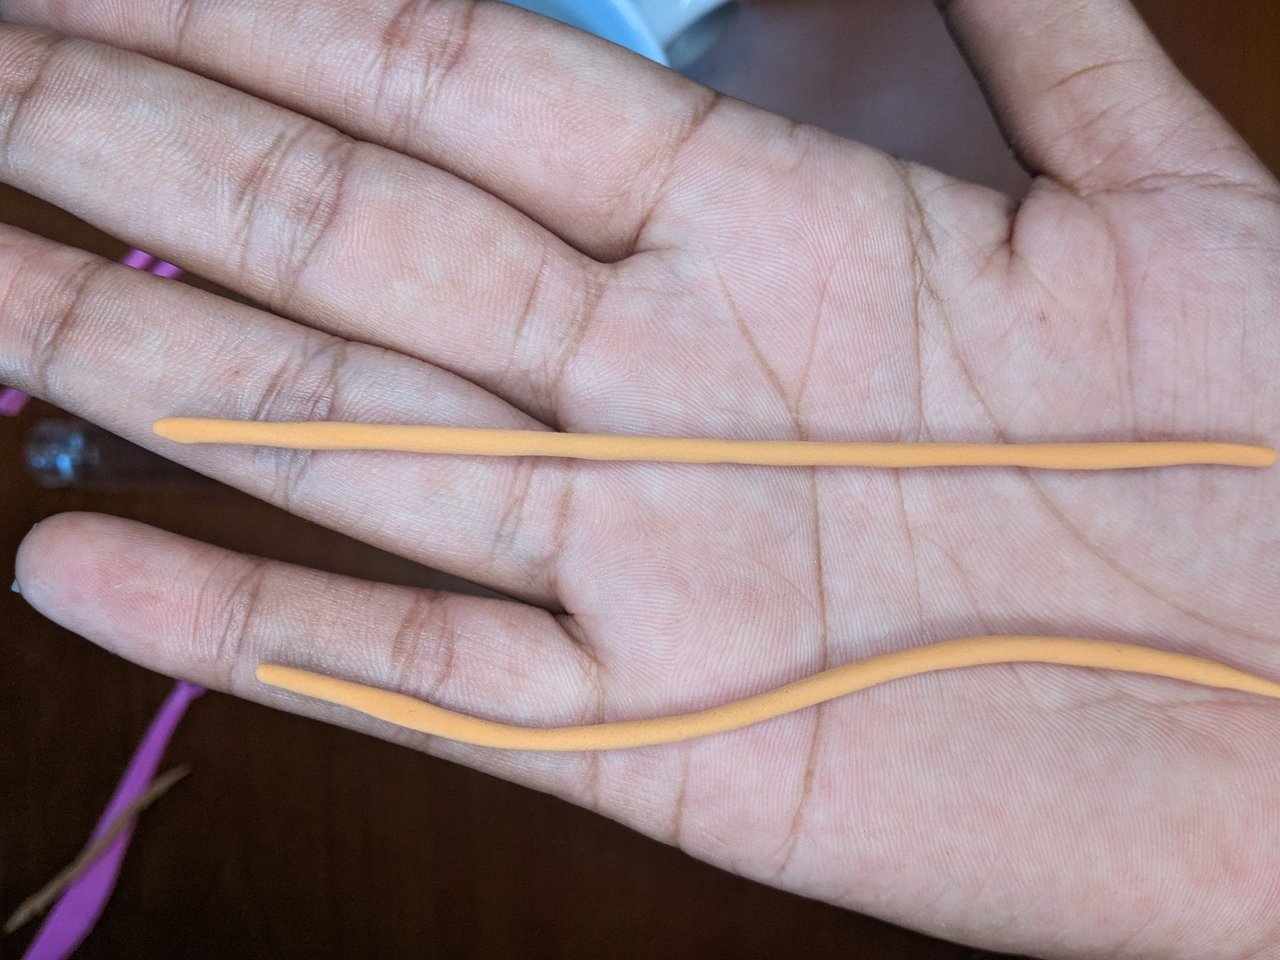
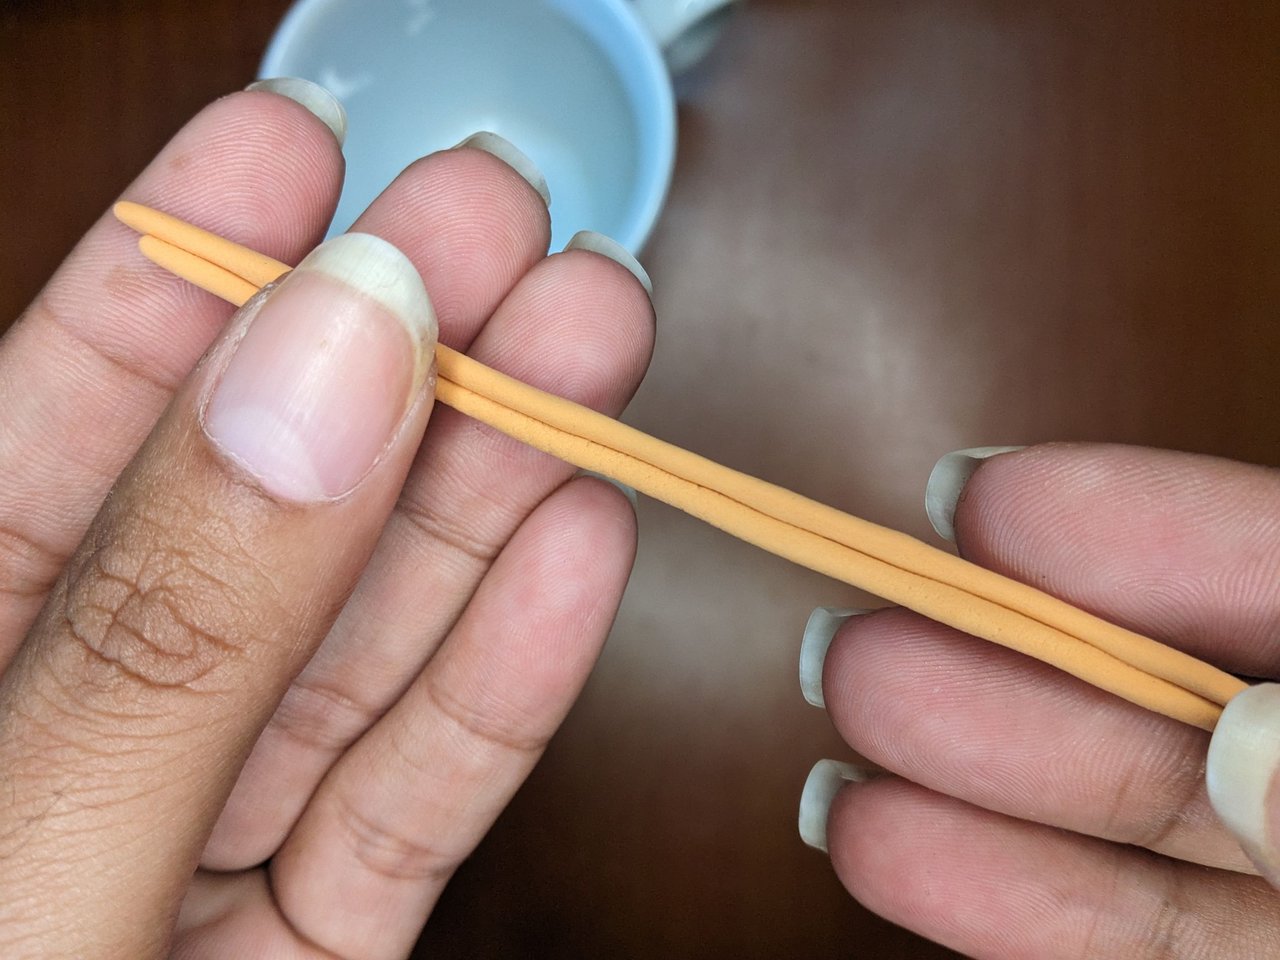
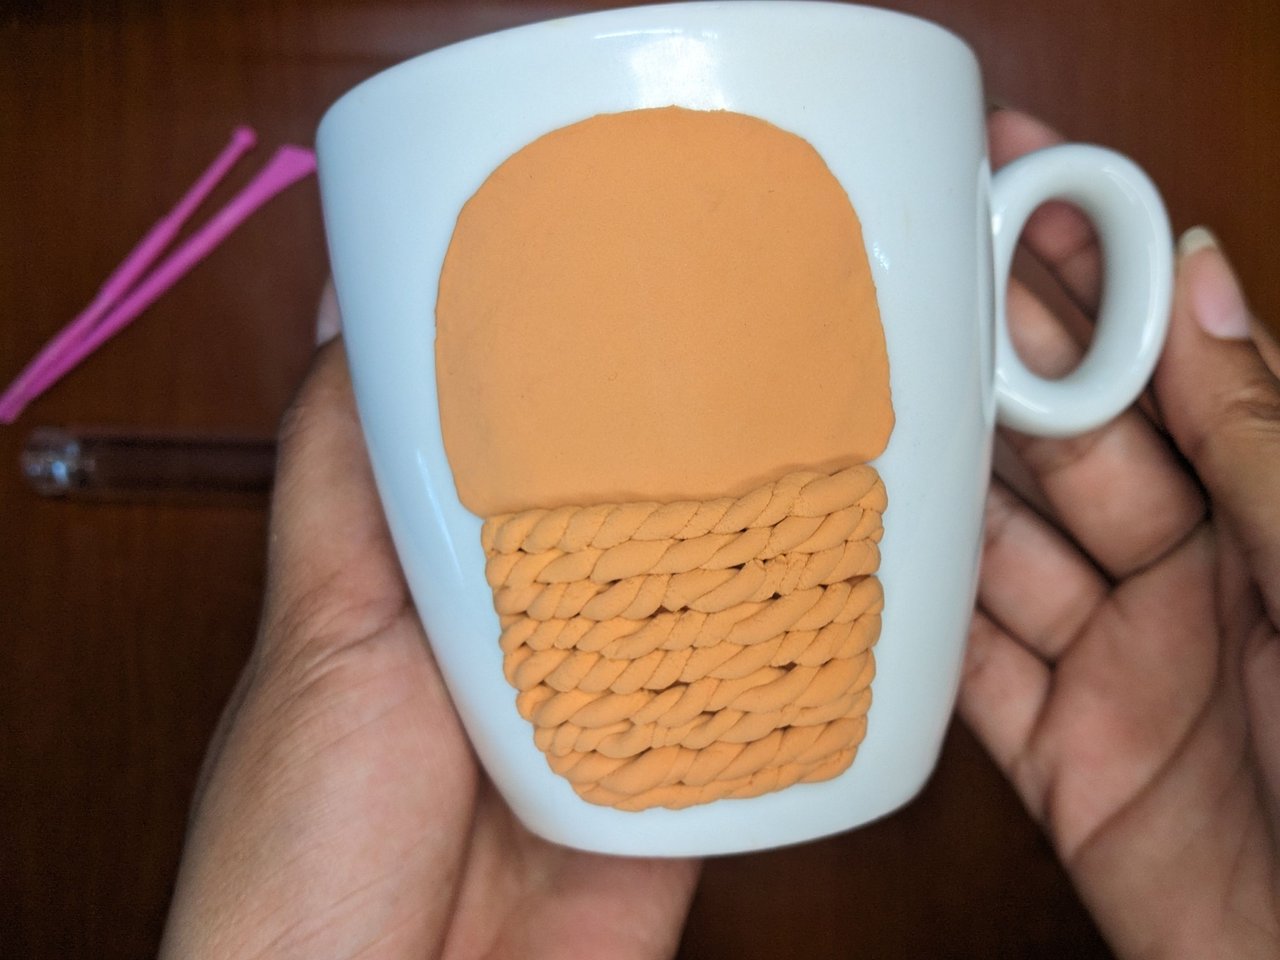
With this same color, I stretched the foami and made some long strips, place them side by side and twist them carefully so as not to break them, because this material dries out very quickly, the good thing is that when joining two pieces it is not necessary to use glue because they stick by themselves. Then the twisted strips are placed all over the lower part of the base. This way it looks like a woven basket.
Con este mismo color, fui estirando el foami y elaboré unas tiras largas, las colocas una al lado de la otra y se va torciendo con cuidado de no romperse, porque este material se reseca muy rápido, lo bueno es que al unir dos piezas no es necesario utilizar pegamento porque se pegan solas. Luego se van colocando las tiras torcidas en toda la parte inferior de la base. De esta forma parece una cesta tejida.
 |
 |
 |
 |
 |
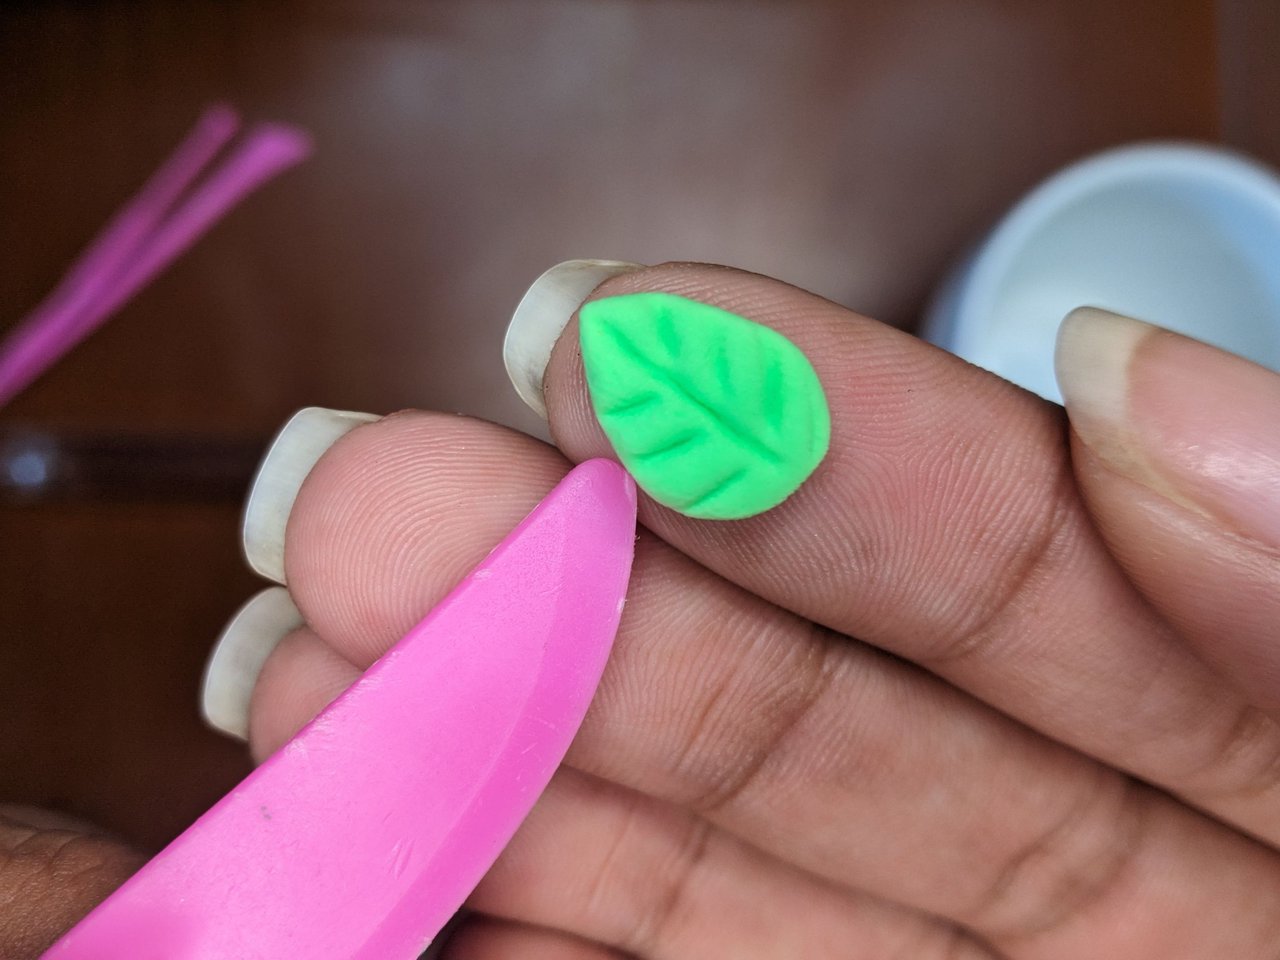
Then with green foami I made the leaves of the flowers, first, make a little ball, flatten it a little and press on one end as if I were going to make a teardrop. Then, with a stake, mark some lines to make it look like a real leaf. In this way make several.
Luego con foami verde fui elaborando las hojas de las flores, primeramente, hacer una pelotica, aplanar un poco y en un extremo presionar como si fuera a hacer una lágrima. Después con una esteca marcar unas líneas para que parezca verdaderamente una hoja. De esta forma hacer varias.
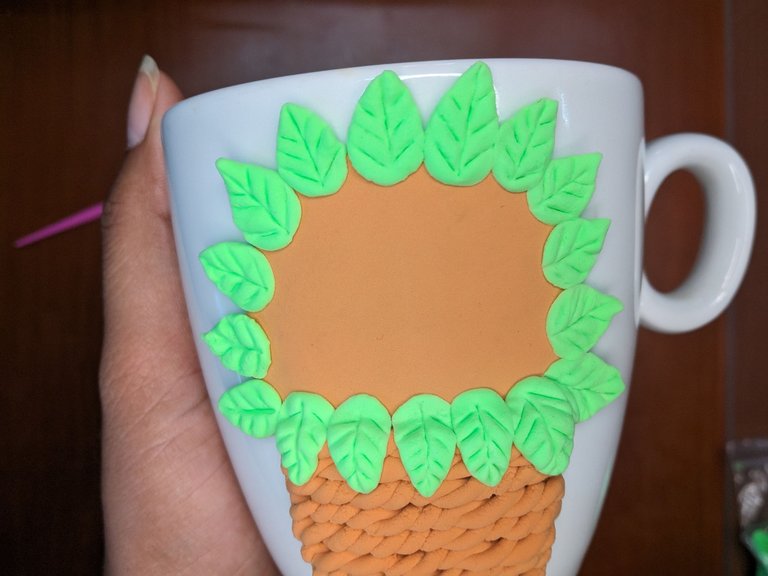
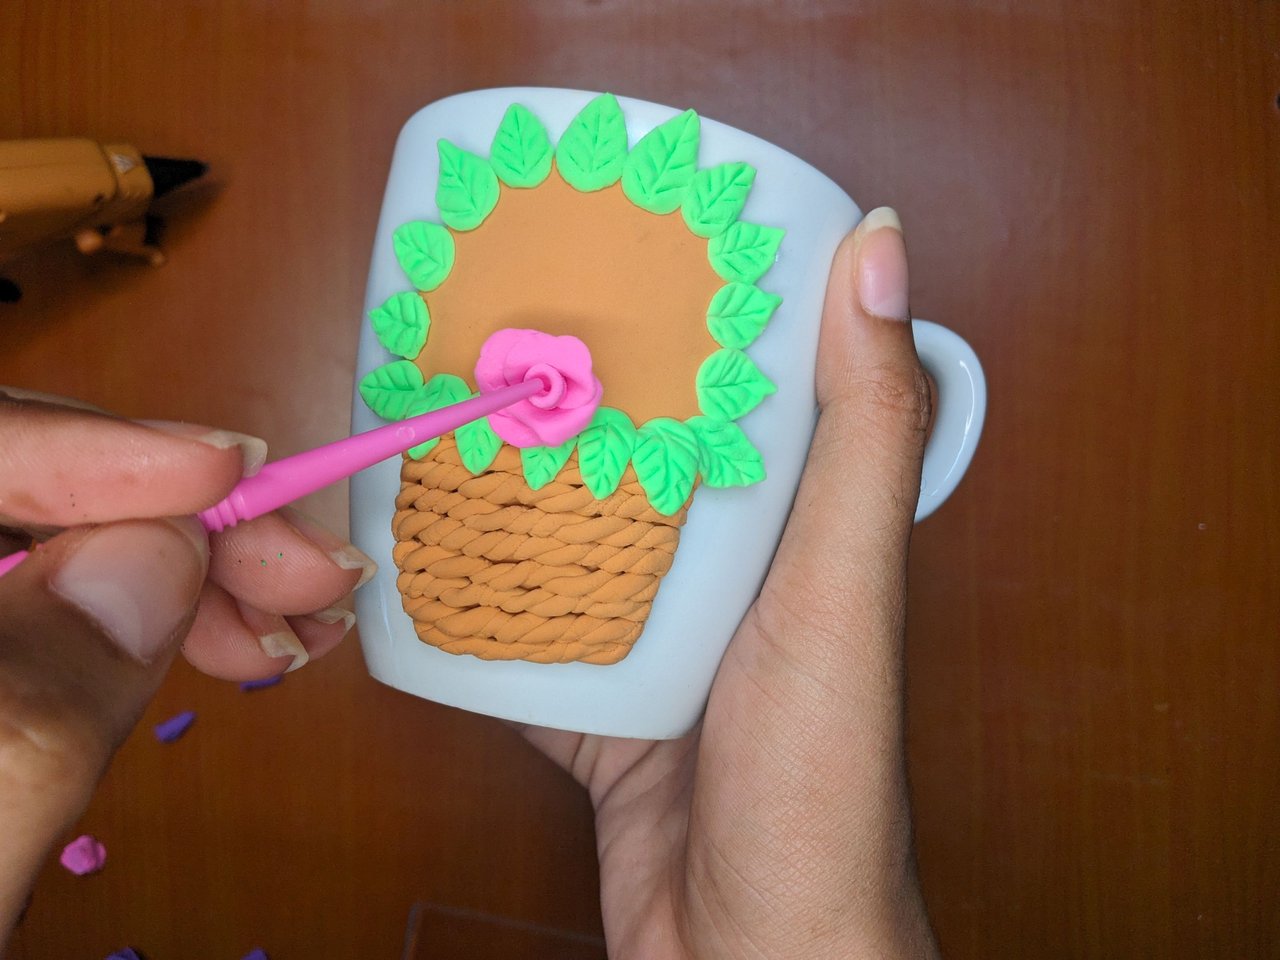
Place the leaves all around the edge of the upper base, side by side.
Colocar las hojas en todo el borde de la base superior, una al lado de la otra.
 |
 |
 |
 |
 |
 |
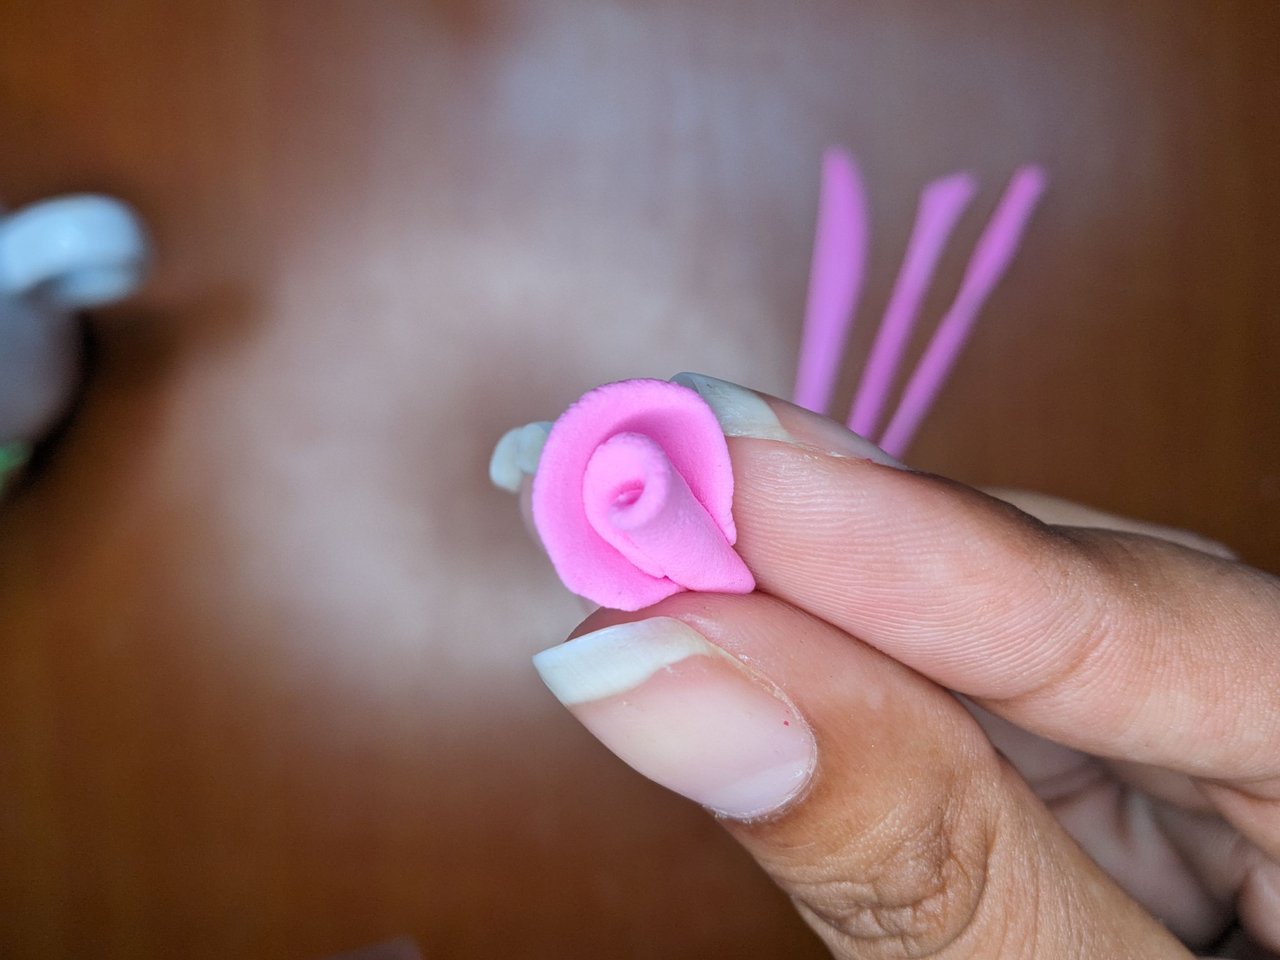
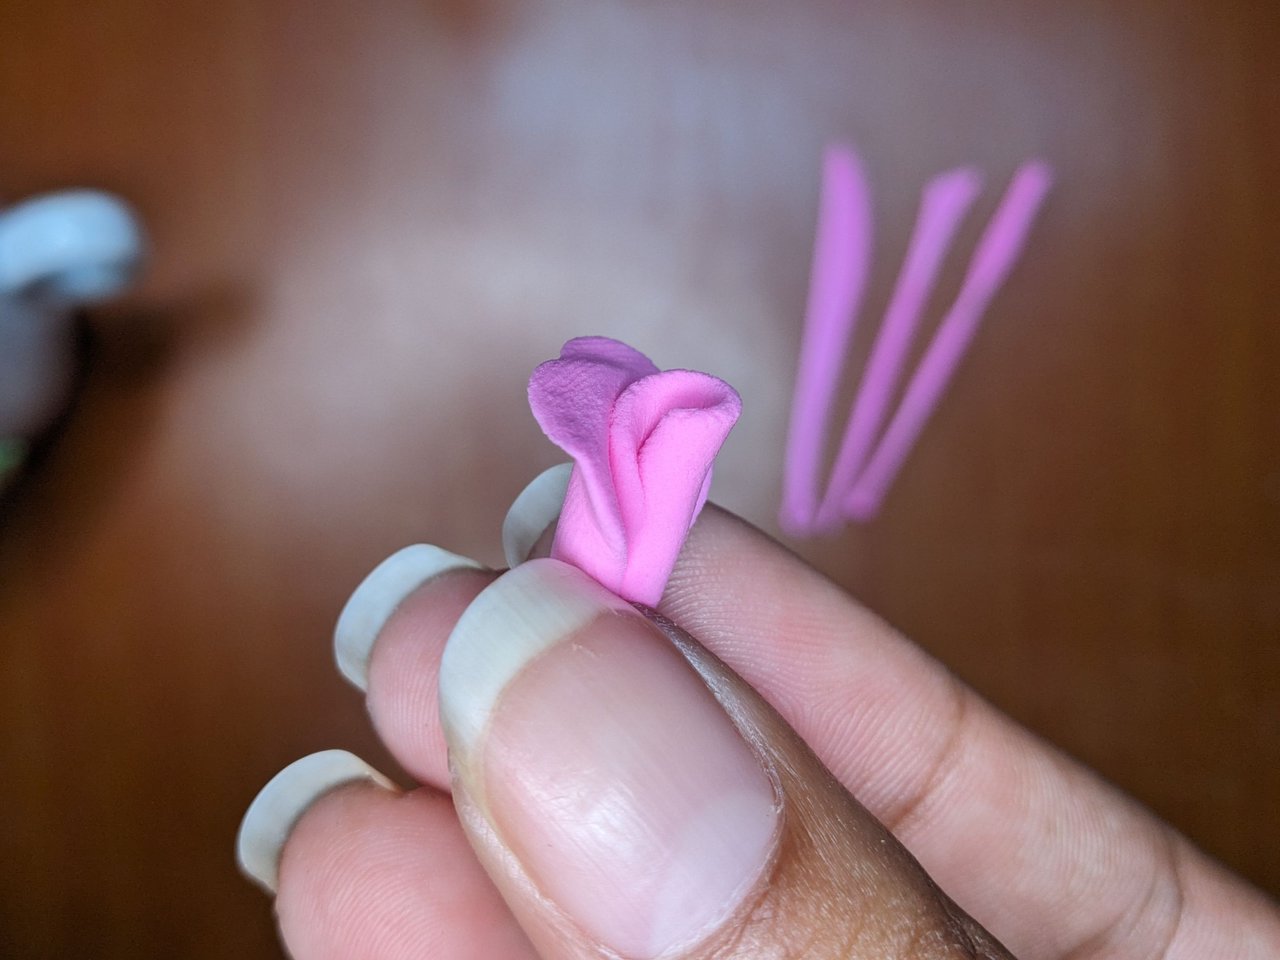
To make the flowers, we start by making a ball, which we flatten with the help of the transparent acrylic plate that allows us to see through it and thus determine the force with which we press. Then we roll it with our fingers, this will be the center of the flower. To make the rest of the petals, we return with the same procedure, and we only place them and glue them one to the other from the middle down and making a fold at the top.
Para elaborar las flores, comenzamos haciendo una pelotica, la cual aplastamos con ayuda de la placa transparente de acrílico que permite ver a través de ella y así determinar la fuerza con la que presionamos. Luego con los dedos la enrollamos, esta será el centro de la flor. Para hacer el resto de los pétalos, volvemos con el mismo procedimiento, y solo vamos colocándolos y pegando uno con otro de la mitad hacia abajo y haciendo un doblez en la parte superior.
 |
 |
 |
 |
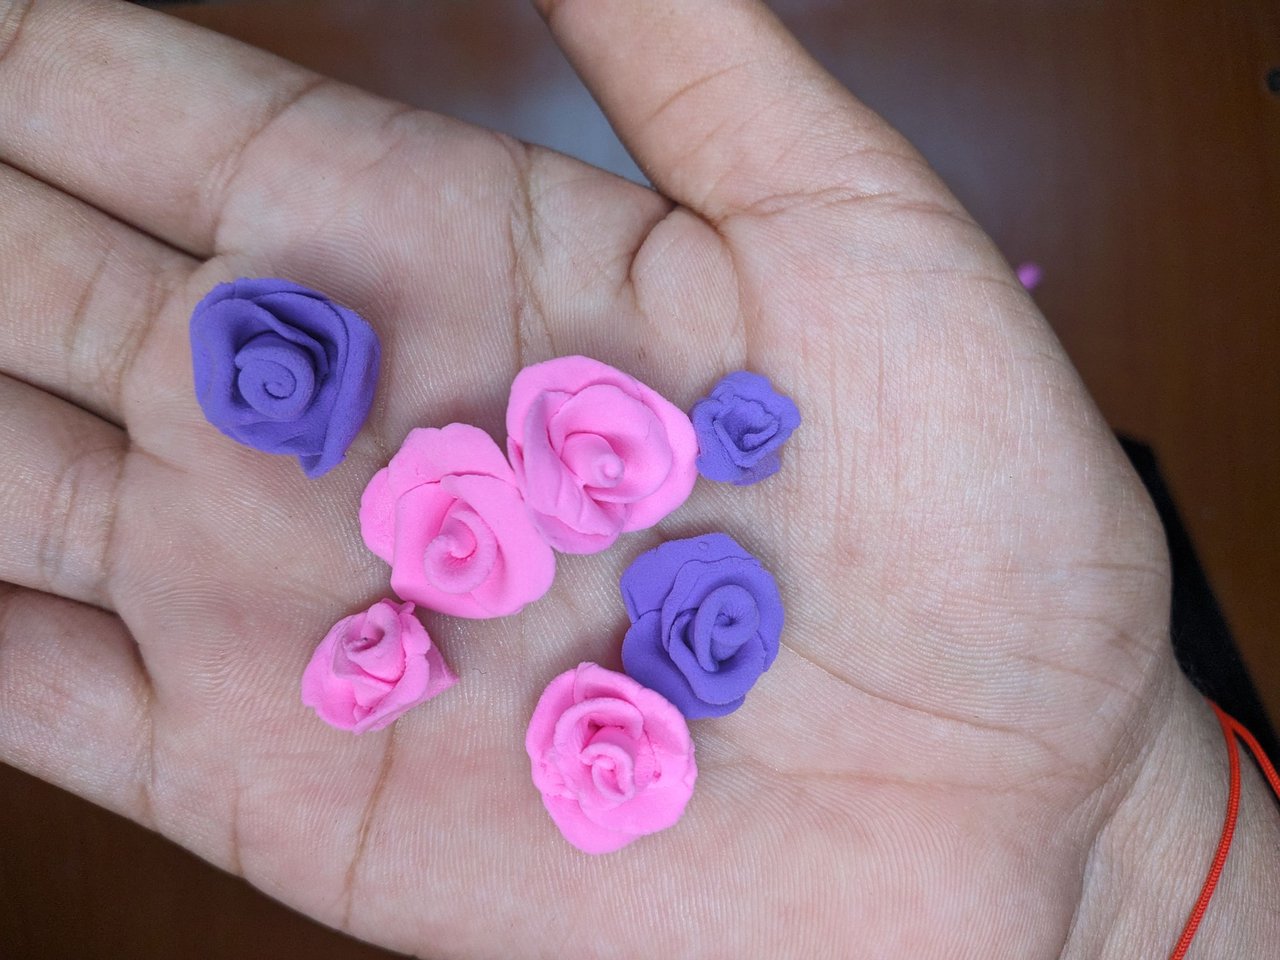
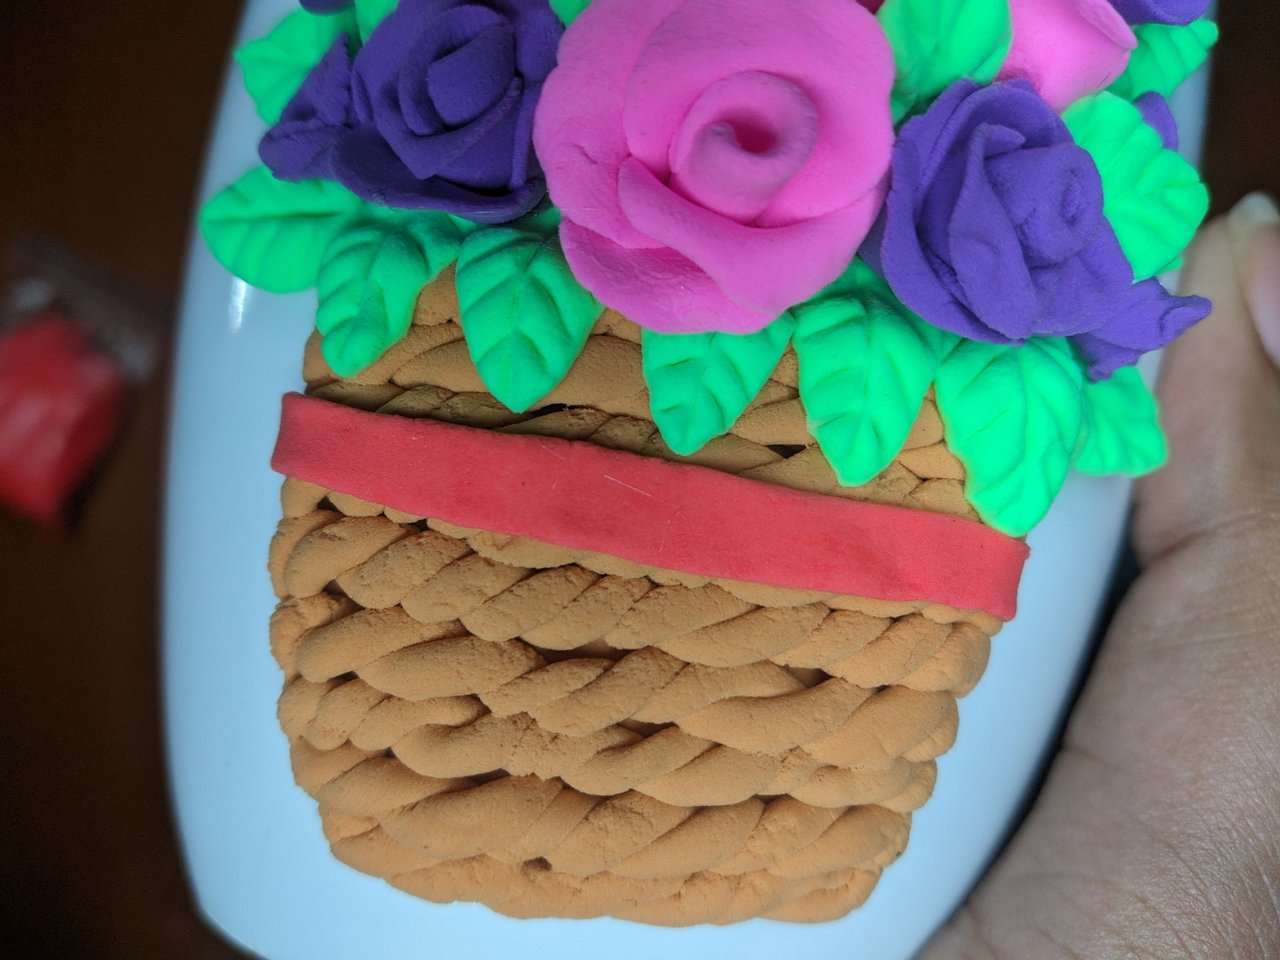
Once you have made all the flowers in the color you want, place them from the bottom to the top, a line of flowers and then include some leaves in between, until you fill all the space. I had to use silicone to glue the flowers because I took a long time making them and the first ones were drying out. Also, I made some closed ones to fill in the empty spaces.
Una vez hechas todas las flores del color que desees, ir colocándolas desde abajo hacia arriba, una línea de flores y luego incluir algunas hojas intermedias, hasta rellenar todo el espacio. Tuve que utilizar silicona para pegar las flores porque demoré haciéndolas y las primeras se iban secando. Además, hacer algunas cerraditas para ir rellenando los espacios vacíos.
 |
 |
 |
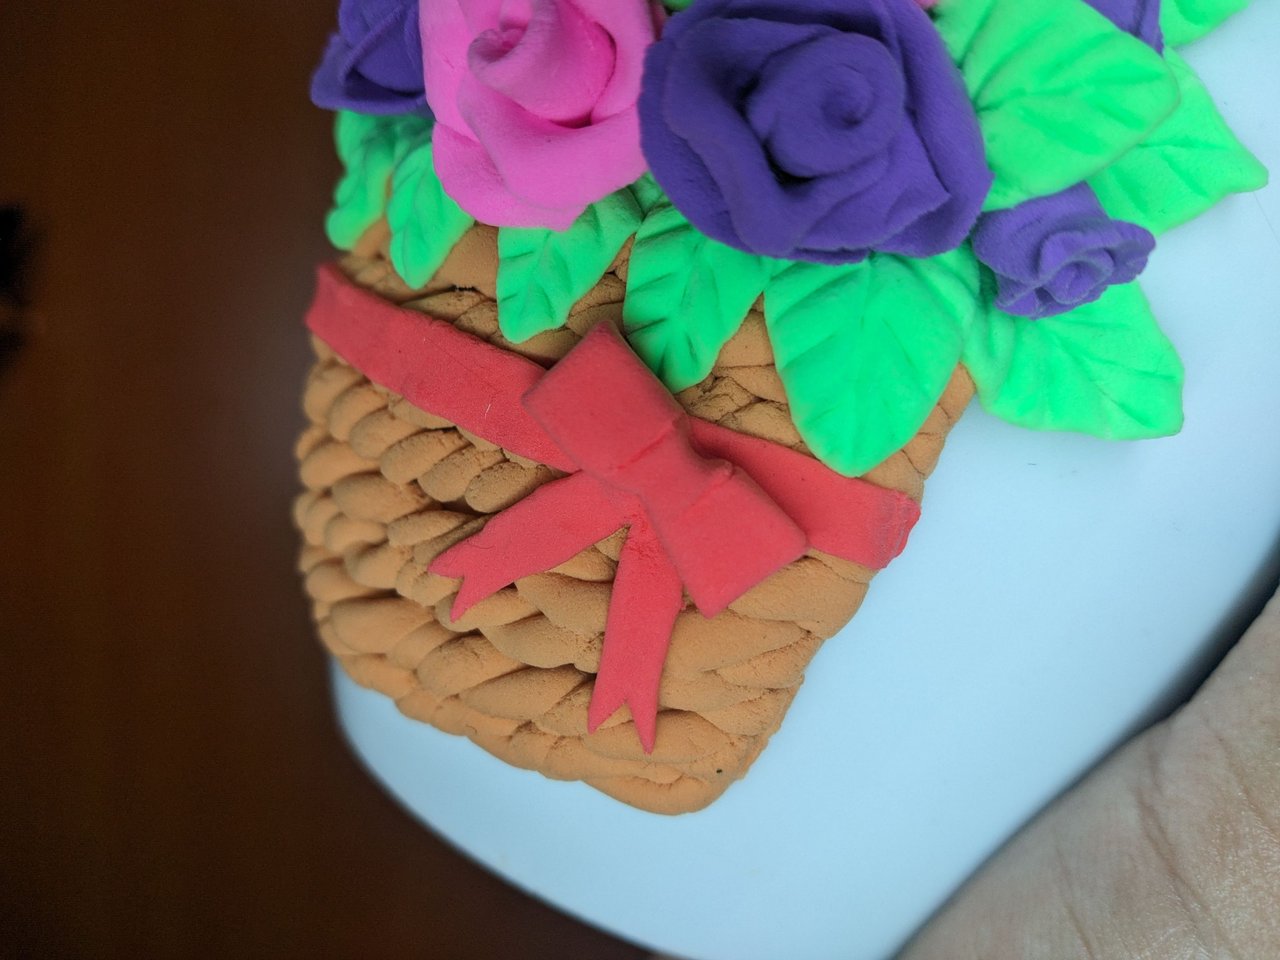 |
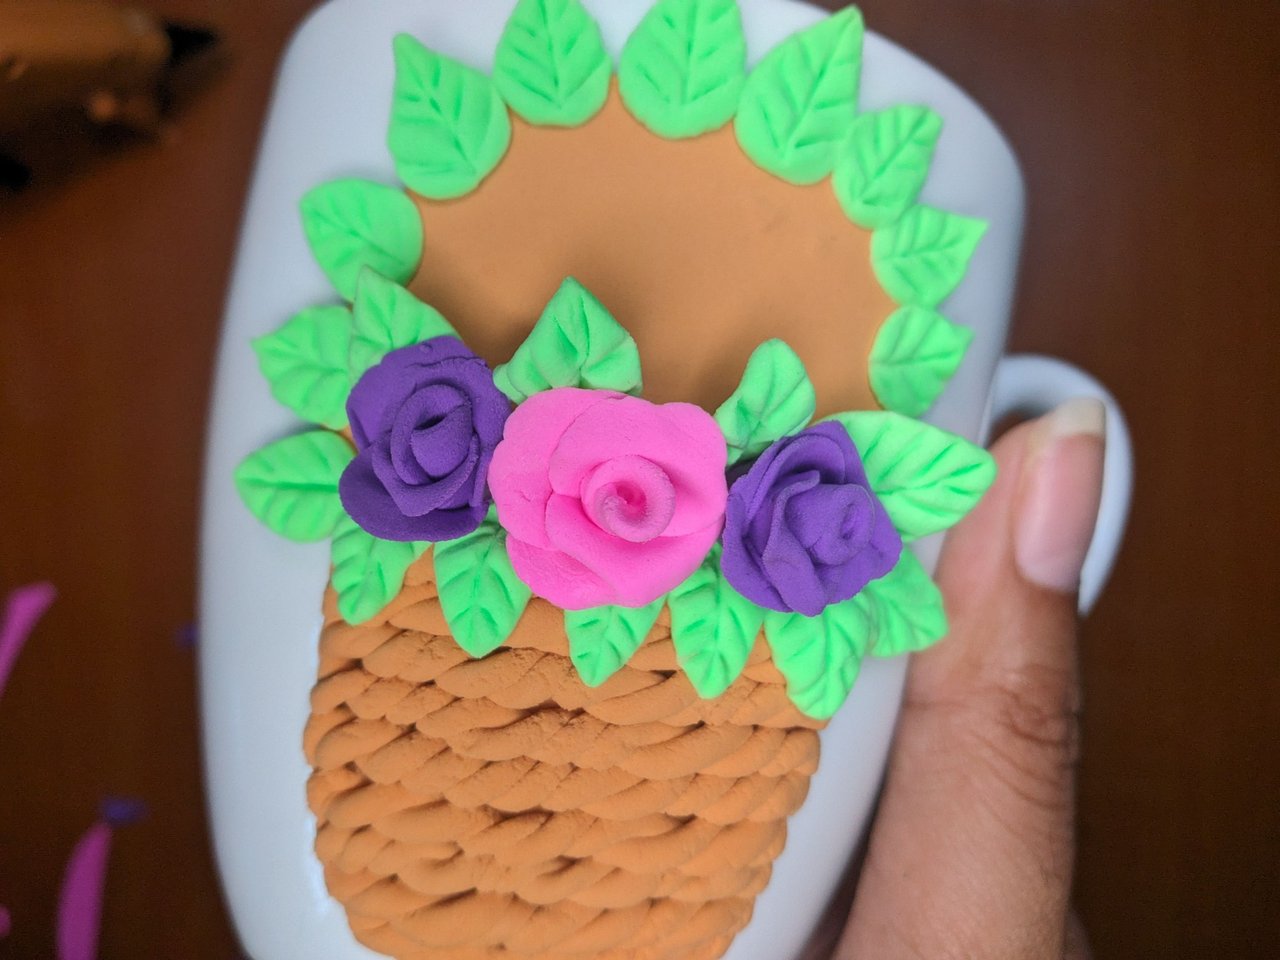
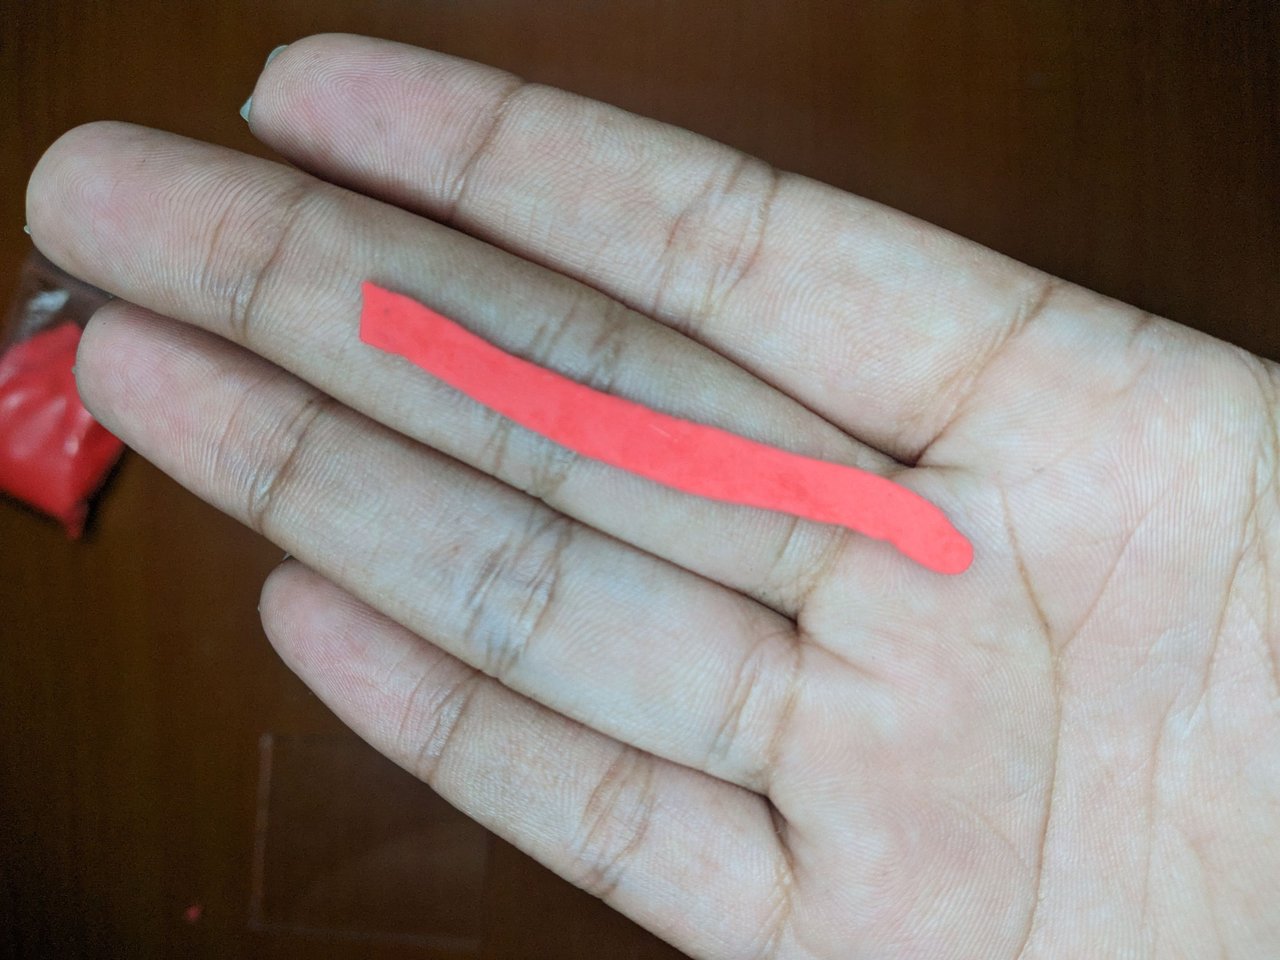
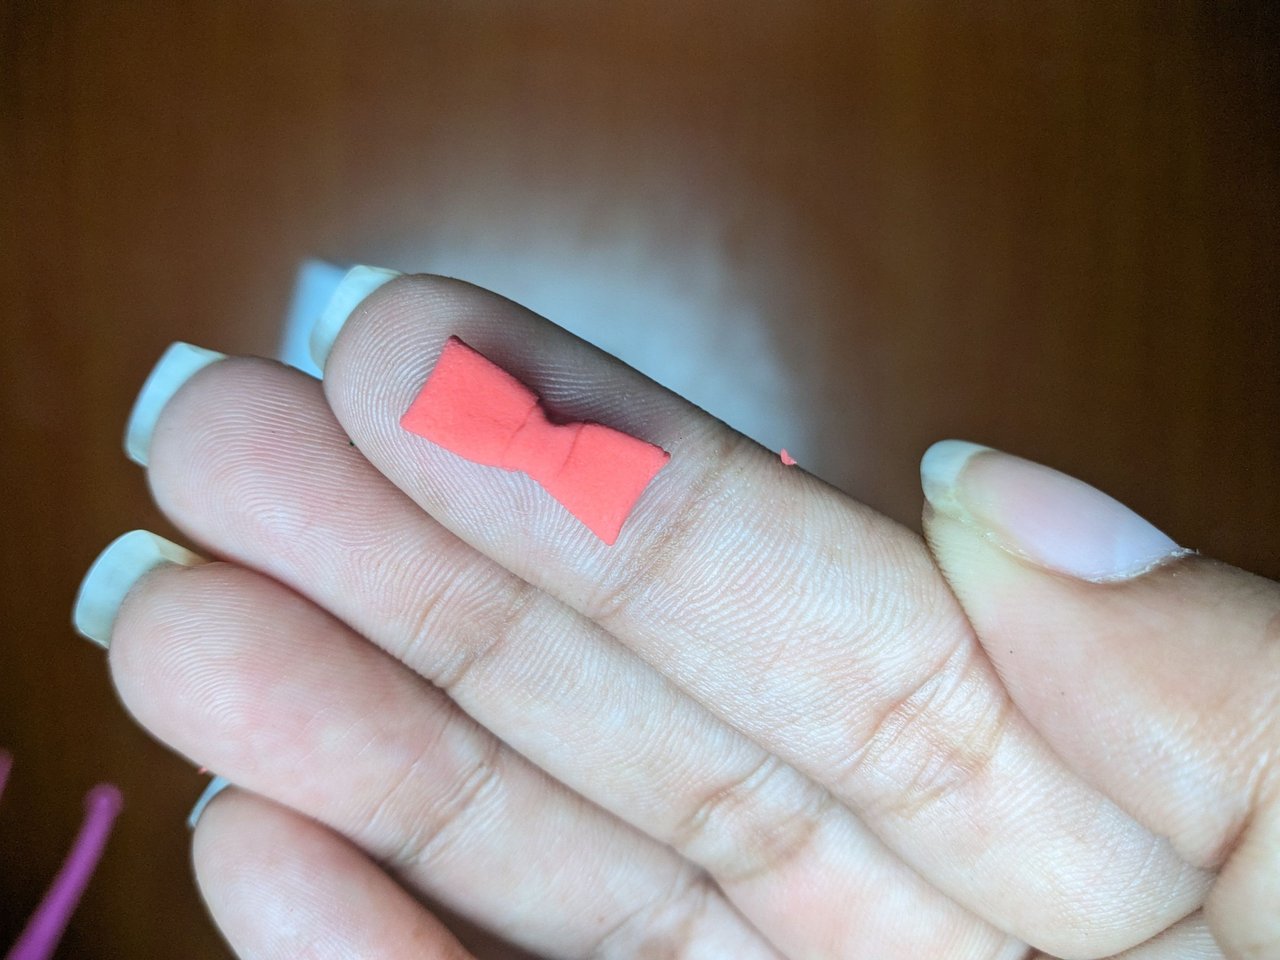
With red foami I wanted to make a ribbon with a bow for the basket, for this I made a ribbon that was as straight as possible, then I made a bow and placed two smaller ribbons, to which I made two cuts at the tip in a triangular shape.
Con foami rojo quise hacerle una cinta con lazo a la cesta, para ello hice un listón que quedara lo más recto posible, luego elaboré un lazo y le coloqué dos cintas más pequeñas, a las cuales les hice dos cortes en la punta en forma triangular.
 |
 |
 |
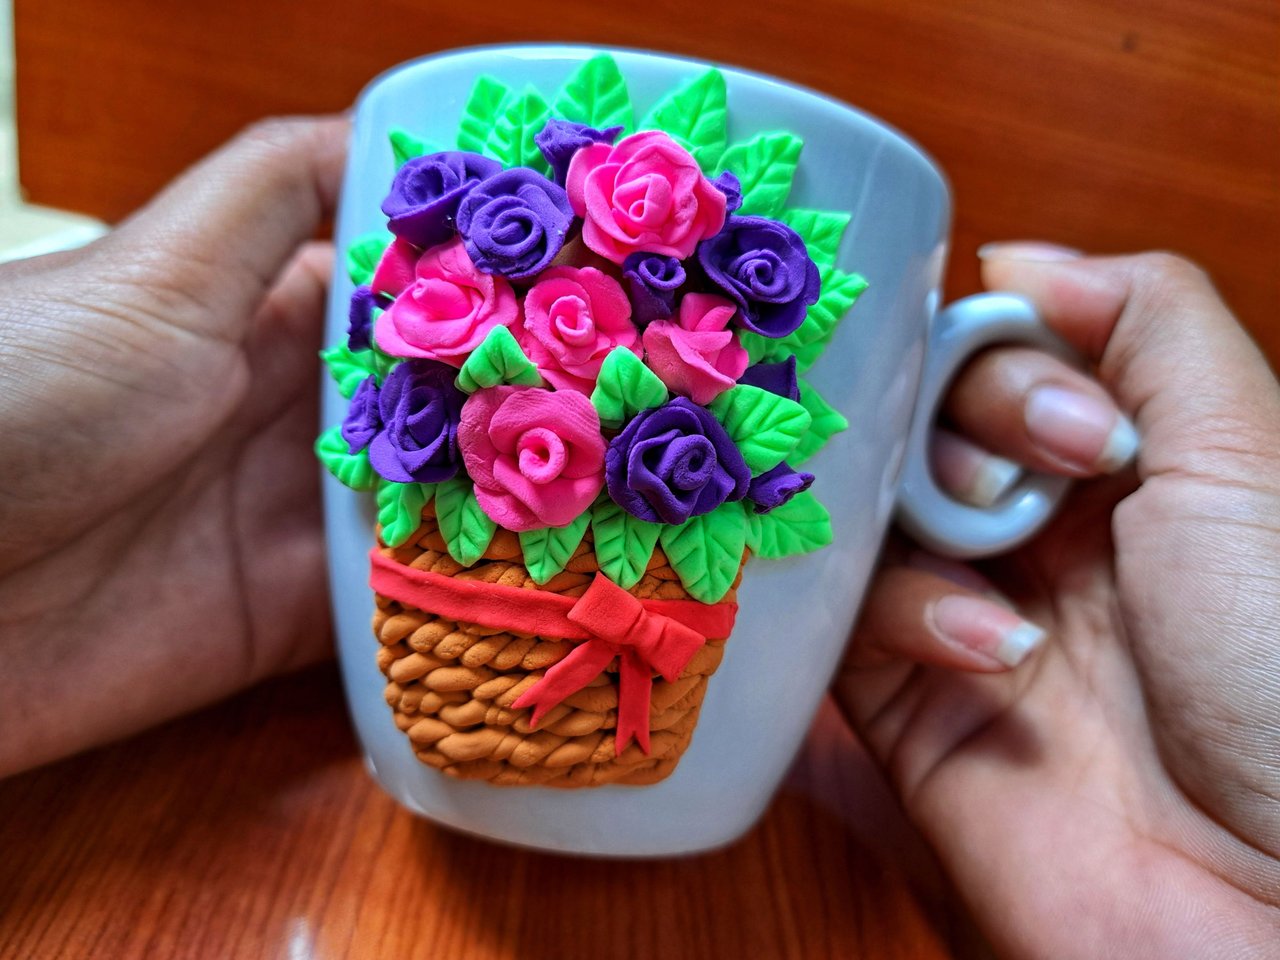 |
And now this beautiful decoration is ready, it is no longer the same boring and neat mug. I think it's a nice gift that every woman would love. They may leave it just for decoration, but if they want to drink something in it, I have been recommended to cover it with resin, but as I don't have any, I will do it with transparent varnish to protect and strengthen it, this is another option and this way it can get wet. I just have to wait for it to dry well and then varnish it. I hope you liked it, greetings to all.
Y ya está lista esta hermosa decoración, ya no es la misma taza aburrida y pulcra. Me parece que es un lindo regalo que a toda mujer le encantaría. Puede que la dejen solo de adorno, pero si quieren beber algo en ella, me han recomendado que cubra con resina, pero como no tengo lo haré con barniz transparente para protegerla y fortalecerla, esta es otra opción y de esta forma si se podrá mojar. Solo debo esperar a que seque bien y luego la barnizo. Espero les haya gustado, un saludo a todos.

Cover made in Canva
English is not my native language, translated by DeepL
It is very beautiful, it reminds me of a time when I used to give mugs to everyone. I gave them to all my family until it was my grandmother's turn to give them and when she saw that I was giving mugs to everyone she told me: "Don't even think about giving me a mug" hahahaha I felt sorry because I had already bought her a mug and I didn't know what to do with it, I was UPS! 😂
Maybe she would have liked this one, it's very pretty and with nice colors ❤️
Thank you so much, 😂 what a comedian your grandmother, not another cup.
wow that looks so amazing you are so creative, amazing work.
Thank you very much, glad you liked it 🤗.
wow you are amazing that looks amazing, keep up the good work.
!giphy wow
@sagarkothari88 vote
!PIZZA
!DHEDGE
Thank you very much for your support 🤗.
Via Tenor
This post has been selected for upvote from our token accounts by @bhattg! Based on your tags you received upvotes from the following account(s):
- @dhedge.bonus
- @dhedge.pob
- @dhedge.neoxag
- @dhedge.waiv
@bhattg has 9 vote calls left today.
Hold 10 or more DHEDGE to unlock daily dividends. Hold 100 or more DHEDGE to unlock thread votes. Calling in our curation accounts currently has a minimum holding requirement of 100 DHEDGE. The more DHEDGE you hold, the higher upvote you can call in. Buy DHEDGE on Tribaldex or earn some daily by joining one of our many delegation pools at app.dhedge.cc.
Thanks 🤗
$PIZZA slices delivered:
@bhattg(4/10) tipped @yale95reyra
Thank you 😍
Que preciosa creación, quedó muy perfecta!!! Buen trabajo✨💕
Muchas gracias 🥰
Quebonito y original se ve esta taza con ese foami moldeable, encanta!
Muchas gracias, que bueno que te haya gustado 🤗
Hermoso y delicado trabajo amiga , me encanta! Lastima que en mi pueblo no vendan ese material, queda estupendo.
Te Felicito.
Muchas gracias 🥰, es una lastima que no vendan ese material, sería un lindo obsequio para regalar y además hecho con nuestras propias manos.
What a creative mind!
Thank you so much, always creating beautiful things.
Ufff te quedó preciosa. Me encanta 😍
Muchas gracias 🥰
Congratulations @yale95reyra! You received a personal badge!
Participate in the next Power Up Day and try to power-up more HIVE to get a bigger Power-Bee.
May the Hive Power be with you!
You can view your badges on your board and compare yourself to others in the Ranking
Check out our last posts: