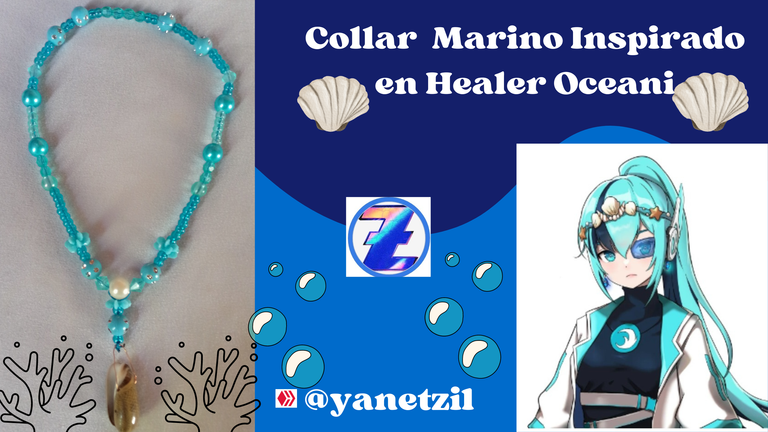
🐚Healer Oceani Inspired Necklace🫧Collar Inspirado en Healer Oceani🐚
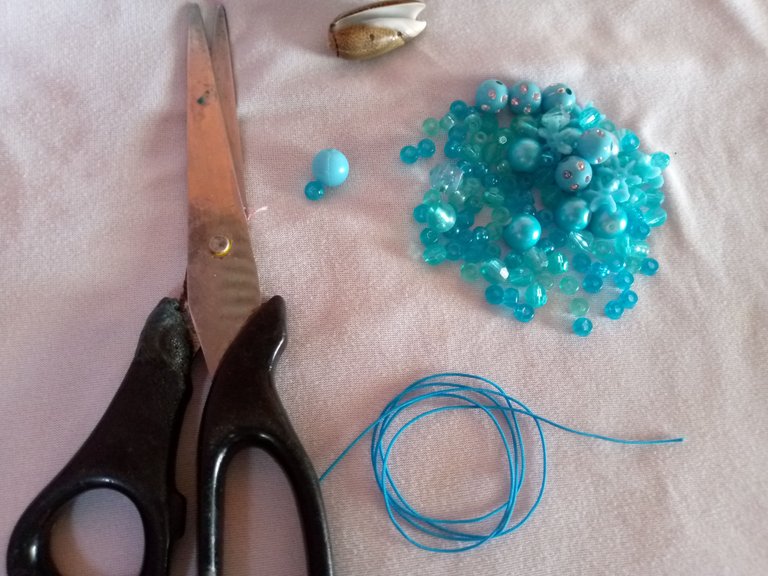
The materials used in the making of the Marine necklace were the following.
✓Blue Chinese thread
✓Scissors
✓Large white pearl
✓Large turquoise blue beads
✓Blue bicones
✓Light and dark blue separators.
✓Pearls with silver crystals.
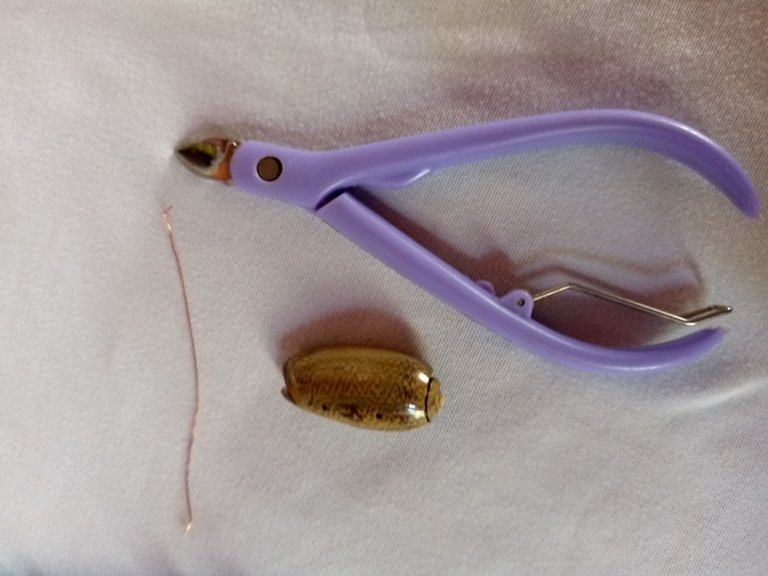
✓Biscuit jewelry wire number 01
✓One marine snail
✓ Clip
✓Crystals diamonds
✓ Watercolors
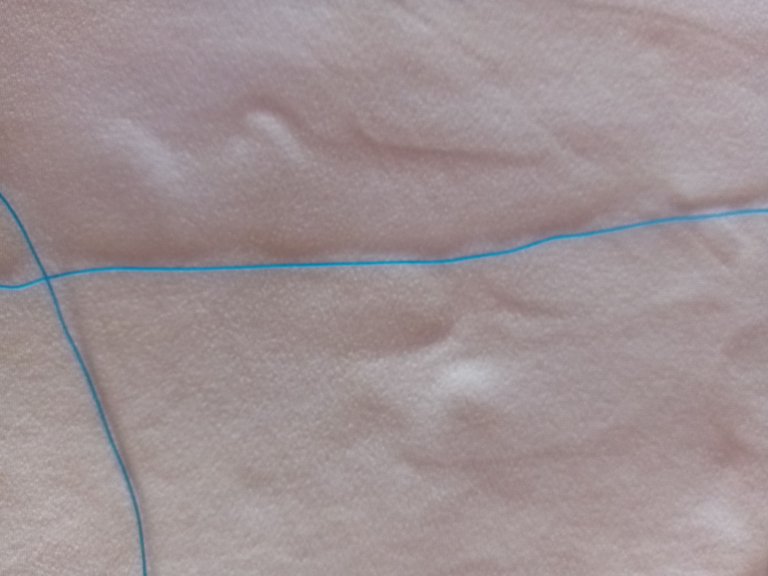
- Step 1
The first thing we are going to do is select the blue Chinese thread so we can measure it at the neck and see how long we want our necklace to be.
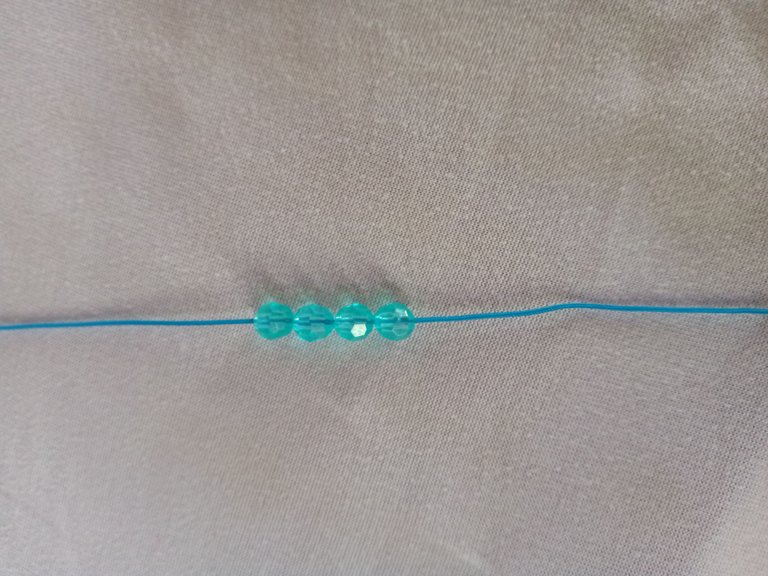
- Step 2
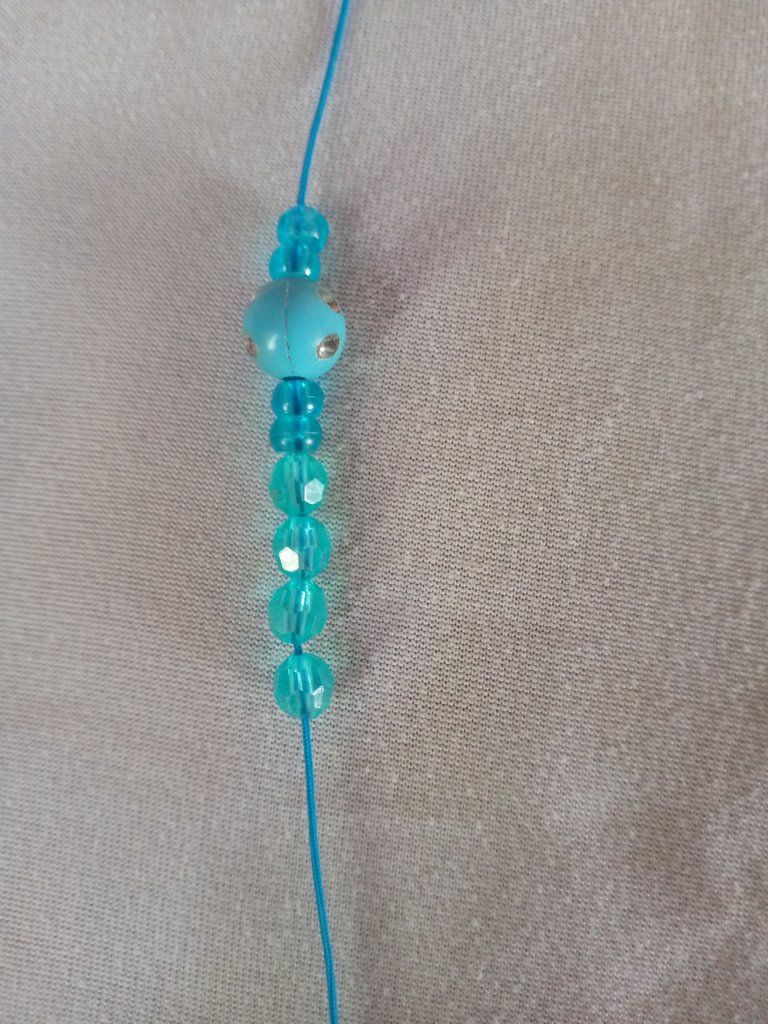
Then we are just going to take four bicones and we are going to introduce it centered in the middle part of the thread like this.
- Step 3
Now we are just going to insert after the four icons two dark blue spacers together with one of the blue crystal beads like this from this coin and then close it with the other two blue spacers.
- Step 4
We are going to perform the same step with the blue crystal beads and adding four more separators.
- Step 5
Well here we take care of putting some blue diamonds, something I wanted to tell you that if we put the two strands in this way it will be easier since we will have the same sequence of stones that we will be introducing the 4 separators and then the turquoise pearls in this way.
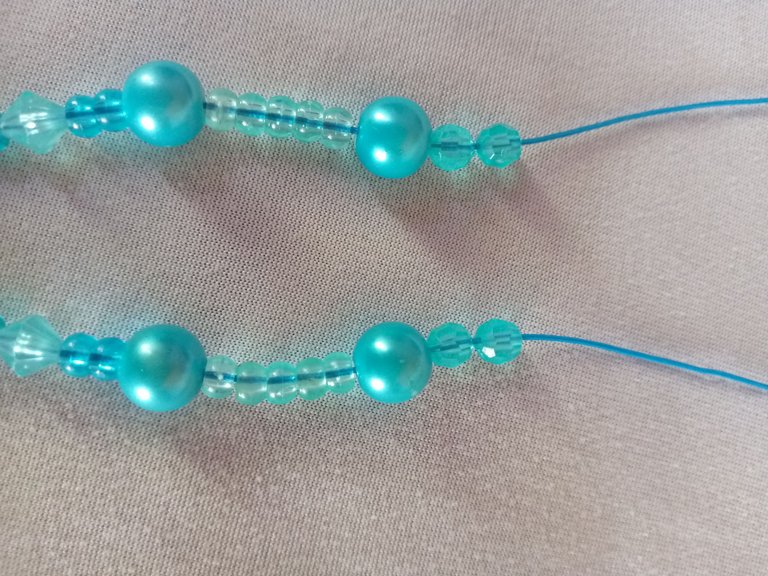
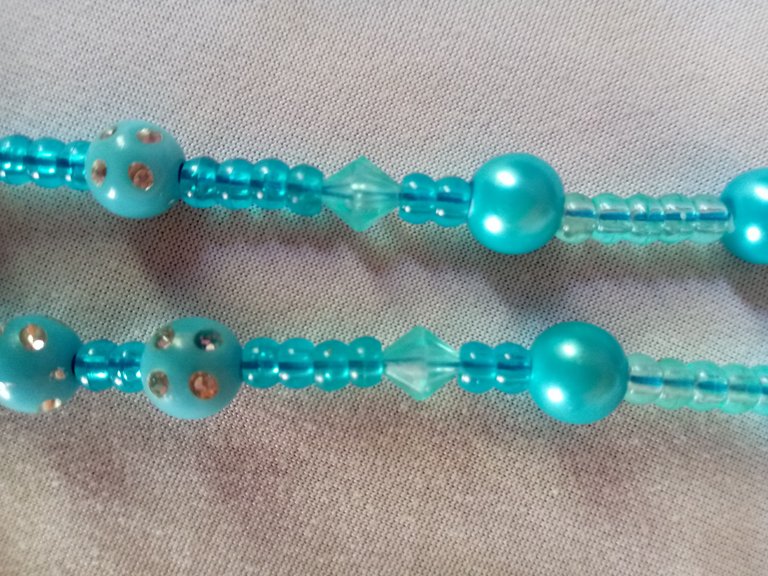
Now we are just going to place the stones exactly as they appear in the photos, it is an easier way. I hope you like it this way.
- Step 6
Now we are only going to put two bicones in a row with the blue crystalline pearls and we will take care of placing the 8 dark spacers.
- Step 7
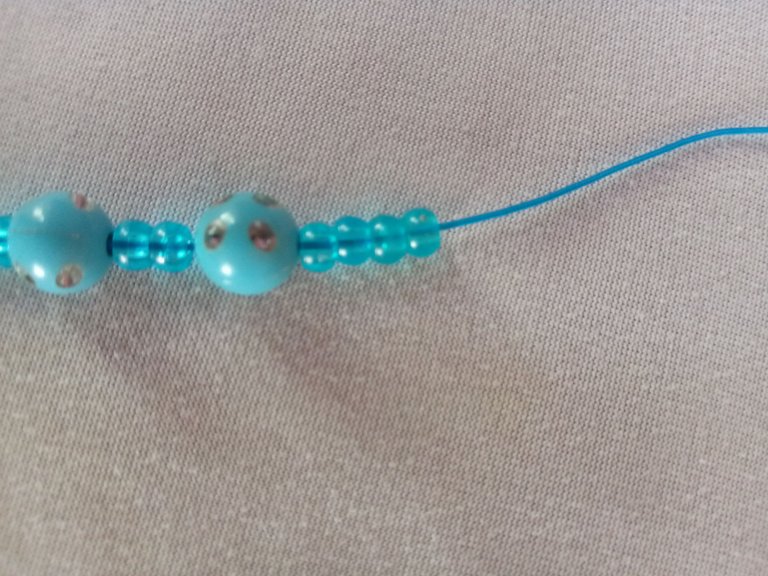
Now we are only going to place some small blue strips like this.
- Step 8
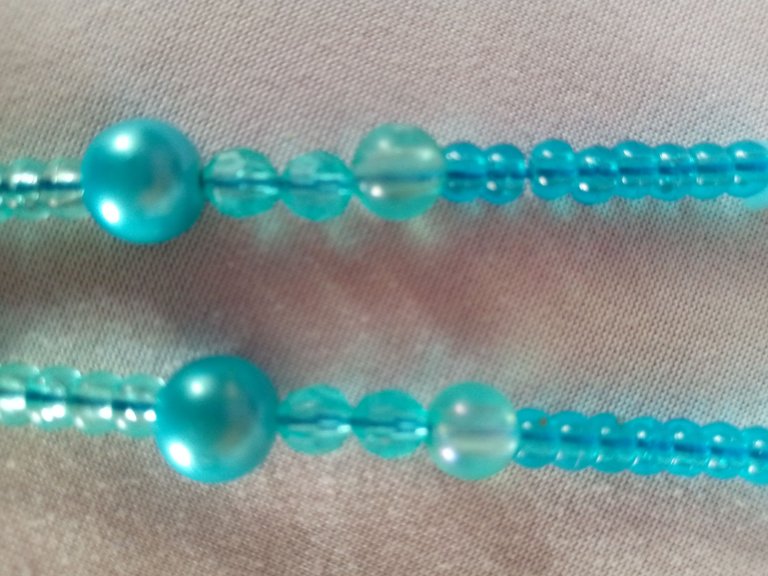
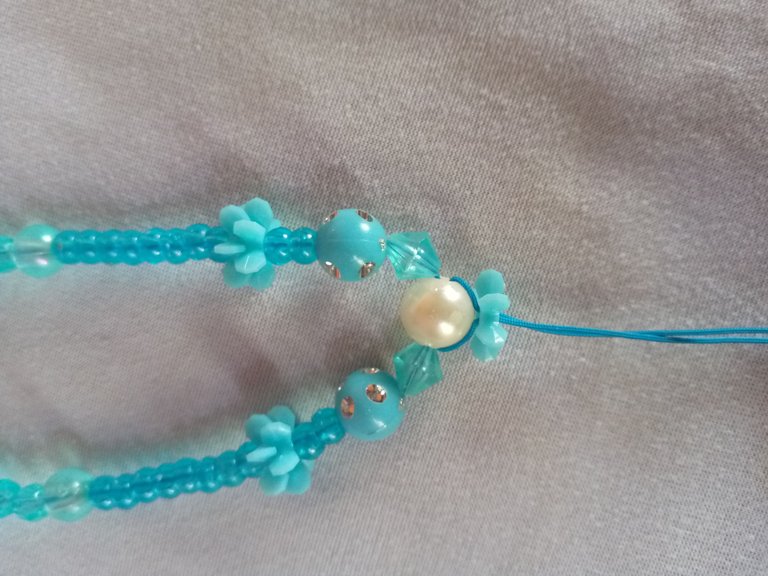
After the watercolors come the two light blue spacers and then one of the big blue pearls with crystals and then the diamond.
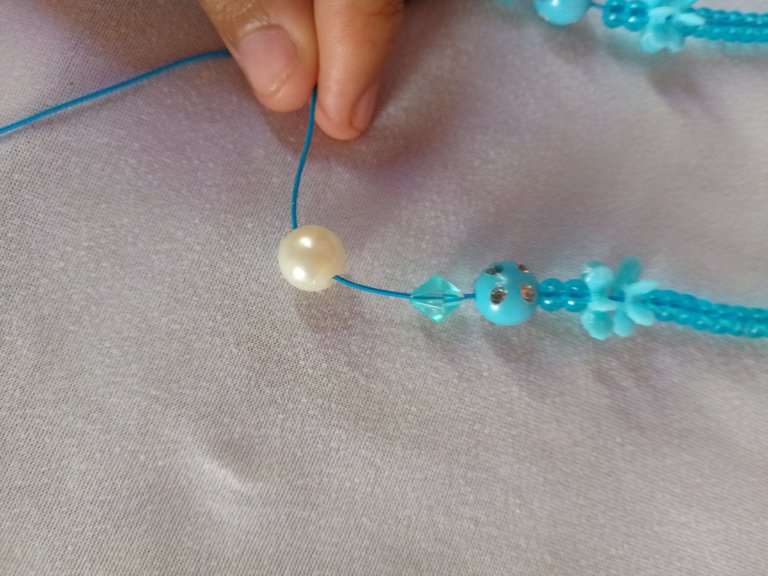
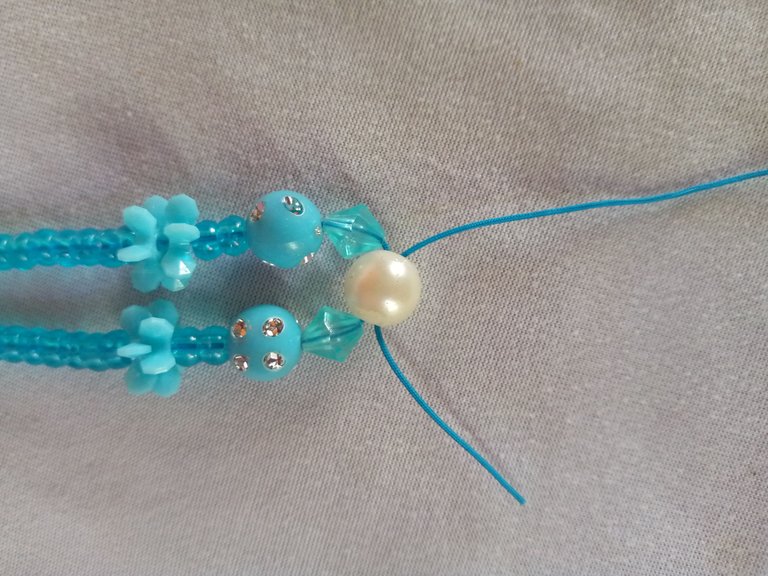
- Step 9
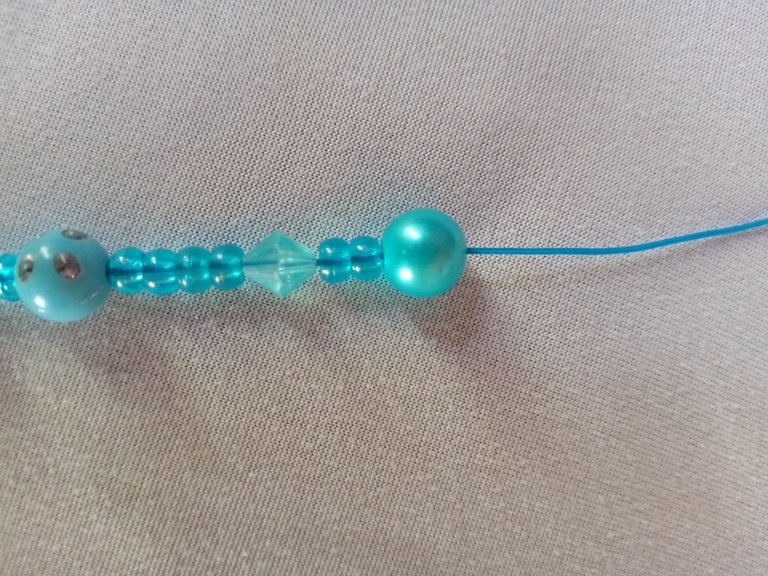
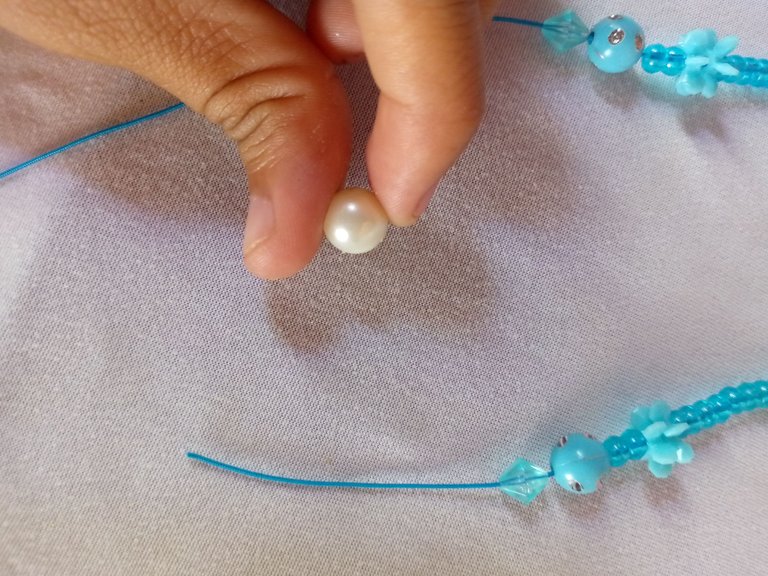
Now we are going to put the white pearl last and we are going to pass it through the two threads.
This is so that it is in the middle of the necklace in order to give a little illumination and intense color to our sailor necklace.
- Step 10
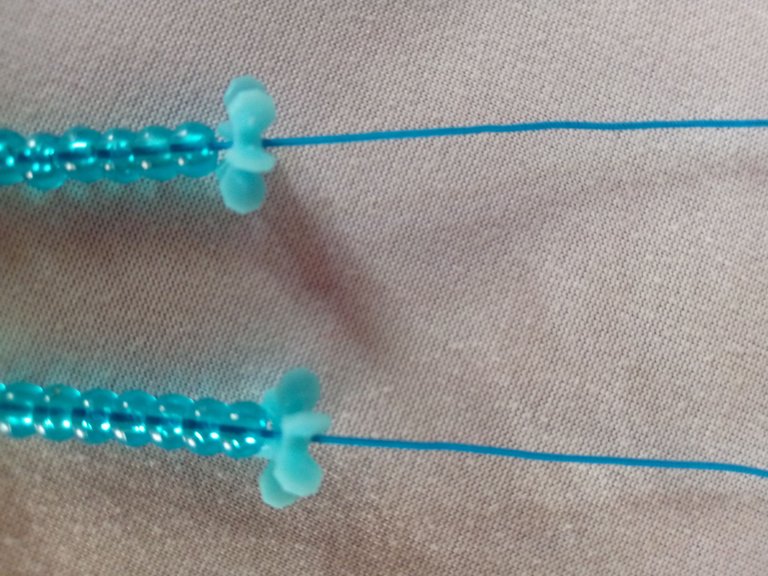
Now we just need to make the new ones so that the excess yarns remain on the bottom part, it's easy, we will just make the ties in the normal way.
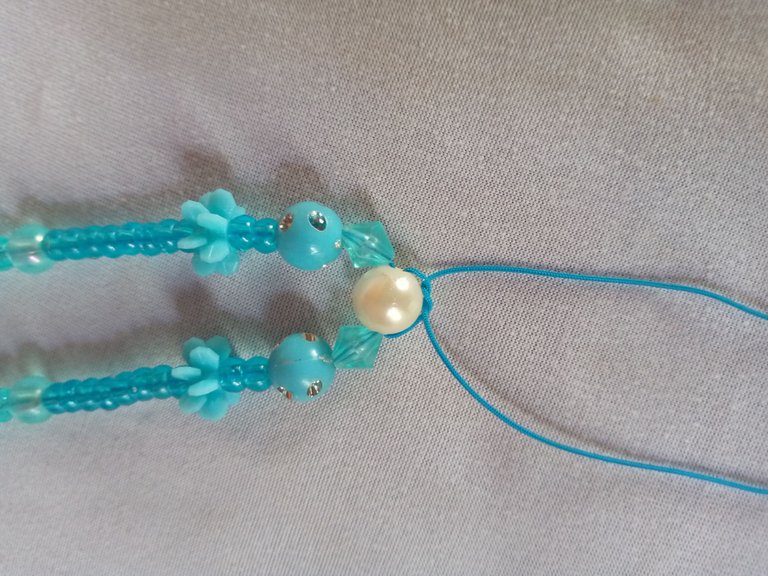
After we have them ready, we are going to put another watercolor to cover the excess knots like this.
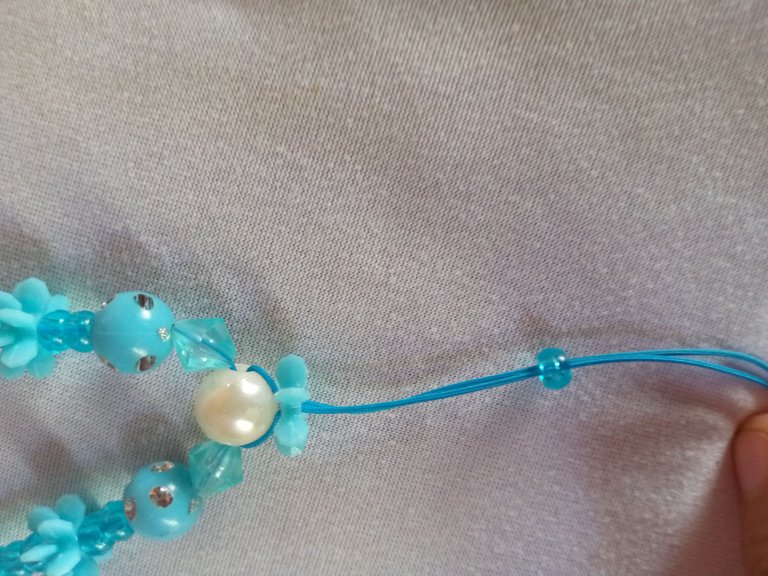
Now we are going to insert this separator last and then we are going to move on to the other step.
- Step 11
Putting again a blue crystal beads with another separator and so we would be with two knots in this way.
- Step 12
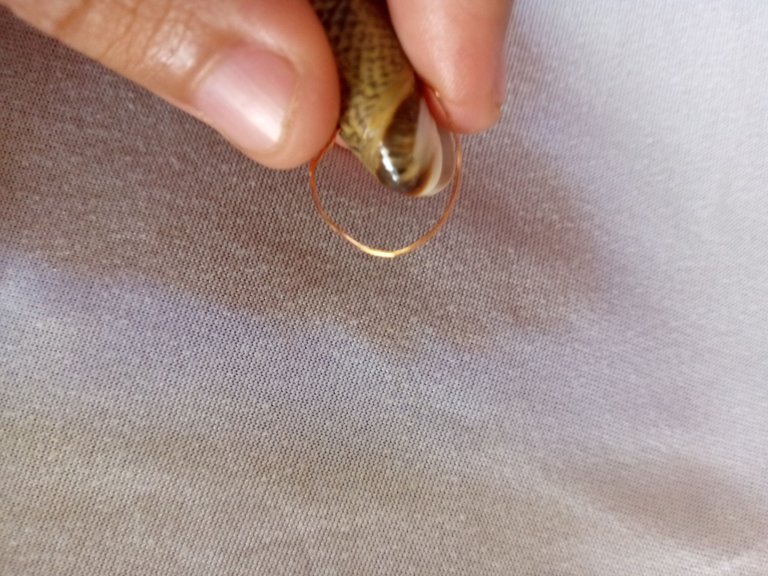
Now we are going to take a little piece of wire that is thin and together with the snail.
We are going to introduce it little by little through the holes of the snail and we are going to give it the hoop style shape like this.
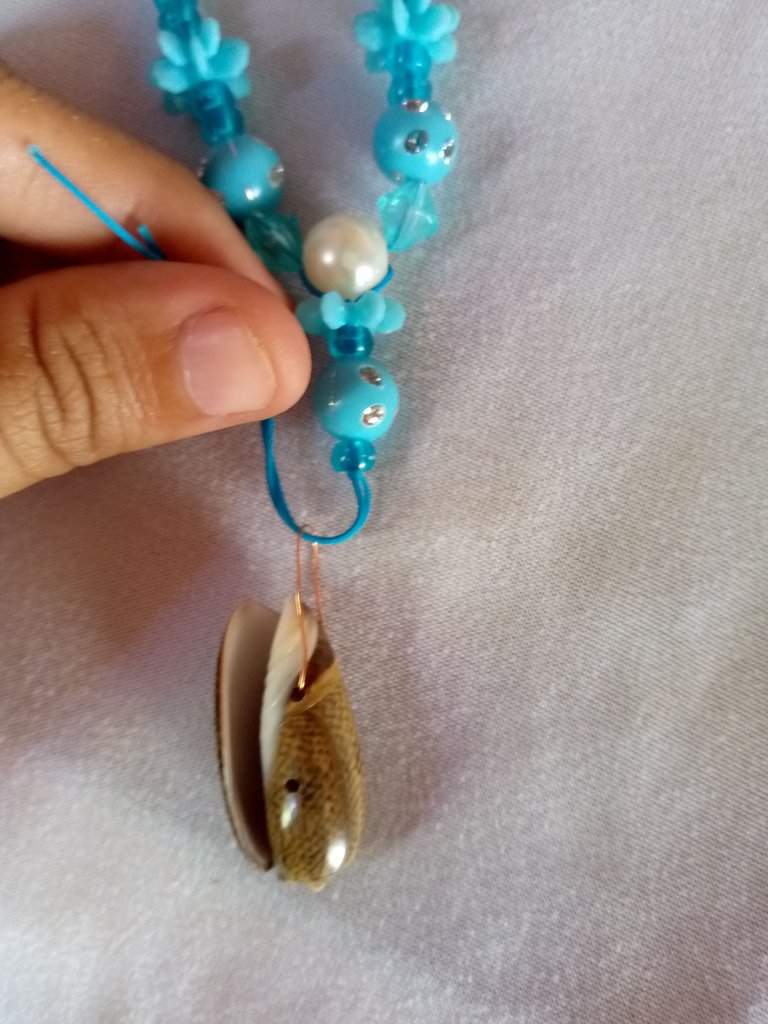

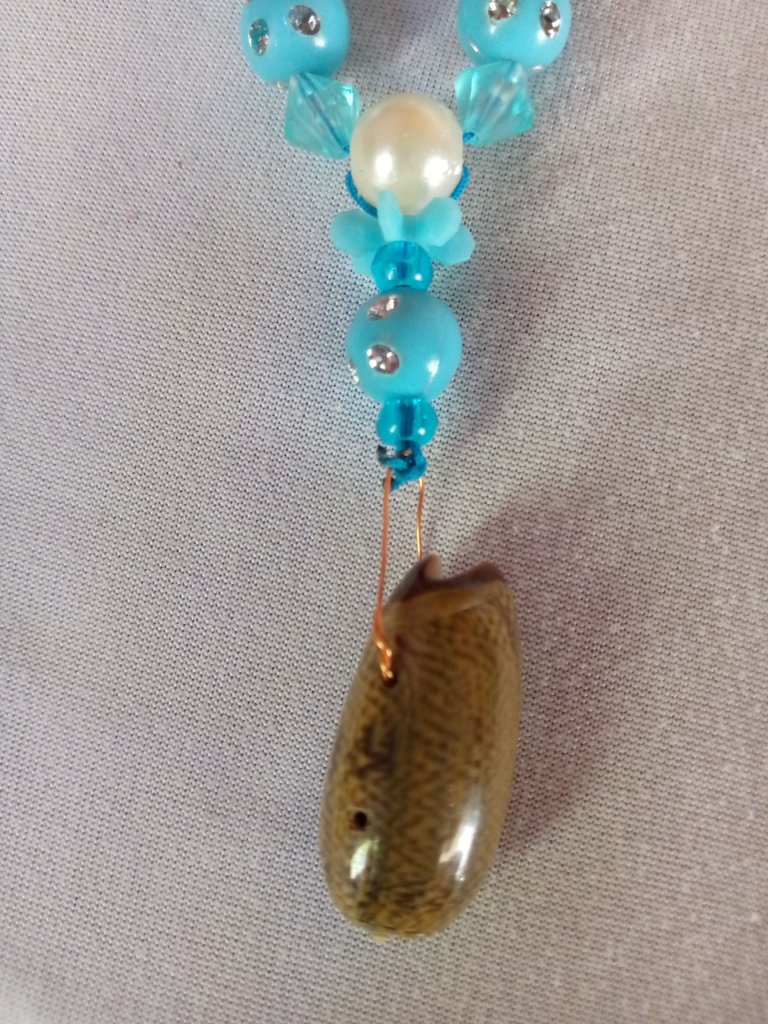
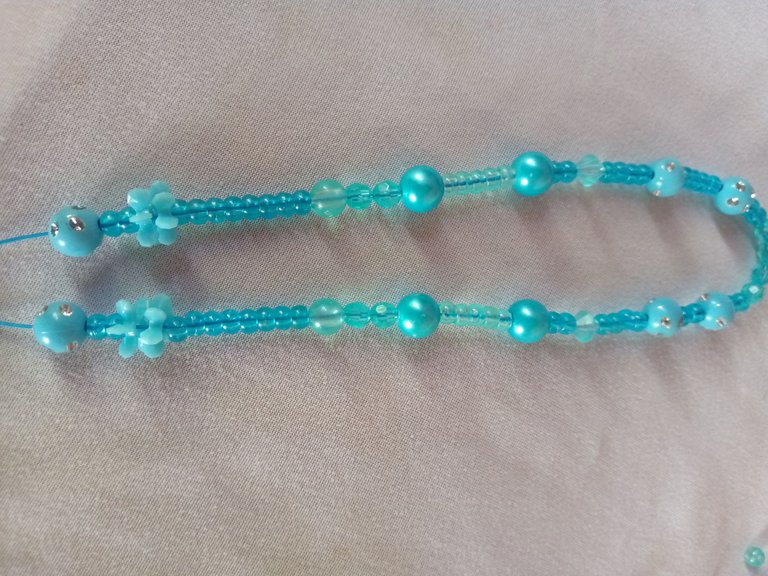
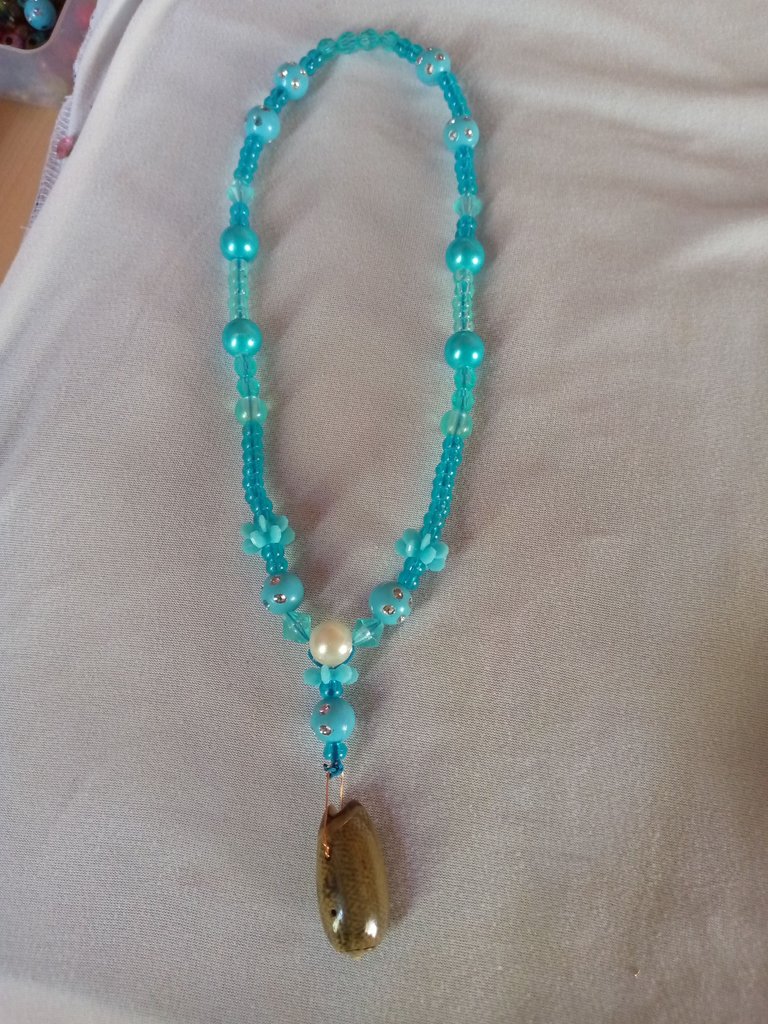
The last thing we are going to hold with the clamp and we will give the final touch that would be to make the tie of the hoop and then we cut and with a lighter we will burn the excess threads and thus we will have a beautiful sailor style necklace.
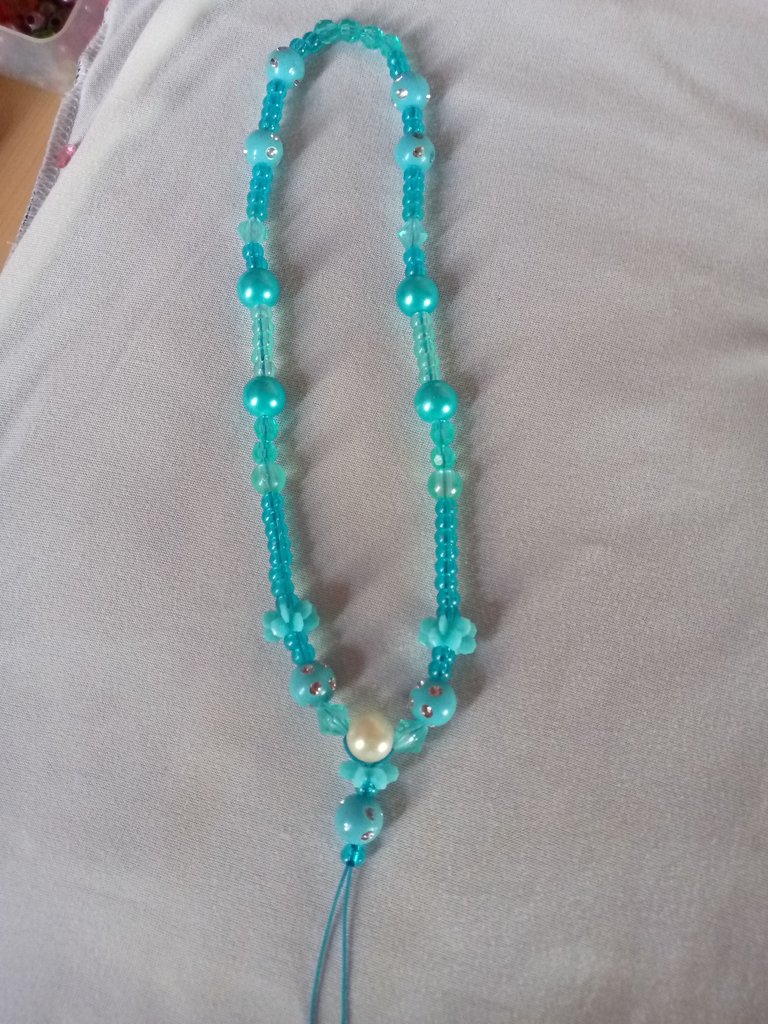
The final result would be this I hope you like it and I will see you soon greetings to all.
See you next time!💎
- Photos are my property and belong to me.
- Translator Used:https://www.deepl.com/mobile-apps/
- Canvas editing.

Versión👇🏻
Los materiales utilizados en la elaboración del collar Marino fueron los siguientes:
✓Hilo chino azul
✓Tijera
✓Perla blanca grande
✓Perlas azul turquesa grande
✓Biconos azules
✓Separadores azules claro y oscuro
✓Perlas con cristales plateado
✓Alambre número 01 de bisutería
✓Un caracol Marino
✓ Pinza
✓diamantes cristales
✓ Acuarelas
- Paso 1
Lo primero que vamos a hacer es seleccionar el hilo chino azul para así medirlo en el cuello y ver de qué largo queremos nuestro collar.
- Paso 2
Luego solo vamos a tomar cuatro biconos y lo vamos a introducir que quede centrado en la parte del medio del hilo así de esta manera.
- Paso 3
Ahora solo vamos a introducir después de los cuatro iconos dos separadores azules oscuros junto con una de las perlas azules de cristales así de esta moneda y luego la cerramos con la otra dos separadores azul.
- Paso 4
Vamos a realizar el mismo paso con la perlas azul de cristales y agregando cuatro separadores más.
- Paso 5
Bueno aquí nos encargamos de poner unos diamantes azules, algo que quería decirle que si ponemos los dos hilos de esta manera se nos va a hacer mas facil ya que vamos a tener la misma secuencia de las piedras que vamos a ir introduciendo los 4 separadores y después las perlas turquesas así de esta manera.
Ahora solo vamos a ir poniendo las piedras de forma exacta así como en las fotos aparecen es una manera más fácil espero que les guste así.
- Paso 6
Ahora solo vamos a poner dos biconos seguidos con las perlas cristalinas azules y nos encargaremos de colocar los 8 separadores oscuros.
- Paso 7
Ahora solo vamos a colocar unas pequeñas acuerelas azules así de esta forma.
- Paso 8
Después de las acuarelas vienen los dos separadores azules claros y luego una de las perlas azules grandes con cristales y luego el diamante.
- Paso 9
Ahora nos vamos a encargar de poner la perla blanca de último y la vamos a pasar por los dos hilos.
Esto es para que quede en todo el medio del collar de maneras que le de un poco de iluminación y color intenso a nuestro collar marinero.
- Paso 10
Ahora solo nos queda realizar los nuevo de manera de los hilos sobrantes queden en la parte de bajo así de esta forma, es fácil solo vamos a hacer los amarres de manera normal.
Luego de tenerlos listo solo vamos a poner otra acuarela para tapas los nudos sobrante así de esta manera.
Ahora vamos a introducir por último este separador y luego vamos a pasar a el otro paso.
- Paso 11
Poniendo de nuevo una perlas de cristales azul con otro separador y así seríamos con dos nudos de esta maneras.
- Paso 12
Ahora vamos a tomar un pedacito de alambre del que es delgado y junto con el caracol.
Vamos a ir introduciendo poco a poco por los orificios del caracol y vamos a darle la forma estilo de aro así de esta manera.
A lo último vamos a sujetar con la pinza y le daremos el toque final que sería realizar el amarre del aro y después cortamos y con un encendedor quemaremos los hilos sobrantes y ya así tendremos un hermoso Collar estilo marinero.
El Resultado Final sería este espero que les guste muchos y nos veremos pronto saludos para todos.
Hasta la Próxima!💎
- Las fotos son de mi propiedad y me pertenecen.
- Traductor Utilizado:La mejor aplicación de traducción
https://www.deepl.com/mobile-apps/ - Edición en Canva.
Hermoso te ha quedado amiga .. éxitos 🤗🫂🫂❤️
Muchas gracias amiga si me gustó mucho colo quedó gracias por tu apoyo 😃😊 Feliz día.
Green means a lot for ocean 🌊 healer and that's what you put out for such necklace with a snail shell pendant.
Has sido votado por
PROYECTO ENLACE
'Conectando Ideas y Comunidades'
PROYECTO ENLACE es un proyecto de curación de habla hispana enfocado en recompensar contenido de calidad y apoyar autores en su proceso de crecimiento en HIVE.
Creemos y apostamos por el futuro de esta gran plataforma, y estamos muy emocionados de poder hacerla crecer junto a esta comunidad. Así que te invitamos a publicar en nuestra COMUNIDAD y estar atento a todas las actividades que tenemos preparadas y que estaremos publicando en breve.
¿QUIERES AUTOMATIZAR TUS GANANCIAS DE CURACIÓN? SE PARTE DEL PROYECTO ENLACE APOYANDO A NUESTRO TRAIL EN HIVE.VOTE INGRESA AQUÍ PARA CONOCER LOS DETALLES.
¿QUIERES INVERTIR ENLACE? DESCUBRE COMO HACERLO Y GENERAR INGRESOS DE FORMA SEMANAL MEDIANTE TU DELEGACIÓN DE HP AQUÍ TE EXPLICAMOS COMO.
Te invitamos a participar en nuestro servidor de Discord: https://discord.gg/3S9y7BbWfS
Atentamente
EQUIPO ENLACE 2024
Me encanta ete coor definitivamente
Muchas gracias bella 💕
It is shining, elegant, and beautiful. This necklace can grab anyone's attention. Well done! Thank you for sharing this.
Congratulations @yanetzi1! You have completed the following achievement on the Hive blockchain And have been rewarded with New badge(s)
Your next target is to reach 4000 upvotes.
You can view your badges on your board and compare yourself to others in the Ranking
If you no longer want to receive notifications, reply to this comment with the word
STOPTo support your work, I also upvoted your post!
Te quedo hermoso amiga