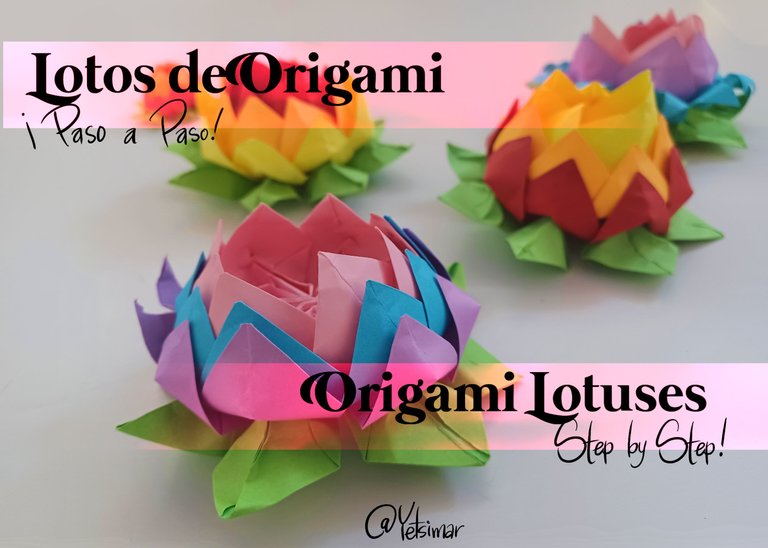
Beautiful Origami Lotus - Step by Step [ENG-ESP]
Greetings dear community of creators!
🌷
Saben me gusta mucho el origami es una actividad muy placentera y relajante, a mi me brinda mucha paz y esta vez les quiero mostrar estos bellos y coloridos lotos que realice, a simple vista me parecían muy complicados, pero resultaron ser mas sencillos de lo que creí, les mostrare el paso a paso a de estas flores, espero puedan seguirlo conmigo, también dejare aquí el pin de Pinterest de donde tome las instrucciones... sin mas les invito a ver el proceso
You know I really like origami is a very pleasant and relaxing activity, to me it gives me a lot of peace and this time I want to show you these beautiful and colorful lotuses that I made, at first glance they seemed very complicated, but they turned out to be simpler than I thought, I will show you the step by step of these flowers, I hope you can follow it with me, I will also leave here the Pinterest pin where I took the instructions ... without further ado I invite you to see the process
Materials:
- Paper of different colors
- Scissors
- Rubber bands or hair ties
- Ruler
Materiales:
- Papel de diferentes colores
- Tijeras
- Gomas o ligas para el cabello
- Regla

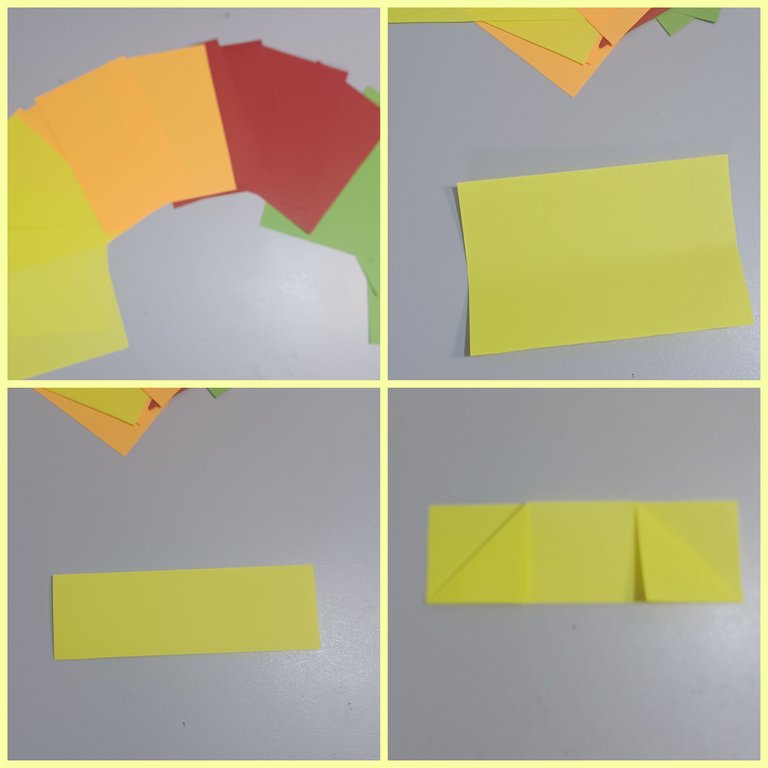
Lo primero fue tomar las medidas de los rectángulos de papel a usar, yo hice de varios tamaños, pero para obtener un loto final de aproximadamente 10cm de diámetro medí y recorte rectángulos de papel de 14x10cm. para hacer la flor completa se deben recortar un total de 16, distribuidos en los papeles de colores de la siguiente manera:
4 rectángulos del color central del loto, en este caso el amarillo; 4 rectángulos del color que sucederá al color central, yo he usado naranja, para hacer un degradado hasta el rojo del cual recortaría otros 4 rectángulos y por ultimo 4 rectángulos en el color verde
Seguidamente procedemos a doblar, para empezar doblaremos a la mitad del lado mas corto, seguidamente se doblan las dos esquinas como se muestra en la ultima imagen.
The first thing was to take the measurements of the paper rectangles to use, I made several sizes, but to obtain a final lotus of approximately 10cm in diameter I measured and cut paper rectangles of 14x10cm. to make the complete flower you must cut a total of 16, distributed in the colored papers in the following way:
4 rectangles of the central color of the lotus, in this case yellow; 4** rectangles of the color that will succeed the central color, I have used orange, to make a gradient to red from which I would cut other 4** rectangles and finally 4** rectangles in the green color.Next we proceed to fold, to start we will fold in half of the shortest side, then fold the two corners as shown in the last image.
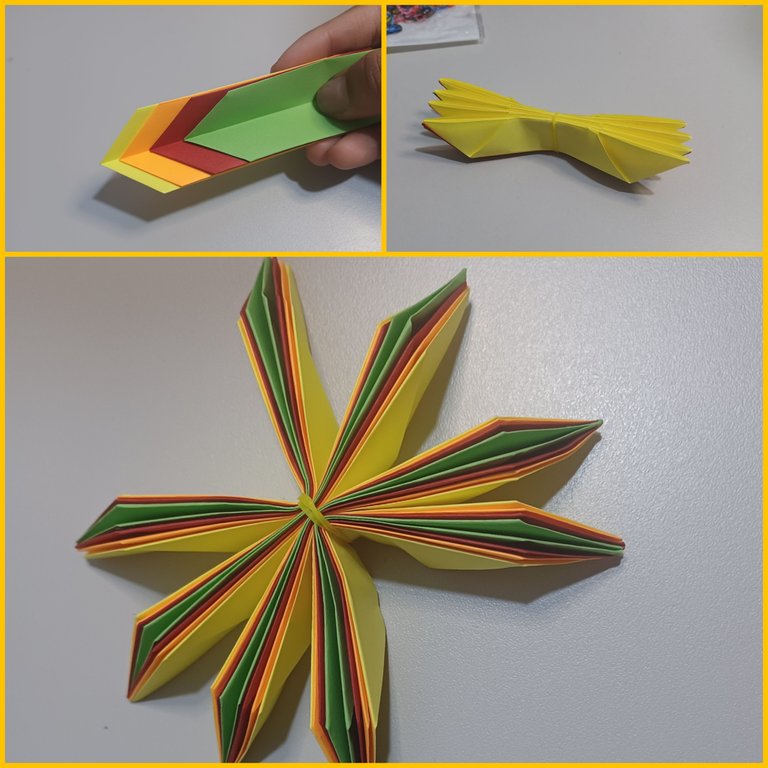
Luego esta parte se vuelve a doblar hacia abajo por toda la mitad nuevamente, y se repite el mismo proceso del otro lado hasta obtener la forma que se puede apreciar en la primera imagen, se repite este mismo proceso en todos los rectángulos, cada una de estas formaran uno de los pétalos del loto al final.
Then this part is folded down the whole half again, and the same process is repeated on the other side until the shape that can be seen in the first image is obtained, this same process is repeated in all the rectangles, each of these will form one of the petals of the lotus at the end.


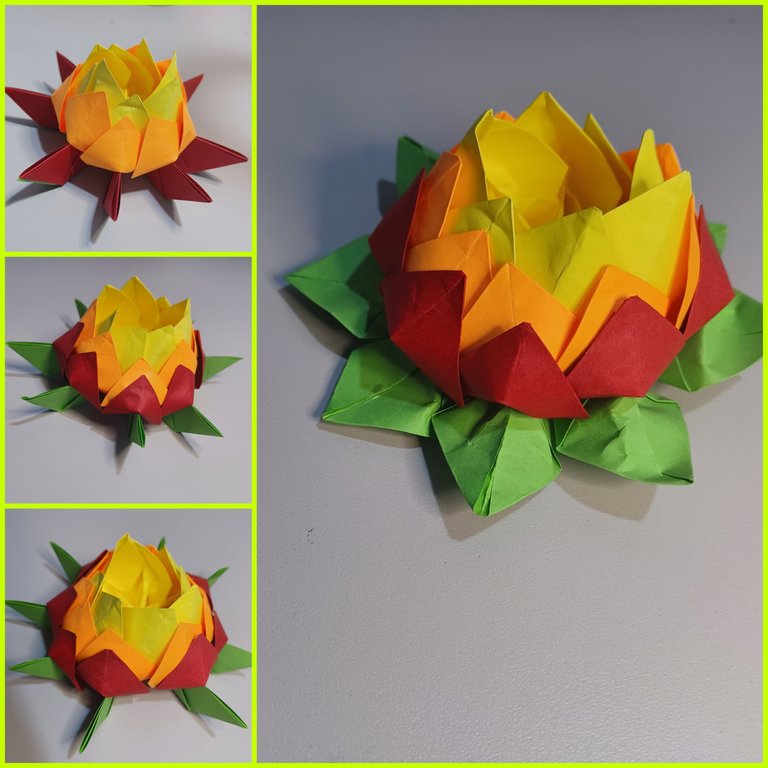
Una vez se hayan doblado todos los pétalos lo dispongo de la siguiente manera, uno sobre otro en orden invertido del degradado, ejemplo el primer color debe ser el verde, luego el color de los pétalo mas externos y de ultimo el color de los pétalos centrales. Luego de disponer todos los grupos de pétalos se colocan uno al lado del otro y se asegura con una liga para billetes, yo use ligas para el cabello, lo siguiente sera hacer algo de presión con los dedos para abrir la flor como se muestra en la ultima imagen de este collage
Once all the petals have been folded I arrange them as follows, one on top of the other in inverted order of the gradient, for example the first color should be green, then the color of the outermost petals and finally the color of the central petals. After arranging all the groups of petals, place them side by side and secure them with a rubber band, I used hair ties, the next thing to do is to make some pressure with your fingers to open the flower as shown in the last image of this collage.
Luego coloco el loto con los pétalos centrales hacia arriba y muy cuidadosamente comencé a voltearlos hacia arriba uno por uno y en un solo sentido, es decir si comenzaste levantando el pétalo de la derecha continua solo levantando los de la derecha, esto te asegurara un orden en la forma final del loto.
Then I place the lotus with the central petals upwards and very carefully start to turn them upwards one by one and in one direction only, that is if you started lifting the petal on the right continue lifting only those on the right, this will ensure an order in the final shape of the lotus.
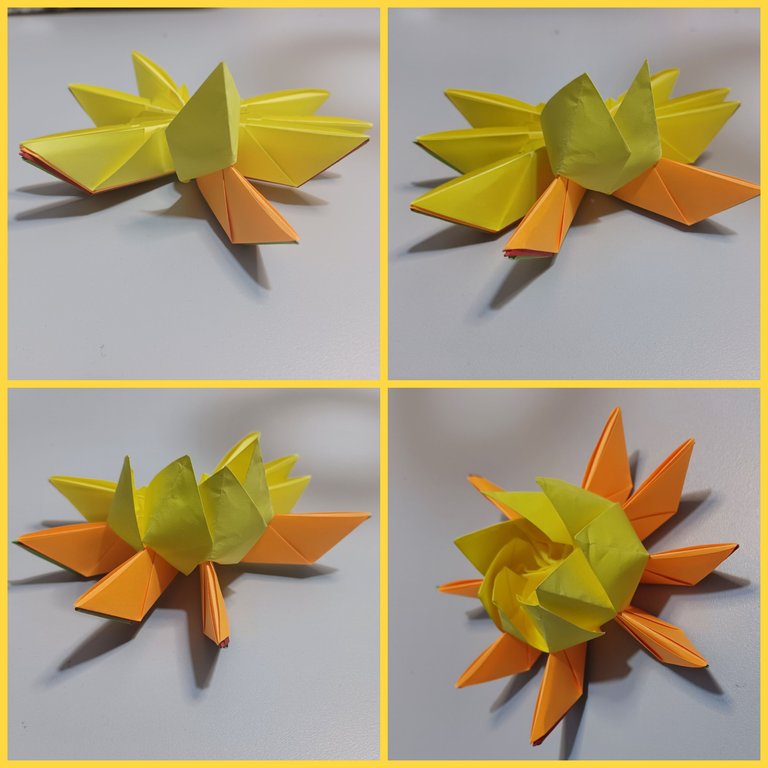
Una vez has volteado los pétalos de la primera linea continua con la siguiente con muco cuidado de los aplastar los primero, y así con la siguiente hilera de pétalos hasta llegar a los pétalos verdes, estos los hice un poco mas aplastados para que se viere como una camita de hojas para la flor.
Once you have turned the petals of the first line, continue with the next one, being very careful not to crush the first ones, and so on with the next row of petals until you reach the green petals, I made them a little more flattened so that they look like a little bed of leaves for the flower.
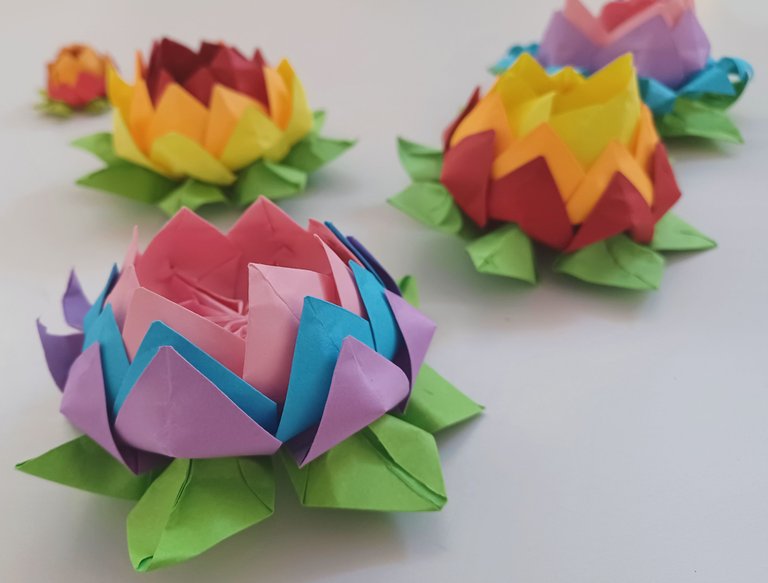
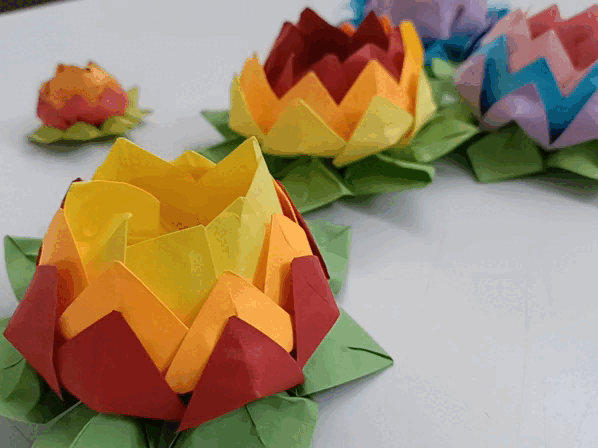
Hice una pequeña sesión con las flores que hice, este proyecto es para mi maravilloso porque me hizo salir de casa para conseguir papel para poder seguir y eso me encanta!
Fueron también bastante los intentos siendo muy cuidadosa para que todos los pétalos quedasen con la misma abertura y bonitos, también rompí algunos en el camino... 😁
I did a little session with the flowers I made, this project is wonderful for me because it made me leave home to get paper to continue and I love that!
There were also many attempts to be very careful so that all the petals were with the same opening and beautiful, I also broke some on the way...

Todo el proceso de este origami es muy satisfactorio y en definitiva estoy enamorada del resultado, espero que te haya gustado esta pequeña manualidad y que te animes a hacer tus propios lotitos.
The whole process of this origami is very satisfying and I am definitely in love with the result, I hope you liked this little craft and that you are encouraged to make your own lotuses.

Muchas Gracias por leer y hasta la próxima!
Thank you very much for reading and see you next time!

Collages creados en Picstar | Traducciones en DeepL.com
Me encantaron, he tenido curiosidad con hacer algo con esta técnica, pero aún no he hecho algún proyecto como estos tan lindos que haces amiga.
Recuerdo en la escuela cuando hacíamos camisas y anillos, con esta técnica en los billetes.
Estas son sencillas y muy bonitas amiga! espero que te atrevas a intentar, yo hice mis primeras prácticas con papel blanco y también quedan muy bonitas!
Gracias por comentar Saludos!
https://twitter.com/1422413915275812864/status/1623676874852278274
https://twitter.com/131481196/status/1623688974484078592
https://twitter.com/3063466861/status/1624560356495618048
https://twitter.com/1491299868391919620/status/1625149339046739968
The rewards earned on this comment will go directly to the people( @mariajcastro28, @creacioneslelys, @virtualgrowth, @baned ) sharing the post on Twitter as long as they are registered with @poshtoken. Sign up at https://hiveposh.com.
El origami siempre me ha llamado la atención, pero no es algo en lo que sea especialmente bueno. Quizás es porque no me he sentado a practicarlo, pero ciertamente es algo muy bonito de ver y agradable a la vista. En este caso, sus diseños lucen muy bien. Quedaron bellísimos.
!discovery 25
A mi siempre me ha gustado también, pero creo que fue durante la universidad en un curso que brindaba unos de los profesores que comencé a hacerlos con mas frecuencia, lo bueno del origami es que te permite practica mucho hasta que puedas hacerlo bien, después de todo solo es papel, me alegra mucho que haya sido de su agrado!
ojala se anime y nos muestre! 😊
This post was shared and voted inside the discord by the curators team of discovery-it
Join our community! hive-193212
Discovery-it is also a Witness, vote for us here
Delegate to us for passive income. Check our 80% fee-back Program
Muchas gracias por apreciar mi post!
Quedan demasiado hermosos y lo que mas me atrae es la variedad de colores que utilizo, la felicito amiga excelente arte en origami, saludos 🖖
Si la naranja me recuerda mucho a una flor de fuego, pero también me hace pensar que parecen pequeños pokemones de tipo hierva jajja! Muchas gracias por tu comentario lo aprecio mucho! Saluditos!
Thank you for sharing this post on HIVE!
Your content got selected by our fellow curator stevenson7 & you just received a little thank you upvote from us for your great work! Your post will be featured in one of our recurring compilations which are aiming to offer you a stage to widen your audience within the DIY scene of Hive. Stay creative & HIVE ON!
Please vote for our hive witness <3
Thank you very much for the appreciation and support of my post!
¡Felicidades! Esta publicación obtuvo upvote y fue compartido por @la-colmena, un proyecto de Curación Manual para la comunidad hispana de Hive que cuenta con el respaldo de @curie.
Si te gusta el trabajo que hacemos, te invitamos a darle tu voto a este comentario y a votar como testigo por La Colmena.
Si quieres saber más sobre nuestro proyecto, te invitamos a acompañarnos en nuestro servidor de Discord.
Muchas gracias por su apoyo @la-colmena! 😊
Yay! 🤗
Your content has been boosted with Ecency Points, by @hive-130560.
Use Ecency daily to boost your growth on platform!
Support Ecency
Vote for new Proposal
Delegate HP and earn more
Amo esta técnica, y sin duda a ti se te da muy bien mi Yetsimar!
Que preciosos lotos ¡me encantan! 😍
¡Hola @yetsimar ! Aprecio tú dedicación para elaborar éstas lindas flores, me gustó mucho, la variedad de colores permite distinguir mejor la forma de la flor, te felicito 🙌
Congratulations, your post has been upvoted by @dsc-r2cornell, which is a curating account for @R2cornell's Discord Community. We can also be found on our hive community & peakd as well as on my Discord Server
Felicitaciones, su publication ha sido votado por @dsc-r2cornell. También puedo ser encontrado en nuestra comunidad de colmena y Peakd así como en mi servidor de discordia
Bellísimas flores y muy bien explicado el tutdorial. 🌼🌼 son ideales para aplicarlas en algún ramo decorativo. Gracias por compartirlas con nosotros💐
Me encantaaaaaaa los colores luces espectaculares además
Me encantaron! Están hermosos😍