Hermoso sobre personalizado con flores / Beautiful personalized envelope with flowers
Hola amigos de esta gran comunidad de #Hivediy. Muchas veces, queremos entregar una carta o simplemente colocar en un sobre un detalle. Hoy en día, existen muchas opciones a la hora de diseñar hermosos sobres y salir del convencional sobre blanco que en ocasiones utilizamos. Por tal motivo, el día de hoy les enseñaré un paso a paso de un sobre personalizado y decorado con flores. Para el mismo, utilizaré retazos de cartulina y foami que han quedado de otros trabajos, por lo tanto, estaré poniendo en práctica el reciclaje. Los invito a seguir este paso a paso muy sencillo de realizar, espero les guste. ¡Vamos a comenzar!
Hello friends of this great community of #Hivediy. Many times, we want to deliver a letter or simply place a detail in an envelope. Today, there are many options when it comes to designing beautiful envelopes and getting away from the conventional white envelope that we sometimes use. For this reason, today I will show you a step by step of a personalized envelope decorated with flowers. For it, I will use pieces of cardboard and foami that have been left over from other jobs, therefore, I will be putting recycling into practice. I invite you to follow this very simple step by step, I hope you like it. Let's get started!
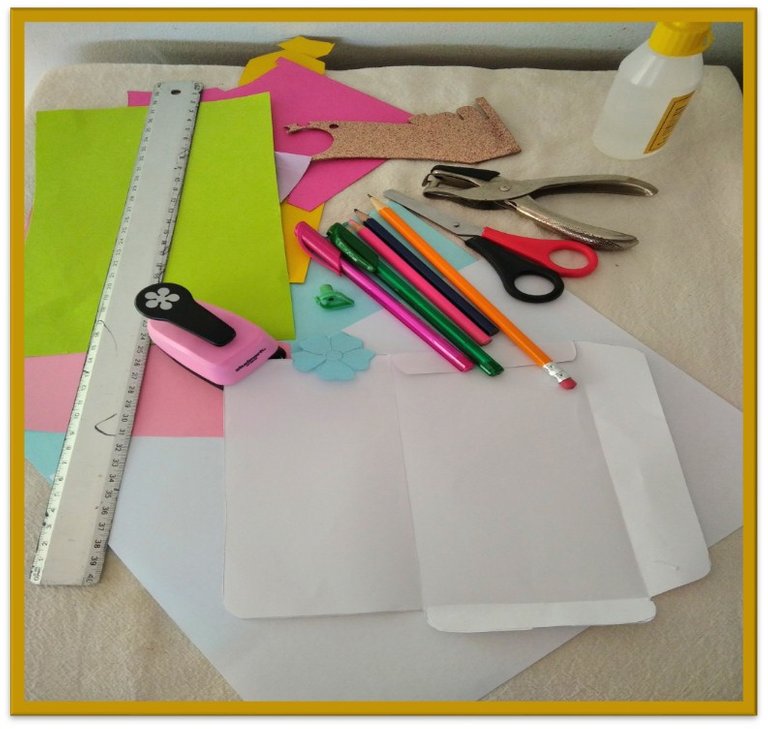
Materiales:
•Plantilla de sobre
•Hoja de papel blanco
•Hojas de colores: verde, fucsia, morado, rosado, amarillo y azul claro
•Lápiz
•Lapiceros de colores: verde y fucsia
•Colores: azul oscuro y rosado
•Tijera
•Pega silicon
•Foami escarchado color bronce
•Perforadora de papel
•Perforadora de flor
•Plantilla de flor y hoja
•Regla
Materials:
•Envelope template
•White sheet of paper
•Colored leaves: green, fuchsia, purple, pink, yellow and light blue
•Pencil
•Colored pencils: green and fuchsia
•Colors: dark blue and pink
•Scissor
•Glue silicone
•Bronze frosted foam
•Paper hole punch
•Flower punch for papel
•Flower and leaf template
•Ruler
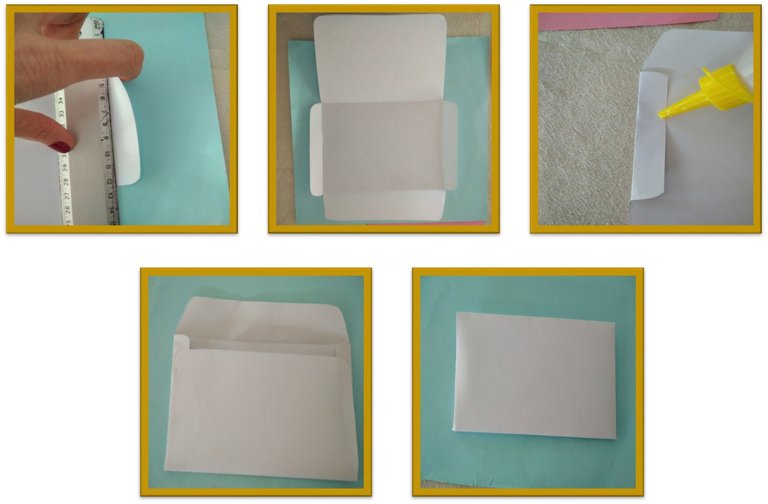
Paso 1
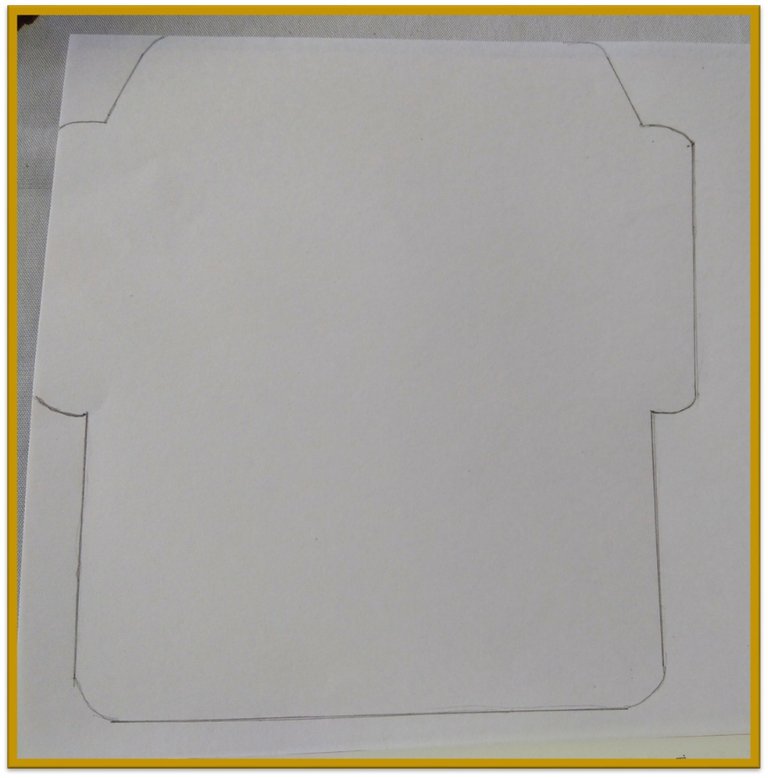
Para comenzar a hacer el sobre, primero toma la plantilla de sobre y dibújala sobre la hoja de papel. Luego, recórtala.
Step 1
To start making the envelope, first take the envelope template and draw it on the piece of paper. Then cut it out.
Paso 2
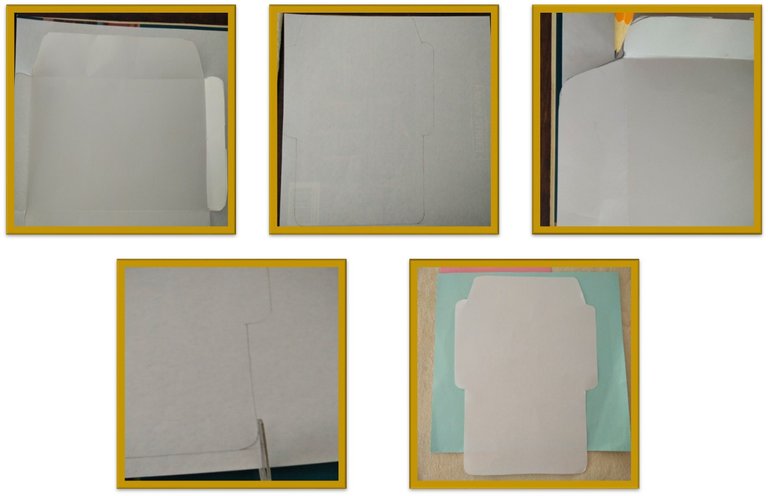
Con ayuda de la regla dobla las pestañas derecha e izquierda. Ahora, dobla las pestañas superior e inferior. Luego, coloca silicon en las pestañas derecha e izquierda y seguidamente pega a ellas la pestaña inferior.
Step 2
With the help of the ruler, bend the right and left tabs. Now fold the top and bottom tabs. Then, silicone the left and right tabs and then glue the bottom tab to them.
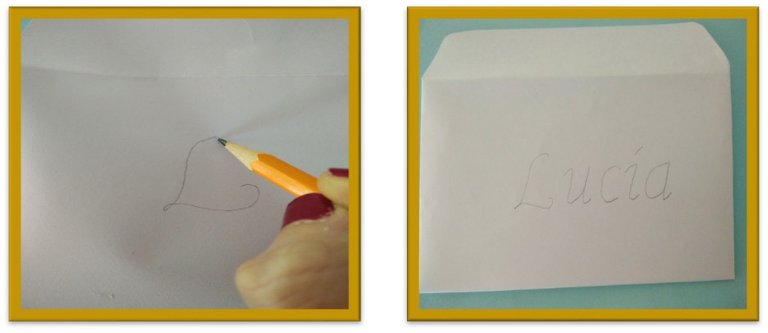
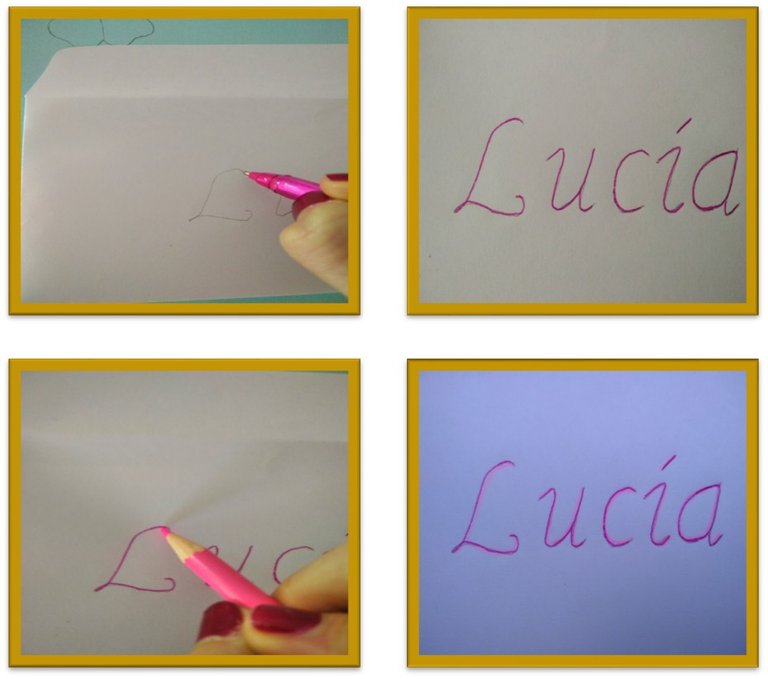
Paso 3
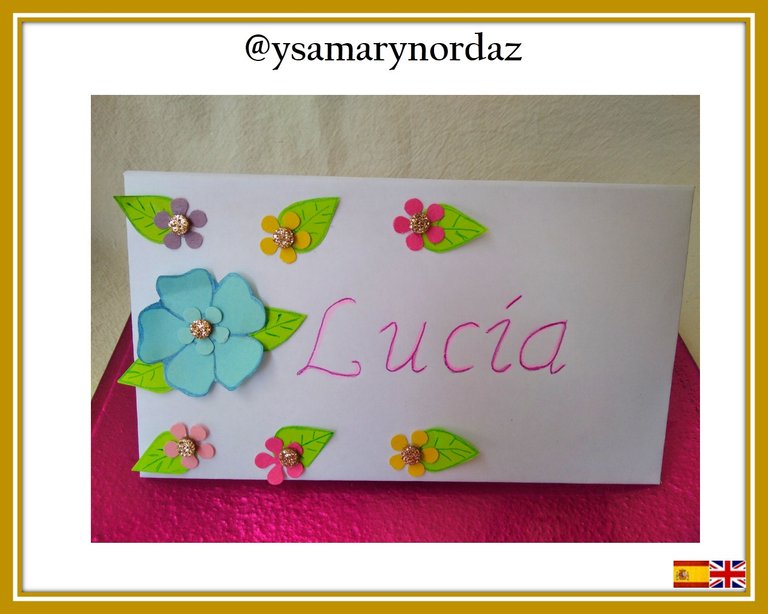
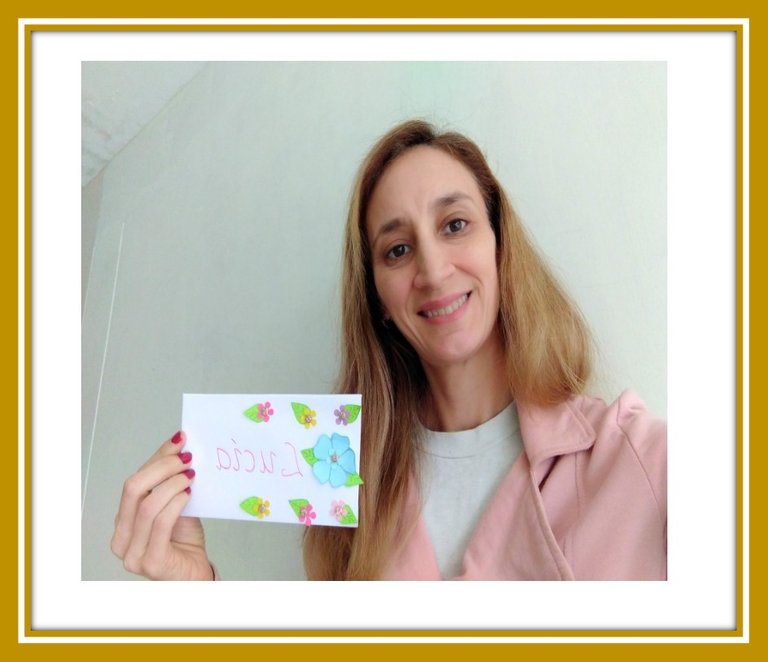
Para personalizar el sobre deja 5cm del lado izquierdo y escribe en el centro el nombre de la persona a la cual va dirigido el mismo, en este caso colocaré el nombre Lucía.
Step 3
To personalize the envelope, leave 5cm on the left side and write in the center the name of the person to whom it is addressed, in this case I will place the name Lucía.
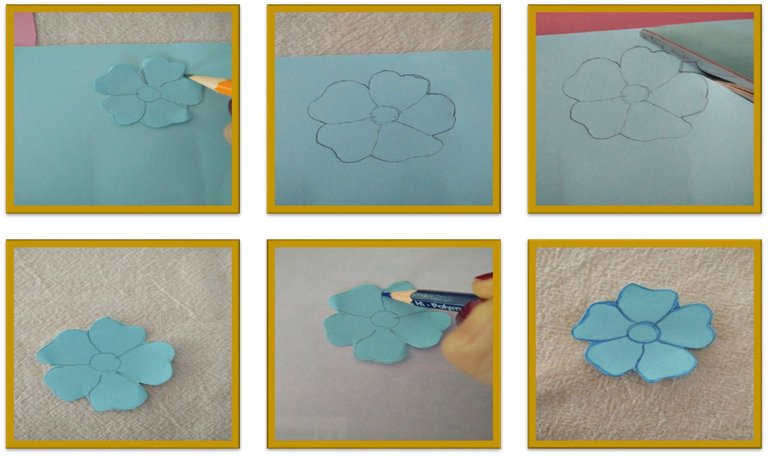
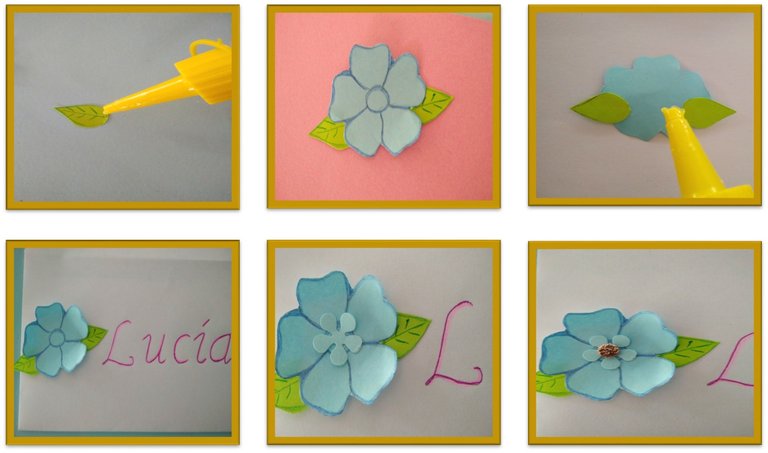
Paso 4
Ahora toma la plantilla de flor y dibújala sobre el papel azul claro. Luego, recórtala y colorea sus bordes con el color azul oscuro.
Step 4
Now take the flower template and draw it on the light blue paper. Then, cut it out and color its edges with the color dark blue.
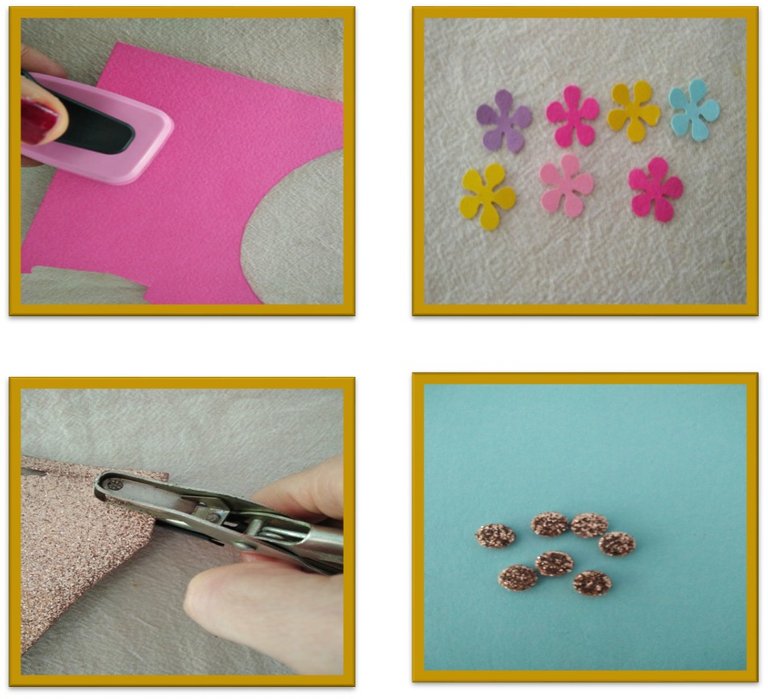
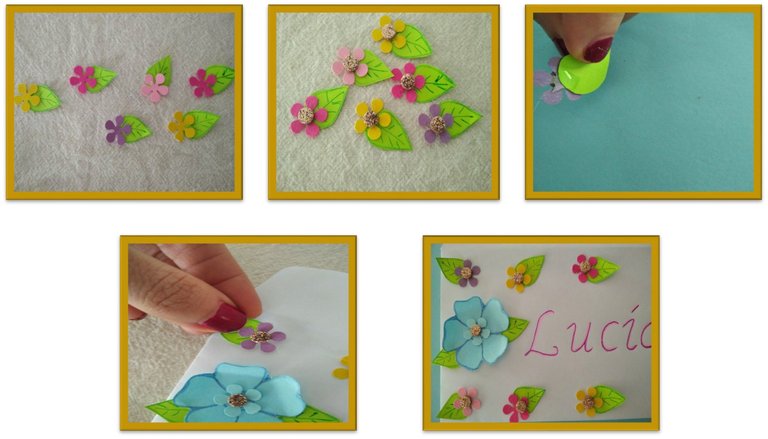
Paso 5
Con la ayuda del perforador de flor extrae siete flores (2 fucsia, 2 amarillas, 1 azul, 1 rosada y 1 morada). Luego, coloca la perforadora sobre el foami escarchado color bronce y extrae 7 círculos.
Step 5
With the help of the flower drill, she extracts seven flowers (2 fuchsia, 2 yellow, 1 blue, 1 pink and 1 purple). Then, place the hole punch on the bronze frosted foam and extract 7 circles.
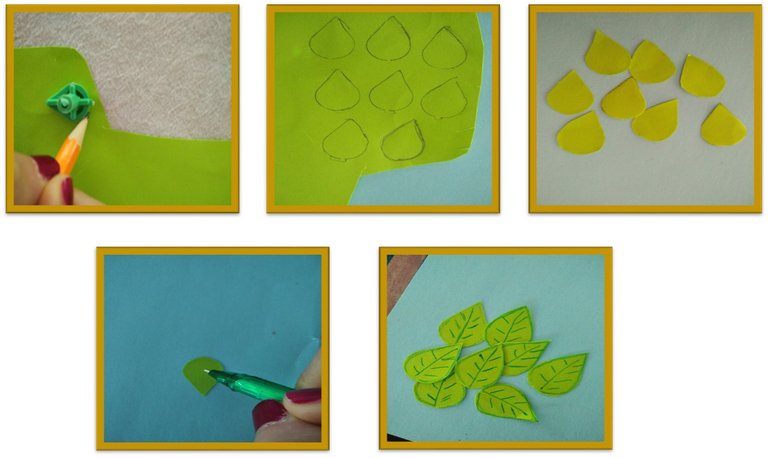
Paso 6
Toma la plantilla en forma de hoja y dibuja sobre el papel color verde 8 hojas. Luego, con el lapicero color verde marca las nervaduras. Por último, recórtalas.
Step 6
Take the leaf-shaped template and draw 8 leaves on the green paper. Then, with the green pencil, mark the ribs. Lastly, cut them out.
Paso 7
Para darle color al nombre toma el lapicero color fucsia y márcalo. Luego, toma el color rosado y vuelve a repasar el nombre.
Step 7
To give color to the name, take the fuchsia pencil and mark it. Then, take the color pink and go over the name again.
Paso 8
Pega dos hojas en cada lado de la flor azul. Luego pégala en el espacio de 5cm que se dejó antes del nombre (Lucía). Posteriormente, pega la flor pequeña azul y; por último, pega el círculo de foami escarchado.
Step 8
Glue two leaves on each side of the blue flower. Then paste it in the 5cm space left before the name (Lucía). Later, paste the small blue flower and; Lastly, glue the circle of frosted foam.
Paso 9
Toma las hojas y pégalas a las flores. Seguidamente, coloca pegamento al círculo de foami. Por último, pega las flores alrededor del sobre.
Step 9
Take the leaves and glue them to the flowers. Next, glue the foami circle. Lastly, glue the flowers around the envelope.
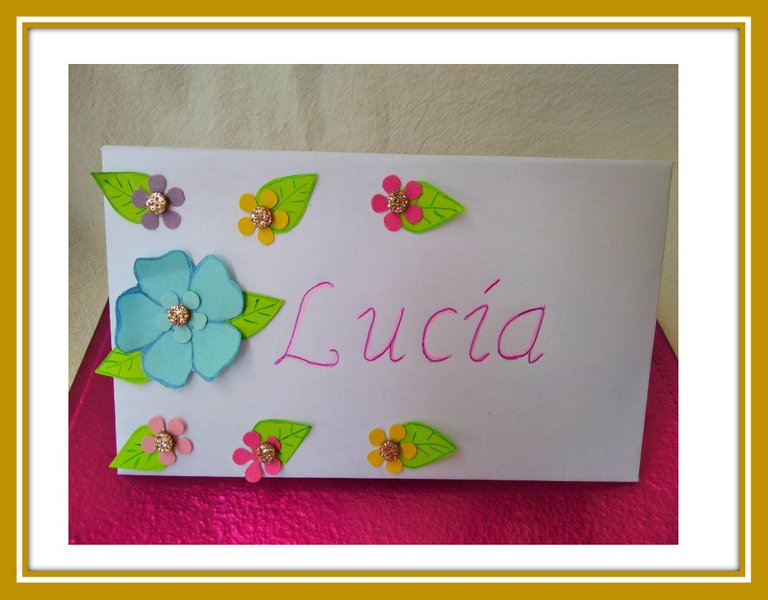
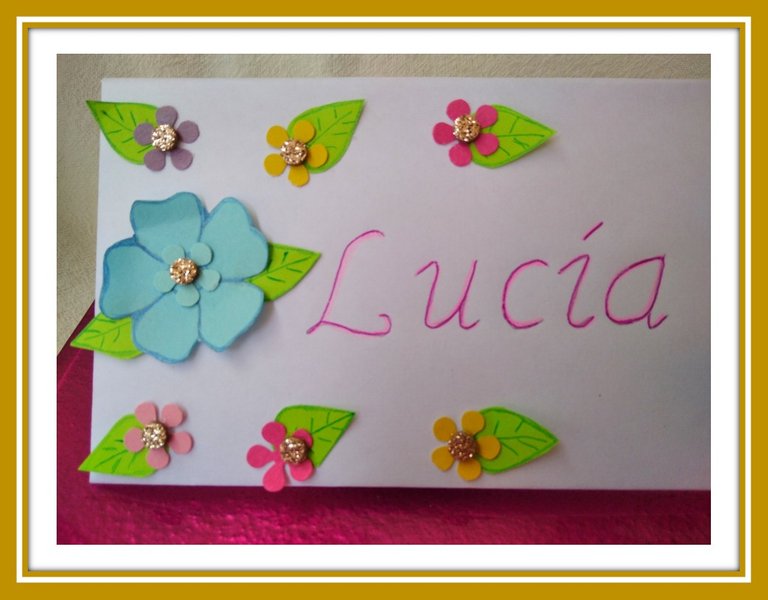
El sobre ya está terminado y ha quedado muy bonito y delicado. Para mí las flores transmiten dulzura y siempre que queremos regalar un detalle lo hacemos con un sentimiento de amor y alegría esperando ver la emoción de la persona al recibir ese detalle y, si el mismo es personalizado, la alegría es aún mayor. Es gratificante visualizar como podemos convertir un simple sobre blanco en un sobre colorido y hermoso. Espero se animen y ponga en práctica este paso a paso. ¡Hasta una próxima oportunidad!
The envelope is already finished and it has been very beautiful and delicate. For me, flowers transmit sweetness and whenever we want to give a gift, we do it with a feeling of love and joy, hoping to see the emotion of the person upon receiving that gift and, if it is personalized, the joy is even greater. It is gratifying to visualize how we can turn a simple white envelope into a colorful and beautiful envelope. I hope you are encouraged and put this step by step into practice. See you soon!
Las fotografías fueron tomadas por mi con mi teléfono celular Redmi Note 8.
The photos were taken by me with my Redmi Note 8 cell phone.
Has sido votado por
PROYECTO ENLACE
'Conectando Ideas y Comunidades'
PROYECTO ENLACE es un proyecto de curación de habla hispana enfocado en recompensar contenido de calidad y apoyar autores en su proceso de crecimiento en HIVE.
Creemos y apostamos por el futuro de esta gran plataforma, y estamos muy emocionados de poder hacerla crecer junto a esta comunidad. Así que te invitamos a usar nuestra etiqueta ENLACE y estar atento a todas las actividades que tenemos preparadas y que estaremos publicando en breve.
¿QUIERES AUTOMATIZAR TUS GANANCIAS DE CURACIÓN? SE PARTE DEL PROYECTO ENLACE APOYANDO A NUESTRO TRAIL EN HIVE.VOTE INGRESA AQUÍ PARA CONOCER LOS DETALLES.
¿QUIERES INVERTIR ENLACE? DESCUBRE COMO HACERLO Y GENERAR INGRESOS DE FORMA SEMANAL MEDIANTE TU DELEGACIÓN DE HP AQUÍ TE EXPLICAMOS COMO.
Te invitamos a participar en nuestro servidor de Discord: https://discord.gg/3S9y7BbWfS
Atentamente
EQUIPO ENLACE 2023
OMMMGG, que lindo te quedo el sobre, se me hace muy bonito el como te expresas de las flores y lo mejor de todo es que es un detalle hecho a mano y creeme que esos son los que valen oro, muy bonito todo y más la combinación de colores, en cuanto las flores ME ENCANTARON!!! jsjs. Gracias por compartir tu linda idea con nosotros.
¡Saludos!<3
Hola amiga @solecitosalazar. Muchas gracias por tu lindo mensaje. Si, tienes razón esos detalles personalizados valen oro. Me alegro mucho que te haya gustado este proyecto. Te envío un fuerte abrazo.
Es un detalle delicado y muy lindo para obsequiar, me gustaron mucho las florecillas , gracias por compartir 🤗
Hola @marlynmont. Me alegro mucho que te haya gustado. ¡Saludos!