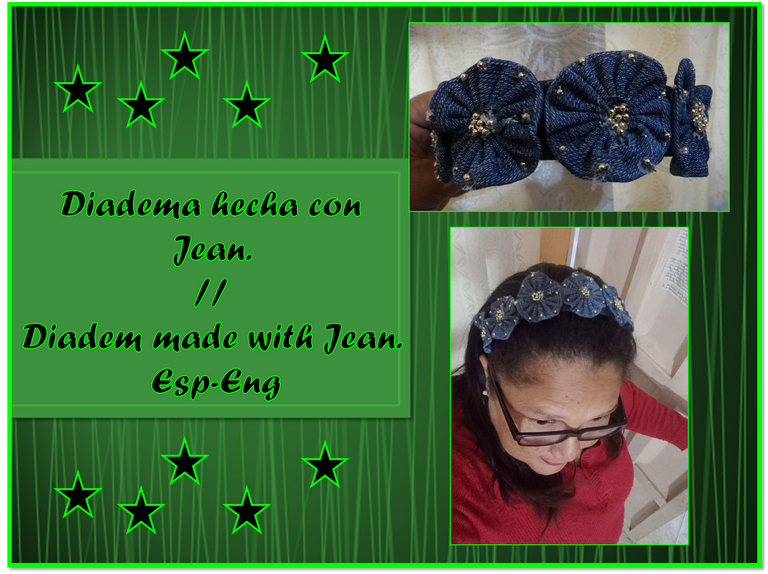
Diadema hecha con Jean. // Diadem made with Jean. Esp-Eng
Saludos a todos en esta colmena donde la joyería nos une, demostramos esas cosas bellas que hacemos para quienes nos ven aprendan, como también aprendemos de lo que otros hacen.
Entre las cosas que aquí podemos enseñar leyendo las reglas, entran los accesorios, como pueden ser: zarcillos, collares, pulseras, diademas, los mismos se pueden hacer con materiales nuevos o reciclando.
Así fue como hice y les presento esta diadema como he visto que le dicen aquí aunque yo los he conocido siempre como cintillo.
Greetings to all in this hive where jewelry unites us, we show those beautiful things we do for those who see us learn, as we also learn from what others do.
Among the things that we can teach here by reading the rules, are accessories, such as: tendrils, necklaces, bracelets, headbands, they can be made with new materials or recycling.
This is how I made and present you this headband as I have seen it called here, although I have always known it as a headband.
Si la diadema es un accesorio para usar en el cabello, lo usan tanto niñas, muchachas, como mujeres adultas, a mi me han gustado desde muchacha, así como también los he hecho yo misma, así como el que les enseño a continuación.
Materiales: - Base para diademas. - Tela de jean reciclado. - Periltas cosidas doradas. – Pega blanca. – Pistola/barra de silicon. – Aguja e hilo. – Regla,lápiz, tijera. – Pinzas de bisutería.
If the headband is an accessory to wear in the hair, it is used by girls, girls, as well as adult women, I have liked them since I was a girl, as well as I have made them myself, as well as the one I show you below.
Materials: - Base for headbands. - Recycled jean fabric. - Gold stitched beads. - White glue. - Silicone gun/silicone stick. - Needle and thread. - Ruler, pencil, scissors. - Jewelry tweezers.
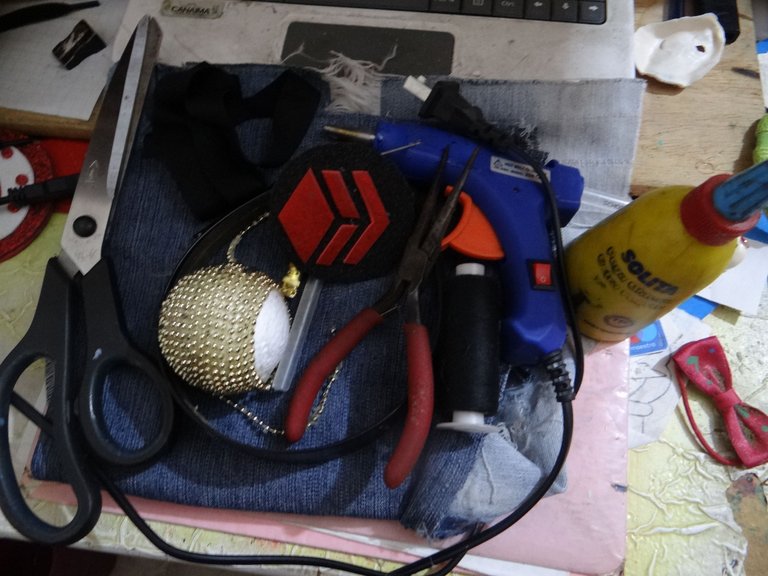
Casi en un 90% los materiales son reciclados, los tenia en casa, el que guarda siempre tiene ja ja y yo tengo muchas cosas.
Almost 90% of the materials are recycled, I had them at home, he who saves always has ha ha and I have a lot of things.
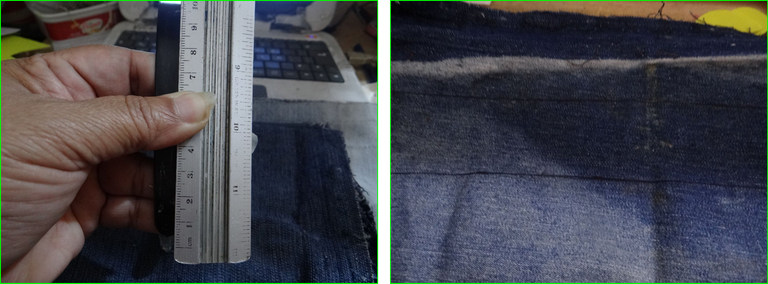
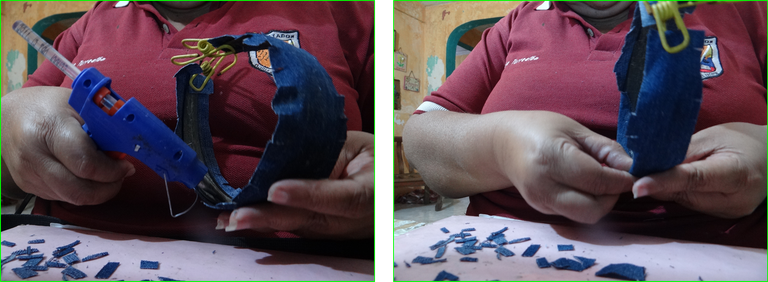
1er Paso:
Medir el cintillo ancho y largo , para así cortar una tira larga para cubrir la diadema, yo medí y corte 5 cms por 38 cms. Siempre es bueno cortar un poco mas, ya que en el caso de la diadema, hay que doblar la tela hacia adentro.
Step 1:
Measure the headband width and length , so as to cut a long strip to cover the headband, I measured and cut 5 cms by 38 cms. It is always good to cut a little more, since in the case of the headband, you have to fold the fabric inwards.
2do Paso.
Ya cortada el rectángulo lo pego al cintillo con pega blanca, para que no se sienta lo grueso del silicon, se coloca buena cantidad de pega, se coloca la tela que no quede arrugas debe quedar bien lisa, en los extremos sujetar con unas pinzas de ropa hasta que se seque.
2nd Step.
Once the rectangle is cut, I glue it to the headband with white glue, so you don't feel the thickness of the silicone, put a good amount of glue, place the fabric so that there are no wrinkles, it should be smooth, at the ends hold it with clothespins until it dries.
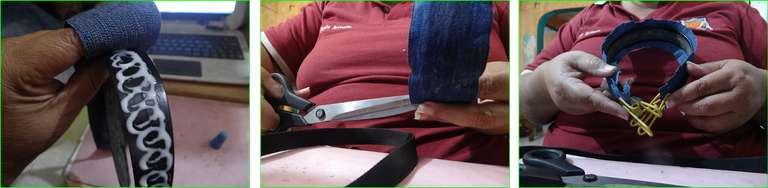
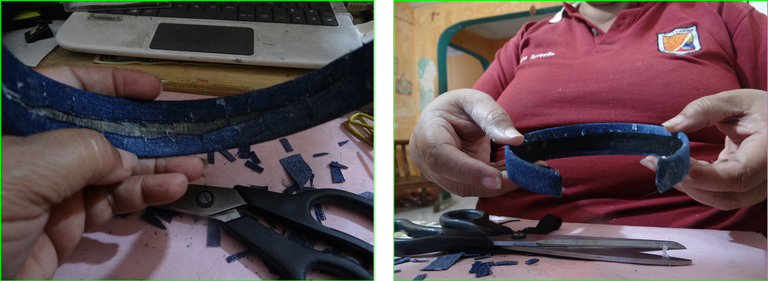
3er Paso.
La tela que sobra de los lados, picarla para que sea mas fácil doblar hacia adentro, al pegarla, aquí si se hace con silicon para que se pegue mas rápido y mas fuerte, con una tira de otra tela, pegamos en el centro del cintillo para cubrir el jean que se pego.
3rd Step.
The leftover fabric on the sides, chop it to make it easier to fold inward, to paste it, here if done with silicone to stick faster and stronger, with a strip of another fabric, paste in the center of the headband to cover the jean that stuck.
4to Paso.
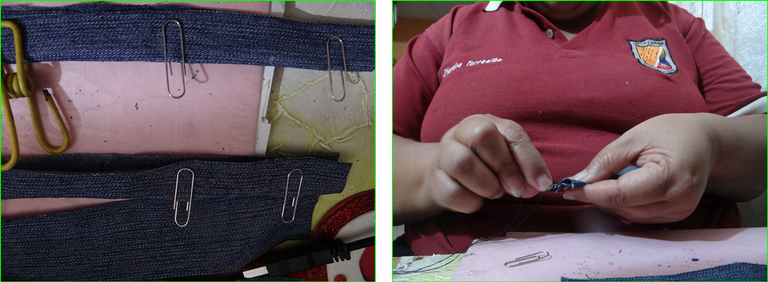
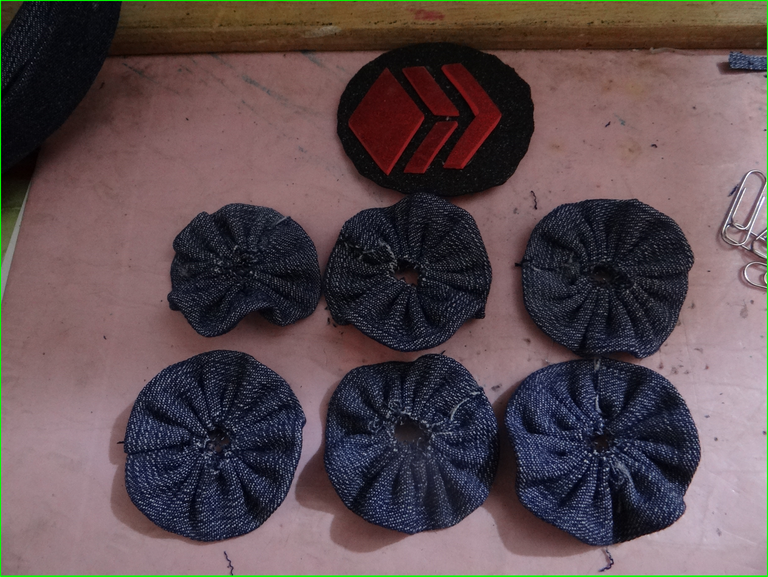
Ya apartamos la base de la diadema que ya esta lista, ahora vamos como lo vamos a decorar, con rosas de la misma tela de jean. Para esto corte rectángulos o tiras de 4cms x 20 cms.
Cada tira la doblamos a la mitad a lo largo, sujetamos con pinzas o clips para luego coser con la aguja e hilo negro puntadas pequeñas, `para cuando lleguemos al otro extremo, halamos el hilo quedara ruchado, quedara como un circulo, unimos ambos extremos con el mismo hilo, en ambos extremos, puntadas pequeñas, así hice 7 círculos para mi flores je je.
4th step.
Now we put aside the base of the headband that is ready, now we are going to decorate it with roses of the same jean fabric. For this cut rectangles or strips of 4 cm x 20 cm.
Each strip is folded in half lengthwise, fasten with clips or clips and then sew with the needle and black thread small stitches, for when we get to the other end, pull the thread will be ruched, it will be like a circle, join both ends with the same thread, at both ends, small stitches, so I made 7 circles for my flowers heh heh.
5to Paso.
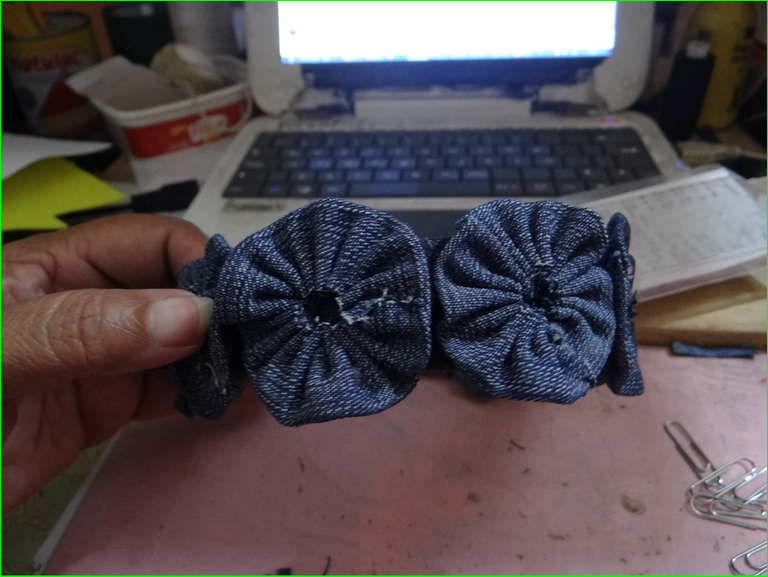
Yo como soy algo medio necia tomo la medida de la diadema, midió 35 cms de largo así que a la mitad o sea 17.5 cms, marque para saber cual es el medio y ah voy pegando los círculos-flores con la pistola de silicon, pegue 7, lo ideal es que lo que uno monte en una diadema, estos no llegue hasta las orejas así no molestan.
5th step.
As I'm a little bit stupid I took the measure of the headband, it measured 35 cms long so half way or 17.5 cms, mark to know which is the middle and then I glue the circles-flowers with the silicon gun, I glued 7, the ideal is that what you mount on a headband, these do not reach up to the ears so they do not bother.

6to Paso.
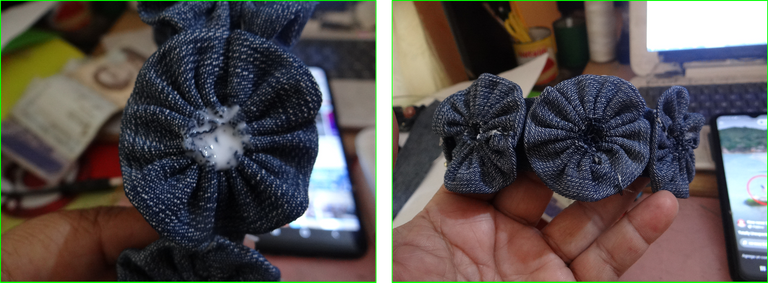
Como el jean es una tela que deshilacha, para evitar eso, en el centro de cada flor, coloque pega blanca, que actuara como un sellador, que luego que se seque no se vera, queda transparente.
6th step.
As the jean is a fabric that frays, to avoid that, in the center of each flower, put white glue, which will act as a sealant, which after it dries will not be seen, it is transparent.
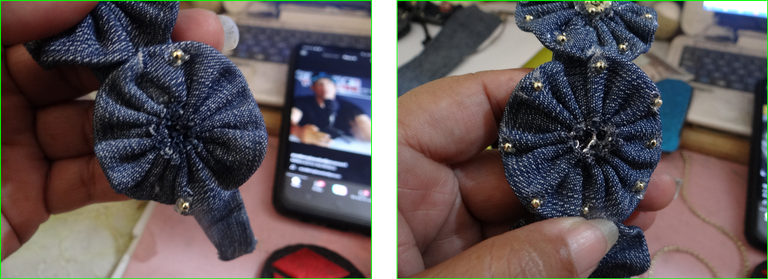
7mo Paso.
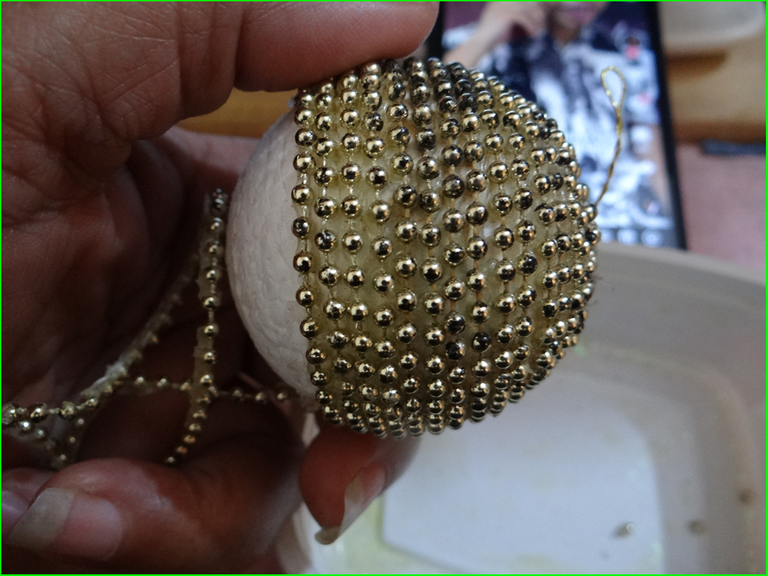
Mientras se seca la pega en las flores, voy con las perlas, que las tome de una bola de navidad que una vez hace años decore, pero cayo donde había agua y se pus fea por un lado y por otro no, así que se podían reciclar unas perlitas que fue lo que hice, despegar del anime las perlitas, que aquí si tuve paciencia, ya que tenia silicon pegado, con una pinza les fui quitando y luego cortando cada perlita.
7th Step.
While the glue dries on the flowers, I go with the pearls, I took them from a Christmas ball that I once decorated years ago, but it fell where there was water and it got ugly on one side and not on the other, so I could recycle some pearls, which is what I did, peel the pearls from the anime, and here I had patience, since I had silicon glued, with tweezers I removed them and then cut each pearl.
8vo Paso.
Con ya previamente la pistola de silicon caliente fui colocando punticos de silicon y con la pinza fui pegando las perlitas, así en todas las flores el mismo proceso. Para después en el centro de cada flor, coloque silicon y muchas perlitas.
8th step.
With the hot silicone gun, I was placing dots of silicone and with the tweezers I was gluing the beads, so in all the flowers the same process. Then in the center of each flower, I placed silicone and many beads.
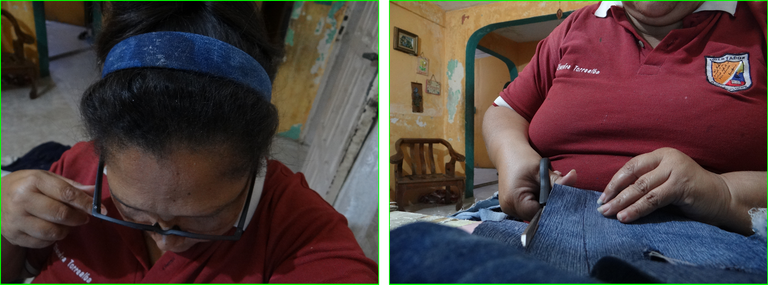
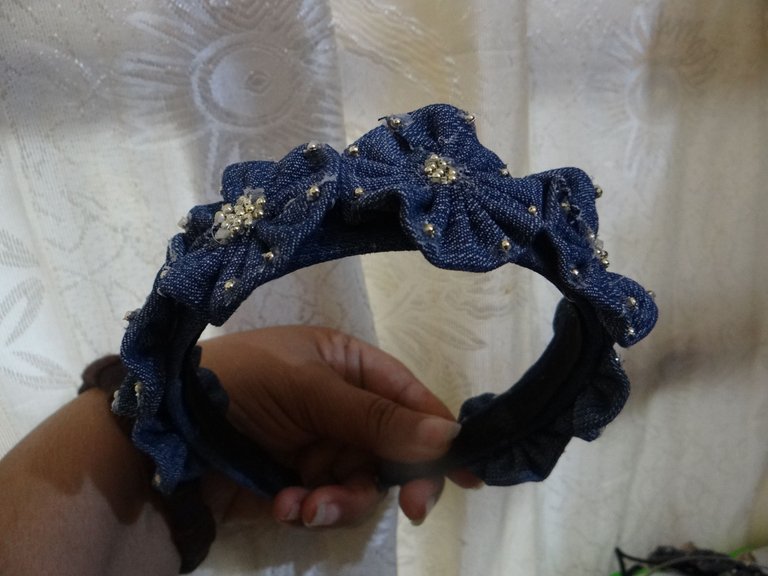
Y así ya he terminado mi diadema, hay que limpiar el trabajo esto es quitar si hay algún hilo o flequillo suelto, quitar los hilos que deja el silicon.
Para luego la sesión de fotos con mi diadema.
And so I have finished my headband, I have to clean the work, this is to remove if there is any loose thread or fringe, remove the threads left by the silicon.
And then the photo session with my headband.
Que tal, bello me quedo, no porque lo diga yo, sino quienes ya me lo vieron puesto je je. Porque lo hice para mi.
How about, I look beautiful, not because I say so, but those who have already seen me wearing it heh heh. Because I made it for me.
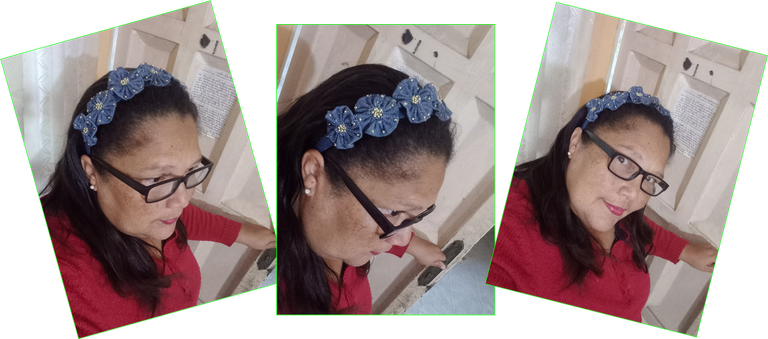
| Las fotos fueron tomadas las primeras con mi cámara Sony. | The photos were first taken with my Sony camera. |
| Los selfies modelando el cintillo con mi celularSamsung A12. | The selfies modeling the headband with my Samsung A12 cell phone. |
| Fotos editadas en PowerPoint | Photos edited in PowerPoint |
| Contenido 100% original y propio. | 100% original and own content. |
| La traducción con la aplicacion DeepL | The translation with the application DeepL |

Hermosa día demasiado bien detallada y realizada, lo mejor es el reciclaje que nos regalas el día de hoy amiga @zhanavic69 cada detalle de pedrería la hace lucir más hermosa 💖, sin duda un gran trabajo.
Gracias así es el detalle es la perlita el brillo que le da y como elegante por ser pequeña, me encanto a mi tambien, ya seguire publicando gracias...
Gracias por su apoyo...eso es muy valioso
Te wuedo muy bonita amiga y tu paso a paso esta bien chevere para seguirlo.
Gracias por compartir
Hola bella, bueno una de las ideas al compartir algo asi el deber ser es explicar bien, pienso que a veces como que me excedo, pero no lo puedo evitar, asi como a mi me gustan que las cosas sean bien explicadas, me gusta expliarlo, espero que lo puedas hacer algun dia.
El acabado me sorprende, a pesar de ser material reciclado quedo muy prolijo y hermoso, esto es muestra de que con materiales de reúso también se hacen cosas de calidad.
Hola amiga gracias por tu comentario.
Bueno yo hago de todo un poquito de manualidades que es extensa y soy de las que si voy hacer algo debe quedar bien, ya que eso vende una buena imagen sino entonces no hago nada.
Si con reciclado se hacen cosas bellas.
Estoy por subir uno de botellas decoradas