Making My Own Handmade Paper | Elaborando Mi Propio Papel Artesanal [ DIY | Tutorial ]
En/Esp
Super cosmic greeting to Hive community!
Welcome to my blog!
¡Un súper saludo cósmico a toda la comunidad de Hive!
¡Bienvenido a mi blog!


During these difficult times we are living and this long quarantine, it has been the perfect time to learn new things, things I had always wanted to try. While i was enjoying the night watching watercolor technique tutorials, among others for inspiration and relaxation, i came across something great, the process of making handmade paper. I always loved this kind of paper, its rustic texture,its color, those touches of dry flowers, besides being made of recycled paper makes it even more attractive. At first, I was a little unmotivated because i didn't have the key instrument, a wooden frame or the tools to make it, but i was so eager to do it that i started looking all over the house for something to solve this problem, and i found it.
Below,i'll show you how this quarantine adventure ended up being a successful project.
Durante estos momentos tan difíciles que vivimos y esta cuarentena tan larga, ha sido el tiempo perfecto para aprender cosas nuevas, cosas que siempre había querido intentar. Mientras disfrutaba mis madrugadas viendo tutoriales sobre la técnica de acuarela, entre otras para inspirarme y relajarme, me topé con algo genial: con el proceso para elaborar papel artesanal. Siempre amé este tipo de papel, su textura rústica, su color, esos toques de flores secas, además de estar hecho de papel reciclado lo hace aún más atractivo. Al principio, me desmotivé un poco pues no contaba con el instrumento clave, un bastidor de madera o las herramientas para fabricarlo, pero tenía tantas ganas de hacerlo que empecé a buscar por toda la casa algo para resolver este problema, y lo encontré.
A continuación, te mostraré cómo esta aventura de cuarentena terminó siendo un proyecto exitoso.
Materials i used / Materiales que utilicé:
Basically what is needed is paper pulp, the frame and a lot of patience. In my case i had to make some adjustments because i didn't have everything i saw in tutorials. I really had to recycle a lot of things:
- Recycled paper, dried flowers,scissors, cutters, stapler, paper clips.
- Polystyrene mould, polyester mesh.
- Blender machine, large bowls, ladles.
- An old sheet or blanket, some towelsand absorbent wipes.
Básicamente lo que se necesita es pulpa de papel, el bastidor y muchísima paciencia. En mi caso tuve que hacer algunos ajustes pues no contaba con todo lo que veía en tutoriales. Realmente tuve que reciclar muchas cosas:
Papel reciclado, flores secas, Tijeras, cutters, engrapadora, clips.
Molde de poliestireno,malla de poliéster.
Licuadora,recipientes grandes, cucharones.
Una sábana omanta vieja, algunas toallas y pañitos absorbentes.
Step 1 / Paso 1
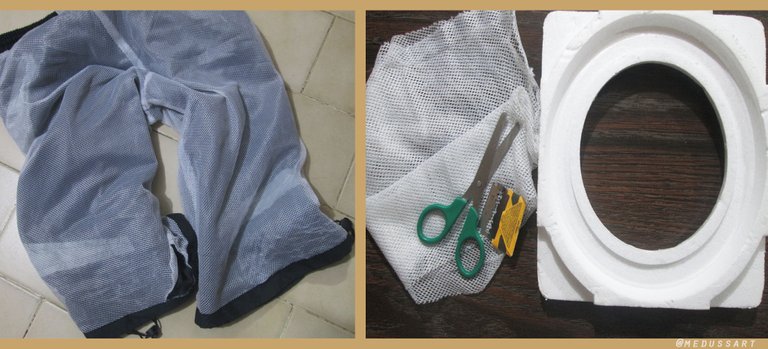
I found a circular polystyrene mouldin the kitchen, this material is not suitable because it is not very resistant,the ideal is that it is made of wood or something that is very rigid, but i was willing to try, i really wanted to make my own craft paper at all costs. In the closet, i found a sport pant that nobodywas using and inside this one had the perfect mesh for my project, because wehave to create a frame and a strainer at the same time.
Encontré en la cocina un molde circular de poliestireno, este material no es el adecuado pues no es muy resistente, lo ideal es que sea de madera o algo que sea muy rígido, pero estaba dispuesta a probar, realmente quería hacer mi propio papel artesanal a toda costa. En el closet, encontré un pantalón deportivo viejo que nadie usaba y dentro de este tenía una tela o malla perfecta para mi proyecto,pues debemos crear como una especie de molde y tamiz a la vez.
Step 2 / Paso 2
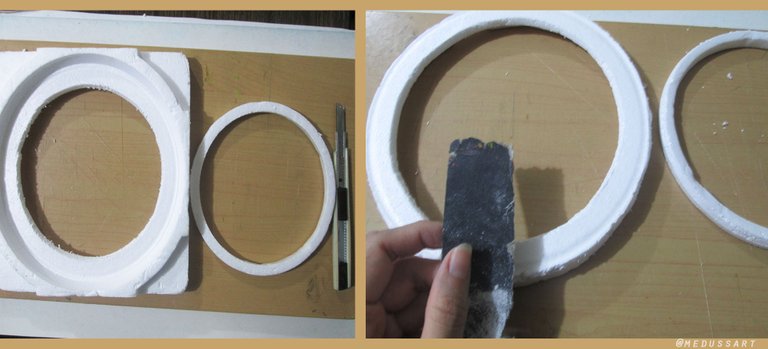
I cut out and perfected my mold,according to the desired shape with the help of cutters and sandpaper. I wanted my mold to be a little bigger but i had no other choice, it would serve as atest.
Recorté y perfeccioné mi molde, según la forma deseada con la ayuda de un cortador y de un papel de lija. Me hubiese gustado que mi molde fuese un poco más grande pero no tenía otra opción, me serviría como prueba.
Step 3 / Paso 3
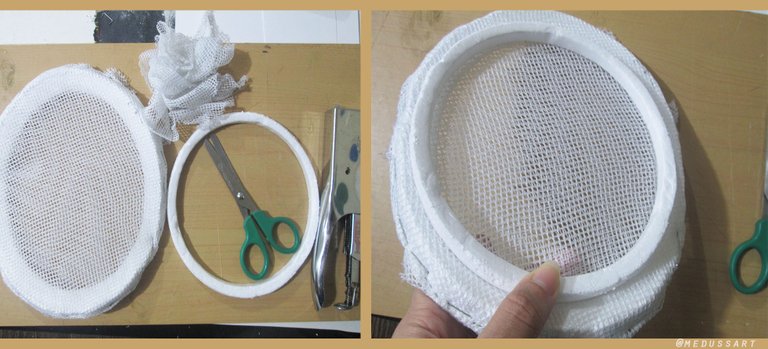
With the help of a stapler i placed the fabric in the main mould, it should be well extended, the support should be as flat and firm as possible. In most of the tutorials you will see that two pieces are used to shape our paper, the second piece without the fabric is to help shape it and control the thickness.
Con ayuda de una engrapadora coloqué la tela en el molde principal, debe estar bien extendida, el soporte debe ser lo más plano y firme posible. En la mayoría delos tutoriales podrán observar que se utilizan dos piezas para formar nuestro papel, la segunda pieza sin la tela es para ayudar a darle forma y controlar el grosor.
Step 4 / Paso 4
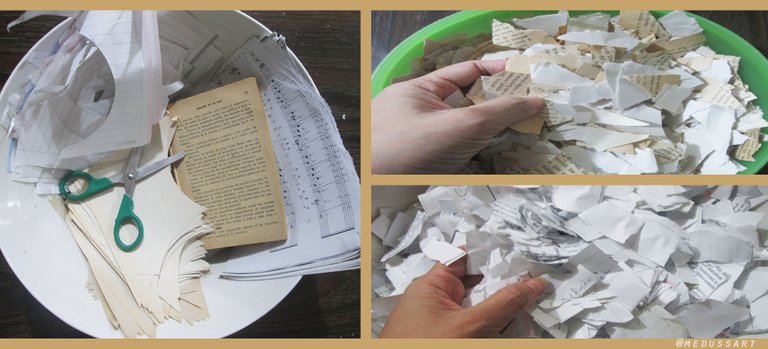
I collected different types of used paper, as i wanted to try with different textures and color, i made several groups of paper, one with white paper of those that bring the notebooks, bond paper... and a group of brown paper, i found a very old book whose leaves were already rotten, it was perfect for my project.
Recolecté diferentes tipos de papel usados y otros recortes que tenía, como deseaba probar con diferentes texturas y color, hice varios grupos de papel, uno con papel blanco de esos que traen los cuadernos,papel bond… y un grupo de papel marrón, encontré un libro muy viejo cuyas hojas ya estaban podridas, era perfecto para mi proyecto.
Step 5 / Paso 5
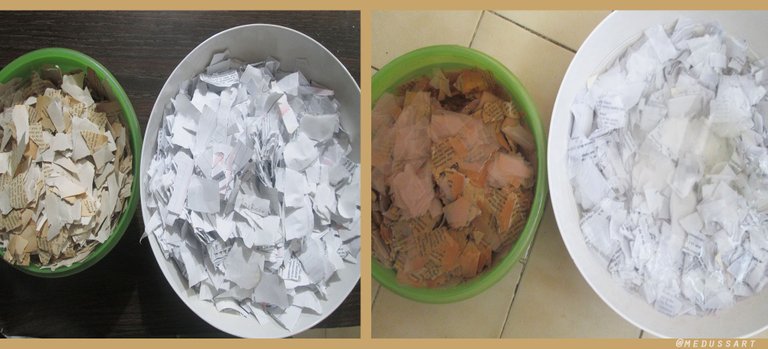
I cut the paper into squares, placed each group in a bowl and added water until it was covered. I left it overnight to hydrate them well so i could be shredded better.
Recorté el papel en cuadritos, coloqué cada grupo en un recipiente y agregué agua hasta cubrir, lo dejé toda una noche para hidratarlos bien y así poder triturarlos mejor.
Step 6 / Paso 6
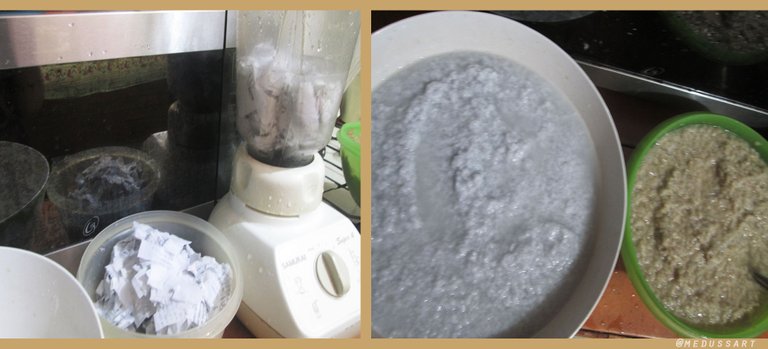
The next day i started processing or shredding each group, part by part, in the blender machine, because if we add a lot of paper, it might not shred very well. We must obtain a paper pulp as homogeneous as possible, if you add a paper cup you can try adding twice as much water.
El día siguiente empecé a procesar o triturar cada grupo en la licuadora en partes pequeñas, ya que si agregamos mucha cantidad de papel, puede que no triture muy bien. Debemos obtener una pulpa de papel lo más homogénea posible, si agregas una taza de papel puedes probar agregando el doble de agua.
Step 7 / Paso 7
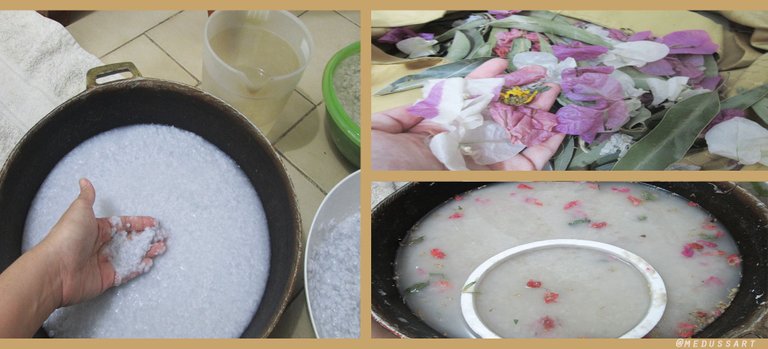
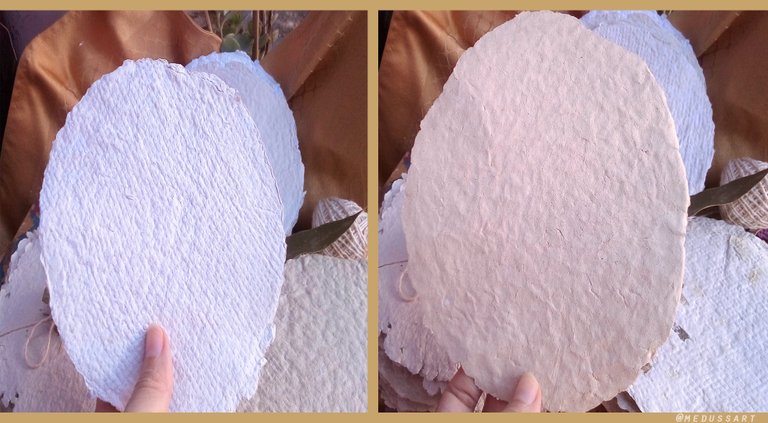
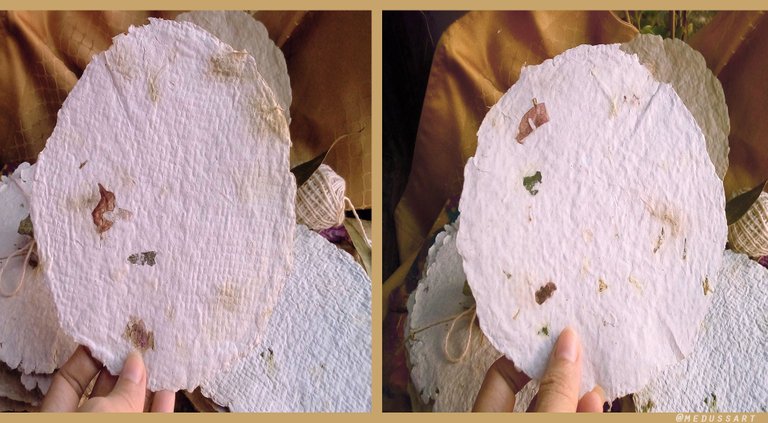
I divided my paper pulp, first i worked with my white paper pulp, then with the brown one, sometimes i mixedboth to get an intermediate shade, i didn't want to use any dyes, i just wanted very neutral and natural shades because i will use them to paint. In the end, i added dried flowers to the mixture to make some floral-type paper sheets that i love so much. The mixture must be made in a bowl wider than our frame since we must dip it to catch the pulp.
Dividí mi pulpa de papel, primero trabajé con mi pulpa de papel blanca, luego con la marrón, algunas veces mezclaba ambas para obtener un tono intermedio, yo no quise usar ningún colorante, quería solo tonos bien neutros y naturales porque los utilizaré para pintar. Al final, agregué a la mezcla flores secas para hacer algunas hojas de papel de tipo floral que tanto me encantan. La mezcla debe hacerse en un recipiente más ancho que nuestro bastidor, ya que debemos sumergirlo para atrapar la pulpa en nuestro molde.
Step 8 / Paso 8

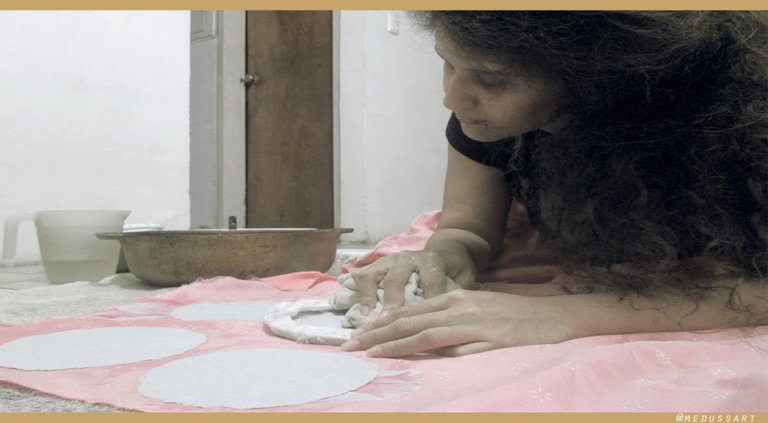
In this step i tried different waysto shape my paper, the most common method is to dip the frame in a wide bowl with the paper pulp, mixed with a lot of water, stir a little by hand to help the pulp float and fall on top of the mold. The piece without the mesh, as i said before, helps to control the shapeand thickness. But in the end, i was very annoyed with this method, so i chose to use only the frame with mesh and with a spoon, i added the paper pulp untilI obtained the desired shape and thickness. With the help of a spoon and the pressure of my hand on the frame i extracted the excess water from the pulp. Then, on a surface as flat as possible and a well-ironed and smooth blanket, Iplaced my already formed mixture.
En este paso probé distintas maneras de darle forma a mi papel, el método más común es sumergir el bastidor en un recipiente amplio con la pulpa de papel, mezclada con mucha agua, remover un poco con la mano para ayudar a que la pulpa flote y caiga encima del molde. La pieza sin tela, como dije anteriormente, ayudar a controlar la forma y el grosor. Pero al final, me fastidió mucho éste método, así que opté por usar sólo el bastidor con tela y con ayuda de un cucharon, iba agregando la pulpa de papel hasta obtener la forma y grosor deseado. Con ayuda de una cuchara y con la presión de mi mano sobre el bastidor extraía el exceso de agua de la pulpa. Luego, sobre una superficie lo más plana posible y una tela bien planchada y lisa, coloqué mi mezcla ya formada.
Step 9 / Paso 9
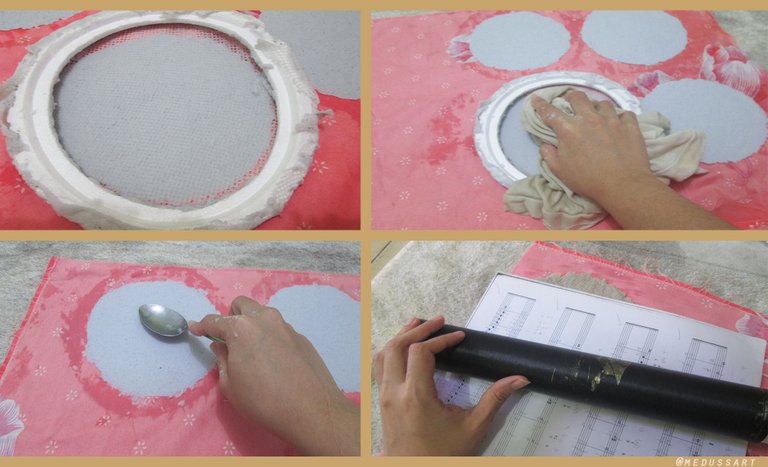
With the help of some towels,absorbent fabrics, it is carefully pressed from the opposite side of the frame,to remove excess water and also to detach the pulp from the mesh. We must notmake it too thin because at this point, it will be quite difficult to take off,it will break. Then when we have our "paper tortillas" formed, we canleave it like this or perfect the texture, using a dry sheet of paper on the clean side and a roller to extract excess moisture, flatten it more, etc.
Con ayuda de unas toallas,telas absorbentes, cuidadosamente se le hace presión por la parte opuesta del bastidor, para sacar el exceso de agua y también para despegar la pulpa de la malla. No debemos hacerlo demasiado delgado pues en este punto, se nos hará bastante difícil de despegar, se nos romperá. Luego cuando ya tenemos nuestras “Tortillas de papel” formadas, podemos dejarlo así o perfeccionar la textura,usando una hoja de papel seca por el lado limpio y un rodillo para extraer exceso de humedad, aplanarlo más, etc.
Step 10 / Paso 10
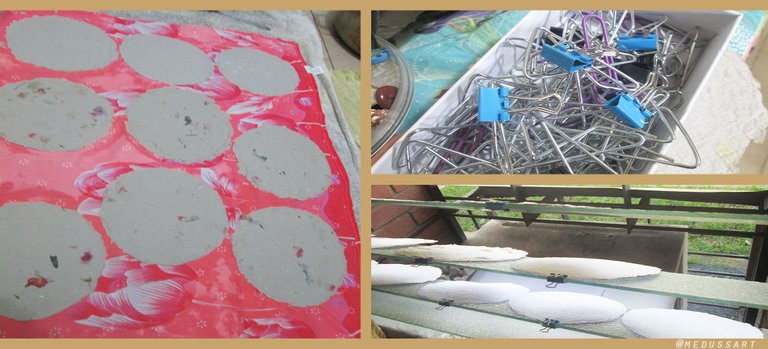
Ready! We already have our paperformed, now it's time to dry them, you can dry them in the sun or you can leavethem inside the house and they will dry very well, obviously in the sun, it will take less time. In my case, i let them dry inside my house and when they were almost dry, with the help of some clips i placed them on top of the glass of my window. They tend to deform as they dry, but don't worry, in the end you put some heavy books on top of them and they return to their flat shape.
Listo! Ya tenemos nuestro papel formado, ahora toca secarlos, puedes ponerlos al sol o puedes dejarlos dentro de casa y se secarán muy bien, obviamente al sol, tomará menos tiempo. En mi caso, los dejé secar dentro de mi casa y cuando estaban casi secos, con ayuda de unos clips los coloqué encima de los cristales de mi ventana. Ellos tienden a deformarse mientras se secan, pero no te preocupes, al final les colocas algunos libros pesados encima y vuelven a su forma plana.
I admit that it was a rather tedious process, not difficult, but forbeing the first time, i got quite tired. I felt super hippie, and i love that!
Admito que fue un proceso bastante tedioso, no es difícil, pero por ser la primera vez, me cansó bastante. Me sentí super hippie y eso me encanta!
Some suggestions / Algunas Sugerencias:
- Make a frame as firm as possible, which will not be deformed by water pressure or the weight of the paper pulp.
Fabricar un bastidor la más firme posible, que no se deforme con la presión del agua ni con el peso de la pulpa de papel.
- The mesh we choose to cover the frame is very important, this texture will be printed on one side of our paper when drying. If you want a more delicate finish, you can use fabrics such as tulle, plastic or polyester mesh that have very small holes.
La tela o malla que elijamos para cubrir el bastidor es muy importante, esta textura quedaráimpresa de un lado de nuestro papel al secar. Si quieres un acabado más delicado, puedes utilizar telas como el tul o mallas de plástico o poliéster que tengan huequitos muy pequeños. De hecho es mucho más fácil a la hora de despegar nuestra mezcla.
- The more water in our mixture, the thinner our sheet of paper will be.
A mayor cantidad de agua en nuestra mezcla, más delgada será nuestra hoja de papel.
- Although it is not necessary to add white glue to our pulp, if we want our paper to be a little more resistant and flexible, we can add some to the mixture.
Aunque no es necesario agregar pega blanca a nuestra pulpa, si queremos que nuestro papel sea un poco más resistente y flexible, podemos agregar un poco a la mezcla.
- If you want colored papers, you can add natural dyes, acrylic paints and watercolors to the pulp.
Si quieres papeles decolores, puede agregar la pulpa colorantes naturales, comestibles, pinturas acrílicas, acuarelas.
Final Result / Resultado Final:

And that's how my handmade paper turned out, i loved the colors and the different textures. The floral ones are my favorite. I'll definitely do them again, in fact i already have a larger wooden frame in mind that i'm going to recycle, and this paper is great for making a rustic watercolor sketchbook.
Y así quedó mi papel artesanal,me encantaron los colores y las diferentes texturas. Los florales son mis favoritos. Definitivamente los volveré a hacer, de hecho ya tengo en la mira un marco que voy a reciclar para usar como bastidor rectangular, son geniales para hacer un sketchbook rústico para acuarelas.
¡Recycling will always be a great project!
¡Cuídense mucho y que las buenas vibras les acompañen siempre!
Congratulations @medussart! You have completed the following achievement on the Hive blockchain and have been rewarded with new badge(s) :
You can view your badges on your board And compare to others on the Ranking
If you no longer want to receive notifications, reply to this comment with the word
STOPSupport the HiveBuzz project. Vote for our proposal!
Way to go!
Would love to see how it turns out after ink or paint is applied.
Thank you! 😊
Yes, it works well with markers, pens... for other techniques, it is necessary to add some glue to the pulp to make it more resistant. Greetings.
Thank u so much!
Están muy bonitos, me encantaron. Gracias por el aprendizaje.
Gracias a ti, por leer ;) Me alegra que te gusten.
have you heard about DIY Hub community? I think that type of content is certainly fits there :)
Oh wow! I didn't know it. Thank you for that suggestion. Greetings!
AH, QUÉ PRECIOSIDAD!!!
Todos amamos ser unos hippies! Y te quedó precioso! Yo ando súper pendiente de hacer unos también y me falta justo lo mismo que te faltaba a ti 😅 a ti también te podría interesar este post @vicvperezdelara.
Todo es más lindo reciclado y hecho a mano. 💛
Apoyamos tu contenido sobre #meditación, #mindfulness, #espiritualidad y #yoga.
Discord // Comunidad
Graciass! ;) Síiii, ser hippie es lo mejorrr! Definitivamente todo hecho a mano y reciclado queda más lindo porque se hace con amor. Un abrazo hippie desde la distancia!
Queee! Eres una genia! Yo lo he estado intentando y fallando terriblemente en el intento. @neyxirnc es testigo de esto jajaja.
Sin duda tomaré de referencia tus descubrimientos para volverlo a intentar!
Gracias por compartir ♥️
Guao! Se ven bellísimos, me han encantado.
Están preciosos, como para hacer un libro de hechizos o recetas.
¡Me encantó este post! 💙
Gracias, me alegra que te haya gustado :)...y sí, es cierto, serían geniales para un grimorio; no lo había pensado, justo quería hacer uno hace tiempo pero no tenía cuadernos. Buena idea!!
Fantastic, you’ve inspired me to try it
Thank u! Yess! You have to try it! You can do it better ! ;) Greetings!