Javascript Programming: Building a simple calculator with HTML, CSS, and Javascript
Hello and Welcome.
I will take you through the process of building a simple calculator using HTML, CSS, and Javascript. There will be no framework or library used.
This tutorial is for anyone with zero or advanced knowledge of coding. I will make it very easy for everyone to understand.
I will be using Sublime Text in this tutorial and it can be downloaded here.
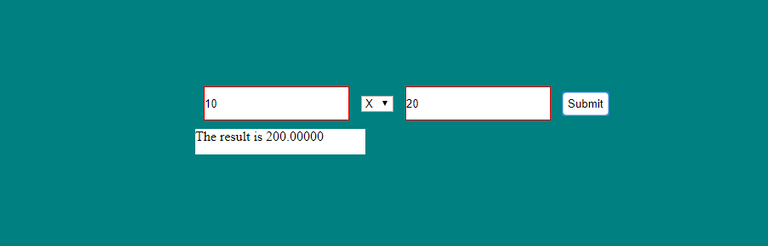
Creating a calculator involves two input area where the user can enter the numbers, a select button where the user can select the signs, and then the submit button which when pressed will display the result. Let’s start with the calculator design first.
You can check out my past tutorial here, here to brush up on creating your first webpage.
Open your sublime text and input the HTML declaration. You can copy the below code which I will explain further.
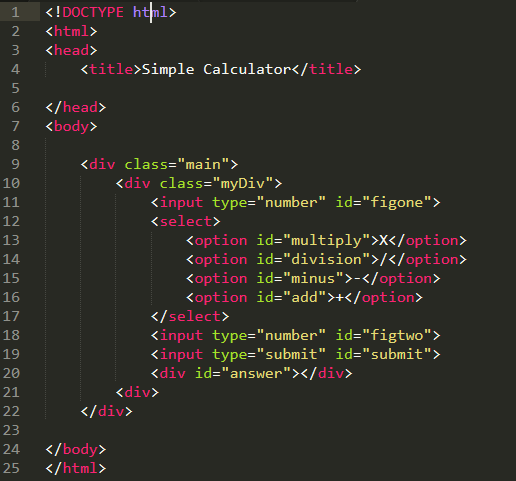
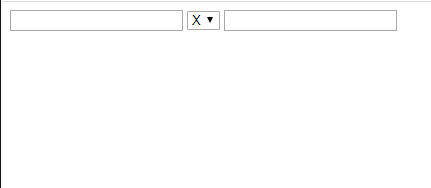
The above code is just simple HTML code and you can see the output in the browser. I created a div with the class main and another with the class myDiv. This divs wrap the main calculator.
The first thing I did was to create an input type of number. This means only Numbers can be inputted, I created a select tag which contains the calculation signs as options. This will let the user choose either division, Multiplication, addition, or subtraction. The next thing is to create another number input and then the submit input type. Once you input your numbers and select the sign, the submit button will trigger the calculation to be made. The last div with id of answer will display the answer.
Let us add some CSS to make the interface look cooler.


I set the body background colour to be teal and gave the main div some height and margin. This moves it away from the left by 30%. I added some css properties to the myDiv too to make it cool to the eyes. The input types were styled next and you can see I selected all the input using the input[type=number] selector. This saved me the stress of selecting each div and applying styles to it. I added some border styling to it and also set the background colour to it.
This will make it distinct from the other div with teal colour. I also styled the submit button and added some padding, border, border-radius, plus making the button have the pointer as cursor. This will let it have a click me feel.
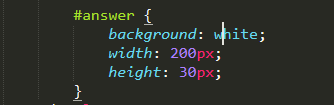
The next thing is styling the answer div. This answer div will be used to display the calculation result. I merely added a background colour of white plus width of 200px and height of 30px. You can see the result above.

However, we only want to show the answer div after the user press the submit button, so I will add the css property and value display:none.
Javascript Section
This is the interesting part and this is what makes the calculator to function. It may look like magic but it is simple if you follow my explanation.
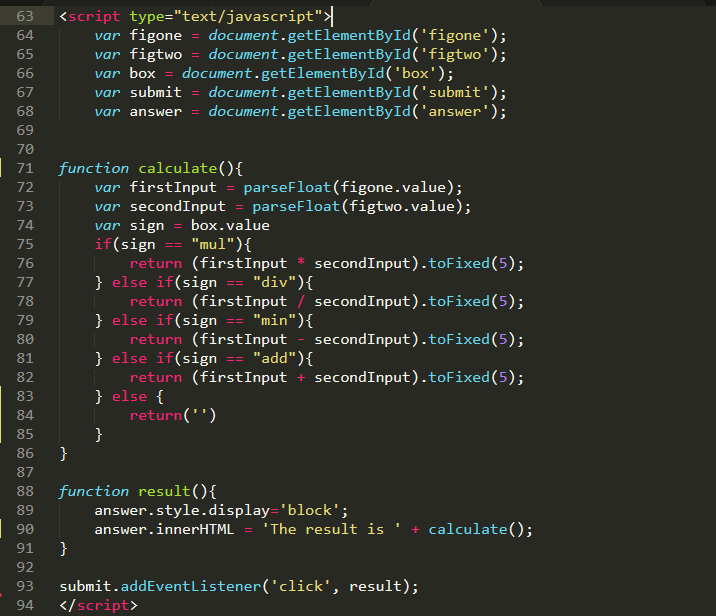
We need to access the DOM elements first and you can see I assigned the elements we need to their respective variables. I assigned the variable figone, figtwo, box, submit, and answer to their corresponding IDs. This variables will be used in the course of the javascript section.
I created a function named calculate and the first thing I did was to extract any values inputted in the input fields. I used parseFloat(figone.value); and assigned it to a variable. I did the same for the second input field and assigned it to a different variable. I could have done figone.value but since we are calculating, we need parseFloat to convert the value into a floating point number. The value is in string and we need it to be in number before making any calculation. This is done with parseFloat(figone.value);.
The next thing is assigning a variable to the box id i.e the calculation signs. This will let us know which sign is pressed and what to do when a particular sign is pressed.
The if/else statement is used here
if(sign == "mul"){
        return (firstInput * secondInput).toFixed(5);
    } else if(sign == "div"){
        return (firstInput / secondInput).toFixed(5);
    } else if(sign == "min"){
        return (firstInput - secondInput).toFixed(5);
    } else if(sign == "add"){
        return (firstInput + secondInput).toFixed(5);
    } else {
        return('')
    }
It just mean if the sign pressed is the same as the mul value, return (firstInput * secondInput).toFixed(5); This means it should run whatever is in the first input and multiply it with the second input. The result will then show in the answer field. The same thing is done to the addition, subtraction, and division. The last statement means if the user did not select any calculation sign and presses the submit button, the result should return an empty string.
You will notice something attached to the return statements and that is toFixed(5);. The toFixed() determines the number of digits to appear after the decimal point and as you can see, I limited it to 5. This means there will be 5 digits after the decimal point when you are calculating anything involving decimal.
The next thing is I created the result function and the function will do two things
- display the hidden answer div and that is accomplished by
answer.style.display='block'; - Once the answer div is displayed, we need to display the answer and we accomplish that by saying
answer.innerHTML = 'The result is ' + calculate();. The innerHTML sets the HTML content of the answer div to'The result is ' + calculate();. This means that whatever we get in the Calculate function above will be attached to The result is and displayed. You can modify the text as you wish.
Our code won’t work now since we haven’t told the submit button to do anything. The submit button is the trigger that will let us see what we have calculated. submit.addEventListener('click', result); will enable the submit button to listen for any click which will then run the result function.
You can see that it is not hard to create a simple calculator. You can create one in matter of minutes if you don’t have any with you. You can also use this tutorial as a template to create a bigger calculator.
You can view the full working code here on Codepen and modify as you like. You can also copy the code there for use.
References
parseFloat|toFixed()|innerHTML|Comparison
Posted from my blog with SteemPress : https://mysteemblog.000webhostapp.com/2020/01/javascript-programming-building-a-simple-calculator-with-html-css-and-javascript
This post has been voted on by the SteemSTEM curation team and voting trail. It is elligible for support from @curie and @minnowbooster.
If you appreciate the work we are doing, then consider supporting our witness @stem.witness. Additional witness support to the curie witness would be appreciated as well.
For additional information please join us on the SteemSTEM discord and to get to know the rest of the community!
Please consider using the steemstem.io app and/or including @steemstem in the list of beneficiaries of this post. This could yield a stronger support from SteemSTEM.
good stuff buddy
Thank you. I appreciate the comment
Hi, thanks for the post! I have included a link and a short description in my daily Science and technology digest, and you'll receive a 10% share of that post's rewards.