NeedleWorkMonday: DIY Spanish and English: Paso a Paso Zarcillo Soutache con Mostacillas Realizados a mano💕💕💕 Step by Step Zarcillo Soutache with Mostacillas Made by hand

avatar
(Edited)

PhotoGrid_Plus_1609800900853.jpg

Feliz y bendecido Lunes, el primer lunes del año, Deseo todos se encuentren bien, llenos de salud y abundancia. Me encanta los lunes de aguja 😃 aprendo cada dia mas de mis compañeros de lunes de aguja en @NeedleWorkMonday somos una hermosa comunidad siempre creando y creciendo juntos! Este dia eh realizado un tutorial de unos Zarcillos medianos realizados a mano, son delicados, alegres y con un toque de color que dara alegria a tu dia 💕

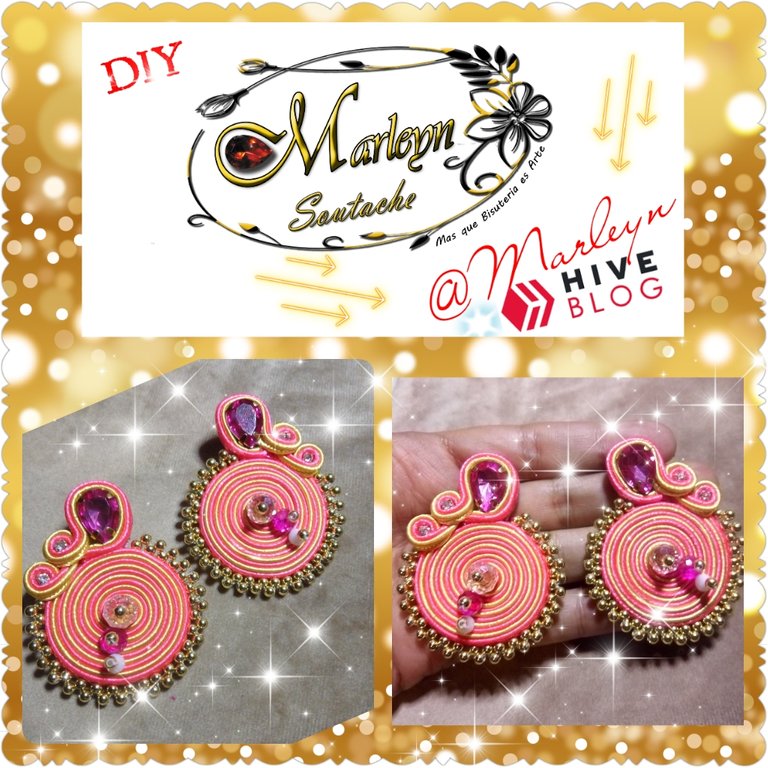
Happy and blessed Monday, the first Monday of the year, I wish you all are well, full of health and abundance. I love Needle Monday 😃 I learn more every day from my fellow Needle Monday at @NeedleWorkMonday we are a beautiful community always creating and growing together! This day I have made a tutorial of some medium tendrils made by hand, they are delicate, cheerful and with a touch of color that will bring joy to your day 💕

Materiales:

  • Aguja e Hilo
  • Mostacillas
  • Hilo soutache 4 tiras de 44 centímetros cada una
  • tijera
  • Encendedor
  • Strass 3 milímetros
  • Pinza punta fina
  • 2 Gotas engastada de 1,2 milímetros
  • Cuero grueso, tela o Gamuza
  • 6 Cristales checos 2 de 8 milímetros, 2 de 6 milímetros y 2 de 2 milímetros
  • Pin de Zarcillos o base para Zarcillos
  • Amor por lo que hacemos, Animo y mucha paciencia.

Materials:

  • Needle and thread
  • Mostacillas
  • Soutache thread 4 strips of 44 centimeters each
  • scissors
  • Lighter
  • Strass 3 millimeters
  • Fine point tweezers
  • 2 Drops set 1.2 millimeters
  • Thick leather, fabric or Suede
  • 6 Czech crystals 2 of 8 millimeters, 2 of 6 millimeters and 2 of 2 millimeters
  • Tendrils pin or base for Tendrils
  • Love for what we do, Courage and a lot of patience.

PhotoGrid_Plus_1609800151645.jpg

Paso 1: Al tener todos los materiales listos, comenzamos toma dos hilos y quema las puntas juntas, ahora comienza a enrollar formando un caracol, corta un cuadro de tela o cuero colocarle silicon liquido y pegar alli el caracol, sigue girando hasta que te quede unos 11 centímetros de hilo de un lado. 💓

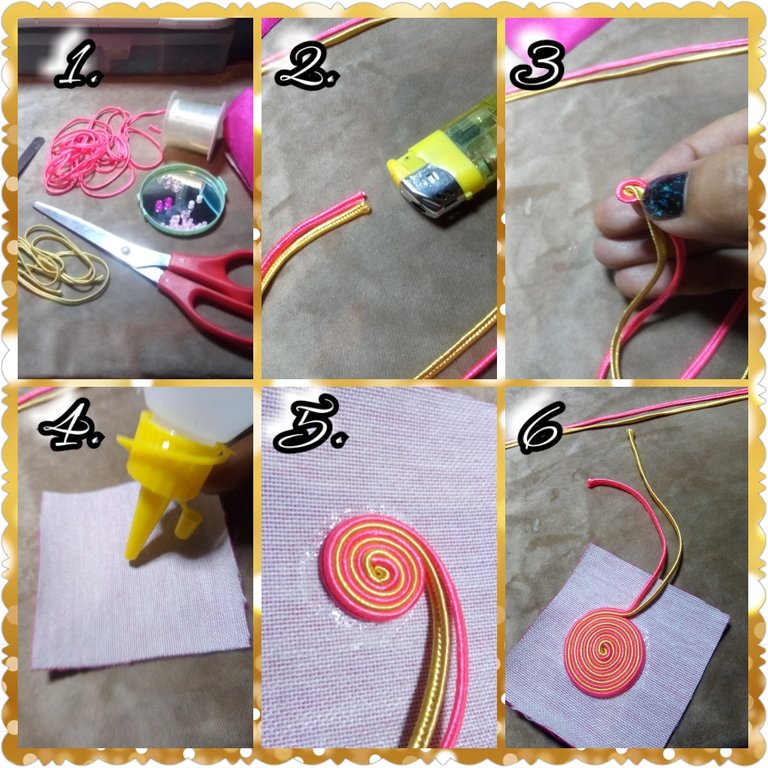
Step 1: When we have all the materials ready, we begin, take two threads and burn the ends together, now begin to roll into a snail, cut a square of fabric or leather, place liquid silicone on it and paste there the snail, keep turning until you have about 11 centimeters of thread on one side. 💓

PhotoGrid_Plus_1609800329015.jpg

Paso 2: Ahora coloca un poco mas de silicon liquido por donde dejaste los hilos, toma el hilo y realiza un giro, coloca mas silicon liquido y realiza una segunda vuelta, mide donde va a ir la gota engastada y marca para colocar el pin de Zarcillo,en la fotos olvide colocarlo que pena 🤪🙈 coloca mas silicon liquido y pega la piedra, arropa la piedra con el hilo que te resta corta el sobrante, quema las puntas e introducirlas con cuidado por abajo de los círculos de hilo anteriormente formados, espera unos minutos que seque un poco el silicón y corta el cuero sobrante, no dejes que seque totalmente para que puedas moverlo y cortar bien.

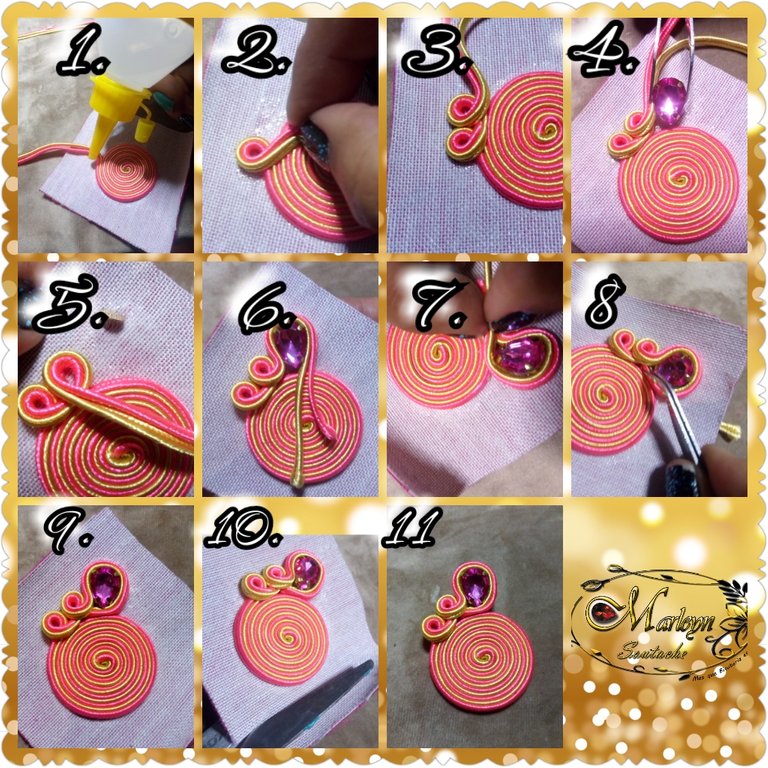
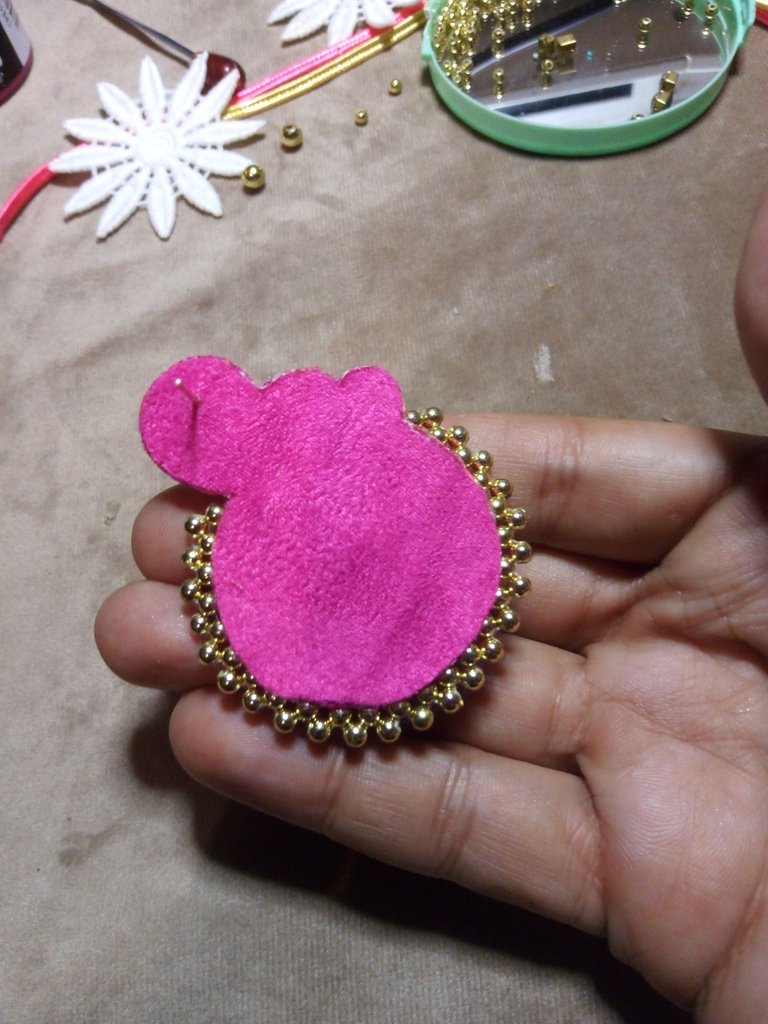
Step 2: Now place a little more liquid silicone where you left the threads, take the thread and make a turn, place more liquid silicone and make a second round, measure where it will go the drop set and mark to place the Zarcillo pin, in the photos forget to place it, too bad 🤪🙈 put more liquid silicone and glue the stone, cover the stone with the remaining thread, cut the excess, burn the tips and insert them carefully below the previously formed circles of thread, wait a few minutes for the silicone to dry a little and cut the excess leather, do not let it dry completely so that you can move it and cut well.

PhotoGrid_Plus_1609800453893.jpg

Paso 3: Ensarta la aguja con el hilo, introducir la aguja por atras del Zarcillo hacia arriba, ahora introducir en la aguja el cristal mas grande y una mostacilla, ahora regresa la aguja por el cristal sin pasarlo otra vez por la Mostacilla de esta manera se sujeta y queda arriba, realiza el mismo proceso con los otros dos cristales, de manera lineal hacia abajo, al terminar saca la aguja por una punta de los lados.

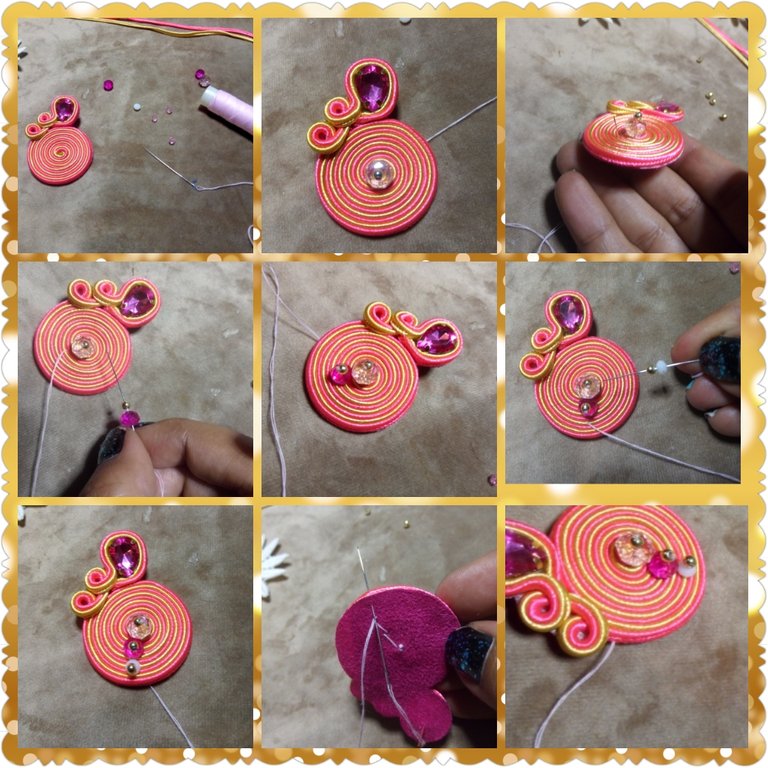
Step 3: Thread the needle with the thread, insert the needle from the back of the tendril upwards, now insert the largest crystal and a bead into the needle, now return the needle through the crystal Without passing it again through the Mostacilla, in this way it is held and remains on top, it performs the same process with the other two crystals, in a linear downward manner, at the end, it removes the needle from one end of the sides.

PhotoGrid_Plus_1609800555741.jpg

Paso 4: Ahora introducir 3 mostacillas en la aguja y devolver el hilo a un lado de la primera mostacilla, regresa el hilo hacia arriba metiéndolo por la última mostacilla y esta vez solamente vamos a meter en la aguja 2 mostacillas y realizar el mismo proceso anterior, asi sucesivamente hasta bordar toda la orilla, al terminar realiza un remate en la parte de atrás del Zarcillo para que no se vea, ahora corta el hilo sobrante. Corta dos piedras del strass de 3 milímetros, ahora untar un poco de silicon liquido en los círculos de hilo que formamos en la orilla del Zarcillo y con ayuda de la pinza introduce las piedras del stras como puedes ver en la imagen! Te quedara hermoso. ahora vuelve a pegarlo sobre un trozo de cuero o tela, recortarlo y listo el otro Zarcillo realiza los mismos pasos solo que los círculos seran del otro lado

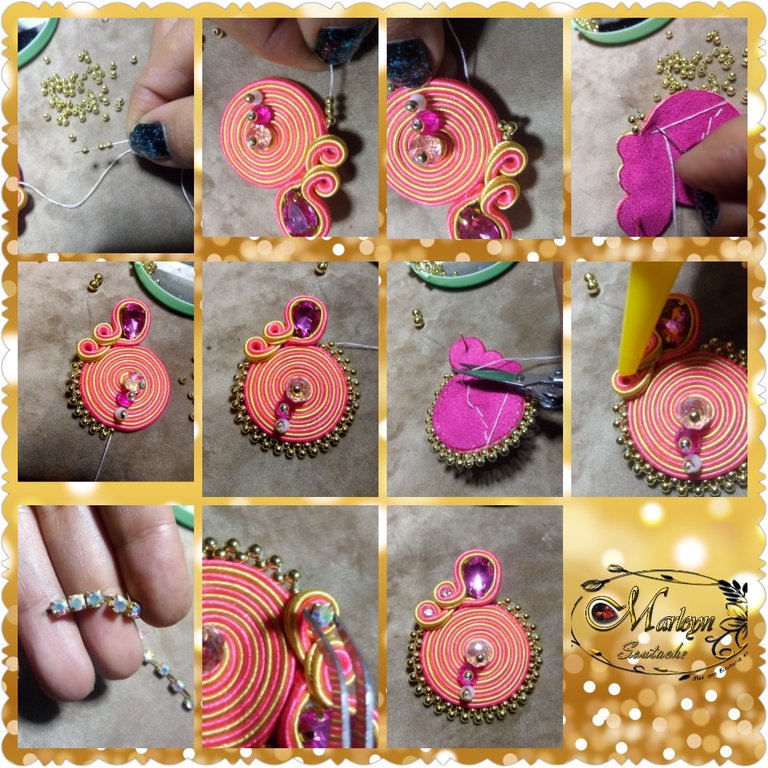
Step 4: Now insert 3 beads into the needle and return the thread to one side of the first bead, return the thread up by inserting it through the last bead and this time we are only going to put in Needle 2 beads and carry out the same process as before, so on until the entire edge is embroidered. When finished, make a finish on the back of the tendril so that it is not seen, now cut the excess thread. Cut two stones from the strass of 3 millimeters, now spread a little liquid silicone in the circles of thread that we form on the edge of the Tendril and with the help of the tweezers introduce the stones of the stras as you can see in the image! It will be beautiful. Now paste it back onto a piece of leather or fabric, cut it out and voila, the other Tendril performs the same steps, only the circles will be on the other side

IMG_20210104_180549.jpg

Si tienes una duda escríbeme un comentario, estaré feliz de ayudarte con cualquier detalle, Espero que mis diseños les gusten tanto como a mí me gusta, aprendan con placer ...!

Nunca olvides que el Poder es Querer y si quieres Puedes...

Eres Luz eres Energía, TU PUEDES ... Que el universo infinito Conspire para que todo siempre sea mejor ... Se les quiere ...

Venezuela FE

Somos Seres Abundantes! Qué las energías del universo vibren en sintonía con las de cada uno de nosotros en armonía! Cuidemos nuestras palabras, acciones y pensamientos!

If you have a question, write me a comment, I will be happy to help you with any details, I hope you like my designs as much as I like, learn with pleasure ...!

Never forget that Power is Wanting and if you want you can ...

You are Light, you are Energy, YOU CAN ... May the infinite universe Conspire so that everything is always better ... They are loved ...

Venezuela FAITH

We are Abundant Beings! May the energies of the universe vibrate in tune with those of each of us in harmony! Let's take care of our words, actions and thoughts!

Autoría del texto y todas las imágenes: @Marleyn , La edición de las imágenes las realicé yo misma, Por favor no Utilices mis fotos sin mi autorización, edites ni re-publiques mi material ¿Deseas ponerte en contacto conmigo? Escríbeme:
Correo electronico: [email protected]
Discord #Marleyn#7821
Twitter: @marleynleal1
Imstagran: @MarleynSoutache
YouTube: https://youtube.com/c/marleynlealramos
Facebook: @marleynsoutache

Authorship of the text and all the images: @Marleyn, I did the editing of the images myself, Please do not use my photos without my authorization, edit or republish my material Do you want to contact me? Write me:
Email: [email protected]
Discord #Marleyn#7821
Twitter: @marleynleal1
Imstagran: @MarleynSoutache
YouTube: https://youtube.com/c/marleynlealramos
Facebook: @marleynsoutache

TZjG7hXReeVthqpTJZmwvzsLcvMeG4TU4GjdDQf8m3xgWRQbKn3rFEg8FhcAjAsDNcoddKcqHGcVgjQCjoQAxZmv2iQE8tpNWuk6c4dbh6EWN22i7zKpQs3JAFR1YvG3HrDP7MEAVhXG4Q.png

7DceLgR4szFxxyfXp1LyUreVzvcKYsMUsH6c5zLMHKbiAxxawHd5wdo7sWHUCsgQK7TcYm8bWmqr2jhi3rRCa.png

368La1qZAv72FqVwi1Et2LrexGk5UkK3zoADVBeXZweLYfmtJkiFYThjPUGv2vrrLjGzTMCPhpV97ih33C1H3oyp.png

AmRc67RgYaWVEa5TxnoPRiGMS1Ae6MyfiK8okBYZJq5b9YipPbzDaUM6rMf4gEAJVK6TZwSeCPBZQQe1eGqpcyivwAwvQ54uQBWoBbNx3b5ctGyZZW8crdEaw684S82QhkTeG1QVNzo6wc4Ptufk1Lw82sGsoP89.gif

C3TZR1g81UNaPs7vz3RwXUdUd21bh3kePKRn38VFSroDe62MPkYDqYQuCC9sbVaAJSu81QsTzmCZyAWBWRxmptEgAgKNvBtkUrQtcgDRGdaQBQzcPEJttTo.gif

Mi trabajo es mi pasión y cuando tu trabajo es tu pasión nada es imposible / My work is my passion and when your work is your passion nothing is impossible

20210104_124645.gif


0
0
0.000
5 comments
avatar

These earrings are truly beautiful! Well done!

0
0
0.000
avatar

Thank you, I'm glad you like it, I hope you try to do it 😁🤗

0
0
0.000
avatar

Manually curated by goldendawne from the @qurator Team. Keep up the good work!

0
0
0.000
avatar
(Edited)

Hola. Me encantó esta manualidad. Te felicito. Además tu forma de mostrar el paso a paso me gustó mucho. De comprensible lectura todo. A mi me gustaría aprender a realizar estos detalles. Estaré pendiente de tus próximos post. FELICIDADES.🐳

0
0
0.000