Mazunte Roof Build - Up on the Roof Again
If you remember, last year around this time (almost) all of my posts were about the construction project I was involved in: Building a round structure with a tire wall and a reciprocal roof. Thanks to the Covid lockdown we were forced to stay here a few weeks longer than anticipated, but once the roof beams were up and the travel restrictions eased, all of us went back to their respective homes, to come back and finish the roof.
Finally the time has come, and we're back together in Mazunte, with an exciting challenge: covering the beams and turning it into a green roof. And just as before, I am excited to share the process on Hive.
Protecting the Beams
Anybody with basic knowledge about wood structures will shake their heads at the notion of using partially green logs on the roof, then leaving them exposed for a year before actually covering them. And that's exactly what happened here. Though we made sure to treat each royal palm log with a few days in a boric acid bath to deter termites from infesting them, they needed a couple of months at least to completely dry, before we could apply the protecting varnish.
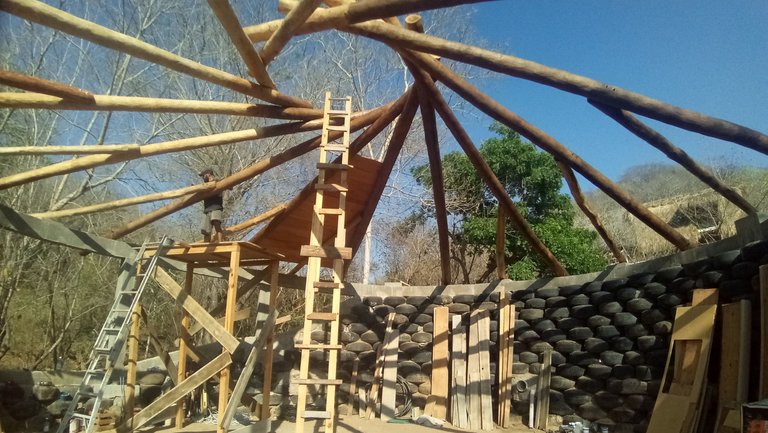
We set them up in the circular reciprocal fashion, where they are going to stay for good, and let them dry out completely. Granted, the rainy season was upon us, so we covered their top sides with a plastic tarp, leaving it open at the bottom, to encourage air flow. All of us admitted that this wasn't the most ideal way, but since there was little else we could do, we hoped for the best.
As it turned out, the rainy season kinda fell short this year. So much so that our mango tree, we planted four years ago, dried up completely. What a bummer! But at least the roof looked fine. We went ahead, and gave the entire structure a good sanding, then proceeded with varnishing it. Half of them are already finished.
Adding Intermediary Beams
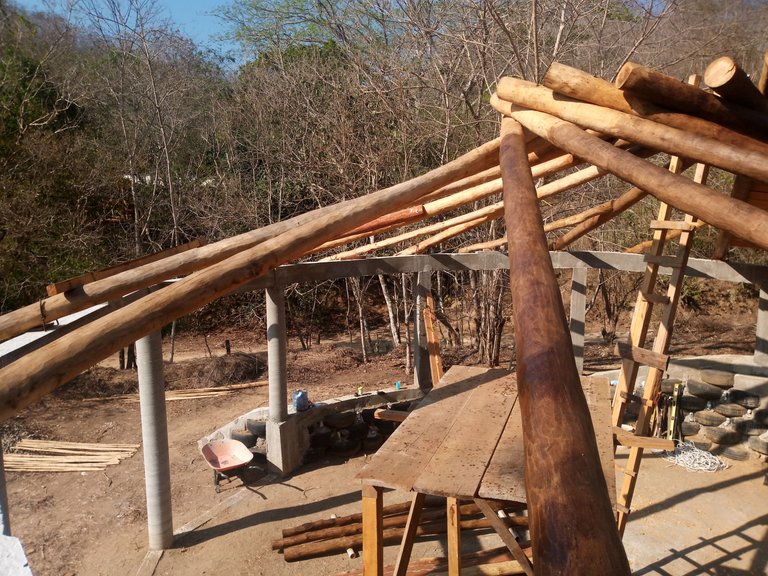
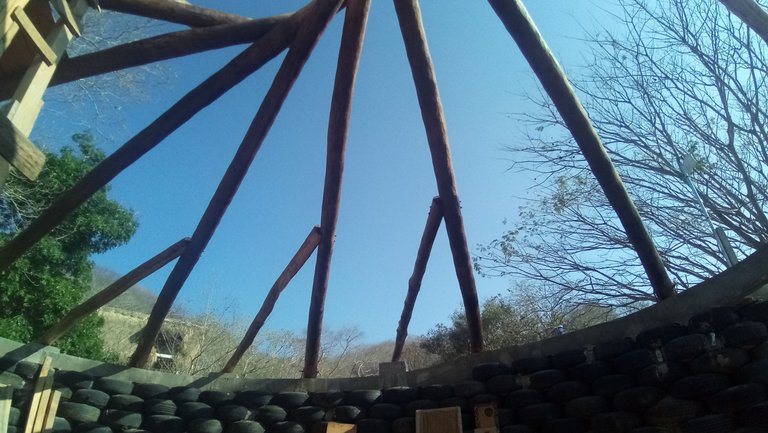
Reciprocal roofs can bear an incredible amount of weight, but where the beams fan out towards the bottom, the triangles are simply too wide, so the beams have too much space between them. To make sure that it would support the green roof, we added intermediary beams to reinforce this area. To attach them to the beams we used the same means as linking the logs together: two threaded rods running through holes drilled through the logs.
First Cover Layer: Boards
Once the intermediary beams are in place, and everything has been varnished nicely, it's time to start covering the roof. First we add a layer of boards, before moving on to the pond-liner, the gravel, the soil, and the plants, as part of the green roof.
Using pine, or other low-cost and even lower quality lumber would mean having to redo the roof in a few years, once the green layer has established itself. No way we were going to do that! Fortunately, there is excellent quality tropical hardwood growing right around the neighboring village. They are expected to last over fifty years. I'm not exactly sure if it is harvested sustainably, but the surest way to give back for what we take, is planting some coralillo on our land, the same as what we have done with the royal palm.
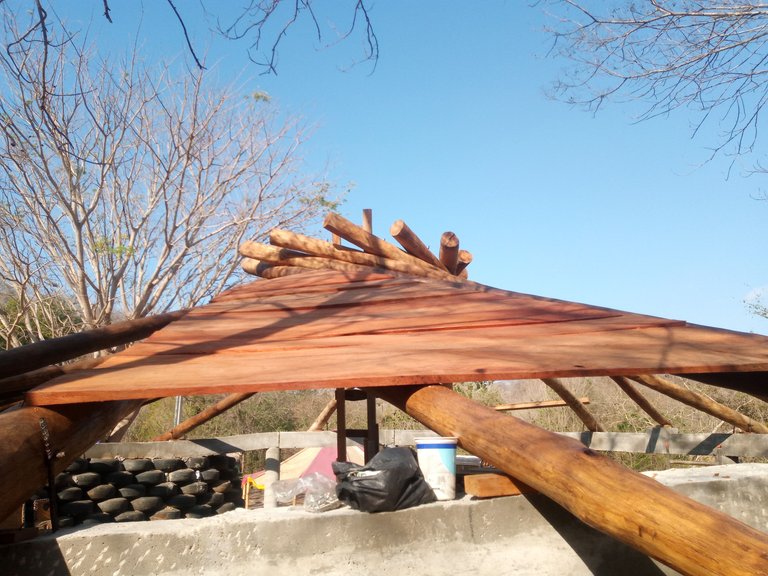
Unfortunately, getting the boards, having them milled to the proper size, and making cuts ourselves have proven a formidable challenge with the hard and heavy material. As always, though, in the end we manage. Thus, we have almost covered the first triangle.
You will notice how the lowest boards on the bottom end of the logs are almost horizontal, while on the top they are increasingly slanted. That is a typical feature of reciprocal structures, after all the right beam is sitting on top of the left one. In the end this will give the whole cover a cool undulating look, but at the moment it's still a bit scary. Screwing down the smallest pieces on the top, while sitting on an increasingly narrow surface, which on top of all is becoming slanted as you go up... Right, just don't think about it, and never look down!
Unlike last year, time in not on our side. I'm leaving Mazunte mid April, and the rest of the group within a couple of weeks. We still don't have all the boards we need, and the pond-liner has also created unexpected problems. Okay, we got enough dirt, that should not be a problem. So let's see how we can get this roof covered over the next few weeks.
Previous Posts on this Exciting Construction Project:
Lost and Found: The Promotional Video for the Theater on the Beach
Back in the Circus of Mazunte
Previous Series on Mazunte Builds:
Mazunte Build Series - 2020
A Theater on the Beach - 2018

I hope it done soon. I can't wait to hear more about it.
You're in luck: Over the next few weeks that is mainly what I'll be posting about.
I remember those posts after I see your photography. That's very good and I wait to see your next post. !wine
Congratulations, @sreypov You Successfully Shared 0.100 WINE With @stortebeker.
You Earned 0.100 WINE As Curation Reward.
You Utilized 1/3 Successful Calls.
Total Purchase : 24480.932 WINE & Last Price : 0.290 HIVE
HURRY UP & GET YOUR SPOT IN WINE INITIAL TOKEN OFFERING -ITO-
WINE Current Market Price : 0.273 HIVE
Thank you @sreypov ! You may have noticed that some pictures were taken in the morning, others in the evening, since the illumination is best from the side. :-)
beautiful!
This is going to be a really cool structure! Hopefully you can get it done before you and the group have to leave!
Let's keep our fingers crossed! Though with so many crossed fingers it's hard to get the work done.
Yeah I’m sure. Sometimes too many people helping might make it harder to get it done lol
Hahaha! Too many people? I wish! We still take volunteers. No, I meant crossing fingers literally. It's hard to do anything that way.
Lol too true. Swinging a hammer is a little tough with crossed fingers :D
Wow, amazing build, I love the design, going to borrow a few ideas if you don’t mind 😅
Of course, by any means. That's sort of the idea actually. Glad to answer any questions you may have.
Nice, for example, what should be considered when placing the first log of the reciprocal roof? Do you keep it in place with a holder until all the other logs are in place?
Yes, it's called a Charlie stick. It needs to be placed so that the first log is a bit higher than the last, so you can lower it down on it once all of the logs are in place. We used a heavy duty car jack for that, with an additional Charlie stick, alternatingly lowering it little by little.
I’m going to try doing something similar in the expansion I’m building for the shelter, see if I cam get it right, thanks for the tip!
it would be nice to live like that👍