(ESP/ENG) Cómo hice mi primer Gif - Tutorial rápido / How I Made My First Gif - Quick Tutorial
¡Hola a todos! El día de hoy les quiero mostrar el proceso de mi mayor orgullo... ¡mi primer gif animado!
💚¿Qué es un gif? / What is a gif? 💚
Por si no lo saben, un gif es una imagen que tiene animación (que se mueve). Todos hemos visto gifs y nos divertimos compartiéndolos con nuestros conocidos. Yo desde hacía tiempo, me moría de ganas de hacer un gif, quería darle vida a mis dibujos, así que me aventuré a intentar a hacer uno bastante sencillo (Y fue una sabia decisión ja ja)
Hello everybody! Today I want to show you the process of my greatest pride ... my first animated gif!
In case you don't know, a gif is an image that has animation (that moves). We have all seen gifs and we have fun sharing them with our acquaintances. I had been dying to make a gif for a long time, I wanted to give life to my drawings, so I ventured to try to make a fairly simple one (And it was a wise decision ha ha)
💚¿Que programa usé? / What program did I use? 💚
Utilicé Photoshop, dado que tengo un conocimiento básico del programa y estaba demasiado ansiosa para aprender a usar uno desde cero. La versión que yo tengo es la CS6, más exactamente una versión portable, o sea, no necesito de un instalador y puedo usarla incluso desde mi pendrive.
I used Photoshop as I have a basic understanding of the program and was too eager to learn how to use one from scratch. The version I have is CS6, more exactly a portable version, that is, I don't need an installer and I can even use it from my pendrive.
💚 ¿Qué hay que tener en cuenta? / What must be considered? 💚
Para elaborar un gif, es necesario que cada parte que hagamos dentro de nuestro diseño, este en una capa independiente. También , es muy útil que dichas capas tengan nombres clave que sean entendibles, así como la organización de dichas capas en carpetas para no enredarnos a la hora de buscar una capa en específico.
To make a gif, it is necessary that each part that we make within our design, is on a separate layer. Also, it is very useful that these layers have understandable code names, as well as the organization of said layers in folders so as not to get tangled up when looking for a specific layer.
💚 ¿Por donde yo empecé? / Where did I start? 💚
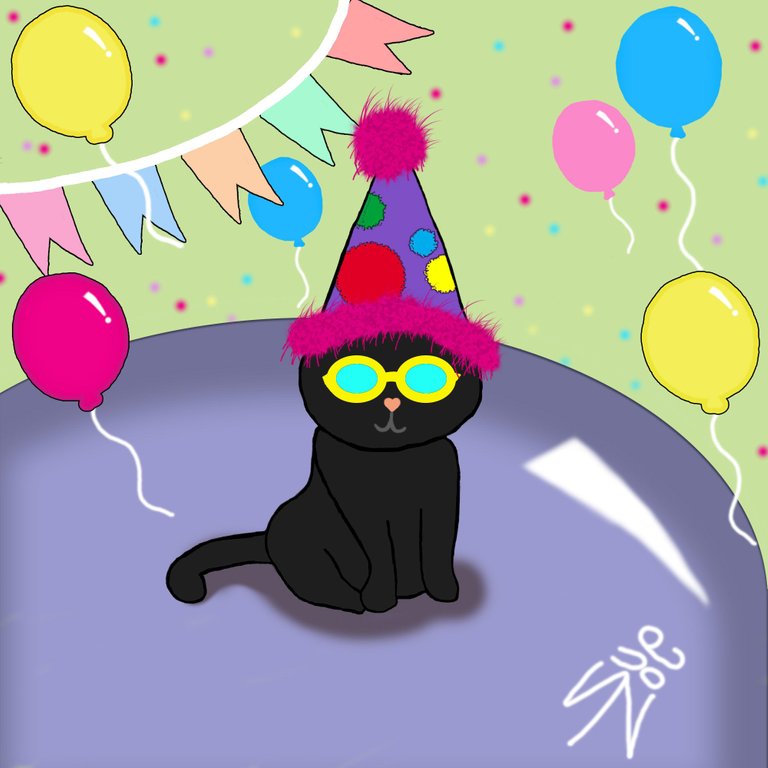
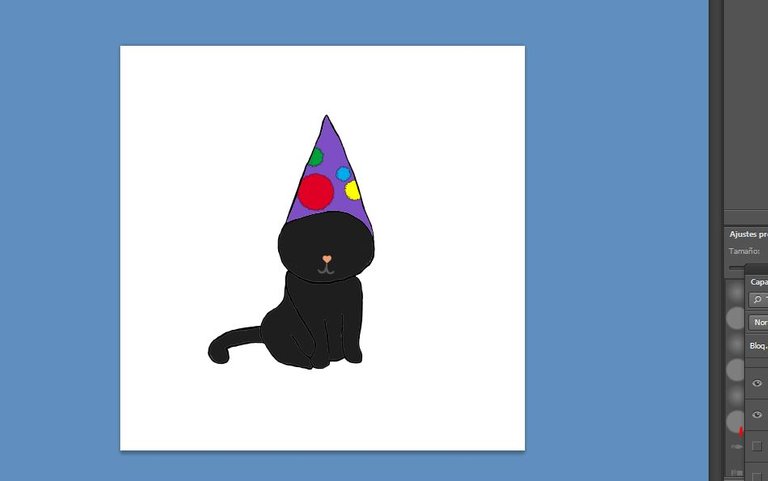
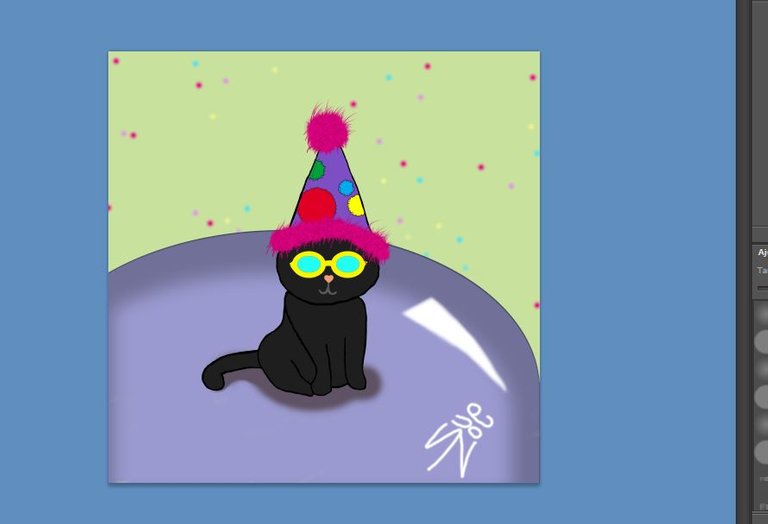
Primero que nada, necesitaba tener un dibujo al cual darle movimiento. Así que como quería dibujar gatos, pensé en hacer un gatito fiestero, con su gorrito picudo y todo, como he visto en muchas fiestas de cumpleaños de mininos.
First of all, I needed to have a drawing to give movement to. So since I wanted to draw cats, I thought about making a party kitten, with its peaked hat and all, as I have seen at many kitty birthday parties.

Teniendo una base, procedí a darle detalles. Quería que fuera algo bastante colorido, ya que como mi gatito es negro, necesitaba algo de brillo. Era necesario crear nuevas capas.
Having a basis, I proceeded to give details. I wanted it to be something quite colorful, since since my kitty is black, it needed some sparkle. New layers needed to be created.
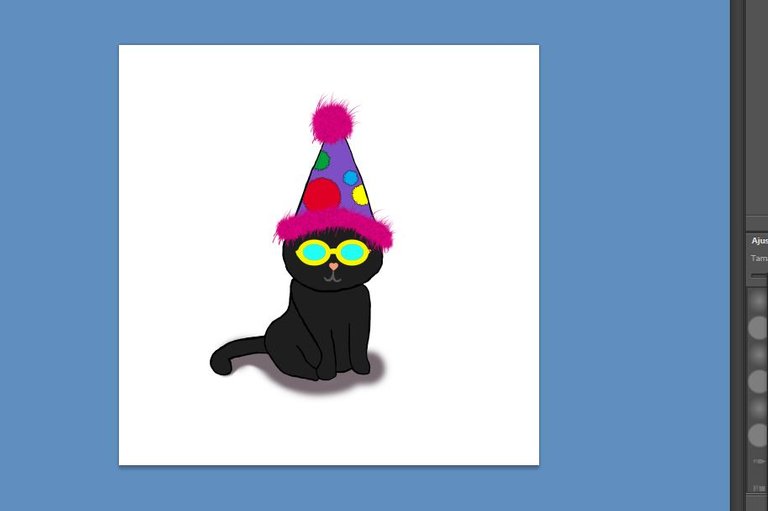
Creé una capa para los lentes y la dupliqué varias veces con distintos colores en sus cristales. Igualmente, para las capas del pompón del gorro, la capa la hice doble y le agregué una pequeña diferencia (Una inclinada hacia el lado derecho y la otra hacia el izquierdo. Agregué también sombras.
I created a layer for the lenses and duplicated it several times with different colors on its lenses. Likewise, for the layers of the hat pompom, I doubled the layer and added a small difference (One slanted to the right side and the other to the left. I also added shadows.
Lo siguiente era darle un fondo. Se me ocurrió colocarlo arriba de un globo gigante. Ya que hacerlo sentado sobre el piso, no me convencía del todo.
The next thing was to give it a background. It occurred to me to place it on top of a giant balloon. Since doing it sitting on the floor, I was not completely convinced.
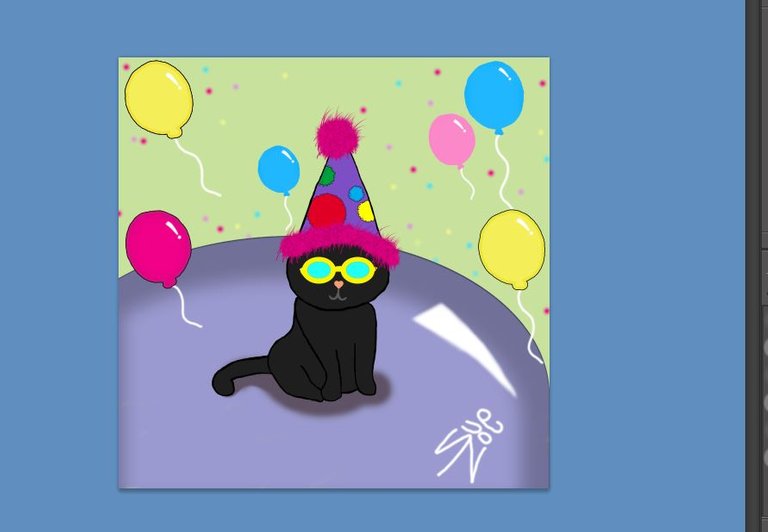
Lo siguiente fue crear los objetos que llamaré (principales) ya que su movimiento es lo que volvería la imagen en un gif. Quería unos globos elevándose, así que dibujé varios globos de colores y creé capas adicionales con distintas posiciones de los mismos globos (Por si se lo preguntan, estas capaz adicionales o duplicadas, permanecen ocultas).
The next thing was to create the objects that I will call (main) since their movement is what would turn the image into a gif. I wanted some balloons rising, so I drew several colored balloons and created additional layers with different positions of the same balloons (In case you are wondering, these additional or duplicate capable, they remain hidden).
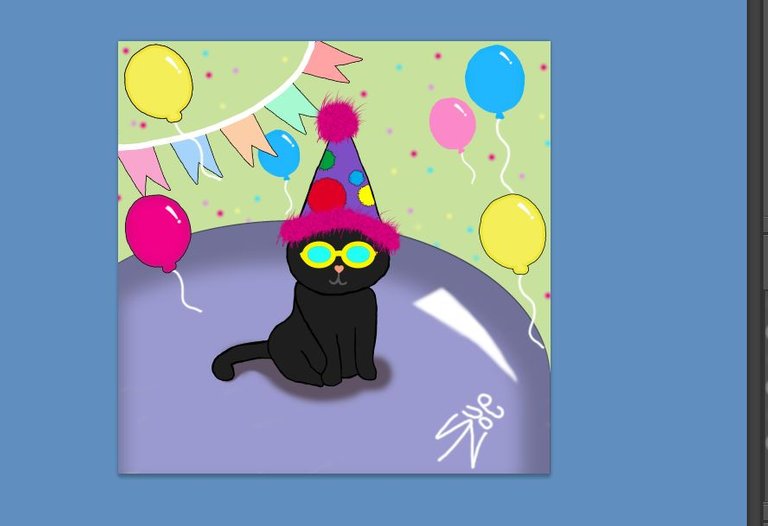
Finalmente, agregué unos banderines porque sentía que necesitaba algo más. Dupliqué cada capa de cada banderín y como iba a formar parte de la animación, le edité las puntas a las capas duplicadas.
Finally, I added some flags because I felt like I needed something more. I duplicated each layer of each pennant and since it was going to be part of the animation, I edited the tips of the duplicated layers.
Ya teniendo el diseño ya hecho y todas las capas necesarias, lo siguiente fue hacer que todas las capas, (incluyendo las que tenía ocultas) se reprodujeran una detrás de otra.
Having already made the design and all the necessary layers, the next thing was to make all the layers, (including the ones that were hidden), to be reproduced one after another.
💚¿Y cómo hice eso? / And how did I do that? 💚
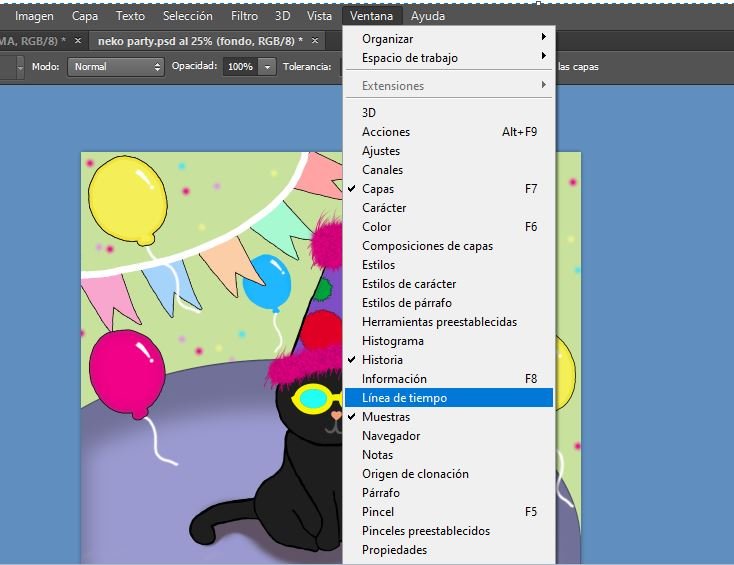
En la parte superior de la barra de herramientas, desplegué la pestaña ventana para que apareciera la opción "Línea de tiempo". Esa es la que usé para el siguiente proceso.
At the top of the toolbar, I unfolded the window tab so that the "Timeline" option would appear. That is the one I used for the following process.
Haciendo eso, aparecerá en la parte inferior de la pantalla la previsualización de nuestra animación. Cada capa creada (llamémosle capas de línea de tiempo 1, 2 y 3) puede permanecer en pantalla el tiempo que consideremos necesario para cada movimiento. También pueden ser la cantidad de capas que queramos, pero recomiendo que mientras menos sean mejor, ya que eso influye en el peso de nuestro gif.
Doing so, the preview of our animation will appear at the bottom of the screen. Each layer created (let's call it timeline layers 1, 2 and 3) can remain on screen for as long as we consider necessary for each movement. They can also be the number of layers that we want, but I recommend that the less they are, the better, since that influences the weight of our gif.
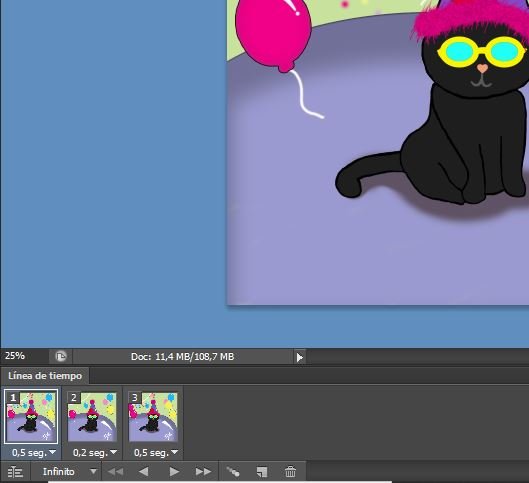
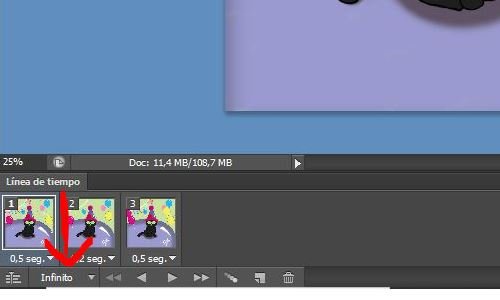
En esta opción, podremos establecer las veces en que se repetirán las capas de la línea de tiempo. Puede ser una sola vez o infinitamente (Yo recomiendo este último):
In this option, we can set the times in which the layers of the timeline will be repeated. It can be once or infinitely (I recommend the latter):
Lo que prosigue es la parte en la que nos tenemos que llenar de paciencia, pues en cada capa de línea de tiempo hay que ocultar o mostrar una capa que en la siguiente línea de tiempo, tenemos que cambiar para que se genere ese movimiento que estamos buscando.
Por ejemplo, en la línea de tiempo 1, la capa de los lentes de mi gato con los vidrios rojos esta visible y las demás oculta. Mientras que en la línea de tiempo 2, oculto la capa roja y visibilizo algún otro color. Al darle al botón de Play, podemos ver la previsualización de como esta quedando nuestro gif.
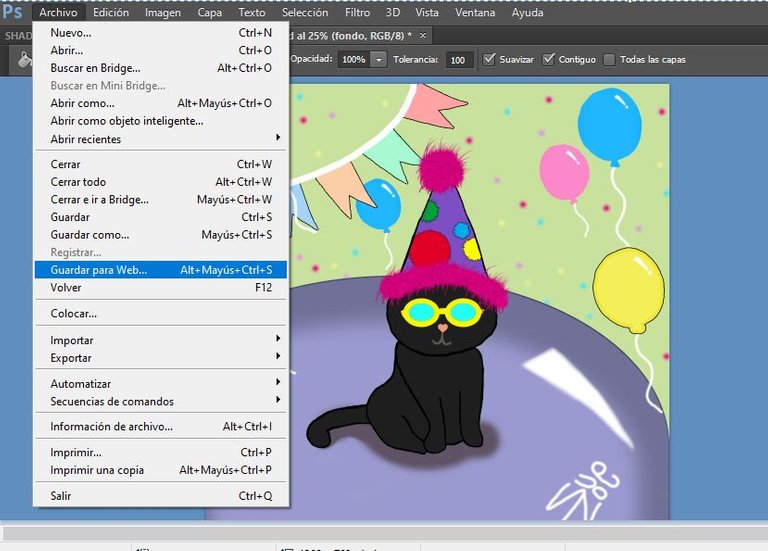
Una vez organizadas nuestras capas de línea de tiempo y verificado que estén acomodadas debidamente, guardamos nuestro gif. Para hacerlo, Nos vamos a la parte superior izquierda de la barra de herramientas y en la pestaña "Archivo", presionamos la opción "Guardar para Web":

What continues is the part in which we have to fill ourselves with patience, because in each layer of the timeline we have to hide or show a layer that in the next timeline, we have to change so that that movement that we are is generated is generated. searching.
For example, in timeline 1, my cat's glasses layer with the red glasses is visible and the others are hidden. While in timeline 2, I hide the red layer and make some other color visible. By clicking the Play button, we can see the preview of how our gif is looking.
Once our timeline layers have been organized and verified that they are properly arranged, we save our gif. To do this, we go to the upper left part of the toolbar and in the "File" tab, we press the "Save for Web" option:
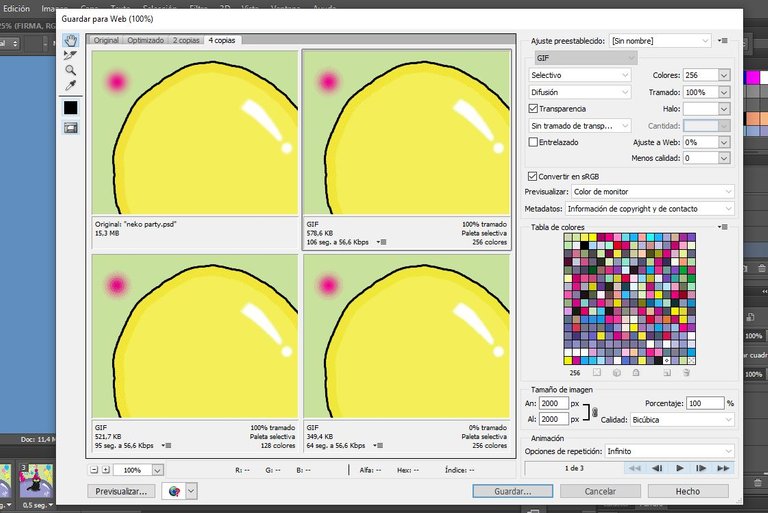
Se nos desplegará otra pantalla en donde podemos hacer unas modificaciones avanzadas, si así lo deseamos. Presionamos guardar.
Another screen will be displayed where we can make advanced modifications, if we wish. We press save.
Y listo. Podemos ver nuestra secuencia de imágenes guardadas en formato Gif:
And ready. We can see our sequence of images saved in Gif format:

Para ser mi primer gif animado el resultado no pudo haber sido mejor. Espero poder hacer gifs más elaborados más adelante y mostrarlos por acá.
Muchas gracias por leer mi publicación. Espero que les haya parecido instructivo o por lo menos interesante.
¡Hasta una próxima oportunidad!
To be my first animated gif, the result could not have been better. I hope I can make more elaborate gifs later and show them around here.
Thank you very much for reading my post. I hope you found it instructive or at least interesting.
Until next time!
Congratulations @suezoe! You have completed the following achievement on the Hive blockchain and have been rewarded with new badge(s) :
You can view your badges on your board and compare yourself to others in the Ranking
If you no longer want to receive notifications, reply to this comment with the word
STOPTo support your work, I also upvoted your post!
Check out the last post from @hivebuzz:
Support the HiveBuzz project. Vote for our proposal!
Que bonito gif, sencillito pero lindo :)
Gracias!!! de verdad me encanto como quedo :) <3