ESP-ENG] / Hermosos pendientes en muy pocos pasos 🍓😉🤗👑👑☺️🤍💙/ ️Beautiful earrings in a few steps 🍓😉🤗👑👑☺️ 💙 /@alexanderflx
It's time to please the little ones in the house, beautiful earrings
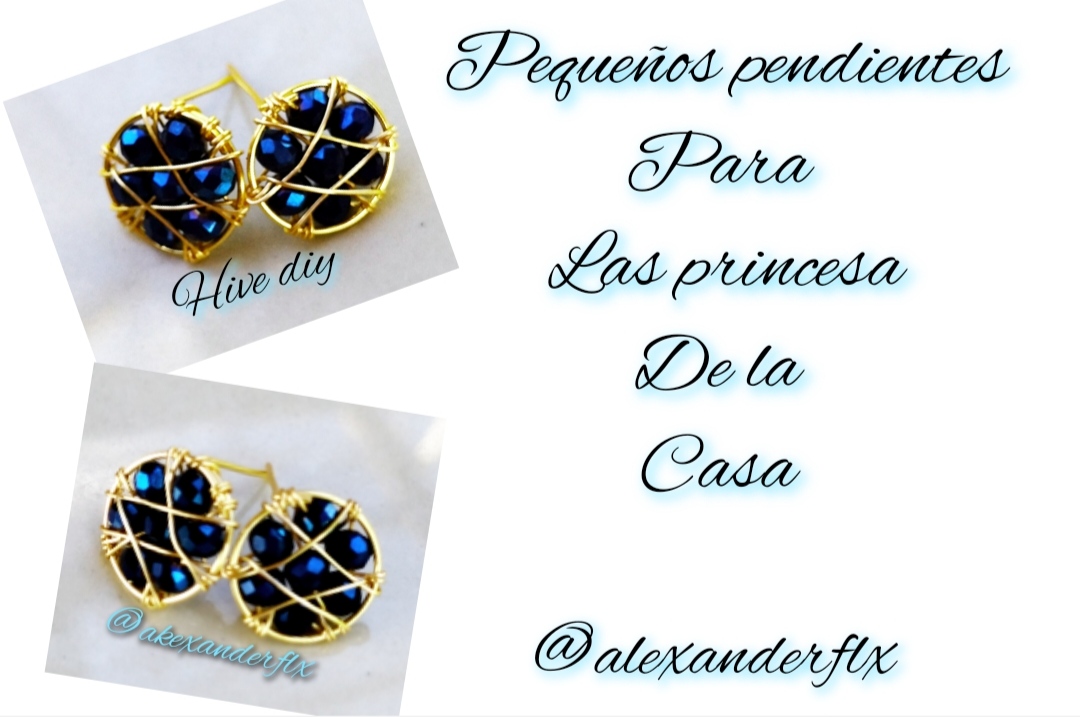
Hola feliz noche para todos y todas espero se encuentren bien les quiero dar las gracias a todas las personas que me apoya muy agradecido, la noche de hoy quiero compartir con ustedes unos hermosos pendientes y muy pequeños pendientes estos pendientes los elabore para complacer a mi niña la más chiquita de la casa por eso lo hice lo más pequeño posible pero con una hermosa personalidad insuperable como pueden ver están echo con el material que más me gusta alambre y piedras de bisutería les cuento que este tipo de piedra es de un color muy diferente a los que vengo utilizando este azul es un azul eléctrico muy lindo y muy elegantes espero les guste y se le agan unos a sus niñas.🤍💙😉🤗☺️.
Hello, happy night to all and I hope you are well, I want to thank all the people who support me, very grateful, tonight I want to share with you some beautiful earrings and very small earrings, I made these earrings to please My girl is the youngest in the house, so I made it as small as possible but with a beautiful and unbeatable personality, as you can see, they are made with the material that I like the most, wire and jewelery stones. I tell you that this type of stone is of a A very different color from the ones I have been using, this blue is a very nice electric blue and very elegant. I hope you like it and your girls will get some. 💙😉🤗☺️.
What do we need.
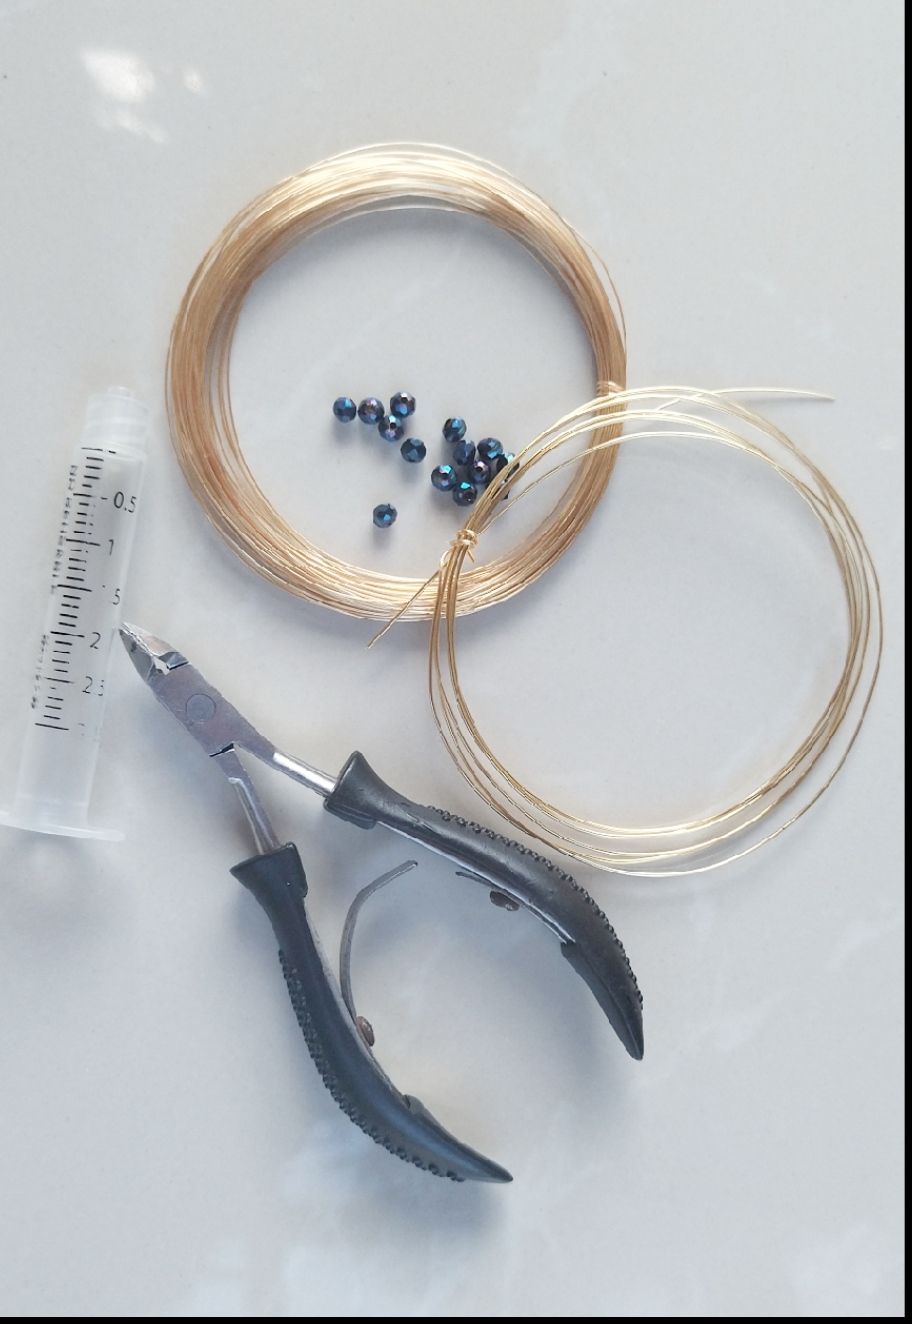
- piedras de bisutería
- alambre para bisutería calibre 22 y calibre y 26
- pinzas
- injectadora
jewelry stones
22-gauge and 26-gauge jewelry
tweezers
injector
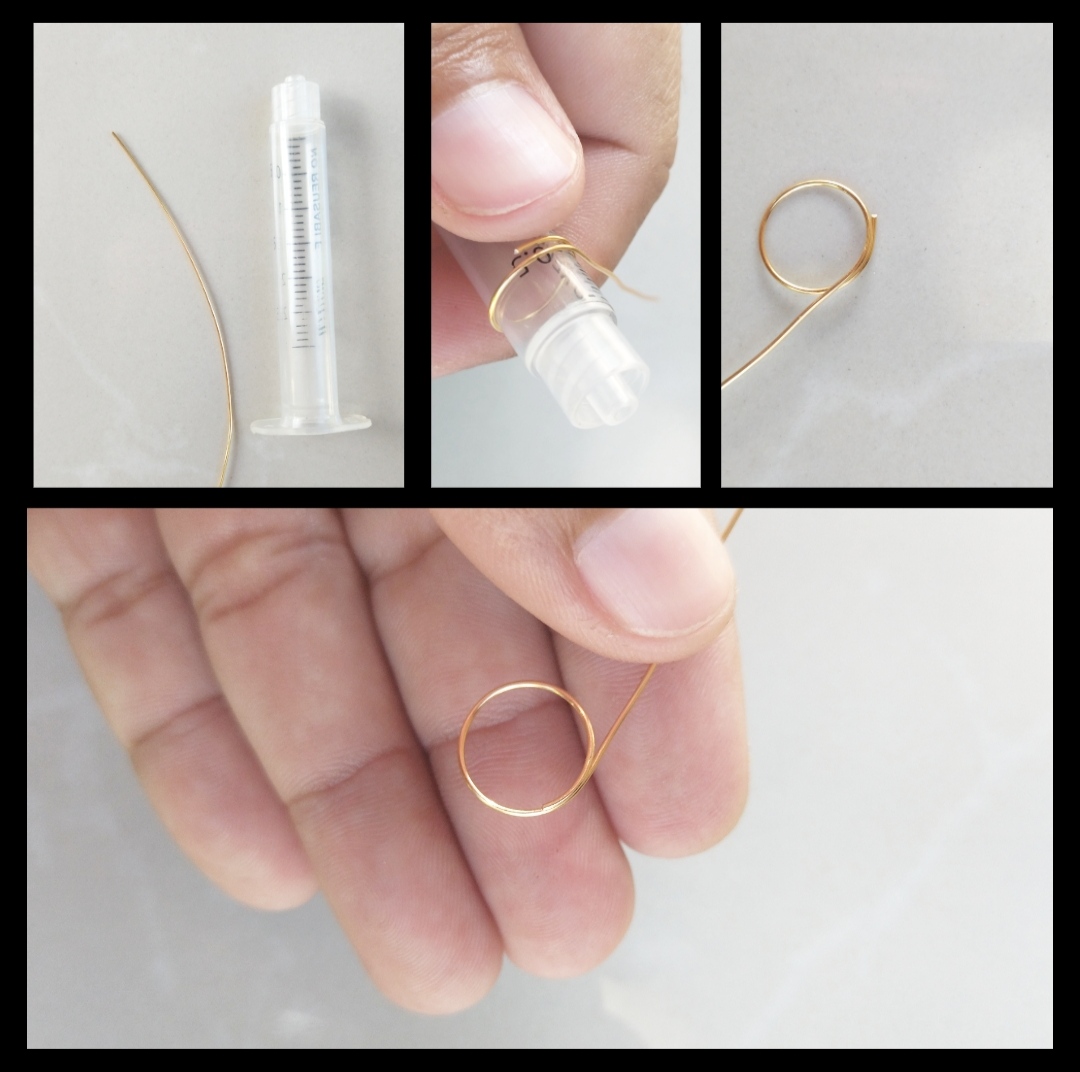
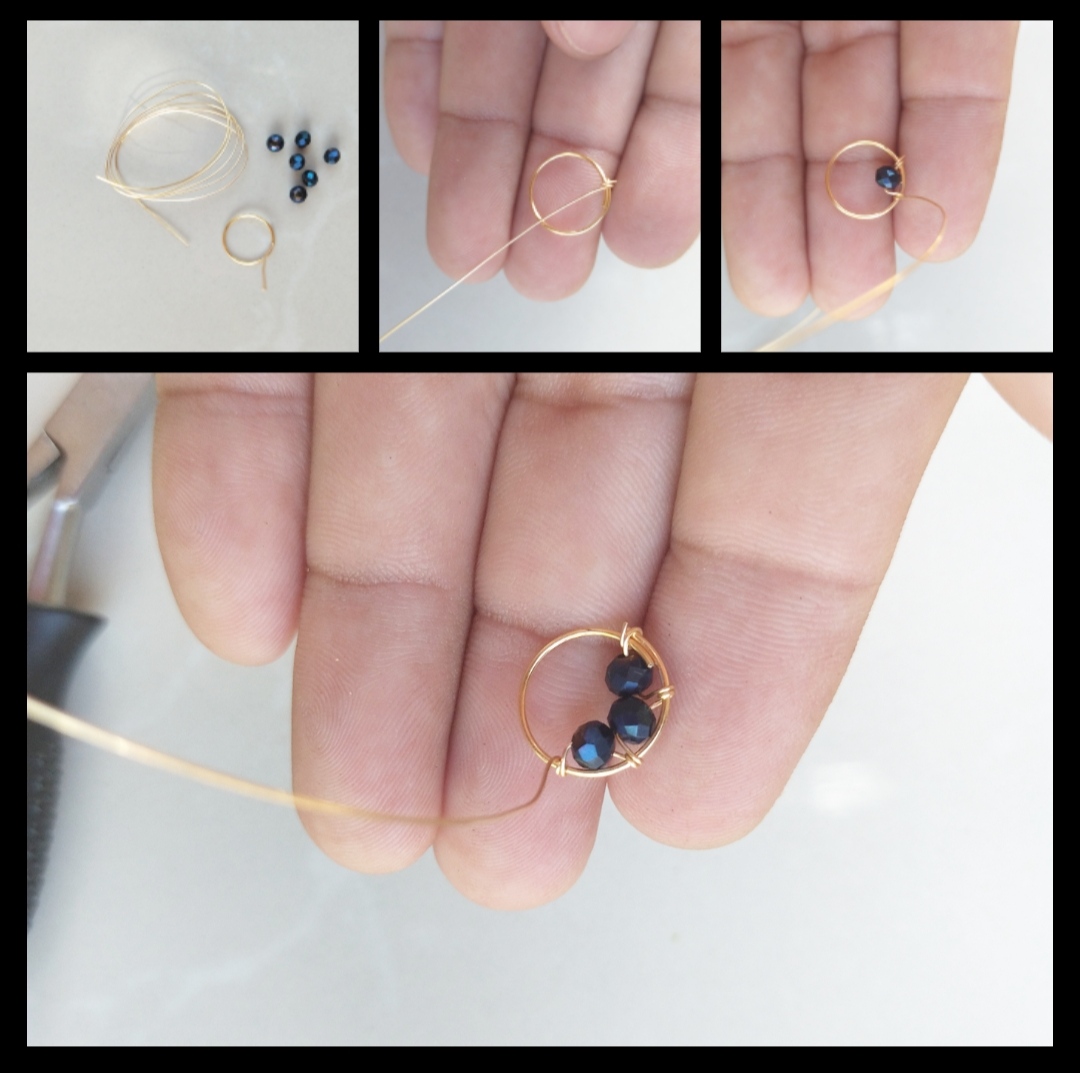
Paso 1: Como lo dice mi título el día de hoy les enseñaré como elaborar unos pequeños zarcillos en muy pocos pasos y muy fácil, en este primer paso lo primero que aremos es hacer la base emde nuestros pendientes como lo aremos tomaremos la injectadora y un trozo de alambre calibre veintidós luego aremos un redondo ayudándonos con la forma redonda de la injectadora tratemos de que nos quede lo más redondo posible .
Step 1: As my title says, today I will teach you how to make small tendrils in very few steps and very easy, in this first step the first thing we are going to do is make the base of our earrings, as we are going to do it, we will take the injector and a piece of twenty-two gauge wire, then we will make a round shape, helping us with the round shape of the injector, let's try to make it as round as possible.
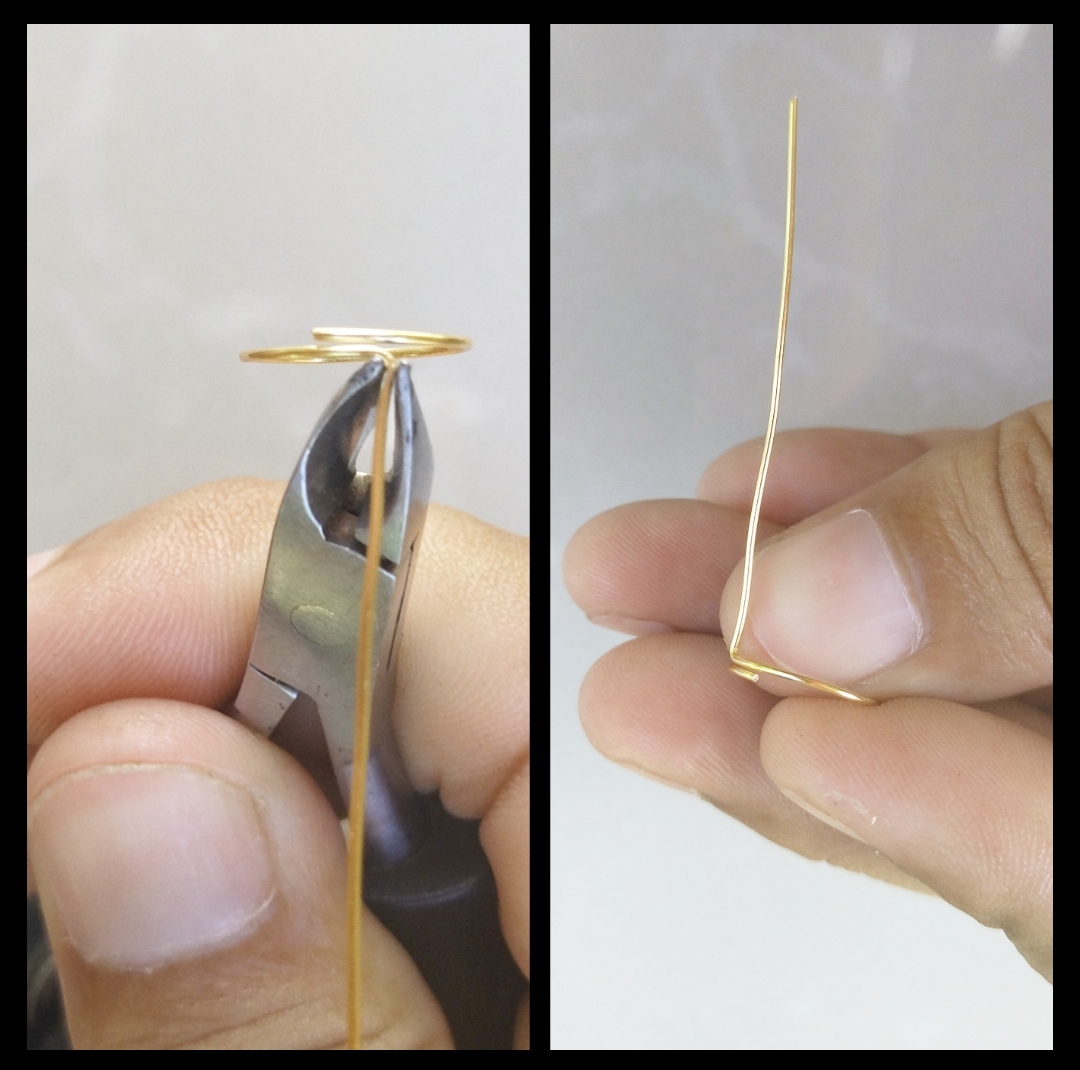
Paso 2: Bueno ya tenemos nuestro redondo ahora trataremos de hacer el palito que utilizaremos para colgarlo en la si quieren pueden sacar la injectadora para que se les aga más fácil doblar el alambre hacia atrás si el redondo se daña volvemos a meter la injectadora y con nuestra mano le volvemos a dar forma cortamos el exceso de alambre para ir terminando con la base .
Step 2: Well, we already have our round, now we will try to make the stick that we will use to hang it on. If you want, you can remove the injector so that it is easier for you to bend the wire backwards. If the round is damaged, we put the injector and with our hand we give it shape again, we cut the excess wire to finish with the base.
Paso 3: Tercer paso en este paso nos dedicaremos a darle un poco de color a nuestro pendiente en este paso trabajaremos con las piedras y alambre calibre veintiséis como siempre digo este alambre es más manejable y más delgado entorchamos la punta de nuestro alambre en la base lo entorcharemos justo donde doblamos el alambre hacia atrás para haci tener el empate en un solo lado luego de asegurar nuestro alambre meteremos una piedra y le daremos una vuelta al rededor de la base para asegurar la piedra luego meteremos otra piedra y aremos lo mismo y así seguiremos haciendo aste te era todas las piedras metidas en el redondo .
Step 3: Third step in this step we will dedicate ourselves to giving our earring a bit of color in this step we will work with the stones and twenty-six gauge wire as I always say this wire is more manageable and thinner we twist the tip of our wire at the base we will twist it just where we folded the wire back to make the tie on one side only after securing our wire we will insert a stone and we will turn it around the base to secure the stone then we will insert another stone and plow the same and so we will continue doing this you were all the stones stuck in the round.
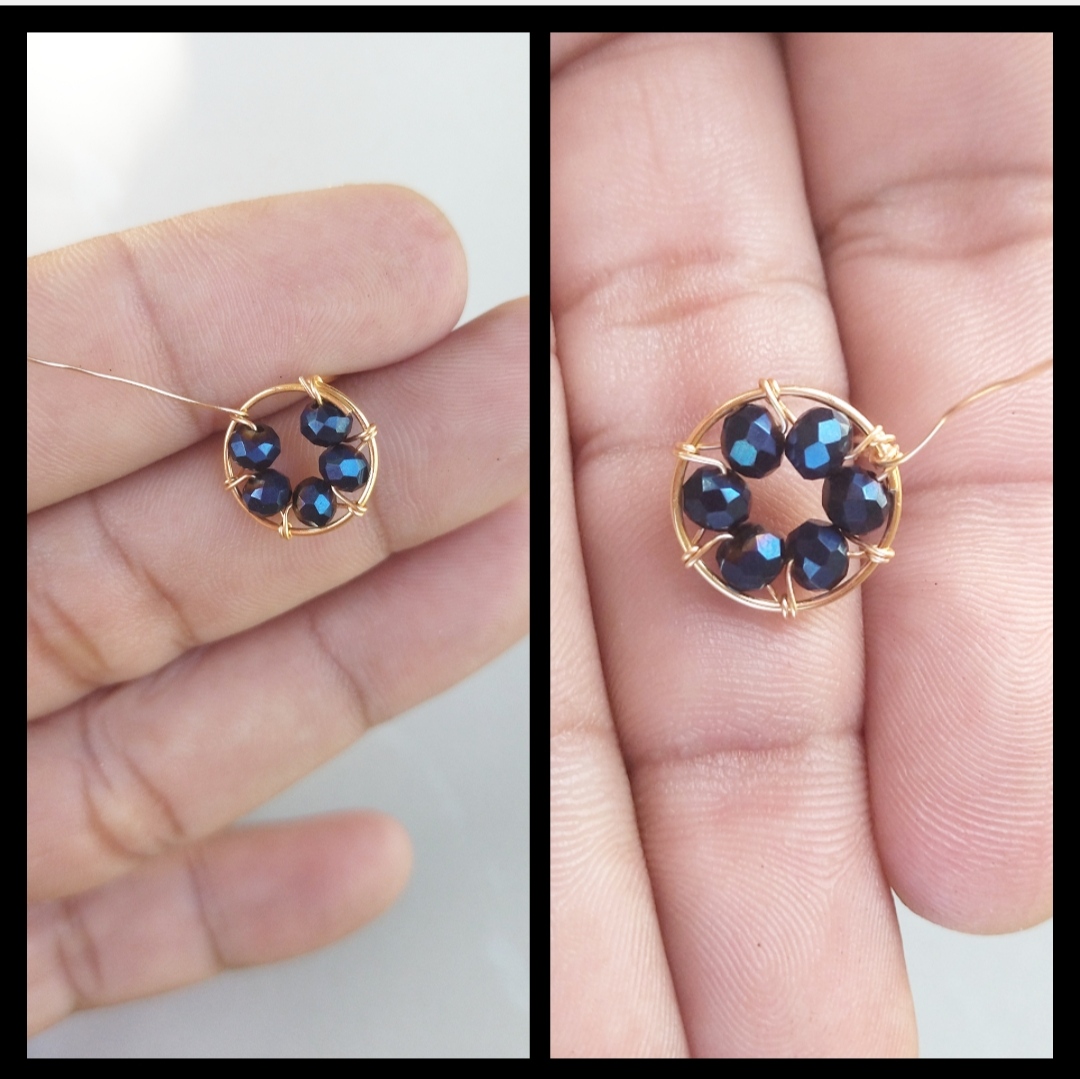
Paso 4: Bueno ya estamos en nuestro último paso para este paso le daremos unos íntimos detalle a nuestros pendientes como pueden ver en la foto ledi unas vueltas con nuestro alambre pero está ves es ordenadamente primero pondremos el alambre en el empate nuevamente bajamos hacia la derecha y luego bajamos otra vez hacia la derecha le damos una vuelta a el alambre en nuestra base para asegurar esto lo aremos en cada punto que tenemos como pueden ver el alambre está en zigzag muy fácil espero que me allá explicado bien ya que es muy fácil pero muy difícil de explicar espero averlo echo bien, bue l será asta la próxima espero les guste.☺️☺️☺️🤗🤗🤗🤗
Step 4: Well we are already in our last step for this step we will give some intimate detail to our earrings as you can see in the photo I gave a few turns with our wire but this time it is neatly first we will put the wire in the tie again we go down to the right and then we go down again to the right we turn the wire at our base to ensure this we will do it in each point that we have as you can see the wire is in zigzag very easy I hope that I explained it well there since it is very easy but very difficult to explain I hope I did it well, well it will be until next time I hope you like it.☺️☺️☺️🤗🤗🤗🤗.

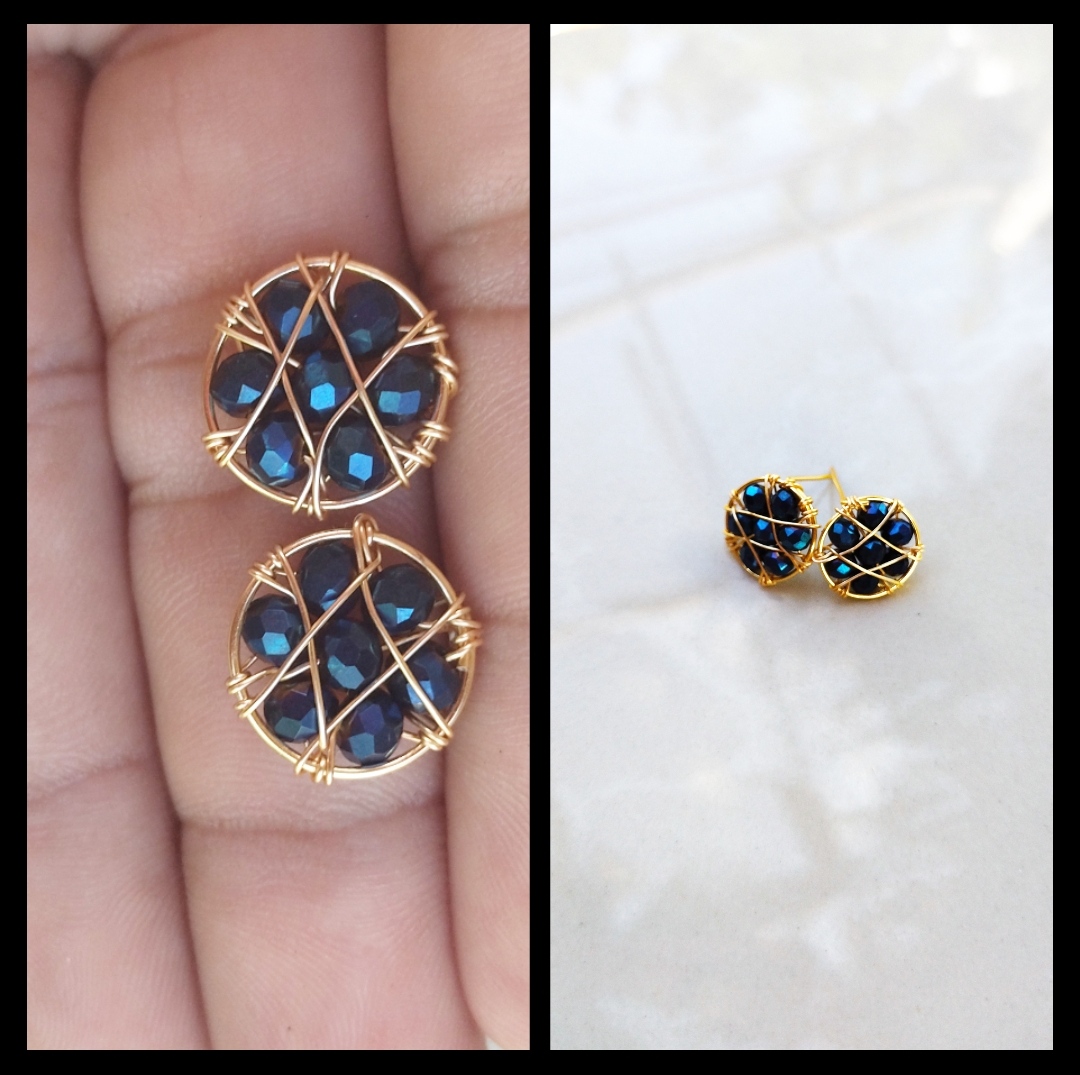
listo nuestros hermosos pendientes , espero que a las damas y a las más pequeña de la casa les guste, fue un gusto compartir con ustedes .
our beautiful earrings are ready, I hope the ladies and the smallest of the house like it, it was a pleasure to share with you.
Todas las Fotos son de mi autoría y fueron tomadas con mi Celular Redmi 9T
All Photos are my authorship and were taken with my Redmi 9T Cellphone
https://twitter.com/608922928/status/1597785267003621376
The rewards earned on this comment will go directly to the people( @kawsar8035 ) sharing the post on Twitter as long as they are registered with @poshtoken. Sign up at https://hiveposh.com.
Están muy hermosos tus zarcillos...felicidades
Hola gracias que tengas feliz día👍👍👍
Thank you for sharing this post on HIVE!
Your content got selected by our fellow curator ashikstd & you just received a little thank you upvote from us for your great work! Your post will be featured in one of our recurring compilations which are aiming to offer you a stage to widen your audience within the DIY scene of Hive. Next time make sure to post / cross-post your creation within the DIYHub community on HIVE and you will receive a higher upvote ;) Stay creative & HIVE ON!
Please vote for our hive witness <3
Wow no me imagine que fuese tan sencillo el procedimiento, me encanta. Te felicito 🤗