(ESP - ING) Aretes para orejas sin perforación / Earrings for ears without piercing
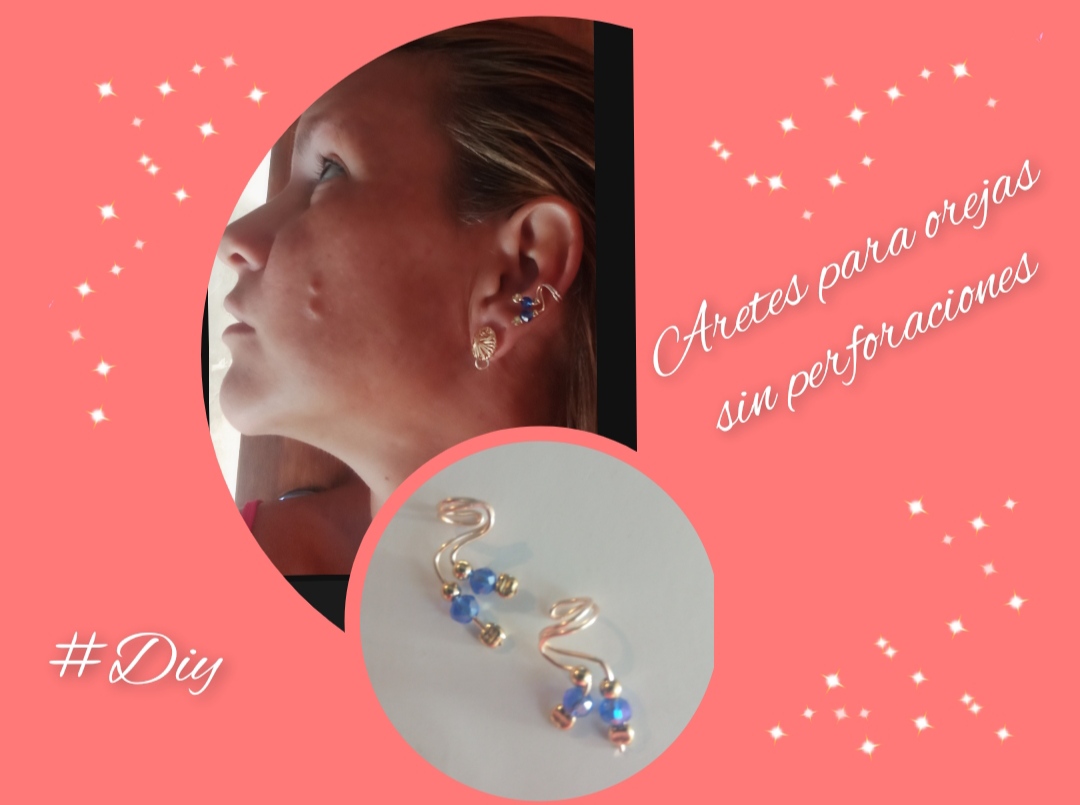
Feliz y bendecido dia tengan todos ustedes mis queridos y apreciados amigos creativos , espero todos se encuentren bien disfrutando de esta hermosa semana yo por mi parte puedo comentarles que he tenido un excelente inicio de semana por lo que me he dispuesto a realizar nuevos diseños para compartir con todos ustedes. En esta ocasión quiero compartirles un hermoso diseño de aretes diseñados para esas personas que por una u otra razón no se pueden realizar perforaciones en sus orejas, así que este hermoso diseño les permite poder lucir un hermoso arete sin necesidad de romper su creencia o tradición de no realizarse una perforación.
Happy and blessed day to all of you, my dear and appreciated creative friends, I hope you are all well enjoying this beautiful week. For my part, I can tell you that I have had an excellent start to the week, so I am willing to make new ones. designs to share with all of you.
On this occasion I want to share with you a beautiful design of earrings designed for those people who for one reason or another cannot have their ears pierced, so this beautiful design allows them to wear a beautiful earring without having to break their belief or tradition of Don't get a piercing.
This is a super easy design that is simple to make but when you figure it out it is extremely creative and beautiful. Here I share this simple tutorial where together step by step we will make this beautiful design which you can combine at your convenience.
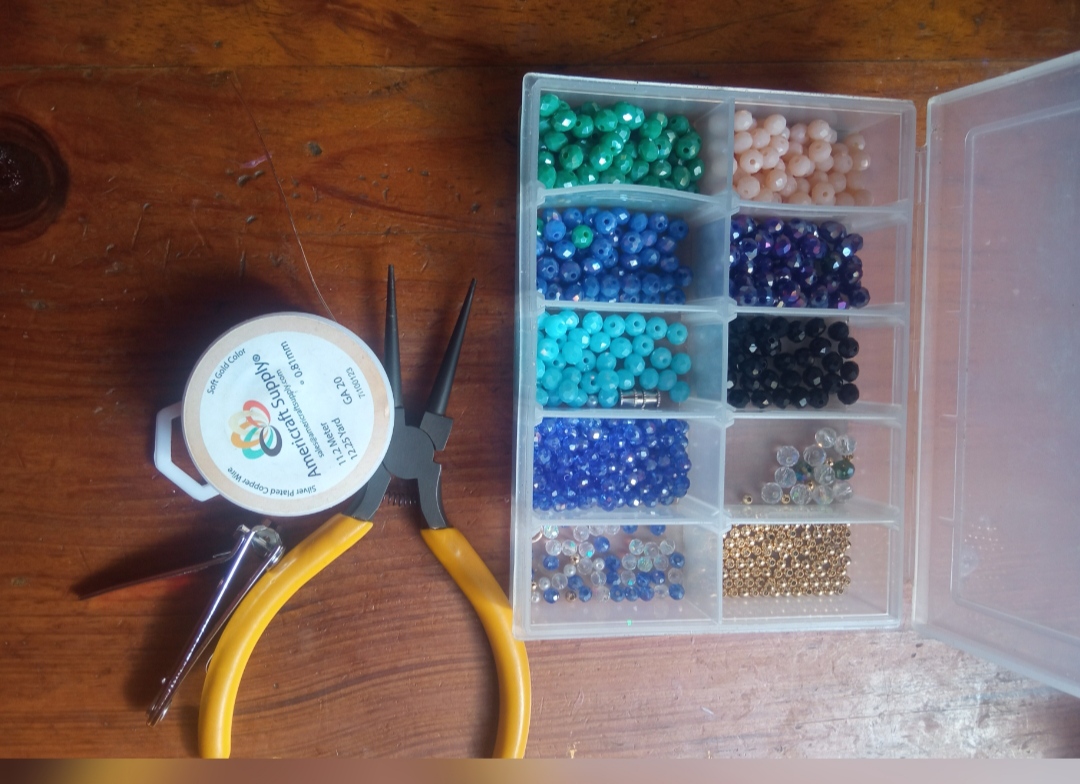
- Alambre de bisutería calibre 20.
- cristales azul.
- balines dorados.
- piedra cerrador.
- lápiz.
- pinza de bisutería.
- 20 gauge jewelry wire.
- blue crystals.
- golden pellets.
- sealing stone.
- pencil.
- jewelry clamp.
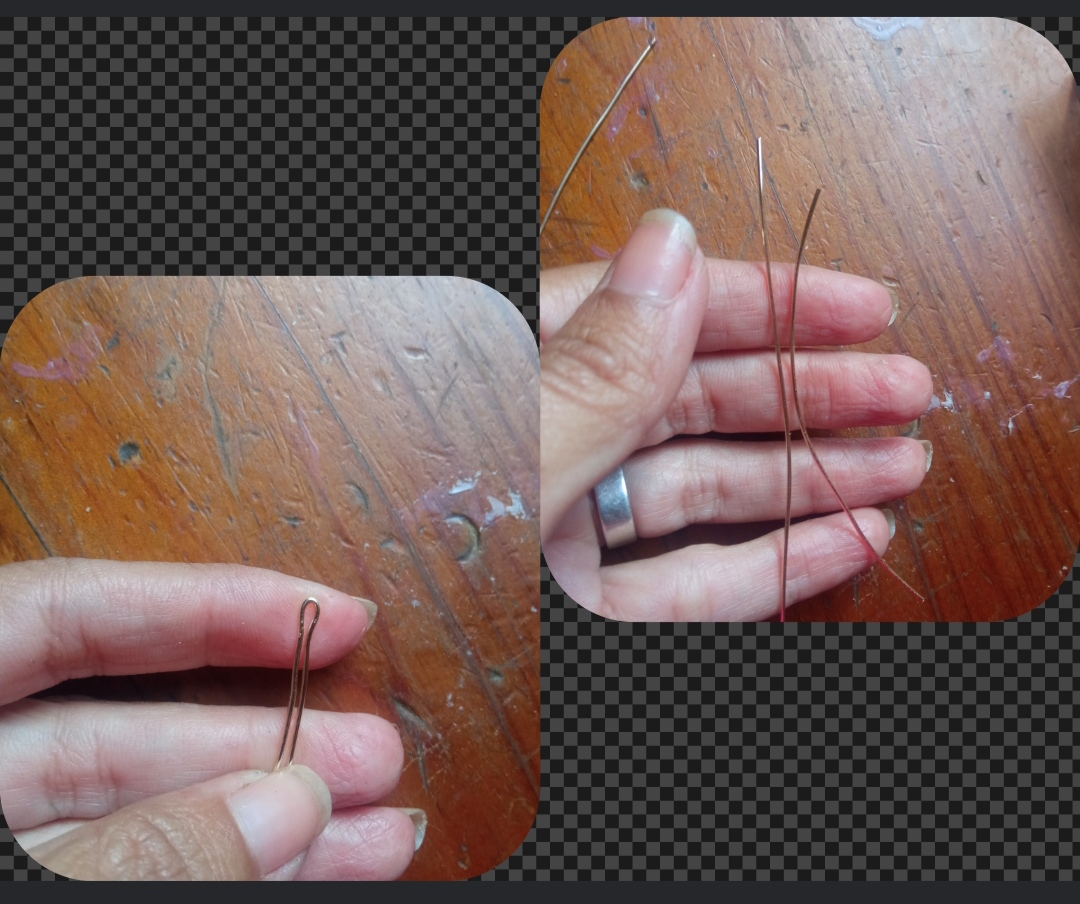
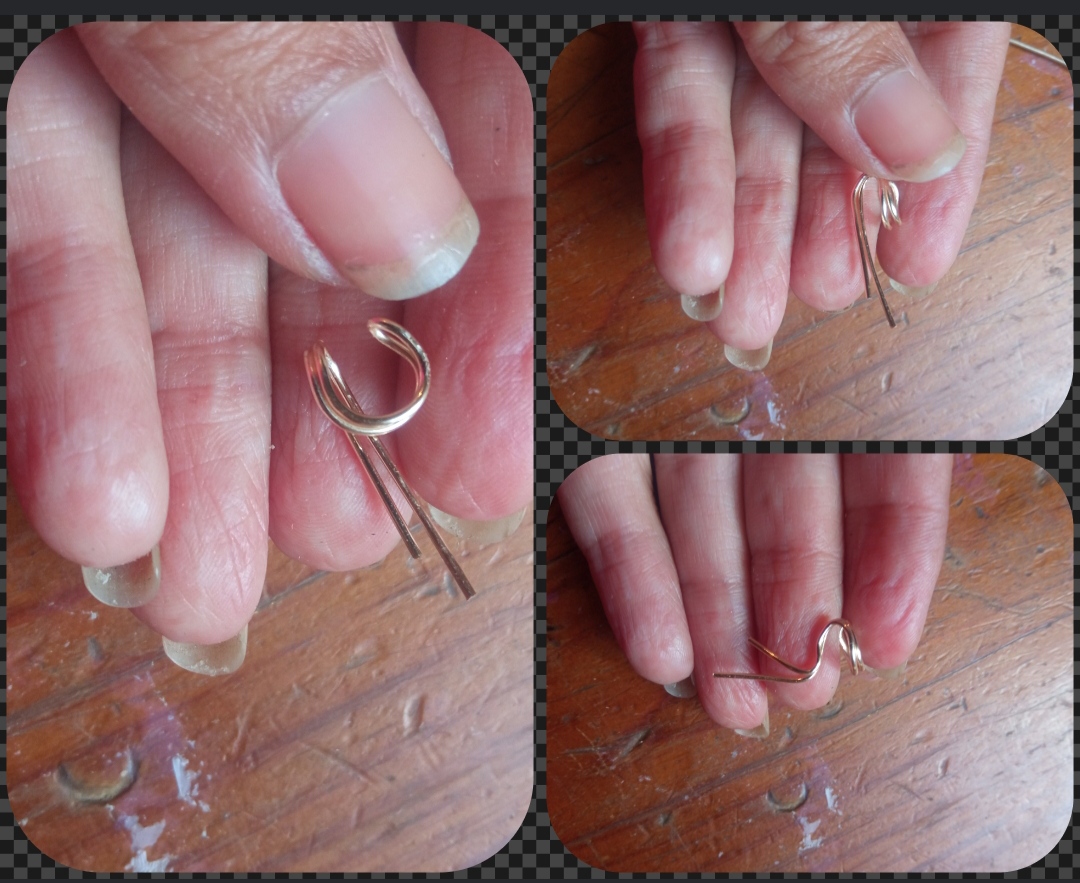
⭐ Paso 1: para iniciar está muy hermosa elaboración primeramente tomaremos el alambre de bisutería calibre 20 y con ayuda de la pinza cortaremos dos pedacitos de alambre de aproximadamente 10 cm cada uno seguidamente tomaremos el primero de ellos para iniciar nuestra primera pieza. Entonces procederemos a doblar este pedacito de alambre a la mitad y doblaremos un poco en el doblez con ayuda de la pinza de manera que nos quede la Unión con una separación mínima como pueden ver en las siguientes imágenes, y a continuación tomaremos un lápiz con la punta de la pinza y realizaremos exactamente dónde está la doblez una forma semicircular sin cerrarla totalmente.
⭐ Step 1: to start this very beautiful preparation, we will first take the 20 gauge jewelry wire and with the help of the tweezers we will cut two pieces of wire of approximately 10 cm each, then we will take the first of them to start our first piece.
Then we will proceed to fold this little piece of wire in half and we will bend a little in the fold with the help of the tweezers so that we have the Union with a minimum separation as you can see in the following images, and then we will take a pencil with the tip of the clamp and we will make exactly where the fold is, a semicircular shape without closing it completely.
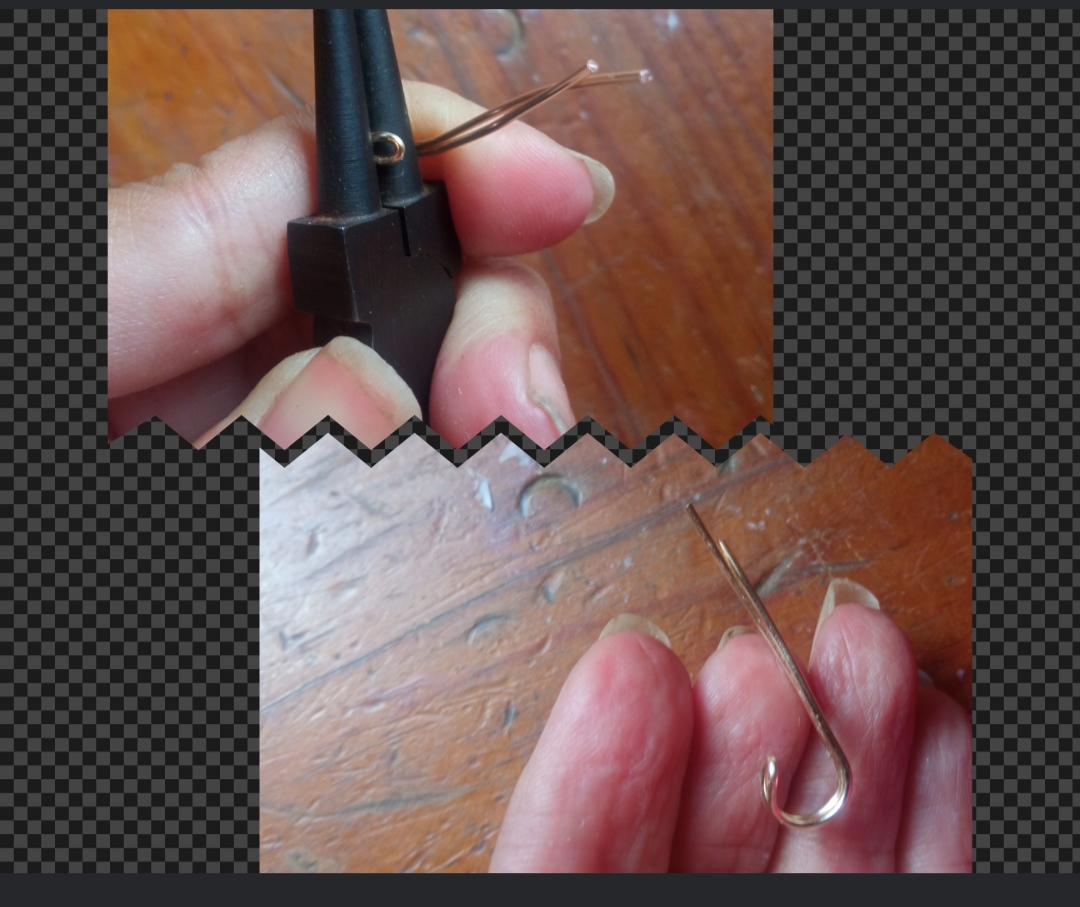
⭐ Paso 2: en nuestro segundo paso tomaremos el alambre y lo doblaremos las dos líneas de alambre hacia abajo realizando una forma de onda en la parte de abajo y dejando las dos puntas de alambre libres como pueden observarla a continuación.
⭐ Step 2: in our second step we will take the wire and bend the two lines of wire downwards, making a wave shape at the bottom and leaving the two ends of the wire free as you can see below.
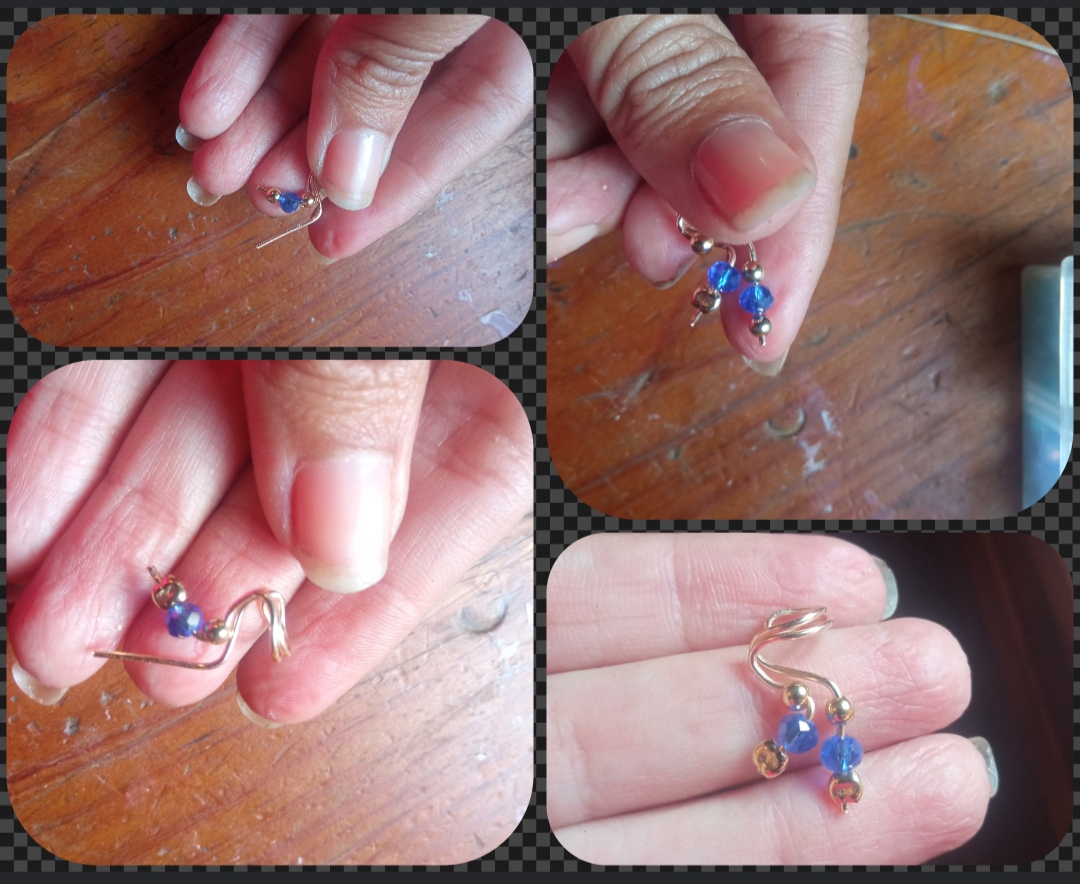
⭐ Paso 3: para continuar tomaremos en la primera junta del alambre e introduciremos un balín dorado un cristal azul y una piedra secadora la cual colocaremos en la punta de la primera tira de alambre y aplastaremos con la pinza para secar la forma de la misma manera realizaremos en la segunda punta del hambre la cual dejaremos un poco más larga que la anterior y por último cortaremos el exceso de alambre que nos haya quedado debajo de la piedra cerradora y así habremos terminado la primera pieza de nuestros aretes. Para la segunda pieza no debemos olvidar que realizaremos el diseño del lado contrario.
⭐ Step 3: to continue, we will take the first joint of the wire and introduce a golden ball, a blue crystal and a drying stone which we will place at the tip of the first strip of wire and crush it with the tweezers to dry its shape. In this way we will make the second point of the hunger which we will leave a little longer than the previous one and finally we will cut the excess wire that we have left under the closing stone and thus we will have finished the first piece of our earrings. For the second piece we must not forget that we will design the opposite side.
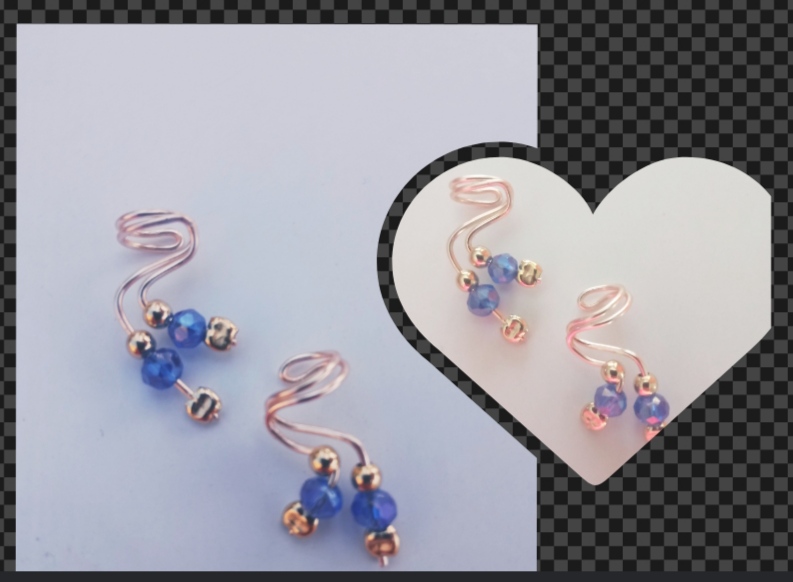
Este ha sido mi aporte de hoy para esta hermosa comunidad el cual espero sea del agrado de todos ustedes me despido por esta oportunidad muy agradecida con todos los que se han tomado un minuto de su tiempo para leerme. Saludos y bendiciones.And so, my dear and appreciated friends, we can make beautiful earrings that we can wear both to people who do not have piercings in their ears and to those of us who do wear earrings but like to place these decorations a little more in the middle of our beautiful ears.
As you can see, this is a super easy design to make and you can combine it with the colors of your preference and with any other tendrils that you want to wear.
Todas las Fotos son de mi autoría y fueron tomadas con mi Celular Redmi 9.This has been my contribution today for this beautiful community, which I hope is to the liking of all of you. I say goodbye for this opportunity, very grateful to everyone who has taken a minute of their time to read me. Greetings and blessings.
All Photos are my authorship and were taken with my Redmi 9 Cellphone
Me encanta esto! si hay muchas personas que no pueden hacerse perforaciones, quedaron lindos lo zarcillos 🤗
Gracias, me alegra mucho que te haya gustado 😊
Saludos @enmaris que gran idea para las personas que no pueden hacerse perforaciones, además quedó muy lindo, gracias por compartir.
Bendecido día!
Hay gracias amiga, 😊
Excelente trabajo, están hermosos y femeninos!
Hola amiga me alegra mucho q te haya gustado.
Very good idea to make tendrils for people who do not have piercing, it is very good that you share this tutorial.
!discovery 40
@sagarkothari88 vote
Gracias amigo 😊
This post was shared and voted inside the discord by the curators team of discovery-it
Join our Community and follow our Curation Trail
Discovery-it is also a Witness, vote for us here
Delegate to us for passive income. Check our 80% fee-back Program
Que bonitos! Me encantaron.
Que bueno que te haya gustado.
Wow, que gran idea, muchos por alguna que otra razón no se hacen perforaciones, ya sea por creencias religiosas o por tan solo tener miedo , y esta es una hermosa forma de usar esta joya sin necesidad de hacerlas. Además que tiene un diseño precioso, a mi en particular me encantó.
Amiga esta idea está genial, además que quedaron hermosos como todo lo que haces!
Hay gracias amiga 😊.
https://twitter.com/hivediy47901/status/1765954843988857139
Gracias.
Quedaron preciosos, ideal para usar cuando no se tiene perforación. Saludos @emmaris.
Me alegra que te haya gustado amiga 😊.
¡Felicitaciones!
Estás participando para optar a la mención especial que se efectuará el domingo 10 de marzo del 2024 a las 8:00 pm (hora de Venezuela), gracias a la cual el autor del artículo seleccionado recibirá la cantidad de 1 HIVE transferida a su cuenta.
¡También has recibido 1 ENTROKEN! El token del PROYECTO ENTROPÍA impulsado por la plataforma Steem-Engine.
1. Invierte en el PROYECTO ENTROPÍA y recibe ganancias semanalmente. Entra aquí para más información.
2. Contáctanos en Discord: https://discord.gg/hkCjFeb
3. Suscríbete a nuestra COMUNIDAD y apoya al trail de @Entropia y así podrás ganar recompensas de curación de forma automática. Entra aquí para más información sobre nuestro trail.
4. Visita nuestro canal de Youtube.
Atentamente
El equipo de curación del PROYECTO ENTROPÍA