Sheep VS Reindeer! (ENG/ITA) Pecore VS Renne!
👉ENG VERSION👈

Today, as often happens for a year, I am in layoffs, work is scarce due to the many colours in which Italy has been classified by our government but I do not want to talk about this thing, it is much lighter :-).

Today I am with my niece who is at home for the Easter holidays and then after taking a tour in the fields we looked at each other and we decided to create sheep and reindeer, it sounds bizarre but taking inspiration from a magazine that I printed at work we have armed ourselves with everything necessary to do this ... let's call it an adventure!
USED MATERIAL:
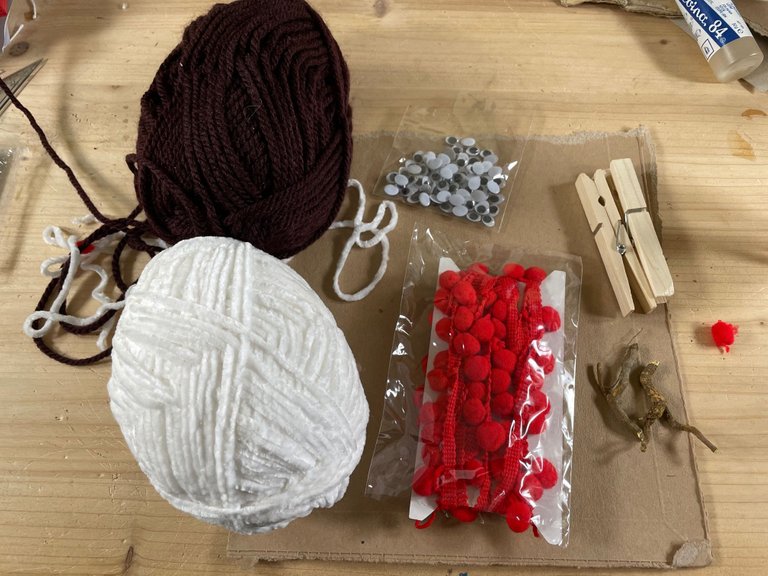
- brown wool rope
- white wool rope
- wooden clothespins
- red pompoms
- Plastic eyes (alternatively you can draw them)
- sprigs of wood
- cardboard.

-SHEEP-
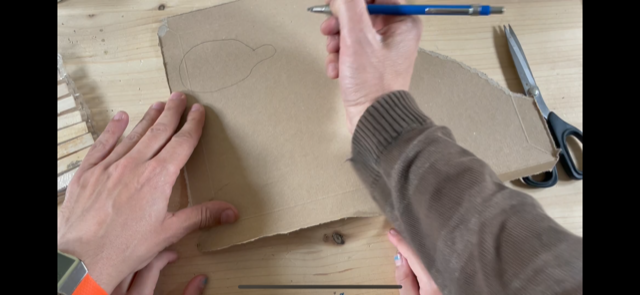
STEP 1.
The first thing we did is to draw a shape on the cardboard a sort of oval with the muzzle, the same design for both sheep and reindeer, once we have drawn it we have cut it out.
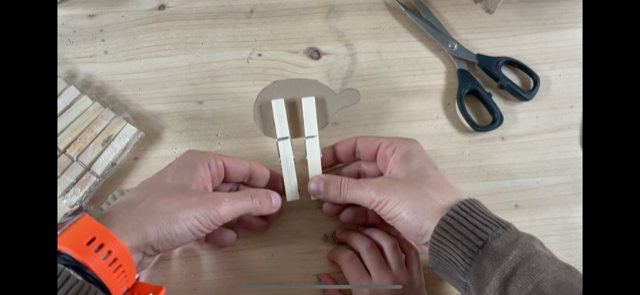
STEP 2.
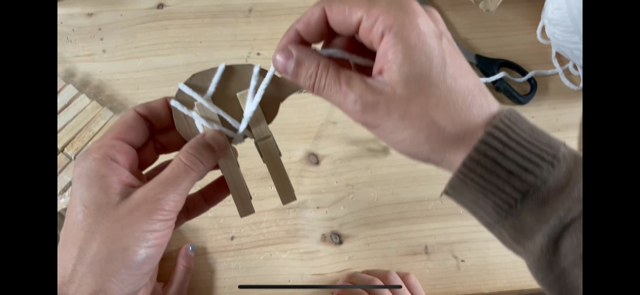
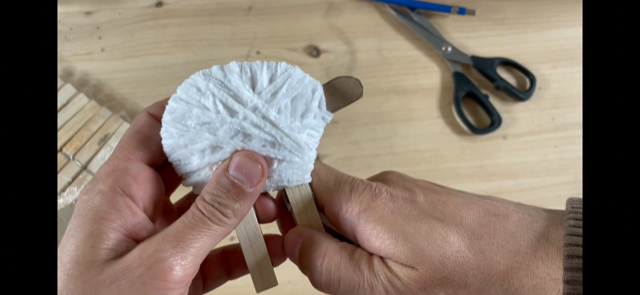
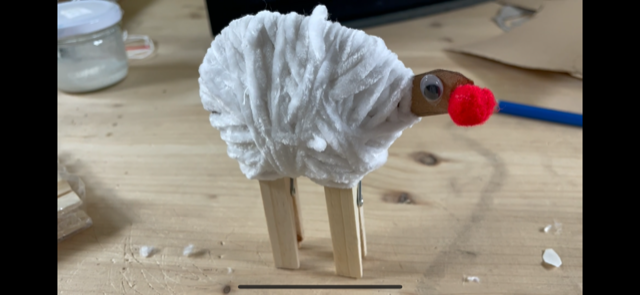
We hooked the clothespins, they will be the legs of the sheep and with the white rope, we turned around the body and the clothespins until the cardboard disappeared and the clothespins were fixed to the cardboard, making everything peckish ... it must be a sheep with a lot of wool on :-).
**STEP 3. **
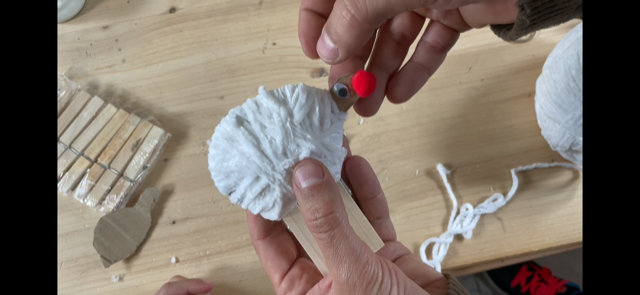
We glued the red pompom to the tip of the muzzle to make it a nose and on top, we glued our little eye and here is our beautiful sheep.

-REINDEER-
(The similar process changes little.)
STEP 1.
We draw the shape like that of the sheep and cut the cardboard to size, it can be made a little bigger since the reindeer are bigger than the sheep.
STEP 2.
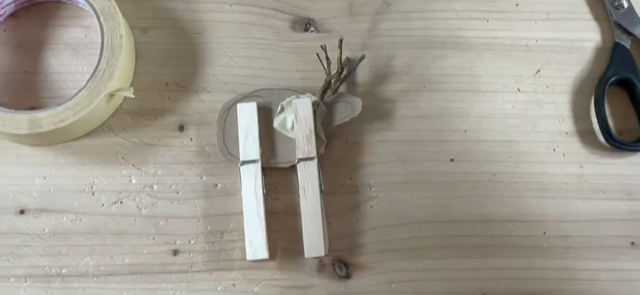
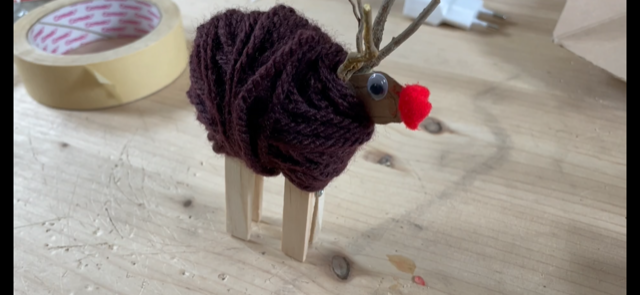
We hook the springs and with tape, we hook the twigs near the muzzle, they will become the horns of our Reindeer.
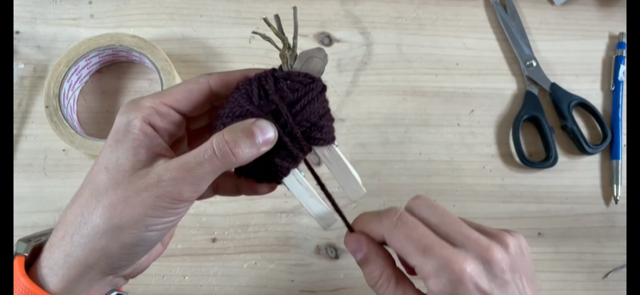
As with the Sheep, start wrapping the brown thread to make the cardboard disappear and fix the clothespins and also our sticks.
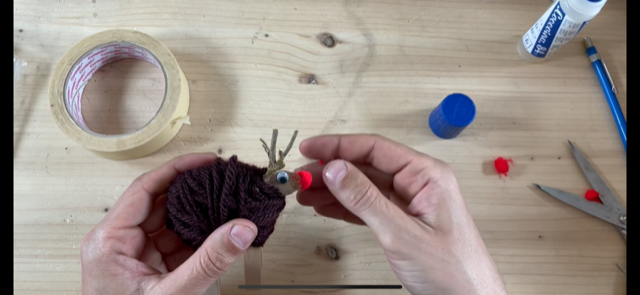
STEP 3.
We glue a small red pompom to make the nose and glue or draw the eye and here are our creations.

The images are shots of the author and the entire video was recorded by the author with iPhone 12 and edited with the Perfect Video APP.
Music samples within the application itself.
I would like to tag my friend @ libertycrypto27 who with his little girl I think can have fun making these little animals and see you at the next creation that my niece Giulia already has in mind!

👉ITA VERSION👈

Oggi, come spesso capita da un anno, sono in cassa integrazione il lavoro scarseggia per via dei tanti colori in cui è stata classificata l'Italia dal nostro governo ma non voglio parlare di questo la cosa è molto più leggera :-).
Oggi sono con mia nipote che a casa per le festività di Pasqua e quindi dopo aver fatto un giro nei campi ci siamo guardati e abbiamo deciso di creare delle pecore e delle renne, si suona bizzarro ma prendendo spunto da una rivista che ho stampato io al lavoro ci siamo armati di tutto il necessario per fare questa... chiamiamola avventura!
MATERIALE UTILIZZATO
- corda di lana marrone
- corda di lana bianca
- mollette di legno
- pompom rossi
- Occhi di plastica (in anternativa si possono disegnare)
- rametti di legno
- cartone.
-PECORE-
STEP 1.
La prima cosa che abbiamo fatto è quella di disegnare sul cartone una sagoma una sorta di ovale con il muso, stesso disegno sia per fare le pecore che per le renne, una volta disegnata l'abbiamo ritagliata.
STEP 2.
Abbiamo agganciato le mollette, saranno le gambe della pecora e con la corda bianca abbiamo girato intorno al corpo e alle mollette fino a far sparire il cartone e afissare le mollette al cartone, facendo inciccionire il tutto... deve essere una pecora con tanta lana addosso :-).
STEP 3.
Abbiamo incollato il pompom rosso alla punta del muso per farlo diventare un naso e sopra abbiamo incollato il nostro piccolo occhio ed ecco la nostra bella pecora.
-RENNA-
(Il procedimento è simile cambia poco.)
STEP 1.
Disegniamo la sagoma come quella della pecora e ritagliamo il cartone a misura, si può realizzarla un pò più grande dato che le renne sono più grandi delle pecore.
STEP 2.
Agganciamo le mollete e con dello scotch agganciamo i rametti in prossimità del muso, diventeranno le corna della nostra Renna.
Come con la Pecora iniziate ad avvolgere il filo marrone a far sparire il cartone fissare le mollette e anche i nostri legnetti.
STEP 3.
Incolliamo un piccolo pompom rosso per fare il naso e incolliamo o disegniamo l'occhio ed ecco le nestre creazioni.
Le immagini sono scatti dell'autore e l'intero filmato è stato e registrato dall'autore con IPhone 12 e montato con l'APP Perfect Video.
La musica sono campioni all'interno della applicazione stessa.
Mi permetto di taggare l'amico @libertycrypto27 che con la sua bambina credo si possa divertire a realizzare questi animaletti e ci vediamo alla prossima creazione che Giulia mia nipote ha già in mente!.
▶️ 3Speak
Hai fatto bene a permetterti di taggarmi anzi fallo tutte le volte che scrivi post come questo e condividi video come questo ;)
Complimenti davvero @blumela e il tuo è un super post che merita un pò di !BEER e un @tipu curate 2
Upvoted 👌 (Mana: 105/150) Liquid rewards.
Grande grazie @libertycrypto27 e allora a breve aspettati un altro tag il tempo di trovare il materiale... situazione difficile visto la zona rossa ma non impossibile 🤣
!BEER
!WINE
View or trade
BEER.Hey @libertycrypto27, here is a little bit of
BEERfrom @blumela for you. Enjoy it!Learn how to earn FREE BEER each day by staking your
BEER.View or trade
BEER.Hey @blumela, here is a little bit of
BEERfrom @libertycrypto27 for you. Enjoy it!Learn how to earn FREE BEER each day by staking your
BEER.Come ti ho già detto altrove, io preferisco le pecore 😜
Hahaha ma dai sono così carine le renne con le loro corna 🤣
!BEER
!WINE
View or trade
BEER.Hey @bencwarmer, here is a little bit of
BEERfrom @blumela for you. Enjoy it!Learn how to earn FREE BEER each day by staking your
BEER.reccao che il Natale e passato. allora, devo asspetare ancora un anno per fare cervo)))